
Member
Yeah those gaskets look fine. The gaskets that came off my vortec has the same small holes.
Jim85IROC
TGO Supporter
close
Oct 4, 2024
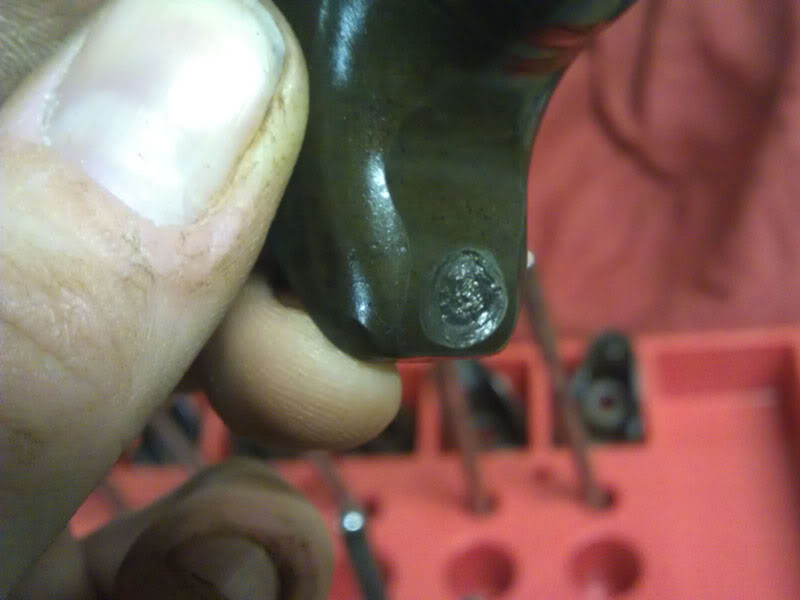
Last week I sold my old 461 heads to a coworker, and when I did, he noticed that one of the valve stem tips was all chewed up. Oops. Over the weekend I pulled out the rocker arms, and sure enough, one of them was chewed up. I wonder how long this would have lasted if I hadn't yanked the motor apart and found it?
Tonight I installed a couple rockers to get the wipe pattern. Apparently 2 revolutions isn't enough to actually scrape the sharpie off the valve tips, but you get the point:
The rockers don't seem to be centered as well as I'd hoped, but the scrub marks seem to be pretty small. What's the opinion of the peanut gallery? Do I need longer rocker arms to get the wipe closer to the center of the valve, or is this good enough?
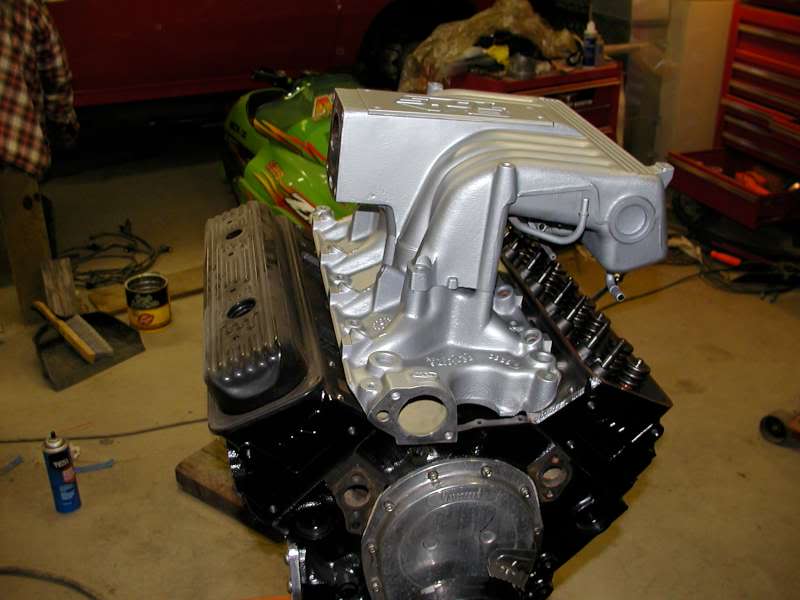
In other news, my stupid new intake doesn't fit.

Tonight I installed a couple rockers to get the wipe pattern. Apparently 2 revolutions isn't enough to actually scrape the sharpie off the valve tips, but you get the point:
The rockers don't seem to be centered as well as I'd hoped, but the scrub marks seem to be pretty small. What's the opinion of the peanut gallery? Do I need longer rocker arms to get the wipe closer to the center of the valve, or is this good enough?
In other news, my stupid new intake doesn't fit.

Junior Member
Looks like a ford intake. Where'd u get that?
Hard to tell in the pic, but it looks like the swipe is on the outside of the valve stem. Correct me if I am wrong, but wouldn't you want longer pushrods, not rockers?
Junior Member
Shorter push tubes will move it closer to the intake side of the valve stem
Jim85IROC
TGO Supporter
close
Oct 4, 2024
Matt, you lost me.
Wyo, I need shorter pushrods to pull the sweep closer to the intake? I guess my little imaginary diagram in my head had me thinking that a taller pushrod would tip the rocker arm down more, which would pull it closer to the intake. I guess it depends on the angle of the rocker compared to the valve.
http://www.hi-flow.com/HP-012Valvetrain/LiftDwg.JPG
Based on this pic (which is generic - I don't know how this relates specifically to an SBC's geometry), if the rocker is sitting at exactly 90* at mid-lift, then theoretically, a longer or shorter pushrod would both result in pulling the wipe closer to the intake side, wouldn't it?
Junior Member
I just went through this with installing 1.6 roller rockers and had to move the sweep in and took 1/4 inch shorter push rods
Jim85IROC
TGO Supporter
close
Oct 4, 2024
THAT much shorter? Wow. I've got a set about 1/4" shorter from a roller cam motor. Maybe I'll give those a try.
Junior Member
My rollers were like almost off the tip of the valve on the exhaust side
Junior Member
I got the comp cams pushrods checker and it was off that far
Quote:
yeah, typing on my phone is dangerous...it doesn't know what a "rocker" is.Originally Posted by Jim85IROC
Matt, you lost me.Jim85IROC
TGO Supporter
close
Oct 4, 2024
haha! Ooops. That should be pushrods. That's what I get for posting right at bed time.
That's what I get for posting right at bed time.Jim85IROC
TGO Supporter
close
Oct 4, 2024
Tonight I went through the process again with shorter pushrods. I had a set that came with the vortec heads that originally came off a roller cam motor, so they were about 1/4" shorter than my original rockers. The results were rather surprising.
Overall, things didn't change much. The rocker tip is still pretty close to the exhaust side of the valve.
Here's a repeat with the PRW 1.6 rocker and my original pushrod:
I repeated with the shorter pushrod, and as you can see, it's not a lot different:
For a reality check, I put the stock rocker back in, still with the short pushrod. Not surprisingly, the wipe pattern is wide, but it looks like it's a little closer to the center:
Lastly, I put the stock pushrod back in with the stock rocker:
All of these are favoring the exhaust side. What surprises me is how minimal the difference in position is from the stock pushrod to the 1/4" shorter one. I really expected it to move more than it did. I really can't imagine what would cause geometry to be so far off that I'd need to go to a pushrod that's 1/2" or more shorter than stock.
Member
Are you using a solid lifter or hydraulic? Hydraulics compress and can mess the readings. I usually use an old lifter that I convert to solid with some washers to measure my pushrods.
this kinda confirms what i thought about 1.6 ratio rockers though (and the reason i don't use higher than stock ratio rockers normally...)
Jim85IROC
TGO Supporter
close
Oct 4, 2024
Kevin, it's a hydraulic, so yeah, it's compressing. I thought about throwing a checker spring in, but all I'd really expect that to do is extend the width of the wipe pattern a little bit due to the additional lift, but I wouldn't really expect it to have much effect on the position of the wipe pattern relative to the center of the valve stem. Or is my thinking off base?
Matt, I'm not quite ready to blame the rocker yet. The stock self aligning vortec rocker is heavily biased to the exhaust side too.
Matt, I'm not quite ready to blame the rocker yet. The stock self aligning vortec rocker is heavily biased to the exhaust side too.
Member
The fact it compresses makes it act like a much shorter pushrod than it really is. Personally if it were me I would get an adjustable pushrod and make a solid lifter out of an old one (or use checker spring). Measure your pushrod after and order accordingly.
Jim85IROC
TGO Supporter
close
Oct 4, 2024
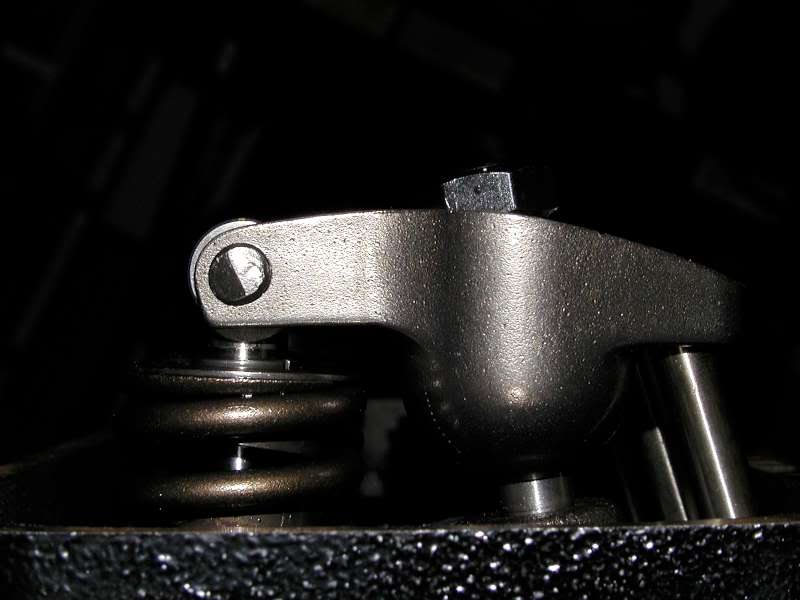
Tonight I played a little bit more. I took pictures from the side with the rocker installed with the 2 pushrods, as well as my checker pushrod. Apparently my estimate of 1/4" difference between pushrod lengths may have been exaggerated. The longest pushrod measures approximately 7.8" (i.e. stock length). The checker pushrod measures about 7.6", and obviously the middle one is somewhere inbetween. Apparently in the heat of battle, a .100" difference looks more like 1/4".
Here are the 3 pushrods:
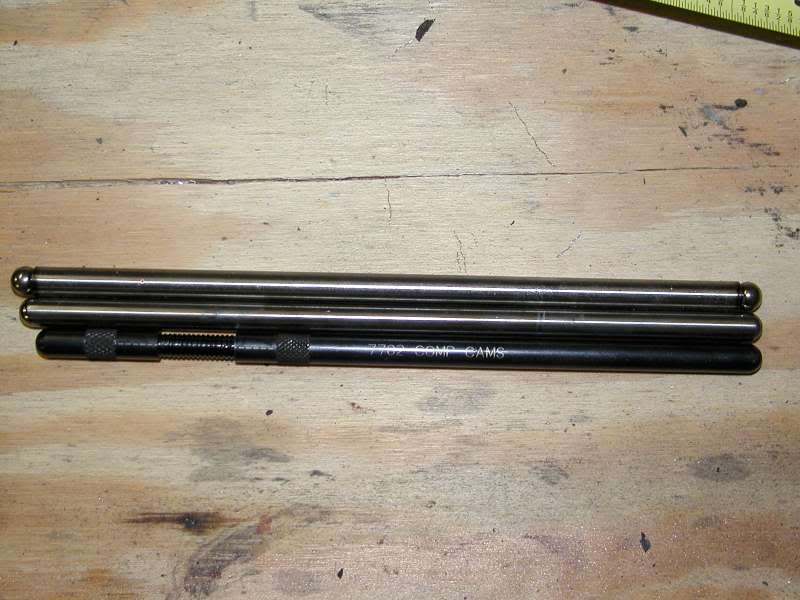
With the "tall" pushrod (7.8")
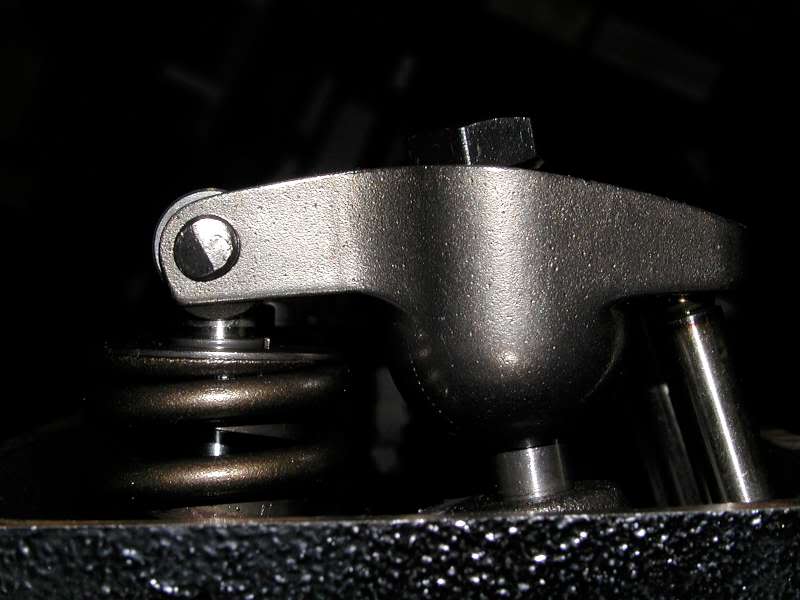
With the shorter pushrod:
With my checker pushrod:
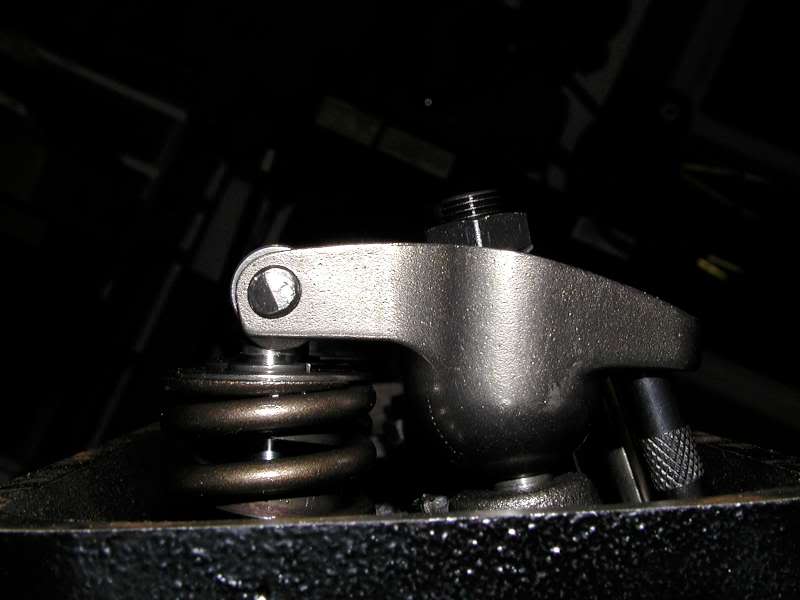
With that checker pushrod, the bottom of the rocker seems to be sitting awfully close to the bottom of the stud. From what I can see, the middle pushrod is likely to be my best option, though I'm going to install my checker springs and go through a full sweep pattern with the checker pushrod as soon as my stud-mount spring compressor comes in.
Here are the 3 pushrods:
With the "tall" pushrod (7.8")
With the shorter pushrod:
With my checker pushrod:
With that checker pushrod, the bottom of the rocker seems to be sitting awfully close to the bottom of the stud. From what I can see, the middle pushrod is likely to be my best option, though I'm going to install my checker springs and go through a full sweep pattern with the checker pushrod as soon as my stud-mount spring compressor comes in.
Jim85IROC
TGO Supporter
close
Oct 4, 2024
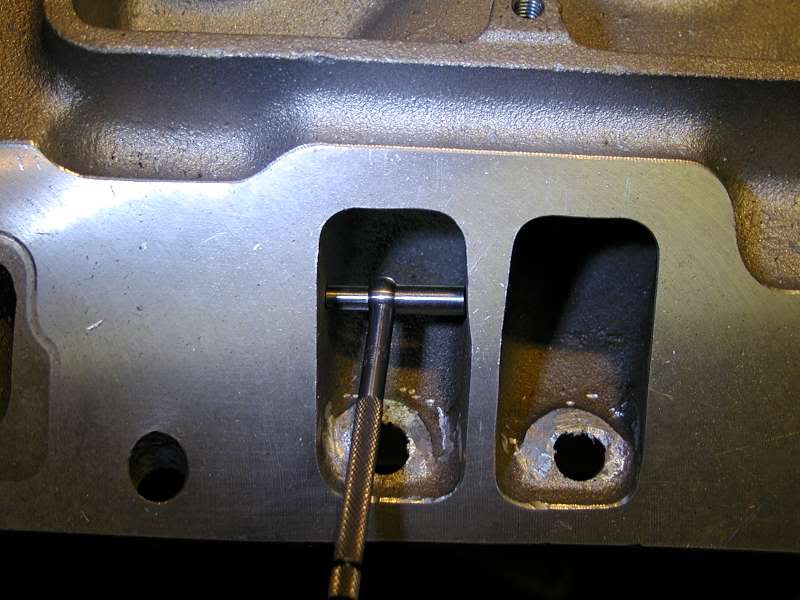
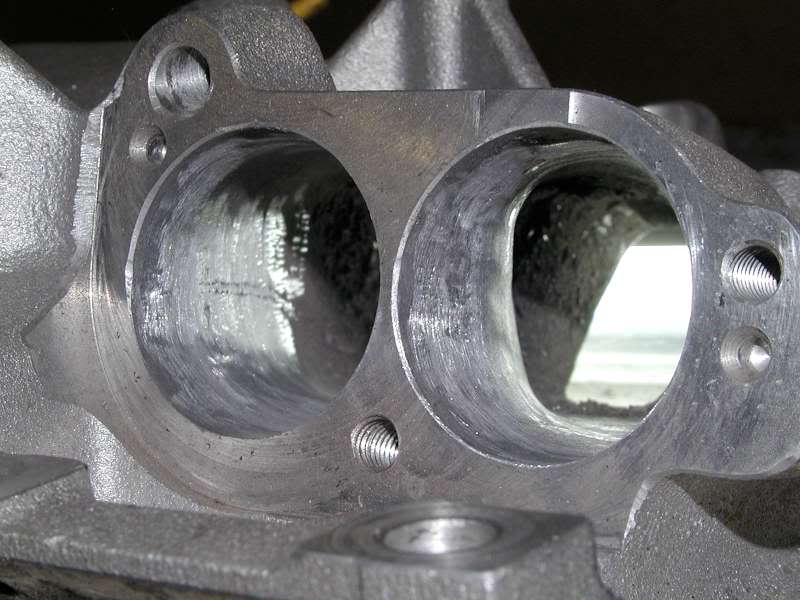
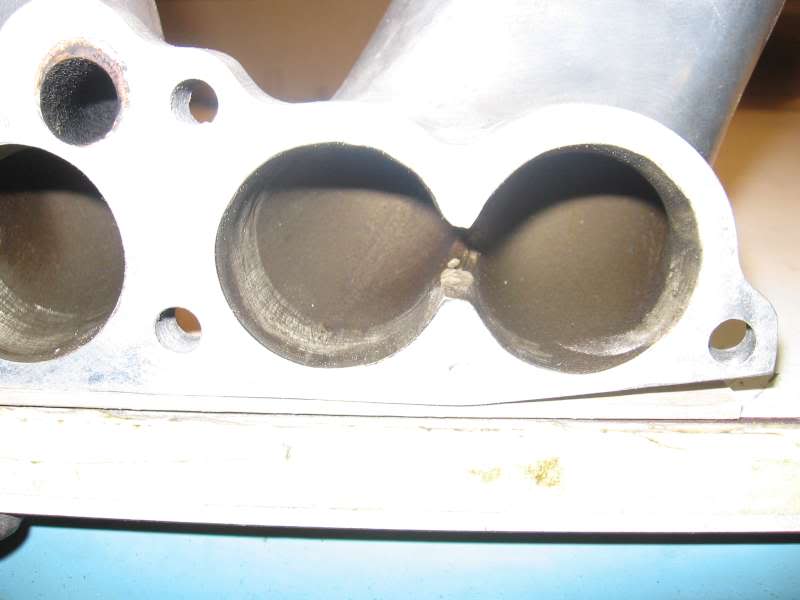
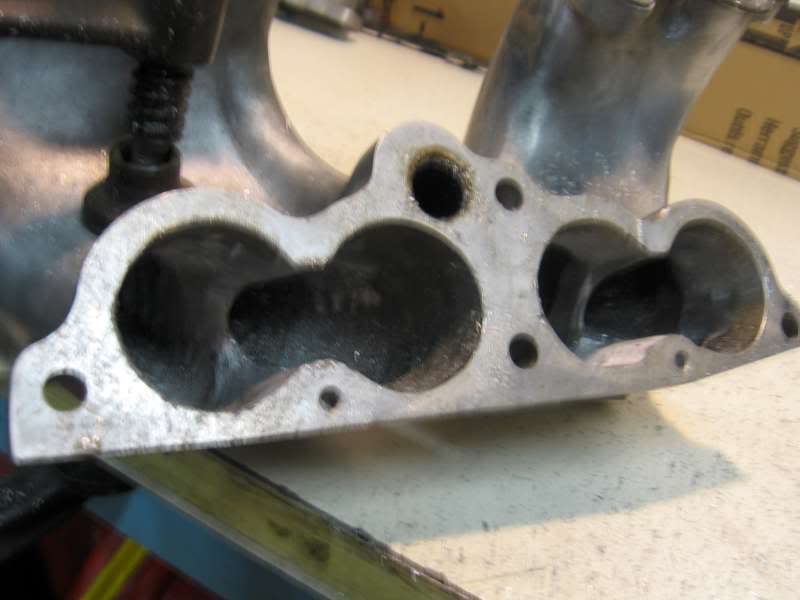
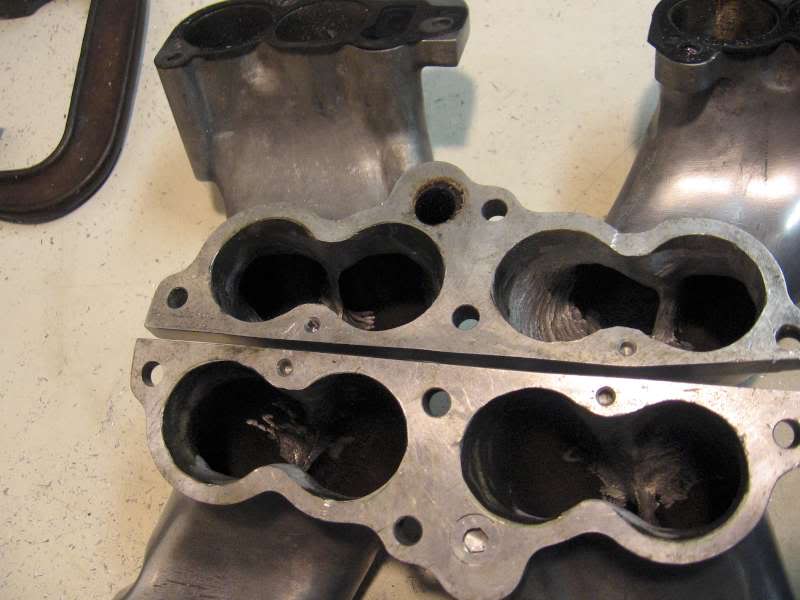
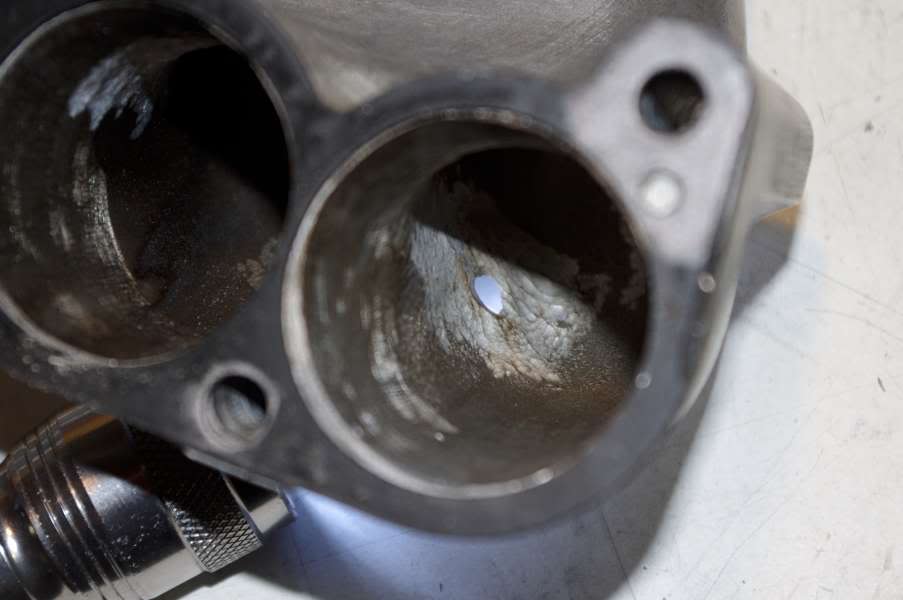
Tonight I started porting my intake. I measured the port opening on the head, and the port opening on the intake and they're exactly the same width, so I didn't widen the opening at all. I concentrated on removing as much as the injector boss as possible, and taking material away on the short side radius to "straighten" the port.
Here's the intake clamped down to my work bench:
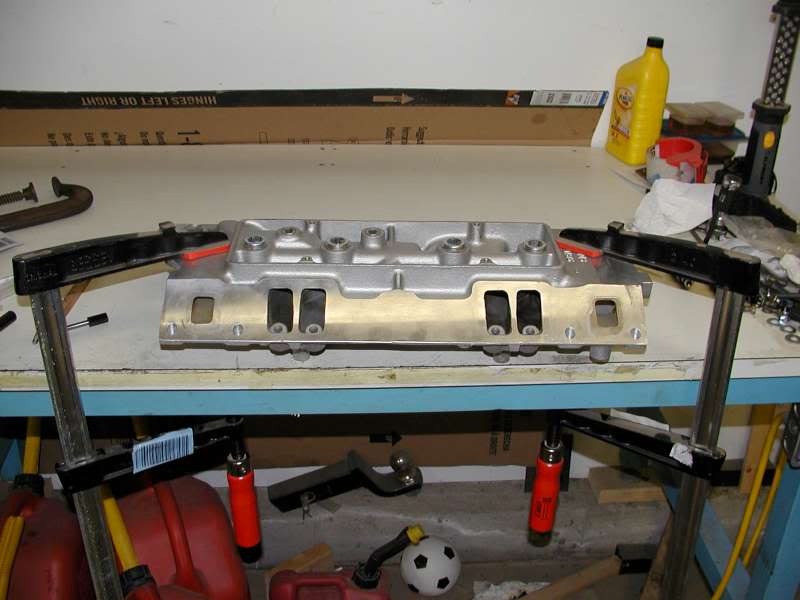
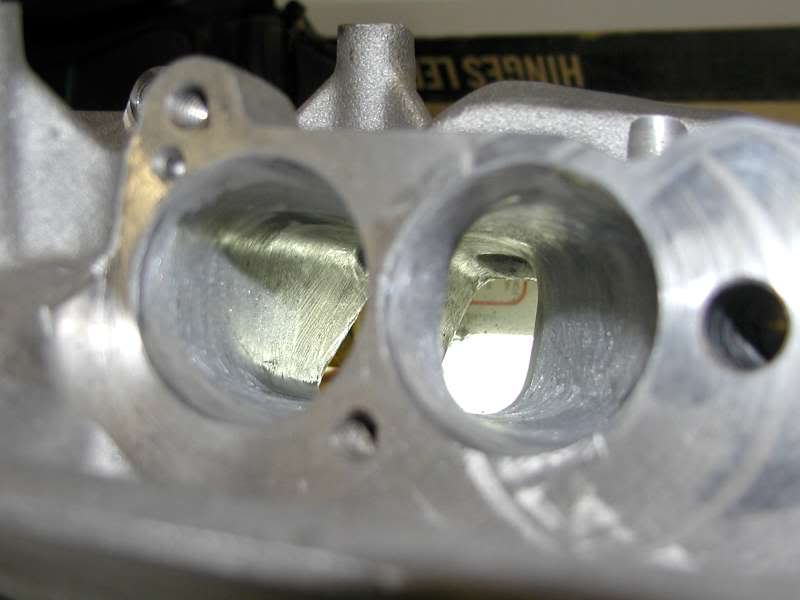
Here's a picture of the untouched injector bosses. You can see how much they protrude into the intake path:
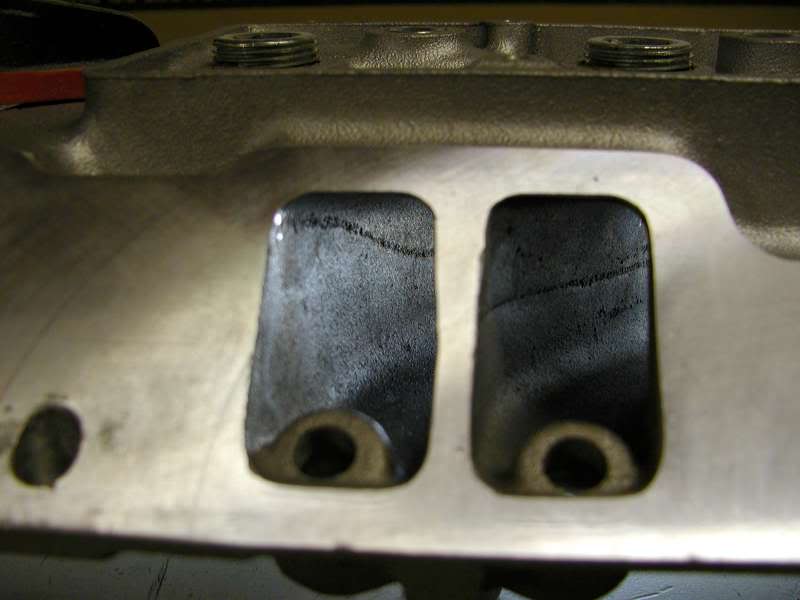
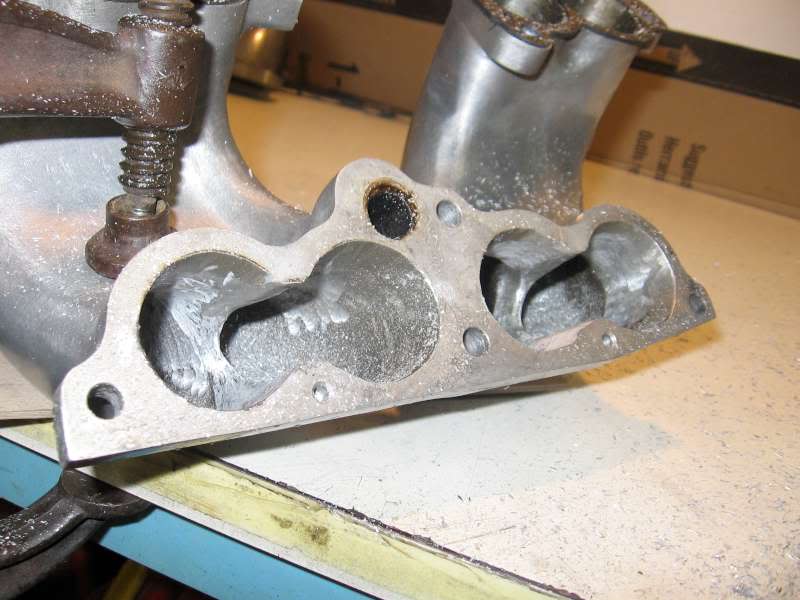
First boss and I already ground too far! You can see that I ground into the o-ring seat area. I need to do check it closer, but I think that the o-ring seals to the side of the injector boss and not necessarily the bottom, so this may not present a problem. Worst case scenario, a little bit of epoxy applied from the outside of the manifold should fix the problem.

A picture with an injector installed:
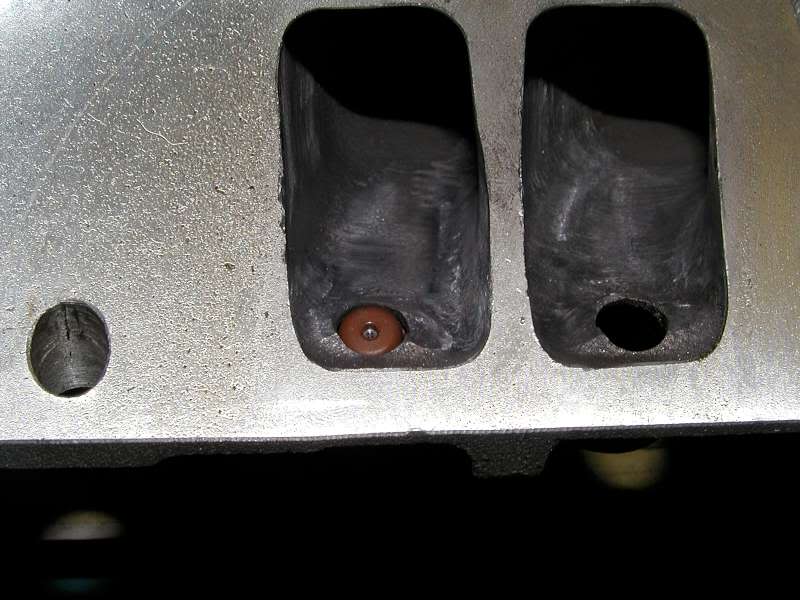
Another shot of my porting so far.
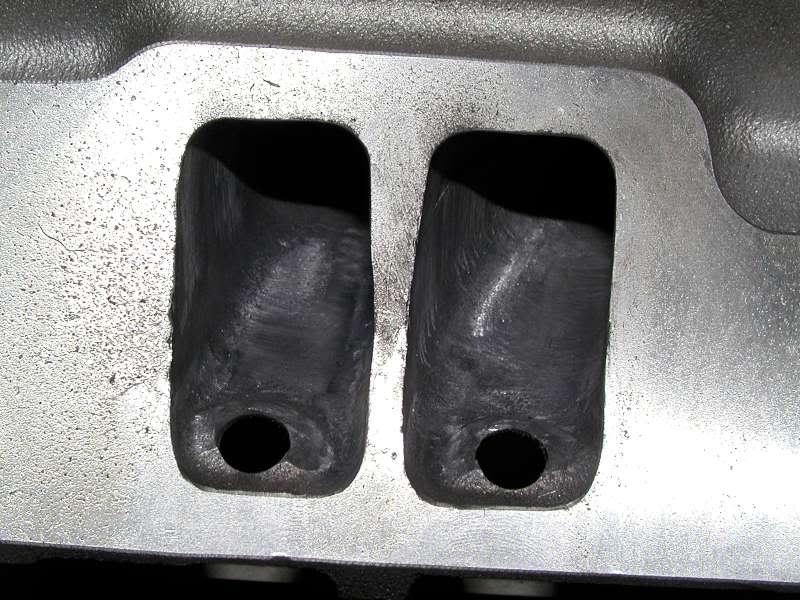
I went through my sand paper rolls a lot faster than I thought, and the 1/4" shank that holds the rolls isn't long enough for me to get any farther into the intake, so this is about as far as I can take it until I get more supplies. I need to decide how much I want to port that short side radius. I still have plenty of material there, but I'm afraid if I take away too much material that it may impact velocity. I also need to see if I need to port match the area where the runners bolt on, as well as clean up that side of the ports.
Here's the intake clamped down to my work bench:
Here's a picture of the untouched injector bosses. You can see how much they protrude into the intake path:
First boss and I already ground too far!
You can see that I ground into the o-ring seat area. I need to do check it closer, but I think that the o-ring seals to the side of the injector boss and not necessarily the bottom, so this may not present a problem. Worst case scenario, a little bit of epoxy applied from the outside of the manifold should fix the problem.A picture with an injector installed:
Another shot of my porting so far.
I went through my sand paper rolls a lot faster than I thought, and the 1/4" shank that holds the rolls isn't long enough for me to get any farther into the intake, so this is about as far as I can take it until I get more supplies. I need to decide how much I want to port that short side radius. I still have plenty of material there, but I'm afraid if I take away too much material that it may impact velocity. I also need to see if I need to port match the area where the runners bolt on, as well as clean up that side of the ports.
Dyno Don
Supreme Member
close

Today
Jim:
The port opening is what we call the pinch area, that is the area you need to work on.
It is a little further back into the port, you will need a set of snap guages to do the measuring.
Try to get that area up to 2.2-2.3 sq. ins. (be careful it is thin there)
Don't worry too much about velocity, you can't hurt it.
The round side just needs cleaning up to get it there.
Then polish everything as smooth as you can.
Jim85IROC
TGO Supporter
close
Oct 4, 2024
Awesome info. thanks! I had a pinch gauge and checked the #7 port (I think... it's the one farthest to the left in my pics above, but I can't remember which way the intake is facing!), and so far I've taken 1/8" away from that pinch area, but I got ahead of myself and forgot to check the rest, though I do know that as-cast, the other 3 were all bigger than the #7.
Dyno Don
Supreme Member
close
Today
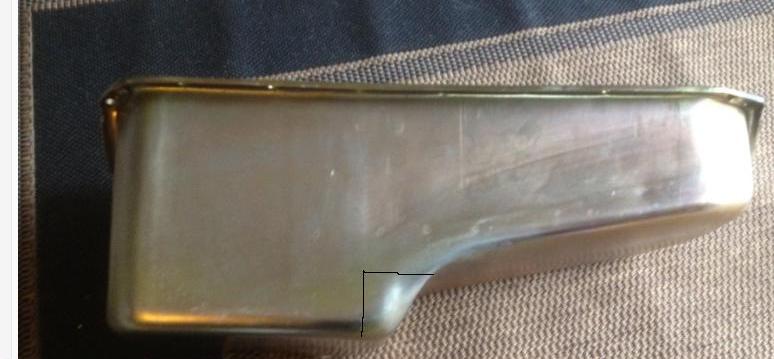
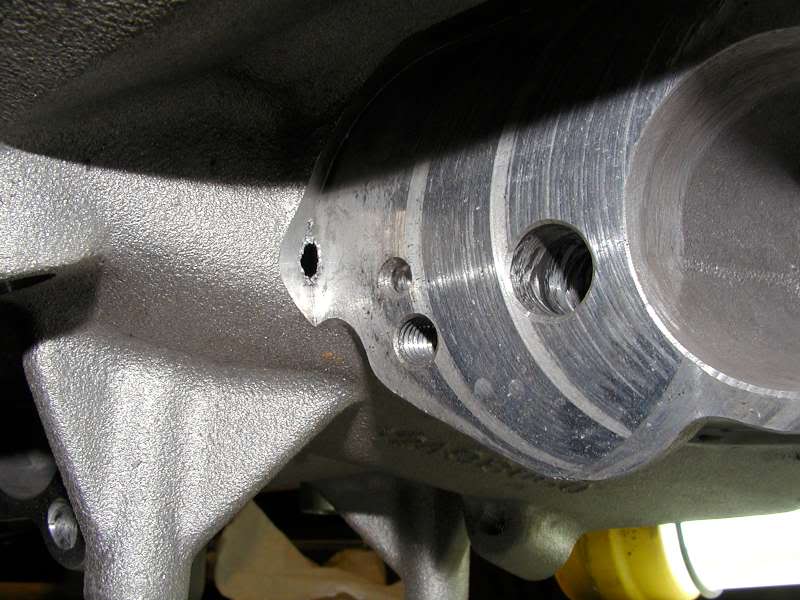
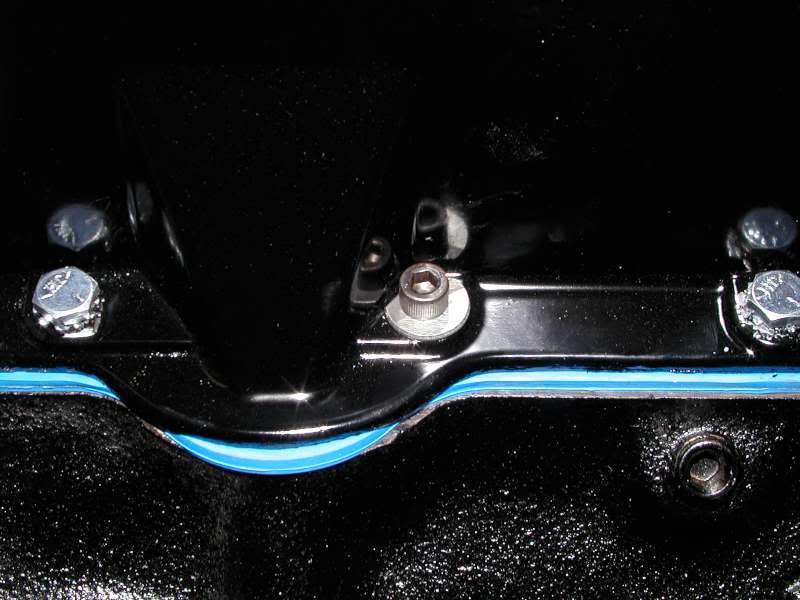
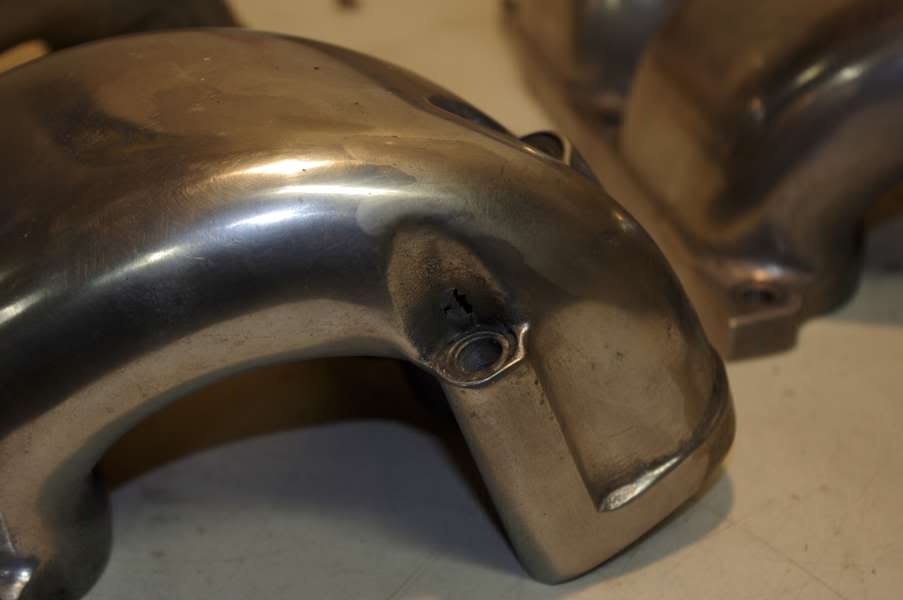
Just a heads up for you, if that oil pan in the picture is what you are going to use, you won't have clearance for a crossover.
It will need this mod.
It will need this mod.
long tubes and a real exhaust would fix that
Jim85IROC
TGO Supporter
close
Oct 4, 2024
Quote:
It will need this mod.
That'll be a real pain in the *** if that's the case. I didn't realize that there were multiple pans to choose from :-/Originally Posted by Dyno Don
Just a heads up for you, if that oil pan in the picture is what you are going to use, you won't have clearance for a crossover.It will need this mod.
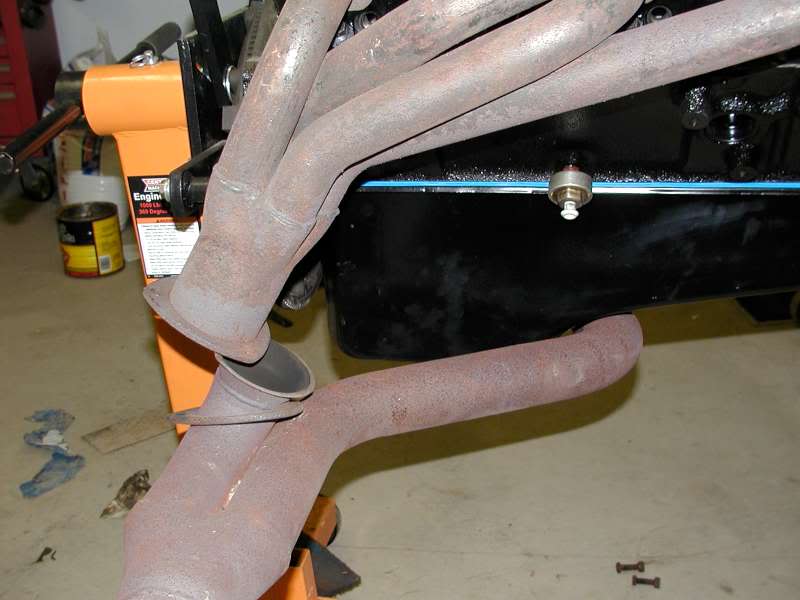
I had a finned aluminum pan on the motor originally, and the y-pipe fit, though it was so snug that I couldn't fit a clamp on it and it wore into the fins on the pan. I guess I'll have to hold the old finned pan to the new one and compare. Thanks for the heads-up.
Jim85IROC
TGO Supporter
close
Oct 4, 2024
Quote:
It will need this mod.
They don't look that much different in the pic. It came out dark, but I lined up the two at the rear with a straight edge:Originally Posted by Dyno Don
Just a heads up for you, if that oil pan in the picture is what you are going to use, you won't have clearance for a crossover.It will need this mod.
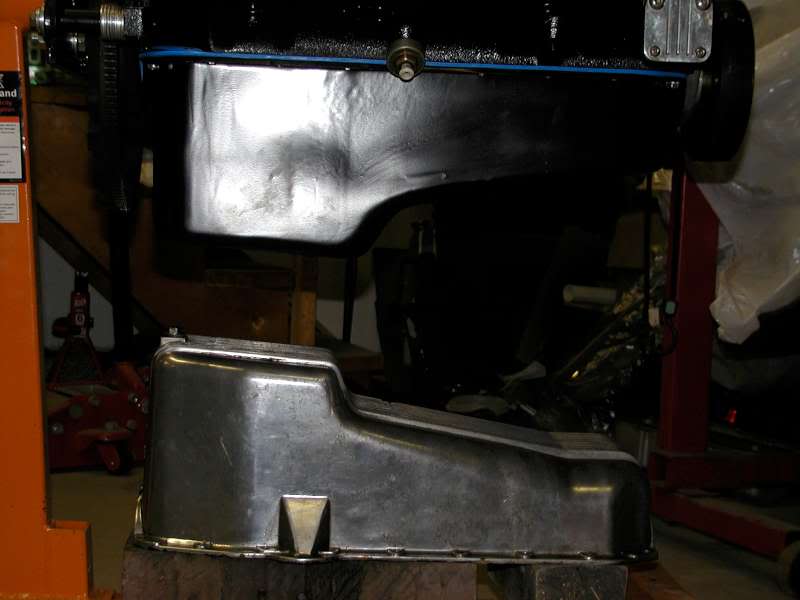
*****.
I've been wrenching on my thirdgens for almost 20 years, and never knew until now that there were oil pans that would interfere with the y-pipe crossover.
I guess now I get to decide whether I want to change oil pans or exhausts. :-/
*subliminal message* LONGTUBES */subliminal message*
Jim85IROC
TGO Supporter
close
Oct 4, 2024
I dunno man. The IROC is getting long tubes, but I don't know if I want to deal with that on the GTA. I want to get that car on the road so that I can have something to drive while I wrench on the IROC, plus I don't want to deal with the ground clearance issues and custom fabrication. My goal with the GTA was to do a budget-friendly swap using the leftovers from the IROC.
I guess I need to cough up the money for a different oil pan, and likely a new oil pan gasket since most aftermarket pans (the one I bought notwithstanding) are designed to use the newer "thin" style oil pan gasket.
Anybody have a recommendation for a cheap oil pan that'll fit a 2 piece block with the dipstick on the driver side and provide clearance for my y-pipe?
Milodon stock replacement. Nicest stock type pan I've ever used.
Jim85IROC
TGO Supporter
close
Oct 4, 2024
The milodon stock replacement for a 2-piece driver side dipstick block won't interfere, or did you mean a stock f-body replacement?
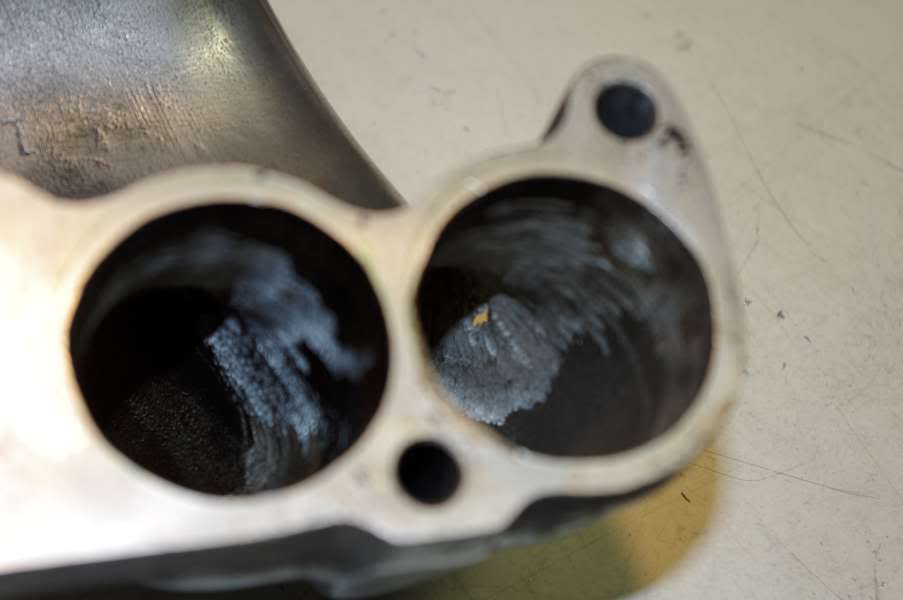
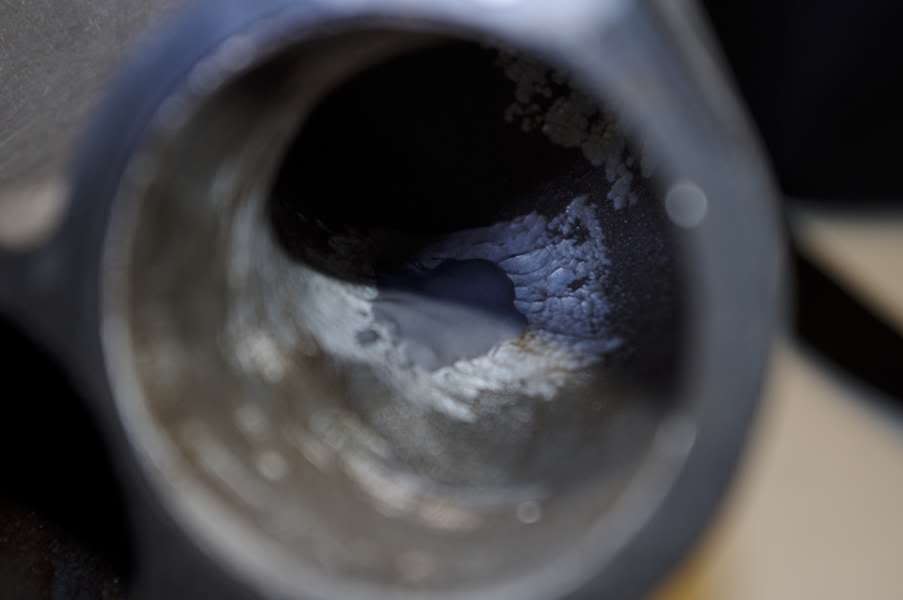
Anyway, I did some more porting tonight. Like last time, I started with a snap gauge to see where my starting point was:
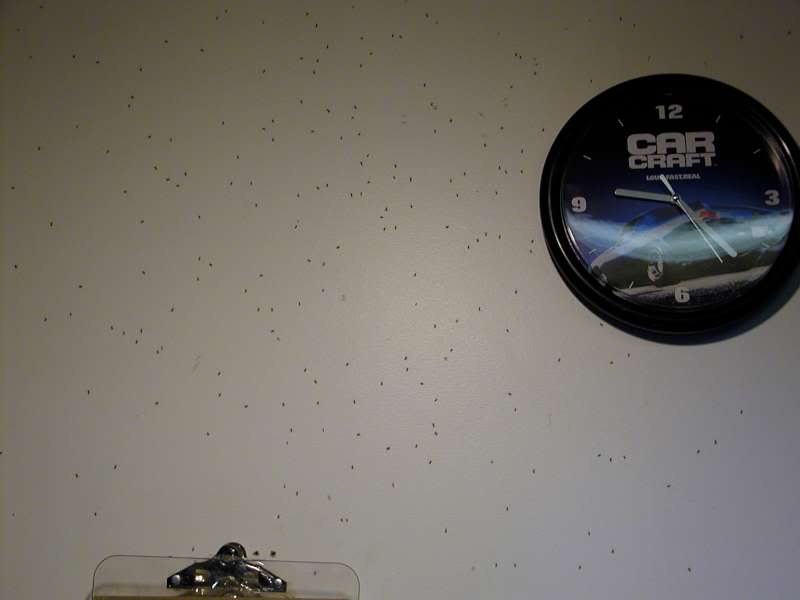
Apparently it's black gnat season. So much for working with the garage door open.
Um, oops. Don wasn't kidding when he said it was thin in places. I only took about 1/16 out of that particular area. Looks like another job for JB Weld.
I burned into the o-ring seat on a couple more of the injector bosses in my zeal to take them way down, but I don't think it'll be a problem. Overall, I think I got them cut down pretty low. Now I just need some more sandpaper rolls and the head-side of the ports will be done. I didn't snap any pics, but there's a lot of the short side radius on the runner side that I can take away, but I did enough damage for tonight. I can only run the air tool for so long. You need to stay very tense to be able to control a 6" long carbide bit, and now my arms & neck are sore.
Anyway, I did some more porting tonight. Like last time, I started with a snap gauge to see where my starting point was:
Apparently it's black gnat season. So much for working with the garage door open.
Um, oops. Don wasn't kidding when he said it was thin in places. I only took about 1/16 out of that particular area. Looks like another job for JB Weld.
I burned into the o-ring seat on a couple more of the injector bosses in my zeal to take them way down, but I don't think it'll be a problem. Overall, I think I got them cut down pretty low. Now I just need some more sandpaper rolls and the head-side of the ports will be done. I didn't snap any pics, but there's a lot of the short side radius on the runner side that I can take away, but I did enough damage for tonight. I can only run the air tool for so long. You need to stay very tense to be able to control a 6" long carbide bit, and now my arms & neck are sore.
Jim85IROC
TGO Supporter
close
Oct 4, 2024
Made a little bit of progress over the last couple nights.
Last night I started porting the runner side of the intake. I went as far as I could until I ran out of sand paper cartridges. Like everything else, nobody sells them locally so I have to order some and wait for them to get here before I can finish cleaning up the intake.
While I'm waiting for cartridges, I decided to work on a couple other things. I mixed up some JB Weld to repair my injector bosses and the one spot on the runner mount that I went through when porting:

Since that's taking my intake out of commission while it dries, I went back to the motor. I replaced one of my valve springs with a checker spring and checked my wipe patterns again.
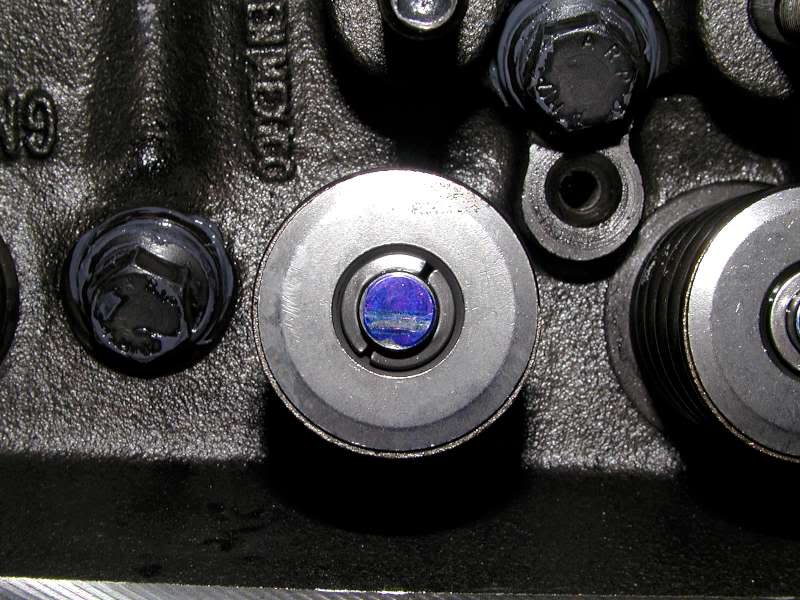
Here's the pattern with the stock 7.8" pushrod:
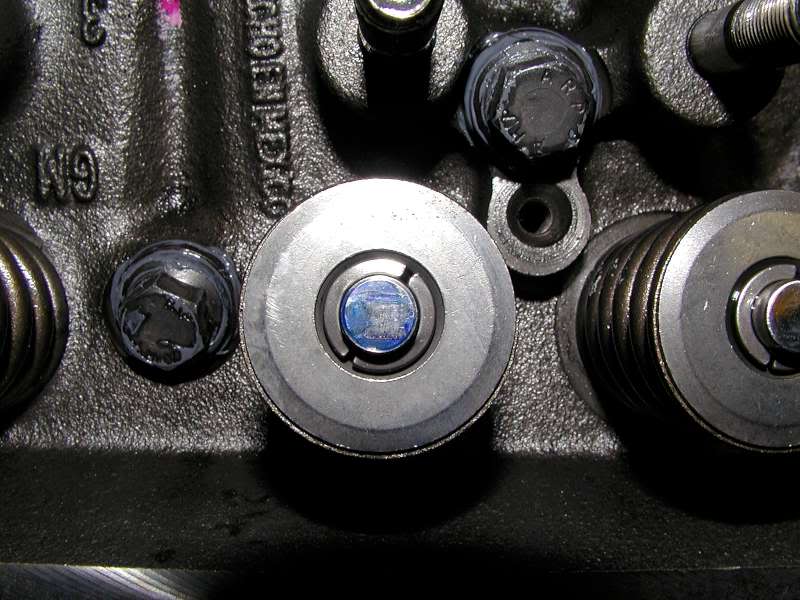
Here it is with the shorter pushrod:
I think I'm just going to go with the shorter pushrod set. If I go any shorter, even though it might move my wipe pattern closer to the center of the valve stem, it just winds up with too short of a pushrod.
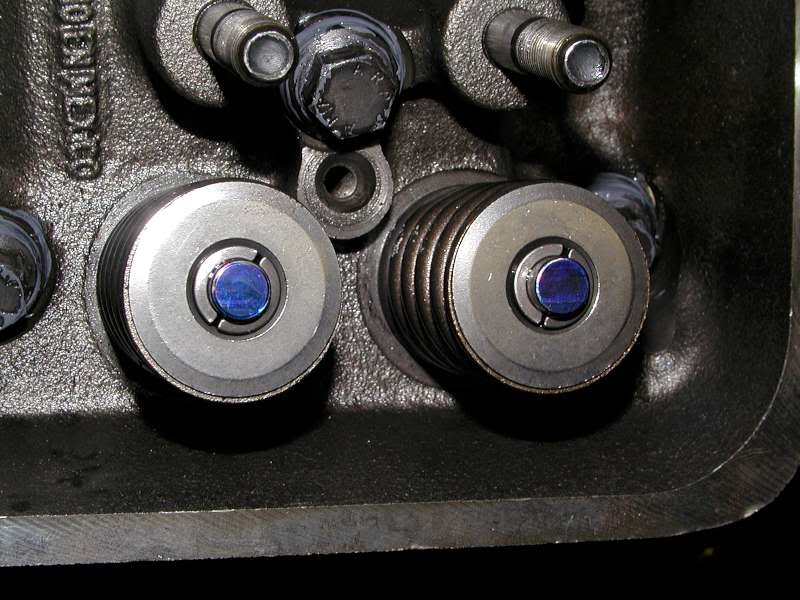
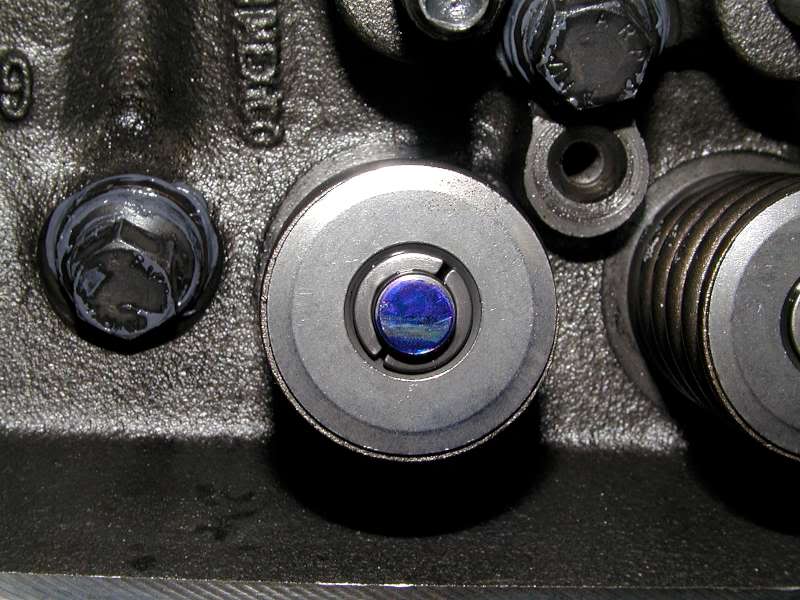
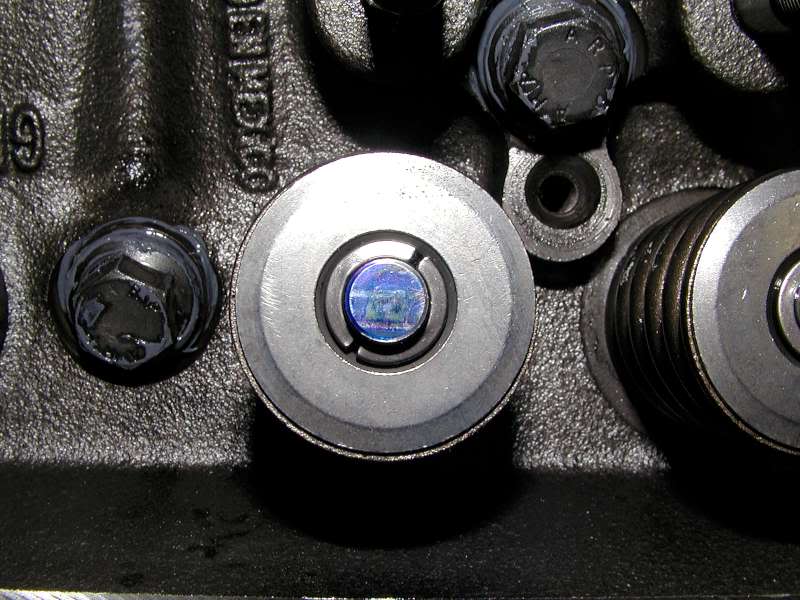
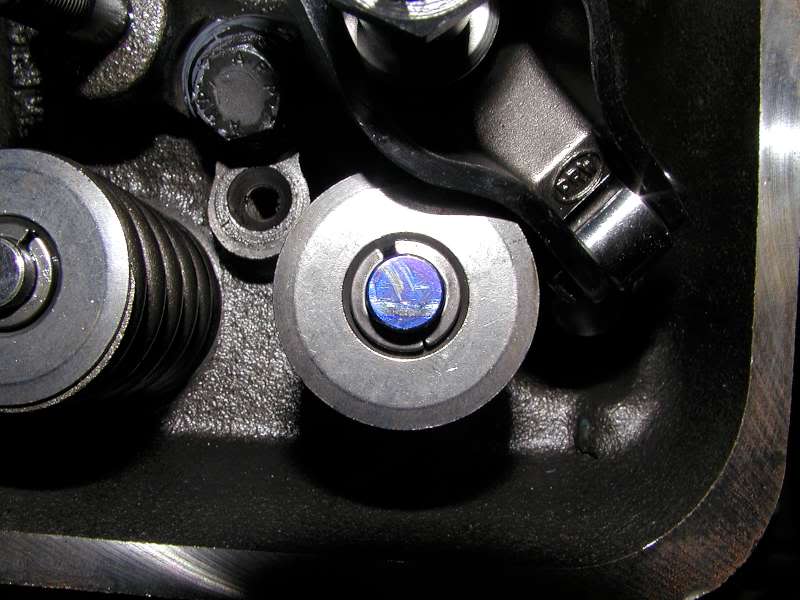
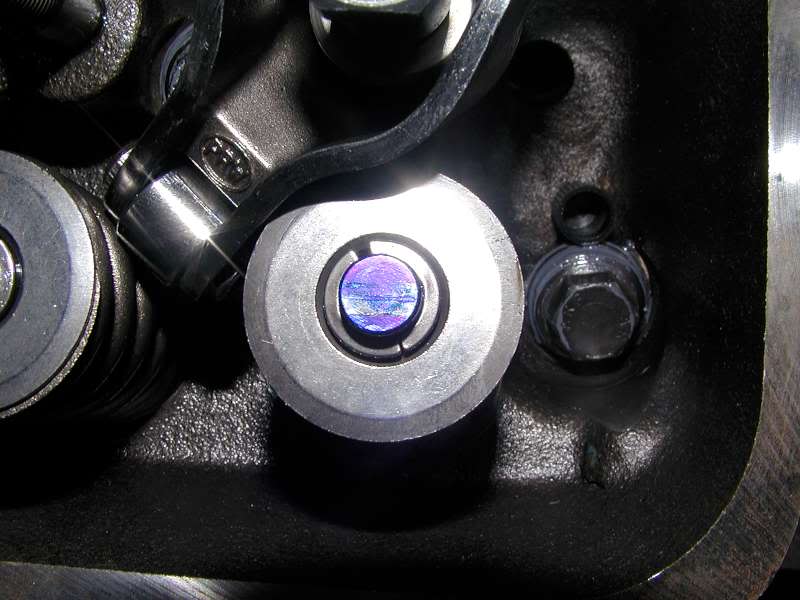
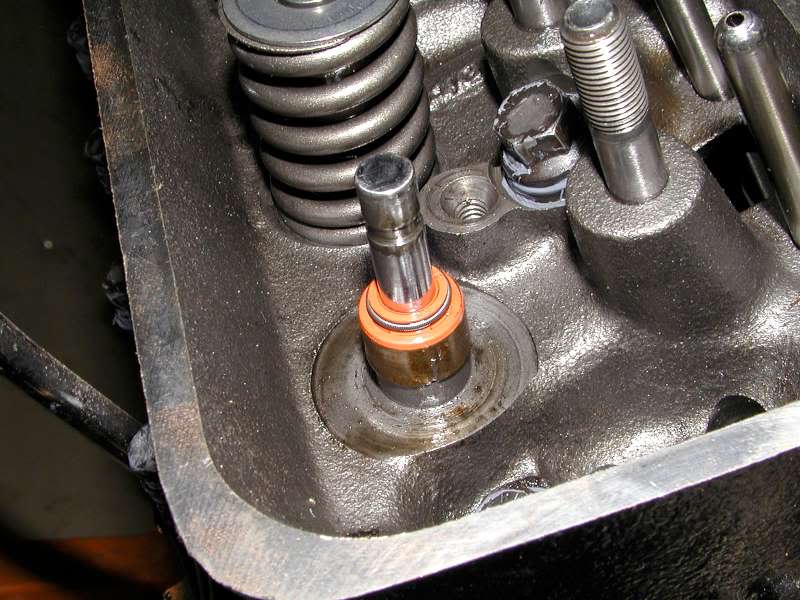
While the spring was off, I snapped a pic to show what the SDPC modification looks like. As you can see, they cut down the valve guide boss and use an aftermarket valve guide seal:
Last night I started porting the runner side of the intake. I went as far as I could until I ran out of sand paper cartridges. Like everything else, nobody sells them locally so I have to order some and wait for them to get here before I can finish cleaning up the intake.
While I'm waiting for cartridges, I decided to work on a couple other things. I mixed up some JB Weld to repair my injector bosses and the one spot on the runner mount that I went through when porting:
Since that's taking my intake out of commission while it dries, I went back to the motor. I replaced one of my valve springs with a checker spring and checked my wipe patterns again.
Here's the pattern with the stock 7.8" pushrod:
Here it is with the shorter pushrod:
I think I'm just going to go with the shorter pushrod set. If I go any shorter, even though it might move my wipe pattern closer to the center of the valve stem, it just winds up with too short of a pushrod.
While the spring was off, I snapped a pic to show what the SDPC modification looks like. As you can see, they cut down the valve guide boss and use an aftermarket valve guide seal:
Jim85IROC
TGO Supporter
close
Oct 4, 2024
The other night I did more port work on the intake, but I ran out of sand paper cartridge rolls, so while I'm waiting for those to arrive, I decided to install my rockers. 4 of the retainer nut thingies didn't want to thread on to the studs. I was able to chase 3 of them with a bolt, but one is too far gone. I ! <3 china parts.
Member
Subscribed! I have a Vortec 350 From a '97 GMC Sierra 2500. I am thinking of a Procharger down the road.
Jim85IROC
TGO Supporter
close
Oct 4, 2024
Quote:
Actually, yeah, but my PC with the Smart Media card reader crashed, so I haven't been able to get any of my pics off my camera.Originally Posted by conlinj
Any progress? Mostly I got the old oil pan re-installed after clearancing it for the y-pipe, and I finished porting the intake. Most of my time in the last couple weeks has been spent working on the 302 that I'm giving to my dad for father's day. Hopefully I'll have pics this week.

Supreme Member
That's a nice present, I'm working on a project for my dad but it won't be ready until next year. Looking forward to seeing pics of the manifold
Jim85IROC
TGO Supporter
close
Oct 4, 2024
Finally some pics! I haven't made any new progress, but I finally got some of my pics off my camera. Because my old camera uses a Smart Media card, and my old PC with the card reader croaked, this was a project unto itself.
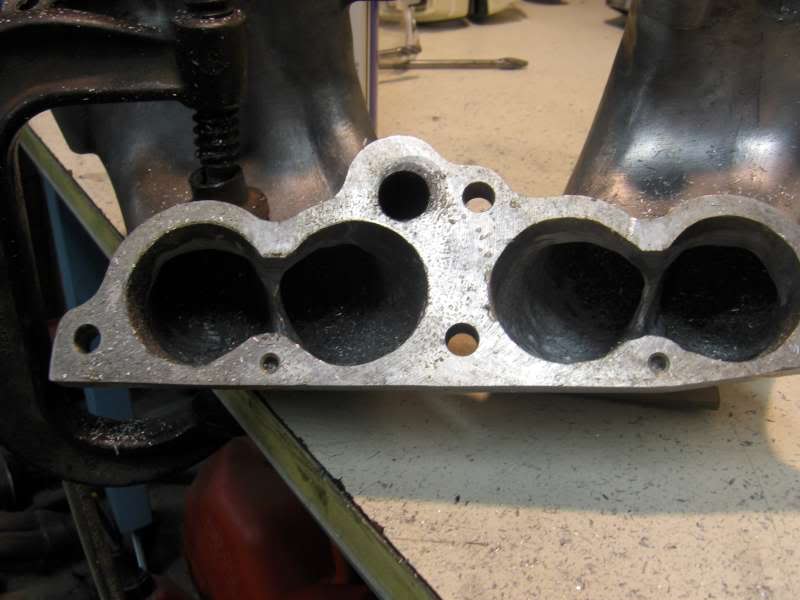
Anyway, pics. First some pics of the baseplate porting:
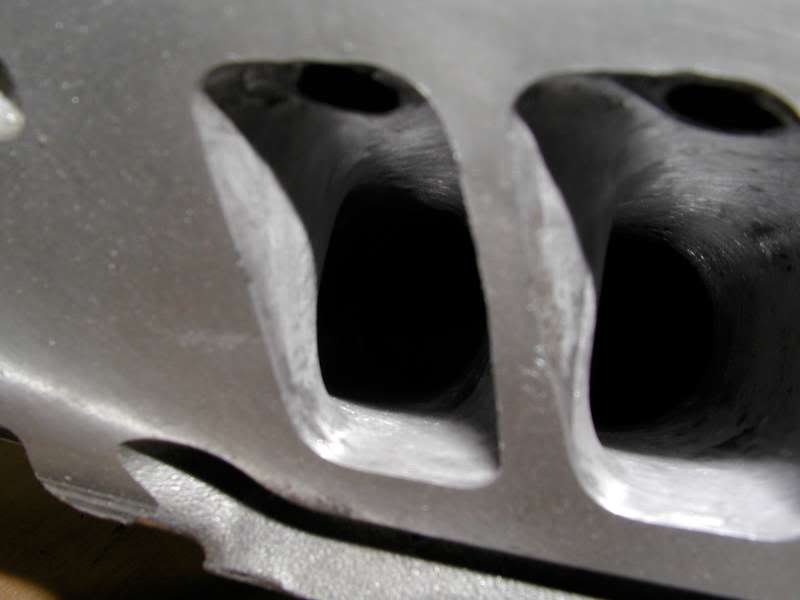
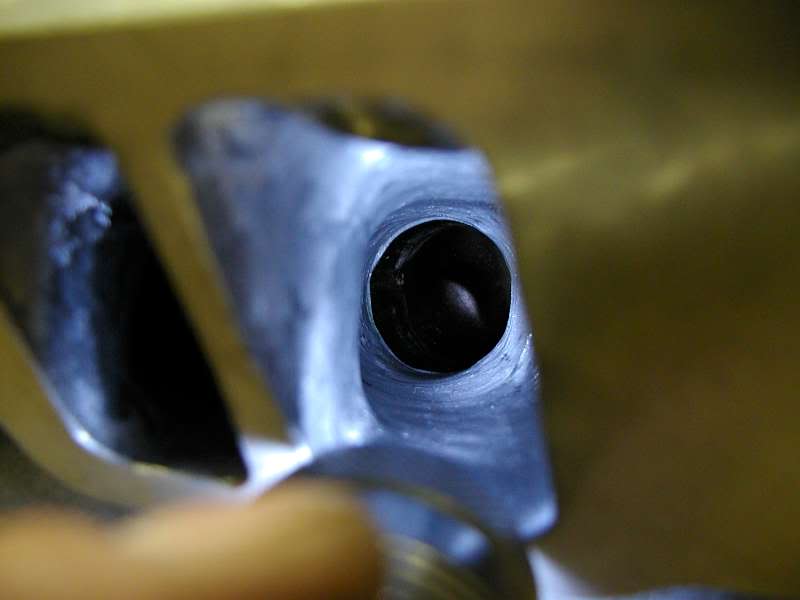
Here's a pic looking in through the port at the runner that's bolted to the intake. You can see that the runner opening is slightly smaller than the baseplate opening. I'm debating whether to try and gasket match in order to have a smoother transition or leave it alone. If I open it up too far, it's going to be a bigger problem than having it be a tad smaller than the base.
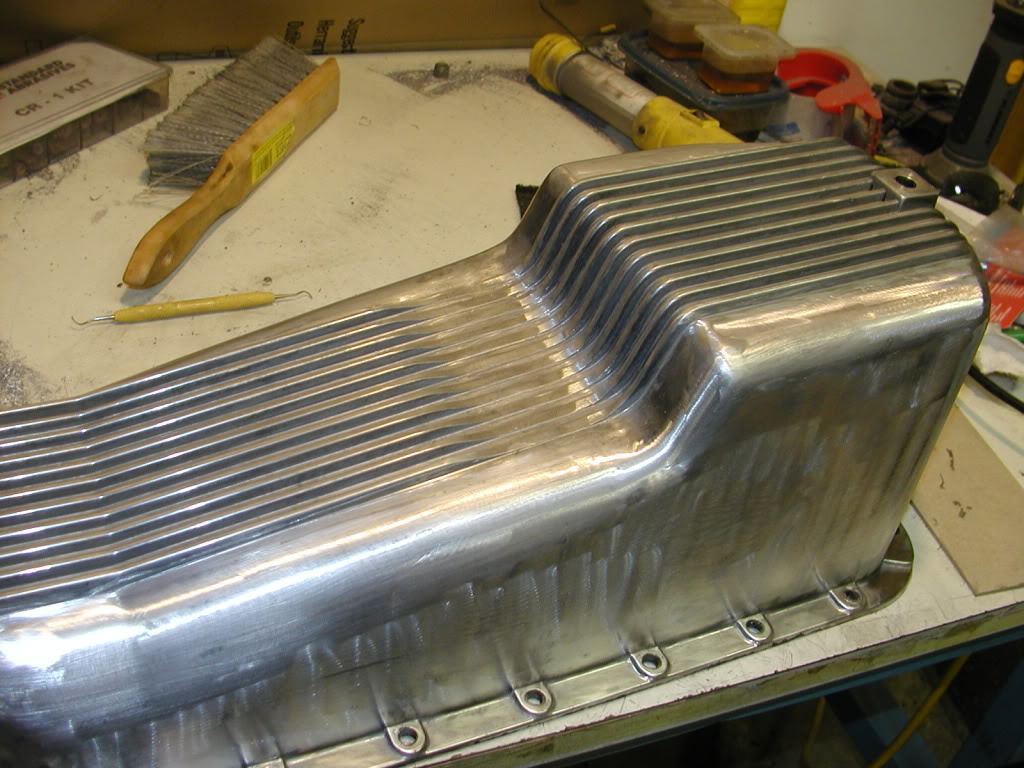
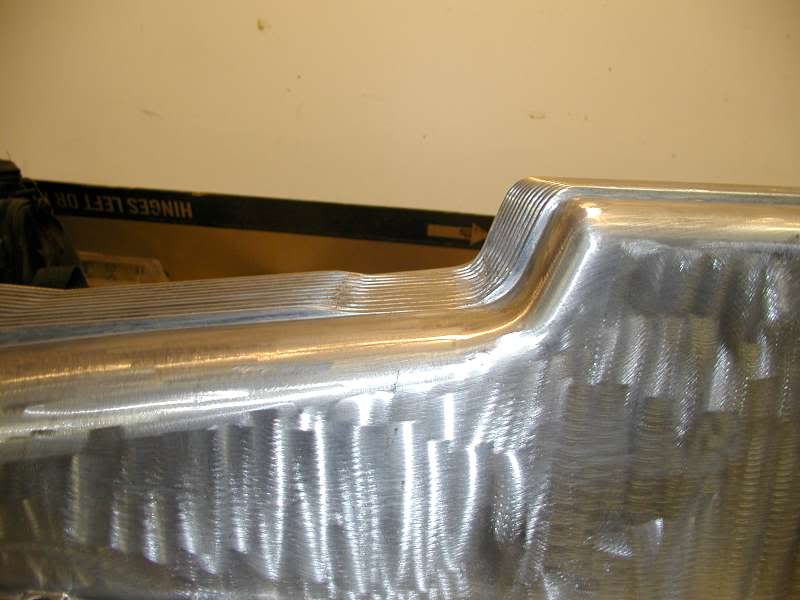
On to the oil pan. As discovered above, my new steel oil pan won't fit with the Y pipe, so I had to go back to the old aluminum pan that I had on the motor originally. One thing I wanted to do was get rid of the fins to help provide extra clearance for the y-pipe. In the Camaro, I never had room to even squeeze a band clamp over the y-pipe union. Here you can see the fins ground down:
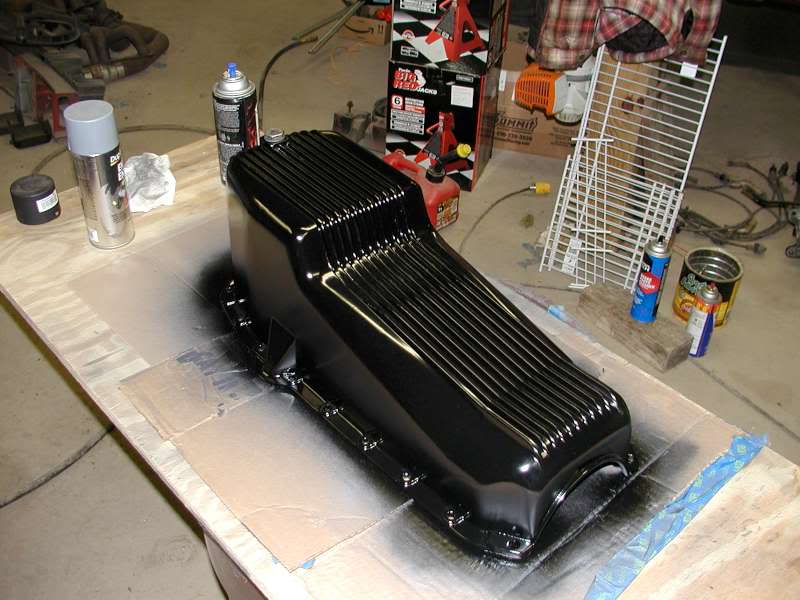
All painted:
Pan installed:
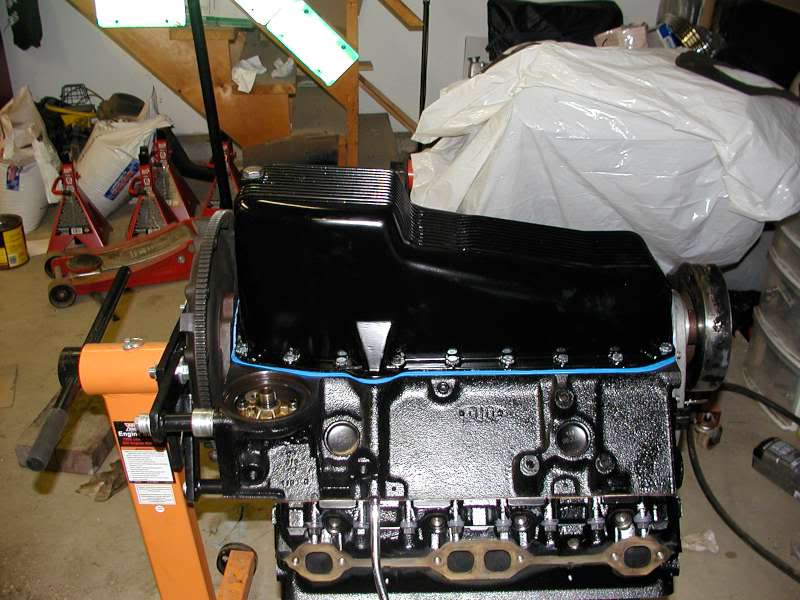
Near the dipstick tube, the pan is too thick for the normal bolts & star washers, so I had to use an allen head with a ground-down washer:
Now that my father's 302 is mostly out of my hair, I'm hoping to get back to this very soon. I need to decide whether I'm going to do any additional port matching on the bottom of the runners. One thing that I'm definitely going to do is additional porting on the top side of the runners in order to siamese them a little deeper, and to open up the plenum a bit more. Once that's done, it'll be time to pull the GTA in and start pulling it apart.
Anyway, pics. First some pics of the baseplate porting:
Here's a pic looking in through the port at the runner that's bolted to the intake. You can see that the runner opening is slightly smaller than the baseplate opening. I'm debating whether to try and gasket match in order to have a smoother transition or leave it alone. If I open it up too far, it's going to be a bigger problem than having it be a tad smaller than the base.
On to the oil pan. As discovered above, my new steel oil pan won't fit with the Y pipe, so I had to go back to the old aluminum pan that I had on the motor originally. One thing I wanted to do was get rid of the fins to help provide extra clearance for the y-pipe. In the Camaro, I never had room to even squeeze a band clamp over the y-pipe union. Here you can see the fins ground down:
All painted:
Pan installed:
Near the dipstick tube, the pan is too thick for the normal bolts & star washers, so I had to use an allen head with a ground-down washer:
Now that my father's 302 is mostly out of my hair, I'm hoping to get back to this very soon. I need to decide whether I'm going to do any additional port matching on the bottom of the runners. One thing that I'm definitely going to do is additional porting on the top side of the runners in order to siamese them a little deeper, and to open up the plenum a bit more. Once that's done, it'll be time to pull the GTA in and start pulling it apart.
Jim85IROC
TGO Supporter
close
Oct 4, 2024
Tonight I started porting my SLP runners. The plan is to extend the siamesed area deeper into the runner, and then smooth out the surrounding area. Without a doubt, this is the most unpleasant port work I've done so far (not that I've done much). It's hard to position the runners in a way that gives me good visibility, plus when I'm cutting away at the metal, it all flies right back into my face. From the shoulders up, I was completely covered in aluminum.
My apologies for the pics. My normal garage camera is out of commission until I find an easy way to download a Smartmedia card to my laptop. To get all the old pics off I had to transfer them one by one onto my old XP laptop, then transfer them to this computer. So, until I get a smartmedia reader that works in Windows 7, I'm stuck with some crappy Canon point & shoot.
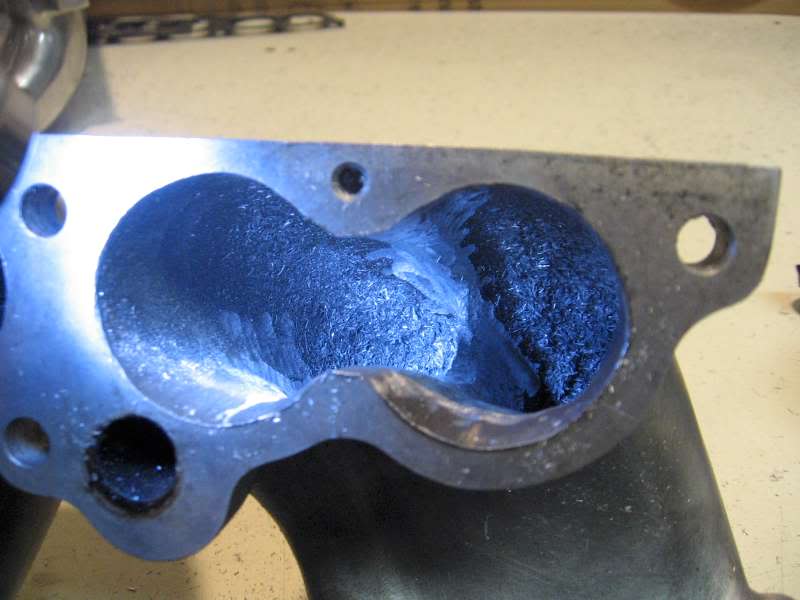
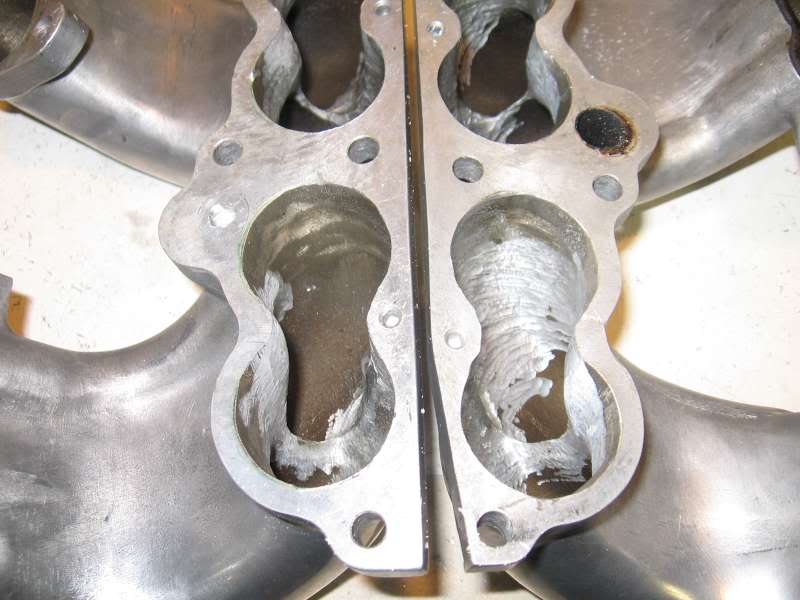
Anyway, on with the pics. Here's a couple of what I started with:
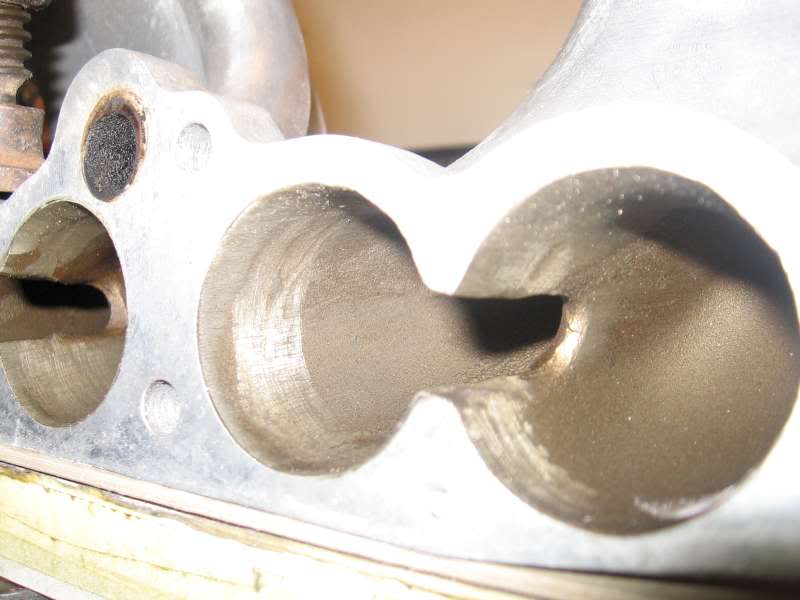
This is the rough cut from the carbides:
After I rough-cut the other runner, I'll clean them up with the sandpaper cartridges, and then port match the plenum. I'm debating whether I want to open up the top of the runners any more or leave it like it is now. I don't want to open it up too much, because I want to keep the power band low enough for it to compliment the mild cam and the vortec heads.
My apologies for the pics. My normal garage camera is out of commission until I find an easy way to download a Smartmedia card to my laptop. To get all the old pics off I had to transfer them one by one onto my old XP laptop, then transfer them to this computer. So, until I get a smartmedia reader that works in Windows 7, I'm stuck with some crappy Canon point & shoot.
Anyway, on with the pics. Here's a couple of what I started with:
This is the rough cut from the carbides:
After I rough-cut the other runner, I'll clean them up with the sandpaper cartridges, and then port match the plenum. I'm debating whether I want to open up the top of the runners any more or leave it like it is now. I don't want to open it up too much, because I want to keep the power band low enough for it to compliment the mild cam and the vortec heads.

I would open it up, power band is not going to change much, also when you check push rod lenght you need a the lifter pumped up, I do the same as said above, I just make a soild one out of an old one. I use the .015 head gaskets on my afr's, been on for over a year and I run the car hard and drive on very hot days so your fine there. As for some dyno numbers my friend has a vortec motor with a First manifold, cam is a Millings hyd. roller, .495/.502 220/224 @ .50, Hooker LT, car was running like **** at the dyno but it still made 275whp but I dont remember the tq. Anyways the car is real fun to drive, very responsive and great low end, no porting just bolted together.
Jim85IROC
TGO Supporter
close
Oct 4, 2024
I agree that using a checker spring in place of the real spring, or using a solid lifter would be ideal, but honestly, that .100" difference doesn't move the wipe pattern much.
I haven't measured a flat tappet but the rollers are .160, I would assume that the flats are the same since the manual says one full turn after 0 lash, one full turn is .080 of the rocker nut, that's half way down on the lifter plunger, these are the measurement I have taken on my own setup.
Jim85IROC
TGO Supporter
close
Oct 4, 2024
Maybe I'm off a little bit on the full plunger depth, but regardless, compared to the 1/2" variation in pushrod length I experimented with, a couple tenths here and there aren't going to have a drastic impact on wipe pattern or position. Changing the pushrod by 1/4" really didn't even make as much of an impact as I expected it to.
Jim85IROC
TGO Supporter
close
Oct 4, 2024
Ported the other runner tonight, and decided to go deeper with the siamese. I did some additional cleanup too. I think now they're ready for the sanding rolls.
Supreme Member
Looking good, I'm looking forward to see how its going to run and if there was any difference compared to my HSR.
Jim85IROC
TGO Supporter
close
Oct 4, 2024
I can't wait too. I'm excited to see how the horsepower and 1/4 mile times compare to the old motor.
Jim85IROC
TGO Supporter
close
Oct 4, 2024
Worked on the lower side of the runners tonight to clean up the inside area that has bumps that correspond to the areas that are clearanced for the runner bolts. Went a little too far. Oops.
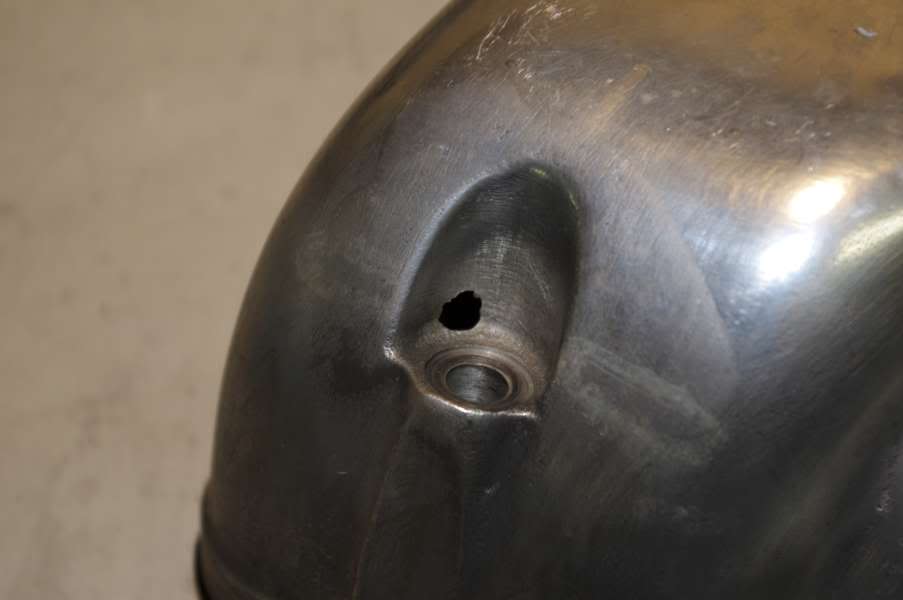
JB Weld to the rescue:
JB Weld to the rescue:
TTOP350
Supreme Member
close


Yesterday
- Join DateOct 2001
- LocationIl
- Posts:12,223
- iTrader Positive Feedback100
- iTrader Feedback Score(9)
- Car1989-92 FORMULA350 305 92 Hawkclone
- Engine4++,350 & 305 CIs
- Transmission700R4 4800 vig 18th700R4 t56 ZF6 T5
- Axle/Gears3.70 9"ford alum chunk,dana44,9bolt
- Likes:2,841
- Liked:1,148 Times in 749 Posts
Nice! When you see the holes, your close but keep on porting! lol
Jim85IROC
TGO Supporter
close
Oct 4, 2024
Nah, that's far enough.  A little cleanup with the sandpaper rolls and I'm calling it done. I want to put this dumb thing into the car before the summer is over. Plus, if I make it too fast, I'll break my T5.
A little cleanup with the sandpaper rolls and I'm calling it done. I want to put this dumb thing into the car before the summer is over. Plus, if I make it too fast, I'll break my T5. Supreme Member
dprest68
Supreme Member
close
May 16, 2022
Always a possibility to break the T5 anyways from what I've heard about them.  Would be a good excuse to put a T56 in there
Would be a good excuse to put a T56 in there Jim85IROC
TGO Supporter
close
Oct 4, 2024
I'd rather not. I'm leary of buying used transmissions because you never know what kind of junk you're going to get, plus I don't plan to keep the car forever and I'll never recoup the cash if I sell it. That said, if (when) I kill the T5, I'll throw the old T5 back into it just to keep it drivable while I find a T56.
Supreme Member
dprest68
Supreme Member
close
May 16, 2022
Sounds like a good plan