

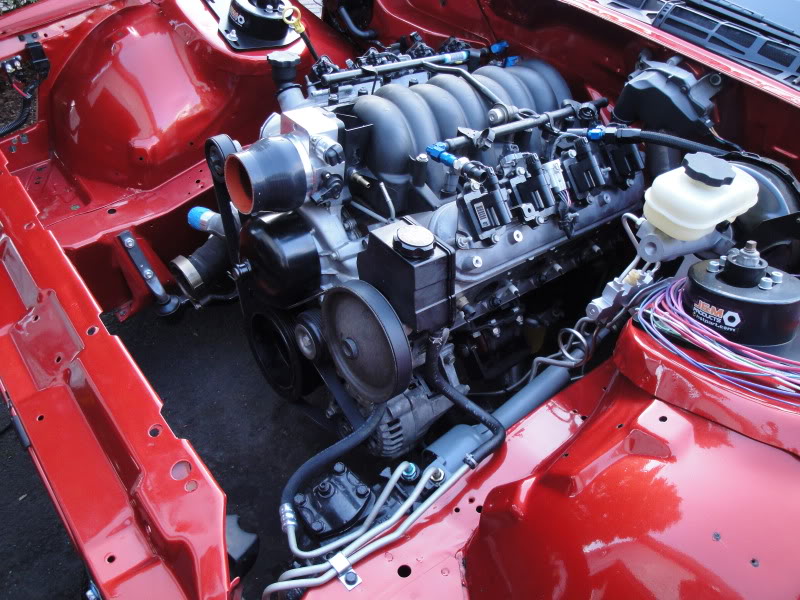
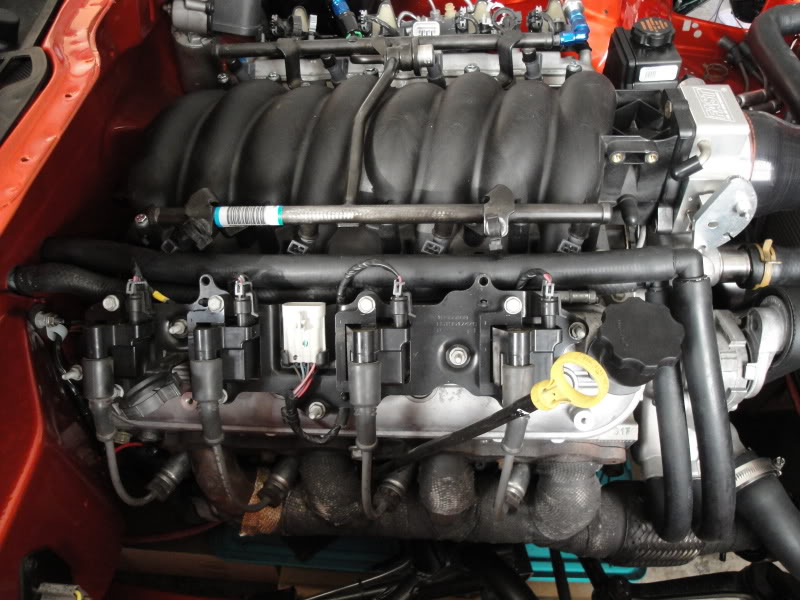
UPDATE: Got my LS1 F-body balancer and was finally able to get the belt on. Also changed out the ugly looking bent up 4th gen lines for some brand new 3rd gen lines and even found out I could get the return line/PS cooler brand new at advance auto for $12!!! Cool! Anyways, heres pics.
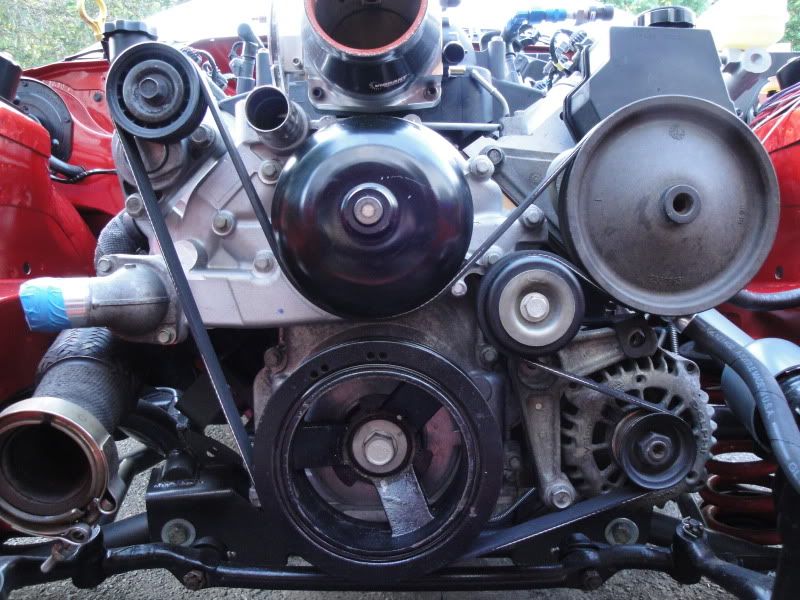
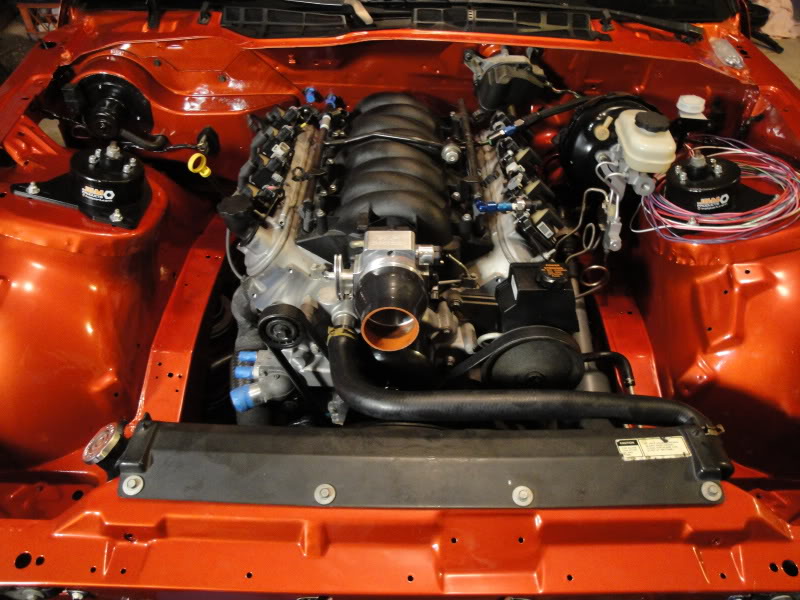
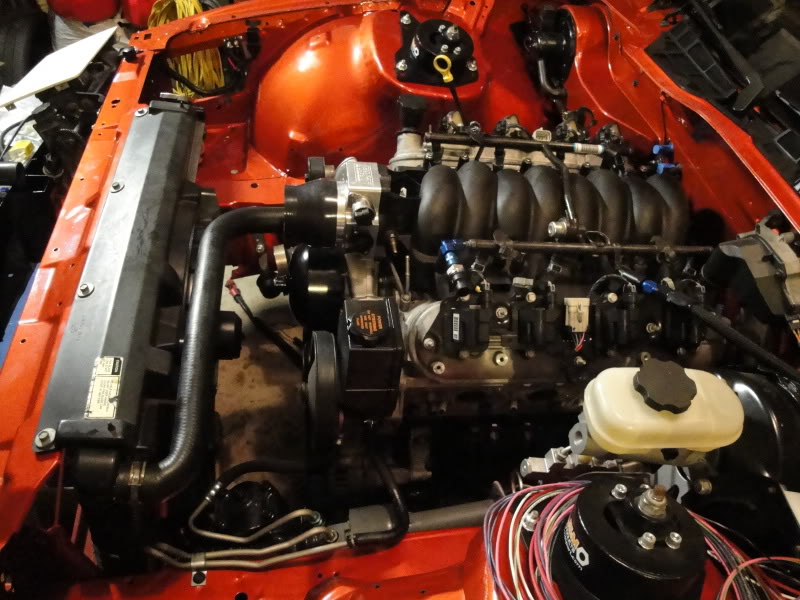
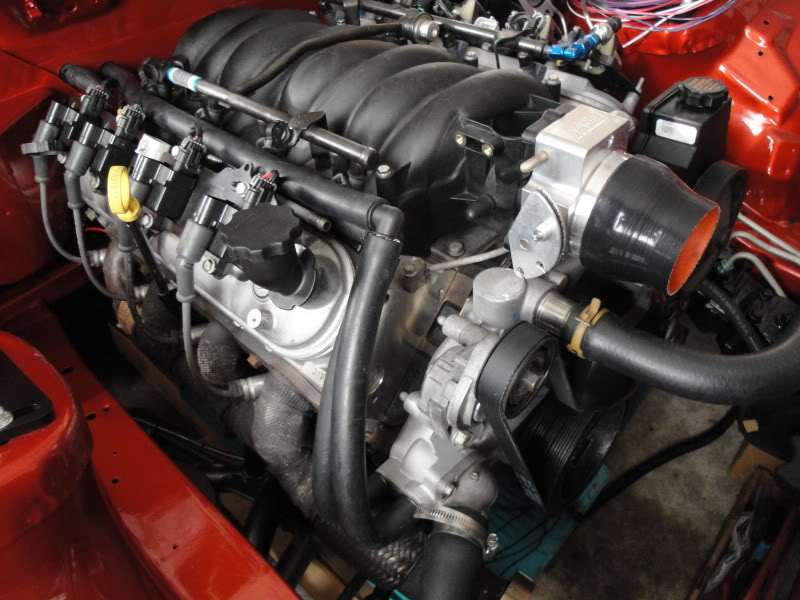
Heres the front accesories all said and done. If you look at the top bolt on the alt bracket, you can see the custom black bracket I made to hold the bolt since theres no provision in the block. Just waiting for the bolt to come in now since I had to order it.
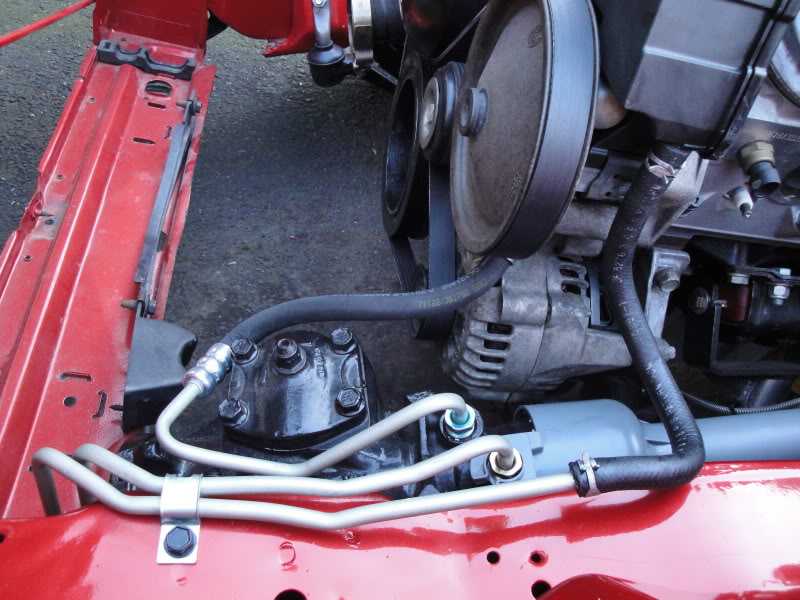
Heres the new lines all in place. Looks SO much cleaner than the 4th gen lines and gives it a stock appearence.
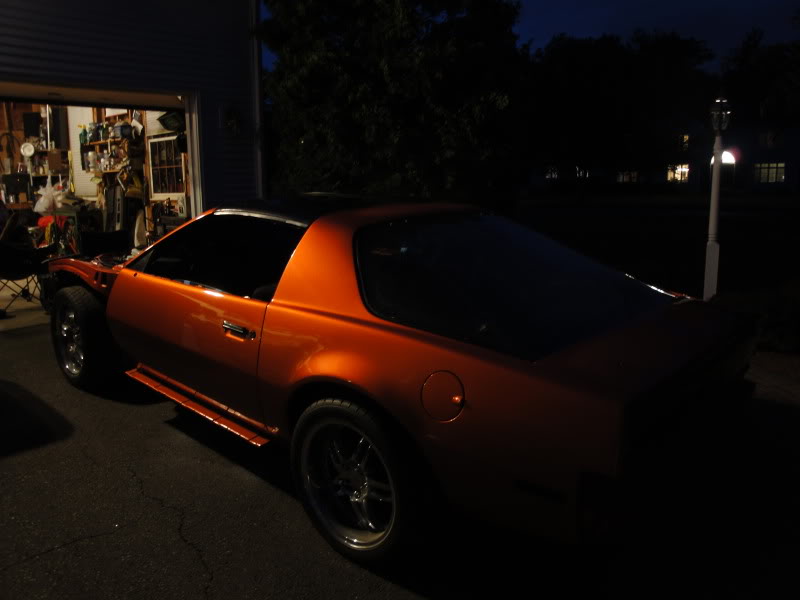
Sun was going down and I took off the auto-brighten feature on my camera and took this shot. I love how the paint looks in low light outside!
Heres the front accesories all said and done. If you look at the top bolt on the alt bracket, you can see the custom black bracket I made to hold the bolt since theres no provision in the block. Just waiting for the bolt to come in now since I had to order it.
Heres the new lines all in place. Looks SO much cleaner than the 4th gen lines and gives it a stock appearence.
Sun was going down and I took off the auto-brighten feature on my camera and took this shot. I love how the paint looks in low light outside!

Junior Member
It is a great feeling to watch your car coming together before your own eyes, isn't it. Still looking awesome, but cant wait for that turbo to be sitting in the engine bay. I do have a question or two for you you have probably answered before, but i will ask again (don't mean to be disrespectful). What was the horsepower # you were going for and what is the power rating of your transmission? Only asking because I have been thinking of swapping a Hurst Driveline T-56 that is rated at 700 ft/lb torque for my busted 700r4 and wondered what yours was rated for.
Quote:
No disrespect at all in that question. I'm expecting around 600 HP or slightly more at the flywheel for the motor and the tranny from GM is rated to 450 lbs ft of torque, but the T56's stock have been in 10 second street cars and have held up fine. Guess it's just the luck of the draw if you get one that holds up or not. If it ever blows, I'll most likely end up going with an RPM transmissions T56 which are rated to 700 lbs ft of torque.Originally Posted by firebird_6645
It is a great feeling to watch your car coming together before your own eyes, isn't it. Still looking awesome, but cant wait for that turbo to be sitting in the engine bay. I do have a question or two for you you have probably answered before, but i will ask again (don't mean to be disrespectful). What was the horsepower # you were going for and what is the power rating of your transmission? Only asking because I have been thinking of swapping a Hurst Driveline T-56 that is rated at 700 ft/lb torque for my busted 700r4 and wondered what yours was rated for. Junior Member
Thank you for the info.
i was gonna ask if you could put up a vid on the car running, but then i remembered that you still had to wire it up, i got a little anxious and its not even my car
Quote:
No problem! Let me know if you have any other questions.Originally Posted by firebird_6645
Thank you for the info. Quote:
Haha your not the only one thats anxious to hear it running. I will be getting a welder with my brother next week and will finally be able to weld up the turbo piping. After the turbo is mounted, I'l be ordering the engine harness. Figure about another 2 weeks or so and hopefully this thing will be ready to fire!Originally Posted by tylercamaro
i was gonna ask if you could put up a vid on the car running, but then i remembered that you still had to wire it up, i got a little anxious and its not even my car Supreme Member
PLEASE blast/powdercoat those accessories!

Supreme Member
As much new stuff as hes putting on the car, or stuff that looks new I'm surprised he didn't, alternator, PS pulley, and crank pulley, idler and tensioner maybe just a pit of polish or something, wouldn't hurt to blast the accessory bracket either, but it does all kind of draw the eye, esp the alternator and PS pulley.
Quote:
prowler orange accesories would be crazyyyyyOriginally Posted by puma1552
PLEASE blast/powdercoat those accessories! To adress the accessories, theres a few reasons I didn't spiffy them up. The PS pulley I TRIED to clean, however those of you that know LS1's know that it's a plastic pulley, so thats the best I could get it, and I will not replace it since it's a PITA. I considered painting it but I don't know how well paint would hold up on something thats constantly spinning.
The alt I am not replacing because I bought this one used, and cleaned it up the best I could but they are not cheap to get replacements! When this one goes, there will be a nice shiny one in there. In all honesty, with the radiator and fan in place, and all the turbo piping, you will never see the accesories except for the very top, like the PS pulley. When I was initially building the engine for this car, I wanted a clean look, but no dress up parts. The look I was going for was business only when I open the hood, meaning all cast aluminum and black finish. Thats why I am using all black AN lines and fittings as well.
Like I said, I would like to make the PS pulley a little prettier so I'll see about working on that, but this motor I want to be more function than looks........AND I WANT IT TO RUN SOON!!!
Supreme Member
plasti-dip might work well for that pulley, on the alternator I would just dremel or drill it with a wire brush or abrasive pad probably, if you're looking for a compromise.
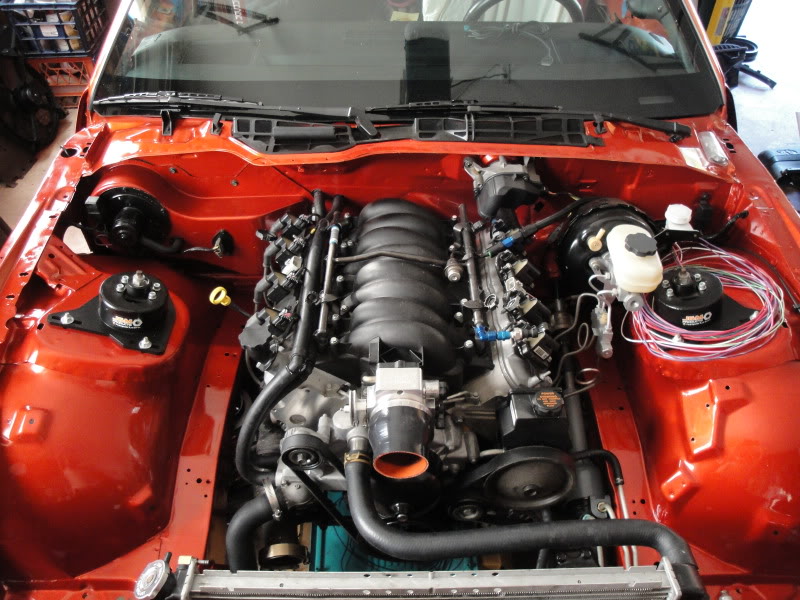
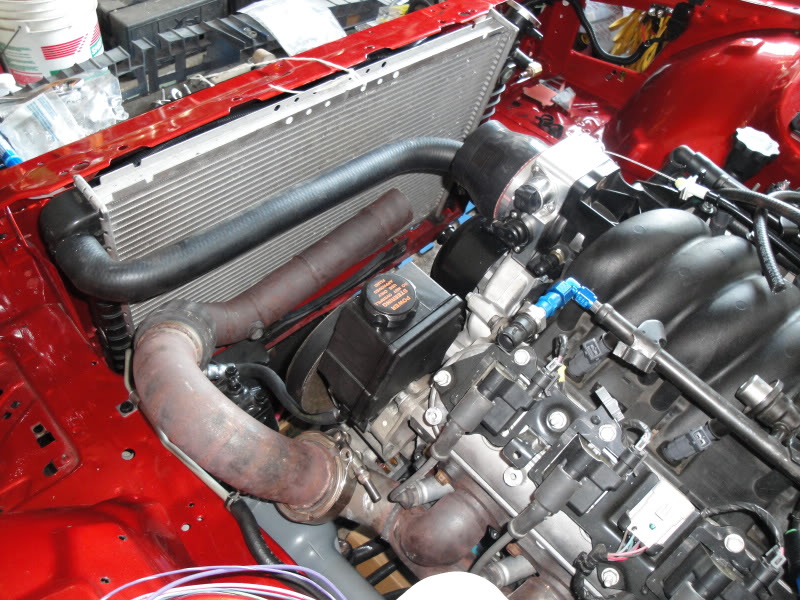
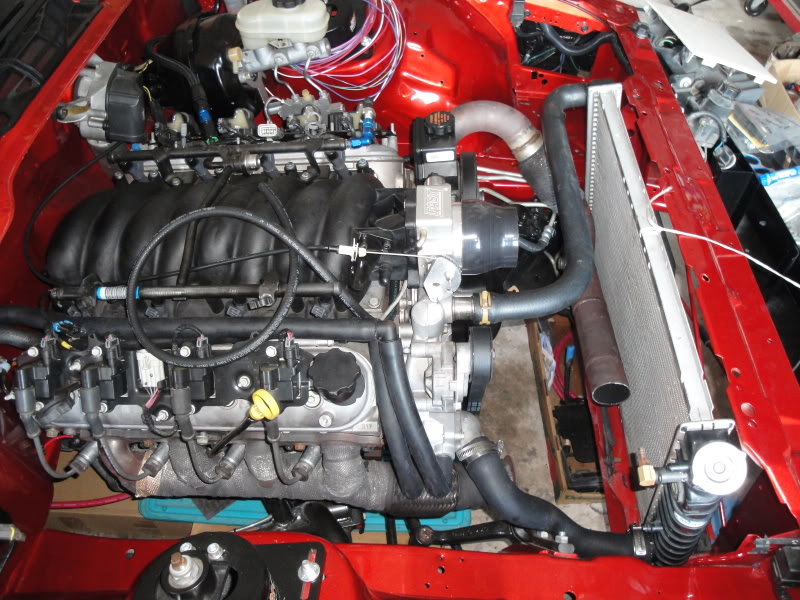
Been trying to get my heater hoses all said and done. Made an attemp to go check out the inventory at the local advance auto today and picked up an upper and lower hose. The upper was spot on but the lower was way off so I'll have to keep searching for that. If anyone has any advice what part number to use for a lower hose, I'd appreciate it! Also saw some heater core pre-bent hoses that may work good so I'll be trying those out when I get back to advance auto. Anyways heres a few pics of the radiator, shroud, fan, and upper hose back on.
Should have a welder within a week so I can finally start fabbing! Good parts coming soooon!!
Should have a welder within a week so I can finally start fabbing! Good parts coming soooon!!
Supreme Member
Is the lower hose too big, too small, or just doesn't route where/how you need it to??
Quote:
It's just not the shape I need. I'm pretty strapped for space as it is because I'm trying to allow as much room for turbo piping as possible so I want a specific shape for the lower hose. I bent up a wire hanger in the shape I needed and tried to get one just by using that as a template. Found one that was close but I got it home and theres no way I can make it work unfortunately. I'm going to see what others have used and hopefully I find something that works!Originally Posted by Project 3.4 Camaro
Is the lower hose too big, too small, or just doesn't route where/how you need it to?? Supreme Member
I've seen SS braided covers for them, maybe someone makes a SS braided flex hose for radiators?
someone used one off of a ford something in one thread but i cant remember which thread or what car or anything
Quote:
Originally Posted by Project 3.4 Camaro
I've seen SS braided covers for them, maybe someone makes a SS braided flex hose for radiators? Quote:
I actually found that a dayco belt from a mid 90's jeep cherokee with the I6 works perfectly with some trimming and advance by me has one in stock according to thier website. I should be able to grab it tomorrow and try it out and then that'll be one more thing out of the way. Originally Posted by tylercamaro
someone used one off of a ford something in one thread but i cant remember which thread or what car or anything And tyler, I did see that one for the ford F250 diesel hose but some people said it worked ok and others didn't. The jeep one should be a good fit I hope!
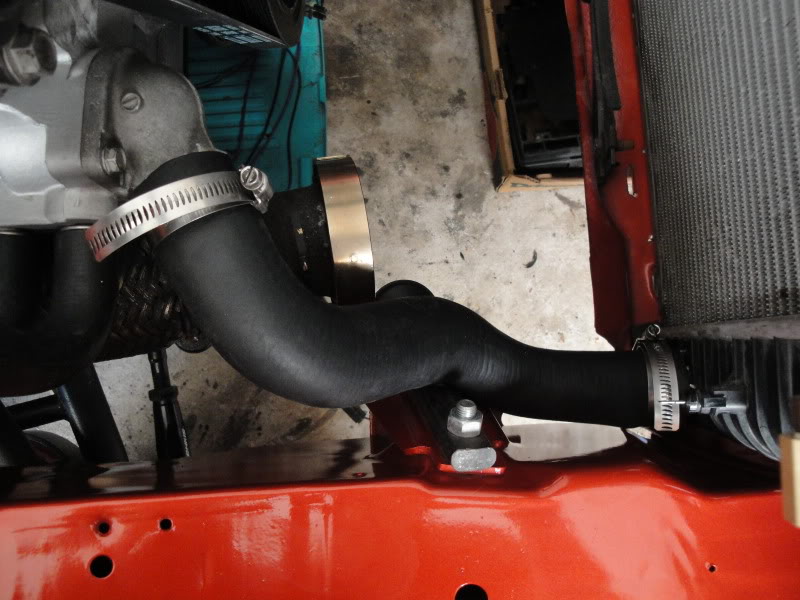
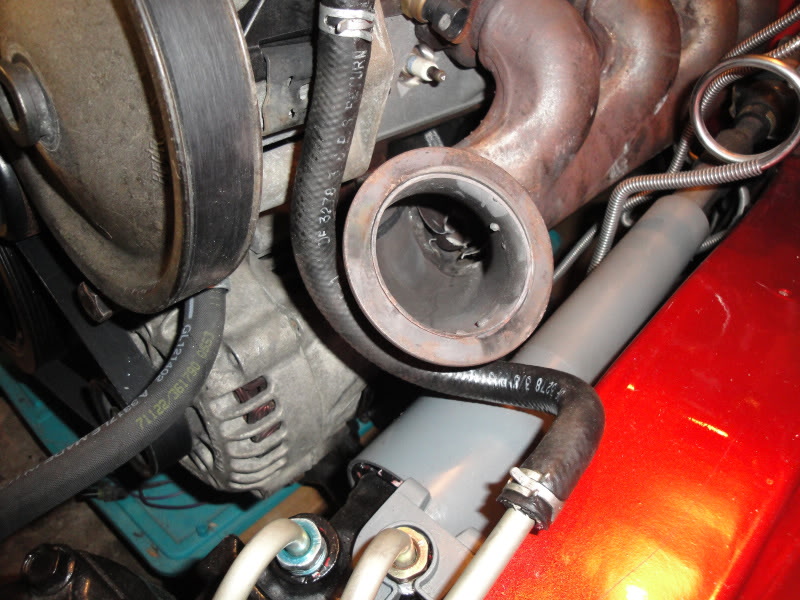
Got some more work done today! Have all my coolant hoses finished now and I'm very happy with how they turned out. Keeping all the lines tucked close to the motor was very important to me since there will be turbo piping all around the engine and especially on the pass side with the downpipe which will probably get close to 1000 degrees. I want to give it as much clearance as I can and I'm happy with how it came out! Anyways, heres a few pics..
Lower radiator hose
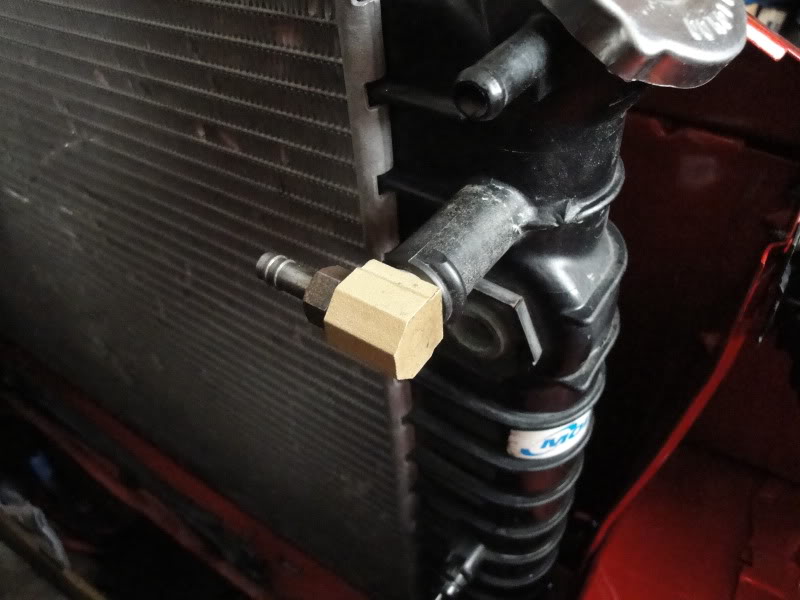
Heres the nipple I added on the radiator for the steam release fitting on the front of the heads.
Heres the heater core lines in place, just not clamped down yet.
And another shot. As you can see this set up allows a good amount of room on the pass side where the framerail is for the downpipe. Most guys run the heater core lines down the framerail when they do the swap but I wanted the lines to run up and over the motor.
And the whole overlook. Should be able to get some antifreeze in it now and have one more thing out of the way! Next I'll either be getting the engine harness or a welder for the turbo piping.
Lower radiator hose
Heres the nipple I added on the radiator for the steam release fitting on the front of the heads.
Heres the heater core lines in place, just not clamped down yet.
And another shot. As you can see this set up allows a good amount of room on the pass side where the framerail is for the downpipe. Most guys run the heater core lines down the framerail when they do the swap but I wanted the lines to run up and over the motor.
And the whole overlook. Should be able to get some antifreeze in it now and have one more thing out of the way! Next I'll either be getting the engine harness or a welder for the turbo piping.

scooter
Supreme Member
close


Jan 31, 2026
- Join DateSep 1999
- LocationNJ
- Posts:4,353
- iTrader Positive Feedback100
- iTrader Feedback Score(11)
- Car92 Firebird
- Engine4.8 LR4
- TransmissionT56
- Axle/Gears3.45 9 Bolt
- Likes:722
- Liked:308 Times in 243 Posts
Quote: 
Info on those elbows you have in the heater hoses please?Originally Posted by whitedevilTA
Quote:
The plastic elbows I just got off the shelf at advance auto. The hoses are 2 different sizes...5/8 and 3/4. The 5/8 plastic elbow I actually found as a 90* heater hose elbow out on the floor. The 3/4 90* elbow was actually in the PCV valve section on the floor since they didn't have a 3/4 sized heater hose one, but they worked out great. The pieces of hose i used coming out of the water pump were just random 90* pre-bent sections in 5/8 and 3/4 that I found behind the counter at advance since the guys there let me browse around behind the counter whenever I need to. The section of 3/4 hose going into the core was just a straight piece but the section of 5/8 going to the core was actually the stock 3rd gen piece since it has a little bend in it by the firewall that made it fit awesome. Hope that helps!Originally Posted by scooter
Info on those elbows you have in the heater hoses please? Junior Member
How much will running the turbo of just one bank of cylinders instead of both throw off the exhaust back pressure or will the scavenging of the y-pipe pull hard enough to make up the difference? I only ask because I have never played around with a V engine with a single turbo, just twins.
Quote:
You can't run a turbo off just one bank. It has to be both banks or nothing. With a turbo off just one bank, first off, you'd never spool one big enough for a V8 application. Also, with only one bank going to the turbo and the other just as an exhaust bank, there would be wasted cylinder pressure exiting into the exhaust and I'm sure the engine wouldn't last very long without some good tuning. I believe there was a certain Saab V6 engine that had a turbo on 3 of the 6 cylinders, but it was a pint sized turbo running very low boost and the cams/heads on the non turbo side were completely different than the turbo side. For how easy it is to just run a crossover pipe from the other side on a single turbo V-engine application, thats what I'd stick to.Originally Posted by firebird_6645
How much will running the turbo of just one bank of cylinders instead of both throw off the exhaust back pressure or will the scavenging of the y-pipe pull hard enough to make up the difference? I only ask because I have never played around with a V engine with a single turbo, just twins. Junior Member
Ok, that makes more sense. I have played with 3 or 4 twin turbo V8's (sad to say 2 were stangs) and know how they are set up just never worked on a single turbo and was scratching my head trying to figure that one out. 
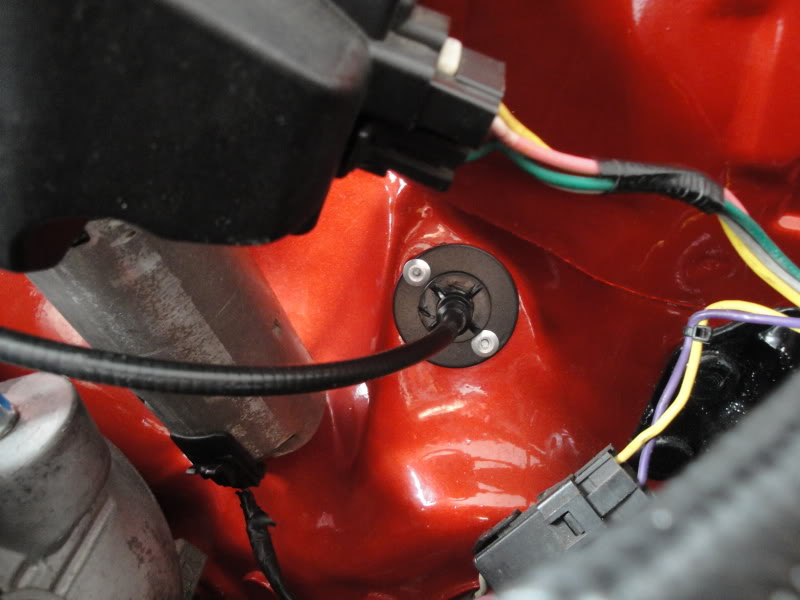
Just got back from the local GM dealership and have a throttle cable and bracket on the way. It was $48 bucks for both and guys selling them on ebay want in the $40 dollar range for just the cable!! Did a little research and found that you can get them cheaper from the GM dealership lol. I ordered the 98-99 cable so hopefully that one works fine. Don't know if it's better to use a 98-99 style or the 00-02 style. 98-99 had a quicker throttle opening since the cable is shorter so I figured I'd go with that one. My FAST throttle body has provisions for both style cables so either one will work in my car.
Anybody know which one works better with the 3rd gen pedals??
Anybody know which one works better with the 3rd gen pedals??
Got an update finally....it's small but hey it's something! Got the LS1 throttle cable on and it came out nice. Just have to bend the 3rd gen pedal a tad more and it'll be perfect. I really need a welder but coming up with the money is tough on limited income!! I'm almost there though so hopefully within the next week I'll have it. Anyways, here's pics...
Brand new GM throttle cable and bracket in place.
Heres the little bracket I made using a washer and rivets to hold it to the firewall. Thanks to Bluezee28 on here for the bracket idea!!
Brand new GM throttle cable and bracket in place.
Heres the little bracket I made using a washer and rivets to hold it to the firewall. Thanks to Bluezee28 on here for the bracket idea!!
Supreme Member
How exactly do you have that bracket doodad setup, can you still remove the throttle cable thing if you need to? I'm working out new throttle cable setup myself and the damn thing loves pulling out of the firewall...
Quote:
The throttle cable is completely removable if I were to have to replace it. Basically all I did was use a large flat washer that had the correct size for the cable to snap into and then the washer was riveted to the firewall. I did have to remove the little piece of foam that comes on the cable where it snaps into the firewall since the washer was thicker than the thin sheet metal of the firewall. The foam was only meant to keep it water tight so no big deal. It was honestly very easy to make, and it looks great too!Originally Posted by Project 3.4 Camaro
How exactly do you have that bracket doodad setup, can you still remove the throttle cable thing if you need to? I'm working out new throttle cable setup myself and the damn thing loves pulling out of the firewall... And also, heres a quick update...
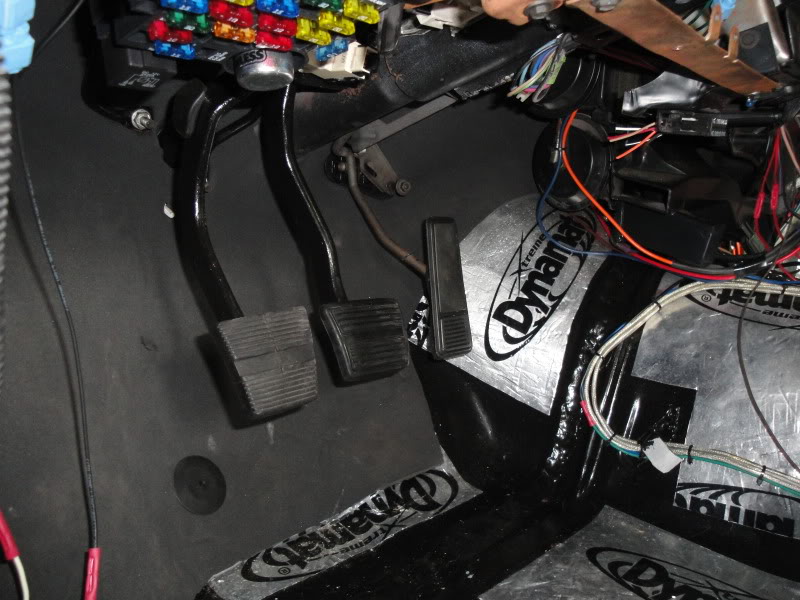
This is what the cable looks like on the insde going to the pedal. Operation is nice and smooth and it feels like factory.

This is how the pedals all sit after slightly bending the gas pedal. I bent it so it sat forward about an inch more than how it was untouched. I felt it gave the best feel for pedal operation this way and after comparing it to my brothers 91 bird, they sit identicle.
scooter
Supreme Member
close
Jan 31, 2026
- Join DateSep 1999
- LocationNJ
- Posts:4,353
- iTrader Positive Feedback100
- iTrader Feedback Score(11)
- Car92 Firebird
- Engine4.8 LR4
- TransmissionT56
- Axle/Gears3.45 9 Bolt
- Likes:722
- Liked:308 Times in 243 Posts
Quote: 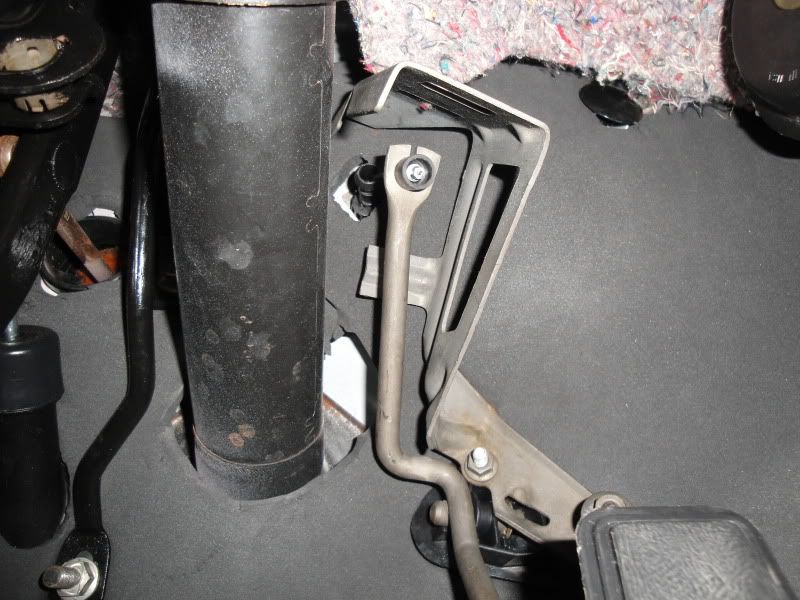
The inner cable is going to saw through the plastic of the outer cable with the angle of everything thereOriginally Posted by whitedevilTA
Quote:
I wondered about that too, but it's been done this way a lot of times before and I havn't heard people bring it up as a problem. Guess we'll find out. I don't want to cut a new hole in the firewall so I am going to leave it and try it for now. Plus, even if it saws through that long plastic part, it'll stop once it reaches the firewall since it's a lot thicker there. Maybe I'll just remove the long piece of plastic and see if that helps.Originally Posted by scooter
The inner cable is going to saw through the plastic of the outer cable with the angle of everything there FueledSoul
Supreme Member
close

Dec 7, 2024
I had to modify mine. Just weld a peace of metal on the side or cut the hole peace off and weld a whole new plate on then figure out where the cable will be pulled from mark and drill a hole then just use a cut off wheel at the top so you can slide the cable down to attach the plastic clip its simple.
But no matter how well you place it (even stock) when you push the pedal to the floor the cable is going to make contact at the bottom hole of the firewall...
But no matter how well you place it (even stock) when you push the pedal to the floor the cable is going to make contact at the bottom hole of the firewall...
Quote:
But no matter how well you place it (even stock) when you push the pedal to the floor the cable is going to make contact at the bottom hole of the firewall...
Hmmm...so what you're saying is to modify the pedal rather than the cable? Basically extend the top of the pedal rod so the cable has a "straighter" pull? That sounds like a good idea. I will be picking up a welder soon so thats def a possibility. I'm curious as to what others have done too. I put up a post in the LSx swap section so we'll see what others say!Originally Posted by FueledSoul
I had to modify mine. Just weld a peace of metal on the side or cut the hole peace off and weld a whole new plate on then figure out where the cable will be pulled from mark and drill a hole then just use a cut off wheel at the top so you can slide the cable down to attach the plastic clip its simple.But no matter how well you place it (even stock) when you push the pedal to the floor the cable is going to make contact at the bottom hole of the firewall...
Supreme Member
Imo just throw a foam sheath or something of that nature around the cable then it won't rub on the plastic.
scooter
Supreme Member
close
Jan 31, 2026
- Join DateSep 1999
- LocationNJ
- Posts:4,353
- iTrader Positive Feedback100
- iTrader Feedback Score(11)
- Car92 Firebird
- Engine4.8 LR4
- TransmissionT56
- Axle/Gears3.45 9 Bolt
- Likes:722
- Liked:308 Times in 243 Posts
Quote:
This is true, but stock the angle was less extreme since the firewall portion was molded to the proper angle. It probably wont be an "issue" but it is going to cut through eventually, depending on the tightness of the cable.Originally Posted by FueledSoul
But no matter how well you place it (even stock) when you push the pedal to the floor the cable is going to make contact at the bottom hole of the firewall... If it were me I would take the cable out, put a large long bolt through the hole, many washers under the head and on the nut side tughten up the nut and use the bolt to bend the firewall to the angle of the throttle cable. This wont cause you to need to repaint or weld or change anything really. Would just need to take the cable out temporarily.
I am just **** about stuff like that. I bought a Lokar cable for my 73 Camaro and the inner cable was rubbing the aluminum part where it connects to the bracket. I kept tweaking the bracket until the cable came out the center of the hole when the pedal was in the up position since it will be in that position for most of its life.
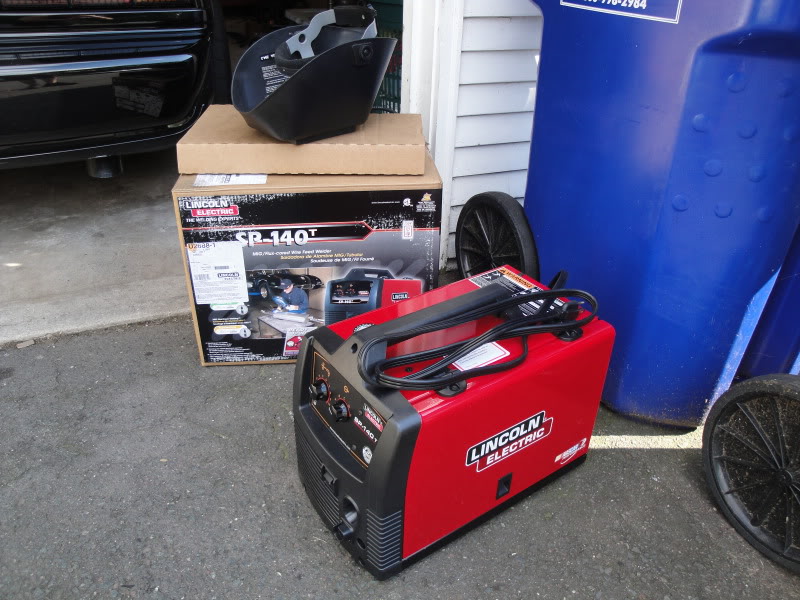
UPDATE! Not really on the car but on a MUCH needed tool purchase. Will have a nice new Lincoln SP140T MIG welder Friday afternoon! Now I can finally get some turbo piping fabbed up and mount that poor turbo thats been living in it's box for the past few months. Can't wait to test the new toy out!
Junior Member
Yaaahoooo!!!!!!!
Got the new welder today and I have to say, I am SO excited to finally get this project going again! I got this welder "new" off craigslist for $500. The guy won it in a contest and already had a more expensive welder so he put this one up for sale. I got if for a pretty good price I'd say for a brand new welder with the full warranty. He even threw in a mask and some replacement lenses he had kicking around. Worked on the car a bit too...mainly just getting the manifolds in place and thinking up how I'm going to be running all the piping. Heres a few pics...
There she is! Lincoln SP140T. Can be used with gas or flux core....I WILL be getting gas soon for the pipe welding.
This was my dads lawnmower deck where the bracket broke off the deck itself. He hasn't been able to cut the lawn with it for weeks, so me getting a welder was good news for him. BTW, this weld was done literally 5 minutes after I got the welder up and running....not the best...but it'll get better with practice!

Found two problem areas with the drivers side manifold. First is the rear bolt for the alternator bracket. It just SLIGHTLY hits the manifold, so I am going to shave a very small amount off the bolt head and it should fix it. Don't want to dent the piping for fitment because the area that contacts is right on a weld.
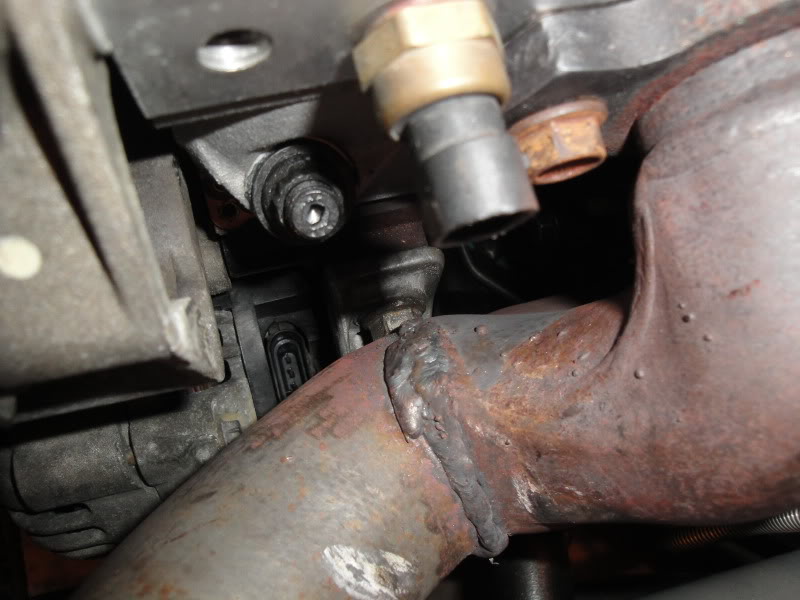
This is the other problem, but very easy to fix. The PS return line touches the pipe. I'm just going to hack some length off the metal portion of the return line which will draw the rubber hose away from the manifold.
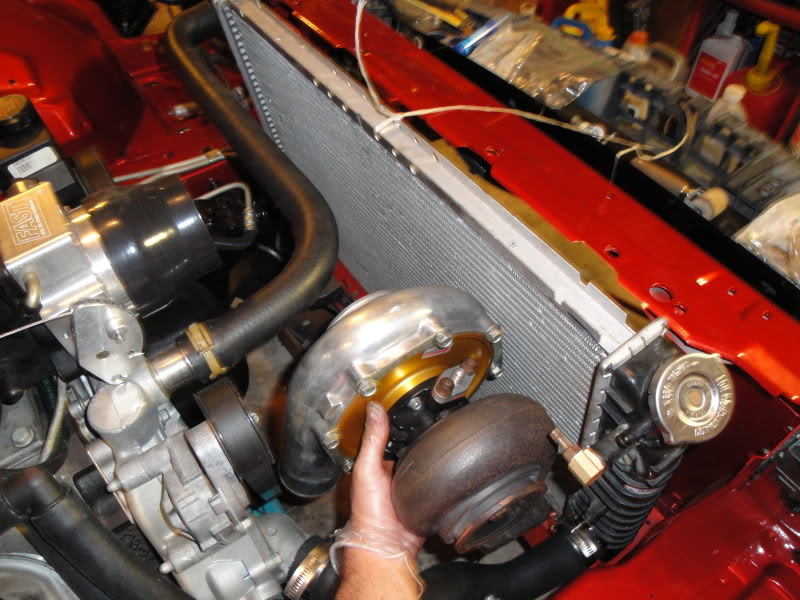
And this is where I have decided the turbo will sit (took some energy holding that baby with one hand while snapping the pic!!). Seems like in this position it offers the most room to run piping, and it will not melt anything from the hot side being too close to it. Only downside is I'll have to run a pusher fan in front of the radiator which generally don't work as well as pullers, but I'll do some research and see which ones are best.
There she is! Lincoln SP140T. Can be used with gas or flux core....I WILL be getting gas soon for the pipe welding.
This was my dads lawnmower deck where the bracket broke off the deck itself. He hasn't been able to cut the lawn with it for weeks, so me getting a welder was good news for him. BTW, this weld was done literally 5 minutes after I got the welder up and running....not the best...but it'll get better with practice!
Found two problem areas with the drivers side manifold. First is the rear bolt for the alternator bracket. It just SLIGHTLY hits the manifold, so I am going to shave a very small amount off the bolt head and it should fix it. Don't want to dent the piping for fitment because the area that contacts is right on a weld.
This is the other problem, but very easy to fix. The PS return line touches the pipe. I'm just going to hack some length off the metal portion of the return line which will draw the rubber hose away from the manifold.
And this is where I have decided the turbo will sit (took some energy holding that baby with one hand while snapping the pic!!). Seems like in this position it offers the most room to run piping, and it will not melt anything from the hot side being too close to it. Only downside is I'll have to run a pusher fan in front of the radiator which generally don't work as well as pullers, but I'll do some research and see which ones are best.
Supreme Member
Nitrile gloves? Pansy. 
Quote:
Baaah ha ha. You know whats funny? I never wear gloves, but I was going to be mounting and unmounting the manifolds a few times and they turn my hands BLACK. I figured, what the heck, I'll put gloves on this time. Glad you noticed! Originally Posted by puma1552
Nitrile gloves? Pansy. 
FueledSoul
Supreme Member
close
Dec 7, 2024
Quote:
Thos are like USDA gloves there not even Nitrile lolOriginally Posted by puma1552
Nitrile gloves? Pansy. 
Junior Member
nice man!
Played with the welder a little more today and got some piping laid out in the engine bay. Started doing the crossover pipe just to get some practice since originally I was just going to mock something up quick and then get all new piping to actually make it. Turns out I really like how this turned out so I think I'm going to keep this set up and make it work. Then later down the road, I'll upgrade to stainless tubular manifolds and a much nicer hot side set up. Anyways, heres a few pics. I need a T4 turbo flange and some tubing to progress from here but it's a start!
Hopefully the entire hotside will start to take shape within the next week....then turbo mount time!
Hopefully the entire hotside will start to take shape within the next week....then turbo mount time!
Supreme Member
Looks great so far!
Junior Member
Are you going to wrap the pipes with heat shielding?
Quote:
Yes...All hot side piping in the engine bay will be wrapped with the heat shielding. I want to keep the engine bay temps down as much as I can...plus keeping the heat in the pipes adds velocity to spool the turbo!Originally Posted by firebird_6645
Are you going to wrap the pipes with heat shielding? Junior Member
What upper rad hose did you end up using??? Looks good...
Quote:
It's a Dayco part #E71994. No idea what it's originally off of though...I just grabbed it from behind the counter and it worked out awesome.Originally Posted by gregriggan
What upper rad hose did you end up using??? Looks good... Junior Member
Quote:
Thanks. The one I ended up with did not end up back in the stock holder on the upper rad support like that.Originally Posted by whitedevilTA
It's a Dayco part #E71994. No idea what it's originally off of though...I just grabbed it from behind the counter and it worked out awesome. 
Senior Member
Quote:

!
Looks like someone stole my upper radiator hoseOriginally Posted by whitedevilTA
!


What are you going to be doing for crank case evac?
Quote:
What are you going to be doing for crank case evac?
I havn't really planned anything out yet to the T, but I will be running a catch can set up with lines to both valve covers and it will get vacuum from the intake pipe. Seems to work really well for a lot of guys with boosted set ups.Originally Posted by White'89
Looks like someone stole my upper radiator hoseWhat are you going to be doing for crank case evac?
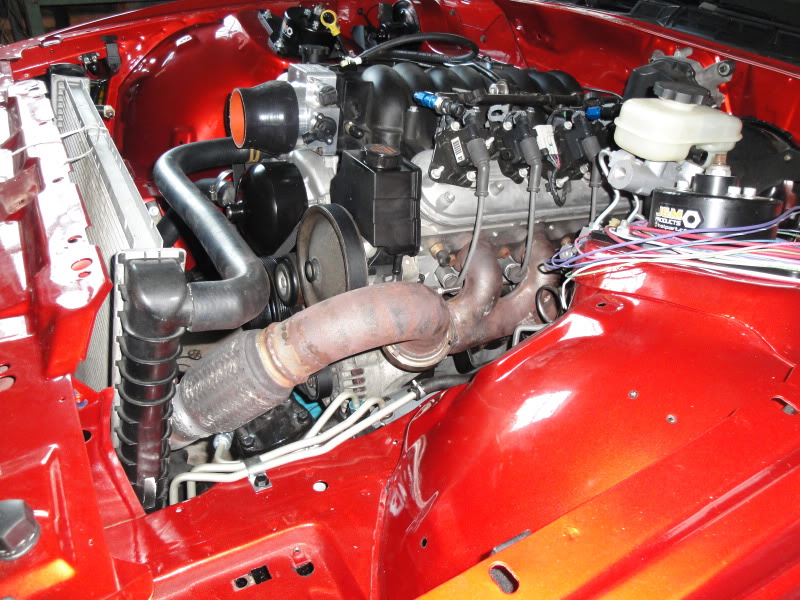
And yea, the upper hose couldn't be anymore perfect!!

Senior Member
YUP just went through all the pages.
Paint will hold up on the accesories
and dont you owe someone dinner
its looking amazing im doing the same to mine here in a few months except I have a 6.0 and 4l80e and im fabricating the whole front end with a rack setup
If I ever get back home to good old CT we will have to cruise
Paint will hold up on the accesories
and dont you owe someone dinner
its looking amazing im doing the same to mine here in a few months except I have a 6.0 and 4l80e and im fabricating the whole front end with a rack setup
If I ever get back home to good old CT we will have to cruise