
How to prep a 3rd gen harness


Senior Member
Joined: Sep 2007
Posts: 599
Likes: 1
From: Long Island, NY
Car: 1992 z28
Engine: 383 LT1 in the works
Transmission: T-56 in the works
Axle/Gears: 3.73 in the works
Re: How to prep a 3rd gen harness
The alternator is a Powermaster Delco CS-130 model.
http://www.jegs.com/i/Powermaster/713/47861/10002/-1
it says for OE style connector, i still have my 305 TPI alternator connector from when i broke down the harness. it connects right in and has a fused red wire and a black wire coming out of it. Do i simply ground the black wire and then hook the red to battery or power distribution block?
if not and i need a new connector do you know what kind?
Senior Member
iTrader: (7)
Joined: Dec 2007
Posts: 618
Likes: 0
From: Williamstown, NJ
Car: '98 Mustang GT
Engine: '03 4.6L
Transmission: T45
Axle/Gears: DK
Re: How to prep a 3rd gen harness
On the 3rd gen C100 connector, the F4 Pink wire is used? This wire was cut really short. I've been trying to remove the pin from C100, but I can not get it out to solder it.
Senior Member
iTrader: (7)
Joined: Dec 2007
Posts: 618
Likes: 0
From: Williamstown, NJ
Car: '98 Mustang GT
Engine: '03 4.6L
Transmission: T45
Axle/Gears: DK
Re: How to prep a 3rd gen harness
Problem is that I was following this thread on camaroz28.com. It has pin F4 as Pink/Black N/A. The link is below.
http://www.camaroz28.com/forums/showthread.php?t=474185
http://www.camaroz28.com/forums/showthread.php?t=474185
Senior Member
Joined: Sep 2007
Posts: 599
Likes: 1
From: Long Island, NY
Car: 1992 z28
Engine: 383 LT1 in the works
Transmission: T-56 in the works
Axle/Gears: 3.73 in the works
Re: How to prep a 3rd gen harness
is there any way you can get a butt connector and crimp it on? Even if wires are not to be used try to cut them with some length just in case you ever need to go back. Check a few posts above but i think Pocket posted a link for depinning a C100 which may help.
Thread Starter
Joined: Jun 2005
Posts: 8,122
Likes: 362
From: NC
Car: 91 Trans Am
Re: How to prep a 3rd gen harness
Check over this thread for repairing the C100 or cut wires
https://www.thirdgen.org/forums/elec...ctor-info.html
F4 is used in most swaps
https://www.thirdgen.org/forums/elec...ctor-info.html
F4 is used in most swaps
Senior Member
iTrader: (7)
Joined: Dec 2007
Posts: 618
Likes: 0
From: Williamstown, NJ
Car: '98 Mustang GT
Engine: '03 4.6L
Transmission: T45
Axle/Gears: DK
Re: How to prep a 3rd gen harness
Check over this thread for repairing the C100 or cut wires
https://www.thirdgen.org/forums/elec...ctor-info.html
F4 is used in most swaps
https://www.thirdgen.org/forums/elec...ctor-info.html
F4 is used in most swaps

 This picture explains it all. I did not know this was holding them in there. I did do a lot of thread searching before hand. I agree that F4 is used, but I am not sure why the other thread (camaroz28.com) had F4 as not applicable. Sometimes too much searching ends up having me more confused. LOL
 Supreme Member
iTrader: (4)
Joined: Mar 2009
Posts: 3,079
Likes: 4
From: Pepperell, MA
Car: 1987 Trans Am
Engine: LQ9/L92
Transmission: 4L60E
Re: How to prep a 3rd gen harness
the problem you run into is that the C100 is different almost every year and between both of the body styles. after searching for weeks, I finally gave up trying to find my pinout (87 TA w/ carbed 5.0) and bought the factory manual from one of the other members on this board (thanks JamesC!).

Member
Joined: Apr 2006
Posts: 122
Likes: 0
Re: How to prep a 3rd gen harness
Ok i haven't fully read everyone's thread reply's but im in the process of rummaging through the driver side harness.. Now the c207 connector for the fuses, What am i goin to have to do with that??
Member
Joined: Apr 2006
Posts: 122
Likes: 0
Re: How to prep a 3rd gen harness
So does this apply even if im putting an old engine thats carbuerated and using no computer what so ever, im removing all the wires on the passenger side, but seems that a ground wire goes from c100 to passenger side, haven't ran than wire down but, jus wondering if i need that c207 connector to use my original fuel pump and gauges etc.
Thread Starter
Joined: Jun 2005
Posts: 8,122
Likes: 362
From: NC
Car: 91 Trans Am
Re: How to prep a 3rd gen harness
Same process for carb cars. Knowing what wires are where is year dependent and some stuff like speedo is engine dependent
Look up the pinout for your year and print it off. Mark off what goes and what stays, then go from there
Look up the pinout for your year and print it off. Mark off what goes and what stays, then go from there
Junior Member
iTrader: (1)
Joined: Jul 2009
Posts: 29
Likes: 0
From: Melbourne Fl
Car: 89 z
Engine: 96 350 HSR vortec
Transmission: 700R4 24-2800 BDR stall
Axle/Gears: 9 bolt disc posi w/3.45
Re: How to prep a 3rd gen harness
OMG!!!Ive been searching for this info for over a year now!!!You guys kick ace!!!!


Thread Starter
Joined: Jun 2005
Posts: 8,122
Likes: 362
From: NC
Car: 91 Trans Am
Re: How to prep a 3rd gen harness
Fan and fuel. That particular harness also had an AC relay but was to be mounted on the HVAC box
Dual fan cars will have 3 relays grouped instead of two
Dual fan cars will have 3 relays grouped instead of two

Joined: Sep 2005
Posts: 6,258
Likes: 6
From: O'Fallon, MO
Car: 1991 Z28 convertible built 3/1/1990
Engine: Cammed 6.0L LSX
Transmission: T56
Axle/Gears: custom Ford 8.8", 4.10 gears
Re: How to prep a 3rd gen harness
They would be those big bulky relays that mount on a metal clip by the brake booster. If dual electric fans, you have three relays because one is the fuel pump. Otherwise there would only be two relays. I wish I had a photo handy, but any stock car would still have them on the firewall by the booster.
Senior Member
Joined: Sep 2007
Posts: 599
Likes: 1
From: Long Island, NY
Car: 1992 z28
Engine: 383 LT1 in the works
Transmission: T-56 in the works
Axle/Gears: 3.73 in the works
Re: How to prep a 3rd gen harness
its a little black rectangular looking thing with a mounting clip. there are only 3 (if you have dual fans) in your entire harness so should be easy to find.
Senior Member
Joined: Sep 2007
Posts: 599
Likes: 1
From: Long Island, NY
Car: 1992 z28
Engine: 383 LT1 in the works
Transmission: T-56 in the works
Axle/Gears: 3.73 in the works
Re: How to prep a 3rd gen harness
Pocket - i am starting to try and wire my autometer gauges and i feel like A LOT of what i did to join the C100 to the stand alone was not needed. everything you discuss above is so you CAN use the factory gauge panel correct?
for example:
- I dont get why i am plugging the WHITE IGN coil wire from the C100 to the white tach wire on my stand along harness. should the white tach wire just go to the autometer gauge? why do i need to hook the WHITE IGN wire to the tach wire?
- why does the GRN/WHITE speedo wire from my stand alone go to C207? Why cant i just not wire this directly to the autometer speedometer?
since i already have everything wired i guess i can just use some T-connector to tap into the wires i need and the plugs that connect into the factory gauge cluster will just be left disconnected. Please help. i am knee deep in wiring and feel like everything is way screwed up right now.
Thread Starter
Joined: Jun 2005
Posts: 8,122
Likes: 362
From: NC
Car: 91 Trans Am
Re: How to prep a 3rd gen harness
The C100/C207 are the body connection points. All of your gauge/fuse wires go through one of those. Theres nothing stopping you from running a wire directly to your new gauges, it just wont be as simple to remove if you are working in the dash, or removing the engine
Senior Member
iTrader: (7)
Joined: Dec 2007
Posts: 618
Likes: 0
From: Williamstown, NJ
Car: '98 Mustang GT
Engine: '03 4.6L
Transmission: T45
Axle/Gears: DK
Re: How to prep a 3rd gen harness
I trying to figure out where a few wires go. One wire goes to pin 10 of the red LT1 pcm connector. The other end of the wire I have going to the fan relay, but it has a splice in it w/ another wire, which was cut off and I have no idea where it goes. The same goes for the wire going to pin 11 of the red Lt1 pcm connector. I have the other end going to my other fan relay, but there is a splice in it. The wiring diagram for a '95 LT1 shows 3 fan relays. I'm not using air cond. and only have two fan relays in my Caprice relay box. Any help/suggestion/info. is appreciated.
Member
iTrader: (1)
Joined: Apr 2004
Posts: 351
Likes: 1
From: Carrollton, Texas - Dallas area
Car: 1992 Z28
Engine: Forged LS3
Transmission: T56 stage 2 clutch
Axle/Gears: 35 spline with 3.55 gears

Junior Member
Joined: Nov 2010
Posts: 4
Likes: 0
From: Kenosha, Wi
Car: 84 berlinetta
Engine: mod 305
Transmission: m5 i think
Axle/Gears: stock
Re: How to prep a 3rd gen harness
hey pocket you probly get botherd alot about this thread .just wondering though, can i do this with my 84 berlinetta 305 4brl with mech fuel pump.i am only running the alt dist and lights . got alot of extra wires hangin around that i wanna get rid of. could you help me out ?

Senior Member
iTrader: (8)
Joined: Sep 2010
Posts: 732
Likes: 0
From: Cincinnati, Ohio
Car: '89 GTA
Engine: 5.7L LS1
Transmission: 4L60E
Axle/Gears: 9 bolt 3.27
Re: How to prep a 3rd gen harness
Just curious because all I have seen so far is about 90-92 cars....I have an '89 GTA which I am about to begin the process of swapping a camaro ls1 into, am I going to follow this guide as its laid out?
Thread Starter
Joined: Jun 2005
Posts: 8,122
Likes: 362
From: NC
Car: 91 Trans Am
Re: How to prep a 3rd gen harness
https://www.thirdgen.org/forums/ltx-...formation.html
Check your pinout and go from there. Most pin locations moved from 82-92 so not everything will be exactly as posted in this thread. A few staysed put 100% like the main 12v pair, main IGN, tach, oil, coolant gauge, PCM fuse, OBDI ALDL C207 pins
EX: 89 has the wipers in the engine harness that must be worked around and the alt/coolant fan relay fuse at C207 pin D. Camaros were mech speedo and birds all used the buffer box at C207 pin K. That means you need a runner wire from your fan relays (and alt for LTx) to the C27 instead of the short run to the C100 for 90-92 cars
Senior Member
iTrader: (8)
Joined: Sep 2010
Posts: 732
Likes: 0
From: Cincinnati, Ohio
Car: '89 GTA
Engine: 5.7L LS1
Transmission: 4L60E
Axle/Gears: 9 bolt 3.27
Re: How to prep a 3rd gen harness
Edit: dumb question. However I followed the guide and it definitely works! Now for phase 2 
Last edited by White'89; Nov 25, 2010 at 11:27 PM.
Junior Member
iTrader: (4)
Joined: Apr 2005
Posts: 35
Likes: 0
From: Wasilla, Alaska
Car: 92 Z28
Engine: L76 in the works.....
Transmission: T56
Axle/Gears: 3:73
Re: How to prep a 3rd gen harness
I just picked up a car I'm going to rob the engine harness from. It's a v6 Firebird with the single fan. What am I going to have to do to wire in the dual fans for my Camaro? It's a 91 bird and it's going into a 92 Z28. I plan on going to the local electronics store and getting a custom fuse/relay box to mount under the bumper cover.
This is a great thread!
This is a great thread!
Thread Starter
Joined: Jun 2005
Posts: 8,122
Likes: 362
From: NC
Car: 91 Trans Am
Re: How to prep a 3rd gen harness
90-92's have ample fuses in place already, dont bother getting an extra one
Upgrading a single fan harness to dual fans requires a relay and fan connector. Tee the brn wires together and run the dk grn/wht wire to the PCM as FAN 2 trigger. Red is 12v in, blk/red is 12v to fan
Upgrading a single fan harness to dual fans requires a relay and fan connector. Tee the brn wires together and run the dk grn/wht wire to the PCM as FAN 2 trigger. Red is 12v in, blk/red is 12v to fan
Junior Member
iTrader: (4)
Joined: Apr 2005
Posts: 35
Likes: 0
From: Wasilla, Alaska
Car: 92 Z28
Engine: L76 in the works.....
Transmission: T56
Axle/Gears: 3:73
Re: How to prep a 3rd gen harness
90-92's have ample fuses in place already, dont bother getting an extra one
Upgrading a single fan harness to dual fans requires a relay and fan connector. Tee the brn wires together and run the dk grn/wht wire to the PCM as FAN 2 trigger. Red is 12v in, blk/red is 12v to fan
Upgrading a single fan harness to dual fans requires a relay and fan connector. Tee the brn wires together and run the dk grn/wht wire to the PCM as FAN 2 trigger. Red is 12v in, blk/red is 12v to fan

Joined: Oct 2007
Posts: 1,375
Likes: 6
From: Wyoming
Car: 1995 Formula
Engine: LT1 350
Transmission: Built 4L60e
Axle/Gears: 10 bolt, Eaton posi, 3.73's
QUESTION Please Help
To Pocket or anyone who knows:
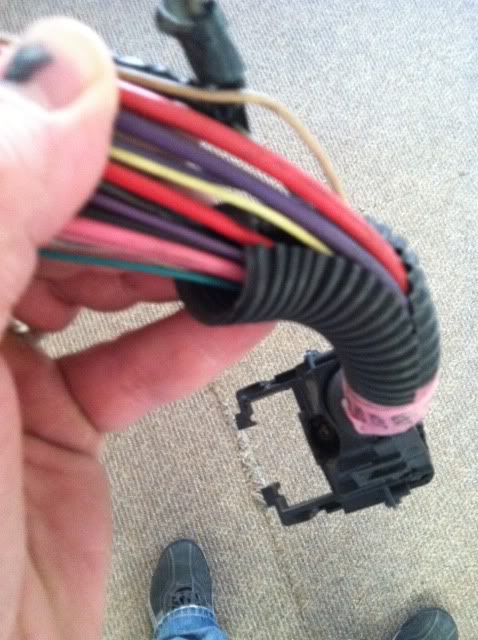
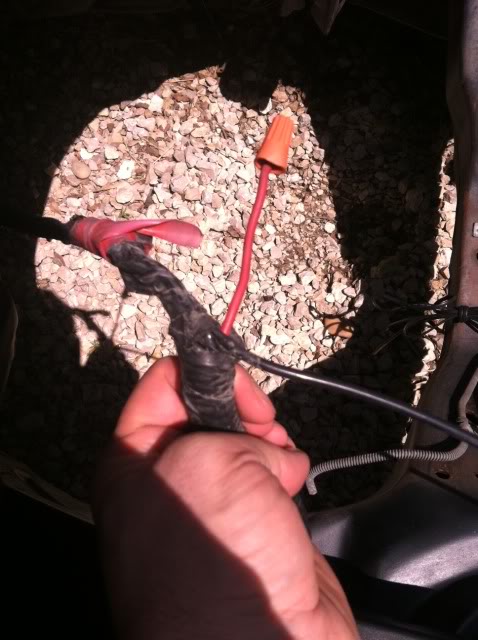
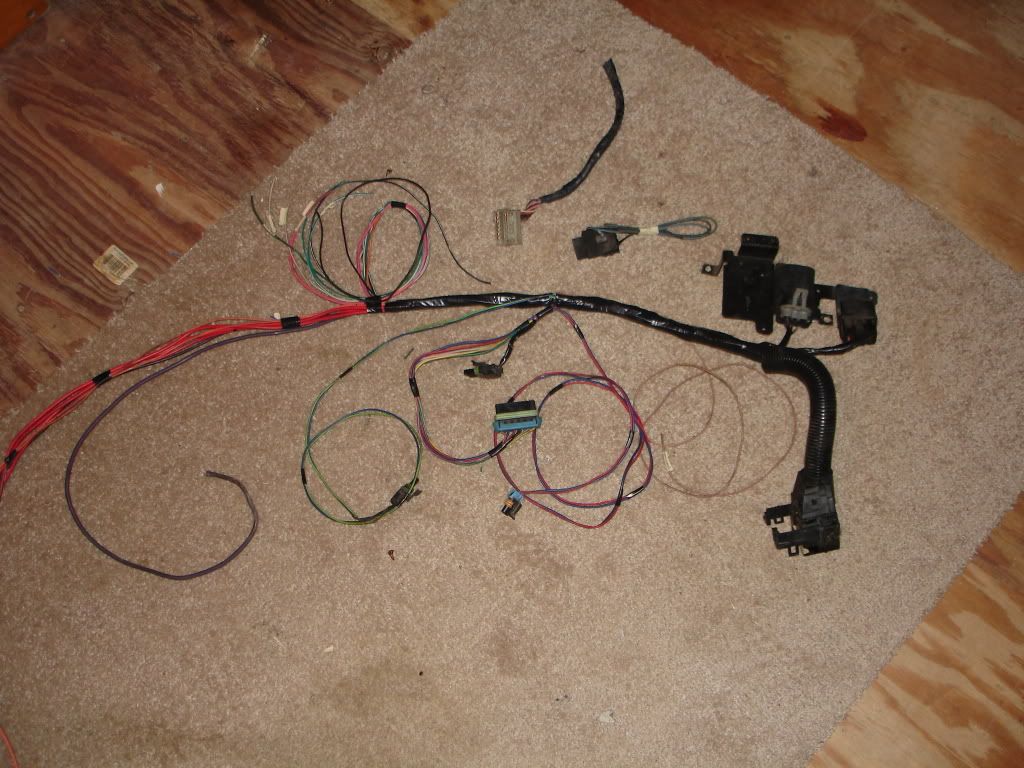
From the large C-plug that plugs into the firewall, there is a thick red wire, a smaller red wire, and a smaller pink wire, as seen in Pic #1. Which of these three, if any, goes to the HVAC blower motor wire that is in the separate HVAC harness that is shown in Pic #2?
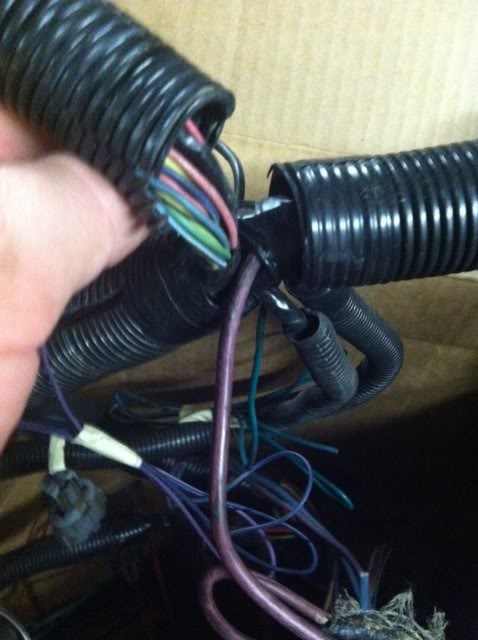
There should be a thick red or pink wire coming out of my LT1 swap harness, from the same place that the purple starter wire comes out of the loom (Pic #3), but there isn't. In my old tpi harness, a reddish wire came out of the loom (by the purple starter wire) and connected right to the wire shown in Pic #2, but I do not know if the wire came from the C-plug or from somewhere else.
I have always wondered where that power wire for the blower motor originates he he he.
Thanks!!
Pic #1
Pic #2
Pic #3
From the large C-plug that plugs into the firewall, there is a thick red wire, a smaller red wire, and a smaller pink wire, as seen in Pic #1. Which of these three, if any, goes to the HVAC blower motor wire that is in the separate HVAC harness that is shown in Pic #2?
There should be a thick red or pink wire coming out of my LT1 swap harness, from the same place that the purple starter wire comes out of the loom (Pic #3), but there isn't. In my old tpi harness, a reddish wire came out of the loom (by the purple starter wire) and connected right to the wire shown in Pic #2, but I do not know if the wire came from the C-plug or from somewhere else.
I have always wondered where that power wire for the blower motor originates he he he.
Thanks!!
Pic #1
Pic #2
Pic #3
Last edited by New2Chevy; Jun 21, 2011 at 08:52 PM.
Thread Starter
Joined: Jun 2005
Posts: 8,122
Likes: 362
From: NC
Car: 91 Trans Am
Re: How to prep a 3rd gen harness
Stock it pulls off a fusible link from the starter and is joined with the coolant fan fusible link. Same ring terminal for some reason, some harnesses join it at the same fusible link. Neither are fun to work with
I tee them into the fan relay 12v wire inside the harness. You can run a fresh 12ga wire from the power dist block to feed the blower motor. Some of my older harnesses didnt have this, which I suspect is why its not sticking out and obvious
I tee them into the fan relay 12v wire inside the harness. You can run a fresh 12ga wire from the power dist block to feed the blower motor. Some of my older harnesses didnt have this, which I suspect is why its not sticking out and obvious
Joined: Oct 2007
Posts: 1,375
Likes: 6
From: Wyoming
Car: 1995 Formula
Engine: LT1 350
Transmission: Built 4L60e
Axle/Gears: 10 bolt, Eaton posi, 3.73's
Re: How to prep a 3rd gen harness
Thanks Pocket. So, you're saying that there is a wire coming from the COOLING FAN relay on the LT1 harness you made for me?
And I don't understand what a fusible link is, not that it really matters I guess.
And I don't understand what a fusible link is, not that it really matters I guess.
Last edited by New2Chevy; Jun 21, 2011 at 10:28 PM.

Junior Member
Joined: Apr 2011
Posts: 6
Likes: 0
From: leland nc
Car: 89 rs
Engine: 1968 355
Transmission: th350
Axle/Gears: 3.42
Re: How to prep a 3rd gen harness
I have an 89 rs i bought minus the engine, trans, driveshaft, wheels, with the addition of a lot of body work. the car came with a 2.8. I have a 1968 350 with an edelbrock eps intake, Holley 600, accel super hei dist, z71 high torque starter, and a th350 trans. the Guy I bought the car from was the original owner but sold it to an old man. I was told the old man sat a 350 in it but past away before he could finish. the harness has been altered so I'm sort of picking up were he left off. I'm going with the bare bones approach with the goal of putting the car on the street so your race car harness looks alot like what I have now I haven't touched the harness any help would be appreciated, maybe point me in the right direction. the engine and trans are not in the car yet.
Thread Starter
Joined: Jun 2005
Posts: 8,122
Likes: 362
From: NC
Car: 91 Trans Am
Re: How to prep a 3rd gen harness
Pull the harness out and trace each wire. Find the gauge wires and hook them up accordingly. Trace the power wires and make sure they're run properly. Not much to it really
Junior Member
Joined: Apr 2011
Posts: 6
Likes: 0
From: leland nc
Car: 89 rs
Engine: 1968 355
Transmission: th350
Axle/Gears: 3.42
Re: How to prep a 3rd gen harness
thanks. i know that the two red wires w fuseable links are main power wires and the pink wire is dist, and the purple is the starter but does that go to the starter or to the batt first? plus I'm unsure about the alternator. other than the wires I just mentioned all I have is the wiper motor plug and a two wire plug that has a red and a blue wire. the rest are lights and one plug that goes to my brake line thing (im unsure what its called) there isn't even a plug to my steering box on one of the lines. there's a bunch of wires that have been cut at the firewall.
Thread Starter
Joined: Jun 2005
Posts: 8,122
Likes: 362
From: NC
Car: 91 Trans Am
Re: How to prep a 3rd gen harness
Ppl starter wire goes to the small lug on the starter solenoid
Alt has two wires, heavy red get battery 12v, brn or tan/wht wire gets 12v IGn off the fan fuse. Its spliced in with the 12v trigger of the fan relays
Wiper wiring doesnt change at all. Red/blue connector is the washer pump
Brake warning switch, sets off the brake dummy light in case your brake pressure drops below a certain point
PS switch bumps idle up when you turn the wheels too far at low RPM conditions so the engine doesnt stall. The switch is not mandatory to run and there isnt a good way to incorporate it into a carb system
Junior Member
Joined: Apr 2011
Posts: 6
Likes: 0
From: leland nc
Car: 89 rs
Engine: 1968 355
Transmission: th350
Axle/Gears: 3.42
Re: How to prep a 3rd gen harness
thanks pocket you helped me out greatly.don't know what this message board would do without you. my next question is what kind of headers should I use. i bought a set from flow tech and they said they were direct fit but obviously they never checked the fitment because on the passenger side the outlet is at the wrong angle w the firewall because I can't pipe to it and the driver side hits the oil filter and steering sector.
tech and they said they were direct fit but obviously they never checked the fitment because on the passenger side the outlet is at the wrong angle w the firewall because I can't pipe to it and the driver side hits the oil filter and steering sector. 
Member
Joined: May 2011
Posts: 286
Likes: 0
From: Andalusia, AL
Car: 1991 Camaro RS
Axle/Gears: Stock
Re: How to prep a 3rd gen harness

Same again except the brake switch wire is missing and the reverse lights connector is present
The three connections regardless of year or swap type(except carb, then no connections are needed)
could you go over the "connections step" in greater detail? thanks pocket
Thread Starter
Joined: Jun 2005
Posts: 8,122
Likes: 362
From: NC
Car: 91 Trans Am
Re: How to prep a 3rd gen harness
From the C100 you connect all the powers, a few grounds, gauge wires and relays
From the C207 you connect a handful of gauge wires, fuse wires and other misc stuff
From the HVAC connector you give it 12v grd and AC request
From the C207 you connect a handful of gauge wires, fuse wires and other misc stuff
From the HVAC connector you give it 12v grd and AC request
Member
Joined: May 2011
Posts: 286
Likes: 0
From: Andalusia, AL
Car: 1991 Camaro RS
Axle/Gears: Stock
Re: How to prep a 3rd gen harness
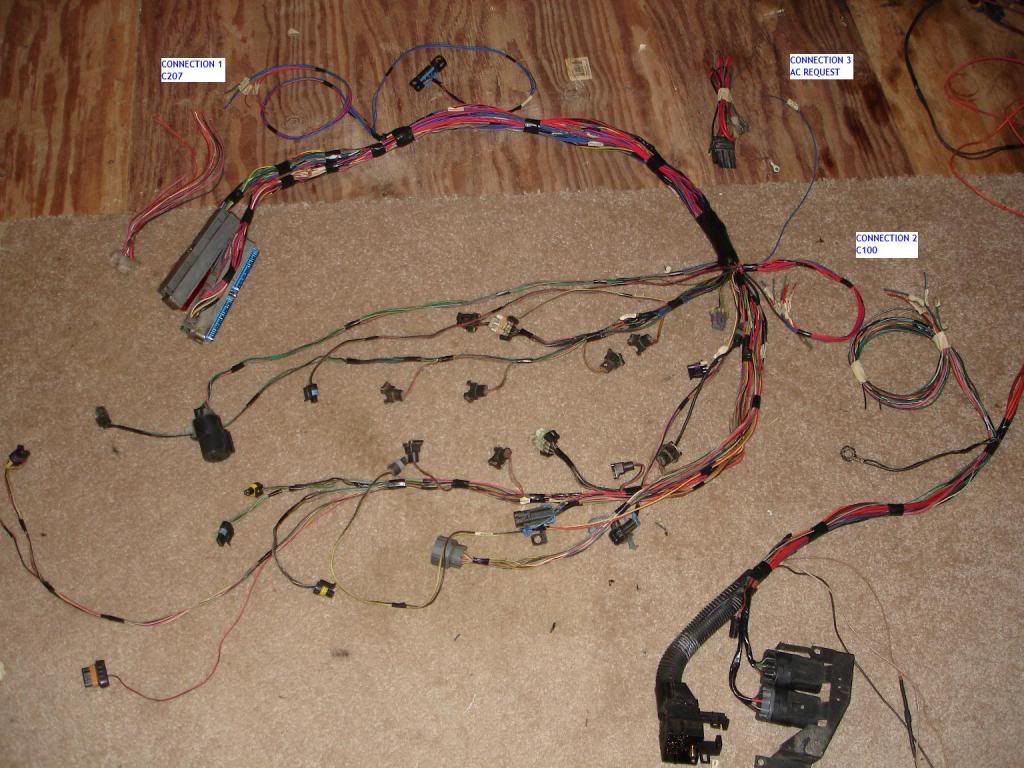
This is what the end result should look like cleaned up and ready to install. The difference between auto and manual is in the rev lights and brake switch. Match your harness to your original trans type
90-92 Auto
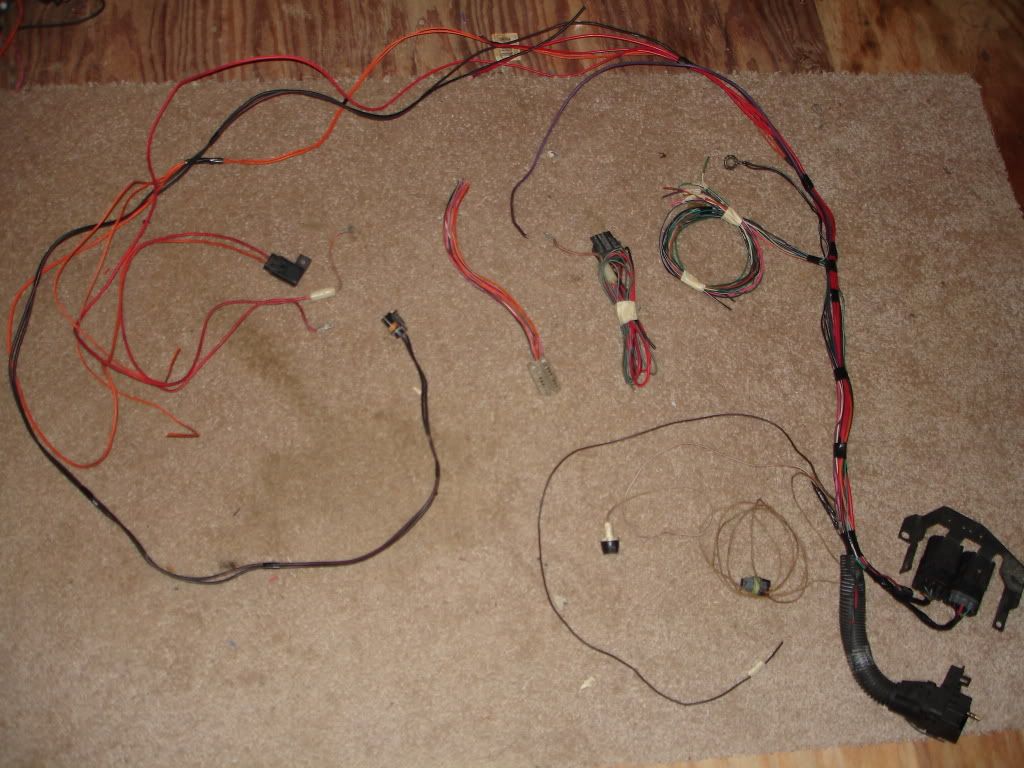
Starting lower right and coming around
C100 and relay center. Single fan and fuel pump relay. Dual fan cars will have 3 relays
Brake warning switch
Oil pressure switch
Long brown lead went to the 3rd gen alt. To upgrade to dual fans, splice the brown wire to this lead and run an additional wire to the coil to be connected to the new harness
Coil of leads gets connected to the new harness
Purple starter solenoid wire
Orange and red wires go to the power dist block. The orange wire is connected to an inline fuse holder which powers the PCM constant 12v and fuel pump
End of the trail is the fan connector
The two loose connectors are the HVAC and C207. Non AC swaps simply connect the red to the power dist block and black to ground. AC swaps hook the LT GRN or LT BLU wire to R17 in the swap harness
89 auto

Much the same
Notice the 3 additional connectors for wiper/washer control
The fan fuse is ran through the C207, so that'll have to be lengthened to install this harness
89 manual
Same again except the brake switch wire is missing and the reverse lights connector is present
The three connections regardless of year or swap type(except carb, then no connections are needed)
Once these are done, the harness is 100% plug and play as far as engine wiring is concerned
Auto to T56 will require dash wiring modifications for reverse lights, clutch switch and park/neutral. TBI and pre-90 cars with the VSS buffer box will require speedo changes at the buffer connector. All VATS equipped cars will have to bypass the starter relay behind the drivers kick panel. Either connect the two heavy wires or ground the BLK/YEL wire. Grounding the BLK/YEL wire via hidden toggle switch is a good owner anti-theft method
90-92 Auto
Starting lower right and coming around
C100 and relay center. Single fan and fuel pump relay. Dual fan cars will have 3 relays
Brake warning switch
Oil pressure switch
Long brown lead went to the 3rd gen alt. To upgrade to dual fans, splice the brown wire to this lead and run an additional wire to the coil to be connected to the new harness
Coil of leads gets connected to the new harness
Purple starter solenoid wire
Orange and red wires go to the power dist block. The orange wire is connected to an inline fuse holder which powers the PCM constant 12v and fuel pump
End of the trail is the fan connector
The two loose connectors are the HVAC and C207. Non AC swaps simply connect the red to the power dist block and black to ground. AC swaps hook the LT GRN or LT BLU wire to R17 in the swap harness
89 auto
Much the same
Notice the 3 additional connectors for wiper/washer control
The fan fuse is ran through the C207, so that'll have to be lengthened to install this harness
89 manual
Same again except the brake switch wire is missing and the reverse lights connector is present
The three connections regardless of year or swap type(except carb, then no connections are needed)
Once these are done, the harness is 100% plug and play as far as engine wiring is concerned
Auto to T56 will require dash wiring modifications for reverse lights, clutch switch and park/neutral. TBI and pre-90 cars with the VSS buffer box will require speedo changes at the buffer connector. All VATS equipped cars will have to bypass the starter relay behind the drivers kick panel. Either connect the two heavy wires or ground the BLK/YEL wire. Grounding the BLK/YEL wire via hidden toggle switch is a good owner anti-theft method
Junior Member
iTrader: (4)
Joined: Apr 2005
Posts: 35
Likes: 0
From: Wasilla, Alaska
Car: 92 Z28
Engine: L76 in the works.....
Transmission: T56
Axle/Gears: 3:73
Re: How to prep a 3rd gen harness
 ) So whats it for?
Thanks
Thread Starter
Joined: Jun 2005
Posts: 8,122
Likes: 362
From: NC
Car: 91 Trans Am
Re: How to prep a 3rd gen harness
Fan, fuel, AC
If you had to put an AC delete box on it, then it originally came with AC and would have the compressor clutch relay
Wires and colors should be these for V6/TBI single fan cars:
Fan:
12ga BLK/RED 12v to fan motor
12ga RED 12v battery
18ga BRN 12v fan/alt fuse
18ga DK GRN/WHT ECM grd
Fuel:
16ga GRY 12v to pump
16ga ORN fused 12v battery
18ga DK GRN/WHT ECM 12v
18ga BLK/WHT grd
AC:
18ga DK GRN 12v to clutch
18ga LT GRN/BLK HVAC 12v IGN
18ga PNK/BLK 12v IGN, gauges fuse
18ga DK GRN/WHT ECM grd
Colors are correct for 90-92 cars. Older cars sometimes changed colors on some things like pump wire went from GRY to TAN/WHT, same for the fan fuse. Functions are the same