

I've been experiencing an intermittent idle problem on my TPI engine. Occasionally on startup it doesn't want to fire unless I crack the throttle open a bit and then it will die if I take my foot off to let it idle. This lasts between a few seconds up to a minute or so; after that all is well. It happens every 1 in 10 starts or so and seems to be tied to the engine being cold (but not always). When it starts normally I don't have to touch the throttle, it fires in a couple of seconds at most, and idles just fine
I'm purely guessing it might be related to the IAC possibly sticking (closed?) Any thoughts, things to check on, or suggestions would be greatly appreciated!
-Tim-
------------------
'88 IROC that looks suspiciously like a Jeep.
It's like a 3rd-gen with the aerodynamics of a brick but that'll go about anywhere!
Engine: 383 TPI, Vortec heads, ported plenum, runners, and highly modified base. 1.5:1 roller rockers, comp X4258HR cam.
I'm purely guessing it might be related to the IAC possibly sticking (closed?) Any thoughts, things to check on, or suggestions would be greatly appreciated!
-Tim-
------------------
'88 IROC that looks suspiciously like a Jeep.
It's like a 3rd-gen with the aerodynamics of a brick but that'll go about anywhere!
Engine: 383 TPI, Vortec heads, ported plenum, runners, and highly modified base. 1.5:1 roller rockers, comp X4258HR cam.


IROC,
I would agree that the IAC would be a good place to start. You can remove the IAC and service it. Work the pintle out of the stepper motor rack gears by gently pulling in the tapered stopper while wobbling the pintle side-to-side. Clean the pintle and air passages in the throttle body with carb cleaner. Apply one drop of light oil to the pintle worm gear, then work the pintle back into the IAC stepper by gently pressing on it while wobbling it back and forth until it is fully retracted. Replace the IAC in the clean throttle body, then proceed with setting the TPS and minimum air position.
Here's a short procedure:
Throttle Position Sensor (TPS)
Tools needed:
1. Digital Volt-Ohm-Meter (VOM)
2. Breakout jumper wires or probes (make your own)
3. AutoXray, Diacom, or similar scanner will replace the VOM and jumper wires.
Turn on ignition, but don't start the engine.
With a diagnostic scanner: plug in the scanner and read the TPS voltage. It should be 0.54Volts +/- 0.07 VDC.
Connect the VOM to the TPS electrical connector terminals ‘A' and ‘B'.
With a breakout jumper: Disconnect the electrical connector from the TPS. Install the breakout in-line, between the TPS and wiring harness connector. Connect the meter probes to terminals 'A' and 'B' on the connector. (‘B' is the positive connection, ‘A' the signal ground, or negative.)
With probes: If you have very slender probes on your VOM, you can back-probe the TPS connector while it is attached to the TPS. If you have made probes of large dressmakers pins or a similar item, you can back-probe the connector as well. Connect the meter probes to terminals 'A' and 'B' on the connector.
Turn on the ignition to read the TPS output voltage at the idle position. The reading should be 0.54VDC +/- 0.07VDC. The ideal is the center of the range, 0.54VDC for a stock engine. To adjust the output voltage, loosen the two Torx screws holding the TPS to the throttle body, and slightly rotate the TPS up or down, reading the voltage until it comes into specification. Tighten screws. Using the throttle lever, rotate the throttle to WOT (wide open throttle). The TPS voltage should be over 4.0 volts. Close the throttle again, and then slowly open it to WOT, observing the voltage reading. It should increase progressively and in a linear fashion. If it sticks or jumps or falls off at all while doing this check, the TPS sensor may be failing and could be a cause of stumbling and driveability problems.
After achieving the desired setting, turn off the ignition switch. Remove all jumpers or the scanner and reconnect the TPS connector as required.
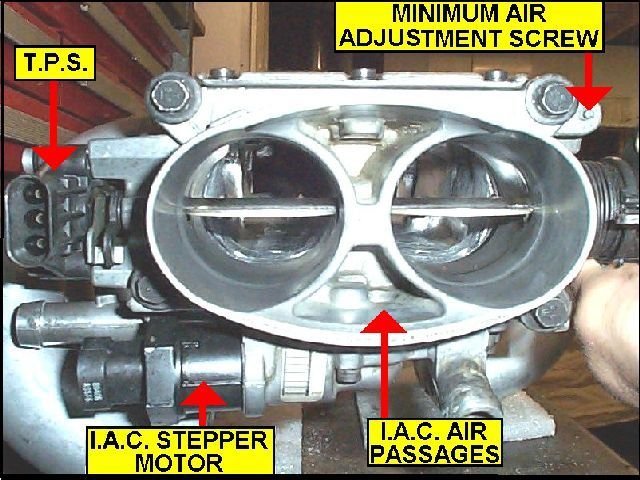
Throttle Minimum Air Position
Tools needed:
1. Torx driver # T-20
2. Paper Clip
3. Small Punch
4. Tachometer
GENERAL NOTE: The engine should be at normal operating temperature before performing any adjustments. Never rely on the dash mounted instruments for diagnostics and adjustments. The oil pressure and temperature gauges and the voltmeter and tachometer just aren't calibrated accurately enough for diagnosis, but are a relative indication for monitoring the vehicle while driving.
For this adjustment, the transmission will be in DRIVE while you're under the hood. You will need to securely set the parking brake and block the drive wheels. It would also be a good idea to have an assistant hold the service brake while you perform the adjustments.
In order to successfully complete the adjustment, the IAC air passages and pintle need to be clean. The throttle plates and bores need to be clean as well. If this is not the case, you'll need to remove the air cleaner from TBI engines or the intake air bellows from TPI engines to gain access to the area to be cleaned. A spray-type carburetor cleaner works well for this. Cleaning the IAC passages on a TPI/MAF engine will set a DTC, but we'll be clearing that later. With the engine idling, direct the spray cleaner in to the IAC air passages and around the throttle plates. Shut off the engine and continue cleaning the throttle plates by opening the throttle manually. Once everything is satisfactorily cleaned, replace the air bellows on TPI engines. Many times, this alone can solve IAC/idle speed problems.
Cut and form a paper clip into a "U" shape. Insert the clip ends into the ALDL in the 'A' and 'B' sockets. Turn on the ignition, but don't start the engine. This will force the ECM into its diagnostic mode. Wait 30 seconds to allow the IAC pintle to fully extend. Under the hood, remove the electrical connector from the IAC, then turn off the ignition and remove the paper clip jumper from the ALDL. With the IAC pintle fully extended (closed) all idle air will be controlled by the position of the throttle plates.
Locate the Torx screw on the left side of the throttle body. It may be equipped with a protective metal cap from the factory. This was intended to discourage adjustment. If the cap is present, use a small punch to knock it out. Once the screw is accessible, start the engine and place the transmission in DRIVE. Adjust the throttle stop to obtain 450-500 RPM with the transmission in "DRIVE", rotating the Torx screw clockwise to raise speed and counter-clockwise to lower speed. Once the idle RPM is set, place the transmission in PARK and turn off the engine.
Re-connect the electrical connector onto the IAC. Start engine. Idle speed should be governed by the ECM at approximately 650 rpm in "DRIVE" (for unmodified cars). Idle speed in NEUTRAL or PARK is less significant, and will be higher.
Reinitializing (Clearing) the ECM
If you set a DTC during the procedure, the SES light should be illuminated on the dash. This ECM retains DTC data for the previous 50 engine starts, so the codes will eventually be cleared. If you want more immediate results, after shutting down the engine disconnect the negative battery terminal for five minutes. This will clear the ECM of all diagnostic trouble codes. Clearing the ECM also clears any data learned about your engine, and clears the radio presets. If you have a Delco-Loc or Theft Loc II radio, make sure you follow the procedure to unlock the radio protection before disconnecting the battery. This five minutes is also just about long enough to clean both battery cables. Reconnect the battery. When you first start the engine after clearing the ECM, the engine will operate with base parameters programmed into the ECM PROM. These parameters may not be optimum for your engine, but the ECM will enter a Block Learn Mode soon after the engine is warm and enters Closed Loop Mode. The ECM will write new data tables specific to your engine and will eventually rely on those tables instead of the base tables of the factory program. You can expedite this process by driving the car for 20 minutes under varying conditions to allow the ECM to initialize. Or you can wait and drive the car normally at your convenience. The BLM tables are constantly being updated as sensor input ranges change, but the greatest change will occur within the first twenty minutes of Closed Loop operation.
------------------
Later,
Vader
------------------
"No matter how hard you try you can't stop us now"
Adobe Acrobat Reader 4.0
I would agree that the IAC would be a good place to start. You can remove the IAC and service it. Work the pintle out of the stepper motor rack gears by gently pulling in the tapered stopper while wobbling the pintle side-to-side. Clean the pintle and air passages in the throttle body with carb cleaner. Apply one drop of light oil to the pintle worm gear, then work the pintle back into the IAC stepper by gently pressing on it while wobbling it back and forth until it is fully retracted. Replace the IAC in the clean throttle body, then proceed with setting the TPS and minimum air position.
Here's a short procedure:
Throttle Position Sensor (TPS)
Tools needed:
1. Digital Volt-Ohm-Meter (VOM)
2. Breakout jumper wires or probes (make your own)
3. AutoXray, Diacom, or similar scanner will replace the VOM and jumper wires.
Turn on ignition, but don't start the engine.
With a diagnostic scanner: plug in the scanner and read the TPS voltage. It should be 0.54Volts +/- 0.07 VDC.
Connect the VOM to the TPS electrical connector terminals ‘A' and ‘B'.
With a breakout jumper: Disconnect the electrical connector from the TPS. Install the breakout in-line, between the TPS and wiring harness connector. Connect the meter probes to terminals 'A' and 'B' on the connector. (‘B' is the positive connection, ‘A' the signal ground, or negative.)
With probes: If you have very slender probes on your VOM, you can back-probe the TPS connector while it is attached to the TPS. If you have made probes of large dressmakers pins or a similar item, you can back-probe the connector as well. Connect the meter probes to terminals 'A' and 'B' on the connector.
Turn on the ignition to read the TPS output voltage at the idle position. The reading should be 0.54VDC +/- 0.07VDC. The ideal is the center of the range, 0.54VDC for a stock engine. To adjust the output voltage, loosen the two Torx screws holding the TPS to the throttle body, and slightly rotate the TPS up or down, reading the voltage until it comes into specification. Tighten screws. Using the throttle lever, rotate the throttle to WOT (wide open throttle). The TPS voltage should be over 4.0 volts. Close the throttle again, and then slowly open it to WOT, observing the voltage reading. It should increase progressively and in a linear fashion. If it sticks or jumps or falls off at all while doing this check, the TPS sensor may be failing and could be a cause of stumbling and driveability problems.
After achieving the desired setting, turn off the ignition switch. Remove all jumpers or the scanner and reconnect the TPS connector as required.
Throttle Minimum Air Position
Tools needed:
1. Torx driver # T-20
2. Paper Clip
3. Small Punch
4. Tachometer
GENERAL NOTE: The engine should be at normal operating temperature before performing any adjustments. Never rely on the dash mounted instruments for diagnostics and adjustments. The oil pressure and temperature gauges and the voltmeter and tachometer just aren't calibrated accurately enough for diagnosis, but are a relative indication for monitoring the vehicle while driving.
For this adjustment, the transmission will be in DRIVE while you're under the hood. You will need to securely set the parking brake and block the drive wheels. It would also be a good idea to have an assistant hold the service brake while you perform the adjustments.
In order to successfully complete the adjustment, the IAC air passages and pintle need to be clean. The throttle plates and bores need to be clean as well. If this is not the case, you'll need to remove the air cleaner from TBI engines or the intake air bellows from TPI engines to gain access to the area to be cleaned. A spray-type carburetor cleaner works well for this. Cleaning the IAC passages on a TPI/MAF engine will set a DTC, but we'll be clearing that later. With the engine idling, direct the spray cleaner in to the IAC air passages and around the throttle plates. Shut off the engine and continue cleaning the throttle plates by opening the throttle manually. Once everything is satisfactorily cleaned, replace the air bellows on TPI engines. Many times, this alone can solve IAC/idle speed problems.
Cut and form a paper clip into a "U" shape. Insert the clip ends into the ALDL in the 'A' and 'B' sockets. Turn on the ignition, but don't start the engine. This will force the ECM into its diagnostic mode. Wait 30 seconds to allow the IAC pintle to fully extend. Under the hood, remove the electrical connector from the IAC, then turn off the ignition and remove the paper clip jumper from the ALDL. With the IAC pintle fully extended (closed) all idle air will be controlled by the position of the throttle plates.
Locate the Torx screw on the left side of the throttle body. It may be equipped with a protective metal cap from the factory. This was intended to discourage adjustment. If the cap is present, use a small punch to knock it out. Once the screw is accessible, start the engine and place the transmission in DRIVE. Adjust the throttle stop to obtain 450-500 RPM with the transmission in "DRIVE", rotating the Torx screw clockwise to raise speed and counter-clockwise to lower speed. Once the idle RPM is set, place the transmission in PARK and turn off the engine.
Re-connect the electrical connector onto the IAC. Start engine. Idle speed should be governed by the ECM at approximately 650 rpm in "DRIVE" (for unmodified cars). Idle speed in NEUTRAL or PARK is less significant, and will be higher.
Reinitializing (Clearing) the ECM
If you set a DTC during the procedure, the SES light should be illuminated on the dash. This ECM retains DTC data for the previous 50 engine starts, so the codes will eventually be cleared. If you want more immediate results, after shutting down the engine disconnect the negative battery terminal for five minutes. This will clear the ECM of all diagnostic trouble codes. Clearing the ECM also clears any data learned about your engine, and clears the radio presets. If you have a Delco-Loc or Theft Loc II radio, make sure you follow the procedure to unlock the radio protection before disconnecting the battery. This five minutes is also just about long enough to clean both battery cables. Reconnect the battery. When you first start the engine after clearing the ECM, the engine will operate with base parameters programmed into the ECM PROM. These parameters may not be optimum for your engine, but the ECM will enter a Block Learn Mode soon after the engine is warm and enters Closed Loop Mode. The ECM will write new data tables specific to your engine and will eventually rely on those tables instead of the base tables of the factory program. You can expedite this process by driving the car for 20 minutes under varying conditions to allow the ECM to initialize. Or you can wait and drive the car normally at your convenience. The BLM tables are constantly being updated as sensor input ranges change, but the greatest change will occur within the first twenty minutes of Closed Loop operation.
------------------
Later,
Vader
------------------
"No matter how hard you try you can't stop us now"
Adobe Acrobat Reader 4.0