

Senior Member
I plan on doing this when it comes time to replace my pump. I am thinking of trying to make the hole a circle though because that would give the most strength. It will also have a hinged door with a latch of some sort and a gasket. Call it a hack if you want to but I build my car for myself only. I dont plan on selling it for a very long time if I do at all. Even if it does take longer to do it this way initially it will make it VERY easy to do later on. In my opinion a fuel pump door done correctly is a mod and not a hack.
Re: Fuel Pump acces done..pics
Well at least its helpful.
Pablo, its not exactly a flat sheet. Its also quasi-reinforced underneath if I remember because the ribs that the tank rides on are formed steel rails spotwelded to the floor. I dont like the idea of rivets because you cant control other drivers and all it would take would be one idiot in the right spot and you leave the chance of damaging the tank. I guess its better than screws. And maybe you missed all the pictures of leaking fuel lines that were previously cut. Sure its only 45 psi but thats more than most people seem to be able to handle dealing with.
Pablo, its not exactly a flat sheet. Its also quasi-reinforced underneath if I remember because the ribs that the tank rides on are formed steel rails spotwelded to the floor. I dont like the idea of rivets because you cant control other drivers and all it would take would be one idiot in the right spot and you leave the chance of damaging the tank. I guess its better than screws. And maybe you missed all the pictures of leaking fuel lines that were previously cut. Sure its only 45 psi but thats more than most people seem to be able to handle dealing with.
Senior Member
Im doing this to my GTA since I dont have the proper tools to do it "right" and I sure as hell don't want to pay $450 for a mechanic! Dont know about u but I actually see this as an improvement to something GM did wrong on our cars...not put in a access door to the f/p!

Senior Member
Someone needs to explain to me why an auto manufacturer needs to accomodate every possible part repalcement, forever, on all vehicles. This whole line of thinking, GM should have done this it would be better, is maddening. GM made a product to last a specific amount of mileage, it did just that, and now the rest is the consumers problem. Just pull the tank, fix the pump properly, and take some pride in a repair well done.
BTW, $450 is hardly the price of a good carb these days. Sounds like a good price to me if it includes parts.
BTW, $450 is hardly the price of a good carb these days. Sounds like a good price to me if it includes parts.

Junior Member
This thread was brought to my attention, so I thought I would post a couple pictures of my car's pump access pannel here.
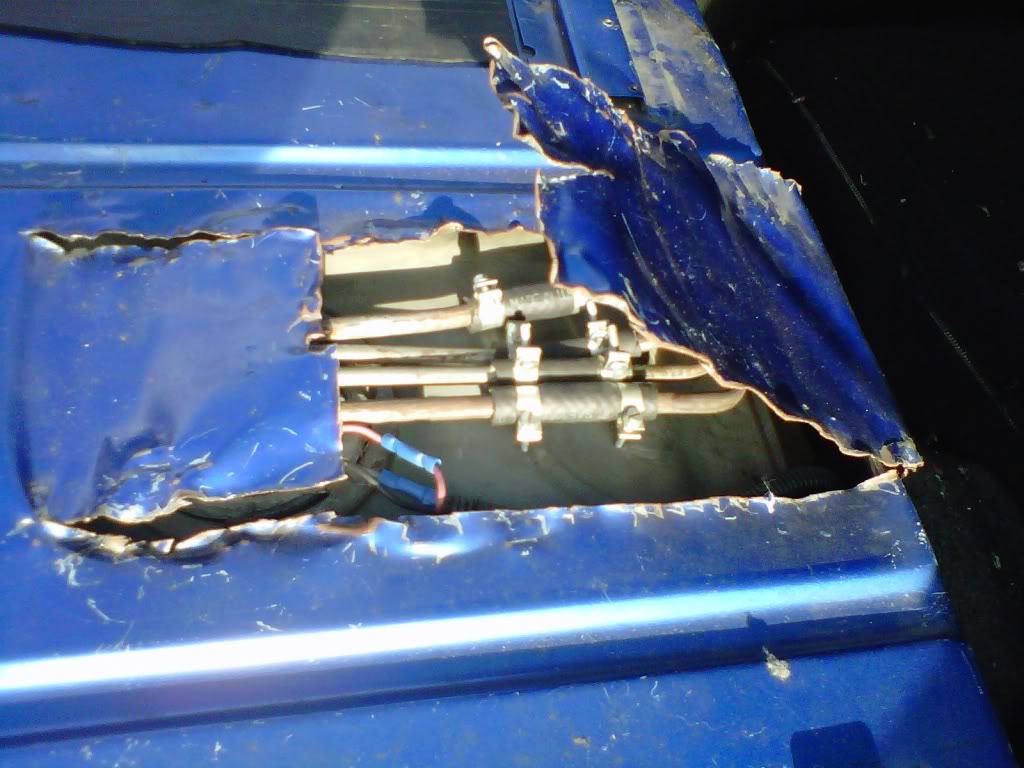
When I purchased my car, the floor directly over the fuel pump had been hacked up by a local "mom & pop" type garage. The metal was simply cut with a cold chizel and a pair of tin snips, I'm guessing. Then it was pulled up, the fuel pump was replaced then the tin was pushed back down and simply glued into place with RTV. No welds, nor rivits were used in the repair. I would consider that to be a "hack" job. The hole wasn't cut round, but insted it was rough, squared, with corners, and there were stress cracks developing from those corners. That area is important to the structural intergety of the car, and a hole of that size and shape was causing issues.
I cleaned up that situation, and installed a better access pannel. (I thought about making a factory repair, but I sorta liked the concept of having an access pannel there.) Since I was restoring the underside of my car anyway, I stripped the car down, removed all the undercarrage, the fuel tank, rear end, exhaust, etc. Then I put in the new pannel, and dressed up the under side of my car a little bit.
Since my car is a custom car, and not a factory origional, I'm quite happy with how the repair has come out. (btw, my car has been driven a tottal of about 12 miles over the past 5 years, needless to say it's not a daily driver LOL)
Anyway, this thread had some good points, but what do I know, I'm not anything certified, or a life time mechanic or anything like that.
Junior Member
Quote:
Do you use 3/8 for all for lines? Two are smaller so should you use 1/4 for those?Originally Posted by mw66nova
to reattach the lines, intead of doing rubber lines, i might suggest going to the hardware store and getting some brass compression fittings for 3/8" line. they will hold the pressure and won't dry-rot with time. 
Member
i found this pic floating around on the web with measurements to help people make the initial cut . 


Member
I'm very happy with my new GM tank.
I'm glad I dropped the tank, saw the filler neck was 1/2 busted off, and ordered a new GM tank.
No more stinky garage.
I'm glad I dropped the tank, saw the filler neck was 1/2 busted off, and ordered a new GM tank.
No more stinky garage.

Junior Member
there is two sizes need for compression fittings
Member
I chose to cut the access hole. I consider it a "serviceability mod". I frequently drive my car on race tracks that happen to be 3 hours from home. Road racing is hard on pumps esp when the fuel level gets low and the pump gets starved in turns. Heat builds up etc. Track days aren't cheap, sometimes up to $250/day. I'd hate to have waste a track day dropping the tank to replace the pump.
As far as cutting the hole, I used a hole saw at the corners to reduce the a stress riser, then used an electric shears to connected the dots, which worked great.
My biggest regret is not paying better attention to the pics here before cutting the hole... I cut mine bigger than I would have liked. The pic that 88IROCZTPI posted is perfect. The hole should be as small as possible to reduce the risk of structural damage. I think the forward part near the bend will be the highest stressed area so I esp with I'd left another inch there.
I used a 37 deg flare to -6AN braided hose.
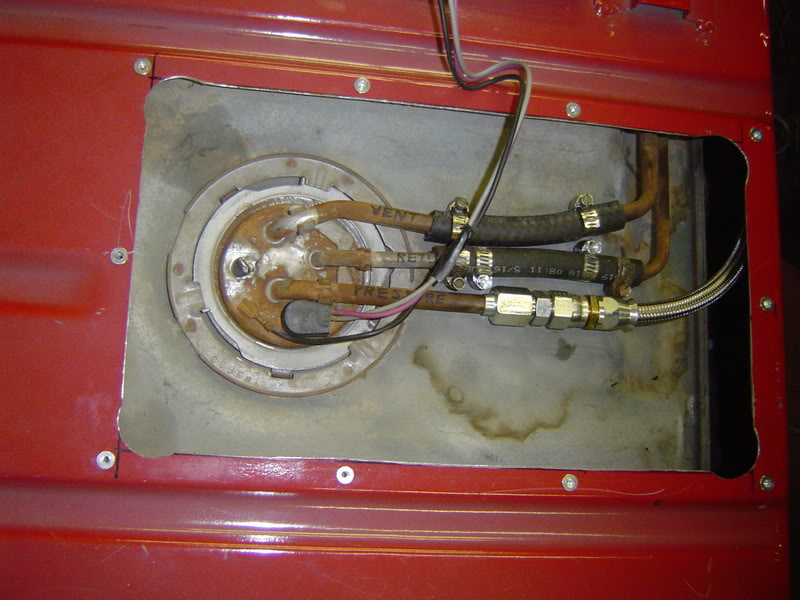
So the parts you need to make the pressure line above: Aeroquip FBM2497 Flare tube Nut, a male -6 union, -6 AN hose fitting and hose that runs to the fuel filter, and a 37 deg flaring tool. Almost all "normal" brake flare tools are 45 deg, so you'll have to find a 37 deg tool. I bought this one: http://www.aircraftspruce.com/catalo...ringtools3.php
It is pricey, but made in good old USA and is a quality piece. I've had bad luck with a China tool so I didn't want to f_ around with a junk tool when it comes to my FUEL line.
The flare tool worked great. I practiced on a scrap of the line that I pulled off the car and pressure tested with a 120 psi air and soap water mix- No leaks. Something worth mentioning is that the factory lines are seam welded so I used a Dremel with a small stone to grind the weld smooth. Scuffed and deburred everything real good as mentioned earlier in this tread. I also pressure tested the real part before I installed, no leaks
The stub on the left is what is left of the charcoal canister purge line that I have now completely deleted from the car. Cut it, pinch it, weld it, but don't do it as close as I did to the cap. Leave at least an inch. I melted the solder between the line and cap and got lucky that it all stayed in place. I removed my cover / pump assembly from the car, removed the pump, and let it sit on the bench overnight to make sure all the fuel evaped before welding.
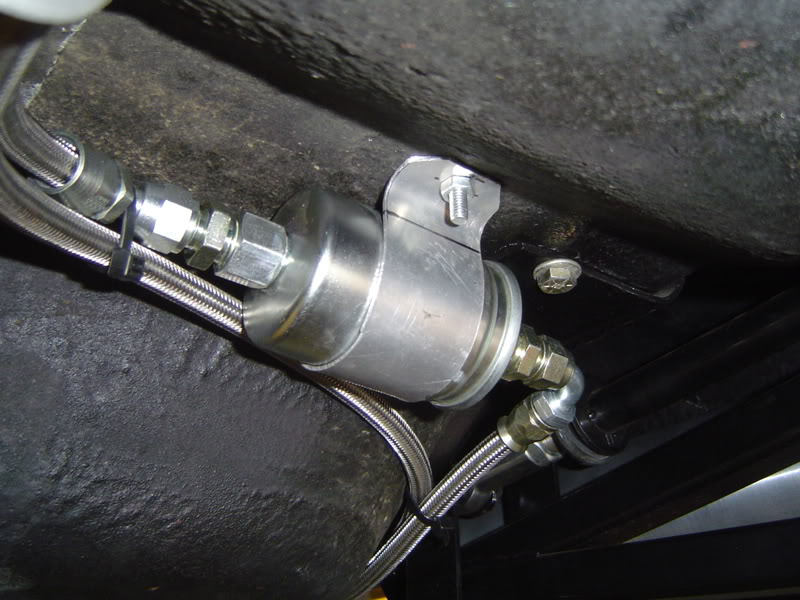
Only special part need here is the Metric Conversion Adapter Aerquip FBM2609. I used a 45 deg hose fitting but a 90 might have been better. Have a look on your own car.
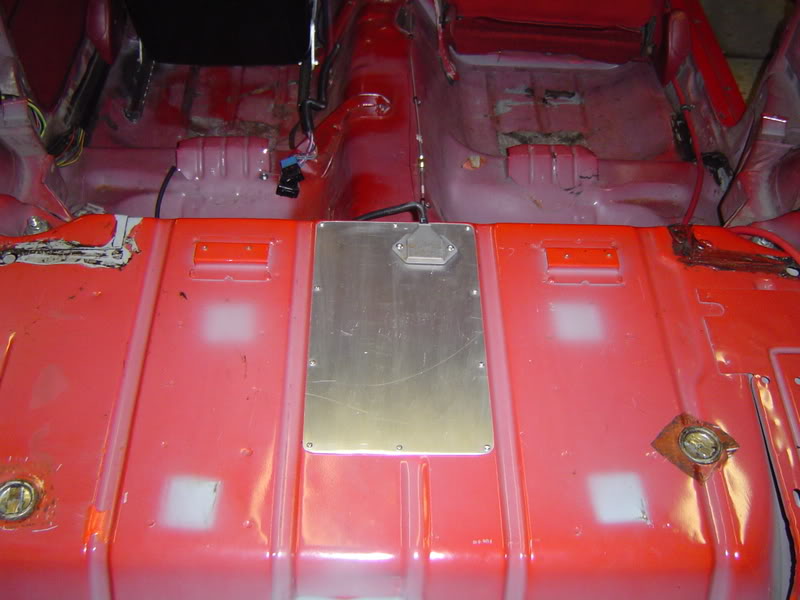
The plate is attached using 6-32 stainless screws into rivet nuts. The torque arm bracket on my axle would come in close contact to the bulkhead connector so I relocated it to the plate. Probably not an issue with the stock axle.
What I did here took longer that doing it the "hard way" but I'll be glad that I did it if the pump ever fails while I'm away from home. And it looks racy
As far as cutting the hole, I used a hole saw at the corners to reduce the a stress riser, then used an electric shears to connected the dots, which worked great.
My biggest regret is not paying better attention to the pics here before cutting the hole... I cut mine bigger than I would have liked. The pic that 88IROCZTPI posted is perfect. The hole should be as small as possible to reduce the risk of structural damage. I think the forward part near the bend will be the highest stressed area so I esp with I'd left another inch there.
I used a 37 deg flare to -6AN braided hose.
So the parts you need to make the pressure line above: Aeroquip FBM2497 Flare tube Nut, a male -6 union, -6 AN hose fitting and hose that runs to the fuel filter, and a 37 deg flaring tool. Almost all "normal" brake flare tools are 45 deg, so you'll have to find a 37 deg tool. I bought this one: http://www.aircraftspruce.com/catalo...ringtools3.php
It is pricey, but made in good old USA and is a quality piece. I've had bad luck with a China tool so I didn't want to f_ around with a junk tool when it comes to my FUEL line.
The flare tool worked great. I practiced on a scrap of the line that I pulled off the car and pressure tested with a 120 psi air and soap water mix- No leaks. Something worth mentioning is that the factory lines are seam welded so I used a Dremel with a small stone to grind the weld smooth. Scuffed and deburred everything real good as mentioned earlier in this tread. I also pressure tested the real part before I installed, no leaks
The stub on the left is what is left of the charcoal canister purge line that I have now completely deleted from the car. Cut it, pinch it, weld it, but don't do it as close as I did to the cap. Leave at least an inch. I melted the solder between the line and cap and got lucky that it all stayed in place. I removed my cover / pump assembly from the car, removed the pump, and let it sit on the bench overnight to make sure all the fuel evaped before welding.
Only special part need here is the Metric Conversion Adapter Aerquip FBM2609. I used a 45 deg hose fitting but a 90 might have been better. Have a look on your own car.
The plate is attached using 6-32 stainless screws into rivet nuts. The torque arm bracket on my axle would come in close contact to the bulkhead connector so I relocated it to the plate. Probably not an issue with the stock axle.
What I did here took longer that doing it the "hard way" but I'll be glad that I did it if the pump ever fails while I'm away from home. And it looks racy


i just replaced my pump. i cut the access hole but then realized it was metal lines (4th gens go to rubber lines) i didnt like the idea of cutting/flaring the lines, so i just dropped the tank. i cant say it was really "hard" just time consuming. just the car up and put the jack stands under the sub frame connectors, and the jack under the rear end, jack it up. wheels/tires off, take bolt out on dr side rear for rear brake line, take end links off, take bottom bolt off each rear shock, remove rear springs, upper and lower pan hard bars off, heat shields off, cut exhaust about 6 inches b4 the rear end *i didnt like this, but since i was going to a new exhaust setup, i didnt care. but if u cut it just get those cuplers at a autoparts store and bolt it over the cut when ur done* disconnect fuel lines around the fuel filter. then just lower the rear end and take the tank out. then just reverse order. i did it all by myself except for the tank, had a friend help me with that. now.. it DID take me about 7 hrs. but that was with alot of breaks, 2 trips 2 walmart looking for sawzall blades, and ending up at the autoparts store.
Member
Quote: 
you have played your part in keeping it going many times i see .. to bad it was mostly flaming .Originally Posted by CamaroMike
The thread that never dies. Senior Member
Good job with the access panel.
Member
Quote:
i agree , what would a tech board be without guys like you . it would be nothing but concentrated information , and we would miss out on all your posts about how perfect and great you are .. Originally Posted by CamaroMike
I only call it as I see it. 
Member
Quote:
Originally Posted by 88I_R_O_C_ZTPI
i agree , what would a tech board be without guys like you . it would be nothing but concentrated information , and we would miss out on all your posts about how perfect and great you are ..  We've all had run-in's with guys like CamaroMike. They always have something better. Mike, you've been coming back for YEARS to the same thread to tell everyone how much better your ideas are. Get a life.
91GTABird, I only wish I had seen this thread a month ago, great job... Enough said.
Senior Member
Don't need a life. Just e-mail notification.
Member
Very nice work Tallpod & Big_mods, I just did mine a couple days ago. Did mine similar to Big_mods (rivet nuts are a great idea wish I saw this earlier) but I used a foam gasket and riveted the cover, no big deal though to drill out 16 rivets. Later. 

Member
I see this is a problem that many ppl have. Im lookin at replacing my fuel pump now since it took a $hit! Im not real big on cutting a hole in my car considering its a very clean Cali car. But im also not a certified mechanic although iv done plenty of work to cars its not my forte. And im sure I can do this access hole thing pretty nicely since i have steel fab experience. Also i was thinkin about the filler neck how that seems to be problem causing in many cases dropping the tank...Why cant this just be a peice of rubber hose considering its just a filler tube? ON my 94 full size blazer i did the in tank fuel pump and the filler neck on that tank was a rubber hose... I have also read on this subject that some ppl didnt drop there rear end they just jacked the car up by the frame and let the rear hang as low as the suspention would let it and then removed the panhard, sway bar, exhaust,and heat sheilds and then dropped the tank Any answers to any of these would be of great appreciation and thanks in advance
Supreme Member
Quote:
That was the cleanest door I had seen until I scrolled further up. The guy with the actual door with the diagrams is the cleanest. Very nice job. I'd be proud to have it like that in my car, but I'll just drop the tank. Personal choice.Originally Posted by BIG_MODS
I chose to cut the access hole. I consider it a "serviceability mod". But you guys did it CLEAN.
Member
AJM-SHORTY, as you mention some of us did not drop the rear end, I'm one of those. Yeah I just loosened or removed everything you mentioned and just let the rear end hang as much as I could without pulling the brake line and just wiggled and twisted the tank till it came out.I posted some pics. on another thread I started on this subject. Never thought about a rubber hose conn. I personally wouldn't do it but there are many other cars with it, so as far as safety goes like everything else, if it's done right there shouldn't be an issue. Later.

Junior Member
i guess it is all up to the honor of the car and the enthusiast but in some opionions and reason if this is such a bad hack as some say than why do the car manufacturers of today have a factory fuel pump access panel usually located under the back seat lol. This is a very good idea as it will not hurt the structural integrity and if done right should not diminish the value. If it was all about keeping it factory the car enthusiast would have nothing to say but i keep it clean and running. V8 swaps would most likely be considered a hack. I have seen some swaps that look way worse than an access panel. lol but to each his own.

Junior Member
Inline fuel pumps can replace expensive or hard to replace intank fuel pumps per http://www.inlinefuelpumps.com/
Has anyone tried this instead of dropping the tank or cutting an access hole? Would a failed intank fuel pump (a blocked intank filer would block fuel passage) block passage of gasoline to the inline fuel pump?
http://www.inlinefuelpumps.com/image...-fuel-pump.jpg
Has anyone tried this instead of dropping the tank or cutting an access hole? Would a failed intank fuel pump (a blocked intank filer would block fuel passage) block passage of gasoline to the inline fuel pump?
http://www.inlinefuelpumps.com/image...-fuel-pump.jpg

Supreme Member
As far as I know you need to remove the pump in the tank and replace it with hose. But, after that, if you want to plumb in an in-line, that's up to you. I'd rather not, as the pumps are loud and get hot, inside the tank they have plenty of liquid coolant. Outside of the tank they have air. :/

Member
Ok, so I have an issue. I already have the access hole cut, nice and neat, got the sending unit out, lines cut and all, I ended up cutting them too short, so I bought a new sending unit. Thing is, I need to find out how to reattatch lines. I am just about finished building my LT1. I'm shooting for 400 whp, so I wasnt sure if rubber hoses and clamps would hold. I have a stock TPI pump. I attempted to do the double flaring route, but the tool I had sucked. I gave up and took the fuel sending assembly to a local fuel line specialties shop and they told me they couldnt do what I was trying to do. I also tryed the compression fittings route, but was told that wouldnt hold... Is there a better double flaring tool, one that will work with these lines, or would hoses and clamps work just fine? I have the stock TPI pump and 42 lb/hr injectors... Any ideas folks? I have been sitting here dead in the water for about a month or so trying to figure this out. Searching on here gave me no results thus far
Supreme Member
Justin89Formy
Supreme Member
close
Jul 7, 2023
I hate when people take shortcuts ")
Member
Shortcuts are fun
Member
Once again, can anyone answer my question from 2 posts up?
Member
I hear you, the problem on here sometimes is that someone can ask a specific question for a problem or situation and then others want to preach about what's right and what's wrong with what was done. There are so many ways to get the same end result to a problem. Later.
TGO Supporter
Quote:
Originally Posted by stealth908
:iMike, you've been coming back for YEARS to the same thread to tell everyone how much better your ideas are. said. Quote:
Which means you're a troll instead.Originally Posted by CamaroMike
Don't need a life. Just e-mail notification. 
Junior Member
https://ssl.circletracksupply.com/pr...1&bestseller=Y
This is the route I intend to take if I ever choose to do this mod.
This is the route I intend to take if I ever choose to do this mod.
Member
Well... I have completed the fuel pump access door not too long ago, here are some pics and even a short video showing the latch mechanism. I added weatherstripping to the car on the underside of the door so it seals nicely. When the door is closed and the latch locked, the seal against the weatherstripping and the door is rather snug, so unusual sounds/gas smell. Overall, works great and turned out to be a clean mod.
Here is a link to the video:
http://s61.photobucket.com/albums/h8...4-14-50-01.flv
Here is a link to the video:
http://s61.photobucket.com/albums/h8...4-14-50-01.flv


Member
Nice clean job. On mine I fastened it to the body with stainless/steel rivets after caulking the hole with polyurethane caulk.
Junior Member
In reality any component that needs to be changed should have access. Basic engineering 101. Years ago a Aircraft Manf installed components that were not going to fail. When they did fail, it required a removal of the aircraft nose. Almost 5000 man hours. Not having a access panel is stupid and was only a cost cutting measure done by GM engineers. The 1963 Jaguar XKE service manual requires you to cut a panel to change the starter. OR pull the engine. Again Stupid. If you take your time and do it right it is a improvement over the original design. Our Bonneville car uses the stock tank as a ballast tank. {WATER} . But there were many times that the cover came off and on in a week, when it had fuel in it. In addition the stock roll over valve does not allways seal. If you get on your head a after market valve would be nice. That requires a panel with a raised portion. While your at it get rid of the rubber hose and install braided line. Move the vent to the wheel well better pressure area . And in most cases farther from your exhaust
Member
Whats the size on the primary and return fuel lines on our cars?I think the main is 3/8 but cant figure out the return.
Member
Dumb question but here it goes. What happens if you dont put a cover where they made a hole to access the fuel pump? The previous owner cut a whole but didnt cover it with anything. Is this the reason the interior of my car smells like gas/exhaust? Because it smells real bad in the cabin that i dont even want to drive the thing. Any feed back is greatly appreciated.
Member
What you are experiencing is the reason you need to put a cover over the access hole that the previous owner installed in the car. Many have put an access hole, covered it properly and experience no fumes that you speak of.

Junior Member
Okay....read through the entire thread. I can see the debate, but I am in the same dilemma as a few posters. I just purchased my IROC about a month ago. I posted a couple threads on parts needed. One of them happened to be the cargo area fiberboard/carpet because it was terribly buckled. Well, when I got around to finally vacuuming and cleaning her up....guess what I found???
I didn't need the fiberboard/carpet after all!! Unfortunately, I will be repairing what I have got to say is the absolute worse HACKJOB I have seen in this thread. They couldn't even cut a straight line!! They went clear into the downward slope behind the seats!! They couldn't even tack the crap back down!!
Thanks for all the tips on here....I will be using them for sure!
Member
That is really bad. I don't think I have ever seen something so ridiculous. You will definitely need to do some serious repair work.
Member
Dakotaram, man that looks like it hurts. Later,

I have gone through 2 fuel pumps in the last 5 years and I think mine is failing for the 3rd time now. The first time I dropped the tank to put in the new one, it turned out to be a bad replacement pump so had to take the tank back out and put another pump in (8 hours). The second time I did not have the time to do it so had to pay to have it done. $685 later it was done. Now it is failing again and I will be doing the access panel. When done correctly I would consider this an upgrade.
P.S.
If doing thing's differently from factory is a "hack job" then anyone that has used anything besides factory parts is a "hack". Why replace your tired old 305 with a 350? If this was a good idea don't you think GM would have put 350's in all of our cars? And whoever said they can do it in an hour or two I will pay for your plain ticket to come to my house and do it in that amount of time then I'll tip you $1,000, your so full of ****.
Ted
Twin_Turbo
Supreme Member
close

Today
Quote:
Mercedes ML 63AMG requires cutting the carpet to replace the battery....they did mark where to cut thoughOriginally Posted by redcatch32
In reality any component that needs to be changed should have access. Basic engineering 101. Years ago a Aircraft Manf installed components that were not going to fail. When they did fail, it required a removal of the aircraft nose. Almost 5000 man hours. Not having a access panel is stupid and was only a cost cutting measure done by GM engineers. The 1963 Jaguar XKE service manual requires you to cut a panel to change the starter. OR pull the engine. Again Stupid. If you take your time and do it right it is a improvement over the original design. Our Bonneville car uses the stock tank as a ballast tank. {WATER} . But there were many times that the cover came off and on in a week, when it had fuel in it. In addition the stock roll over valve does not allways seal. If you get on your head a after market valve would be nice. That requires a panel with a raised portion. While your at it get rid of the rubber hose and install braided line. Move the vent to the wheel well better pressure area . And in most cases farther from your exhaust im looking to do this soon, im not a fan of cutting open the body, buuuut i figured if i reinforce it properly it shouldnt be bad, i was looking into the moroso access door, i was thinkin i could cut the body smaller than the frame of the door and then have my friend weld it in place, it comes with a hinged door so who know
what do you guys think??
heres a link to the door its an 8 1/8" frame all the way around, the door itself is 6 inches.....too small?? or do you think it can work? i dont wannt do a rivet job, no offense to the guyds who did but i like to go over the top sometimes lol
http://www.jegs.com/i/Moroso/710/85700/10002/-1

Junior Member
Thanks for this post. I'm glad I was able to search and find it. It gives direction, opinion, good and bad results, and helped me to no end. Could it be a sticky?
Sincerely,
Steve
Sincerely,
Steve

Junior Member
I just wanted post in the ever controversial IMO thread or act done to any f-body.
I happen to own a 99 w-body. The fuel pump did fail on it but i was relieved to find an access panel. I could not believe it. I thought i had to drop the tank to swap the pump but there it was an access panel. The fuel tank on it is replaceable too. I dont who thought about it but i am very thankful.
I will try to find a picture of it. The idea is to show how a designed access panel is done. It is oval in shape, no screws going through it, and no sharp corners.
Moderator
Alacran,
I'd be interested in seeing that picture.
I'd be interested in seeing that picture.
Junior Member
Quote:
I'd be interested in seeing that picture.
here it is complete with instructions.Originally Posted by RMK
Alacran,I'd be interested in seeing that picture.
http://www.clubgp.com/newforum/tm.as...mode=1&smode=1

Junior Member
Quote:
My shop teacher informed me you dont want to use compression fittingsOriginally Posted by mw66nova
to reattach the lines, intead of doing rubber lines, i might suggest going to the hardware store and getting some brass compression fittings for 3/8" line. they will hold the pressure and won't dry-rot with time. because of some type of stress on the line.?
