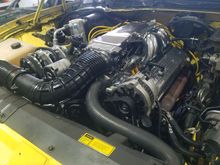
Final result, MUCH easier to view and adjust base timing. Just visible on the left side is the white mark on the balancer. I made sure engine was at 0 TDC before locating the timing tape. If I could do it again, I'd move the tape a little further down from the pointer. However, that adhesive is not coming off!