Upgrading Headlights For Your Third-Generation F-Body
Introduction –
With thirdgens pushing ten and twenty years by now, the headlights that your vehicle was equipped with begin to seem dim by comparison to newer cars. This is especially true since some of our cars are suffering from old bulbs and degraded wiring. In some cases, your vehicle may even still be using incandescent bulbs instead of its halogen counterpart! In this quick write-up, I’m compiling information on some upgrades from personal experience and various sources, both printed and electronic, to bring your car up to par. This should increase your ability to see your surroundings at night, and others’ ability to see you, thereby improving your personal safety and enjoyment. The upgrades will be presented in "stages" in which improvements can stack on or benefit from the upgrade before it.
Background –
Your headlight system consists of the bulbs, headlight motors (if equipped), on/off switch, and beam selector switch. The circuit is a series-parallel circuit following a very long route in series from the ignition power source, through the engine compartment, through the firewall, to the on/off switch, beam selector switch, and back through the firewall and into the engine compartment, and finally to the lights (which are in parallel). Most of the wiring is 16 gauge. The bulbs are of a sealed beam type, in which the bulb is a permanent part of the housing; and is bought and replaced as one unit. The lamps are dual filaments, with one filament for the low beams, and the other for high beams (2A1, 2B1, or 2E1). Only one filament is on at a time. The four lamp system used in Camaros have two additional lamps, which are high-beam only (1A1). For the purposes of the headlight circuit, the headlight switch is simply on or off. The beam selector switch is a SPDT switch which routes power to either the low beam filaments, or the high beam filaments.
Stage I – Maintenance
The biggest cause in a dim headlight condition is low voltage. This could be cause by an ailing battery or alternator, corrosion on the battery terminals or headlight/switch connections, or excessive draw elsewhere in the car. Check the alternator for proper output, and the battery for its condition. Make sure it’s topped off if it’s not a maintenance-free battery. Doing every step in this "upgrade" and not skipping over some can ensure the best results for your car’s circumstances.
For Stage I, you will need:
-Assorted tools for removing the battery terminals
-Container of baking soda and water
–or battery terminal cleaning spray
-Terminal brush(es)
-Acid brush
-Petroleum Jelly
-Small flathead screwdriver
-Some sandpaper (180 grit is okay)
-Contact cleaner
1a) *Optional step – If you want to see the difference before and after just for your own curiosity, be sure to measure the voltage drop on all the bulb terminals now. See Measuring Voltage for how to do this.
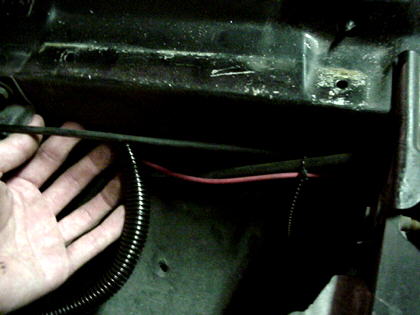
1) Disconnect the battery cables, and use the baking soda and water solution or battery terminal cleaner to clean the corrosion and acid build up from the battery. Then use the terminal brush to clean the posts or side terminals and it’s respective cable end. Reconnect and put a thin film of petroleum jelly on to prevent future build up.
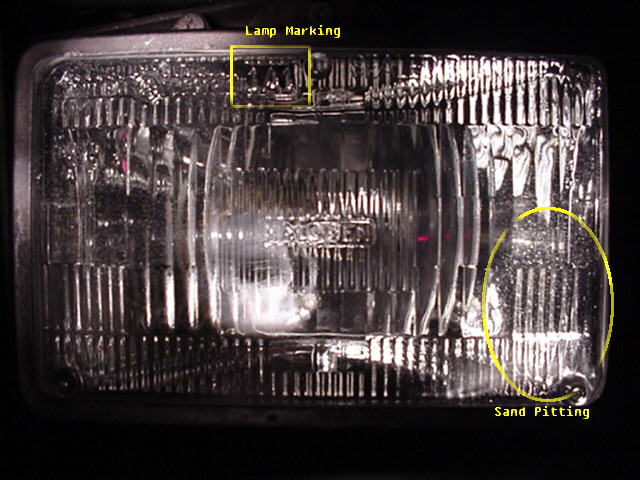
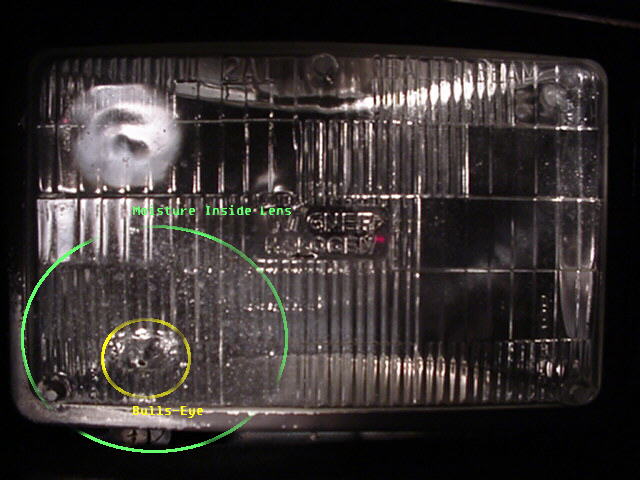
2) Check the headlights themselves. Check for cracks, rock chips, bullseyes, sand pitting, dirt/mud, or degraded silver/mirror surfaces. Moisture getting into the lamp scatters the light and causes algae to sometimes grow inside the lens which degrades light output. In fact, basically anything but clean, clear glass (or plastic) hurts your overall light output. Replace or clean lamps if necessary.
|
A dirty low-beam bulb – this sucker is pretty dim |
|
A pitted high-beam bulb – although it has a bit of sand pitting, it’s only in a lower corner of the bulb, so it doesn’t hurt the light output much. |
|
An old low-beam bulb – the reflective backing inside the bulb has thinned to the point it leaks light out the back of the housing. |
|
A damaged high-beam bulb – moisture has been collecting inside this housing for a long time because a rock chip created a hole in the lens. |
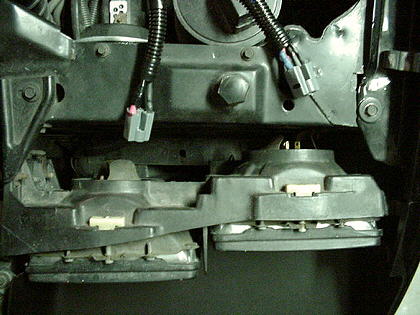
3) Disconnect the connectors at each headlight one at a time and disassemble them. This is done by inserting a thin flathead screwdriver or paperclip into the slot next to each terminal to push down the retention barb and pulling the wire out of the back of the connector housing. Pull out one at a time so you don’t get them mixed up. Spray them with the electrical contact cleaner, and/or use some sandpaper to clean off the corrosion on the connector (focus on the parts that actually touch the prong on the headlight). Clean off the prongs on the headlights as well. Reconnect everything.
4) To be extremely thorough, remove the headlight switch and clean it’s connections the same way. This is usually not necessary since it’s not exposed to outside elements. The multi-wire connector in the lower steering column (the high-beam circuit goes through here) can be checked as well, but also isn’t as necessary.
5) *Measure voltage drop again. This will tell you how much of an improvement the "upgrade" made (besides turning them on and looking. 🙂
Measuring Voltage –
To get an idea on how your headlight system is doing, you can do a few quick measurements with a multimeter (preferably digital) in a mode close to battery voltage (usually 20VDC). These tests are done with the key OFF, and the headlights ON (in high or low beam mode depending on which leads you are testing). Later on, I’ll put up a chart where I took every measurement possible for comparison. But you really only need the battery voltage and positive voltage drop measurements.
Measure the voltage – Measure the voltage of the battery first. Red lead on the multimeter to the (+) terminal on the battery, and black lead to the (-) terminal on the battery. You want this measurement as close to 12 or up as possible. Write that measurement down somewhere.
Then measure the voltage that each lamp is seeing. Connect the positive lead of the multimeter to the bulb terminal that the tan wire connects to (it’s usually exposed even with the connector on), and the negative lead to the negative terminal on the battery. That’s the low-beam voltage. Turn on the high beams and test the green wire (test all four lamps if on a Camaro; adjacent lamps should be close). That’s the high-beam voltage. The closer these measurements are to the battery’s voltage, the better.
Measure voltage drop – Voltage drop is the difference in voltage between the two points measured. This will tell you just how degraded the circuit is. If you perform this test with the engine running, test from the positive terminal on the alternator instead of the (+) battery terminal, or the alternator case instead of the (-) battery terminal.
Place the red lead on the multimeter on the (+) battery terminal, and the black lead on the green or tan wire of the bulb. This is your positive voltage drop. It’s probably somewhere in the neighborhood of 0.75 volts, but could be anywhere up to 2 volts! Measuring from the negative battery terminal to the ground (black) wire of the bulbs will give you the negative voltage drop (basically the condition of the bulb’s ground). If the voltage drops are pretty low (0.2 to 1 volt), your headlights are already as bright as they’re going to get (noticeably). If they’re still high (1.5 to 2 volt range) even after cleaning the connections, or if you want a little higher performance, then it’s time for Stage II.
Aiming Your Headlights –
The brightest headlights in the world don’t do much good if they are pointed at the sky or the ground right in front of the vehicle. It is also nicer (and safer) to be considerate of other drivers and not dazzle them with badly aimed headlights. So aim them! You have three options. Here they are in order of preference:
1) Have them aimed by a body shop, or any facility equipped to properly aim headlights. The downside is sometimes it costs you more than you want to spend to just turn a few screws. How hard can it be?
2) Buy a headlight aiming kit. These can set you up with a professional quality aim quickly and easily, and once past the initial cost, you can aim them yourself anytime, anywhere.
-Follow the instructions included in the kit.
3) Use the old "wall, masking tape, and 25 feet" method. Here’s how:
You’ll need:
– Masking Tape
– Measuring Tape
– Phillips screwdriver
– A blank wall with flat, level terrain from about 35 unobstructed feet leading right up to it.
1) Park your car on a level surface near a blank wall. Have half a tank of fuel and proper tire pressure.
2) Measure the distance from the ground to the centerline of your headlights and put a piece of masking tape horizontally on the wall to reflect that It can be one long piece, or a short strip for each headlamp..
3) Back your car up (make sure it’s still level!) until the headlights are 25 feet from the wall.
4) Sight through the rear window over the hood to find the centerline of your car in reference to a spot on the wall, then go mark that spot. If your windows are tinted and it’s too dark outside for you to sight through, sit inside and sight down the center ridge of your hood.
5) Measure the distance from the centerline of your car to the center of the headlights, then transfer that measurement onto the wall to show where headlights are.
6) You should basically have two crosshairs (or four if it’s a Camaro) and a mark of the centerline of your car taped on the wall. Looks like this: --+--+-----|-----+--+--
7) Make another tape mark two inches under, and two inches to the right of each crosshair.
8) Turn on your low beams and adjust them so that the bright spot centers on the new, lower marks.
9) If you have the four-lamp system, turn on the high beams and adjust the high beam bulbs to center on the original crosshair and then just slightly down.
10) Don’t readjust the low beam lamps on high beam mode.
Stage II –
One way to get around high voltage drop is to wire the lamps directly off the battery (or alternator) using relays. You can build a wiring harness that will plug in between the factory wiring and the lamps and use the factory wiring only to "trigger" the relays (and raise/lower the headlights if it’s a Firebird). Use 12 or 10 gauge wire for the harness to maximize voltage and allow future upgrades. This example is for Camaros with the battery on the passenger side. Firebirds are similar. If you relocated your battery, you can use the alternator’s (+) terminal (remember, shorter wires=good!).
For Stage II you will need:
-Approximately 6 – 8 feet each of 10 gauge wire in red, blue, and black. $10
-some 16 or 14 gauge wire for the "trigger" leads, preferably in green and brown (the factory colors for the circuits you will be dealing with), but I used yellow with colored telltales for both. $3
-assorted colors of shrink-tubing (1/4" or slightly larger) to match wiring. If you generally don’t use this stuff, I suggest you start. Not only does it make installations cleaner, there’s not enough space in the connectors (especially the relay connectors) for a bunch of 10 gauge wires each with three or four turns of electrical tape. $6 worth should get you through this project.
-electrical tape $2
-8 feet of 1/2" convoluted wire loom $4
-4-6 feet of 3/8" convoluted wire loom $2
-2 SPDT relays (good ones: eg. Bosch, Hella, or DEI. rated for 40 amps) $20 to $30
-4 three-prong headlamp connectors. Try to find ones that let you crimp your own wires instead of the ones provided by them. High beams only use two out of three prongs; simply remove the third (bottom one) on the connector and discard. Firebird owners may have a harder time locating connectors for their lamps, but only have to purchase two. If they can’t be found, large female blade connectors will have to be substituted. You may have to modify the connectors slightly to accept the huge 10 gauge wires. $16 to $22.
-2 ring terminals for 10 gauge wire $1
-2 blade terminals for the 16 or 14 gauge wire $1
-crimping/stripping/cutting tool(s) $5 for an el-cheapo
-inline fuse-holder and fuse (20 Amps) $5
-lots of solder (get the thick resin-core stuff: that 10 gauge wire absorbs a lot) $5
-soldering iron (I like my 260/200 watt soldering gun)
-heatgun or lighter (for shrinking the shrink tubing)
A worst-case scenario total cost of $95, but most of you will already have a lot of this stuff laying around. You can save a good bit of money using what you already have, but don’t cheap out on the relays. The next biggest cost is the lamp connectors. You could get away with female blade connectors if they’re large enough to slip over the prongs on the lamps, but this takes away from the "plug ‘n’ play" aspect. Your choice.
Following this circuit diagram, build a wiring harness that will suit your vehicle’s particular layout.
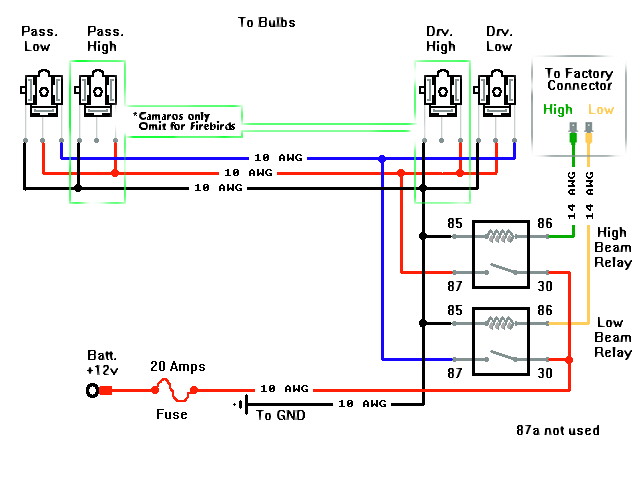
The diagram itself is roughly in the layout most applications would use (battery on passenger side). Decide where you will mount the relays and take that into consideration as well. Mock up the wires where you will be routing them to find the lengths. On mine, I used about 7 feet to go from the relays (mounted by the battery) to the farthest lamp (the D.S. low beam) following the same routing as the factory lighting harness. Once you know the lengths of all the wires you need, you can start assembling the harness.
Firebirds use a different pattern in the layout of the prongs, but the connections are still the same.
|
|
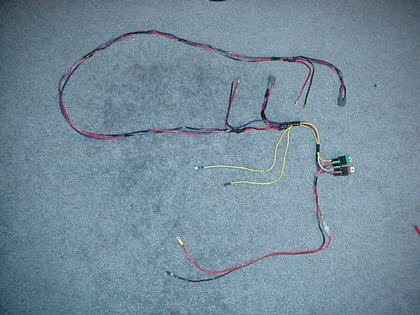
Bundle your wires according to where they are and where they’re going. I mounted my relays next to the battery. The two yellow wires will plug into the original wiring harness to act as a "trigger" to activate the low and high beam relays (I marked the relays, their connectors, and the yellow wires with colored tape according to their circuit using the factory wire colors; brown and green). The low beams already have their connectors on them in this picture. |
|
|
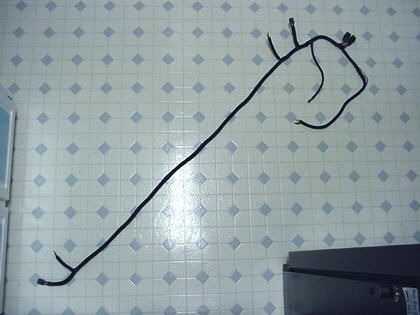
Here is the completed harness (except the high beam connectors, the store was still out of them since they only stocked two). Since this is now a one-piece wiring harness that plugs in between the lamps and factory wiring, it can easily be removed and the car reverted to stock if you ever sell it. The harness can then fit or be adapted to many different vehicles. |
Solder all splices and connectors (including any crimp-on connectors you might use). The relays usually come with a connector harness that makes installations much cleaner and allows you to remove the wiring without removing the relay. The connectors usually come with smaller gauge wiring though, so you’ll have to strip off the wires and solder the connectors to your huge 10 gauge wires. Try not to make the solder joints too fat and gloppy, as they won’t fit into the connector afterward.
Before making a splice or soldering a connector on, be sure to have a piece of shrink tubing already slid onto the wire.
|
|
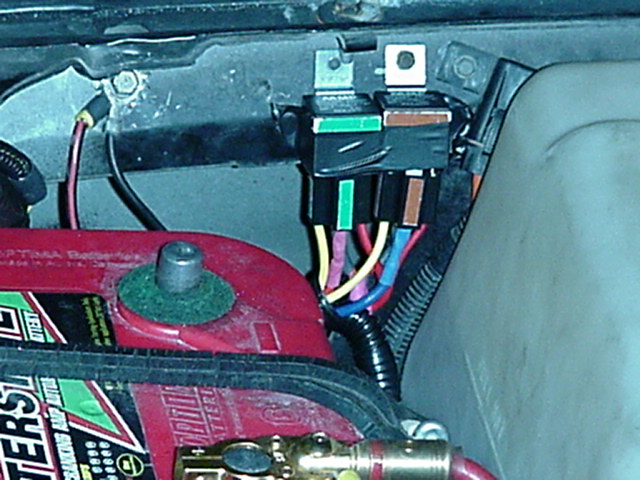
Mount the relays somewhere out of the way. Run the ground and power wires. |
|
|
Then run the wires to the headlights. I followed the factory headlight wiring harness as you can see here. It is tucked underneath the upper radiator support. |
|
|
Plug the connectors into their respective lamps. |
Once your harness is built and installed, test it to make sure both beams are working and nothing is wired wacky. The headlights on my 89 were never dim to begin with (compared to my 86), but the harness alone made a visible difference in the lighting! Here is a chart of the measurements I took before and after installing the upgraded wiring into the car:
|
Battery Voltage |
12.38 |
|
|
Before |
|
After |
|
|
|
|
Voltage |
Positive |
Negative |
%Loss Due to |
|
%Loss w/ Wiring |
|
Difference |
|
Driver Side |
11.08 |
1.06 |
0.27 |
12.04% |
– |
2.48% |
= |
9.55% |
|
Driver Side |
10.37 |
1.69 |
0.33 |
19.50% |
– |
3.95% |
= |
15.55% |
|
Driver Side |
10.38 |
1.73 |
0.19 |
18.36% |
– |
3.95% |
= |
14.41% |
|
Before |
|
|
|
|
|
|
|
|
|
Pass. Side |
10.92 |
1.21 |
0.09 |
11.73% |
– |
1.89% |
= |
9.84% |
|
Pass. Side |
10.06 |
1.98 |
0.14 |
20.66% |
– |
2.91% |
= |
17.75% |
|
Pass. Side |
10.08 |
1.99 |
0.20 |
21.49% |
– |
3.08% |
= |
18.41% |
|
|
|
|
|
|
|
|
|
|
|
Driver Side |
11.85 |
0.20 |
0.10 |
2.48% |
|
|
|
|
|
Driver Side |
11.65 |
0.31 |
0.16 |
3.95% |
|
|
|
|
|
Driver Side |
11.65 |
0.31 |
0.16 |
3.95% |
|
|
|
|
|
After |
|
|
|
|
|
|
|
|
|
Pass. Side |
11.88 |
0.16 |
0.07 |
1.89% |
|
|
|
|
|
Pass. Side |
11.70 |
0.25 |
0.10 |
2.91% |
|
|
|
|
|
Pass. Side |
11.69 |
0.26 |
0.11 |
3.08% |
|
|
|
|
Stage III –
Still thirsty for more? Now that you’ve upgraded your wiring, you can replace your dusty old low wattage sealed-beam lamps, for some high wattage replacements. Without the upgraded wiring, high wattage bulbs would have fried your factory harness, tripped the circuit breaker, and/or perhaps caused a fire in the process.
You have two choices for Stage III. 1) An "improved" design replacement bulb, or 2) A composite bulb housing with replacable H4 (or other) bulbs.
Here are some options for simple replacement bulbs:
GE – General Electric’s standard replacement bulb.
GE High Output – Denoted by an "HO" suffix on the standard bulb number. Very good beam pattern. Nice hotspot with a sharp cutoff. Good fill, especially on the sides.
GE SB – General Electric’s stab at the niche market of the fad "blue" bulbs.
Sylvania – Sylvania’s standard replacement bulb.
Sylvania XtraVision – "XV" suffix. Claims to be three times brighter than the standard bulb.
Sylvania Cool Blue – "CB" suffix. Slight blueish tint to create whiter light.
Sylvania LL – Claims to last four times longer than a standard halogen bulb.
|
|
Camaro – High Beam (1A1) |
Camaro – Low Beam (2A1) |
Firebird – (2E1) |
|
Stock Bulb |
H4651(*replaced incandescent 4651) |
H4656 (*replaced incandescent 4652) |
H4666 |
|
General Electric |
18532 (*replaced incandescent 18517) |
18533 (*replaced incandescent 18518) |
18535 |
|
General Electric HO |
n/a |
14753 |
|
|
General Electric SB |
|
|
|
|
Sylvania |
|
|
|
|
Sylvania XV |
|
|
|
|
Sylvania CB |
|
|
|
|
Sylvania LL |
|
|
|
If you decide to convert your car to use H4 bulbs, you’ll need a lamp housing of the same size as your stock lamp, that accepts H4 bulbs. You’ll also need to make the following changes to your wiring harness to support the upgrade: Click here. H4 bulbs and the stock sealed-beam bulbs both use the same connector, but the wiring is different. Converting to H4 bulbs, and failing to make these wiring changes can result in incorrect/erratic headlight operation.
Here are some options for H4 upgrades:
GR-Motorsports MatriX – They have two types: standard, and diamond-cut projector lamps. I tried their diamond-cut projector lamps with their matching "Ultimate White" 100W H4 bulbs. The housings look really nice, and are made of a heavy plastic. They come with small, blue "cruising lights" already installed. Those, I suggest hooking up with your parking lights or leaving unwired (they’re not my taste and was one of my reasons for returning the housings). I was told by the sales rep as well as the description in the catalog that the housings would handle the matching 100W bulbs, but once I received the housings, I noted that they were marked 60W MAX. They installed in seconds and fit perfectly in place of the original lamp. Within 5 minutes of lighting them off, one lamp cracked from the heat, and they both bubbled the silver reflective surface above the bulbs. I have no doubt they could have been fine with 55 watt H4s, but never had an opportunity to try. The "Ultimate White" bulbs they sent me turned out to actually be blue tinted bulbs. I would rather have had clear bulbs that maybe had a little xenon mixed in with the gas, so that was my second disappointment. They turned out slightly dimmer than my GE HO bulbs on low beam, and slightly brighter on high beam. But the light distribution was horrid. There was a large gap in the center of the beam and a concentrated hot spot "ring", then total dimness everywhere else. Not to mention the blue tinge that I was trying to stay away from (due to the poor bulb choice).
Hella – Supposedly very good. Will be trying these out soon.
Bosch – Also reportedly well-made.
|
|
Camaro – High Beam (1A1) |
Camaro – Low Beam (2A1) |
Firebird – (2E1) |
|
MatriX |
n/a |
09-120 |
|
|
MatriX Diamond-Cut |
n/a |
09-130 |
|
|
Bosch |
|
|
|
|
Hella |
72116 (72117?) |
72146 (72147?) |
|
Miscellaneous – Adding auxiliary lights
Gonna keep this section short since this really is not upgrading your headlights, just your lighting system as a whole.
Adding some aux. lights (driving, fog, projector) can help by putting light in places your factory lights fall short on. Driving lights put out all-around useful light, especially for lighting up the side of the road (signs, pedestrians). Fog lights can cut through and under fog, rain, and snow to light up objects that your headlights won’t due to the scattering effect of those conditions. Projector lights light up distant objects by concentrating it’s light output on a smaller spot, and are good for highway/interstate travel at night. Decide which is best for the majority of your driving and find a good set. There are many manufacturers to choose from, and the kits usually include all the wiring, switches, and relays you need to install them. The kits can run anywhere from $40 (eg. Ralley) to $300 (eg. Catz). F-Bodies have limited options of mounting positions for aux. lights, so take that into consideration when picking out your lights. If you can, try to mount them less than 30 inches off the ground (I think you’d have to try pretty hard to install them higher than that)..
Once you’ve picked and purchased your kit, take a look at the relay. Make sure it’s a well made relay (such as Bosch, DEI, Hella, or at least has some heft to it). Some kits come with really cheap relays and if they’re not properly grounded, will cause a fire. If you’re not sure, or don’t care, just take extra care grounding the relay, and make sure the switch is fused, as well as the lights themselves. Wire the lights from the battery, not the fusebox. It’s okay to power the relay (through the switch) from the fusebox though.
Follow the instructions for mounting and wiring. Try to keep the relay in the engine compartment. Use convoluted tubing where possible for protection and to keep a neat appearance. Use dielectric grease on the connections near the lights to keep moisture out.
Disclaimer and such –
As mentioned before, these upgrades and the preceding write-up on them were based on personal experience, experimentation, and research. The author cannot be held responsible for any damage done to any vehicle as a result of attempting these upgrades. Some basic electrical and automotive knowledge is encouraged before undertaking any of these outlined procedures. The author does not own a Firebird, so information pertaining to exact part numbers regarding bulbs for Firebirds may be incorrect or incomplete. If anyone wants to fill in or correct missing information for the sake of completeness for other readers, emails are welcome. Also, personal testimonials for aftermarket headlight conversions are welcome and will be gladly added. Please include part numbers, prices, build quality, material type, vendor name and contact information, and any other observations you may deem relevant.