When you click on links to various merchants on this site and make a purchase, this can result in this site earning a commission. Affiliate programs and affiliations include, but are not limited to, the eBay Partner Network.
I juat read through this whole thread. I must say its very impressive, and you have certainly given me some ideas.
As far as the door locks, its not the mechanism, its the relay. These relays were crap from the factory. For instance, I had the same problem as you, 2 years ago, I decided to remove the dash to clean up the hacked up wiring. I ended up installing a body control module from a 2002 trans am. The first thing I noticed is that the locks actually work now. One push of the button on the door or on the key fob (yea thats a nice benefit - you get to have gm key fobs for your car now lol), and the dor locks work flawlessly. Before this I was considering replacing the mechanisms. Both of my door locks are actually cracked and the module saved them actually.
It is definitly the relay. I keep seeing this issue - many complain about the door locks and the windows. I plan to do a write up soon about the door locks. The difference is definitly night and day.
Thanks again for answering my taillight paint thread and directing me here., I enjoyed reading the entire thread.
I wanted to point out that my 91 firebird has the same rear drum brake grab when it is cold or wet, and only when they are first applied after starting the car(1-3 grabs, then they are fine). I also used to own a late 80's,early 90's chevrolet celebrity wagon that had the same problem. The celebrity was a front wheel drive v-6, the firebird rearwheel v8 both with original proportioning valves and master cylinders, so the problem is drivetrain and platform independent. I flushed the brake fluid in the bird with no change. (My theory was that perhaps the fluid was old, degraded or had acquired water over time). My current theory is that, when it is cold or wet, the front DISCS are not initially grabbing properly, forcing the drums to do ALL the work. 1-3 applications and the discs are DRY and Grabbing so all works as it should as the load is now shared front and rear.
I am interested in hearing from others on this topic.
Has this occurred to anyone with 4 wheel discs?
Is there another proven cause and remedy that anyone has experienced?
Help us both out please.
Last edited by TRANSSPORT; 05-14-2015 at 03:17 AM.
Reason: typo
Thanks guys. I appreciate all the feedback!
Interesting thought about that 4th gen relay. Looking forward to your write-up.
Please post the link here when you're done or send me a pm to it.
Regarding the braking condition, my recent thought is that my front calipers may need refurbishing.
New sleeves and stuff.
Since it is platform-independent, as you said, this is the only thing that gets neglected on ALL cars and happens to all of them, so perhaps they're not moving freely and the rears get their pressure first... but that would also mean my brake warning light should come on, I think.
Will investigate this later this year (I hope).
Regarding the braking condition, my recent thought is that my front calipers may need refurbishing.
New sleeves and stuff.
.
I never suspected the calipers, but you may be on to something. For the record I have new rotors (passenger rotor 2014, driver's rotor 2010) and pads (June 2014 both sides), so we should be able to discount unnecessary gap between pads and rotor. perhaps the caliper reservoirs lose pressure over time and need to be replaced? It does only occur when it is cold or wet though, not all the time.
Originally Posted by NCC-2569
Interesting thought about that 4th gen relay. Looking forward to your write-up.
I too want to read that. If you are talking about the automatic door lock sticking problem, i have 2 cents to add to the stew. My door locks took 2 pushes on the button to shut for the longest time...pushed the button so much i broke the mounting tab. I bought 2 new buttons and replaced both sides, still no fix. When I replaced the door panels, I initially tried to install some extra padding that covered the sliding bar that activates the lock.
The door locks would barely function at all! I took the new panel back off and removed the extra padding as i could see nothing impeding the bar from functioning as before.
Once the extra padding was removed, the door locks work perfectly! The new panels are not "new", just black ones i purchased as i was converting my interior from grey to black and red, otherwise they were identical to the old grey ones (with the exception of a new moisture barrier that may also help reduce friction).
My thought is that the cardboard had probably gotten wet and swelled, restricting the flow of the mechanism. (i have t-tops) The replacement, though just as old, apparently does not induced drag on the bar, so the problem no longer exists.
The only thing restricting rod movement in my doors could be the rods themselves.
Perhaps it'll help sanding and polishing them until they have a smooth finish.
But for now I have a totally different kind of problem to fix and want to share with you guys how I'm approaching it, as I'm new to hunting down electrical gremlins and I'm sure many of you are, too.
Reports have indicated my right brake light wasn't working, so I had to investigate the issue some more.
These are the options to go through step by step
1. Bulb(s)
2. Socket(s)
3. Ground spot
4. Wiring
5. Connectors
6. Brake switch
7. Turn signal/hazard switch assembly
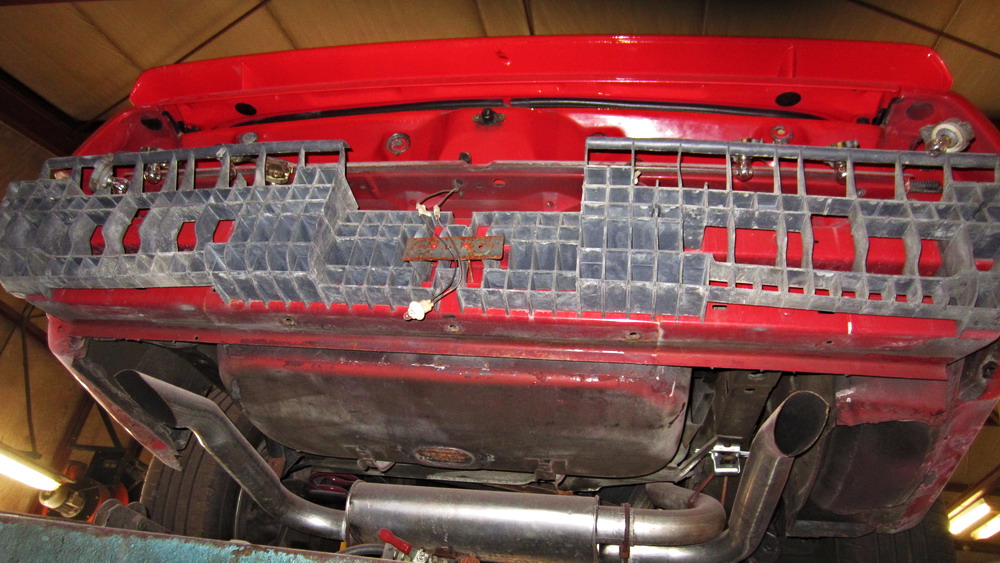
I started out by removing the trunk trim and tilting the tail lights across the rear bumper to gain access to everything relevant in the rear end.
My girlfriend stepped on the brake pedal for me and the brake lights all turned on.
I shook the housings a bit, no change. No flickering, no cut-outs, everything working perfectly.
I SHOULD have looked at the bulbs themselves, as a broken filament can cause intermittent problems.
Edit:
Checked the bulbs, both are ok.
Removed the one from the socket with two dark green wires and the second bulb still lights up, so that's my lucky theory going out of the window.
Wiggling the wires going into the sockets also did not change the situation.
Same thing with the entire length of wiring across the rear end and the connector/grommet/whatever on the left side behind the interior trim.
This is the wiring I'm talking about.
So let's say the bulbs are ok, the sockets and this part of the wiring.
Time to get out the wiring diagrams!
This is the matching diagram for my vehicle.
There are different sets of diagrams in the service manual: some for all models, some are marked EXCEPT TRANS AM, some WITHOUT T61 (which would be the daytime running lights RPO code), so you need to find the right one.
What we can see here is that the two sockets on the right side are wired up independently from the left side.
Dark green insulation for the right side, yellow for the left side.
Both sides are using the same ground spot, though, so let's look up ground distribution cell 14.
This simplified schematic show us that all rear lights are spliced together at several points so that we have one wire coming out to our ground spot.
Now we just need to know where G303 is located physically, so let's look into the component locations table for the exterior lights.
The troubleshooting hints do not cover my issue, so we'll skip them this time.
The table shows G303 as being located in the center of the trunk's rear wall and a reference to yet another part of the service manual.
This drawing isn't entirely accurate. The ground spot is not on the hatch motor plate, but is in fact attached quite securely to the rear wall.
The trunk light also shares G303 with the tail lights, so the tail ground has connection from above and below.
If this spot was an issue, none of the rear lights would work, so we need to inspect other things.
This is all you can do from the rear of the car.
So let's follow the first wiring schematic one up to another one.
Our dark green wire shows a large "G" in a triangle, which refers to this other schematic and shows the wire's path into connector C210 and from there into the TURN-/HAZARD SWITCH.
Further investigation also shows another connector to the left of the left rear seat (C208).
I'll go for the connector up front first. It's supposed to sit on the steering column and I hope (I sooo hope) it's come loose and just needs a replugging.
One step up the bad-ladder comes the connector behind the rear side trim, which is a PITA to remove and more so to reinstall and at the top of this pile sits the hazard-switch.
I assume the steering wheel has to come off to provide access to the turn signal and hazard switch assembly, which means certain DEATH, due to that airbag timebomb sitting in the way.
It's like the dragon sitting in front of its lair, guarding the princess and along comes the knight with his cattle prod, except the dragon explodes and takes the knight and the princess with it!!!
I'll keep you guys posted once I get my car back from the paint shop.
Getting some minor repair done to my hood.
The front edge is rusting again, which is no wonder seeing how it's constructed.
If you don't hear back from me within the next month, I have probably attempted to slay the dragon using EVERY precaution and procedure there is to that and still failed
Seriously though... that airbag stuff really gives me the creeps, even though I know from others' experience how to properly discharge the electrical components and what to do to prevent it from going off in my face.
Probably would let some mechanic do it for me instead.
Getting stuff done here. Stuff that I can do without assistance, that is.
My left cup holder has broken once again, so I removed it and fixed it with an additional step this time.
I took care of one of the mounts three years back and it's still holding.
Take a look here:
There was enough mating surface to roughen up and simply move the bushing in a bit, then glue the parts together.
The other broken part wasn't so lucky. I tried to glue it onto the jagged edge, which held up till a week ago.
So I sanded the bushing down to get a relatively even surface.
Once again, time for my special superglue.
I also tried an idea I got of manolis1969's YouTube channel and dropped some liquified zip tie in the cracks.
Here's a link to the video I'm referring to:
How To Plastic Weld - DIY Plastic Repair - YouTube
I then moved on to the center piece of my tail lights using the same trick, not knowing how durable this solution is going to be, since the materials are most certainly not identical and I don't know if the bond will be strong enough.
One corner segment broke off and was only kept in place by the grommet.
After positioning it with some paper to get the parts to the same height, I gave it the zip tie treatment from both sides.
We'll see if it cracks the instant I mount it back onto the car.
Edit:
Well... from the sounds of it... it didn't hold up very well.
The cup holder is fine, but my center piece is always under pressure in some spot, even though it shouldn't be.
Melting zip ties, eh? I would never have thought of that one.
I didn't know those cup holders were prone to breakage. I bought a set to add to my car someday. They are not broken currently, but I guess I'd better think about reinforcing those mounts when the time comes.
Yep, the cup holders keep getting accidental kicks, plus if the bottle is large enough to just fit into the holder and tall enough to touch the dash, you'll create pressure on the cup holder.
If you can reinforce the mounts, it's a good idea to do so.
Oh man... how I hate this posture...
Everyone of you who's been in this position surely understands why.
I was looking for freeeedom... no, wait, different song.
In fact, I was looking for that dark green wire to the turn/hazard assembly and GUESS WHAT!
There's TWO TYPES of dark green wires coming together next to each other, so imagine my face as I pulled the first of two the large plugs apart and NOTHING changed at the tail lights.
Well there's these two flat connectors which are supposed to be slipped into a bracket on the steering column and both of them look like my C210 and have one green wire which are slightly different in tone, but not as light as the light green wires everywhere else.
So I took my time and brought the connectors back to their place, figured out a bit of the really messy wiring (someone installed a car alarm in there) and found remains of a former stereo system.
A while ago I found the connector and wondered where it went; then I found the cut off other end some place else and now I realized they belong together.
Out with the trash then.
Now the bad part.
Tilting the steering column causes the right rear brake light to go out for a moment :/
I don't know why this only affects the lights while driving. It's not as if I were tilitng the column around wildly when I'm on the road.
Only when I let it snap from the bottom into the lowest position can I cause the failure for a split second.
I accessed the turn signal lever through the small port on the side, wiggled the dark green wire and nothing changed, which leads me to believe that my wire between the turn/hazard assembly and connector C210 is broken, chafed open or whatever.
Which meeeeeaaaaaans... removing...
We've had the first (and so far only) day of t-top weather here a few days ago.
I realized how nicely the trim rings reflect the light into the gauges, so here's a random trim pic.
What a nice time to wash the car, right?
Break in the rim cleaner, they said.
You've used it before you had to go with that alternative one while your usual cleaner wasn't available.
It'll be fine, they said.
Yeah. Right. This stuff was for my former 91's clear coated rims and worked great.
Not so much for bare aluminum rims, though.
So that's my weekend gone into polishing. By hand.
But well, at least the rims look far better now. This is as far as polishing by hand will ever take them and the foggy haze is gone as well.
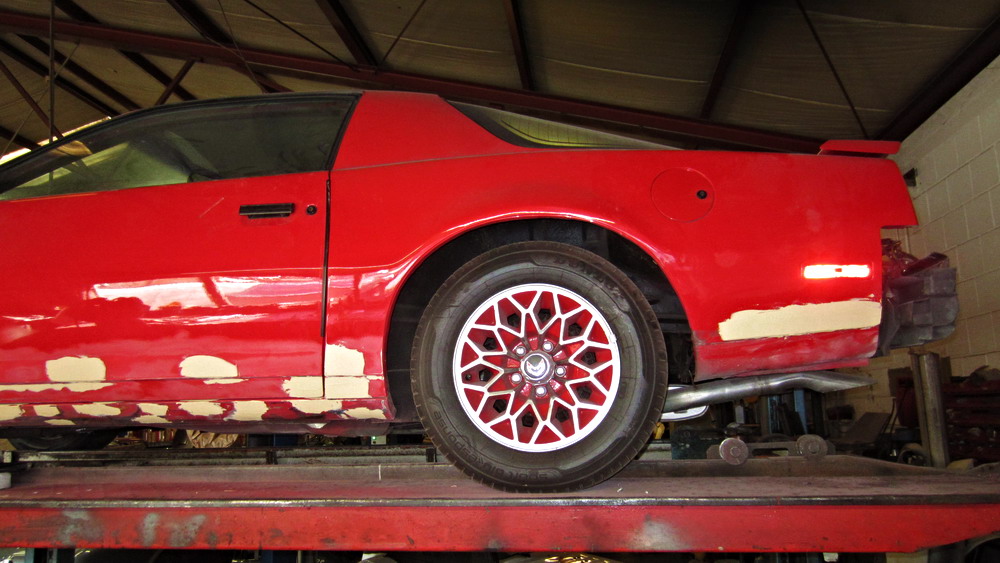
I always wondered how stock rims would look on my car...
Well, I don't like them more or less than my Centerlines.
It was "new-tyre-Saturday" for the rear wheels and I decided to take only the wheels to the tyreshop this time.
I have a complete set of spare stock rims with good tyres on them, so why not put them to use?
No more bent body parts, no more furious anger due to people jacking the car up wrong, PLUS those guys can more easily swap tyres on short notice this way.
Getting stuff done here. Stuff that I can do without assistance, that is.
My left cup holder has broken once again, so I removed it and fixed it with an additional step this time.
I took care of one of the mounts three years back and it's still holding.
Take a look here:
There was enough mating surface to roughen up and simply move the bushing in a bit, then glue the parts together.
The other broken part wasn't so lucky. I tried to glue it onto the jagged edge, which held up till a week ago.
So I sanded the bushing down to get a relatively even surface.
Once again, time for my special superglue.
I also tried an idea I got of manolis1969's YouTube channel and dropped some liquified zip tie in the cracks.
I then moved on to the center piece of my tail lights using the same trick, not knowing how durable this solution is going to be, since the materials are most certainly not identical and I don't know if the bond will be strong enough.
One corner segment broke off and was only kept in place by the grommet.
After positioning it with some paper to get the parts to the same height, I gave it the zip tie treatment from both sides.
We'll see if it cracks the instant I mount it back onto the car.
Edit:
Well... from the sounds of it... it didn't hold up very well.
The cup holder is fine, but my center piece is always under pressure in some spot, even though it shouldn't be.
If this is ABS plastic you can weld it with 100% acetone, i used this on my center console and it is as strong as new
That's what I always thought, but my RPO sticker lists the code for the "Hi-Tech Turbo Aluminum Wheels", which are also standard according my '89 product book.
The diamond spokes are standard for GTA.
Here it is:
N24 - WHEEL,15X7,FIVE INCH BOLT CIRCLE(CAST ALUMINUM) AL WHL(N24)
Those white letters are definitely a nice touch, dude
good luck finding that in Europe.
There are few things that are not american specific for cars which are really hard to find ,one is white letter tyres and the other is pinstripe...I have yet to find the original like silver and red pinstripe that goes around the car ,rear eleron and mirrors.It was a dealer thing from what I understand but the car originally had that plus its something really american about pinstripes.
A couple of weeks back someone wrote about a US based company which custom makes kind of an adhesive lettering based on a photograph you provide.
Interesting idea, but as you said, I don't think this will be available in Europe.
I know of the pinstripe issue. There was ONE company that used to make a double stripe with, IIRC, a black 3mm stripe, 3mm margin and another black 1,5mm stripe.
Apparently they were the ONLY ones doing that and they went out of business a while ago.
The resellers told me that the combination I was looking for just wasn't being used anymore after the '90s.
Last Saturday I swapped my idler arm for a new one.
I could move the old one around quite freely once it was removed from the vehicle.
Didn't help me that much, tho:
- Left ball joint dead
- Right ball joint dying
- Outer and inner tie rod threadings damaged, rubber caps died from old age
- Adjustment sleeves corroded badly
- Relay rod rubber caps died from old age
The only thing still ok is the pitman arm... aw man...
Well, luckily I already have two ball bearings, sleeves and outer tie rods in stock, so I can keep the repair bill in check and just had to order the relay rod and inner tie rods.
Getting the ball bearings swapped will be the hardest task, because there's no way I'm getting the required tools in the right size on short notice here, so I'll have to find a shop with the necessary time on their hands to do it for me.
I had the chance to take a pic of how my new transmission lines had been formed for me.
Not very fond of those little kinks there.
Those are pre-flared lines with the nuts already on them, but they only come in precut lengths, so there's a little slack that needs to be bent so it'll all fit under the car.
And in case anybody wants to look for a trunk seal in form of yard goods and only needs to know the profile, here ya go:
Keep in mind that the fat part used to be a nice circle. If your seal looks like this, it's time to replace it.
The Metro seal I installed doesn't have that lip which you can see reaching over my fingers, but I don't see an issue coming from that.
Update:
All my missing steering linkage components have arrived today, so I can replace everything with the exception of the pitman arm and the new idler arm.
Ye ol' wishbones will also be seeing some new bushings, which will arrive during the week.
First test-fit results are looking good. What could go wrong?
My mechanic will only be able to get the ball joints swapped mid of July, so this is gonna rest till then.
Four hours and a nearly destroyed new ball joint later, it is done.
I'm getting an alignment today and that should take care of tyre wear and wheel squeal in low speed turns.
What I've learned this time:
Cars on this continent do not tend to have grease fittings, but instead closed up joints.
So when they finally break a few years after installing them, you have to get new ones plus a new alignment.
Our cars are different. The grommets are simply pushed over the joints and grease will flow out of them a bit.
So don't let a German mechanic tell you all the joints are dead, just because they see some grease!
Well, whatever. The parts weren't that expensive and you'll see a very good reason to swap your tie rods further down this thread.
Firstly, we removed the control arms to get to the ball joints.
We did it as so many others did before us:
- got the car up on the lift
- took off the tyres for additional space
- removed the ball joint's cotter pin and loosened the nut slightly beyond the breakaway point
- used a hydraulic transmission stand to press up against the control arm
- disconnected the outer tie rod
- removed the ball joint's nut
- slowly let the transmission stand come down completely
- removed the spring
- disconnected the control arm mounts
We removed the ball joints using a press and some large old bearing shells.
One immediately broke, but that only causes things to take longer, so no problem there.
The bushings were a different thing, though.
We got them out with a bench vise, a socket of the right size and another bearing shell for space.
As so many people do, we also had to hammer the control arm back into its original form after this.
So here's a few pics now!
See, this is normal. Excessive play is the word here. There was none. And that after 25 years.
Old vs. new.
If you want to do this and not have the absolute worst alignment afterwards, you need to adjust the new tie rods as closely to the old ones as you possibly can.
I scratched off the grime on the tie rod ends and used flexible measuring tape with an angled end for this.
The angled end went on the outer edge of the inner tie rod and the other side went over to the outer tie rod with a twist in the middle, so I could place the rod on top of the tape and read the numbers.
And this is why tie rods need to finally be replaced anyway. There's no way someone's going to do another alignment with these.
If you're going to install new adjustment sleeves, keep this in mind:
The slot in the sleeve must not be over the slot of the clamps.
You can see that the clamps' slots are opposite from the sleeve slot here. This has to do with forces and helps keep everything tighter.
Here's how some of the bushings looked like.
It was definitely time for a swap.
And in case anyone was wondering what kind of springs I'm riding, here they are.
Now just one more thing...
How did THIS happen? And why is there a triangular vertically mounted sheet metal behind this side of the wheel well and on the other side no such thing?
This has not been there a few weeks back, not even slightly. And I've driven very few miles over the last month, compared to past times.
And I'm not just driving tight circles here, either.
The only thing that had changed until yesterday was the idler arm. But how would that influence the driver's side?
If this is ABS plastic you can weld it with 100% acetone...
Thanks for the advice on the acetone!
After my super glue broke up during the last couple of warm days, I tried some of my remaining filler I used to fix my wooden door frames at home, simply because I had it readily available.
Worked for about half a day and by then I had bought a can of acetone.
Damn, that stuff dissolves ABS quickly
Some advice for others with this issue:
I sanded the broken "bushing" again until it was smooth, then pushed it a bit farther into the opening on the cupholder, so the mating surface got larger.
Then I fixed it into place with some duct tape, pulled some acetone into ony of my syringes (no needle required) and let a drop sink into the small gap between the parts.
Once the acetone dries, you're ready to go. I let it sit over night, therefore I can't give exact estimates.
Acetone dissolves the ABS and once dry, the liquid ABS turns into fused material.
We're moving into a new place, so I'm not posting much right now.
The only things going on with the car are these:
- Rear differential bleeding (again):
My mechanic will take care of that after our vacation, since he was tasked to seal it up in the past and it didn't hold up.
Checked fluid level, still ok. Just the occasional drop spinning out during movement
- New transmission cooler lines leaking at radiator fitting:
He'll look into that as well. Said it's not the fitting and can still be sealed, so I got my hopes up for this one
- Rear wing disintegrating further:
I was wondering why I kept having rust particles in the trunk side rails.
At times there would even be some rust on the driver's side rear seat.
Well, the wing is getting fleshier by the week while it's rotting out badly and there's nothing I can do about it :/
I'll be checking junk yards for a D80 plus the metal closing piece and be done with it, except if a fiberglass wing accidentally comes my way.
Keep in mind that this is Germany. These things are EXPENSIVE to ship.
For now I'll have to get used to seeing this picture:
The amount of stuff you can get in this car... it's like Tetris, but it gets the job done... slowly... but surely.
As you all know we 3rd gen guys are masters of persistence and patience
Not much happening here.
I had the car in the shop several times last year, because the differential kept leaking again and again and finally needed new bearings.
At least that wasn't my fault.
Now it's winter time. Not moving the car around very much in this weather.
It isn't snowing or anything, it's just wet and grimy. Ugh!
Well, at least I can fire her up whenever I want to and it was about time for it.
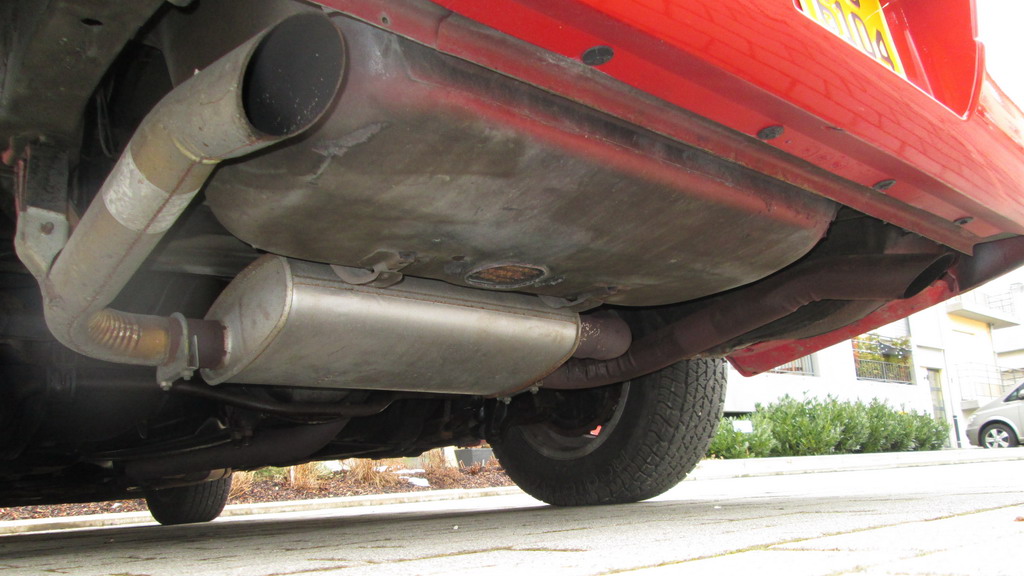
Lots of condensation in the exhaust.
You are keeping your Trans Am really nice. The amount and care of details is amazing. I see that the car still looks to have the factory style shaped tips on it's tail pipes. They look way nicer and as far as I know, ATP Exhaust did/does the tail pipes shapes and the oval slant cut like factory and it isn't present on other aftermarket replacements.
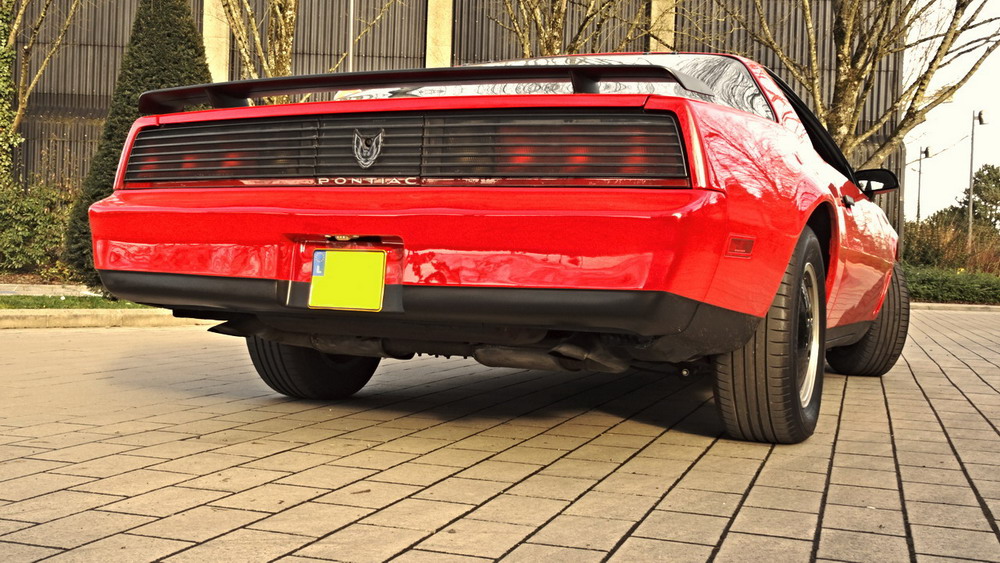
The tail pipes are shaped like the stock ones... loosely... vaguely...
Recalling my Firebird's tail pipes, they were cut off at almost a right angle in relation to the pipe, whereas my current ones have been cut off parallel to the ground, probably for more ground clearance... or something.
One day, when they need to be replaced, perhaps I'll be able to get some stainless steel pipes in the same design.
Want to stick with that leaf blower kind of exhaust
Same here, that sound is perfect I think. Its not obnoxiously loud, very tasteful. The dog towards the background gives an idea of how loud it really is (since videos and speakers aren't really the best at doing that)
Yeah, the Walker pipes are the ones my Firebird used to have.
Thank you. Yes the Walker seems to be the common ones to replace stock exhaust systems. The ones your car has now look exactly like the ones on my pics. They're 2.5 inches large of diameter and have that factory stock shape and cut. The stock tail pipes were however welded on the muffler by the factory.
Originally Posted by alex722607
Same here, that sound is perfect I think. Its not obnoxiously loud, very tasteful. The dog towards the background gives an idea of how loud it really is (since videos and speakers aren't really the best at doing that)
Thanks! I completely agree with you.
Last edited by Fireblood83; 02-26-2016 at 09:31 AM.
I hadn't noticed the dog in the video until you mentioned it, lol
The volume of that exhaust is probably somewhere near mine. Got an Edelbrock muffler in there.
I know someone who had a company fix up a stainless steel setup and they also bend the pipes, so I guess I'll be going in that direction when the time comes and see what they can offer
Please make sure to show us pictures when it will be done.
I'm glad that I found the factory 1982-84 dual resonator setup that were used on the V8 Camaro and Firebird. They're not obnoxiously loud either and have that 60's muscle car deceleration sound at high revs. They look cool but are hated by most "due to their restricted flow characteristics"
I went to fix up some loose connections in my rear sidemarkers yesterday.
Had to stick some putty in the sockets to help with securing the LED lights in there.
While I was at it, I saw my engine oil jar sitting in the trunk mound and went up front to check the oil level.
I noticed three things in the engine bay:
1: The clamp securing the air intake snorkel to the flex piece was loose. Don't know why, though. Haven't been at it for a long time.
2: There was a piece of string looking out of my air filter box. No idea how that got there, either. I always use disposable towels, never cloth towels.
And my mechanic didn't have any business in that area for a long time as well.
3: It seemed to be time to swap out the rivet from the clamp at the air filter end of the snorkel.
I tapped the old rivet out and replaced it with a new one.
At first I thought "damn, what if this comes loose and the engine eats it?".
...
...
"Well... nothing. It's behind the flange, idiot!"
I had several attempts at this.
1. Didn't insert the rivet from inside the snorkel -> Left the main part of the rivet in the way of the flange.
2. Bad rivet -> Open hole. Doesn't matter really, but still sucks.
3. Turned out ok. Filled it up with a bit of putty. Maybe it'll work as a corrosion protector.
The nice weather has finally arrived here and of course there are specific issues to this condition -> engine heat.
I've met the boss of all traffic lights. They were red for so damn long, that engine temps reached almost 240, according to the gauge, and I did not notice a running fan... no wonder with the engine running.
My former V6 with the single fan setup would let me know with a certain vibration and audible hum that the fan came on.
Now, I know that my gauge sensor connector tends to be a bit wonky at times, so one never knows the exact temperature.
Nevertheless, I decided to check out my temperature electronics and read up a bit on the dual fan setup, as there is much talk and little fact about it.
These components are involved:
- Primary fan (driver side fan)
- Secondary/auxilliary fan (passenger side fan)
- Coolant fan relay (center relay on relay mount in engine bay)
- Auxilliary coolant fan relay (relay closest to the fender on said mount)
- A/C pressure switch (if A/C equipped)
- Auxilliary coolant fan switch (passenger side head)
- Coolant temperature sensor (front of engine, below the intake)
- Fusible link near battery
- Temperature gauge sensor (driver side head)
- Temperature gauge
- ECM
First thing: Hook up computer and see what engine temp sensor tells the ECM, then compare to gauge value.
Here's my rig:
I use a serial -> USB converter with an Ostrich chip inside (IIRC), a USB extension lead just to avoid break off the converter (again) while moving the laptop around, and a custom made ALDL cable using a 12V source from the cigarette lighter socket.
TunerPro then shows me exactly what I need to know:
- Engine Temp sensor input
- Fan request states
Apparently my gauge did match the sensor value for the ECM and sitting outside the car, I was able to hear the primary fan starting up at 110�C/230�F.
According to the Service Manual it should be starting up at 104�C/220�F, but this discrepancy may be due to my ECM/PROM combination with the intermediate board which maxes out the speed limit and compensates for my larger than stock injectors.
Well, testing the secondary fan is a little more difficult.
I don't like revving the engine for a period of time to get temps up to dangerous levels.
"Man, get to the point! How's this stuff work?!"
Alright, alright.
Note these facts:
-The gauge receives input from the gauge temp sensor in the driver side head.
- The ECM receives input from the engine temp sensor below the intake.
- Once the ECM receives a voltage from the sensor which converts to 104�C/220�F, it sends the primary fan relay a signal.
- The primary fan relay engages the primary fan until a temperature somewhere close to engine operating temperature is reached and the ECM terminates the signal to the relay.
That's the simple part.
To provoke the primary fan, put your ALDL port into diagnostic mode.
For my model I need to bridge the two rightmost pins in the upper row of my ALDL port, like this:
Just use a bent open paper clip, insert it into the appropriate holes for your type of ECM and turn the key into the ignition position, but don't turn on the engine.
If everything is ok, the primary fan will start right up.
The secondary fan only engages when one of the pressure switches has been closed. It is NOT controlled by the ECM, though the ECM is somehow able to note the fan's state.
One of them sits in the passenger side head and one is in the A/C line somewhere in the passenger side engine compartment's A/C tubing.
If your A/C is fine and you switch it on, the secondary fan comes on, because there is a certain line pressure in the A/C tubing.
This closes the switch, power flow is directed toward the auxilliary fan relay and the fan engages.
My A/C is empty, so no luck there.
Another condition would be to have such a high coolant temperature that the pressure in the coolant lines around the switch in the header is enough to close that switch.
Something around 115�C/240�F should do the trick.
All of those components can be tested.
- Both fans not coming on? > They share the fusible link near the battery. Check it.
- One fan working, the other is doubtful? > The relays are the same. Unhook the connectors, swap the relays. Now use said methods to check whether the confirmed fan still works. (Inside circle: left = primary, right = secondary)
- Relays both ok? > Disconnect both fans directly at their own motor terminals and swap the connectors. Always keep the ignition OFF while working on the fans!
- The secondary fan can also be engaged by bridging the orange and black/purple terminals in the relay connector. The Service Manual instructs to use a 20A fuse in the bridge. There's quite some current going through there to power up a fan motor, so be careful. I used insulation tape to fix two pieces of wire to my fuse for this. Can't recommend it.
- You can also check voltage at the fan side connectors if you can get your hands and tools down there. The bridge needs to be in place at the relay connector for this, but I think it's easier to do the above mentioned steps to determine if the power reaches the motors at all.
- One last thing are those pressure switches. They CAN be measured for voltage, either there is voltage or there is not, but good luck getting your hands between those exhaust manifolds to reach down to it. You'll need a ramp or lift to get there and even then I don't recommend it. If in doubt just replace the damn switch when the engine is cool.
I hope this helps anyone who might have been wondering how to diagnose his fan motors and that it settles the rumor that one fan is always running.
It is NOT.
If it is, then there is a fault or modification. Keep in mind that our engines have been designed around EMISSIONS.
A constantly running fan causes the engine to take longer to reach operating temperature, which would mean MORE FUEL CONSUMPTION and BAD EMISSIONS (as if that really matters considering the throughput of our injectors these days, lol).
Also, a running fan while the key is in the ignition position with the engine OFF, is also not working as designed.
 05-09-2015, 11:35 PM