Thirdgen F-Body Rear Drum Brakes to LS1 Discs
by Michael R. Brumm ( michael.brumm@singularity.org )
Visit http://www.knightreplicas.com/
This is only meant as a documentation of work that I have done on my automobile and in no way a recommendation that you perform any of these procedures on any other vehicle. I take no responsibility for anything you do. This document is also not guaranteed to be free from errors.
|
Parts Needed These are the fourth generation 1998-2002 (LS1) Camaro and Firebird rear disc brakes I bought to install on my third generation 1991 Pontiac Firebird (which had rear drum brakes). They are large disc brakes and the emergency brake works like a drum. I purchased both sets (driver and passenger side) from a salvage yard for $200 total. All of these parts were needed for each side. 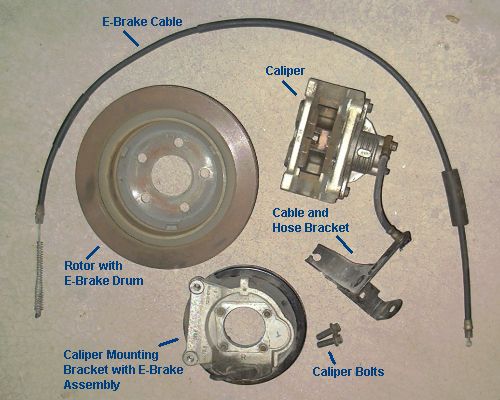 |
|
| 1st Step: Removing Drum Brakes and Axle
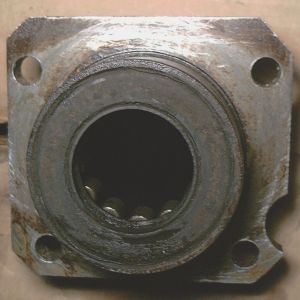
I’m not going to get too detailed in describing exactly how I did this because both procedures are covered in any off-the-shelf or service manual. The only tricky part is getting off the large top bolt that holds the backing plate onto the axle flange. The bolt is essentially designed to never come off, and has been stamped on all sides to ensure this. To remove it, I had to use an 18 inch plumber’s wrench and bounce all my weight on it. I tried using other methods, but I found that the plumber’s wrench was the best tool, simply because the more force you apply, the harder it grips. Here is the stock drum axle flange on my 1991 Pontiac Firebird with the drum brakes and axle removed. |
 |
|
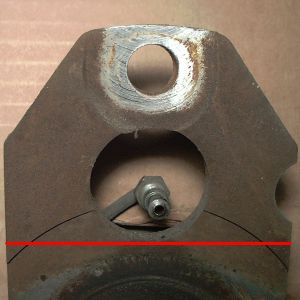
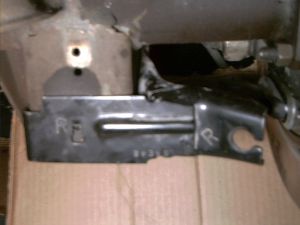
2nd Step: Marking the Cut Line I used a carpenter’s square to mark off a cut line that just kissed the bottom of the brake line hole in the flange. While it was not absolutely critical that this line be straight and square to the outside edges, it helped a lot when I later used this edge to align the caliper bracket. |
 |
|
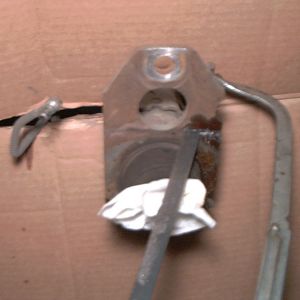
3rd Step: Cutting the Top off the Axle Flange Next, I moved the brake line out of the way, stuffed the axle entrance with a paper towel (to keep metal filings out of the axle housing and differential), and began to cut the top of the axle flange with a hacksaw. If you look closely at the first picture, you can see the pencil line that my cut is following. I used a hacksaw because although it may be a little slower, I had a lot more control over the cut. It really didn’t take that long (kinda surprising, really). |
   |
|
4th Step: Cutting the Corners off the Axle Flange I also had to cut off the little raised corners or the caliper mounting bracket wouldn’t sit flat against the axle flange. |
 |
|
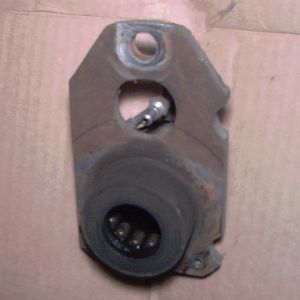
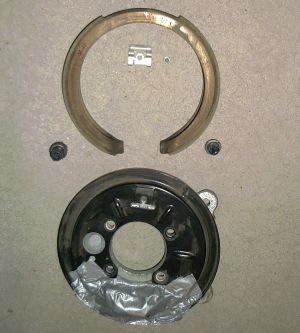
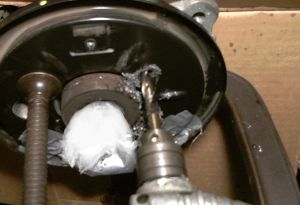
5th Step: Preparing the Caliper Mounting Bracket To make it easier to use the clamps, and to keep metal filings from getting into every nook and cranny, I removed the emergency brake drum shoe (the horseshoe shaped ring) and some other hardware from the caliper mounting bracket. Then, I used duct tape to cover the rest of the bottom of the bracket. This later prevented me from having to spend a lot of time cleaning little metal filings out of everything. |
 |
|
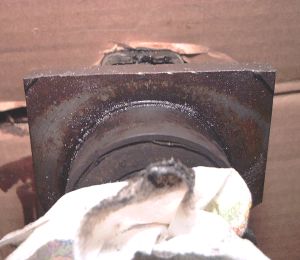
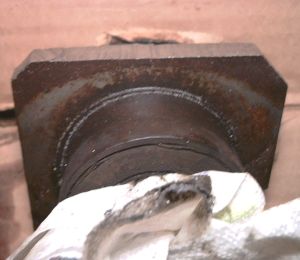
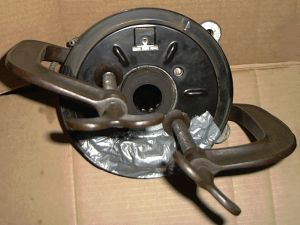
6th Step: Centering and Clamping the Caliper Bracket to the Axle Flange Two large clamps were used to hold the caliper bracket up to the axle flange. For leveling, I matched up the ridge on the back of the caliper bracket and the top of the axle flange. For centering, I placed a nail in the crack between the axle housing and the bracket, and used the nail to test the clearance all the way around the housing. For minor adjustments (to level or center the bracket), I lightly tapped the caliper bracket with a small hammer. When I was sure that the bracket was centered and level, I tightened the clamps as hard as I could. |
 |
|
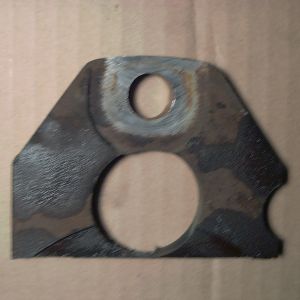
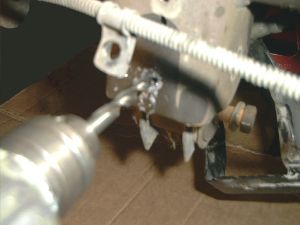
7th Step: Drilling the Axle Flange Using the holes in the caliper bracket as guides, I drilled holes in the axle flange. I placed a bolt in each hole after drilling and secured it tightly with a bolt. After drilling two holes, I was able to remove one of the clamps to gain access to the third hole. I used a brand new 3/8 inch cobalt drill bit and plenty of oil, so the drilling went pretty quickly. The bottom holes overlap existing holes from the drum mounting, so they were a little bit more difficult because they tended to grab the bit. I found it was best to begin drilling one (or both) of the top holes before the bottom ones. When I got done cleaning up all the little bits of metal and the pool of oil, I had the beautiful little axle flange shown in the second picture. |
  |
|
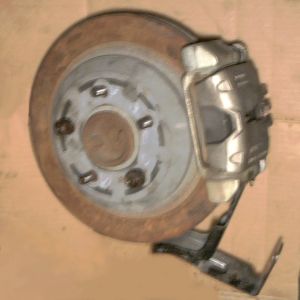
8th Step: Testing the Setup To make sure that everything was working fine, I reassembled the emergency brake to the caliper bracket, bolted the caliper bracket to the axle flange, put the axle in, bolted the rotor to the axle, and bolted the caliper to the caliper mounting bracket (note that I just left the brake line and cable bracket dangling). When I turned the axle, everything cleared fine, except the emergency brake rubbed a little. This is fine, since I can adjust it. Plus, driving it down the road would take care of that, too. |
 |
|
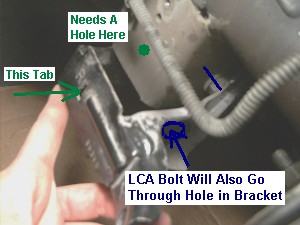
9th Step: Attaching the Brake Line and Hose Bracket In order to attach the brake line and hose bracket to the lower control arm mount on the axle, I had to drill a hole for the tab in the bracket to fit into. This was fairly easy to do. I first removed to bolt for the LCA (lower control arm) and pulled the arm below the mount and out of the way, then stuck the bolt in the LCA’s hole to keep it from swinging back up to the mount. I drilled the hole centered horizontally and 7/8 inch up from the bottom, using a 5/16 inch drill bit. When I got done, the bracket fit perfectly. |
   |
|
10th Step: Installing the Brake Pipes and Emergency Brake Line I had to bend the pipe around to make it go where it was needed. On my 1991 Firebird, the driver’s side pipe just needed to be cut shorter and re-flared. On my passenger side, I had to bend the pipe around considerably and also cut it shorter and re-flare it. I used a pipe cutter and an ISO bubble flaring kit to do this. These disc brakes expect a 4.5mm brake pipe with an ISO bubble flare. My car already had these, but I suspect earlier years (when GM used SAE and double flares) might have to make some type of conversion. For the emergency brake lines, I had to run them differently than the stock ones, but it wasn’t very difficult to get them working. Finally, I expect that I will need to replace my combination (proportioning) valve, but I have not yet determined which valve to use (third or fourth generation?). I may just buy an adjustable valve and tune it by trial-and-error. |
|