Power Windows, 101
Troubleshooting:
The following are general assumptions using the history and experiences of actual board members, taken from the archives. Before you assume that your problem is as easily solved as reading this, check your switch, always check the simplest things first, changing a switch is MUCH MUCH MUCH easier than changing a motor. Now the answers to your questions, assuming the switch is fine….
Problem: Slow moving windows.
Diagnosis: (The great Vader had something to say on this issue) "Permanent fix? Remove inner door panels, clean tracks and regulators, relube with white lithium (Lubriplate AERO), adjust guides, remove motor brushes and clean the commutators (vacuum out carbon, rinse with CRC Electromotive cleaner) install new motor brushes. You should be set for another fifteen years." (Editors note: Getting a new or remanufactured window motor is a more practical option compared to rebuilding a stock motor, the stock motors are basically riveted, and sealed tight, not exactly user-friendly).
Problem: Intermittent windows, IE: Windows begins to roll up/down and stops.. BUT will move a little more after a "rest."
Diagnosis: (The ever-informative GMTech had this to say on the issue..) "The window motors have internal circuit breakers, and when worn out, the motors pull excessive amperage causing the internal breaker to continually trip, that is why if you let it set for about 30-40 seconds, it will move again." (Ed: In summation, replace the motor.)
Problem: No movement at all/intermittent windows.
Diagnosis: Remember, the switch has been ruled out. This leaves one thing, a wiring/connector problem. Chances are if the window will not move but occasionally moves, and doesn’t depend on a "rest," you have a frayed/shorted/ wire.
Problem: No movement at all.
Diagnosis: Bad wiring/connections, or a bad motor.
If the problem is your window motor, here’s what you need to know:
You have four options for window motors.
#1 A remanufactured one from a major auto parts chain. Expect to pay around $35-55 for one of these. But BEWARE, although some will come with a lifetime warranty, you DO NOT ever want to repeat a motor replacement. Remanufactured parts as a general rule should be avoided, the quality is substantially sub-par.
#2 A no-name brand new motor from a major parts chain. Expect to pay between $45-75, sometimes higher. In my opinion, these are acceptable, you should always get a lifetime warranty, and the quality should be acceptable, but not top-end.
#3 A new AC-Delco motor. While some may argue that the quality of AC-Delco parts is not top-notch, I don’t agree. I trust AC-Delco.
#4 A junkyard motor. Expect to pay between $5-30. As with any junkyard part, beware. A little tip from our buddy Vader, "Get a motor from a rear door of a four-door if you can, since they generally are used very little. There are only about three-four different types of motors used in the ’80s on GM vehicle, and the recycler should have the interchange information. My Fiero is running on two used motors from rear doors from an ’88 Olds Cruiser wagon."
So the motor is history…
So, I guess you’ve decided your motor is shot, if you want to replace it, read through the whole article first and foremost. Second, do your research on parts, shop around, I got my new ACI brand motor for ~$50 from Advance Auto Parts. Third, if you are not mechanically inclined, get a quote from a shop, have them do it. This job is not for the faint of heart, and is something I’d probably pay to have done, if my RS needs a motor again. Expect sore, bloody arms after.. You have been warned…
The Dirty Work:
Be forewarned, this procedure is NOT for the impatient.
Removing the Door Panel:
This is the easy part, first off you’ll need T15 and T30 Torx bits. The T15 bit is used to remove the small trim screws around the handle/lock button/mirror adjustment assembly. Be careful when doing this though, some of the Torx screws in the panel are fake, you don’t want a rounded off plastic Torx head in your door, trust me, it looks bad. Also, it’s a little tricky getting the plastic surround off the door release handle, you just have to be patient and work it off. Next, you’ll need to remove the armrest, which is held on by three T30 Torx bits. The door panel itself is held on by a series of plastic clips around it’s perimeter. Removal of these clips from the door shell is very tricky. There is a tool specifically made for this, but if your like me, you are too cheap to buy that tool. The Macgyver way around the tool is this, use a small pair of needle-nose pliers, slide the tips under the door panel and directly around the shaft of the clip, slowly pry the clip out of the door. Using the pliers does not harm the door panel, all your are touching is the clip itself. Once you have the clips all loose, the plastic top section is all that’s stopping you. It’s hard to describe the way it’s held on, but in essence, it clips on. A little plastic tab in slides into a groove in the door shell. You need to separate the two by tilting the upper plastic part of the door panel slowly and carefully downward toward the bottom of the door shell. Rolling the window down helps this procedure, if possible of course 🙂
Removing the Regulator/Motor assembly:
Roll the window to about the half-way position. The Regulator/Motor assembly is held to the door by four rivets. Before drilling the rivets out, have a friend hold the window glass it’s very heavy and will do alot of damage if it fell freely onto your wrists.. Find a small drill bit and drill the centers out of each rivet, if the rivet does not pop off, you may need to chisel the head off the door, this is very easy since all the steel should have been drilled out, the rivet head itself is made of aluminum. Once all the rivets are removed, the motor should hang free. There are three roller guides on the regulator, two are on the same track. First remove the guide/arm from the track on the inner half of the door shell by sliding the motor/regulator assembly towards the lock mechanism (or door jamb, whatever as long as you slide it to the back of the door). Next, continue to slide the assembly back and allow the second guide to slide out of the track located on the outer half of the door, continue by sliding the third and last guide out of the same track, in the same manner. The assembly should be free.
To remove the free Regulator/Motor assembly from the door shell, you basically have to force it out, cause it aint going without a fight. The biggest access hole in the door shell is towards the door jamb, on the lower half of the door, you should be able to flex the regulator arm enough to get a guide outside the door, from then on, it’s all careful flexing, and trying not to break something…
Removal and installation of the motor:
The window moves up and down because the motor pushes a half-moon shaped gear up and down. That gear is spring loaded. I highly recommend clamping down and securing the gear and spring assembly before removing the motor from the regulator. There are two rather large holes in both the regulator arm, and the gear, I shoved a screwdriver in both those holes at the same time, effectively stopping movement, and greatly increasing my safety. The gear would have the effect of a circular saw if allowed to spring loose, I cannot stress the importance of securing the gear enough..
Anyway, The motor is held to the regulator by three rivets, drill them out. After the motor has been separated from the regulator, attach the new motor. My new motor came with a set of screws to replace the rivets I drilled out on the motor, these screws turned out to be very weak, and stripped when I tightened them, so I decided to rivet the new motor on. Keep in mind, you may have to align the motor gear, and regulator gear, I did this by slowly "bumping" the motor by attaching the wiring harness to the new motor and tapping my power window switch. Visually inspect everything.
Installation of the new Regulator/Motor assembly:
Sliding the new assembly back in the door shell is the same as removal. Installing the guides is the exact opposite of removal. And that’s where this project stops being fun. There are four rivets that held the assembly to the door shell, and now there should be four holes where each rivet was. You have three options when it comes to replacing the first four rivets you’ve drilled out. The first option is to go to a GM dealer and order the correct rivets, and installation tool, which I highly recommend BTW. The second option is to use smaller rivets, this is an option because the large 1/4" rivets originally used are very hard to come by. To use the smaller rivets, you’ll need to find some small washers so the rivet has something to grab on when it’s secured. The Third option is to use nuts and bolts, this is the option I chose. I used 1/4"x28 thread bolts, 1/2" long. and used 1/4" washers on each bolt head. I didn’t use washers on the nut because it’s just too difficult to get a washer on that side..
The image below is to simplify the explanation of the installation, (Hey, that almost rhymed..) 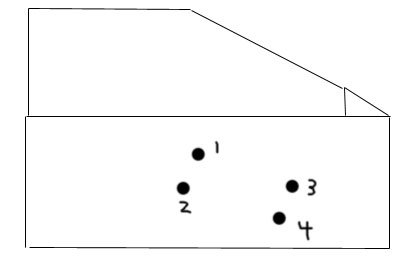
Hole #2 is the first one you will secure, it’s the easiest to get too 🙂 Have that friend lift the window all the way up. line up the assembly with the hole and insert your rivet/bolt. Tighten snug, but not very tight. Next, move the motor so that hole #4 lines up. This one is by far the hardest to install. hold everything in place, and roll the window all the way down. The gear should now be out of the way to allow access to the back side of hole #4. I have large hands, the best position for me to install the nut was to insert my hand above the motor, sliding it back towards the backside of the hole, inserting the bolt with my free hand and allowing the nut to rest on the tip of the bolt, which I then threaded onto the nut. If you think that sounds complicated, wait till you actually perform this feat… It’s NOT easy. Tighten down bolt #4
Hole #3 is a little easier, everything should be pretty well lined up, and straightforward, tighten it. Rolling up the window al the way helps with hole #1, which is absolutely cake compared with #4.. Tighten down bolts 1 and 2.
Finishing Up:
Get a can of that spray white lithium Grease, apply generously to all tracks and anywhere else that has friction. It has also been suggested to clean the tracks with WD40 or a similar silicone spray before applying the lithium grease, while this couldn’t possibly hurt, I didn’t feel it necessary for my car.
Attach the connector to the motor firmly, double check operation. And don’t forget to check all the other wires for interference, and general wear. When I did mine, I found the source of my power door lock problem, a frayed wire..
Assembly is the reverse of removal from here on out, enjoy your rejuvenated power window.