Completed the Red Taillight Mod. Here's how I did it. (PICS INSIDE)
 05-11-2006, 01:09 PM
#1
Senior Member

Thread Starter
Join Date: Jul 2003
Location: Cleveland, OH
Posts: 770
Likes: 0
Received 1 Like
on
1 Post
Car: 25th Anniversary RS
Engine: 305 TBI
Transmission: 700R4
Axle/Gears: Stock 2.73s for now..
Completed the Red Taillight Mod. Here's how I did it. (PICS INSIDE)
So I spent some time last weekend outside working on the 92. I just got it out of storage late last week (which is a whole other story in itself) and was pretty anxious to dig in and start prepping for summer. I spent a good portion of my winter downtime putting together a list of appearance modifications that would be the first things tackled in the spring, and on the top of that list was the amber delete taillight mod.
Although there are quite a few threads out there on TGO on the subject, there really didn’t seem to be one central location where readers could get information about this mod. I spent a couple of days lurking around the forums, searching through old posts, and reading before I was able to filter out the bad ideas and put together what I thought was relevant information. I thought that it would be helpful if I shared that information, along with a step-by-step procedure, so that people who may have been uncomfortable with attempting this on their own could see what’s involved.
Supply List
1 Flat-head screwdriver
4-5 clean rags
4-5 clean terry-cloth towels
1 roll of masking tape
1 old newspaper
1 bucket of soapy water
1 spray bottle with diluted 409 cleaner
1 spray can of Testors #1605 candy apple red translucent paint ($2.00-$4.00 at your local craft store)
I’ll start with a “before” photos. This is what the car looked like before I began disassembly.


The first and most obvious step is to remove the taillights from the rear of the vehicle. To do this, you must first remove the plastic molding in the rear hatch area. This is as simple as using flathead screwdriver to unscrew the gray plastic fasteners that look like screws and removing the panels. In my car, there were only three or four of them, and they weren’t really holding things together too well.
Once you’ve exposed the metal behind the trim panels, you will find some black plastic butterfly nuts. There are five of them holding each of the two taillights in place. If you choose not to take off the plastic trim pieces on the sides of the rear hatch area, you’re going to have to get someone with relatively small hands to reach in and get the one on the corner of each light. (Be careful not to drop the butterfly nuts behind the molding and down into the rear hatch, you’re really not going to want to dig them out)
Once you remove all of the plastic nuts, the taillights will be free from the car and able to be pulled forward and removed. Be careful pulling them out because you are going to have to remove all of the four light bulbs from each tail. (1 for the brake, 1 for the turn signal, 1 for the reverse light, and one for the license plate light. Removing the bulbs is quick and easy, just push in on the tab and spin the connector to release them from the tails.
This shot shows where the bulbs and connectors are located in the back of the light:

This one shows the connectors and bulbs post removal:


Now that the easy part is done, you can get to the cleaning of the car and the light housings themselves. If your car is anything like mine, chances are that the rear part of the vehicle where the lights sit is filthy. I had tons of dirt and leaves hidden back there, a shop vac, a few cotton-swabs (for the tight squeezes) and some soapy water really made a huge difference. It took me about 20-30 minutes to completely clean up the rear of the car itself.
The front and back of my taillights were covered with dirt, dust and old leaves. It’s tempting to take a hose to them, but I was worried about water getting caught inside the lenses and causing fogginess. Anyone with foggy front turn signals can relate to this. A bucket of soap and water are your best friends; take your time and wash them carefully, because any remaining dirt will inevitably get caught underneath the paint.
Here’s a picture of the taillight housing before cleaning:


After I washed them out good with soap and water, I took some diluted 409 cleaner to the front of the lenses. Formula 409 is a great degreaser and can be found in any local grocery store. I wanted to be absolutely confident that there was no remaining dirt or debris before applying the paint. After washing them good with 409, I went over everything with a FRESH rag and FRESH CLEAN WATER (not your now dirty black water) before hand drying them with a terry-cloth towel.


Although there are quite a few threads out there on TGO on the subject, there really didn’t seem to be one central location where readers could get information about this mod. I spent a couple of days lurking around the forums, searching through old posts, and reading before I was able to filter out the bad ideas and put together what I thought was relevant information. I thought that it would be helpful if I shared that information, along with a step-by-step procedure, so that people who may have been uncomfortable with attempting this on their own could see what’s involved.
Supply List
1 Flat-head screwdriver
4-5 clean rags
4-5 clean terry-cloth towels
1 roll of masking tape
1 old newspaper
1 bucket of soapy water
1 spray bottle with diluted 409 cleaner
1 spray can of Testors #1605 candy apple red translucent paint ($2.00-$4.00 at your local craft store)
I’ll start with a “before” photos. This is what the car looked like before I began disassembly.
The first and most obvious step is to remove the taillights from the rear of the vehicle. To do this, you must first remove the plastic molding in the rear hatch area. This is as simple as using flathead screwdriver to unscrew the gray plastic fasteners that look like screws and removing the panels. In my car, there were only three or four of them, and they weren’t really holding things together too well.
Once you’ve exposed the metal behind the trim panels, you will find some black plastic butterfly nuts. There are five of them holding each of the two taillights in place. If you choose not to take off the plastic trim pieces on the sides of the rear hatch area, you’re going to have to get someone with relatively small hands to reach in and get the one on the corner of each light. (Be careful not to drop the butterfly nuts behind the molding and down into the rear hatch, you’re really not going to want to dig them out)
Once you remove all of the plastic nuts, the taillights will be free from the car and able to be pulled forward and removed. Be careful pulling them out because you are going to have to remove all of the four light bulbs from each tail. (1 for the brake, 1 for the turn signal, 1 for the reverse light, and one for the license plate light. Removing the bulbs is quick and easy, just push in on the tab and spin the connector to release them from the tails.
This shot shows where the bulbs and connectors are located in the back of the light:
This one shows the connectors and bulbs post removal:
Now that the easy part is done, you can get to the cleaning of the car and the light housings themselves. If your car is anything like mine, chances are that the rear part of the vehicle where the lights sit is filthy. I had tons of dirt and leaves hidden back there, a shop vac, a few cotton-swabs (for the tight squeezes) and some soapy water really made a huge difference. It took me about 20-30 minutes to completely clean up the rear of the car itself.
The front and back of my taillights were covered with dirt, dust and old leaves. It’s tempting to take a hose to them, but I was worried about water getting caught inside the lenses and causing fogginess. Anyone with foggy front turn signals can relate to this. A bucket of soap and water are your best friends; take your time and wash them carefully, because any remaining dirt will inevitably get caught underneath the paint.
Here’s a picture of the taillight housing before cleaning:
After I washed them out good with soap and water, I took some diluted 409 cleaner to the front of the lenses. Formula 409 is a great degreaser and can be found in any local grocery store. I wanted to be absolutely confident that there was no remaining dirt or debris before applying the paint. After washing them good with 409, I went over everything with a FRESH rag and FRESH CLEAN WATER (not your now dirty black water) before hand drying them with a terry-cloth towel.
Last edited by DigitalMonarch0; 01-18-2007 at 11:53 PM.
 05-11-2006, 01:10 PM
#2
Senior Member
Thread Starter
Join Date: Jul 2003
Location: Cleveland, OH
Posts: 770
Likes: 0
Received 1 Like
on
1 Post
Car: 25th Anniversary RS
Engine: 305 TBI
Transmission: 700R4
Axle/Gears: Stock 2.73s for now..
I should have done this even before doing the red turn signal mod; completely removing and cleaning the taillight housings made them look 1000% better:


The next and second most important part of this job is taping off the pieces of the lens that aren’t going to get painted. This was honestly the most time consuming portion of the entire mod. I was lucky enough to have a beautiful day and some CD’s to listen to in the interim. It’s a pain to get masking tape in between each of the lenses because it requires you to cut the masking tape into thirds. You’re going to want to tape some newspaper around the outside of the lights so that overspray doesn’t catch the trim.
You’re going to put 4-5 coats of paint on the lenses so it is EXTREMELY important to make sure you get 2-3 layers of masking tape and newspaper on your taillights. If you’re using cheap masking tape, the paint can actually bleed through.
It’s a little hard to explain, so check out these pictures to see what I mean:


Now, FINIALLY, you’re ready to paint the lenses. The owner of the craft store recommended that before applying the paint, I set the spray can into hot water. This supposedly warms the gas up and builds pressure in the can making for a longer more effective spray pattern. I ran some water through my coffee pot and let the can sit in there for about 10 minutes before painting. It seemed to work well, so I would definitely recommend trying this if possible.
The instructions said to keep the spray can about a foot away from the target, but I would just use your common sense on this one depending on whether or not you’re doing this outside or in a garage. I was doing it outside, so I had to keep the can a little bit closer to keep the paint on target. Try to make long, even strokes so as to avoid “runs” in the paint that will inevitably screw up the whole project. I used 4 coats (about 20 minutes apart) to get the shade of red that I have now, looking back I think that I could have gotten away with one more… but it doesn’t really make that much of a difference at the end of the day.

The next and second most important part of this job is taping off the pieces of the lens that aren’t going to get painted. This was honestly the most time consuming portion of the entire mod. I was lucky enough to have a beautiful day and some CD’s to listen to in the interim. It’s a pain to get masking tape in between each of the lenses because it requires you to cut the masking tape into thirds. You’re going to want to tape some newspaper around the outside of the lights so that overspray doesn’t catch the trim.
You’re going to put 4-5 coats of paint on the lenses so it is EXTREMELY important to make sure you get 2-3 layers of masking tape and newspaper on your taillights. If you’re using cheap masking tape, the paint can actually bleed through.
It’s a little hard to explain, so check out these pictures to see what I mean:
Now, FINIALLY, you’re ready to paint the lenses. The owner of the craft store recommended that before applying the paint, I set the spray can into hot water. This supposedly warms the gas up and builds pressure in the can making for a longer more effective spray pattern. I ran some water through my coffee pot and let the can sit in there for about 10 minutes before painting. It seemed to work well, so I would definitely recommend trying this if possible.
The instructions said to keep the spray can about a foot away from the target, but I would just use your common sense on this one depending on whether or not you’re doing this outside or in a garage. I was doing it outside, so I had to keep the can a little bit closer to keep the paint on target. Try to make long, even strokes so as to avoid “runs” in the paint that will inevitably screw up the whole project. I used 4 coats (about 20 minutes apart) to get the shade of red that I have now, looking back I think that I could have gotten away with one more… but it doesn’t really make that much of a difference at the end of the day.
Last edited by DigitalMonarch0; 01-18-2007 at 11:55 PM.
05-11-2006, 01:10 PM
#3
Senior Member
Thread Starter
Join Date: Jul 2003
Location: Cleveland, OH
Posts: 770
Likes: 0
Received 1 Like
on
1 Post
Car: 25th Anniversary RS
Engine: 305 TBI
Transmission: 700R4
Axle/Gears: Stock 2.73s for now..
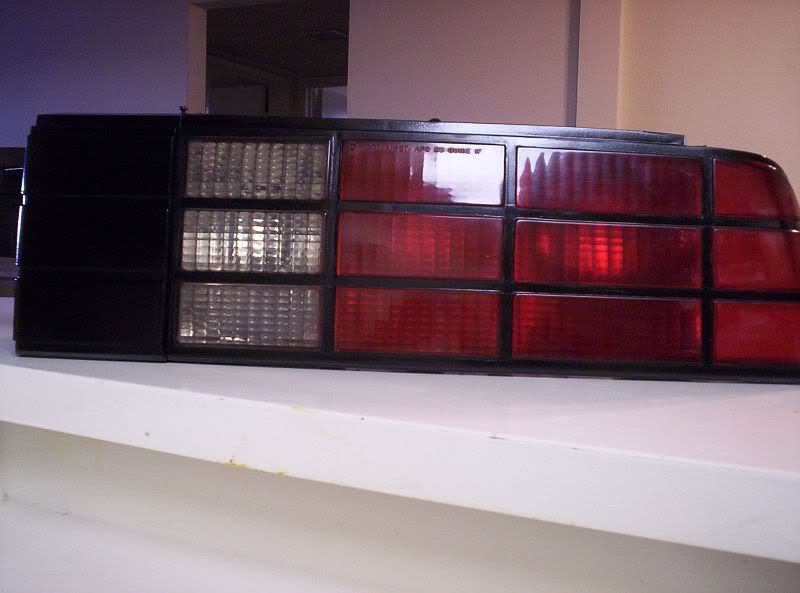
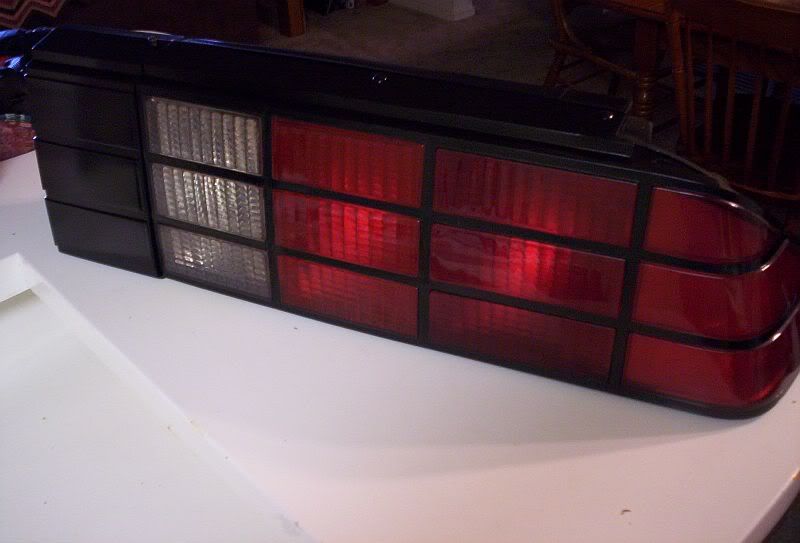
Here’s a quick comparison of the painted light to the stocker:


Obviously you’re going to want to repeat the above steps for the other light. And reverse the installation procedures to get everything back together again. All in all, I think that this was one of the most painless and least costly appearance mods that I’ve ever done. The return on the investment (I think I spent less than $15 total) is totally worth giving up one afternoon. I don’t miss the amber color on the back of the car at all.
Here are some more photos of the finished product. The lenses still need to be wet-sanded and buffed so the paint still looks a bit foggy, but I think you get the idea.
Let me know what you guys think!
Last edited by DigitalMonarch0; 01-18-2007 at 11:57 PM.
05-11-2006, 02:16 PM
#4
Supreme Member
iTrader: (45)
Join Date: Dec 2003
Location: Northern, VA
Posts: 3,970
Likes: 0
Received 0 Likes
on
0 Posts
Car: Pair of 92 Z28s
Great tech article, it should be a sticky just because its asked so frequently. But there are many ways to do this. I perfer and think its better to paint from the outside. When painting for the inside it actually turns out to look foggy inside and not nice crystal clear like the other red grids. Painting on the outside has its downside also. It looks dull compared to all the other sections. If yours doesnt now it will in a few months, lots of people dont like to paint there taillight at all because of that reason.
But what people dont know is that you can simply polish over paint. Some wet sanding+buffer = Identicle shine all across the taillights.
Ive painted both insides and out and done it many times i know these taillights like the back of my hand.
Now seperating taillights is just really tricky and gotta use like 2-3 small flatheads and TAKE YOUR TIME or else you will crack parts of the taillight.
Also if your willing to risk seperating the taillights it pays off because you can now clean all the reflectors/repaint them and stuff. Makes light shine and the inside of the tail lights look A LOT better from the outside.
Great write up and great results. This is by far the easiest way to just change your amber color and not think twice. Your example is exactly what i did for the first time when painting tail lights.
05-11-2006, 02:31 PM
#5
Senior Member
Thread Starter
Join Date: Jul 2003
Location: Cleveland, OH
Posts: 770
Likes: 0
Received 1 Like
on
1 Post
Car: 25th Anniversary RS
Engine: 305 TBI
Transmission: 700R4
Axle/Gears: Stock 2.73s for now..
Originally Posted by Stevo
Painting on the outside has its downside also. It looks dull compared to all the other sections. If yours doesnt now it will in a few months, lots of people dont like to paint there taillight at all because of that reason.
05-11-2006, 02:41 PM
#6
Supreme Member
iTrader: (45)
Join Date: Dec 2003
Location: Northern, VA
Posts: 3,970
Likes: 0
Received 0 Likes
on
0 Posts
Car: Pair of 92 Z28s
Id put the buffer on it first really slowly to see if you get anymore shine from it to start with. Normally id start out with at least 6-7 coats of red on there. Then wet sand using 1000/1200/2000. Now your actually taking off paint thats why you need to have a lot of coats on. Very little sanding just enough to get it hazy looking and nice and smooth. There is prolly some texture on there now from painting. Very minimal sanding like i said just so its smooth enough by ur standards and hazy. Then just buff it out with a plastic polish compound(any cheapo $30-50 buffer works i use the craftsman orbital). Id do the whole taillight not just that section.
Its tricky but youll learn how it all works pretty fast. Honestly id get a junk tail light to start out with. (a non-grid taillight or a cracked one)
Let me know if you need anymore help. If your not bothered by the shine now i wouldnt worry about it. Its tricky and takes time, but you can have a like glass shine...
05-11-2006, 11:15 PM
#7
Member
Join Date: Apr 2002
Location: charleston,SC
Posts: 363
Likes: 0
Received 0 Likes
on
0 Posts
Car: 1990 Camaro RS (IROC-Z Clone)
Engine: LO3
Transmission: T-5
Axle/Gears: 3.08
Nice,
I would spray over the other red lens to match the two colors, to me there is a differance in color between the stock red and your spray paint red. Jus my two cents.
I would spray over the other red lens to match the two colors, to me there is a differance in color between the stock red and your spray paint red. Jus my two cents.
Trending Topics
05-11-2006, 11:46 PM
#8
Supreme Member
iTrader: (1)

Join Date: Mar 2002
Location: The nation's capital
Posts: 2,467
Likes: 0
Received 1 Like
on
1 Post
Car: 91 RS
Engine: 350 TBI
Transmission: 700R4
Originally Posted by 91RS5spd
Nice,
I would spray over the other red lens to match the two colors, to me there is a differance in color between the stock red and your spray paint red. Jus my two cents.
I would spray over the other red lens to match the two colors, to me there is a differance in color between the stock red and your spray paint red. Jus my two cents.
05-11-2006, 11:48 PM
#9

Originally Posted by 91RS5spd
Nice,
I would spray over the other red lens to match the two colors, to me there is a differance in color between the stock red and your spray paint red. Jus my two cents.
I would spray over the other red lens to match the two colors, to me there is a differance in color between the stock red and your spray paint red. Jus my two cents.
Now I've polished a few taillights in my time, no way am I an expert, but I think I got it down pretty good.
I use a AC Delco buffer, and it works great. The only reason I have it is because my uncle gave it to me because he didn't use it. I use 3M Plastic Polish, which is available at any auto part store that stocks waxes and such. I was actually a guinny pig on this stuff, because noone (that I've talked to) had used it before, and it works very well. Basicly what I do is put a dab on each section of the grid taillight (I do one section at a time) and I goto town. I use the buffer to smear the polish lightly over the section, so when I turn it on and start buffing, it doesn't go everywhere. I've also found out that with my buffer, its ok to press somewhat hard and with a corner, because it still covers the entire grid. You just go over it until YOU like the shine. When I polish taillights for a friend, I have him right there, and inspect the shine until he is happy. I tend to spend 30 minutes a taillight polishing them, because I like to polish EVERYTHING (minus the back side), even parts you dont see on the car.
Now wetsanding is an art in itself. The only time you really should use fingures is on parts of an object that your sanding that aren't flat. Otherwise use a sanding block, or a peice of wood wrapped in sand paper. This will ensure nice even strokes, and you won't tend to dig into a specific part of the object with your fingures. You really only need to start at a lower number (like 400 for really deep, 600 for pretty deep, and 800 for somewhat deep) if there are somewhat deep scratches, but for polishing a relativily mint taillight, starting higher up like Stevo said (maybe even 1500 then move to 2000) is plenty.
I've noticed that once you buff the Grid taillights, the taillight feels kind of.. how do I explain it, for lack of a better word wavy. Not wavy as in I heated up the plastic to much, wavy as in it following the contour of the lens. This results in a mirror like shine, and the shine is not even close to looking wavy.
Great write up by the way, my friend was really thinking about doing this modification (jpfnk1682), but he wants to see if lit up during the day and at night (turn signals). Anyway I could bug you for pictures like that?
Great write up!

 05-12-2006, 12:07 AM
#11
Supreme Member
iTrader: (5)

Join Date: Aug 2004
Location: Redondo Beach CA
Posts: 1,912
Likes: 0
Received 0 Likes
on
0 Posts
Car: '02 Z06
like stated you will get a much better match after polishing..here are mine, painted from the inside, and polished. I also went as far as to repaint the black sections of the lights.
Excuse the paint, won't look that way much longer lol, also excuse the polish residue on the lights in these pics..
")
Excuse the paint, won't look that way much longer lol, also excuse the polish residue on the lights in these pics..


 05-13-2006, 09:22 AM
#15
Member
 awesome
Hmm, now it would be interesting to rewire the whole thing like on the firebird. turn signal in all the red segments...
05-13-2006, 08:25 PM
#16
Junior Member

Join Date: Aug 2005
Location: Greenville, Texas
Posts: 20
Likes: 0
Received 0 Likes
on
0 Posts
Car: 89 Camaro RS
Engine: 305 TBI
Transmission: 700R4
Looks really good! I was wondering if anyone have done this mod to a set of non-grid taillights? If so, could you pls. post a pic or two? Thanks!
05-13-2006, 08:39 PM
#17
Supreme Member
iTrader: (7)
Join Date: Mar 2005
Location: mid GA
Posts: 1,926
Likes: 0
Received 3 Likes
on
2 Posts
Car: 88 IROC
Engine: 305 TPI w/ l98 cam
Transmission: T5 5-speed
Axle/Gears: 3.45 posi disc 9 bolt
i would like to know how to take the taillight apart and paint the inside ive been wanting to do that for a while but i dont want to break anything. with this mod the turn signal lights up red right? isnt that illegal?
05-13-2006, 09:45 PM
#19
Member
iTrader: (1)
Join Date: Oct 2005
Location: San Diego, CA
Posts: 270
Likes: 0
Received 0 Likes
on
0 Posts
Car: 1984 Z28 ~Brown Horse~
Engine: 305 V8
Transmission: 700R4
Axle/Gears: 3.23...i dunno...
Originally Posted by maroon88iroc
i would like to know how to take the taillight apart and paint the inside ive been wanting to do that for a while but i dont want to break anything. with this mod the turn signal lights up red right? isnt that illegal?
please read these fully and do a test run to make sure you understand them correctly. feel free to respond to this thread if you have any questions.
alright. i just did this so hang with me on this. the part of the light where there are the plastic rivet looking things will be side a. and the other side will be side b.
if you want to just/or happen to break them a correct size screw/nut should work when putting back together.
side a: taking a flathead screwdriver and looking at the back of the plastic rivet you will see three pieces of plastic surrounding the shaft. one of the pieces should be loose and you should be able to move it aside with the screwdriver slightly. you're going to want to position the corner of the screw driver blade at the end of the center shaft and push it out as far as you can. sometimes this gets it out enough where you can pull the whole plastic rivet out, if not take a bent paper clip and insert where you were pushing, i used the screw driver to push the paperclip and the whole plastic rivet popped out. think of the plastic rivet like a one piece dry-wall screw, when the center shaft pushes in, it pushes the little plastic pieces out, sercuring it in place.
side b: for these instructions the light was on my lap with the lense facing me.
after side a is done and wiggled a bit loose (makes it easier i think for the other side) using two flat head screwdrivers, slide one between one of the lense flaps (where it clips on to) the screwdriver should be facing you. then you'll want to position another screwdriver right next to it, but vertically, wedged between the lense and the backing. you'll pull up slightly (be carefull not to break, they are very fragile) on the screwdriver that is facing you. then you'll twist the other screwdriver (vertical one) which will move the lense away from the backing. the goal is to get that little lip of the lense over the catch on the backing. once one is done, go onto the other one. i recommend doing the outside first.
something else i did was i took the two torx bolts out of the top and bottom of the black part, that is next to the reversal lights. this made it a bit easier to takout the lense once i did everything else. please remember to take your time and note that the use of screwdrivers will probably leave little dents in the backing of the light, but oh well. have fun. i also have not resealed them so i don't know if you should use any special sealer.
05-13-2006, 10:25 PM
#20
Supreme Member
iTrader: (45)
Join Date: Dec 2003
Location: Northern, VA
Posts: 3,970
Likes: 0
Received 0 Likes
on
0 Posts
Car: Pair of 92 Z28s
little dents in the back of the lights?
anyway here is how i took them apart.
Like so the 2 top small rivets are a pain in the *** i can normally get them out but putting them back together i just have to glue them together. You gotta push the inside out like said above. After those 2 small rivets are out. Take a flathead and start prying the silicone up from the side next to the reverse light grid. Youll figure it out once you start. You work slowly and with 2 flatheads. Pry all along the sides and top and once its almost seperated move onto the bottom. These clips break VERY EASY just hope you dont break them too far out so that you can see the chip from under the taillight. They are not that big of a deal if you break just like the top rivets because its not what actually holds the hole light together. The silicone is. Once you get one up and over the backing pry around to loosen the silicone. Then do the last clip and you should be able to get the lens completely apart from there.
Putting it back together:
Get some black silicone from any parts store and just apply it just like a gasket. I used the main chrome side not the lens itself. I just went right over top the old silicone because there is no harm in doing so and it bonds better i think. Place the lens over and push till the bottom clips clip and then once its all aligned, the top holes place your 2 small top rivets back into place. Smooth the silicone or apply more if needed, let dry and your done.
I have not had 1 lens fog up on me yet and ive taken apart about 6. I have cracked the bottom clips but it was not a big deal because it cant be seen from the outside of the taillight. I just glued them back together.
Here are 2 pictures of the lens and housing seperated.
Just remember...TAKE YOUR TIME.


EDIT - Maybe one of the mods can sticky this so people wont keep asking? Its good to pack all the info ud ever want to know about painting taillights into 1 thread. Maybe we can clean this up of anything non-tech related and keep the good info. Its a very popular subject and many people are curious.
anyway here is how i took them apart.
Like so the 2 top small rivets are a pain in the *** i can normally get them out but putting them back together i just have to glue them together. You gotta push the inside out like said above. After those 2 small rivets are out. Take a flathead and start prying the silicone up from the side next to the reverse light grid. Youll figure it out once you start. You work slowly and with 2 flatheads. Pry all along the sides and top and once its almost seperated move onto the bottom. These clips break VERY EASY just hope you dont break them too far out so that you can see the chip from under the taillight. They are not that big of a deal if you break just like the top rivets because its not what actually holds the hole light together. The silicone is. Once you get one up and over the backing pry around to loosen the silicone. Then do the last clip and you should be able to get the lens completely apart from there.
Putting it back together:
Get some black silicone from any parts store and just apply it just like a gasket. I used the main chrome side not the lens itself. I just went right over top the old silicone because there is no harm in doing so and it bonds better i think. Place the lens over and push till the bottom clips clip and then once its all aligned, the top holes place your 2 small top rivets back into place. Smooth the silicone or apply more if needed, let dry and your done.
I have not had 1 lens fog up on me yet and ive taken apart about 6. I have cracked the bottom clips but it was not a big deal because it cant be seen from the outside of the taillight. I just glued them back together.
Here are 2 pictures of the lens and housing seperated.
Just remember...TAKE YOUR TIME.
EDIT - Maybe one of the mods can sticky this so people wont keep asking? Its good to pack all the info ud ever want to know about painting taillights into 1 thread. Maybe we can clean this up of anything non-tech related and keep the good info. Its a very popular subject and many people are curious.
Last edited by Stevo; 05-13-2006 at 10:31 PM.
05-14-2006, 12:09 AM
#21
Senior Member

Join Date: Oct 2004
Location: Moreno Valley, CA
Posts: 748
Likes: 0
Received 0 Likes
on
0 Posts
Car: 1990 Camaro RS
Engine: 305 TBI (L03)
Transmission: 700R4 (MD8)
Axle/Gears: 2.73 Open (GU2)
how did you clean the inside? i polished and degreased the heck out of my lights, but the reverse lights are a bit foggy/dirty, so I suspect the inside of it needs to be cleaned/polished. How did you clean inside the lens?
06-10-2006, 01:51 AM
#23
Supreme Member
Join Date: Oct 2001
Location: Louisville, Ky
Posts: 3,155
Likes: 0
Received 2 Likes
on
2 Posts
Car: 1991 Z28
Engine: 383
Transmission: T-5
Axle/Gears: 3.08 10 Bolt
Bringing it back...it looks amazing! I've recently wanted to do this to my grids but will try to spray inside the hole...50% lazy 50% so I don't have to wetsand and buff (...100% lazy?)
BTW...rear turn signals can be red. Fronts have to be amber.
BTW...rear turn signals can be red. Fronts have to be amber.
06-10-2006, 04:52 AM
#24
Senior Member
Join Date: Aug 2005
Location: Springfield, Oregon
Posts: 852
Likes: 0
Received 0 Likes
on
0 Posts
Car: 85 Z28, 88 GTA, 68 Cutlass S
Engine: 305TPI X2 ;), Chevy 250
Transmission: T5, 700R4, powerslide >:(
Axle/Gears: posi, and posi w/discs :D.
Originally Posted by jn_texas
Looks really good! I was wondering if anyone have done this mod to a set of non-grid taillights? If so, could you pls. post a pic or two? Thanks!
06-10-2006, 06:32 PM
#25
Supreme Member
iTrader: (1)
Join Date: Jul 2004
Location: Lubbock, TX
Posts: 1,010
Likes: 0
Received 0 Likes
on
0 Posts
Car: 1989 GTA
Engine: Future: LSX Turbo
Transmission: built T-56
if i could id like to make a suggestion...buy some VHT night shade and do a medium black tinting maybe 3 coats MAX over your reverse clears and i think it will look great with the stripes..bc it kinda looks like the stripes almost come down the back of the tail lights...i think it would look great
just my opinion...nice job tho
after doing a little paintshop...i think itd look pretty good
just my opinion...nice job tho
after doing a little paintshop...i think itd look pretty good
Last edited by GodSpeedGTA; 06-10-2006 at 06:36 PM.
06-10-2006, 08:17 PM
#26
Member
Join Date: Jun 2003
Location: Hartland, WI
Posts: 494
Likes: 0
Received 0 Likes
on
0 Posts
Car: 1991 Camaro
Engine: 2000 LS1
Transmission: 4L60E SS3600
Originally Posted by GodSpeedGTA
if i could id like to make a suggestion...buy some VHT night shade and do a medium black tinting maybe 3 coats MAX over your reverse clears and i think it will look great with the stripes..bc it kinda looks like the stripes almost come down the back of the tail lights...i think it would look great
just my opinion...nice job tho
after doing a little paintshop...i think itd look pretty good
just my opinion...nice job tho
after doing a little paintshop...i think itd look pretty good
07-04-2006, 08:02 PM
#27
Senior Member
Join Date: Jun 2004
Location: Saint Clair Shores, Michigan
Posts: 720
Likes: 0
Received 0 Likes
on
0 Posts
Car: 1985 IROC
Engine: 350 TPI (block was swapped)
Transmission: 700r4 w/corvette servo
Axle/Gears: no idea
I did that mod on my camaros tailights, I have the split style tailights.
http://img225.imageshack.us/img225/1231/dscf14437ls.jpg
*edit*
yes, I know my car needs some bondo/paint. I know
http://img225.imageshack.us/img225/1231/dscf14437ls.jpg
*edit*
yes, I know my car needs some bondo/paint. I know
Last edited by WaaX; 07-04-2006 at 09:07 PM.
 08-10-2006, 06:22 PM
#30
Senior Member
Join Date: Aug 2005
Location: Springfield, Oregon
Posts: 852
Likes: 0
Received 0 Likes
on
0 Posts
Car: 85 Z28, 88 GTA, 68 Cutlass S
Engine: 305TPI X2 ;), Chevy 250
Transmission: T5, 700R4, powerslide >:(
Axle/Gears: posi, and posi w/discs :D.
08-12-2006, 08:53 PM
#31
I did that mod on my camaros tailights, I have the split style tailights.
http://img225.imageshack.us/img225/1231/dscf14437ls.jpg
*edit*
yes, I know my car needs some bondo/paint. I know
http://img225.imageshack.us/img225/1231/dscf14437ls.jpg
*edit*
yes, I know my car needs some bondo/paint. I know
EDIT: works now
Last edited by krisb410; 08-18-2006 at 12:12 PM.
08-16-2006, 01:09 PM
#32
Senior Member

Join Date: Jun 2000
Posts: 915
Likes: 0
Received 0 Likes
on
0 Posts
I'd also recommending a clear coat on the whole tail if you do it on the outside.
I did this to my old camaro back in '01, sold it in '02, by '04 the red had faded off significantly and the taillights looked stupid as hell.
I did this to my old camaro back in '01, sold it in '02, by '04 the red had faded off significantly and the taillights looked stupid as hell.

 08-17-2006, 03:44 AM
#35
Senior Member
Join Date: Aug 2005
Location: Springfield, Oregon
Posts: 852
Likes: 0
Received 0 Likes
on
0 Posts
Car: 85 Z28, 88 GTA, 68 Cutlass S
Engine: 305TPI X2 ;), Chevy 250
Transmission: T5, 700R4, powerslide >:(
Axle/Gears: posi, and posi w/discs :D.
^
that looks pretty cool actually!
hmm, i see a weekend project comin up.
that looks pretty cool actually!
hmm, i see a weekend project comin up.
08-17-2006, 09:18 PM
#36

https://www.thirdgen.org/forums/auto...ghlight=custom
 08-17-2006, 10:35 PM
#37
Supreme Member
Join Date: Feb 2005
Location: Torrance, CA
Posts: 1,286
Likes: 0
Received 2 Likes
on
2 Posts
Car: 1991 Camaro RS
Engine: THE LT1 SWAP SHALL BEGIN!!!!
Transmission: 700 R4
Axle/Gears: LSD! =(
The only problem I have with this mod is everytime I try to pry open those lenses they always somehow crack somewhere!!!! this is why I dont attempt trying this on cleaner looking ones I get. I can never EVER get that black gue off them!!!!!!!! is there a solution to use on this without damaging the plastic?
08-18-2006, 05:37 PM
#38
Senior Member
Join Date: Jun 2004
Location: Saint Clair Shores, Michigan
Posts: 720
Likes: 0
Received 0 Likes
on
0 Posts
Car: 1985 IROC
Engine: 350 TPI (block was swapped)
Transmission: 700r4 w/corvette servo
Axle/Gears: no idea
The only problem I have with this mod is everytime I try to pry open those lenses they always somehow crack somewhere!!!! this is why I dont attempt trying this on cleaner looking ones I get. I can never EVER get that black gue off them!!!!!!!! is there a solution to use on this without damaging the plastic?
 08-18-2006, 06:09 PM
#39
If you read the whole thread, Stevo seperates the lenses and paints them from the inside. Mine are done this way. I've seen them done both ways, and it looks way better painting them from the inside. You can even respray the backs to get them looking new again. I think painting them on the outside is a "hack job" way of doing it.
08-18-2006, 06:20 PM
#40
Supreme Member
iTrader: (45)
Join Date: Dec 2003
Location: Northern, VA
Posts: 3,970
Likes: 0
Received 0 Likes
on
0 Posts
Car: Pair of 92 Z28s
Its a tricky process and takes patience. Start by removing the 2 small rivet clips at the top. Then with 2 small flatheads start moving around the sides. Once the top is free i then get the 2 other clips on the bottom side of the tail light. Those are tricky and lots of times will snap. ITs not a big deal if they do snap as you can just glue them back togethjer and no one can see them. The main thing that holds these lights together is the black RTV all around the sides.
That is my way of doing them and i have never ruined a set. I really should offer my services on the red tail light mod.
Paint on the outside will make that section dull, and even though you can polish over the paint it will still not match, painting from the inside matches just about perfect.
That is my way of doing them and i have never ruined a set. I really should offer my services on the red tail light mod.
Paint on the outside will make that section dull, and even though you can polish over the paint it will still not match, painting from the inside matches just about perfect.
09-15-2006, 11:58 AM
#42
Supreme Member
iTrader: (25)
Join Date: Sep 2005
Location: NJ
Posts: 1,816
Received 280 Likes
on
218 Posts
Car: 1987 IROC-Z
Engine: 406 on N20 w/ EFI
Transmission: P.B. 700R4
Axle/Gears: 12 bolt w/ 3.91
hell yea! i am doing this mod.
i thought about doing it years ago, but got smoke blackouts instead...and a bunch of tickets for those... i jsut really didnt like having all sorts of colors on my tailights
im guna do this, paint from inside, and repaint all the red ones as well, and might as well take em apart and clean the reflectors too,
10-02-2006, 10:26 PM
#43
Supreme Member

Eh....don't quite get this one...I always wished my 4th gen had an amber section on the tailights for the turn signals, seems like it would be safer having the turn signals a different color so other idiot drivers don't get them mixed up with brake lights.
 10-02-2006, 11:47 PM
#44
If you really want amber sections for your 4th gen bird, GM made export taillights that had them. They are a modified LT1 taillight though.
10-02-2006, 11:47 PM
#45
Member
Join Date: Jun 2006
Location: Windsor Ontario, Canada
Posts: 338
Likes: 0
Received 4 Likes
on
1 Post
Car: 1986 Firebird
Engine: V6
Transmission: Automatic
You'd have to be a really big idiot to not think that a flashing light on either the left or right side isn't a turn signal. Whether its amber or red. And thanks for the pics Firebat, that's what I was talking about. Those are the same tail lights that I have too
10-03-2006, 12:08 AM
#46
Supreme Member
Hmm, anyone got a pic of those export Firebird lights? I've never seen them. I did however see several Firebird 4th gen's in France, including a 94 T/A and a 95 base model, and while I do remember seeing extra (and cringe-inducing) running lights on the fenders, I don't recall different tailights.
10-03-2006, 12:09 AM
#47
Advice on the firebird red taillight mod: Paint them on the OUTSIDE
10-03-2006, 02:20 AM
#49
I have a set of 3rd gen camaro export taillights, and 4th gen camaro exports as well. When exported, most 3rd gens firebirds/TAs got the firebird style taillight as far as i know, but i may be wrong, and the 4th gen birds did get a special light with an amber section in it.
01-10-2007, 01:31 PM
#50
Member
I have a set of 3rd gen camaro export taillights, and 4th gen camaro exports as well. When exported, most 3rd gens firebirds/TAs got the firebird style taillight as far as i know, but i may be wrong, and the 4th gen birds did get a special light with an amber section in it.
As far as I know in Germany they are just wiring the turns to the backup lights and bolt an additional light somewhere for backing up.