Can i hook this wire straight to the battery instead? (Pics inside
 09-08-2017, 09:57 PM
#1
Supreme Member
Thread Starter
Join Date: Apr 2010
Location: Modesto, California
Posts: 1,015
Likes: 0
Received 5 Likes
on
4 Posts
Car: 88 Firebird Formula
Engine: LO5 5.7 TBI/Ebl Flash
Transmission: 700R4
Axle/Gears: 2.73 stock rear end
Can i hook this wire straight to the battery instead? (Pics inside
Hey all so today after replacing the rear lcas and phb i go to start my car and notice the idle is all lumpy jumping off the stall saver. I visually scan my gauges and instantly notice the battery gauge shows well below 12V (usually shows 13.8-14.v). I go check the battery and notice this.


Half the wire was just touching itself and readily able to break off. As soon as i moved the wires together the car jumped back to normal. gauge showed 14volts
Now 3 years ago i had to replace the stock positive battery cable (https://www.thirdgen.org/forums/tech...-loss-car.html ). I bought a cheap one from autozone and it worked fine until now. It came with a small wire that came off (show in pic melted) and went to that hot wire, that i had to splice together, which to my understanding (which could be completely wrong) looks to power that hot 'junction'. Only the autozone cable small wire was much smaller in gauge than the original wiring, which caused the melting.
What im wondering is can i just throw a connector on the 'hot' wire that goes to the junction and hook it directly to the positive battery post (like my red wire shown in the pic that powers a circuit breaker/relay for aftermarket fan)?
Or should i resplice into that small wire that comes off the positive battery cable and hold my fingers until i can get a new quality cable. I just know if i resplice into that smaller wire its just going to melt it off sooner or later...
are you guys still using Innovative Wiring? http://innovativewiring.com/
Thanks all for information and advice!
 09-08-2017, 10:32 PM
#2
Member
Join Date: Sep 2016
Location: Ventura County, CA
Posts: 124
Likes: 0
Received 1 Like
on
1 Post
Car: 1989 Iroc Z
Engine: 5.7
Transmission: 700r4
Axle/Gears: Currie 9"/US Gear Lightning 3.00
Re: Can i hook this wire straight to the battery instead? (Pics inside
How far back into the loom did it burn?
09-08-2017, 10:38 PM
#3
Supreme Member
Thread Starter
Join Date: Apr 2010
Location: Modesto, California
Posts: 1,015
Likes: 0
Received 5 Likes
on
4 Posts
Car: 88 Firebird Formula
Engine: LO5 5.7 TBI/Ebl Flash
Transmission: 700R4
Axle/Gears: 2.73 stock rear end
Re: Can i hook this wire straight to the battery instead? (Pics inside
on the side thats connected to the 'hot junction'? No where. I personally put that plastic loom on. It only burned where i tried to show in the pics. Only right at that splice, and then all that on the other side which is the smaller gauge wire that came with the autozone positive cable.
09-08-2017, 10:55 PM
#4
Member
Join Date: Sep 2016
Location: Ventura County, CA
Posts: 124
Likes: 0
Received 1 Like
on
1 Post
Car: 1989 Iroc Z
Engine: 5.7
Transmission: 700r4
Axle/Gears: Currie 9"/US Gear Lightning 3.00
Re: Can i hook this wire straight to the battery instead? (Pics inside
It looks like its connected directly to the battery through the eyelet, so I can't imagine it wouldn't work for you. But I would trace it back as far as you can. The wire may be exposed farther down and grounding out. It burned for a reason.
09-08-2017, 11:09 PM
#5
Supreme Member
Thread Starter
Join Date: Apr 2010
Location: Modesto, California
Posts: 1,015
Likes: 0
Received 5 Likes
on
4 Posts
Car: 88 Firebird Formula
Engine: LO5 5.7 TBI/Ebl Flash
Transmission: 700R4
Axle/Gears: 2.73 stock rear end
Re: Can i hook this wire straight to the battery instead? (Pics inside
I'll pull the plastic loom all the way off tomorrow to verify but it looks just like its right at the splice and afterward, only on the small gauge wire. My believing is thats why it burned, is because its too small of a gauge for that much.
Keep in mind this is melting over 3 years.
09-08-2017, 11:11 PM
#6
Member
Join Date: Sep 2016
Location: Ventura County, CA
Posts: 124
Likes: 0
Received 1 Like
on
1 Post
Car: 1989 Iroc Z
Engine: 5.7
Transmission: 700r4
Axle/Gears: Currie 9"/US Gear Lightning 3.00
Re: Can i hook this wire straight to the battery instead? (Pics inside
Upgrade with some thicker wire, crimp on an eyelet, shrink wrap it. Should be good to go.
Trending Topics
09-08-2017, 11:48 PM
#8
Supreme Member
Thread Starter
Join Date: Apr 2010
Location: Modesto, California
Posts: 1,015
Likes: 0
Received 5 Likes
on
4 Posts
Car: 88 Firebird Formula
Engine: LO5 5.7 TBI/Ebl Flash
Transmission: 700R4
Axle/Gears: 2.73 stock rear end
Re: Can i hook this wire straight to the battery instead? (Pics inside
This also might be a dumb question to ask for you electronic gurus but will wiring like this be fine? I had some laying around from an old audio install... If i can use it that would be great, if not i'll get something else.


Thanks all
Thanks all
09-09-2017, 12:32 AM
#9
Member
Join Date: Sep 2016
Location: Ventura County, CA
Posts: 124
Likes: 0
Received 1 Like
on
1 Post
Car: 1989 Iroc Z
Engine: 5.7
Transmission: 700r4
Axle/Gears: Currie 9"/US Gear Lightning 3.00
Re: Can i hook this wire straight to the battery instead? (Pics inside
That'll work. Its a power cable, just a little prettier than the cheaper stuff.
09-09-2017, 10:40 AM
#10
Supreme Member
Thread Starter
Join Date: Apr 2010
Location: Modesto, California
Posts: 1,015
Likes: 0
Received 5 Likes
on
4 Posts
Car: 88 Firebird Formula
Engine: LO5 5.7 TBI/Ebl Flash
Transmission: 700R4
Axle/Gears: 2.73 stock rear end
Re: Can i hook this wire straight to the battery instead? (Pics inside
Ok im going to attempt the fix this morning... Anyone else got anything else to add? lol
 09-09-2017, 11:10 AM
#12
Supreme Member
Thread Starter
Join Date: Apr 2010
Location: Modesto, California
Posts: 1,015
Likes: 0
Received 5 Likes
on
4 Posts
Car: 88 Firebird Formula
Engine: LO5 5.7 TBI/Ebl Flash
Transmission: 700R4
Axle/Gears: 2.73 stock rear end
Re: Can i hook this wire straight to the battery instead? (Pics inside
Thanks for the help i'll update in an hour.
 09-09-2017, 12:40 PM
#15
Supreme Member
Thread Starter
Join Date: Apr 2010
Location: Modesto, California
Posts: 1,015
Likes: 0
Received 5 Likes
on
4 Posts
Car: 88 Firebird Formula
Engine: LO5 5.7 TBI/Ebl Flash
Transmission: 700R4
Axle/Gears: 2.73 stock rear end
Re: Can i hook this wire straight to the battery instead? (Pics inside
I ended up capping that wire off the autozone positive cable and running my own 8 gauage wire directly from the hot post, to the junction. Works fine 'so far'


 09-09-2017, 12:54 PM
#16
Re: Can i hook this wire straight to the battery instead? (Pics inside
No. No. No. No. No. No. NO. NO. NO. NO! NO! NO! NO! NO! NO!!
NO!! NO!! NO!! NO!! NO!! NO!! NO!!
NO!!
Never ever ever ever replace a wire that has burned twice with a heavier wire. All you're doing is removing the "fuse" that is currently limiting the circuit and keeping it from burning your car down.
Think about it. Currently (pun not intended) when whatever is shorting, or drawing too much current, over loads the wiring, it's melting at the battery. Now if you give it a wiring upgrade to feed it's appetite, what's going to happen if it's an electrical failure or short elsewhere in the car? It's going to burn there instead. "There" might be behind the dash, or under the car where you won't see it until you're the proud new owner of the burned out shell on the side of the highway.
Step 1) Identify exactly what that wire is feeding. This can be complicated, because TBI, V6, carb, TPI cars all grab power for different circuits from different places like the positive post at the battery, junction blocks, or the positive post at the starter solenoid. Your best bet is to pick up the GM/Helm Service Manual or Electrical Diagnosis Manual if there's one for your year/make/model car. Then study the wiring diagrams until you can figure out what the wire is feeding.
Step 2) Read the manual. It will tell you exactly HOW that circuit is supposed to be fused. Usually, it's going to be a FUSIBLE LINK. There's actually a section in the manual that discusses fusible links and how to properly replace them.
Step 3) Install a new fusible link into the circuit. If it burns again, figure out what's wrong with the circuit using the manual and fix the problem, not the symptom.
Step 4) Enjoy driving your car instead of coming on the forum and telling us how your car burned to the ground.
09-09-2017, 01:10 PM
#17
Supreme Member
Thread Starter
Join Date: Apr 2010
Location: Modesto, California
Posts: 1,015
Likes: 0
Received 5 Likes
on
4 Posts
Car: 88 Firebird Formula
Engine: LO5 5.7 TBI/Ebl Flash
Transmission: 700R4
Axle/Gears: 2.73 stock rear end
Re: Can i hook this wire straight to the battery instead? (Pics inside
No. No. No. No. No. No. NO. NO. NO. NO! NO! NO! NO! NO! NO!!
NO!! NO!! NO!! NO!! NO!! NO!! NO!!
NO!!
Never ever ever ever replace a wire that has burned twice with a heavier wire. All you're doing is removing the "fuse" that is currently limiting the circuit and keeping it from burning your car down.
Think about it. Currently (pun not intended) when whatever is shorting, or drawing too much current, over loads the wiring, it's melting at the battery. Now if you give it a wiring upgrade to feed it's appetite, what's going to happen if it's an electrical failure or short elsewhere in the car? It's going to burn there instead. "There" might be behind the dash, or under the car where you won't see it until you're the proud new owner of the burned out shell on the side of the highway.
Step 1) Identify exactly what that wire is feeding. This can be complicated, because TBI, V6, carb, TPI cars all grab power for different circuits from different places like the positive post at the battery, junction blocks, or the positive post at the starter solenoid. Your best bet is to pick up the GM/Helm Service Manual or Electrical Diagnosis Manual if there's one for your year/make/model car. Then study the wiring diagrams until you can figure out what the wire is feeding.
Step 2) Read the manual. It will tell you exactly HOW that circuit is supposed to be fused. Usually, it's going to be a FUSIBLE LINK. There's actually a section in the manual that discusses fusible links and how to properly replace them.
Step 3) Install a new fusible link into the circuit. If it burns again, figure out what's wrong with the circuit using the manual and fix the problem, not the symptom.
Step 4) Enjoy driving your car instead of coming on the forum and telling us how your car burned to the ground.
NO!! NO!! NO!! NO!! NO!! NO!! NO!!
NO!!
Never ever ever ever replace a wire that has burned twice with a heavier wire. All you're doing is removing the "fuse" that is currently limiting the circuit and keeping it from burning your car down.
Think about it. Currently (pun not intended) when whatever is shorting, or drawing too much current, over loads the wiring, it's melting at the battery. Now if you give it a wiring upgrade to feed it's appetite, what's going to happen if it's an electrical failure or short elsewhere in the car? It's going to burn there instead. "There" might be behind the dash, or under the car where you won't see it until you're the proud new owner of the burned out shell on the side of the highway.
Step 1) Identify exactly what that wire is feeding. This can be complicated, because TBI, V6, carb, TPI cars all grab power for different circuits from different places like the positive post at the battery, junction blocks, or the positive post at the starter solenoid. Your best bet is to pick up the GM/Helm Service Manual or Electrical Diagnosis Manual if there's one for your year/make/model car. Then study the wiring diagrams until you can figure out what the wire is feeding.
Step 2) Read the manual. It will tell you exactly HOW that circuit is supposed to be fused. Usually, it's going to be a FUSIBLE LINK. There's actually a section in the manual that discusses fusible links and how to properly replace them.
Step 3) Install a new fusible link into the circuit. If it burns again, figure out what's wrong with the circuit using the manual and fix the problem, not the symptom.
Step 4) Enjoy driving your car instead of coming on the forum and telling us how your car burned to the ground.
can i just state this; nothing burnt twice? this wire was replaced 3 years ago and had a smaller connection heading to the hot junction rather than the larger wire the original cable had? my thinking is that nothing else is overloading, shorting. Its this 14gauge tiny wire that is overloading off the battery and attempting to power the whole hot junction rather than the 10gauge original wire that the stock cable had?
To state again, the original part of this wire was not burnt at all...? Only the small tiny 14 gauage wire that came off the autozone positive cable.... So nothing else was burnt...
So pull off that wire i just installed, and install a fusible link, also smaller wire, connecting the hot positive cable to the hot junction?
09-09-2017, 01:44 PM
#18
Re: Can i hook this wire straight to the battery instead? (Pics inside
First off everything being soldered needs to be CLEAN. So if your wire or whatever is green, rusty, corroded, covered in electrical tape tar, etc consider cutting it back until you reach clean copper. Don't touch the clean copper with your greasy fingers! Skin oils, oils repel liquids, molten lead is a liquid... If you do accidentally get something on the wire, clean it. Acetone, Alcohol, carb cleaner. A clean Q-tip in solvent, wipe clean.
Second, the better your parts contact mechanically, the better they'll likely solder. In the case of wires, you can twist them tightly together, or use a crimp to mechanically stake them together, then flow solder into the joint. If you touch the joint to twist the wires together, don't forget to clean the joint!
Third, Materials.
- Choose your solder wisely. The EPA approved Sierra Club wouldn't-hurt-a-chipmunk-if-you-fed-it-a-roll-of-it, lead free plumber's crapola from the Home Labyrinth is not good for anything. Assuming you still have a Radio Shack, they might have a decent 60/40 general purpose electrical solder. Don't buy the heaviest garbage they have. Heavier diameter requires more heat, too much heat you damage the wire and insulation, etc.
- Flux. Your solder should be rosin core, meaning flux core, but think of flux as a cleaner. Remember what I said about keeping things clean? Flux is your last line of defense. A dab of flux is cheap insurance. The water soluble **** from the Home Labyrinth actually works fairly well. Hydroflo is one brand, if you can find Nokorode it's hard to beat. Avoid the gray stuff. Avoid Acid core, you don't need it. A very light coating on the wires is all you need, anything more will just drip when it melts anyway.
Fourth, Tools.
-Soldering Iron... You will want to use something between the generic no-name pencil iron you can probably find at Walmart, and something over the top like a propane torch. A cheap Weller 35 or 40 watt iron works great for most small stuff. A gun is also workable but sometimes hard to maneuver under a dash or in tight spaces.
-Soldering Station... A cornball weighted base with a coiled wire holder for your pencil iron goes a LONG way. The coil helps regulate the heat of the iron, so it doesn't burn any flux and solder on the tip, which helps keep it from oxidizing, and remember what I said about clean? Clean extends to your soldering tool. Most stations have a spot for a small sponge, soak it with water, and wipe the tip of your iron often to keep it clean. It's also handy to have a place to put your iron so it doesn't melt your carpet or work bench, etc.
-Wire brush... Of the corny 3 detailing brushes for $3 variety is fine. But you're after the stainless steel toothbrush. This comes in handy for cleaning really bad materials, or the tip of your soldering iron, etc. Try to keep the brush clean, for obvious reasons.
Ok, so you have your tools, your wire is clean, your joint is firmly mechanically joined... The goal is to use the iron to heat your joint hot enough to melt the solder and draw it into the joint making it a single mass. Getting the heat from your iron to the joint and solder is the trick.
I talked about keeping things clean, keeping your soldering iron tip clean. You will need to "tin" your soldering iron's tip. Basically we're going to get a layer of solder on the tip of the iron. The molten solder on the tip will bridge the joint between your iron, and the solder, or your iron and the joint. The bridge of molten solder will conduct the heat from your iron into the workpiece and the solder.
To tin the iron, plug it in, and it'll start heating up. Dip the tip into the flux just a lil to wet the tip. JUST THE TIP! Remove the tip from the flux and hold it, think about something for a moment or two while you wait. Soon you'll see the tip of the iron start to smoke as the flux melts. The flux melting tells you approximately when the tip is hot enough to actually melt the solder. Take your solder and gently rub the exposed end of the solder across the smoking tip. After a couple seconds rubbing the solder should melt, and if we've done our job right, it'll stick to the tip and look like the T-1000 from Terminator 2. If not, if it ***** up and drips off and leaves the tip dry, wipe the tip on your wet sponge, and try again. A lil flux, rub the solder when the flux starts to smoke, when the tip is wet with liquid chrome looking molten solder, we're good. If it still doesn't tin, your tip may need additional attention ie. cleaning. Wire brush, fine sandpaper, fine file, whatever... The tip needs to be CLEAN. Once the tip is cleaned, tinned, etc you can plop your soldering iron in the soldering station, and focus on your workpiece.
Nice clean, tight joint... Apply just a touch of flux, grab your iron, should still look freshly tinned, no carbon or oxidation on your tip, wipe the sponge with the tip... Should sizzle a little and look freshly tinned... Press the soldering iron's tip gently against your joint and hold it there. After a couple seconds the flux should melt off the joint, and start smoking/sizzling. If you've done everything right up to this point, the solder tinned on your iron's tip will actually start to draw into the heated joint. Holy ****, that's cool right? Ok, keep your shorts on... Carefully touch the exposed end of your solder to the now sizzling smoking joint, the solder should MELT and FLOW into the joint. Again you don't need to melt an entire roll of solder into the joint. Just enough to flow into the joint. If it starts to bulge or drip you've got more then enough solder in the joint. Pull the soldering iron tip away, wipe the sponge, and put the iron back in the station. After a few seconds the solder in the joint should cool. Wait awhile longer for it to cool, and you should have a solid joint.
Follow up by wiping any residual flux off the joint. If you leave any flux, it'll probably corrode your joint. Clean it thoroughly. Water soluble flux cleans off with water, otherwise acetone, alcohol, lacquer thinner, + Q-tips, papertowels, old toothbrush, etc.
If your joint doesn't look like shiny chrome, if it's lumpy, pitted, dark, etc - you either didn't heat it long enough, heated it too long, didn't get it clean, etc.
If your joint looks shiny, but has big globs of solder dripping off or pointy projections where you pulled away the iron, etc you probably applied too much solder. Fortunately if you're soldering wires, you can usually just lightly file off the points or excess and seal the joint. Try harder next time to use the right quantity of solder.
It sounds complicated, but it takes much longer to learn and explain than to actually do. Of course when dealing with cars, a crimped connection with weather resistant shrink tubing and so on, soldering isn't really required, but once it's learned, why not?
Hope that helps a little.
 09-09-2017, 01:48 PM
#19
Re: Can i hook this wire straight to the battery instead? (Pics inside
Sorta... Grab the book. Identify what the circuit is feeding. Use a properly sized repair emulating the diagram from the book, with special attention to wire sizes and fusible links used by the factory, and then just keep a watchful eye out for mystical blue smoke. The blue smoke is magical, if you let it escape from the wire, the wire stops working.
09-09-2017, 01:58 PM
#20
Supreme Member
Thread Starter
Join Date: Apr 2010
Location: Modesto, California
Posts: 1,015
Likes: 0
Received 5 Likes
on
4 Posts
Car: 88 Firebird Formula
Engine: LO5 5.7 TBI/Ebl Flash
Transmission: 700R4
Axle/Gears: 2.73 stock rear end
Re: Can i hook this wire straight to the battery instead? (Pics inside
Ty for the tips on soldering... going to really attempt to learn it. I know i need to figure it out as crimping should really just be temp...
Well forshure the NO NO NO NO NO NO NO scared the living hell out of me to pull that wire off my battery and reconnect through the wire off the positive cable it was originally hooked to. I attached some pics just to show you the original wire size... It looks like it was original 8 gauge... I think thats why this small wire burned... Heres how its hooked now... I know like s h i t
Well forshure the NO NO NO NO NO NO NO scared the living hell out of me to pull that wire off my battery and reconnect through the wire off the positive cable it was originally hooked to. I attached some pics just to show you the original wire size... It looks like it was original 8 gauge... I think thats why this small wire burned... Heres how its hooked now... I know like s h i t
09-09-2017, 02:16 PM
#21
Re: Can i hook this wire straight to the battery instead? (Pics inside
If you added wires to the junction (or plan to) that can increase demand on the circuit.Causing the insulation to melt in the first place.Not necessarily a fault in your system.Bad/improper crimping doesn't help either.
09-09-2017, 02:31 PM
#22
Supreme Member
Thread Starter
Join Date: Apr 2010
Location: Modesto, California
Posts: 1,015
Likes: 0
Received 5 Likes
on
4 Posts
Car: 88 Firebird Formula
Engine: LO5 5.7 TBI/Ebl Flash
Transmission: 700R4
Axle/Gears: 2.73 stock rear end
Re: Can i hook this wire straight to the battery instead? (Pics inside
Nothing has been added to the junction block. Must have been a bad crimp and was 3 years of coming apart... I put it back together as it was before for now.
09-09-2017, 02:52 PM
#23
Re: Can i hook this wire straight to the battery instead? (Pics inside
Crimping isn't that bad, but it has it's limitations. Quality crimp tools are a bit expensive and uncommon. Also there are better terminals available in recent years. For example, the insulated terminals in your photos are OK, but you can usually find the bare terminals and adhesive lined heatshrink, or 3M even makes most terminals and splices with adhesive lined shrink tubing already installed just crimp and heat until the tubing shrinks and bonds to the wire. They're just a little pricey.
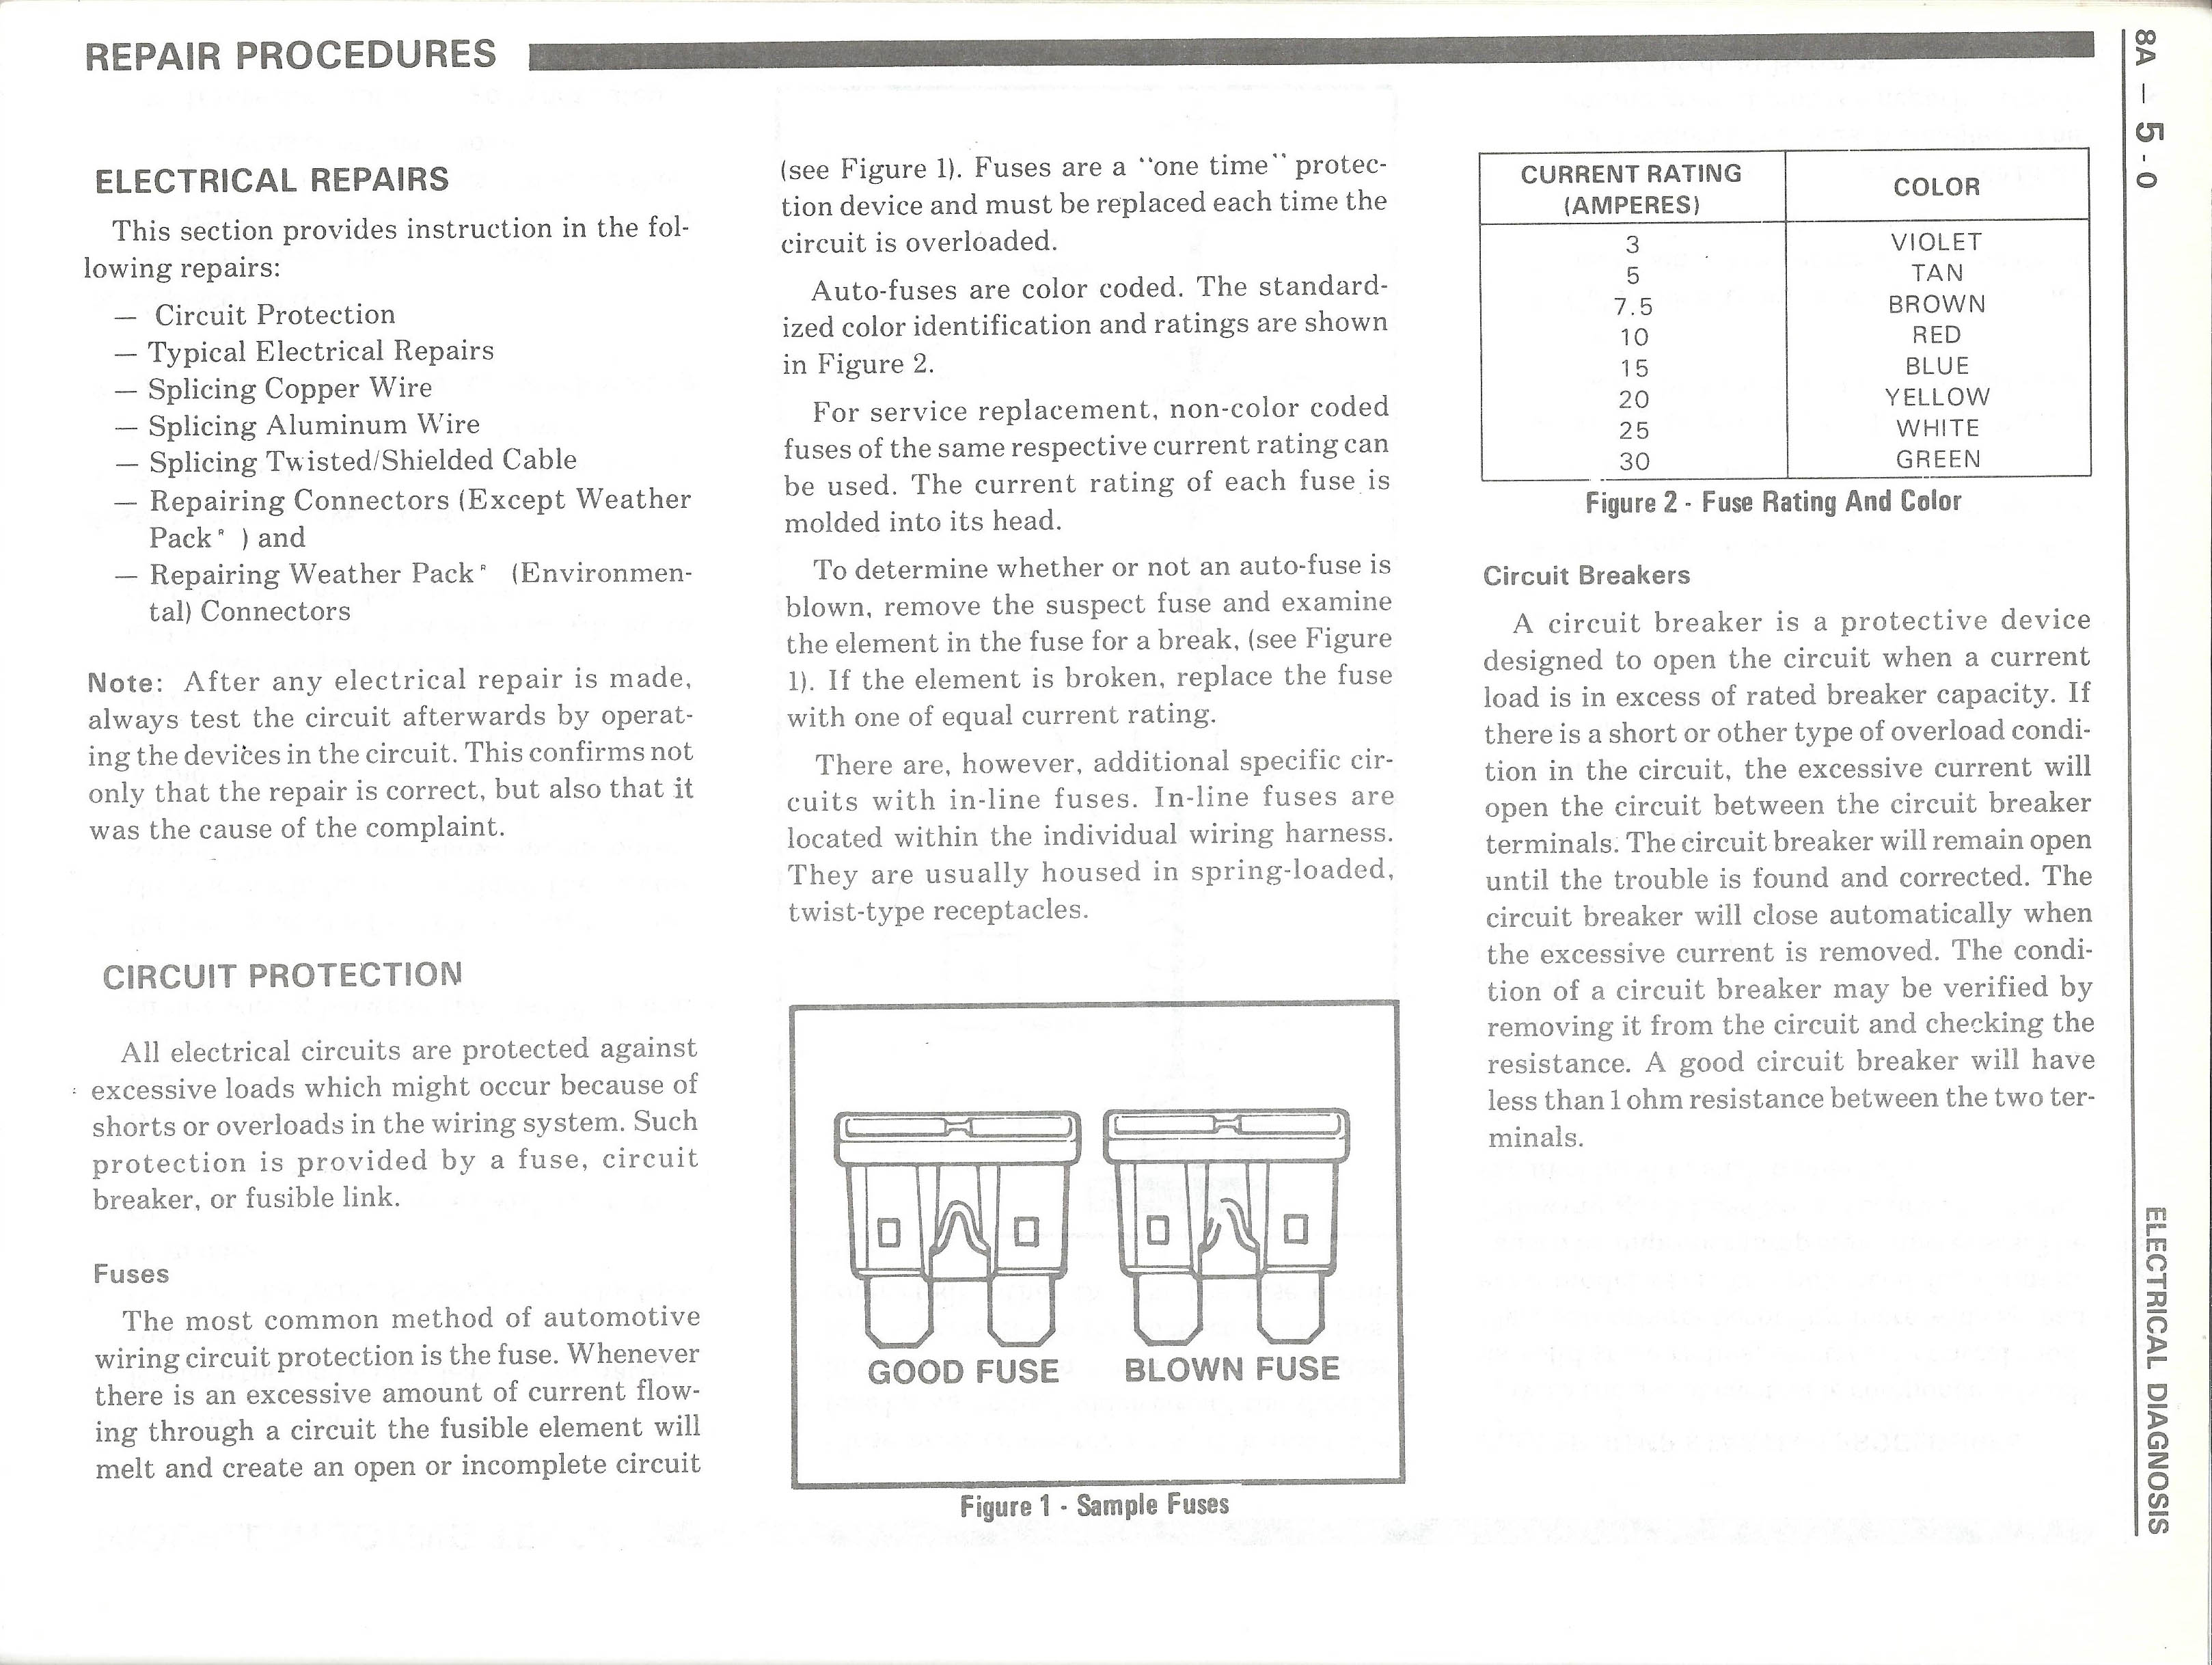
I scanned a few pages from the 1987 Camaro Elictrical Service Manual supplement. While the wiring diagrams aren't exactly specific, the repair procedures are and the diagrams illustrate what I'm trying to explain...


These two diagrams show the power distribution for an 87 Camaro with TPI and the V6. They illustrate how different cars pick up power sources at different places. Notice how nearly everything is fused by a fusible link? The TPI diagram shows the battery cable to the starter solenoid where several fusible links take power to the car, and another wire to the alternator along the way supplying power to another fusible link and an inline fuse. Now notice how the positive wires from the battery are marked "19 BLK" and "5 BLK/RED" and the single number 2 labeled underneath? 19 & 5 are the wire sizes. They're metric, and there's a chart to convert them to AWG in the manual that I'll link in a minute. The "BLK" and "BLK/RED" are the wire colors, the single number 2 underneath is the circuit number, not terribly important but not to be confused with the wire gauge.
The V6 diagram shows how on the 6cyl (like TBI cars) GM used an additional junction block instead of having all the wiring pick up at the positive post of the starter solenoid. Notice here the battery cables are marked 8 and 19, which translate to 8 and 4 AWG wire.
Note also how both diagrams have the fusible link colors and size called out, "RUST" "RED" etc. When repairing these connections, the new wire and any fusible links need to match the original wiring. You'll want to refer to a diagram for your exact year/make/and drivetrain so you can do the repair by the book.
Below I'm going to link the pages of the service manual that cover electrical repairs, fusible links, and splicing wires. Pay special attention to the wire conversion chart, and fusible link color/current rating chart, but the entire section is worth reading.


 09-09-2017, 03:40 PM
#24
Supreme Member
Thread Starter
Join Date: Apr 2010
Location: Modesto, California
Posts: 1,015
Likes: 0
Received 5 Likes
on
4 Posts
Car: 88 Firebird Formula
Engine: LO5 5.7 TBI/Ebl Flash
Transmission: 700R4
Axle/Gears: 2.73 stock rear end
Re: Can i hook this wire straight to the battery instead? (Pics inside

Drew thank you very much for your help! You've been helping me out past few weeks with a few different problems!! Great info here i really appreciate you taking your time to post the wiring diagrams and the repair procedures! I was about to post a link i found to the 88 tbi wiring off austinthirdgen.org (8 digit vin E) and it looks very similar to the 87 VIN s (6cyl with junction block).
As yours shows and the one i linked, it shows the '8' Black wire for the 87 VIN S (which on my car is black/red as shown in my last pics and shows on the 88 diagram VIN E yet i believe it is like the 87 v8 for metric '5.0' code or 10awg black/red wire)) goes to the junction block, and then the wires that come off the junction block themselves are the ones with the fusible links in them? So it looks as if, on both diagrams, that the fusible links are not on the code '8' (awg 8) black on 87 VIN S , black/red on 88 VIN E(which is on my car and shown in last pics) that comes off the positive battery cable and to the junction block.
Im going to get my car on ramps right now and chase the 3 wires that come off the junction block to verify. I can instantly see that one is right there off the connection (you can see in pic) and it shows that on the 88 diagram for VIN E as well.
Also in the diagrams when they state 'generator' im assuming that means alternator?
Last edited by Ghettobird52; 09-09-2017 at 03:44 PM. Reason: adding picture
09-09-2017, 04:49 PM
#25
Re: Can i hook this wire straight to the battery instead? (Pics inside
No problem, it's kind of fun talking about how to solve problems.
Yep. Generator would be alternator translated from GM to english.
You'll really want to refer to the GM service manual wiring diagram for your exact car, because different applications used different size wire. While you can probably get away with over-doing it from the battery to the junction block, I'd feel better knowing what the factory used. The diagram you linked is decent, but the GM diagram would give you more to work with. The next closest diagram I have in my library is from the 91 Firebird manual, and it shows the same 8ga wire as the 87 Camaro 2.8L diagram above. Now assuming the reason the wire on the Autozone generic cable burned, is that it couldn't supply enough current for the devices running off the junction block, I'd start by running an 8ga wire from the battery to the junction block. Just know that if it burned because of an abnormal current draw, going to a large gauge wire could give it enough current for the melting to move someplace else. It could be like replacing a fuse every couple days is fixing a symptom instead of the actual problem, or how popping in a larger fuse is just inviting trouble.
On a related side note... A direct replacement for the original battery cable could be assembled. Several vendors offer the later GM style sidepost terminals and insulator covers. A person can get bulk battery cable, terminals, insulators, and some good adhesive lined shrink sleeves, and then build a much higher quality cable than the off-the-shelf generic replacements. It'd be a going the extra mile kind of thing, but in some circumstances it'd be worth the trouble.
09-09-2017, 06:37 PM
#26
Supreme Member
Thread Starter
Join Date: Apr 2010
Location: Modesto, California
Posts: 1,015
Likes: 0
Received 5 Likes
on
4 Posts
Car: 88 Firebird Formula
Engine: LO5 5.7 TBI/Ebl Flash
Transmission: 700R4
Axle/Gears: 2.73 stock rear end
Re: Can i hook this wire straight to the battery instead? (Pics inside
No problem, it's kind of fun talking about how to solve problems.
Yep. Generator would be alternator translated from GM to english.
You'll really want to refer to the GM service manual wiring diagram for your exact car, because different applications used different size wire. While you can probably get away with over-doing it from the battery to the junction block, I'd feel better knowing what the factory used. The diagram you linked is decent, but the GM diagram would give you more to work with. The next closest diagram I have in my library is from the 91 Firebird manual, and it shows the same 8ga wire as the 87 Camaro 2.8L diagram above. Now assuming the reason the wire on the Autozone generic cable burned, is that it couldn't supply enough current for the devices running off the junction block, I'd start by running an 8ga wire from the battery to the junction block. Just know that if it burned because of an abnormal current draw, going to a large gauge wire could give it enough current for the melting to move someplace else. It could be like replacing a fuse every couple days is fixing a symptom instead of the actual problem, or how popping in a larger fuse is just inviting trouble.
On a related side note... A direct replacement for the original battery cable could be assembled. Several vendors offer the later GM style sidepost terminals and insulator covers. A person can get bulk battery cable, terminals, insulators, and some good adhesive lined shrink sleeves, and then build a much higher quality cable than the off-the-shelf generic replacements. It'd be a going the extra mile kind of thing, but in some circumstances it'd be worth the trouble.
Yep. Generator would be alternator translated from GM to english.
You'll really want to refer to the GM service manual wiring diagram for your exact car, because different applications used different size wire. While you can probably get away with over-doing it from the battery to the junction block, I'd feel better knowing what the factory used. The diagram you linked is decent, but the GM diagram would give you more to work with. The next closest diagram I have in my library is from the 91 Firebird manual, and it shows the same 8ga wire as the 87 Camaro 2.8L diagram above. Now assuming the reason the wire on the Autozone generic cable burned, is that it couldn't supply enough current for the devices running off the junction block, I'd start by running an 8ga wire from the battery to the junction block. Just know that if it burned because of an abnormal current draw, going to a large gauge wire could give it enough current for the melting to move someplace else. It could be like replacing a fuse every couple days is fixing a symptom instead of the actual problem, or how popping in a larger fuse is just inviting trouble.
On a related side note... A direct replacement for the original battery cable could be assembled. Several vendors offer the later GM style sidepost terminals and insulator covers. A person can get bulk battery cable, terminals, insulators, and some good adhesive lined shrink sleeves, and then build a much higher quality cable than the off-the-shelf generic replacements. It'd be a going the extra mile kind of thing, but in some circumstances it'd be worth the trouble.
Awesome ok so how i had it wired on post #15 would work? I think im just going to play it safe and grab some 10awg wire and use that instead of 8gauge. My car had this black/red 10awg wire on it from stock so thats the size i'll use. That stock wire didnt burn so 10awg should be ok. and i'll use this as a TEMP fix.
Honestly im VERY interested in a quality set of battery cables now. I dont like playing around with all this stuff and would really like to have it off my mind so that i can drive in peace not worrying about my crimp job or if the wire is large enough... Thats why i asked about Innovative Wiring. I was recommended to them 2 years ago by a board member just curious if anyone is still using them or who are you guys going with now? Anyone to recommend?
I must be having a bad weekend because as soon as i get the car about a mile away from my house im braking and hear a loud "KINK" sound from the rear. Right after i get some very large squealing noises from the driver rear brake. I limp the car home (slowly), jack up the rear, pull off the driver wheel and drum and find this. One piece was stuck between one of the shoes.

ebay image host
I was lucky enough to race ( in another car of course) to the local junkyard and pull a spare one off a 86 camaro. What a weekend so far

 09-09-2017, 09:43 PM
#27
Re: Can i hook this wire straight to the battery instead? (Pics inside
 My Friend , with all due respect , a brake return spring really should be thought of as a one time use item and a whole kit of brand new ones for both wheels worth of brakes can usually be had for around $15 .
Some things are just always best to use new ones of , brake springs , condoms , that sort O' thing ....
09-09-2017, 10:03 PM
#28
Supreme Member
Thread Starter
Join Date: Apr 2010
Location: Modesto, California
Posts: 1,015
Likes: 0
Received 5 Likes
on
4 Posts
Car: 88 Firebird Formula
Engine: LO5 5.7 TBI/Ebl Flash
Transmission: 700R4
Axle/Gears: 2.73 stock rear end
Re: Can i hook this wire straight to the battery instead? (Pics inside
My Friend , with all due respect , a brake return spring really should be thought of as a one time use item and a whole kit of brand new ones for both wheels worth of brakes can usually be had for around $15 .Some things are just always best to use new ones of , brake springs , condoms , that sort O' thing ....
 . I just wanted a spring that day so i could drive the car. Will be doing the brakes on entire car soon...
Ok side note i found the original GM manual for the 1988 pontiac firebird!!
https://www.thirdgen.org/forums/tech...ce-manual.html
Its real and i found the starter&charging system diagram (page 1302, its 2000 pages!) im uplaoding it. It shows as you state. 8 black/red wire running to junction block with the fusible links on the other 3 wires that are connected to it. What do you think?
 09-09-2017, 10:05 PM
#29
Re: Can i hook this wire straight to the battery instead? (Pics inside
8ga is what is shown in the diagrams I have on file, so there shouldn't be any reason to go smaller. The 8ga you show in post #15 should work.
I'm not really familiar with Innovative, but from a quick look at their website, I don't see any reason not to use their products. I'm just frugal and picky about how I want my wiring to look. I'd most likely buy the tools and raw materials to build what I need than to buy something pre-assembled. But that's just me.
I'm not really familiar with Innovative, but from a quick look at their website, I don't see any reason not to use their products. I'm just frugal and picky about how I want my wiring to look. I'd most likely buy the tools and raw materials to build what I need than to buy something pre-assembled. But that's just me.
09-09-2017, 10:09 PM
#30
Re: Can i hook this wire straight to the battery instead? (Pics inside
Ok side note i found the original GM manual for the 1988 pontiac firebird!!
https://www.thirdgen.org/forums/tech...ce-manual.html
Its real and i found the starter&charging system diagram (page 1302, its 2000 pages!) im uplaoding it. It shows as you state. 8 black/red wire running to junction block with the fusible links on the other 3 wires that are connected to it. What do you think?
That's the smoking gun, 8ga it and call it good. You might want to verify the rest of the wiring with splices and crimps by the manual to be sure a previous owner hasn't done anything fishy, but you should be good to go!
09-09-2017, 10:21 PM
#31
Supreme Member
Thread Starter
Join Date: Apr 2010
Location: Modesto, California
Posts: 1,015
Likes: 0
Received 5 Likes
on
4 Posts
Car: 88 Firebird Formula
Engine: LO5 5.7 TBI/Ebl Flash
Transmission: 700R4
Axle/Gears: 2.73 stock rear end
Re: Can i hook this wire straight to the battery instead? (Pics inside
8ga is what is shown in the diagrams I have on file, so there shouldn't be any reason to go smaller. The 8ga you show in post #15 should work.
I'm not really familiar with Innovative, but from a quick look at their website, I don't see any reason not to use their products. I'm just frugal and picky about how I want my wiring to look. I'd most likely buy the tools and raw materials to build what I need than to buy something pre-assembled. But that's just me.
I'm not really familiar with Innovative, but from a quick look at their website, I don't see any reason not to use their products. I'm just frugal and picky about how I want my wiring to look. I'd most likely buy the tools and raw materials to build what I need than to buy something pre-assembled. But that's just me.
Thank you everyone who contributed to this thread! Appreciate the help and once again love this forum!
 09-10-2017, 12:49 AM
#32
Re: Can i hook this wire straight to the battery instead? (Pics inside
Used copies of the GM/Helm Service Manuals come up pretty frequently on Ebay. If you don't mind some character you can find them for $20-40 usually. PDF's are nice, but having the physical book packed full of bookmarks is hard to beat.
It used to be that you could go to helminc.com and order the service manuals direct from the publisher, but it looks like they're out of print now. Other sources are 'automobilia' and auto literature collectors and dealers.
It used to be that you could go to helminc.com and order the service manuals direct from the publisher, but it looks like they're out of print now. Other sources are 'automobilia' and auto literature collectors and dealers.
09-10-2017, 09:59 PM
#33
Supreme Member
Thread Starter
Join Date: Apr 2010
Location: Modesto, California
Posts: 1,015
Likes: 0
Received 5 Likes
on
4 Posts
Car: 88 Firebird Formula
Engine: LO5 5.7 TBI/Ebl Flash
Transmission: 700R4
Axle/Gears: 2.73 stock rear end
Re: Can i hook this wire straight to the battery instead? (Pics inside
Used copies of the GM/Helm Service Manuals come up pretty frequently on Ebay. If you don't mind some character you can find them for $20-40 usually. PDF's are nice, but having the physical book packed full of bookmarks is hard to beat.
It used to be that you could go to helminc.com and order the service manuals direct from the publisher, but it looks like they're out of print now. Other sources are 'automobilia' and auto literature collectors and dealers.
It used to be that you could go to helminc.com and order the service manuals direct from the publisher, but it looks like they're out of print now. Other sources are 'automobilia' and auto literature collectors and dealers.
Even the 'cloud saved data' thing scares me. One day internet is going to go out and everything is not going to work... Call me a dinosaur
 09-10-2017, 11:29 PM
#34
Member
Join Date: Sep 2016
Location: Ventura County, CA
Posts: 124
Likes: 0
Received 1 Like
on
1 Post
Car: 1989 Iroc Z
Engine: 5.7
Transmission: 700r4
Axle/Gears: Currie 9"/US Gear Lightning 3.00
Re: Can i hook this wire straight to the battery instead? (Pics inside
Glad to see you got the issue sorted out it seems, with some solid advice. The best way to find out how to do things right on the internet is to do them wrong. Then everyone will let you know lol
09-12-2017, 07:44 PM
#35
Supreme Member

Re: Can i hook this wire straight to the battery instead? (Pics inside
For years I used to shove the ring terminal between the cable and the battery until I found these replacement bolts:
http://www.autozone.com/batteries-st...olt/296092_0_0
http://www.autozone.com/batteries-st...olt/296092_0_0