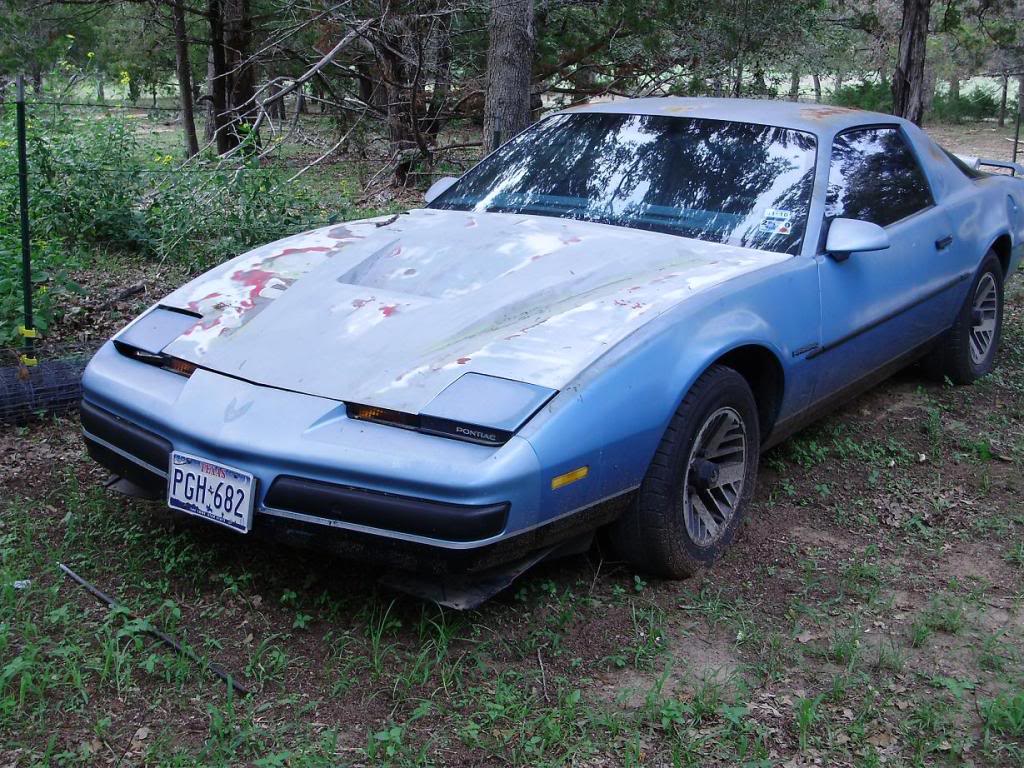
The Japanese heat extractor build...for my bird
 08-10-2009, 03:06 AM
#51
Supreme Member
iTrader: (5)
Join Date: Aug 2007
Location: Milwaukee, Wisconsin
Posts: 1,525
Likes: 0
Received 1 Like
on
1 Post
Car: 1987 IROC-Z
Engine: 383 with Edelbrock ProFlow EFI
Transmission: TH350
Axle/Gears: 12 bolt 3.73 Eaton posi
Re: The Japanese heat extractor build...for my bird
I need to keep a closer eye on this board... I can't believe I just noticed this now. Curse you!!! Now I have even more ideas for my car and still no time to do any of it! 
Mike
Mike
 08-13-2009, 09:16 PM
#52
Supreme Member
Thread Starter
Join Date: Jan 2007
Location: Bastrop, TX
Posts: 1,002
Likes: 0
Received 12 Likes
on
11 Posts
Car: 1988 SC Convertible
Engine: LT-1
Transmission: 700R4
Axle/Gears: 3.23 posi w/PBR's
Re: The Japanese heat extractor build...for my bird
*Update*
I finally got back on to work on the hood today. There wasn't a whole lot of progress made, but there was still some. This evening I started fabbing up the new support braces and tacking them in place.
I got my perforated stainless for the scoop and cowl holes today. Luckily I got plenty of scrap from work. It's a good thing I didn't have to buy it since this stuff goes for $600-$900 per 10'X4' sheet. I have two different types and I haven't decided on which I'm going to use yet. One is 18ga with 1/8" holes and the other is 14 ga with 1/4" holes.
Sorry no pics as of now, I need to pick up new batteries for my camera.
This project should be very close to completion by the end of this weekend.....I hope.
08-13-2009, 10:08 PM
#53
Re: The Japanese heat extractor build...for my bird
i commend your fab skills. looks sweet.
i do have a question though. what happens if you get caught in the rain with this hood? it looks like the water will run down onto your pullys and belts. i try not to drive my car in the rain, but it does happen.
i do have a question though. what happens if you get caught in the rain with this hood? it looks like the water will run down onto your pullys and belts. i try not to drive my car in the rain, but it does happen.
 08-13-2009, 10:27 PM
#54
Supreme Member
Thread Starter
Join Date: Jan 2007
Location: Bastrop, TX
Posts: 1,002
Likes: 0
Received 12 Likes
on
11 Posts
Car: 1988 SC Convertible
Engine: LT-1
Transmission: 700R4
Axle/Gears: 3.23 posi w/PBR's
Re: The Japanese heat extractor build...for my bird
This car is/was a daily driver. If it ever rains here again (hasn't in over a year) I'm really not going to worry about the water. The extractor scoop goes down right behind the radiator, in front of the accessories so the water would run down the back of the radiator. The water will only have a chance to run down in there when the car is sitting still which doesn't happen to often since I drive 35 miles one way to work and back every day. When I'm driving it should just roll up the back of the hood as normal. There will be a "grille" of perforated stainless steel covering the hole to keep leaves, sticks, birds, rodents, small children, etc.... from falling down into the engine compartment.
08-13-2009, 10:48 PM
#55
Banned
iTrader: (12)
Join Date: Jul 1999
Location: Bertram (outside Austin), TX
Posts: 12,212
Likes: 0
Received 10 Likes
on
10 Posts
Car: 87 GTA
Engine: L98
Transmission: 700R4
Axle/Gears: Dana M78 3.27 posi
Re: The Japanese heat extractor build...for my bird
Don't park under trees too much, or the extractor grille will fill with leaves & twigs. Some will blow out after driving, but it would still suck, huh?
08-15-2009, 01:39 AM
#56
Junior Member

Join Date: Jul 2009
Location: MiAmi
Posts: 77
Likes: 0
Received 0 Likes
on
0 Posts
Car: 92 CaMaRo RS
Engine: CARBED 350 5.7
Re: The Japanese heat extractor build...for my bird
looks sick. how many hours would you say you have into it @ this point? if i was you id sell em. keep up the nice work.
08-15-2009, 09:58 PM
#57
Supreme Member
Thread Starter
Join Date: Jan 2007
Location: Bastrop, TX
Posts: 1,002
Likes: 0
Received 12 Likes
on
11 Posts
Car: 1988 SC Convertible
Engine: LT-1
Transmission: 700R4
Axle/Gears: 3.23 posi w/PBR's
Re: The Japanese heat extractor build...for my bird
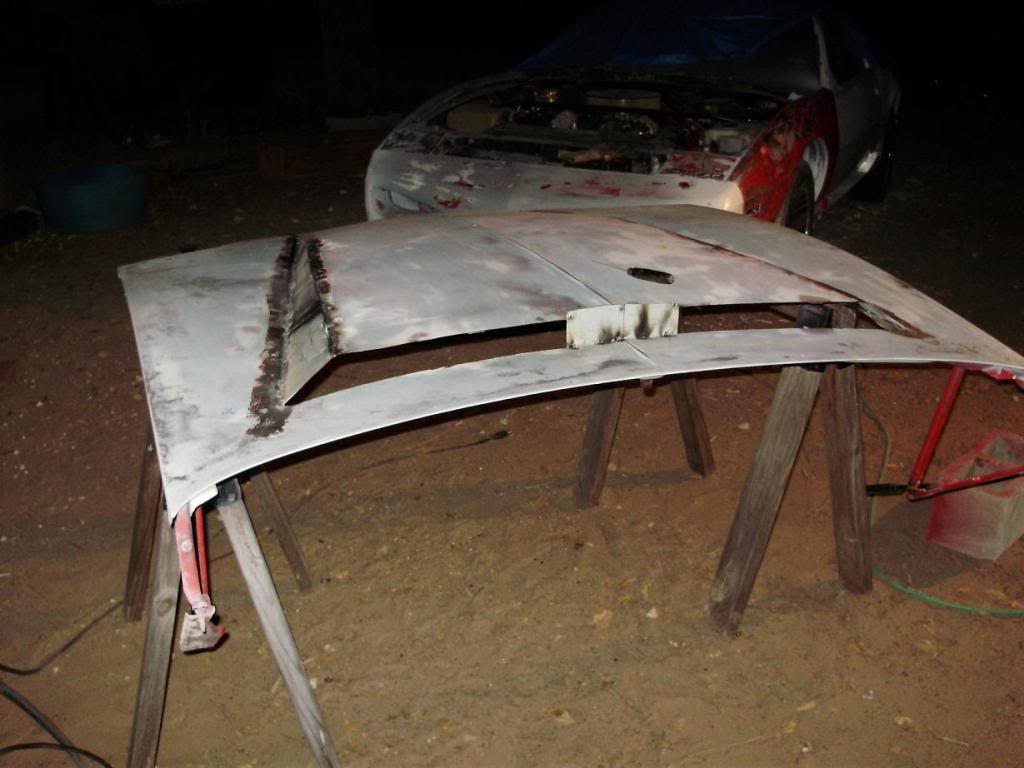
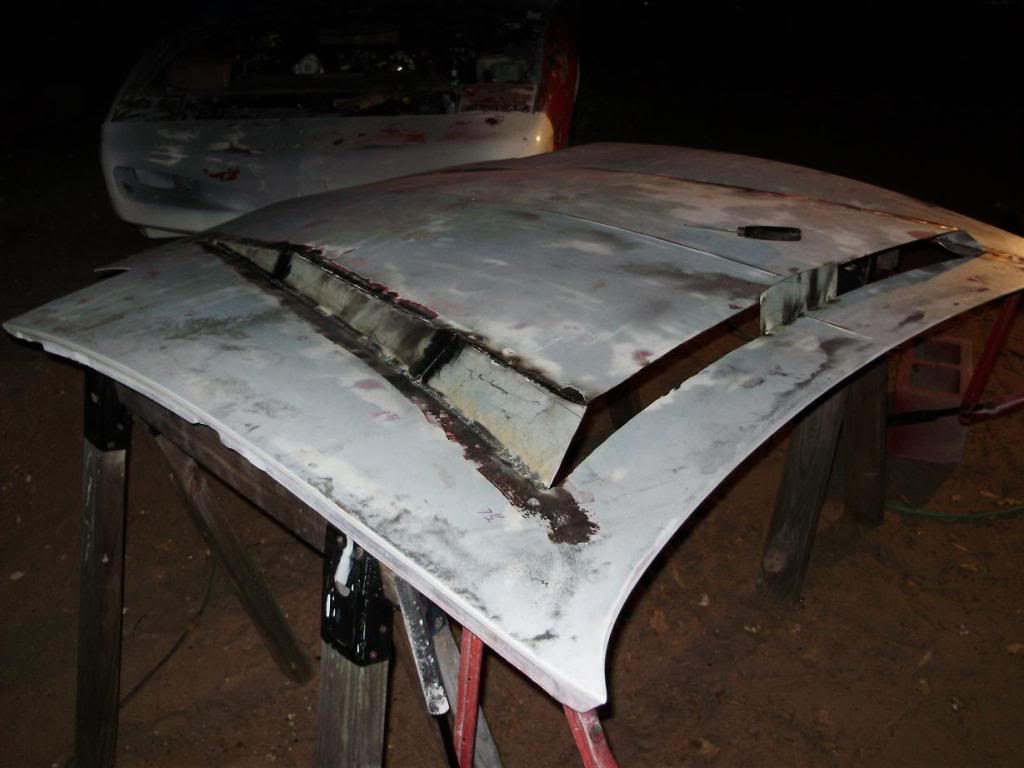
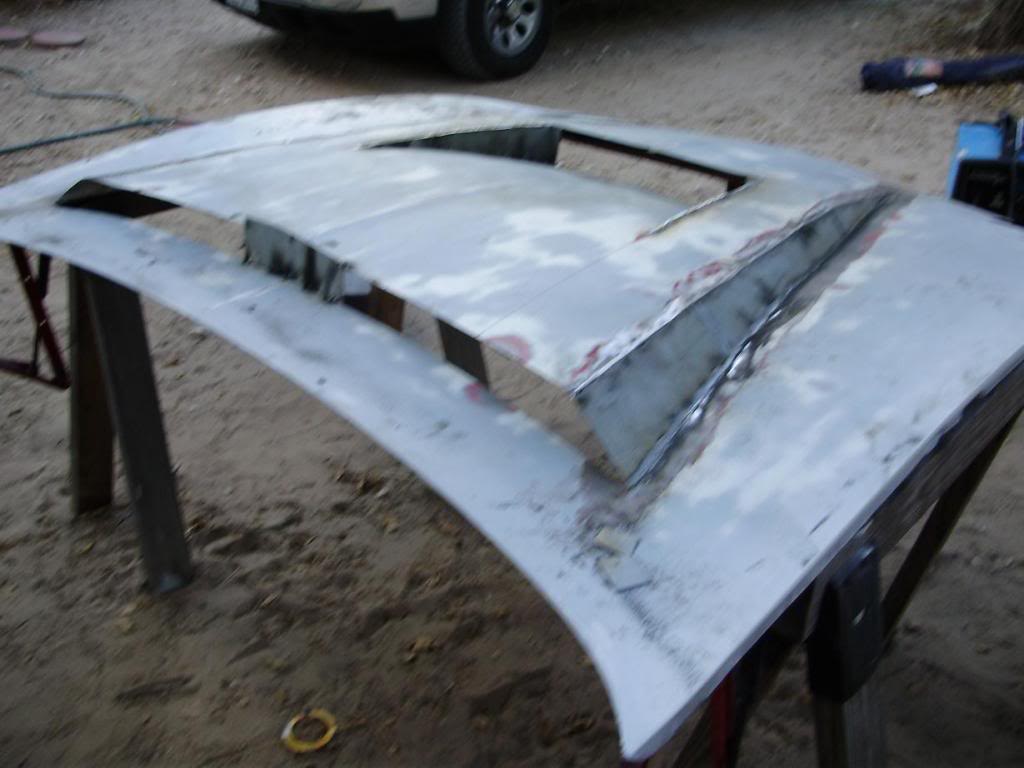
All the fab work is DONE! All I have left to do is grind, skim with filler, sand, and paint.....and a little hammer/dolly here and there.
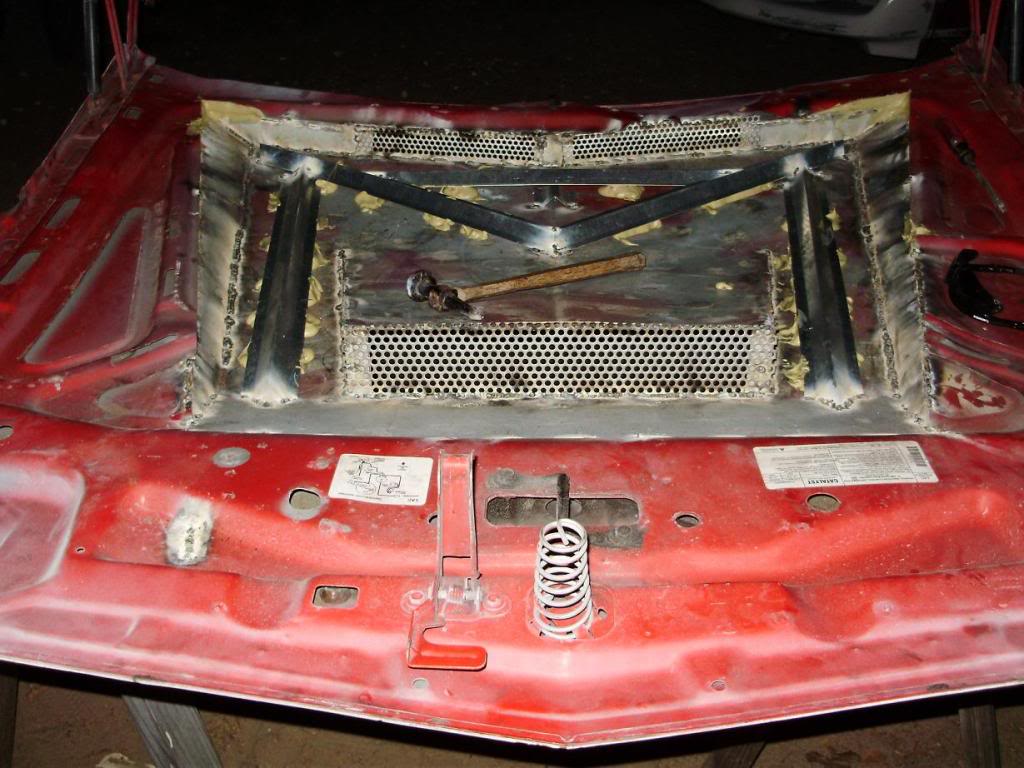
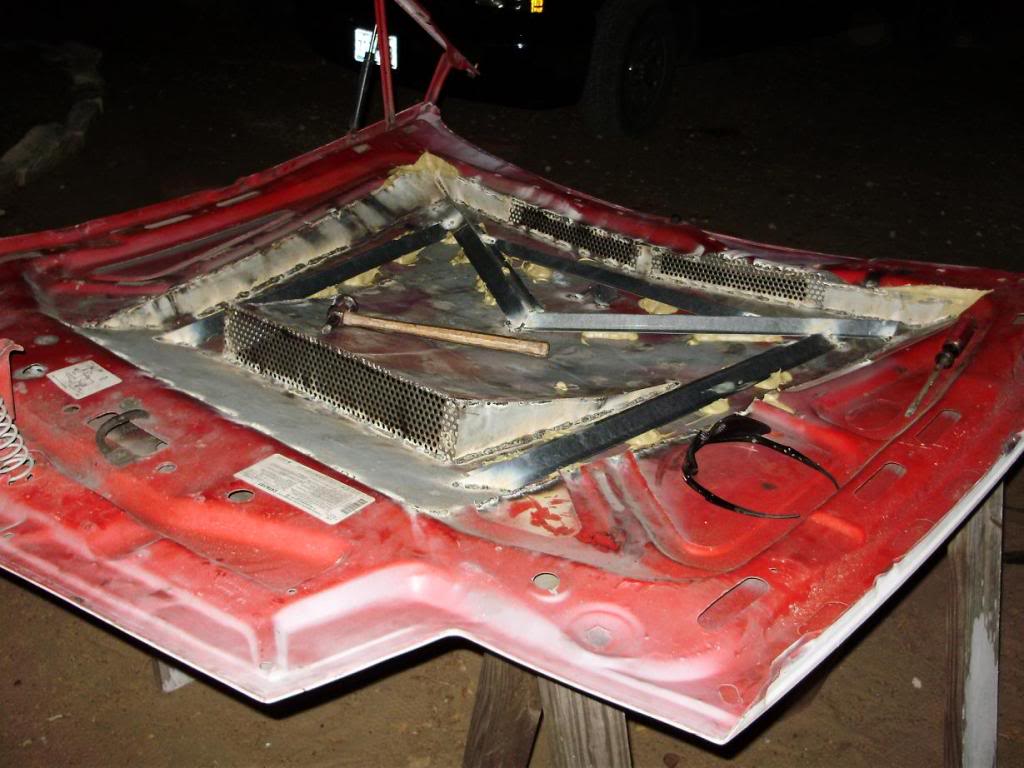
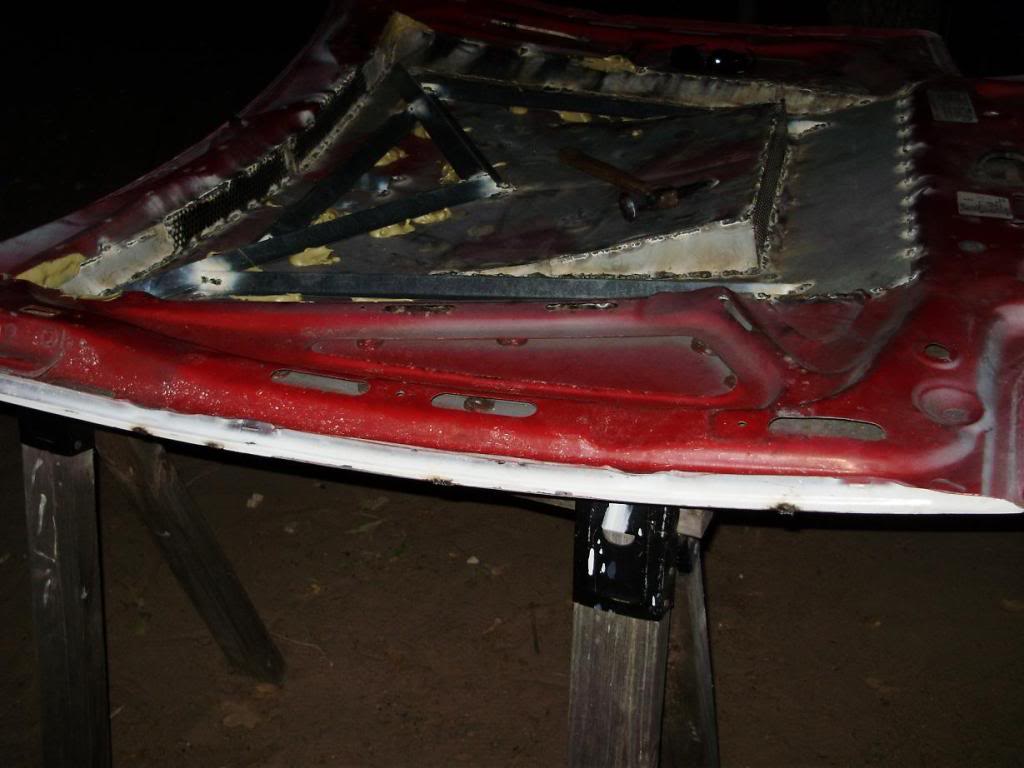
I work in a sheet metal shop so I decided to go a different route with my bracing. I made the braces as a 90* angle with a 45* foot turned up on each side. They're 20 ga galvanized. None of the stock bracing that I cut out was used. It's real flimsy and it just wouldn't do what I wanted it to do. In the front of the hood between the extractor and the latch I welded in a plate of 20 ga paint grip steel to help it transition a little better and it actually added a good bit of bracing so that's where I decided to tie in the front to rear braces. This hood is SOLID. There is absoloutely NO flex/bend to it anymore like it was is stock form. I might have added around 4-5 lbs to it maybe but I could care less since this isn't a race car. I can still take it off the car and install it by myself (which I did about 5 times today making sure everything was still lining up right).
I ended up using the 14 ga perforated stainless steel with the 1/4" holes for the vent grilles since it's easier to weld and it just adds a little more rigidity to the entire structure.
Between the braces and the outer skin I put big globs of Liquid Nails for support where there is no metal on metal contact. It's very similar to what was used at the factory. I install alot of stainless sheetmetal on walls of commercial kitchens and I use Liquid Nails exclusively so I know that it will bond with the metal very well.
I still need to run a wire wheel over the welds to clean up all the slag but as of tonight here is what it looks like. I'll put it back on the car and start on the finish work tomorrow.
Last edited by FYRCHKN; 08-15-2009 at 10:12 PM.
08-15-2009, 10:03 PM
#58
08-18-2009, 12:57 AM
#59
Re: The Japanese heat extractor build...for my bird
You say that you've been fitting it to the car... can you take some pictures of it sitting on the car?
I have to give you credit... that is LITERALLY exactly what I've described dozens of times as what someone should build for these cars. I've even contacted 2 different fiberglass companies with the idea. I've pretty much been ignored or told it won't look right. I'm not 100% sold on doing it out of a steel hood (mainly because in my case really will be a form follows function, it will go on a "race" car where weight will matter, but if I'm forced to carry a few extra pounds to get proper cooling/packaging, well, oh well), so in my case what I end up with will depend on if I find a flat steel or 'glass hood first for cheap enough that i'm willing to cut it up.
I'm curious (to get some sense of proportion), you said that the wedge that you cut out of it was about 3" wide... was it a straight sided wedge or did it have a curve to the inside cut?
08-20-2009, 03:05 PM
#60
Supreme Member
Thread Starter
Join Date: Jan 2007
Location: Bastrop, TX
Posts: 1,002
Likes: 0
Received 12 Likes
on
11 Posts
Car: 1988 SC Convertible
Engine: LT-1
Transmission: 700R4
Axle/Gears: 3.23 posi w/PBR's
Re: The Japanese heat extractor build...for my bird
You say that you've been fitting it to the car... can you take some pictures of it sitting on the car?
I have to give you credit... that is LITERALLY exactly what I've described dozens of times as what someone should build for these cars. I've even contacted 2 different fiberglass companies with the idea. I've pretty much been ignored or told it won't look right. I'm not 100% sold on doing it out of a steel hood (mainly because in my case really will be a form follows function, it will go on a "race" car where weight will matter, but if I'm forced to carry a few extra pounds to get proper cooling/packaging, well, oh well), so in my case what I end up with will depend on if I find a flat steel or 'glass hood first for cheap enough that i'm willing to cut it up.
I'm curious (to get some sense of proportion), you said that the wedge that you cut out of it was about 3" wide... was it a straight sided wedge or did it have a curve to the inside cut?
I have to give you credit... that is LITERALLY exactly what I've described dozens of times as what someone should build for these cars. I've even contacted 2 different fiberglass companies with the idea. I've pretty much been ignored or told it won't look right. I'm not 100% sold on doing it out of a steel hood (mainly because in my case really will be a form follows function, it will go on a "race" car where weight will matter, but if I'm forced to carry a few extra pounds to get proper cooling/packaging, well, oh well), so in my case what I end up with will depend on if I find a flat steel or 'glass hood first for cheap enough that i'm willing to cut it up.
I'm curious (to get some sense of proportion), you said that the wedge that you cut out of it was about 3" wide... was it a straight sided wedge or did it have a curve to the inside cut?
Unfortunately I haven't taken a pic of it on the car since I cut the vent in it. But, I am in the process skimming with filler and sanding at this very moment. I'm actually waiting on the filler to dry right now. The hood is currently sitting on saw horses in my driveway. I will get it on the car as soon as I finish smoothing it all out and take plenty of pics. That should be within a couple of days.
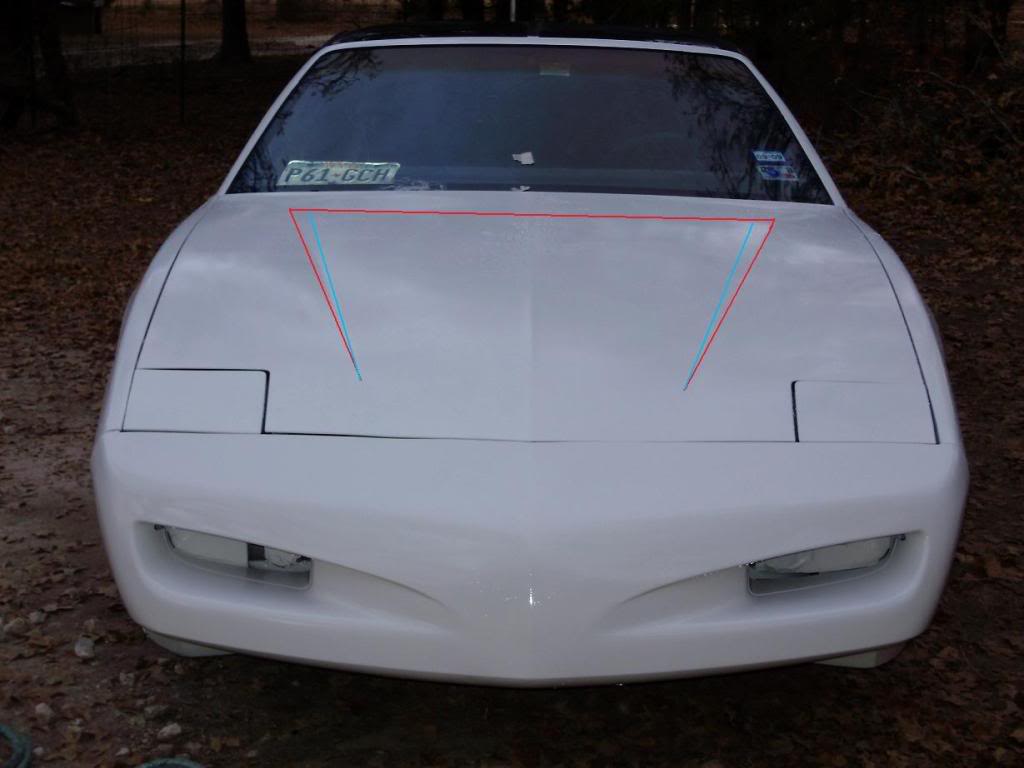
As far as the wedge that I cut out of it here is a rough sketch as to where and how I cut it. I cut it initially on the body line creases in the hood. Those are indicated by the two red lines going from the front to back on the hood. Then I cut the red line across the back of the hood. I measured in 3" from each cut at the rear of the hood and drew a line from there to the starting point of the original cut. That is marked by the blue lines. The raised section of the hood is 2" above it's stock location. All cuts except the rear cut were straight cuts. For the cut in the rear I made a gauge that followed the curve in the rear of the hood. I can't remember all of my measurements off the top of my head but I'll gather them up and post them if anyone is interested.

This project is getting very close to completion and will be done within the week.
If anyone knows of a place in central Texas that makes fiberglass hoods I would be more than willing to make a deal with them to make a mold of my hood so it can be mass produced.
08-20-2009, 03:18 PM
#61
Banned
iTrader: (12)
Join Date: Jul 1999
Location: Bertram (outside Austin), TX
Posts: 12,212
Likes: 0
Received 10 Likes
on
10 Posts
Car: 87 GTA
Engine: L98
Transmission: 700R4
Axle/Gears: Dana M78 3.27 posi
Re: The Japanese heat extractor build...for my bird

Last edited by Stephen; 08-20-2009 at 04:09 PM.
08-20-2009, 04:18 PM
#62

Re: The Japanese heat extractor build...for my bird
I was about to say "i'll take number 3" but remembered that I don't have a bird...
You seem to have accomplished what seemingly takes thousands of dollars to to for a camaro. My compliments to you!
08-20-2009, 05:15 PM
#63
Supreme Member
Thread Starter
Join Date: Jan 2007
Location: Bastrop, TX
Posts: 1,002
Likes: 0
Received 12 Likes
on
11 Posts
Car: 1988 SC Convertible
Engine: LT-1
Transmission: 700R4
Axle/Gears: 3.23 posi w/PBR's
Re: The Japanese heat extractor build...for my bird
The Camaro guys aren't completely out of luck just yet. I have been given a 91 RS hood (gotta go pick it up) that I might modify in a similar fashion in the next few months, possibly this winter. If I do then I'll see about getting a company (maybe the one Stephen informed me about) to mass produce them in fiberglass.
Total out of pocket cost so far in this project:
flux core welding wire- 2 rolls @ $10 each
liquid nails (heavy duty)--- 4 tubes @ $2.50 each
scrap sheet metal from work--- $0 (FREEEEEBBBBIIIIEEEE)
Evercoat body filler --- 1 gallon @ $22
various sand paper/grinding wheels ----already on hand---$20 +/-
______________________________
$72.00 +/-
I have roughly 25-30 hours into it so far...maybe more, maybe less. I haven't really been keeping track of it. I've been working on it when I can or when I feel like it since it's been sooo HOT here this summer (over 60 consecutive 100* + days...that's with 75%+ humidity too desert boys).
......gotta go sand on it some more.
08-24-2009, 05:43 PM
#64
Supreme Member


Join Date: Jan 2001
Location: Pittsburgh, PA
Posts: 1,374
Likes: 0
Received 1 Like
on
1 Post
Car: 06 SRM M6 GTO, 98 Grand Prix GTP
Re: The Japanese heat extractor build...for my bird
WOW, that looks fantastic!!!!! I like the design, and your workmanship is impressive!!!!!! Cant wait to see the finished product.
 09-07-2009, 03:22 PM
#67

Re: The Japanese heat extractor build...for my bird
well i think its going good so far, im a fabricator and welder and i see a couple of things you could have done to make it more tidy instead of using 3 peaces of metal to fab the sides, now im not saying what you got done is not good, but one piece sides would be better, and more symmetrical, using the wood is ok, but if you made the sides and then started tacking them on it would have to be the same, but at least your not afraid to try unlike some people, i cant wait to see the finished product, keep it up.
09-10-2009, 04:07 PM
#69
 09-12-2009, 09:59 AM
#70
Supreme Member
Thread Starter
Join Date: Jan 2007
Location: Bastrop, TX
Posts: 1,002
Likes: 0
Received 12 Likes
on
11 Posts
Car: 1988 SC Convertible
Engine: LT-1
Transmission: 700R4
Axle/Gears: 3.23 posi w/PBR's
Re: The Japanese heat extractor build...for my bird
well i think its going good so far, im a fabricator and welder and i see a couple of things you could have done to make it more tidy instead of using 3 peaces of metal to fab the sides, now im not saying what you got done is not good, but one piece sides would be better, and more symmetrical, using the wood is ok, but if you made the sides and then started tacking them on it would have to be the same, but at least your not afraid to try unlike some people, i cant wait to see the finished product, keep it up.
The hood is pretty much done. I've kind of put it on the back burner for right now so I can finish up my '91 and get it back on the road to enjoy it for the winter.
After mocking up the whole car I really wasn't "feeling" it on the 91 with the pointed nose, 4th gen wing, and all the shaving/body mods that I've done to it. I'm going with a very streamlined/smooth look with that car and the boxiness of the hood just wasn't flowing with the overall look of the car.
So I decided to swap the hood over to my '89, which I'm glad I did...it flows so much better with the '90 & earlier noses. It will remain on the 89. I haven't had a chance to get any pics because it's been raining every day for the past week. But, once I get an even coat of at least primer on it I'll post up "finished" pics of it on my '89 project car. I think it was a better decision putting it on the '89 since that car is going to be getting a 6.0 next spring and the hood will clear the truck intake.
09-12-2009, 10:58 AM
#71
Member

Join Date: Jan 2004
Location: silverton/salem, oregon
Posts: 422
Likes: 0
Received 0 Likes
on
0 Posts
Car: 87 Trans am
Engine: 350 TPI
Transmission: built 700R4
Axle/Gears: BW 9 bolt posi w/ disc
Re: The Japanese heat extractor build...for my bird
glad to hear you got it done for the most part.
This is exactly what i have been wanting for my '87 TA. Maybe one of the hood companies will see how much interest there is in what youre doing and "copy" your design for the rest of us!
This is exactly what i have been wanting for my '87 TA. Maybe one of the hood companies will see how much interest there is in what youre doing and "copy" your design for the rest of us!
09-12-2009, 05:40 PM
#72
Re: The Japanese heat extractor build...for my bird
i hear ya, sometimes you can only do so much with what you have, i would love to have all the tools from the shop but i dont have the money, it a real nice project you got there though, and a nice job at that, keep it up.
 09-20-2009, 10:47 PM
#74
Junior Member

Join Date: Aug 2009
Location: Pa
Posts: 51
Likes: 0
Received 0 Likes
on
0 Posts
Car: 89 Firebird
Engine: 305, swapping out to a 350 tbi
Transmission: t5
Re: The Japanese heat extractor build...for my bird
Damn hood looks awesome. One of the nices hoods I have seen. Wanna sell it when its finished???

 09-22-2009, 02:37 PM
#79
Junior Member
Join Date: Aug 2009
Location: Pa
Posts: 51
Likes: 0
Received 0 Likes
on
0 Posts
Car: 89 Firebird
Engine: 305, swapping out to a 350 tbi
Transmission: t5
Re: The Japanese heat extractor build...for my bird
Hahaha yea, well im the type when I see something like that I want, ill either buy it or make one. So one way or the other ill have a custom hood on it, before my one buddy thats on here saw this and told me about it we were talkin about building one not like that but I really like that design alot.
09-22-2009, 04:00 PM
#81
Supreme Member
Thread Starter
Join Date: Jan 2007
Location: Bastrop, TX
Posts: 1,002
Likes: 0
Received 12 Likes
on
11 Posts
Car: 1988 SC Convertible
Engine: LT-1
Transmission: 700R4
Axle/Gears: 3.23 posi w/PBR's
Re: The Japanese heat extractor build...for my bird
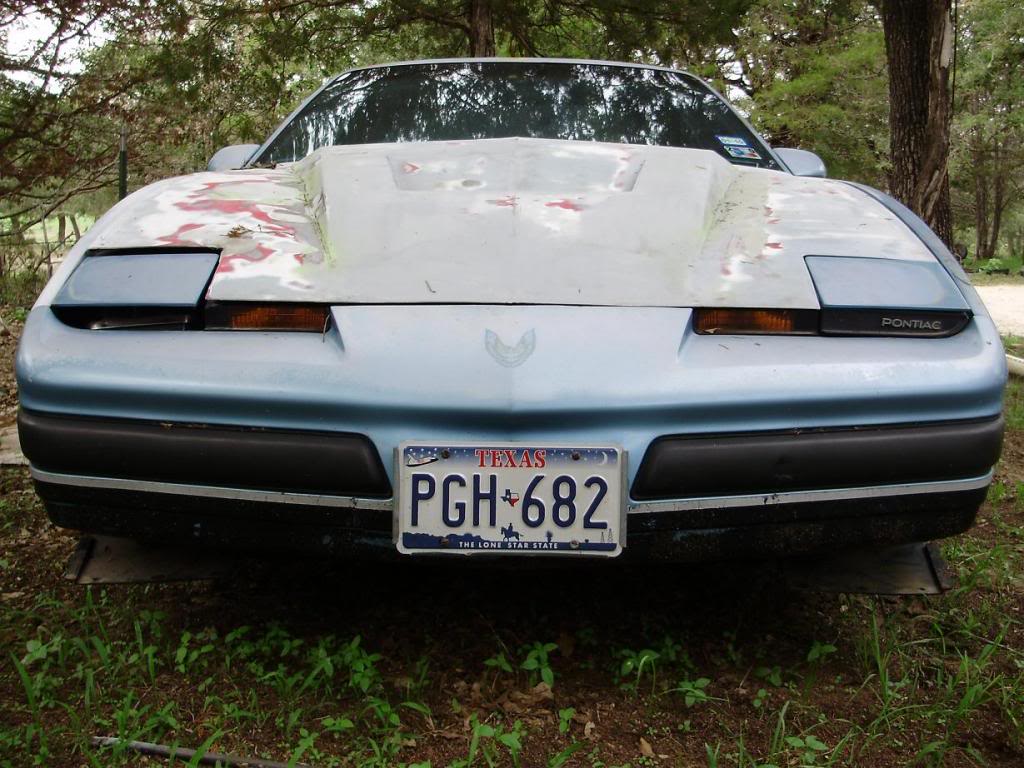
The hood has been put on the back burner until I get my 91 all put back together and back on the road...which shouldn't be too long now since I laid the paint on it Sunday. I wasn't "feeling" it on my 91, which was the car that I basically built it for so I swapped it over to my 89 base model LSX project and to me it flows soooo much better with the squared off nose on the 89. Structurally it's done. I still have to sand the filler down smooth where I welded on the driver side of the raised section, and fill/sand the same part on the passenger side. That was taking a while because I am extremely **** and I make sure everything is perfect. This hood was riddled with tiny hail dings and that took a long, long time to smooth out and get perfect. This hood also had 3 different paint jobs on it and everywhere that I had bare metal exposed I've just shot some rattle can primer on to keep it from rusting.
Be assured though, it has been built, and now IT DOES EXIST!!! Here it is on my project 89 that I recently aquired:
Finishing up the body/paint work on my 91 has taken alot longer than I had anticipated. But, it's almost done. As soon as it is put back together and on the road again in the next couple of weeks I'll be back to work on finishing up the cosmetics on the hood so I can paint the 89.
....Oh, and for everyone that has good eyes the nose and the passenger fender are loosely on the car and the passenger headlight bucket is basically just sitting in there for the moment. Everything does line up perfectly.
09-22-2009, 04:22 PM
#82
Senior Member

Join Date: Jun 2008
Location: Norfolk VA
Posts: 1,298
Likes: 0
Received 2 Likes
on
2 Posts
Car: 85 Camaro IROC
Engine: 5.7 TPI
Transmission: 700-R4
Axle/Gears: open rear, 3.42 gears
Re: The Japanese heat extractor build...for my bird
i want one for my IROC lol
that looks really good on that car.
you are right about the squared off nose looking better
that looks really good on that car.
you are right about the squared off nose looking better
09-22-2009, 04:42 PM
#83
Senior Member
Join Date: Feb 2009
Location: N. Virginia
Posts: 660
Likes: 0
Received 0 Likes
on
0 Posts
Car: 1988 Firebird - 1998 Z28
Engine: 2.8 - LS1
Re: The Japanese heat extractor build...for my bird
That is some A+ custom work. I'd love to get one on mine now. 
 09-22-2009, 06:27 PM
#86
Supreme Member
iTrader: (5)
Join Date: Aug 2007
Location: Milwaukee, Wisconsin
Posts: 1,525
Likes: 0
Received 1 Like
on
1 Post
Car: 1987 IROC-Z
Engine: 383 with Edelbrock ProFlow EFI
Transmission: TH350
Axle/Gears: 12 bolt 3.73 Eaton posi
Re: The Japanese heat extractor build...for my bird
I think it would have looked better if the hood scoop was a little wider to better match the front bumper's lines. I know it's too late now, but if you (or anyone else) would make another one, I just think it would look better wider.
Just my $0.02
Still looks great though!
Just my $0.02
Still looks great though!
09-22-2009, 06:48 PM
#87
Banned
iTrader: (12)
Join Date: Jul 1999
Location: Bertram (outside Austin), TX
Posts: 12,212
Likes: 0
Received 10 Likes
on
10 Posts
Car: 87 GTA
Engine: L98
Transmission: 700R4
Axle/Gears: Dana M78 3.27 posi
Re: The Japanese heat extractor build...for my bird
I think it would have looked better if the hood scoop was a little wider to better match the front bumper's lines. I know it's too late now, but if you (or anyone else) would make another one, I just think it would look better wider.
Just my $0.02
Still looks great though!
Just my $0.02
Still looks great though!
Not that I don't agree with you...I think straight up walls would look better too, but that is the way the stock pieces turn out.
09-22-2009, 11:09 PM
#88
Re: The Japanese heat extractor build...for my bird
The hood has been put on the back burner until I get my 91 all put back together and back on the road...which shouldn't be too long now since I laid the paint on it Sunday. I wasn't "feeling" it on my 91, which was the car that I basically built it for so I swapped it over to my 89 base model LSX project and to me it flows soooo much better with the squared off nose on the 89. Structurally it's done. I still have to sand the filler down smooth where I welded on the driver side of the raised section, and fill/sand the same part on the passenger side. That was taking a while because I am extremely **** and I make sure everything is perfect. This hood was riddled with tiny hail dings and that took a long, long time to smooth out and get perfect. This hood also had 3 different paint jobs on it and everywhere that I had bare metal exposed I've just shot some rattle can primer on to keep it from rusting.
Be assured though, it has been built, and now IT DOES EXIST!!! Here it is on my project 89 that I recently aquired:


Finishing up the body/paint work on my 91 has taken alot longer than I had anticipated. But, it's almost done. As soon as it is put back together and on the road again in the next couple of weeks I'll be back to work on finishing up the cosmetics on the hood so I can paint the 89.
....Oh, and for everyone that has good eyes the nose and the passenger fender are loosely on the car and the passenger headlight bucket is basically just sitting in there for the moment. Everything does line up perfectly.
Be assured though, it has been built, and now IT DOES EXIST!!! Here it is on my project 89 that I recently aquired:
Finishing up the body/paint work on my 91 has taken alot longer than I had anticipated. But, it's almost done. As soon as it is put back together and on the road again in the next couple of weeks I'll be back to work on finishing up the cosmetics on the hood so I can paint the 89.
....Oh, and for everyone that has good eyes the nose and the passenger fender are loosely on the car and the passenger headlight bucket is basically just sitting in there for the moment. Everything does line up perfectly.
Can you get a few pictures from the side (high and low angles) to get some impression of how where you started and stopped the scoop look as well as following the contour of the back of the hood for the back of the scoop (when I imagined doing it I imagined it being straight across the back like roughly a 2x as wide formula scoop, which is straight across the back)?
09-22-2009, 11:28 PM
#89
Banned
iTrader: (12)
Join Date: Jul 1999
Location: Bertram (outside Austin), TX
Posts: 12,212
Likes: 0
Received 10 Likes
on
10 Posts
Car: 87 GTA
Engine: L98
Transmission: 700R4
Axle/Gears: Dana M78 3.27 posi
Re: The Japanese heat extractor build...for my bird
Looks incredible... good work.
Can you get a few pictures from the side (high and low angles) to get some impression of how where you started and stopped the scoop look as well as following the contour of the back of the hood for the back of the scoop (when I imagined doing it I imagined it being straight across the back like roughly a 2x as wide formula scoop, which is straight across the back)?
Can you get a few pictures from the side (high and low angles) to get some impression of how where you started and stopped the scoop look as well as following the contour of the back of the hood for the back of the scoop (when I imagined doing it I imagined it being straight across the back like roughly a 2x as wide formula scoop, which is straight across the back)?
09-22-2009, 11:47 PM
#90
Re: The Japanese heat extractor build...for my bird
He "simply" cut long the stock creases & raised the center section up. To maintain the width after being raised, the center section would have to be widened.
Not that I don't agree with you...I think straight up walls would look better too, but that is the way the stock pieces turn out.
Not that I don't agree with you...I think straight up walls would look better too, but that is the way the stock pieces turn out.
I would have followed the lines of the hood slightly differently, probably would have taken some tape and laid some straight lines from the signal openings of the hood to the back in a straight line which I believe would put the inside cut very close to where his outside cut was and then matched that line with the outside line of the heat extractor opening, just to make the lines work a little better for my eyes (though with the contours of the hood, I might do something different in person then I would with pictures), and then from a function perspective, I would have left a little lip around the heat extractor; very little air deflection would make a big difference in airflow.
FYRCHKN's orginal is on the left, what I'm getting at is photochopped on the right (I know, it's subtle):
Again, I don't know what I would do with the back of the hood, which is why I'm asking for some more pictures so I can work that out... I'm hoping that what i like following the contour of the back of the hood, but suspect that what I really would want to do would not be compatible with doing it out of one hood... which is to extend the thing all the way past the original hoodline, sort of climbing the windshield with the back of the scoop like some cowl and prostock hoods.
If I had a flat hood I would do it right now, I'm actually tempted to take my TA hood, fix it's dent in the front/middle and then fill the center vents and try it, but I'm a bit worried that the patches will result in a funny bend at the front of the hood
Last edited by 83 Crossfire TA; 09-22-2009 at 11:56 PM.
09-23-2009, 12:00 AM
#91
Banned
iTrader: (12)
Join Date: Jul 1999
Location: Bertram (outside Austin), TX
Posts: 12,212
Likes: 0
Received 10 Likes
on
10 Posts
Car: 87 GTA
Engine: L98
Transmission: 700R4
Axle/Gears: Dana M78 3.27 posi
Re: The Japanese heat extractor build...for my bird
to each his own, but if you want straight up walls just get one of the generic cowl hoods and be done with it.
I would have followed the lines of the hood slightly differently, probably would have taken some tape and laid some straight lines from the signal openings of the hood to the back in a straight line which I believe would put the inside cut very close to where his outside cut was and then matched that line with the outside line of the heat extractor opening, just to make the lines work a little better for my eyes (though with the contours of the hood, I might do something different in person then I would with pictures), and then from a function perspective, I would have left a little lip around the heat extractor; very little air deflection would make a big difference in airflow.
If I had a flat hood I would do it right now, I'm actually tempted to take my TA hood, fix it's dent in the front/middle and then fill the center vents and try it, but I'm a bit worried that the patches will result in a funny bend at the front of the hood
Still following the same lines, but straight UP, not back, walls of the new cowl scoop.
What he did, was basically what I Photoshopped last year, then added the Japanese-style extraction reverse scoop to it.

https://www.thirdgen.org/forums/body...loed-hood.html
Last edited by Stephen; 09-23-2009 at 01:18 AM.
09-23-2009, 01:12 AM
#92
Senior Member
iTrader: (1)
Join Date: Dec 2008
Location: Dallas, Tx
Posts: 600
Likes: 0
Received 0 Likes
on
0 Posts
Car: 1991 camaro rs
Engine: 305 tbi
Transmission: t5
Axle/Gears: stock
Re: The Japanese heat extractor build...for my bird
great job FYRCHKN you are an inspiration
09-23-2009, 03:41 PM
#93
Senior Member
iTrader: (4)
Join Date: Jan 2008
Location: Rustfree Gilbert Arizona
Posts: 545
Likes: 0
Received 0 Likes
on
0 Posts
Car: 1989 IROC
Engine: 305TPI
Transmission: 700R4
Axle/Gears: 2:73 posi
Re: The Japanese heat extractor build...for my bird
This thread sure gives me alot of good ideas!!!
Keep up the great work and keep the pics coming!!
Keep up the great work and keep the pics coming!!
09-23-2009, 05:43 PM
#94
Supreme Member
Thread Starter
Join Date: Jan 2007
Location: Bastrop, TX
Posts: 1,002
Likes: 0
Received 12 Likes
on
11 Posts
Car: 1988 SC Convertible
Engine: LT-1
Transmission: 700R4
Axle/Gears: 3.23 posi w/PBR's
Re: The Japanese heat extractor build...for my bird
t
I would have followed the lines of the hood slightly differently, probably would have taken some tape and laid some straight lines from the signal openings of the hood to the back in a straight line which I believe would put the inside cut very close to where his outside cut was and then matched that line with the outside line of the heat extractor opening, just to make the lines work a little better for my eyes (though with the contours of the hood, I might do something different in person then I would with pictures), and then from a function perspective, I would have left a little lip around the heat extractor; very little air deflection would make a big difference in airflow.
I would have followed the lines of the hood slightly differently, probably would have taken some tape and laid some straight lines from the signal openings of the hood to the back in a straight line which I believe would put the inside cut very close to where his outside cut was and then matched that line with the outside line of the heat extractor opening, just to make the lines work a little better for my eyes (though with the contours of the hood, I might do something different in person then I would with pictures), and then from a function perspective, I would have left a little lip around the heat extractor; very little air deflection would make a big difference in airflow.
I modded the hood while it was on my 91, so I didn't have the turn signals to go off of.
Here's some pictures of the back of the hood. My original idea was to basically have two "power bulge" type openings, one on each side of the hood.
The rear opening is 6", IIRC from the rear edge of the hood. It follows the curve of the rear of the hood exactly. The rear opening of the cowl is slightly angled towards the front of the car, very similar to the stock Formula bulge.
The raised center section of the hood is only 1 1/2" above stock, but the way that I cut the sides wider at the rear it makes it look taller.
I see what you're saying about making the top of the raised section following the lines on the nose of the car, but I did it where the bottom of it does. It's really hard to tell in the pictures that I have at the moment since there are so many different colored spots all over it and that distorts the lines. Once it's a solid color it will be much more defined.
09-23-2009, 06:24 PM
#95
Senior Member
Join Date: Jun 2008
Location: Norfolk VA
Posts: 1,298
Likes: 0
Received 2 Likes
on
2 Posts
Car: 85 Camaro IROC
Engine: 5.7 TPI
Transmission: 700-R4
Axle/Gears: open rear, 3.42 gears
Re: The Japanese heat extractor build...for my bird
is there a reason you didnt bring the cowl back to the back of the hood like a typical cowl hood would be?
just curious
just curious
09-23-2009, 07:13 PM
#96
Supreme Member
Thread Starter
Join Date: Jan 2007
Location: Bastrop, TX
Posts: 1,002
Likes: 0
Received 12 Likes
on
11 Posts
Car: 1988 SC Convertible
Engine: LT-1
Transmission: 700R4
Axle/Gears: 3.23 posi w/PBR's
Re: The Japanese heat extractor build...for my bird
Yeah, I was kinda going for the IMSA feel, and extending it through the rear of the hood would have been a major PITA. There would have been some very extensive modifications that I really didn't feel like dealing with. Trying to deal with the seams on the edges of the hood is not any kind of fun.
09-23-2009, 07:13 PM
#97
09-23-2009, 08:01 PM
#98
Member
Join Date: Sep 2009
Location: Lower Burrell, Pa
Posts: 329
Likes: 0
Received 0 Likes
on
0 Posts
Car: 86 Iroc-Z28 Camaro/84 BMW M Power
Engine: 350TPI/ S50
Transmission: t-5 five speed/ 5 speed
Axle/Gears: 3.42 posi/ 3.73LSD
Re: The Japanese heat extractor build...for my bird
This is a great idea, and that is some really good metal work. Do you do this stuff alot?
09-23-2009, 08:23 PM
#100
Member
Join Date: Sep 2009
Location: Lower Burrell, Pa
Posts: 329
Likes: 0
Received 0 Likes
on
0 Posts
Car: 86 Iroc-Z28 Camaro/84 BMW M Power
Engine: 350TPI/ S50
Transmission: t-5 five speed/ 5 speed
Axle/Gears: 3.42 posi/ 3.73LSD
Re: The Japanese heat extractor build...for my bird
I'd love to see you post other custom work like this stuff!