The Japanese heat extractor build...for my bird
 07-26-2009, 08:21 PM
#1
Supreme Member
Thread Starter
Join Date: Jan 2007
Location: Bastrop, TX
Posts: 1,002
Likes: 0
Received 12 Likes
on
11 Posts
Car: 1988 SC Convertible
Engine: LT-1
Transmission: 700R4
Axle/Gears: 3.23 posi w/PBR's
The Japanese heat extractor build...for my bird
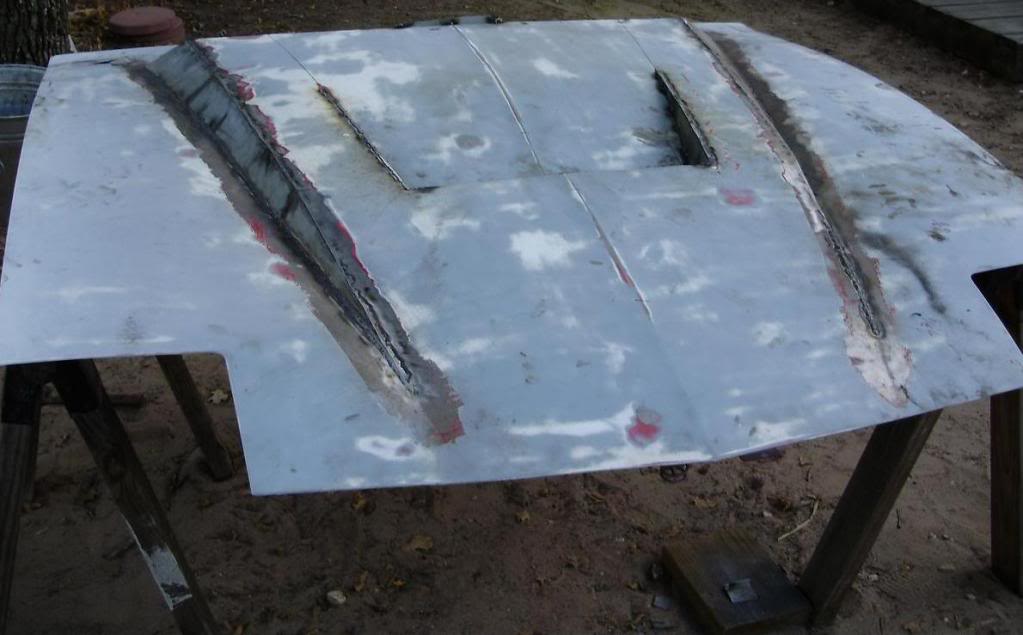
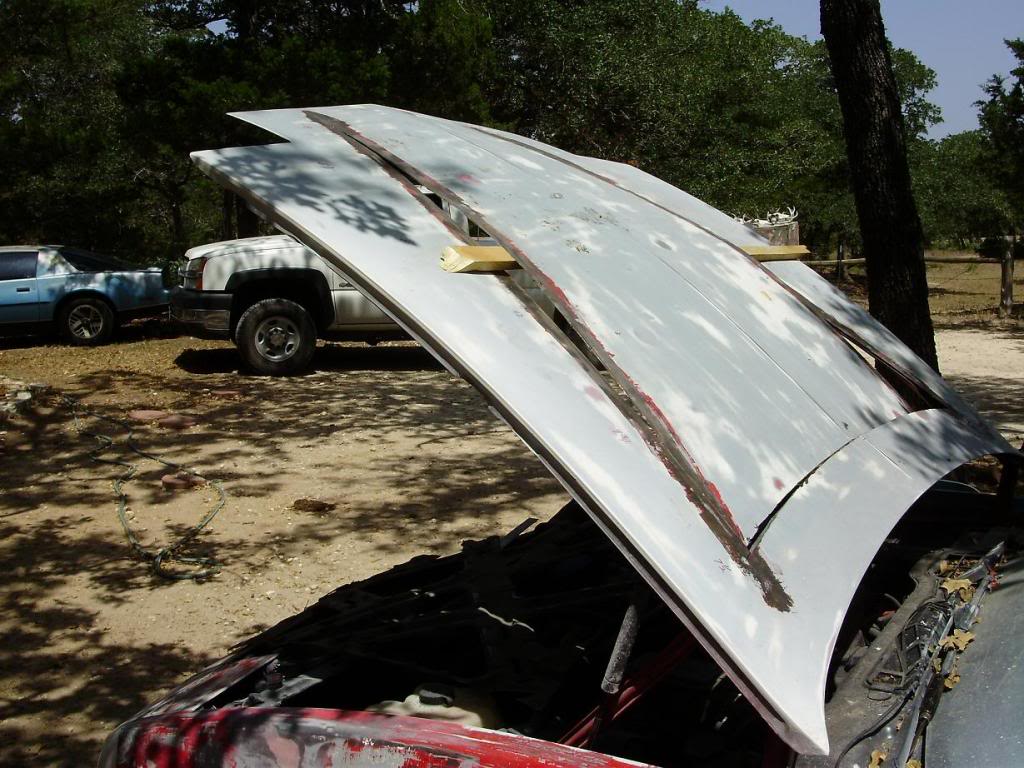
I've read every single post on TGO about the elusive heat extractor hood. It seems to be the "bigfoot" of the thirdgen world. Everyone has seen pics of it, but no one has actually seen one in person.
I took it upon myself this weekend to hack up a base bird hood full of hail dings in hopes of creating the first all steel thirdgen bird heat extractor hood.....or at least my take on it.
It is no where near finished, but after a few hours Friday night, yesterday afternoon, and a couple of hours today I am getting close to having proof that at least one does exist....at least in central Texas.
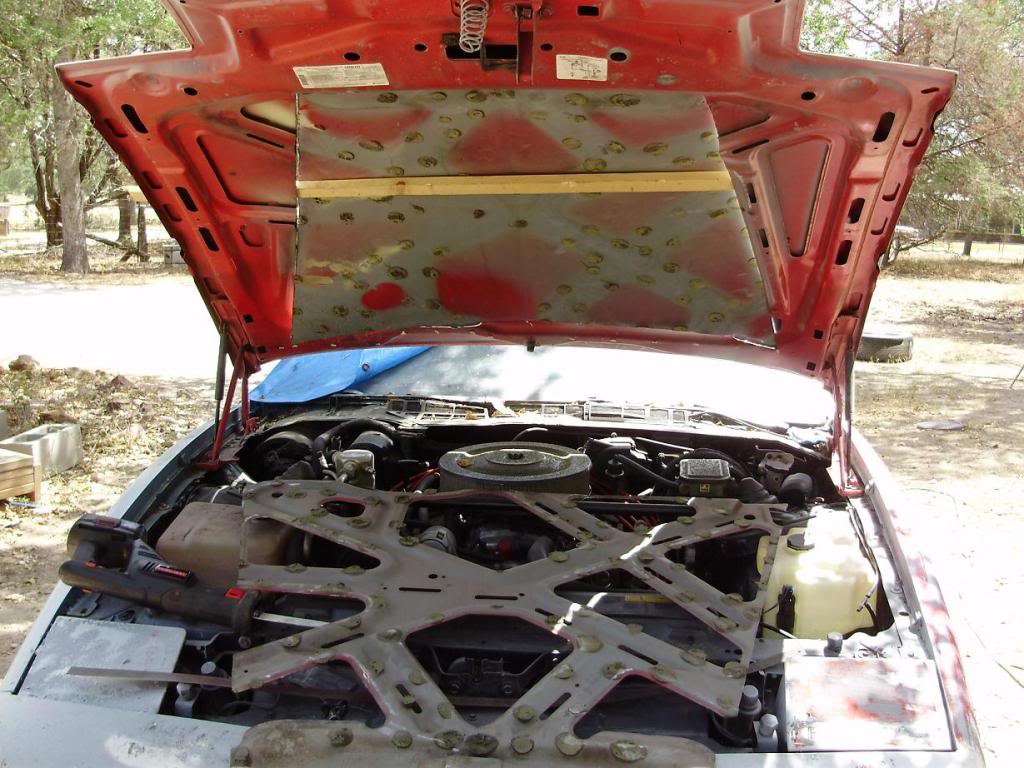
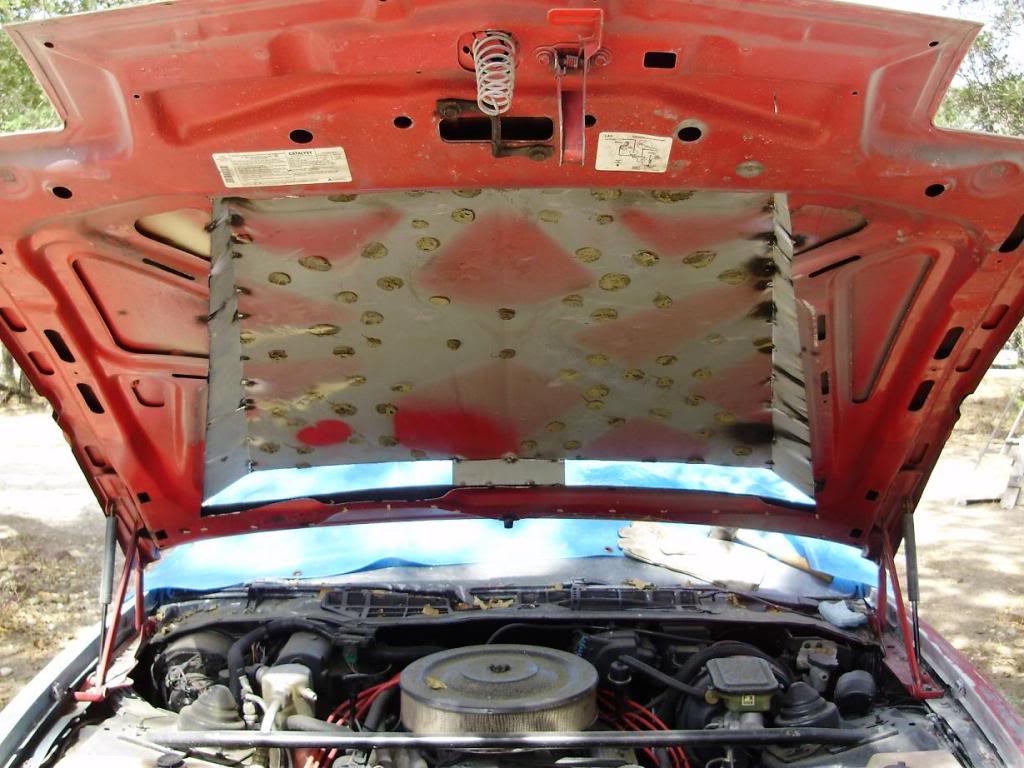
I have already checked the fitment on the car and the extractor scoop has plenty of clearance above the accessories. I still need to modify the stock bracing to fit in the raised section of the hood and reinstall it.
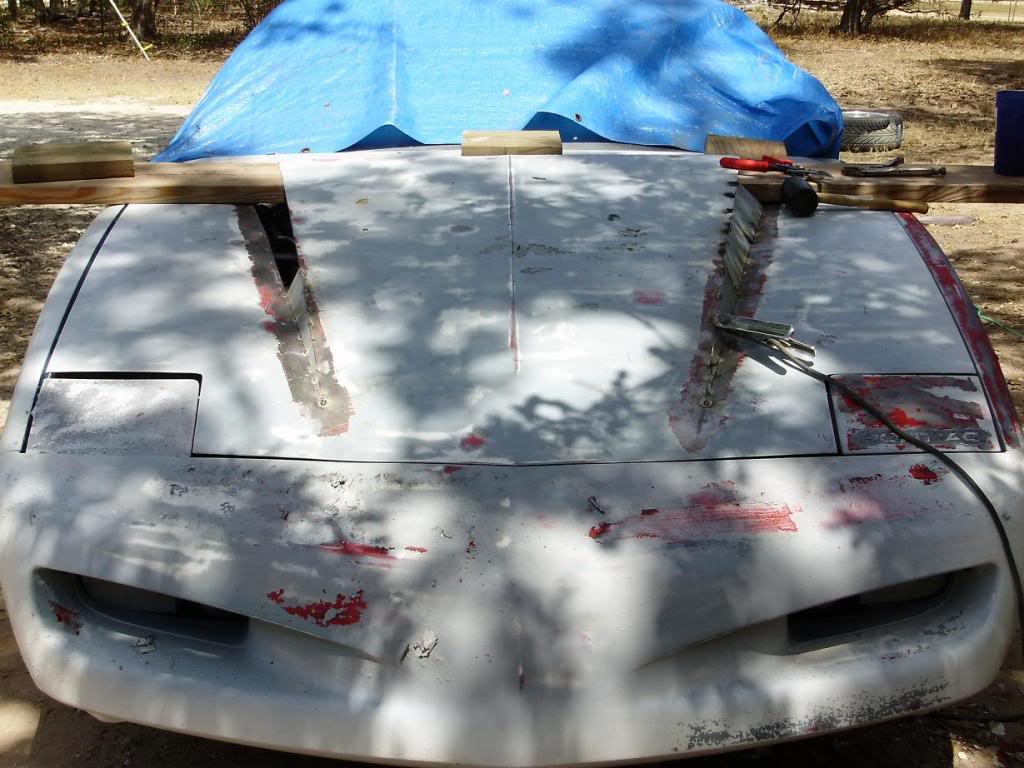
For the moment I have only roughly ground down the welds. I still need to run a sander over them to smooth them out, and then the whole hood gets a skim coat of filler to smooth out all of the hail dings and any other imperfections.
Here you go.....
I took it upon myself this weekend to hack up a base bird hood full of hail dings in hopes of creating the first all steel thirdgen bird heat extractor hood.....or at least my take on it.
It is no where near finished, but after a few hours Friday night, yesterday afternoon, and a couple of hours today I am getting close to having proof that at least one does exist....at least in central Texas.
I have already checked the fitment on the car and the extractor scoop has plenty of clearance above the accessories. I still need to modify the stock bracing to fit in the raised section of the hood and reinstall it.
For the moment I have only roughly ground down the welds. I still need to run a sander over them to smooth them out, and then the whole hood gets a skim coat of filler to smooth out all of the hail dings and any other imperfections.
Here you go.....
 07-26-2009, 09:12 PM
#2
Banned
iTrader: (12)
Join Date: Jul 1999
Location: Bertram (outside Austin), TX
Posts: 12,212
Likes: 0
Received 10 Likes
on
10 Posts
Car: 87 GTA
Engine: L98
Transmission: 700R4
Axle/Gears: Dana M78 3.27 posi
Re: The Japanese heat extractor build...for my bird
 Absolutely SICK!
By that, I mean your talent makes me SICK!
 07-27-2009, 02:32 AM
#4
Senior Member
iTrader: (1)
Join Date: Dec 2008
Location: Dallas, Tx
Posts: 600
Likes: 0
Received 0 Likes
on
0 Posts
Car: 1991 camaro rs
Engine: 305 tbi
Transmission: t5
Axle/Gears: stock
Re: The Japanese heat extractor build...for my bird
edges need to be a bit smoother, but damn it looks good.... im thinking itll make a good mold for future fiberglass ones... im up for buying if u ever take that route
07-27-2009, 03:09 AM
#5
Junior Member
Join Date: Jun 2008
Location: Deltona FL
Posts: 25
Likes: 0
Received 0 Likes
on
0 Posts
Car: Building a 1984 Z28
Engine: 383
Transmission: T-56
Axle/Gears: Posi Discs
Re: The Japanese heat extractor build...for my bird
bad a** man. this is the one i have seen and what i am modeling my project after.

07-27-2009, 09:10 AM
#6
Supreme Member
Join Date: Jan 2005
Location: Amsterdam , NY
Posts: 1,699
Likes: 0
Received 3 Likes
on
3 Posts
Car: 1985 Trans Am
Engine: vee eight
Transmission: auto
Axle/Gears: 4.10 gears
Re: The Japanese heat extractor build...for my bird
awesome , i cant wait to see it finished . Keep up the good work .

Trending Topics
07-27-2009, 02:03 PM
#8
Supreme Member
Thread Starter
Join Date: Jan 2007
Location: Bastrop, TX
Posts: 1,002
Likes: 0
Received 12 Likes
on
11 Posts
Car: 1988 SC Convertible
Engine: LT-1
Transmission: 700R4
Axle/Gears: 3.23 posi w/PBR's
Re: The Japanese heat extractor build...for my bird
Here's some of the progress pics from the beginning. Never mind the condition of my car, I know it looks like a P.O.S. at the moment, but give me a month and it'll be back to looking good. It's undergoing some fairly major surgery.
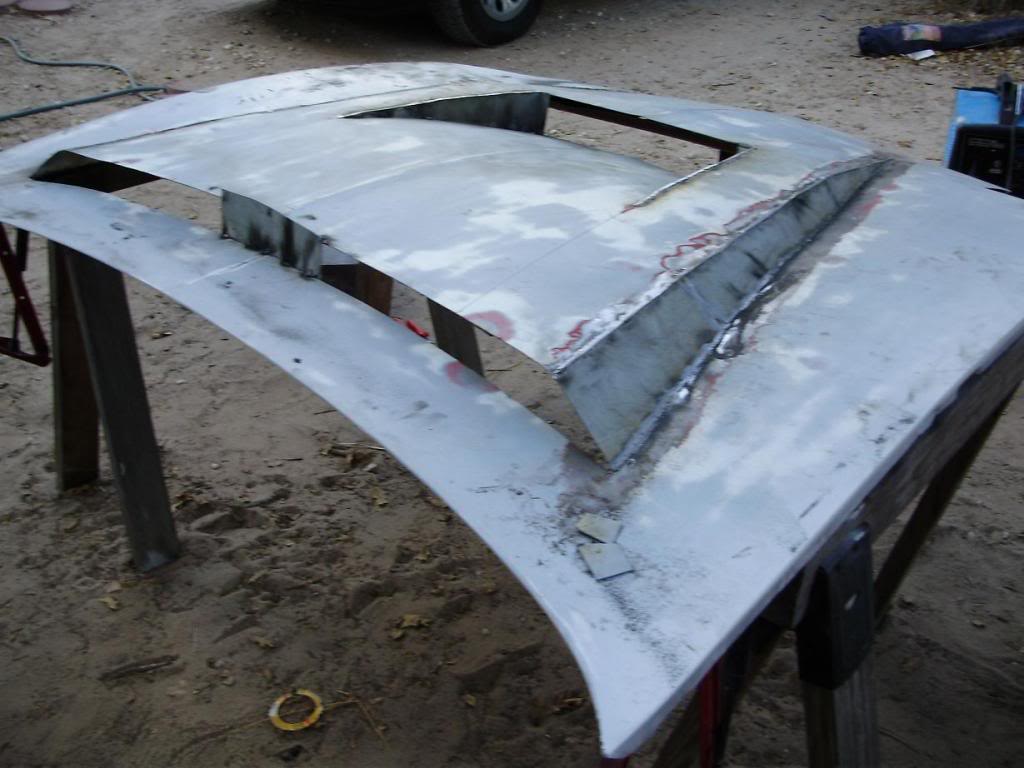
I cut the creases with a cut off wheel in my angle grinder and propped up the center with a 1X2. Then I removed the bracing from the cut section. All the epoxy spots where cut with a sawzall.
I drew a line from 3" in on the sides of the center section near the widshield down the hood to the end of the cut near the nose. The piece on each side of the hood was cut out with tin snips.
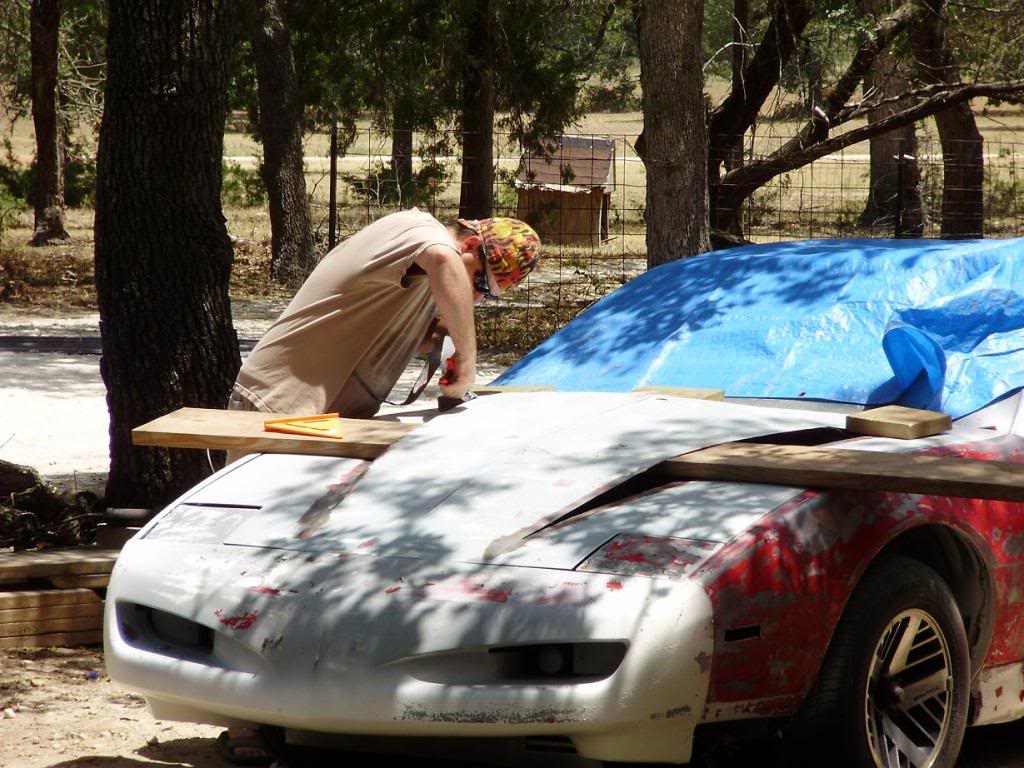
A scrap 2X8 was used to raise the center section to my desired height. The cowl is raised 2" above stock from around center of the hood to the rear.
Pieces were cut out steel that I scored for free from work and then tacked in. Of course, measurements were taken to make sure that the raised cowl would end up even/level/square. There ended up being 3 pieces on each side since I was using the 2X8 to keep even height along the hood.
I cut the creases with a cut off wheel in my angle grinder and propped up the center with a 1X2. Then I removed the bracing from the cut section. All the epoxy spots where cut with a sawzall.
I drew a line from 3" in on the sides of the center section near the widshield down the hood to the end of the cut near the nose. The piece on each side of the hood was cut out with tin snips.
A scrap 2X8 was used to raise the center section to my desired height. The cowl is raised 2" above stock from around center of the hood to the rear.
Pieces were cut out steel that I scored for free from work and then tacked in. Of course, measurements were taken to make sure that the raised cowl would end up even/level/square. There ended up being 3 pieces on each side since I was using the 2X8 to keep even height along the hood.
07-27-2009, 02:06 PM
#9
Supreme Member
Thread Starter
Join Date: Jan 2007
Location: Bastrop, TX
Posts: 1,002
Likes: 0
Received 12 Likes
on
11 Posts
Car: 1988 SC Convertible
Engine: LT-1
Transmission: 700R4
Axle/Gears: 3.23 posi w/PBR's
Re: The Japanese heat extractor build...for my bird
Continued....
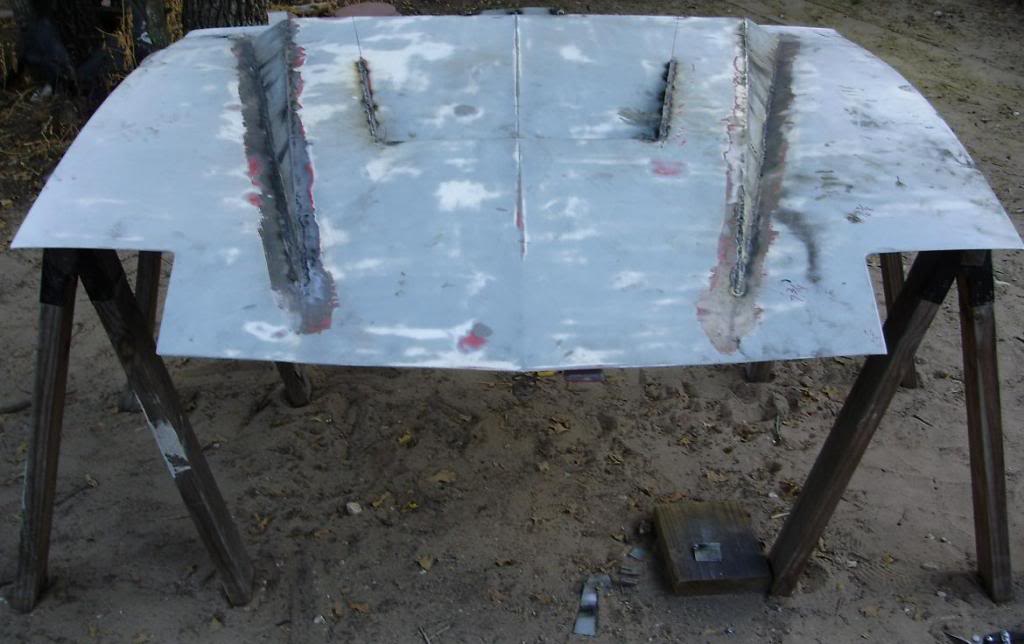
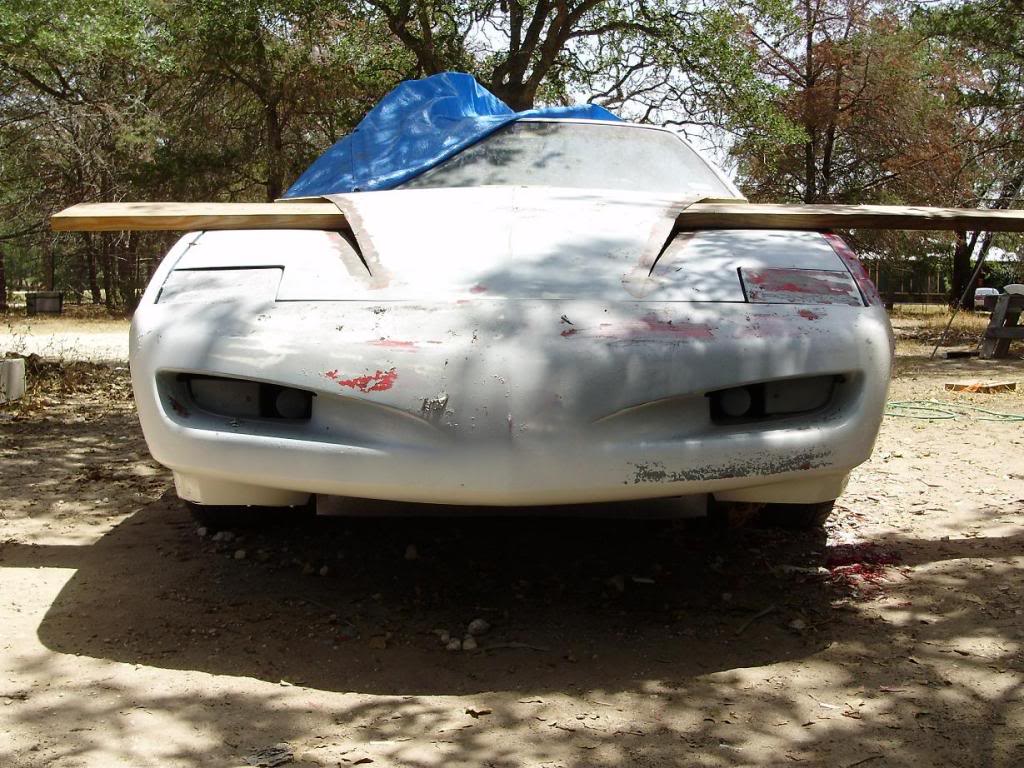
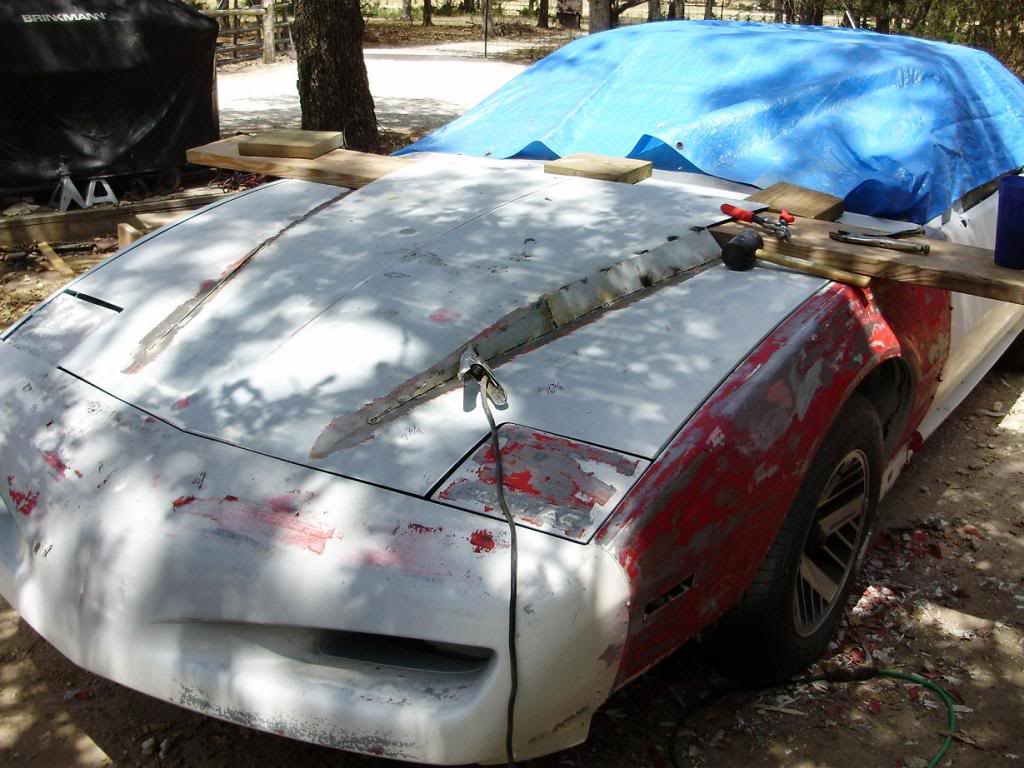
Here's a shot of the underside with the sides tacked into place. The piece tacked in at the rear of the hood is just to keep it from sagging in the middle for right now. I still haven't decided exactly what I'm going to do back there yet but the majority of it will remain open.
Here it is before I cut the extractor hole. I came real close to just leaving it like this. But, I have another Bird now that will probably end up with one like this.
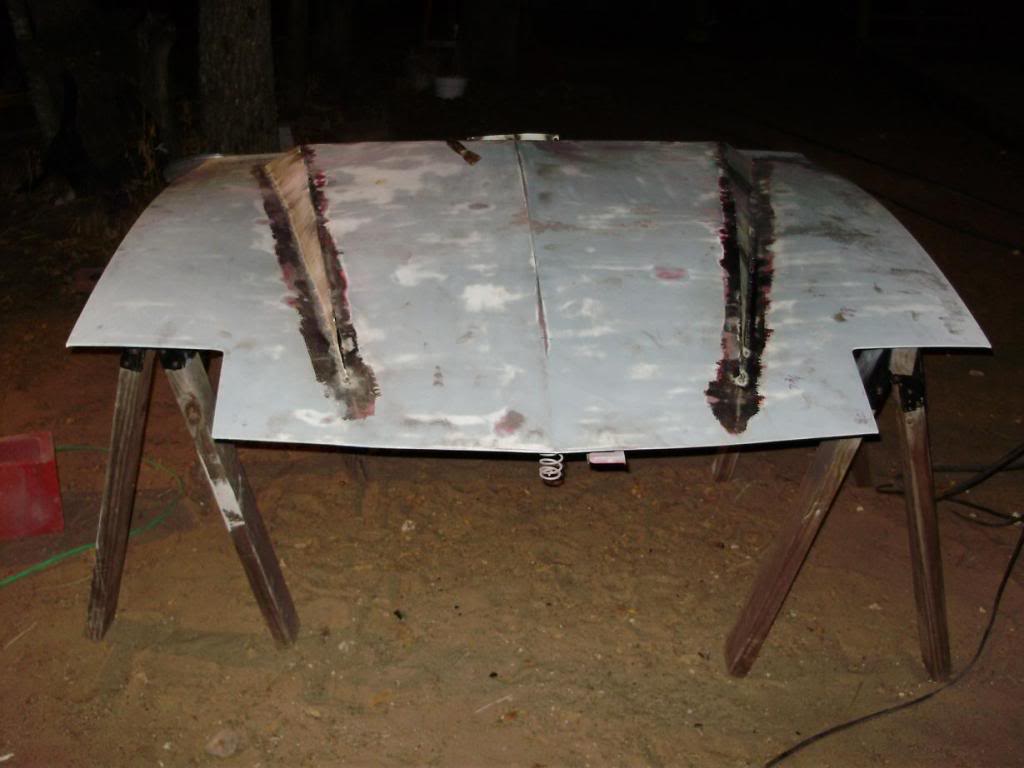
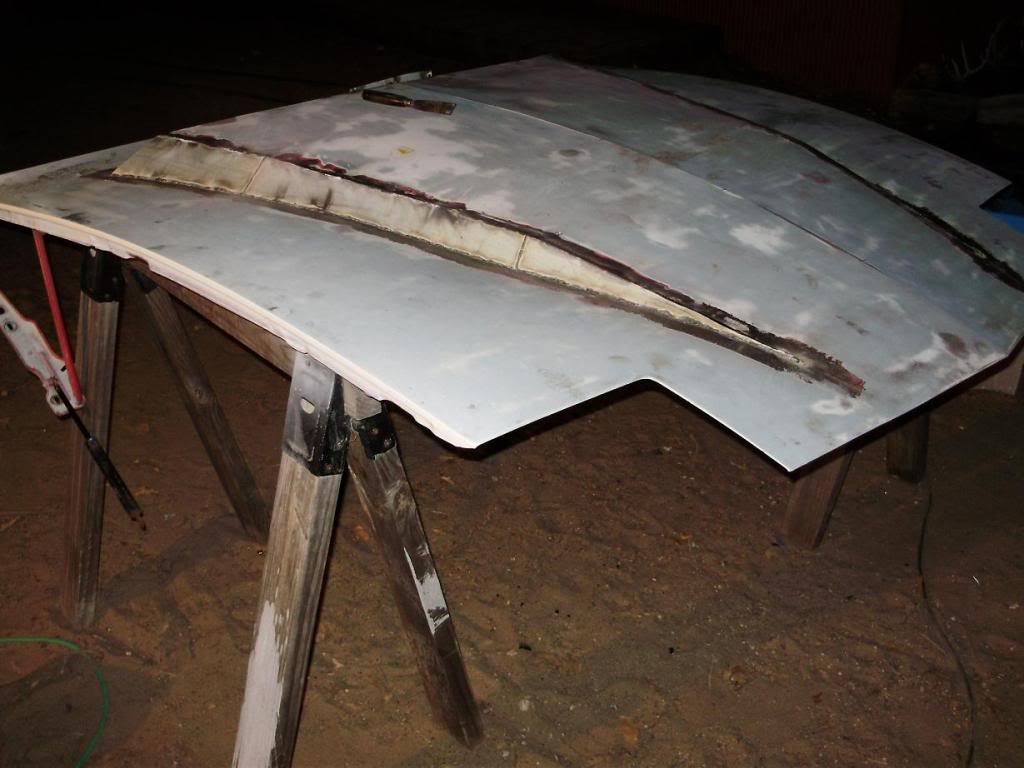
And here's with the hole cut and the sides getting tacked in.

It all looks kind of sharp and square on the edges at the moment, but I haven't gotten to it with the hammers/dollies yet either. There is still a good bit of small things I need to do to it like cleaning up the edges of the opening to where they look stock and deciding what I want to do with the openings.
Here's a shot of the underside with the sides tacked into place. The piece tacked in at the rear of the hood is just to keep it from sagging in the middle for right now. I still haven't decided exactly what I'm going to do back there yet but the majority of it will remain open.
Here it is before I cut the extractor hole. I came real close to just leaving it like this. But, I have another Bird now that will probably end up with one like this.
And here's with the hole cut and the sides getting tacked in.
It all looks kind of sharp and square on the edges at the moment, but I haven't gotten to it with the hammers/dollies yet either. There is still a good bit of small things I need to do to it like cleaning up the edges of the opening to where they look stock and deciding what I want to do with the openings.
07-27-2009, 03:43 PM
#10
Supreme Member

iTrader: (3)
Join Date: Jun 2007
Location: Pennsylvania
Posts: 2,359
Likes: 0
Received 5 Likes
on
5 Posts
Car: 1992 Camaro RS
Engine: Rebuilt 350 going in after paint
Transmission: WCT5, 7k & counting behind the 350
Axle/Gears: 4thgen disc rear w/ 3.73 Posi
Re: The Japanese heat extractor build...for my bird
Lookin great! Please keep us updated with the progress pics! I've been playing with ideas of doing something similar to my Camaro following the lines of the hood louvers. You make it look a lot easier than I expected it to be.
07-27-2009, 03:57 PM
#11
Supreme Member
iTrader: (7)
Join Date: Nov 2006
Location: Alamogordo, NM
Posts: 3,740
Likes: 0
Received 9 Likes
on
9 Posts
Car: 88 Formula 350
Engine: 5.7
Transmission: T-56
Axle/Gears: 9" 3.89
Re: The Japanese heat extractor build...for my bird
Looks good bro. Keep up the good work! Definitely a way to make a hood nobody else has...
07-27-2009, 03:59 PM
#12
Banned
iTrader: (12)
Join Date: Jul 1999
Location: Bertram (outside Austin), TX
Posts: 12,212
Likes: 0
Received 10 Likes
on
10 Posts
Car: 87 GTA
Engine: L98
Transmission: 700R4
Axle/Gears: Dana M78 3.27 posi
Re: The Japanese heat extractor build...for my bird
It all looks kind of sharp and square on the edges at the moment, but I haven't gotten to it with the hammers/dollies yet either. There is still a good bit of small things I need to do to it like cleaning up the edges of the opening to where they look stock and deciding what I want to do with the openings.
 07-27-2009, 04:35 PM
#13
Supreme Member
Thread Starter
Join Date: Jan 2007
Location: Bastrop, TX
Posts: 1,002
Likes: 0
Received 12 Likes
on
11 Posts
Car: 1988 SC Convertible
Engine: LT-1
Transmission: 700R4
Axle/Gears: 3.23 posi w/PBR's
Re: The Japanese heat extractor build...for my bird
You'd sport it around with the primer, two colors of paint, and all the ground bare metal?
07-27-2009, 04:53 PM
#16
Supreme Member
iTrader: (14)
Join Date: Aug 2006
Location: Central NJ
Posts: 12,652
Likes: 0
Received 46 Likes
on
44 Posts
Car: 86 Trans Am, 92 Firebird
Engine: 408 sbc, 3.1L of raw power
Transmission: TKO600, T5
Axle/Gears: Moser 9", 3:70 trutac, 3:23 torsion
Re: The Japanese heat extractor build...for my bird
i like it, just finish it, and if it finishes well, make a fiberglass mold and start production, i'll buy one , or sell it to VFN and see what they do with it.
, or sell it to VFN and see what they do with it.
07-27-2009, 04:56 PM
#17
Member
iTrader: (2)
Join Date: Oct 2002
Location: Toms River, NJ
Posts: 195
Likes: 0
Received 0 Likes
on
0 Posts
Car: '89 Camaro Rs/ '87 Z28
Engine: 305 c.i. TBI/ 305 c.i. 4bbl
Transmission: 700r4/T5
Axle/Gears: 3.73 posi/ 3.73 posi
Re: The Japanese heat extractor build...for my bird
Nice work. Mass produce in fiberglass, and make lotsof $$$
07-27-2009, 05:51 PM
#18
Re: The Japanese heat extractor build...for my bird
Or you can be like Kandied and say " Im tired of this, im having this hood made.. i'll post pics with progress..." then a few months later.. "progress is well, about 95% of the way through. pics later " .. then "no pics until its done... and on my car.. and on every magazine.. and on Rides.. and has been played out so bad that you look rice trying to rock it.... " .. and then it goes into Mass production 
(Kandied is not really that bad, but he's gone silent until the Car show thing happens and he's already moved onto the next new hotness.... To his credit, he did fork over mad green to have it made, and is probably doing more for the thirdgen aftermarket in this single action than most of the aftermarket... Kandied... WHERE DA HOOD, WHERE DA HOOD, WHERE DA HOOD AT??? )
(Kandied is not really that bad, but he's gone silent until the Car show thing happens and he's already moved onto the next new hotness.... To his credit, he did fork over mad green to have it made, and is probably doing more for the thirdgen aftermarket in this single action than most of the aftermarket... Kandied... WHERE DA HOOD, WHERE DA HOOD, WHERE DA HOOD AT??? )
07-27-2009, 07:31 PM
#19
Senior Member
iTrader: (9)
Join Date: Nov 2008
Location: CT
Posts: 898
Likes: 0
Received 0 Likes
on
0 Posts
Car: 1989 Camaro RS
Engine: 305 TBI
Transmission: 700R4
Axle/Gears: 3.23 LS
Re: The Japanese heat extractor build...for my bird
should just ask you to my my cowl while your at it coming along real nice man!
coming along real nice man!
07-27-2009, 08:00 PM
#20
Banned
iTrader: (12)
Join Date: Jul 1999
Location: Bertram (outside Austin), TX
Posts: 12,212
Likes: 0
Received 10 Likes
on
10 Posts
Car: 87 GTA
Engine: L98
Transmission: 700R4
Axle/Gears: Dana M78 3.27 posi
Re: The Japanese heat extractor build...for my bird
Lemme know when you ready to do this to a GTA hood. We'll just hafta do the extractor differently, because of my TPI intake tubing.
We'll just hafta do the extractor differently, because of my TPI intake tubing.
07-27-2009, 10:23 PM
#21
Supreme Member
Thread Starter
Join Date: Jan 2007
Location: Bastrop, TX
Posts: 1,002
Likes: 0
Received 12 Likes
on
11 Posts
Car: 1988 SC Convertible
Engine: LT-1
Transmission: 700R4
Axle/Gears: 3.23 posi w/PBR's
Re: The Japanese heat extractor build...for my bird
I don't think there would be any fitment issues with this hood on your car at all. There is still plenty of room under the extractor vent before it collides with any of the accessories/brackets. Once it's finished we can test fit it on to your car to see for sure if there are any clearance issues that would need to be addressed.
07-27-2009, 10:34 PM
#22
Banned
iTrader: (12)
Join Date: Jul 1999
Location: Bertram (outside Austin), TX
Posts: 12,212
Likes: 0
Received 10 Likes
on
10 Posts
Car: 87 GTA
Engine: L98
Transmission: 700R4
Axle/Gears: Dana M78 3.27 posi
Re: The Japanese heat extractor build...for my bird
You gonna build a "scoop" to go behind your radiator, to direct the cooling air up & out? Not SEALED, but upwards?
07-27-2009, 11:01 PM
#23
Senior Member
iTrader: (9)
Join Date: Nov 2008
Location: CT
Posts: 898
Likes: 0
Received 0 Likes
on
0 Posts
Car: 1989 Camaro RS
Engine: 305 TBI
Transmission: 700R4
Axle/Gears: 3.23 LS
Re: The Japanese heat extractor build...for my bird
could cut a ss slip into the cowl  and have the tpi shroud collect the air as you like glue it to the slit. good forced induction!
and have the tpi shroud collect the air as you like glue it to the slit. good forced induction!
07-28-2009, 09:32 AM
#26
Supreme Member
iTrader: (3)
Join Date: May 2004
Location: stockton, CA
Posts: 2,233
Likes: 0
Received 4 Likes
on
4 Posts
Car: Camaro RS/SS
Engine: 5.7 LS1
Transmission: 4L60E Transgo shift kit, 3500 stall
Axle/Gears: 4th Gen Rear 3:42
Re: The Japanese heat extractor build...for my bird
sweet dude!! Keep up the great work!
07-28-2009, 09:24 PM
#28
Supreme Member
Thread Starter
Join Date: Jan 2007
Location: Bastrop, TX
Posts: 1,002
Likes: 0
Received 12 Likes
on
11 Posts
Car: 1988 SC Convertible
Engine: LT-1
Transmission: 700R4
Axle/Gears: 3.23 posi w/PBR's
Re: The Japanese heat extractor build...for my bird
Made some good progress on the hood this evening after work. Nothing really picture worthy. I made a few more passes over some weld joints that looked a little thin after being ground down and worked the hood over pretty good with a mallet to get the vast majority of the little bit of warpage out of it. I just slapped it back on the car to make sure the hood still fits right since I've been man-handling it and flipping it over and over on the saw horses.
I ordered some perforated stainless steel that will be the "grilles" for the extractor and the back of the cowl. I should get it tomorrow if everything works right.
The stock hood bracing doesn't look like it is going to do much good so I'm going to have to fab up some new braces. But, with the raised cowl and the extractor scoop the hood actually feels pretty rigid the way it is. It doesn't bend or flex when opening or closing it on the stock hinges.
If everything works right I might have it in primer by the end of the week....hopefully. I wont get a chance to work on it at all this coming weekend because I'm going to be replacing a complete rear quarter panel on a friend's 92 Z28. Once that little project is complete I can get back to finishing my car.
07-29-2009, 04:09 PM
#29
Senior Member

Join Date: Jun 2008
Location: Norfolk VA
Posts: 1,298
Likes: 0
Received 2 Likes
on
2 Posts
Car: 85 Camaro IROC
Engine: 5.7 TPI
Transmission: 700-R4
Axle/Gears: open rear, 3.42 gears
Re: The Japanese heat extractor build...for my bird
it would be really really cool to add fans into the "extractor vent" to pull hot air out of the engine.
like this:
if it were me, i'd consider bringing the back of the cowl down a bit and making it more horizontal
like this:
if it were me, i'd consider bringing the back of the cowl down a bit and making it more horizontal
07-30-2009, 10:45 AM
#31
Member
Join Date: Jan 2006
Location: Austin, TX
Posts: 111
Likes: 0
Received 0 Likes
on
0 Posts
Car: 1983 Z-28, Black w/ Silver Stripes
Engine: LT1 350
Transmission: T56
Axle/Gears: 3.27 9 bolt posi discs
Re: The Japanese heat extractor build...for my bird
Looks sick! keep it up so we can see it finished!
~JAKE
~JAKE
 07-30-2009, 10:50 PM
#33
Supreme Member
Join Date: Sep 2005
Location: Osceola Indiana
Posts: 2,151
Likes: 0
Received 0 Likes
on
0 Posts
Car: 92 RS(sold) 1989 IROC-Z
Engine: 350 TPI
Transmission: 700R4
Axle/Gears: ones that turn
Re: The Japanese heat extractor build...for my bird
sweet  cant wait to see it finished
cant wait to see it finished
07-30-2009, 11:00 PM
#34
Supreme Member
iTrader: (10)
Join Date: Sep 2000
Location: Moorpark, CA
Posts: 2,387
Likes: 0
Received 146 Likes
on
105 Posts
Car: '91 GTA, '92 T/A Convertible
Engine: GTA: 350 w/Vortec heads, T/A: 305
Transmission: Pro-built 700R4
Axle/Gears: GTA: 3.27, T/A: 2.73
Re: The Japanese heat extractor build...for my bird
FYRCHKN, sweet job! Your fab skills are awesome.
 07-31-2009, 02:44 AM
#35
Member
Join Date: May 2009
Location: Quad Cities,IA
Posts: 104
Likes: 0
Received 0 Likes
on
0 Posts
Car: 91 RS
Engine: Carb'd 350
Transmission: built 700R4
Axle/Gears: 2.73
Re: The Japanese heat extractor build...for my bird
that does look pretty sweet. can't wait to see the finished result.
07-31-2009, 10:29 PM
#36
Supreme Member
Thread Starter
Join Date: Jan 2007
Location: Bastrop, TX
Posts: 1,002
Likes: 0
Received 12 Likes
on
11 Posts
Car: 1988 SC Convertible
Engine: LT-1
Transmission: 700R4
Axle/Gears: 3.23 posi w/PBR's
Re: The Japanese heat extractor build...for my bird
The hood project has been put on hold for a few days. I am replacing a quarter panel on a friend's 92 Z28. I just got the car delivered to my place last night.

Once I'm done with that then I'll be back on the hood hard and heavy. I'm ready to finish it so I can do my other body mods and then repaint the car.
Once I'm done with that then I'll be back on the hood hard and heavy. I'm ready to finish it so I can do my other body mods and then repaint the car.
07-31-2009, 10:51 PM
#37
Supreme Member
Join Date: Nov 2007
Location: IL
Posts: 1,092
Likes: 0
Received 1 Like
on
1 Post
Car: 88 IROC, 76 Malibu Classic
Engine: 350 TPI, 350
Transmission: 700R4, 4-speed
Axle/Gears: 10 bolt ????
Re: The Japanese heat extractor build...for my bird
OUCH! that looks bad. poor camaro. amazing hood though, makes me want to make a cowl hood w/ my old one, but that wouldn't be right on a V6. lol
08-01-2009, 10:18 AM
#38
Supreme Member
iTrader: (3)
Join Date: May 2004
Location: stockton, CA
Posts: 2,233
Likes: 0
Received 4 Likes
on
4 Posts
Car: Camaro RS/SS
Engine: 5.7 LS1
Transmission: 4L60E Transgo shift kit, 3500 stall
Axle/Gears: 4th Gen Rear 3:42
Re: The Japanese heat extractor build...for my bird
The hood project has been put on hold for a few days. I am replacing a quarter panel on a friend's 92 Z28. I just got the car delivered to my place last night.
Once I'm done with that then I'll be back on the hood hard and heavy. I'm ready to finish it so I can do my other body mods and then repaint the car.
Once I'm done with that then I'll be back on the hood hard and heavy. I'm ready to finish it so I can do my other body mods and then repaint the car.
08-01-2009, 02:30 PM
#39
Re: The Japanese heat extractor build...for my bird
That is a very awesome hood. I wish I knew how to weld, but no nothing about metal work. Very nice skills you've got and that's going to eb a very awesome hood when you've got it all done and on your car. Very nice.
08-01-2009, 07:27 PM
#40
Senior Member
iTrader: (5)
Join Date: Dec 2006
Location: Augusta, Ga
Posts: 2,212
Likes: 0
Received 0 Likes
on
0 Posts
Car: 1987 Trans Am
Engine: 355ci L98 soon to be turbo'd
Transmission: 700R4
Axle/Gears: 2.73 posi
Re: The Japanese heat extractor build...for my bird
looking very good *subscribing*
08-01-2009, 07:30 PM
#41
Member
iTrader: (1)
Join Date: May 2003
Location: NC
Posts: 457
Likes: 0
Received 1 Like
on
1 Post
Car: '91 Camaro Z28
Engine: 383 Vortec HSR
Transmission: Pro-Built 700-R4;Vig 4000 stall
Axle/Gears: Moser M9 9" / 3.89
Re: The Japanese heat extractor build...for my bird
Wow, that hood looks great so far! Good job. If it turns out looking sweet I'm sure you'll have plenty of requests to make some more. ($$$$)
08-02-2009, 01:59 PM
#42
Senior Member
iTrader: (1)

Join Date: Feb 2009
Location: La Grange Park, IL
Posts: 972
Likes: 0
Received 1 Like
on
1 Post
Car: 1987 Iroc Z28/ 1982 Z28
Engine: 355 TPI IP/ 305 CFI
Transmission: T-56/ 300C
Axle/Gears: 3.42 Open/ 3.73 Posi
Re: The Japanese heat extractor build...for my bird
after seeing that hood i for one know that camaro is in good, hands!
08-02-2009, 02:22 PM
#43
Senior Member
iTrader: (5)
Join Date: Dec 2006
Location: Augusta, Ga
Posts: 2,212
Likes: 0
Received 0 Likes
on
0 Posts
Car: 1987 Trans Am
Engine: 355ci L98 soon to be turbo'd
Transmission: 700R4
Axle/Gears: 2.73 posi
Re: The Japanese heat extractor build...for my bird
I think it would be "easy" to modify a joeblong (sp?) hood to make it into a heat extractor...
08-02-2009, 07:53 PM
#44
Supreme Member
Thread Starter
Join Date: Jan 2007
Location: Bastrop, TX
Posts: 1,002
Likes: 0
Received 12 Likes
on
11 Posts
Car: 1988 SC Convertible
Engine: LT-1
Transmission: 700R4
Axle/Gears: 3.23 posi w/PBR's
Re: The Japanese heat extractor build...for my bird
That's exactly what the owner of the car said. I have a thread going in the body section of this site on the quarter swap.
I agree. It's basically the same as the first stage of this project. I pretty much turned my hood into a jongbloed before I cut the extractor scoop. The cool thing that I learned doing this hood is that I am almost 100% sure that an LSX truck intake would have fit under the hood before I cut the scoop. I'm planning on an LSX swap on my 89 bird so I'll more than likely build the same hood for it minus the scoop.
I agree. It's basically the same as the first stage of this project. I pretty much turned my hood into a jongbloed before I cut the extractor scoop. The cool thing that I learned doing this hood is that I am almost 100% sure that an LSX truck intake would have fit under the hood before I cut the scoop. I'm planning on an LSX swap on my 89 bird so I'll more than likely build the same hood for it minus the scoop.
08-05-2009, 09:59 PM
#45
Supreme Member
Thread Starter
Join Date: Jan 2007
Location: Bastrop, TX
Posts: 1,002
Likes: 0
Received 12 Likes
on
11 Posts
Car: 1988 SC Convertible
Engine: LT-1
Transmission: 700R4
Axle/Gears: 3.23 posi w/PBR's
Re: The Japanese heat extractor build...for my bird
Okay, I have the Camaro all fixed up with a new quarter panel. All I have to do is put the interior back together and have the owner come get it. I should be able to get back to work on the hood around Sunday.
In case your curious about how the quarter panel came out, here's the thread:
https://www.thirdgen.org/forums/body...ml#post4243435
In case your curious about how the quarter panel came out, here's the thread:
https://www.thirdgen.org/forums/body...ml#post4243435
08-06-2009, 12:46 AM
#46
Member
iTrader: (6)
Join Date: Sep 2007
Location: Appleton, WI & Platteville, WI
Posts: 144
Likes: 0
Received 0 Likes
on
0 Posts
Car: 92 Camaro
Engine: 404 SBC
Transmission: The strongest stock T5 ever made
Axle/Gears: 3.73 w/Detriot Tru Trac Locker
Re: The Japanese heat extractor build...for my bird
subscribing! looks amazing so far
08-08-2009, 05:49 PM
#47
Supreme Member
iTrader: (1)

Join Date: Jun 2001
Location: Tacoma, Wa
Posts: 3,109
Likes: 0
Received 25 Likes
on
17 Posts
Car: '91 TA vert
Engine: turboLSx
Transmission: T56
Axle/Gears: 3.23
Re: The Japanese heat extractor build...for my bird
I love to see ingenuity like this. Good work! I'd like to see the inverted scoop moved farther forward and the rear of the cowl closed off/blended back closer to the stock heigh of the hood though.
08-08-2009, 11:22 PM
#48
Supreme Member
Thread Starter
Join Date: Jan 2007
Location: Bastrop, TX
Posts: 1,002
Likes: 0
Received 12 Likes
on
11 Posts
Car: 1988 SC Convertible
Engine: LT-1
Transmission: 700R4
Axle/Gears: 3.23 posi w/PBR's
Re: The Japanese heat extractor build...for my bird
The opening of the scoop is right behind the radiator. I agree, it would look a little better if it was a little farther forward but function before form. The next one will probably end up blending back into the hood at the rear but I figured I'd take advantage of the cowl induction since this is a TBI car.
08-08-2009, 11:27 PM
#49
Supreme Member
iTrader: (1)
Join Date: Jun 2001
Location: Tacoma, Wa
Posts: 3,109
Likes: 0
Received 25 Likes
on
17 Posts
Car: '91 TA vert
Engine: turboLSx
Transmission: T56
Axle/Gears: 3.23
Re: The Japanese heat extractor build...for my bird
What? Seriously? Must be the angle of the shot because it looks like it's a good 5-6" behind the rad. The only reason I said to bring it forward was to meet the rear of the fanshroud/rad. Good job!
08-09-2009, 08:24 AM
#50
Senior Member
iTrader: (9)
Join Date: Nov 2008
Location: CT
Posts: 898
Likes: 0
Received 0 Likes
on
0 Posts
Car: 1989 Camaro RS
Engine: 305 TBI
Transmission: 700R4
Axle/Gears: 3.23 LS
Re: The Japanese heat extractor build...for my bird
so how much would you charge to make me a cowl hood? and ship it to ct haha
and ship it to ct haha