My attempt at the FYRCHKN hood
 02-29-2012, 11:55 PM
#1
Member
Thread Starter

Join Date: Apr 2011
Location: La Crosse WI
Posts: 166
Likes: 0
Received 0 Likes
on
0 Posts
Car: '91 Firebird '85 Firebird
Engine: 305 TPI
My attempt at the FYRCHKN hood
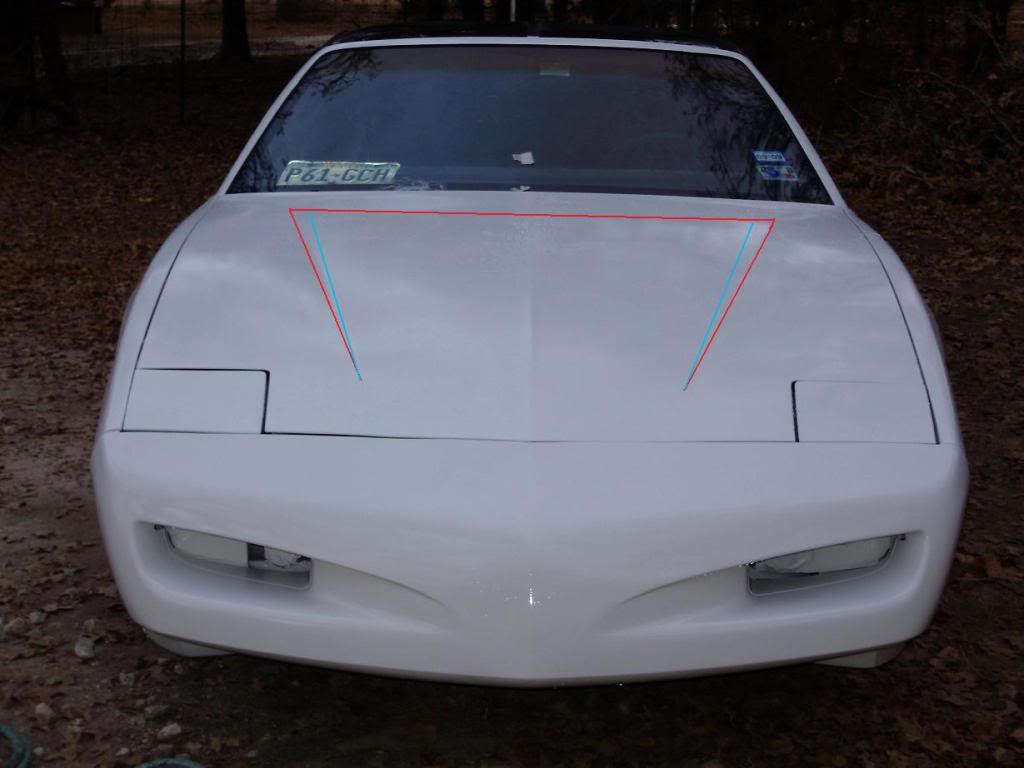
Ever since reading FYRCHKN's thread on his custom hood I have been itching to make myself one for my 'bird. After a long time of getting the car to the point where doing the hood was feasible I have finally started. With a whole day off (very rare) I decided to head to the garage and start hacking the hood up! This is my progress from tonight, took about 2 1/2 hours to get to this point (and a couple trips to town for forgotten supplies!)


Not going to lie at this point I was kind of worried because in FYRCHKN's thread he mentioned that he cut the glue spots with a sawzall so I was expecting rock hard glue, but to my surprise it was actually pretty soft and was really easy to get it to separate using a small putty knife


Not going to lie at this point I was kind of worried because in FYRCHKN's thread he mentioned that he cut the glue spots with a sawzall so I was expecting rock hard glue, but to my surprise it was actually pretty soft and was really easy to get it to separate using a small putty knife
Last edited by WickedCrazy; 03-01-2012 at 12:01 AM.
 03-01-2012, 12:10 AM
#2
Supreme Member
iTrader: (5)
Join Date: Mar 2011
Location: Central Texas
Posts: 2,893
Likes: 0
Received 4 Likes
on
4 Posts
Car: GTA
Engine: 350 TPI
Transmission: 700R4
Axle/Gears: Aussie 9-bolt/3.27 posi
Re: My attempt at the FYRCHKN hood
Why did you cut the 2 sides into a triangle cut instead of just 1 cut. Seems like all you did was increase the effort by making 2 cuts.
I know that the FYRCHKN hood is for sell too for "cheap".
I know that the FYRCHKN hood is for sell too for "cheap".
03-01-2012, 12:31 AM
#3
Member
Thread Starter
Join Date: Apr 2011
Location: La Crosse WI
Posts: 166
Likes: 0
Received 0 Likes
on
0 Posts
Car: '91 Firebird '85 Firebird
Engine: 305 TPI
Re: My attempt at the FYRCHKN hood
So that the cowl edges aren't vertical, this way they will have an angle on the sides to give it more shape.
03-01-2012, 12:51 AM
#5
Member
Thread Starter
Join Date: Apr 2011
Location: La Crosse WI
Posts: 166
Likes: 0
Received 0 Likes
on
0 Posts
Car: '91 Firebird '85 Firebird
Engine: 305 TPI
Re: My attempt at the FYRCHKN hood
The only thing so far that I have done differently and TBH will probably be changing is that I didn't go as far forward with my two outside cuts and that I only did a 2 inch cut inwards from the outside lines.
This is from FYRCHKN's thread showing the cuts:
Last edited by WickedCrazy; 03-01-2012 at 12:55 AM.
03-08-2012, 04:25 AM
#6
Senior Member
Join Date: Mar 2009
Location: 47798 Germany
Posts: 505
Likes: 0
Received 0 Likes
on
0 Posts
Car: '89 RS camaro 305 TBI
Engine: LO3
Transmission: 700R4
Axle/Gears: yep, has those too (stock)
Re: My attempt at the FYRCHKN hood
Other then not going as far to the front of the hood, which will cause an awkward looking bumped spot in your cowl, you did things right. You wat to cut the cowl section up to about the height of where the headlight covers start or even an inch further then that to make it look right.
Cutting out a small triangular section will allow the sides of the cowl to slightly slope.
One thing I might advise to try, and being different from FYRCHKN�s attempt is to create a 1" rounded edge. A hammer and dolly should do the trick. Some shaving and filler should then allow for a finish with nice rounded edges rather then the straight cut hack job kind of style.
03-10-2012, 07:13 AM
#7
Member

Join Date: Oct 2004
Location: waverly ia
Posts: 449
Likes: 0
Received 0 Likes
on
0 Posts
Car: z28
Engine: 305
Transmission: pro built 700r4 (road racing kit)
Re: My attempt at the FYRCHKN hood
i tryed this myself, i realized after i took the frame work off the back everything went to hell. hood ended up in the junk yard lol so be careful not to allow the hood to get warped.
Trending Topics
03-10-2012, 08:28 AM
#8
Member
Thread Starter
Join Date: Apr 2011
Location: La Crosse WI
Posts: 166
Likes: 0
Received 0 Likes
on
0 Posts
Car: '91 Firebird '85 Firebird
Engine: 305 TPI
Re: My attempt at the FYRCHKN hood
ALSO: Going to the shop today finally to start welding the cowl in place, then cut out the heat extractor and weld that in. hopefully I can get it all done today so I can start doing the filler and then get it painted!!!! Also I will be doing the bracing underneath and like FYRCHKN I will be using some thin angle iron to brace it as that is going to be the easiest and strongest and cheapest way to brace it up.
Pictures to come later tonight
03-10-2012, 12:29 PM
#9
Member
Thread Starter
Join Date: Apr 2011
Location: La Crosse WI
Posts: 166
Likes: 0
Received 0 Likes
on
0 Posts
Car: '91 Firebird '85 Firebird
Engine: 305 TPI
Re: My attempt at the FYRCHKN hood
So. ****in. Close. To. Just. Leaving. It. As. A. Cowl. Looks baddass. Started the day tho by just about loosing my left trigger finger. Got lucky though. Would never be able to ambi shoot if id lost that 
03-12-2012, 11:29 AM
#10
Member
Join Date: Oct 2004
Location: waverly ia
Posts: 449
Likes: 0
Received 0 Likes
on
0 Posts
Car: z28
Engine: 305
Transmission: pro built 700r4 (road racing kit)
Re: My attempt at the FYRCHKN hood
updated pics? id love to learn more on how to weld such thin metal...
03-12-2012, 01:43 PM
#11
Member
Thread Starter
Join Date: Apr 2011
Location: La Crosse WI
Posts: 166
Likes: 0
Received 0 Likes
on
0 Posts
Car: '91 Firebird '85 Firebird
Engine: 305 TPI
Re: My attempt at the FYRCHKN hood
I have about an hour or two of the nights work captured but unfortunatly I decided to drink with a friend and was rushing to finish welding it up and forgot to take pictures after we started drinking. Blame it on the scotch!
Decided to widen the inside cut out to 3 inches and bring the front down

Boards in place to hold it while I weld, marked the hood also just incase I bumped into a board

What I did was fabbed up a piece for the front and then made an exact copy of it for the other side. Just so that I knew that they wouldnt make the hood lopsided. Also what I did was tacked the one side in 3 spots, then went to the other side and did the same then went back and forth doing a couple tacks on each one to prevent warping. Did the same with the second piece just to get the board out of there. Then did the middle piece and then the rest in pretty much the same fashion.


0
Showing the small 1/2 flatstock I used to keep the center "raised" otherwise it would have sat flat and had a squashed look to it.

Decided to widen the inside cut out to 3 inches and bring the front down
Boards in place to hold it while I weld, marked the hood also just incase I bumped into a board
What I did was fabbed up a piece for the front and then made an exact copy of it for the other side. Just so that I knew that they wouldnt make the hood lopsided. Also what I did was tacked the one side in 3 spots, then went to the other side and did the same then went back and forth doing a couple tacks on each one to prevent warping. Did the same with the second piece just to get the board out of there. Then did the middle piece and then the rest in pretty much the same fashion.
0
Showing the small 1/2 flatstock I used to keep the center "raised" otherwise it would have sat flat and had a squashed look to it.
 03-15-2012, 12:24 AM
#13
Member
Thread Starter
Join Date: Apr 2011
Location: La Crosse WI
Posts: 166
Likes: 0
Received 0 Likes
on
0 Posts
Car: '91 Firebird '85 Firebird
Engine: 305 TPI
Re: My attempt at the FYRCHKN hood
Im going to try I haven't purchased anything for the back part yet as im trying to find something I like. I would like to try to find an octagon shaped expanded steel. Id like to let it breath a lot but the downside is lots of debris getting into the engine bay


Thread
Thread Starter
Forum
Replies
Last Post
91TTOPZ
Exterior Parts for Sale
5
09-20-2016 12:42 PM