Here we go again. Swap #2 has begun. LOTS of pics...
 06-18-2008, 08:29 AM
#151
Supreme Member

Join Date: Mar 2004
Location: In the Garage
Posts: 2,519
Likes: 0
Received 4 Likes
on
3 Posts
Car: Camaro
Engine: 6.2L
Transmission: T56
Re: Here we go again. Swap #2 has begun. LOTS of pics...
LOL Man I'm so sorry to hear BUT.... once again i feel your pain!
So here we are about two+half years ago and my car is literally hours away from its first start up. I had taped off the entire body on the outside and then covered it in moving blankets and tarps to protect my house of Kolor silver pearl paint job. I sprayed it myself but I still spent over $1500.00 in paint and a whole summer prepping the damn thing so it is valuable paint to say the least. Back on point now that I'm at the showdown stage all sorts of friends suddenly start showing up to "help" HA help drink my beer is more like it. Anyways so I had previously painted my C5 brakes red to look like ZO6 calipers but it never looked right on the car as there was nothing else red so I had removed them again and painted them black. All the pieces on my car got sprayed with base clear fwiw. So my great friends decide to help me out and bleed my clutch and brakes and by this point I was fried anyways so I accepted. They got it all done in short order and everything seemed fine.
I tried to start the car and had all sorts of initial confusion that ended in two problems. I had seized injectors so only one was firing off and believe it or not the thing started on ONE cylinder with some quickstart helper. You should heard it I thought the thing was broken internally. Second issue was I THOUGHT I had bought an LS1 fuel tank with a reg but it seems I had bought a V6 tank and they have no reg. So needless to say a couple of days of trouble shooting and adding a Vette filter and all seems good to go.
I pull the tarps, moving blankets, and paper off my car and my nephew pipes up "We got a problem here.... big ****ing problem here" and sure as sunshine right on my drivers side fender just in front of the wheel... huge brake fluid damage. About 4" long by 2" wide the paint is ( well you know ) and so being that I am not a pro painter and that there is a custom mix pearl on the car and you cant spot touch pearl you have to spray the whole side and that i no longer have a spray friendly area. Its still there and every time I look at it its just a reminder that there is no such thing as perfect. So I had a few beers and decided to put it out of my mind and to be honest not many people even notice oddly enough as at least its under the body line so its usually in shadow. So clear coat or not brake fluid is your enemy when it comes to paint
I dont know if this story makes you feel better or not but **it happens and some days your the bug, some days your the windshield. You'll get her fixed up in no time man no worries.
 06-18-2008, 08:38 AM
#152
Re: Here we go again. Swap #2 has begun. LOTS of pics...
Haha...thanks man. I dont let my friends help for just that reason. haha. I got one buddy that I trust 100%, but the rest are tool getters when they show up. My paint isnt anywhere near as nice or work intensive as base/clear or pearl.... I can deal with it.
Luckily, most of the paint damage is towards the back side of the inner fender area...by the bulkhead connector. My saving grace was that my strut mounts are still out. So i was able to hold the line over that big hole in the fenderwell for the most part. Still a mess though.
My biggest concern is the clutch. I know I can fix the paint...but the clutch thing bugs me because this is my first time even messing with clutch parts. Other than mounting hydraulics. So I dont know if I installed something wrong, if my slave is busted...if my master is toast. Not sure if the hydraulic line is crimped. It got sort of pinched during the motor removal, but it seemed ok.
Gotta just check things over, and bleed the crap out of it I guess. See what happens.
J.
06-18-2008, 10:14 AM
#153
Supreme Member
Join Date: Mar 2004
Location: In the Garage
Posts: 2,519
Likes: 0
Received 4 Likes
on
3 Posts
Car: Camaro
Engine: 6.2L
Transmission: T56
Re: Here we go again. Swap #2 has begun. LOTS of pics...
Might want to start with verifying the master piston travel. When I did mine I found specs over on LS1tech that stated 7/8" min 15/16" max. I did this by marking the piston with magic marker and pumped it a bunch of times then measured the swiped clean section with calipers. I figured since you replaced the pin it might be worth checking this out. Good luck!
06-18-2008, 10:32 AM
#154
Re: Here we go again. Swap #2 has begun. LOTS of pics...
I think its a bout that. I set the rode length so the clutch and brake pedal were about the same height. But the hard pedal comes in about halfway...way before any overtravel would happen.
Ill definetly give it a look though. Im REALLY REALLY hoping I didnt bust something in that clutch. Ill set the car on fire at this point. Hopefully its just requiring some bleeding.
Im also not sure how different the clutch is going to feel with the 3rd gen pedals vs. the 4th gen...since there is no helper spring. That spring had some force behind it.
J.
06-18-2008, 11:39 AM
#155
Supreme Member
Join Date: Mar 2004
Location: In the Garage
Posts: 2,519
Likes: 0
Received 4 Likes
on
3 Posts
Car: Camaro
Engine: 6.2L
Transmission: T56
Re: Here we go again. Swap #2 has begun. LOTS of pics...
I cant offer any input regarding feel as I have only run third gen pedals but it feels like a smooth stock clutch to me. Its much easier than most of my other stick cars were and much smoother than any LT1 style clutch I ever ran
 06-18-2008, 02:40 PM
#157
Re: Here we go again. Swap #2 has begun. LOTS of pics...
Yup. 4th gen pedals have a spring that helps the pedal snap back to the top, and also snap down to the bottom of its throw. Its fairly strong...just as the few fingers that got caught by the pedal on its way down while fiddling with the brackets. haha.
A lot of guys have them break. Some replace it, some just leave it off... Im sure you'll feel a bit of a difference without it, but it should still function fine.
J.
A lot of guys have them break. Some replace it, some just leave it off... Im sure you'll feel a bit of a difference without it, but it should still function fine.
J.
06-18-2008, 03:12 PM
#158
Junior Member

Join Date: May 2008
Location: Oregon
Posts: 52
Likes: 0
Received 0 Likes
on
0 Posts
Car: 84 Z28
Engine: 383
Transmission: TKO 600
Axle/Gears: 3.73/Strange 12 bolt
Re: Here we go again. Swap #2 has begun. LOTS of pics...
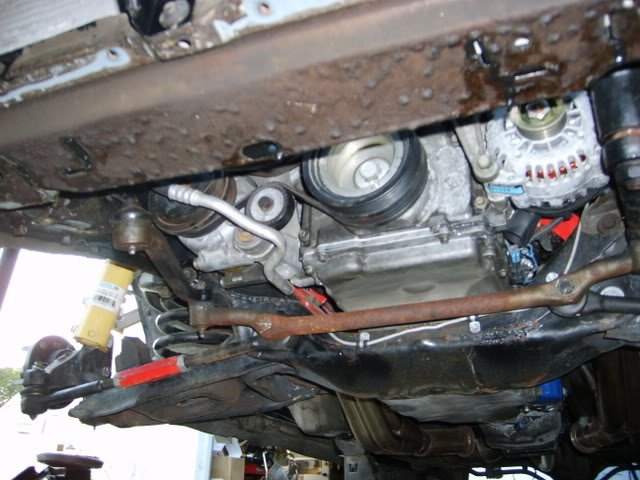
Ghettocruiser,
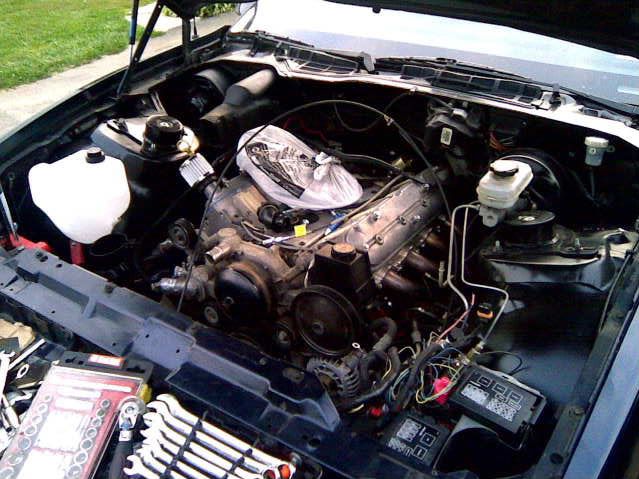
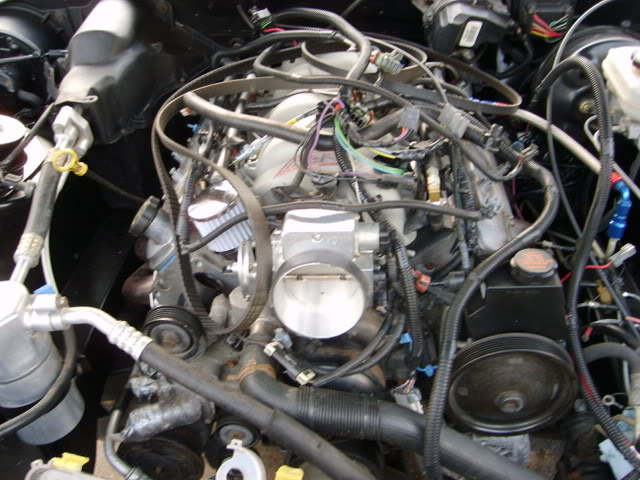
I'm about to replace my 383 with an LQ9/LS6. I currently have a T-56, but it's got the imput shaft for the 383, so I'm replacing it with another T-56. Anyway, from the looks of your motor when it was removed, it appears to be attached to the stock K member. I was told that the stock k member would not work with an LS motor and that I would have to install a tubular unit. If you've got any ideas or opinions about this, I like to hear them. Thanks.
I'm about to replace my 383 with an LQ9/LS6. I currently have a T-56, but it's got the imput shaft for the 383, so I'm replacing it with another T-56. Anyway, from the looks of your motor when it was removed, it appears to be attached to the stock K member. I was told that the stock k member would not work with an LS motor and that I would have to install a tubular unit. If you've got any ideas or opinions about this, I like to hear them. Thanks.
06-18-2008, 04:17 PM
#159
Supreme Member
iTrader: (2)
Join Date: Feb 2006
Location: 39.84N 105.11W
Posts: 1,547
Likes: 0
Received 0 Likes
on
0 Posts
Car: '89 Trans Am GTA
Engine: WAS 350 - now L92 (alum. 378/6.2L)
Transmission: WAS 700R4, now a built T56
Axle/Gears: 3.27 9-bolt
Re: Here we go again. Swap #2 has begun. LOTS of pics...
The stock K-member will work just fine, check the sticky @ the top of this forum for details...
06-18-2008, 07:11 PM
#160
Senior Member

Join Date: Jul 2002
Location: Saskatchewan
Posts: 631
Likes: 0
Received 1 Like
on
1 Post
Car: 1992 GTA
Engine: LS1
Transmission: T56
Axle/Gears: 4.10
Re: Here we go again. Swap #2 has begun. LOTS of pics...
If its any consolation I have 4th gen pedals and when I bled my LS7 clutch I was wondering if everything was alright as there felt like zero resistance from the hydraulics. I bled mine totally by myself with a 90 degree spark plug boot and some clear pvc line. One end of the boot on the open slave bleeder and the other end of the boot was plugged with the clear pvc tubing that ran back up into my master resivoir. It took maybe 5 minutes of pumping and then bam the hydraulics were there. Becasue fluid is in the line, no air is drawn back in. I simply crawled under the car and tightened the bleeder. *knocks on wood* Its been good since then. I also change my resivoir fluid often now after reading a few articles about burnt fluids and the chaos they cause on these terrible GM hydraulic systems.
06-18-2008, 10:20 PM
#161
Re: Here we go again. Swap #2 has begun. LOTS of pics...
MN246: In a nut shell, the stock k-membe will work 100%. Just have to either buy motor mount brackets, or make them. There are two conditions. One if you arent running a/c, no modifications are needed at all on the k-member. If you are going to run the 4th gen a/c compressor, you'll need to make a notch in the k-member to clear it. For more details, check out the sticky, or even just seach my old threads. i have a few pictures of the k-member modifications and all.
razor: I wish my problem was no pedal pressure. Then Ide know that I just need to keep bleeding. Right now I have no pedal for 1/2 the travel, then really stiff resistance. And it kind of happened all at once. It seemed nice and light like normal at first, then I heard a "pop" and it got stiff halfway through. So Im hoping I didnt bust something
J.
06-19-2008, 10:44 PM
#162
PHEW!!!!
Ok... The crisis has subsided.
First...My lifted Cherokee failed inspection for some dumb stuff today. So I had to fix a couple things in order to get my sticker tomorrow, because I have a big off road event on saturday. So I took care of that first.
Then, I fixed my power bleeder so it doesnt spew. I felt the pedal again, still horrible feeling. So I hooked up the bleeder, poured in the remaining half a bottle of fluid, pressurized the bleeder, and cracked the remote bleeder. Got a nice steady stream of fluid, and random spurts. So tons of air.
I ran the entire half a bottle through. Removed the power bleeder, closed the remote bleeder and tried the pedal. AND.... IT FEELS GREAT!!!! Nice and smooth. Nice and light. Very positive feeling. I slid the drive shaft in, and had my pop push in the pedal by hand. I get complete disengagement, and engagement. It seems to grab about 1 - 1.5 inches off the floor. Of course I wont know for sure til its running...but it seems like its good. VERY VERY VERY relieved and excited that its working.
After that, I drilled out the 6 transmission crossmember bolt holes, and tapped them to 7/16. I built my trans crossmember to use all 6 bolts, and 7/16 vs. the smaller stock ones.
That was all I had time for. Had to pack it in, and make the drive back to my new place. No pictures tonight because there wasnt much to take pictures of. But I have some pictures from Tuesday...when nothing went right.
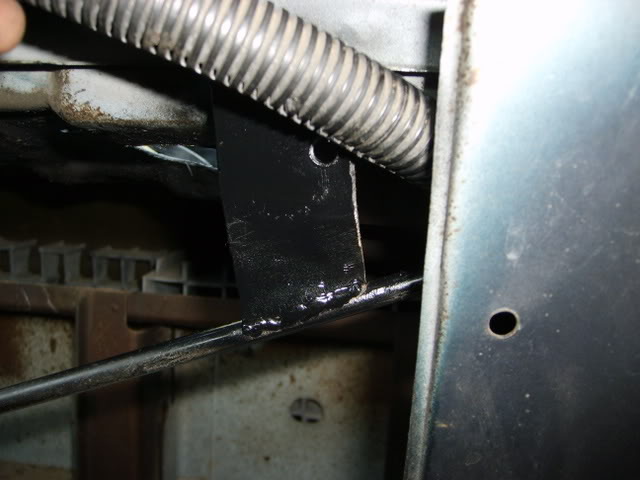
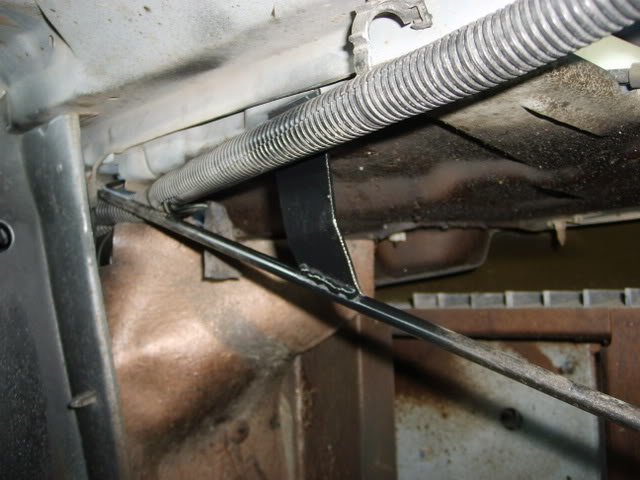
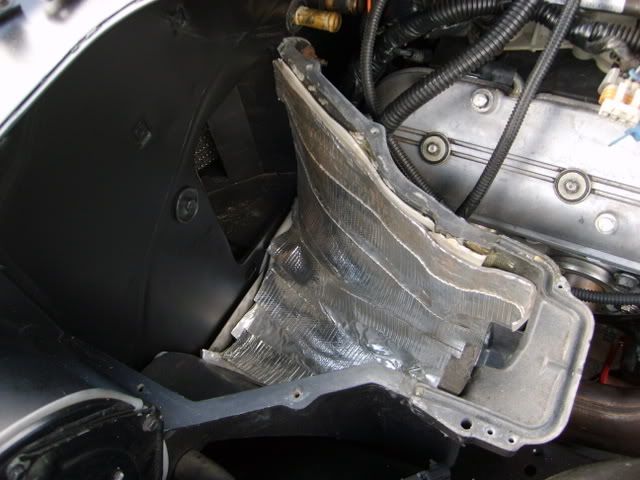
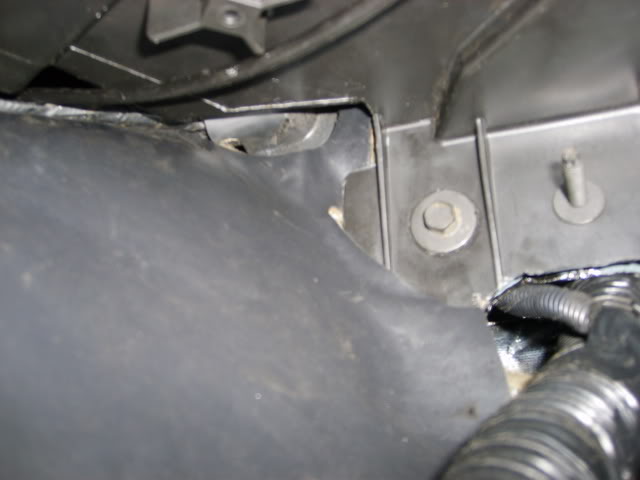
Here is the new location for the clutch hydraulic line to enter the car.
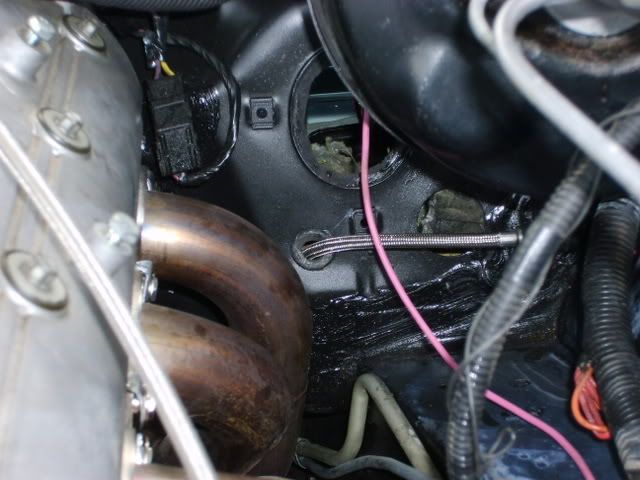
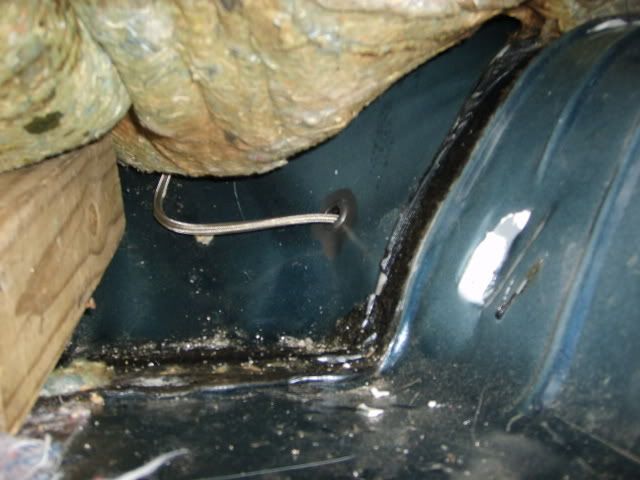
Here is where it goes through the tunnel. It goes straight through the tunnel into the slave. Almost a direct shot. Im going to seal the grommet up at the firewall, but leave this one un-sealed, to allow for the trans to move.
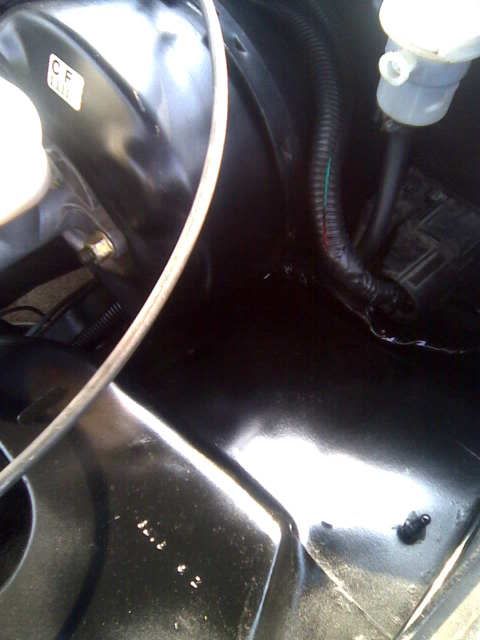
And here is just a small area of paint damage from the brake fluid disaster. Ugh... It had to happen in an area that is hard to get into too. I could only manage to take one picture of it... I was afraid I would get angry again and toss the camera.

Hopefully sunday I get a chance to work on it more...And have more updates for you guys.
J.
First...My lifted Cherokee failed inspection for some dumb stuff today. So I had to fix a couple things in order to get my sticker tomorrow, because I have a big off road event on saturday. So I took care of that first.
Then, I fixed my power bleeder so it doesnt spew. I felt the pedal again, still horrible feeling. So I hooked up the bleeder, poured in the remaining half a bottle of fluid, pressurized the bleeder, and cracked the remote bleeder. Got a nice steady stream of fluid, and random spurts. So tons of air.
I ran the entire half a bottle through. Removed the power bleeder, closed the remote bleeder and tried the pedal. AND.... IT FEELS GREAT!!!! Nice and smooth. Nice and light. Very positive feeling. I slid the drive shaft in, and had my pop push in the pedal by hand. I get complete disengagement, and engagement. It seems to grab about 1 - 1.5 inches off the floor. Of course I wont know for sure til its running...but it seems like its good. VERY VERY VERY relieved and excited that its working.
After that, I drilled out the 6 transmission crossmember bolt holes, and tapped them to 7/16. I built my trans crossmember to use all 6 bolts, and 7/16 vs. the smaller stock ones.
That was all I had time for. Had to pack it in, and make the drive back to my new place. No pictures tonight because there wasnt much to take pictures of. But I have some pictures from Tuesday...when nothing went right.
Here is the new location for the clutch hydraulic line to enter the car.
Here is where it goes through the tunnel. It goes straight through the tunnel into the slave. Almost a direct shot. Im going to seal the grommet up at the firewall, but leave this one un-sealed, to allow for the trans to move.
And here is just a small area of paint damage from the brake fluid disaster. Ugh... It had to happen in an area that is hard to get into too. I could only manage to take one picture of it... I was afraid I would get angry again and toss the camera.
Hopefully sunday I get a chance to work on it more...And have more updates for you guys.
J.
06-19-2008, 11:51 PM
#163
Moderator
iTrader: (14)
Join Date: Mar 2000
Location: Littleton, CO USA
Posts: 43,169
Likes: 0
Received 35 Likes
on
34 Posts
Car: 82 Berlinetta/57 Bel Air
Engine: LS1/LQ4
Transmission: 4L60E/4L80E
Axle/Gears: 12B-3.73/9"-3.89
Glad the bleeding took care of it.
I don't have a power bleeder (although I want one). Anyone tried the Mity Vac method discussed on ls1tech.com?
I don't have a power bleeder (although I want one). Anyone tried the Mity Vac method discussed on ls1tech.com?
Last edited by five7kid; 06-20-2008 at 02:43 PM.
06-20-2008, 09:45 PM
#164
Supreme Member
iTrader: (2)
Join Date: Feb 2006
Location: 39.84N 105.11W
Posts: 1,547
Likes: 0
Received 0 Likes
on
0 Posts
Car: '89 Trans Am GTA
Engine: WAS 350 - now L92 (alum. 378/6.2L)
Transmission: WAS 700R4, now a built T56
Axle/Gears: 3.27 9-bolt
Re: Here we go again. Swap #2 has begun. LOTS of pics...
I've considered getting the Mity-Vac and the one-man bleeding system that's advertised over there...
06-21-2008, 04:46 PM
#165
Supreme Member

Join Date: Apr 2002
Location: New Jersey
Posts: 3,552
Likes: 0
Received 5 Likes
on
5 Posts
Car: 86 Corvette, 89 IROC, 1999 TA
Engine: 350, 350, LS1
Transmission: 700r4, 700r4, T-56
Axle/Gears: 3.07, 373, 4.10
Re: Here we go again. Swap #2 has begun. LOTS of pics...
I have, with lots of success. There's actually a GM bulletin that deals with this procedure that's been around for a number of years that I came across at work when I was having trouble bleeding a clutch on a 98 maro after replacing a leaking acutator cylinder (slave cylinder). I was actually able to find the "special tool" that goes on top of the clutch res. lying unopened in our parts department and with an old vac pump from an a/c machine we had laying around go it to work. I used it many times on different models after that when bleeding hydrolic clutches. Works great.
06-25-2008, 11:47 PM
#166
Re: Here we go again. Swap #2 has begun. LOTS of pics...
Motive power bleeder for me... For both the clutch hydraulics, and the brakes. Works WONDERFULLY....
Ok...small updates. Oh...and the pics are crappy. Forgot my camera so I had to use my cell phone.
I got a few little odds and ends done tonight that were keeping me from bigger projects. The list for tonight:
Mounted fuse blocks
Mounted cruise unit
Secured brake lines
Installed strut mounts
Tightened pedals and brackets
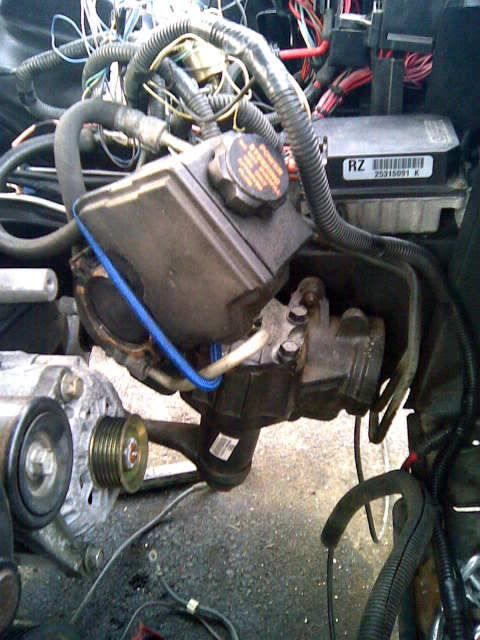
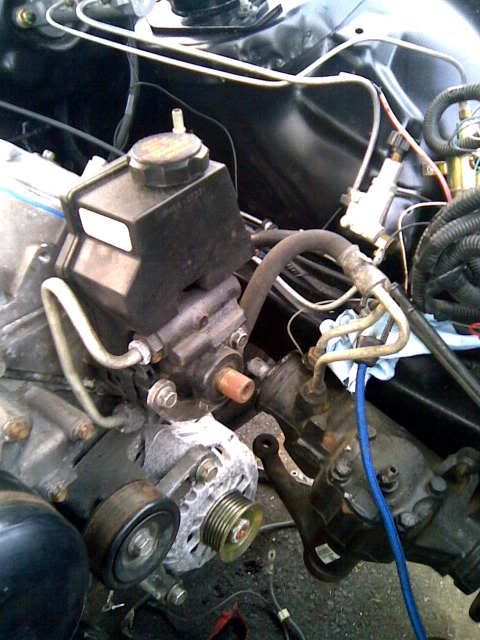
Installed steering gear and steering pump/pulley
Mounted new overflow tank
Re-painted brake fluid spill area
Im sure a couple other odds and ends. The good news is, I felt like I had a productive night. Spent some time cleaning the garage up too. I needed a night like this of finishing small projects. I feel good about tomorrow... Gonna work on it again. Maybe get the intake back on, some wiring done, maybe start on the dash and a few things inside.
Here are the pics:
Brake fluid area...

Thats it for now. Ill try to remember the camera for tomorrow.
J.
Ok...small updates. Oh...and the pics are crappy. Forgot my camera so I had to use my cell phone.
I got a few little odds and ends done tonight that were keeping me from bigger projects. The list for tonight:
Mounted fuse blocks
Mounted cruise unit
Secured brake lines
Installed strut mounts
Tightened pedals and brackets
Installed steering gear and steering pump/pulley
Mounted new overflow tank
Re-painted brake fluid spill area
Im sure a couple other odds and ends. The good news is, I felt like I had a productive night. Spent some time cleaning the garage up too. I needed a night like this of finishing small projects. I feel good about tomorrow... Gonna work on it again. Maybe get the intake back on, some wiring done, maybe start on the dash and a few things inside.
Here are the pics:
Brake fluid area...
Thats it for now. Ill try to remember the camera for tomorrow.
J.
06-25-2008, 11:56 PM
#167
Supreme Member
iTrader: (2)
Join Date: Feb 2006
Location: 39.84N 105.11W
Posts: 1,547
Likes: 0
Received 0 Likes
on
0 Posts
Car: '89 Trans Am GTA
Engine: WAS 350 - now L92 (alum. 378/6.2L)
Transmission: WAS 700R4, now a built T56
Axle/Gears: 3.27 9-bolt
Re: Here we go again. Swap #2 has begun. LOTS of pics...
Glad to see that you're still "taking bites outta the elephant", Justin. I've been meaning to send you a PM & let you know that this thread is REALLY helping w/ my own swap, but I've been spending all of my time with my car...  (But seriously, it is appreciated.)
Wrote up a LONG update for my own thread, found that I don't have a picture of one thing that I want to illustrate, so I bagged it for tonight. Hopefully I'll be able to get that tomorrow...")
And thanks again for taking the time to document all of this...
(But seriously, it is appreciated.)Wrote up a LONG update for my own thread, found that I don't have a picture of one thing that I want to illustrate, so I bagged it for tonight. Hopefully I'll be able to get that tomorrow...
And thanks again for taking the time to document all of this...
06-26-2008, 08:20 AM
#168
Member
Join Date: May 2008
Location: Battle Ground, WA
Posts: 228
Likes: 0
Received 0 Likes
on
0 Posts
Car: 1986 Chevy Silverado
Engine: 350 Crate
Transmission: Turbo 400 w/ shift kit
Axle/Gears: dana60/corp14 4.10 gears
Re: Here we go again. Swap #2 has begun. LOTS of pics...
Ghettocruiser,
I'm about to replace my 383 with an LQ9/LS6. I currently have a T-56, but it's got the imput shaft for the 383, so I'm replacing it with another T-56. Anyway, from the looks of your motor when it was removed, it appears to be attached to the stock K member. I was told that the stock k member would not work with an LS motor and that I would have to install a tubular unit. If you've got any ideas or opinions about this, I like to hear them. Thanks.
I'm about to replace my 383 with an LQ9/LS6. I currently have a T-56, but it's got the imput shaft for the 383, so I'm replacing it with another T-56. Anyway, from the looks of your motor when it was removed, it appears to be attached to the stock K member. I was told that the stock k member would not work with an LS motor and that I would have to install a tubular unit. If you've got any ideas or opinions about this, I like to hear them. Thanks.
Thank You
Trey
06-26-2008, 09:08 AM
#169
Supreme Member
Join Date: Mar 2004
Location: In the Garage
Posts: 2,519
Likes: 0
Received 4 Likes
on
3 Posts
Car: Camaro
Engine: 6.2L
Transmission: T56
Re: Here we go again. Swap #2 has begun. LOTS of pics...
Getting there!
Seeing that last series of pics made me realize how utterly disgusting my coolant overflow bottle is and almost every time I show my engine someone comments on how nasty it is so time for a new one. I have the same style as yours which looks like its BN so mind telling me where you got it? tanks
Seeing that last series of pics made me realize how utterly disgusting my coolant overflow bottle is and almost every time I show my engine someone comments on how nasty it is so time for a new one. I have the same style as yours which looks like its BN so mind telling me where you got it? tanks
06-26-2008, 09:20 AM
#170
Re: Here we go again. Swap #2 has begun. LOTS of pics...
Yeah Im hoping to get more done tonight. I have to rebuild the intake and get that back on. And maybe get some of the wiring hooked up. Then its dash time...which Im NOT looking forward to. I have to re-install the pillar cluster, and all the gauges, and all the little things that I did to make the dash the way I wanted. Just a pain.
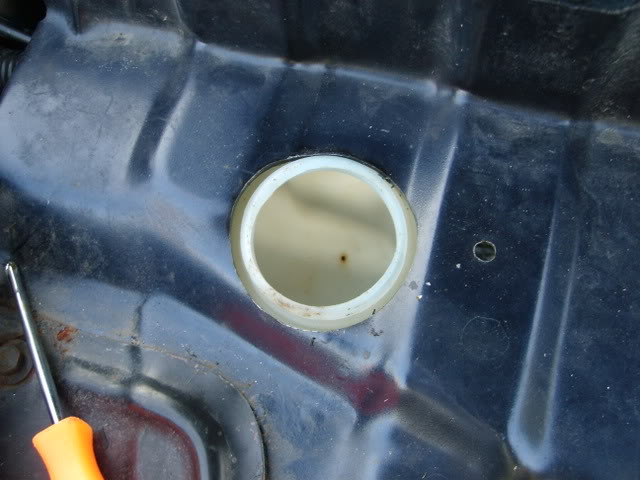
The ONLY way I was gonig to use a 3rd gen tank was if it was nice and new. I decided not to relocate the battery just yet. Im going to use the 4th gen washer tank still. I figured a new tank wouldnt look THAT bad. And it would be super easy to install....because it belongs there.
I got the tank from moderndaymuscle.com. Very quick shipping, and the price is awesome. I got a new cap too while I was at it. It looks pretty good...and it will be nice to see my coolant level at a glance... The stock tanks were so filthy you couldnt see. And the 4th gen tank used a dipstick... Only thing is...I wish I would have got the 88-92 tank. Its more square and bigger. And I think the hose hooks up at a different spot... But it will work either way... Oh...and its only $16
J.
Last edited by ghettocruiser; 06-26-2008 at 09:24 AM.
06-26-2008, 09:31 PM
#172
Re: Here we go again. Swap #2 has begun. LOTS of pics...
Didnt get much done tonight. Was just burnt out from the day of work, then the drive to work on the car.
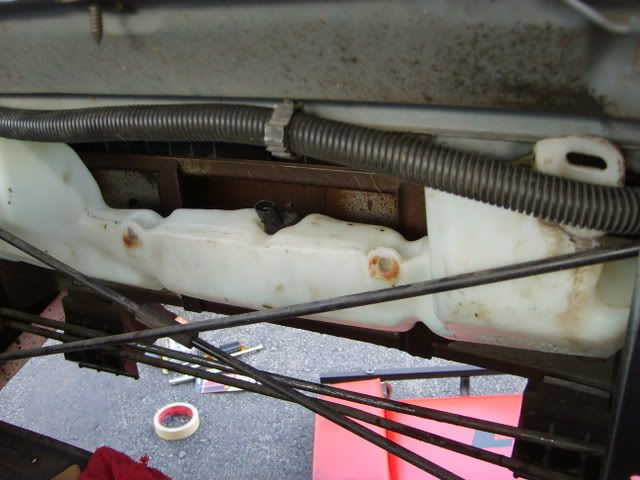
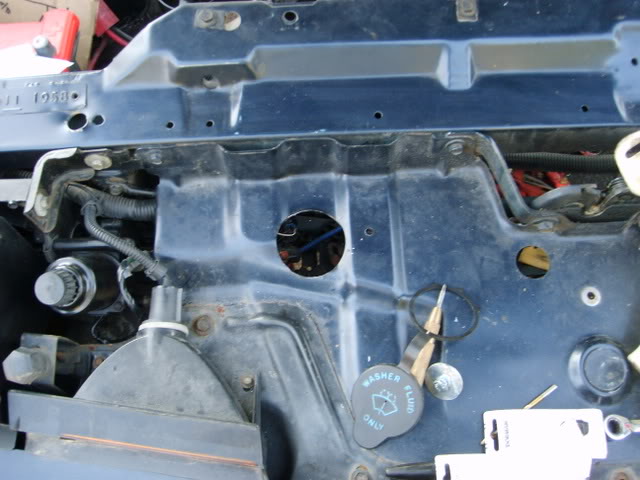
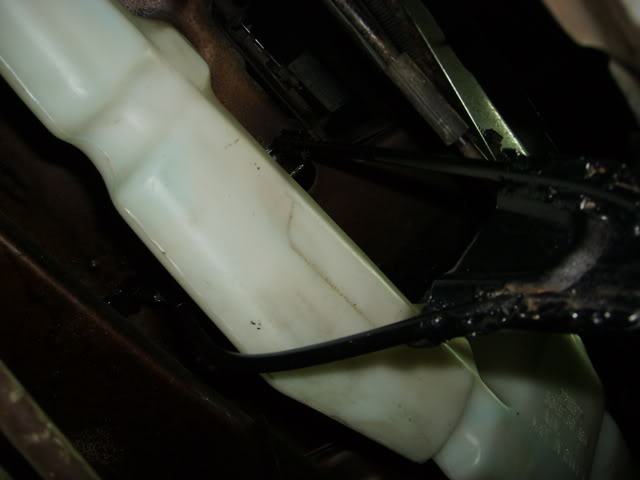
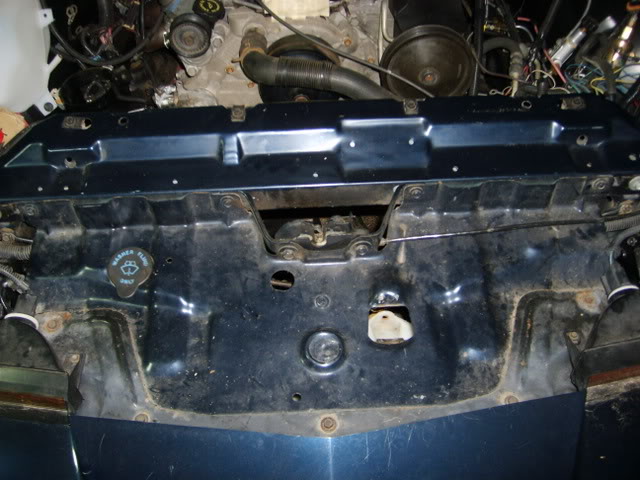
I did get the 4th gen washer tank mounted. Its not 100% done, but its in there, and looks 10000x better than when I installed it the last time. Nice and clean.
Thanks to shroom on here for the help on this one.
All you see from the outside...The retaining strap will be hidden as well, its just stuck on there for the pic.

I have to tweak the triangular center brace for the hood latch some more. ill get pics of that when its done. Oh yeah, all that brown crap you see is that undercoating gunk. Thats terrible stuff. So gooey and gets on anything that touches it, yet is difficult to get off. If it werent for that, it would be nothing but clean metal.
Just that... And I cleaned up some more. I hate working in a messy environment...especially since my garage is tiny. Gets out of hand real quick.
Ill keep ya'll updated.
J.
I did get the 4th gen washer tank mounted. Its not 100% done, but its in there, and looks 10000x better than when I installed it the last time. Nice and clean.
Thanks to shroom on here for the help on this one.
All you see from the outside...The retaining strap will be hidden as well, its just stuck on there for the pic.
I have to tweak the triangular center brace for the hood latch some more. ill get pics of that when its done. Oh yeah, all that brown crap you see is that undercoating gunk. Thats terrible stuff. So gooey and gets on anything that touches it, yet is difficult to get off. If it werent for that, it would be nothing but clean metal.
Just that... And I cleaned up some more. I hate working in a messy environment...especially since my garage is tiny. Gets out of hand real quick.
Ill keep ya'll updated.
J.
06-27-2008, 03:53 PM
#173
Supreme Member

Join Date: Jan 2001
Location: Pittsburgh, PA
Posts: 1,374
Likes: 0
Received 1 Like
on
1 Post
Car: 06 SRM M6 GTO, 98 Grand Prix GTP
Re: Here we go again. Swap #2 has begun. LOTS of pics...
comin along! I like the 4th gen washer bottle, thats def something I need to add to my agenda.
 06-28-2008, 04:42 PM
#175
Junior Member
Join Date: May 2008
Location: Oregon
Posts: 52
Likes: 0
Received 0 Likes
on
0 Posts
Car: 84 Z28
Engine: 383
Transmission: TKO 600
Axle/Gears: 3.73/Strange 12 bolt
Re: Here we go again. Swap #2 has begun. LOTS of pics...
Hey DCCOWBOYS, thanks for the interest, but I sold the 383 to my brother-in-law. He's going to stick it in his 67' Camaro.
06-30-2008, 09:23 AM
#176
Re: Here we go again. Swap #2 has begun. LOTS of pics...
Alittle progress this weekend. I was pretty busy with other things though. Stinks... I really wanted the car finished by now.
I messed around with the washer tank some more. I need to do a good bit of fitting for it to fit the way I want... Probably going to work on that some more soon.
I also started getting the engine harness in place. Let me say, it was 100x easier when I had the wiring attached to the motor before install. Trying to get that harness into position with the motor in and the HVAC box in is a real pain.
But, I have the harness for the PCM inside, and the other inside connectors routed.
Im rebuilding the FAST intake, then that will go back on. Once thats one, I can plug everything back in and get it ready to run. After that, Im going to move on to the dash. I need to move the pillar pod and gauges over, as well as the main dash cluster. Then the fun begins...wiring up all the various things inside and getting the fuel tank wiring in place etc etc. I might try to remove more wiring this time around. Ive realized that I need VERY little of the original thirdgen wiring. Especially the big bundle of wires behind the dash. So I might work on getting those out of there...
Another surprise though. The wiring for the clutch switch down by the kick panel has a plug that does not fit the clutch switch. I learned that there was a different style of switch used on the older car. 86 and back I guess... My pedals are from an 87, so the switch is the newer style. So I have to swap the plug on those wires with the plug from my 87.
Anyway, no pictures...plan on working on it a couple days this week, and Ill have some update pictures for you guys.
J.
06-30-2008, 10:47 AM
#178
Supreme Member
Join Date: Apr 2002
Location: New Jersey
Posts: 3,552
Likes: 0
Received 5 Likes
on
5 Posts
Car: 86 Corvette, 89 IROC, 1999 TA
Engine: 350, 350, LS1
Transmission: 700r4, 700r4, T-56
Axle/Gears: 3.07, 373, 4.10
Re: Here we go again. Swap #2 has begun. LOTS of pics...
what is rebuildable about the fast intake? Just curious..
06-30-2008, 11:50 AM
#179
Re: Here we go again. Swap #2 has begun. LOTS of pics...
There are three pieces. The lower base, an inner shell, and the top/outer shell. There is gasket material that seals all of that together, and some sealant here and there. I want to be sure that the thing is 100% leak free, and the only way to do that in my opinion is put new seals in. The seal is one long peice of gasket material. You have to cut it up, and press it into the grooves that the pieces fit into.
I was getting oil in my intake...so I want to competely remove all the gaskets and really clean the intake out. Since Im running a breather for now, I dont see any need to have to clean out or open the intak up again. So Im even thinking about sealing it all up with "the right stuff" or something. Im waiting to hear back from FAST about the right way to go about re-doing the seals...
J.
06-30-2008, 12:21 PM
#180
Supreme Member
Join Date: Apr 2002
Location: New Jersey
Posts: 3,552
Likes: 0
Received 5 Likes
on
5 Posts
Car: 86 Corvette, 89 IROC, 1999 TA
Engine: 350, 350, LS1
Transmission: 700r4, 700r4, T-56
Axle/Gears: 3.07, 373, 4.10
Re: Here we go again. Swap #2 has begun. LOTS of pics...
can you post some pics when if you get a chance? I've never seen one in person, just a couple of stocker ls1's and a few ls6's (replaced a ls1 with an ls6 under warrenty at work after some kid blew a hole thourgh it with a 100 shot, no idea how they got it through warrenty). If you get a chance that would be great!
06-30-2008, 01:08 PM
#181
Re: Here we go again. Swap #2 has begun. LOTS of pics...
Dont worry...Ill post up some pics. I would have snapped some this weekend, but I wasnt expecting to get to work on it at all....so I didnt have the camera with me. Ill show all the pieces, how they go together, some porting, and how the new seals go in...or how I use RTV and say screw the seals. haha. Either way Ill produce some pics.
J.
J.
07-03-2008, 06:43 AM
#182
Re: Here we go again. Swap #2 has begun. LOTS of pics...
Here ya go gents. Spent a couple hours at home last night. Hopefully tonight too. I should have picked tonight as my night to work until midnight though...I was alittle late for work this morning and Im beat.
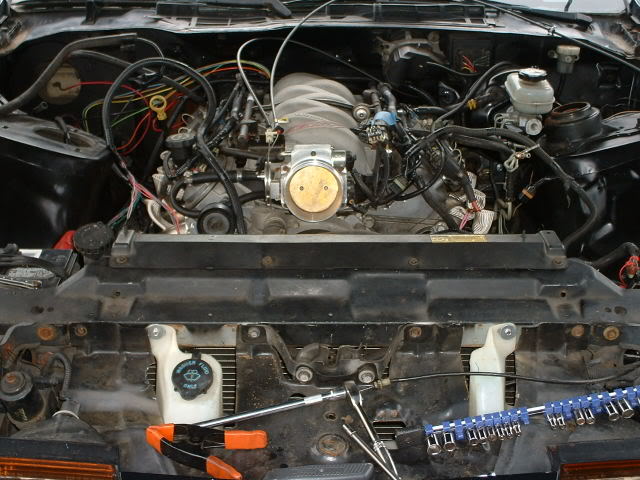
I got two projects finished last night. Yeah it doesnt sound like much, but it was also the last of the "fabrication" on this car. I got the 4th gen washer bottle finished, and I got the intake rebuilt and installed. Both of these jobs were more of a pain than I was hoping.
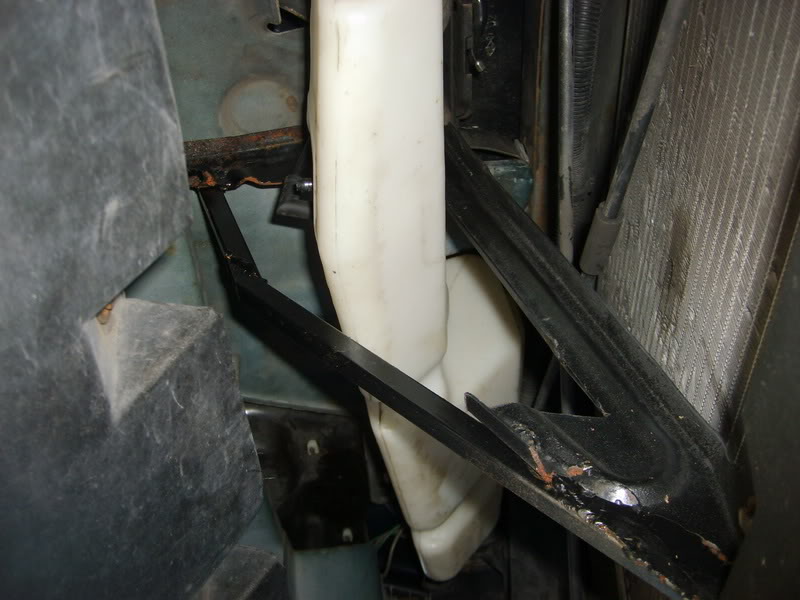
First the washer bottle. Last time, I installed it and it was VERY hack. Big holes in the hood supports and it was bolted in wierd, and the trigangular brace was just kind of busted together in a late night effort. This time I feel its much cleaner and much studier and looks 100 times better.
Here it was before for a refrsher. Looks more like the 4th gen mounting.
My plan was to clean all this up at some point...but I just wanted it mounted.
The new way...
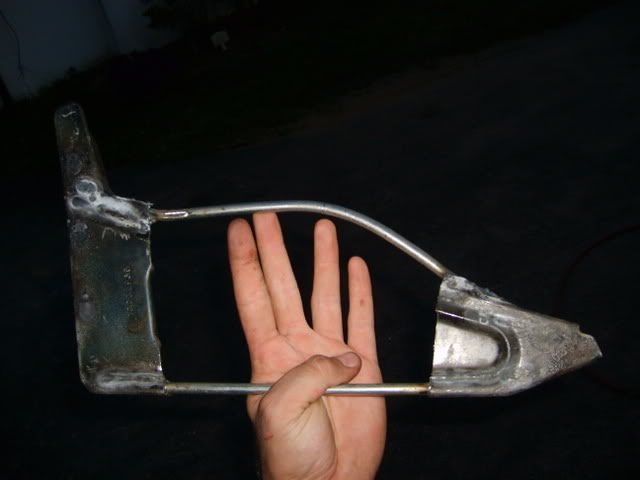
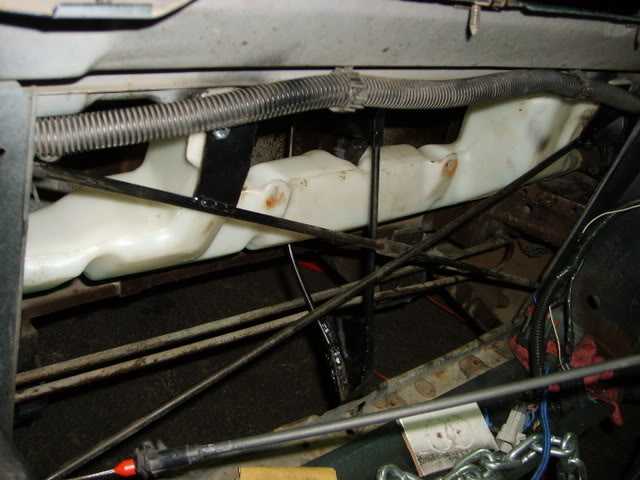
Shroom was the inspiration for this... I did it a little different than him though. Decided to make use of those cross braces and alittle welding. Its very study and should work perfectly for me.
Cont'd....
I got two projects finished last night. Yeah it doesnt sound like much, but it was also the last of the "fabrication" on this car. I got the 4th gen washer bottle finished, and I got the intake rebuilt and installed. Both of these jobs were more of a pain than I was hoping.
First the washer bottle. Last time, I installed it and it was VERY hack. Big holes in the hood supports and it was bolted in wierd, and the trigangular brace was just kind of busted together in a late night effort. This time I feel its much cleaner and much studier and looks 100 times better.
Here it was before for a refrsher. Looks more like the 4th gen mounting.
My plan was to clean all this up at some point...but I just wanted it mounted.
The new way...
Shroom was the inspiration for this... I did it a little different than him though. Decided to make use of those cross braces and alittle welding. Its very study and should work perfectly for me.
Cont'd....
07-03-2008, 06:51 AM
#183
Re: Here we go again. Swap #2 has begun. LOTS of pics...
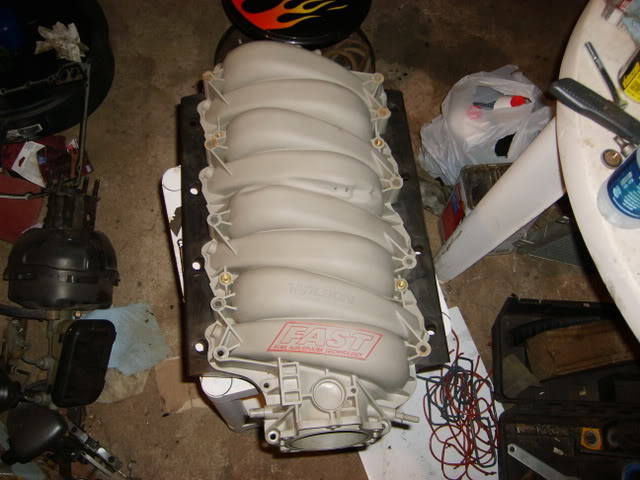
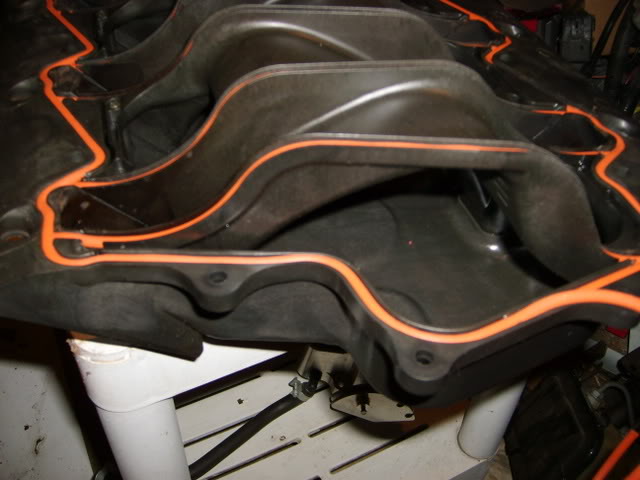
Here's the intake "rebuild". It was sort of a pain. This is after I cleaned it up as best I could.
Here is the inside. This is after I already laid new seals in for mock up. All the seals going across are short pieces and then there is a single long piece all the way around.
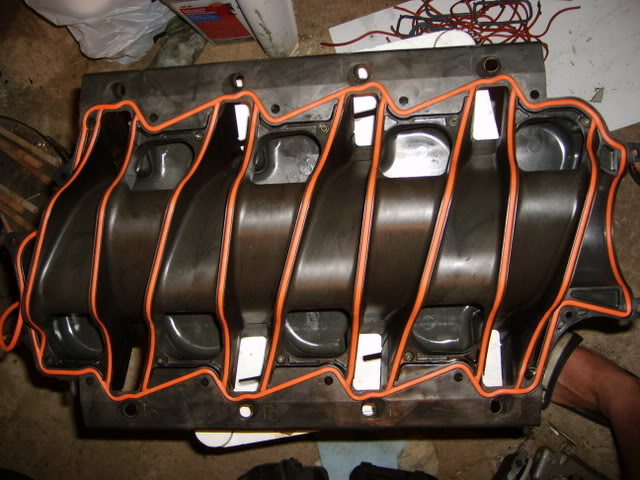
There is also a "mid baffle" which I had already put back on in this pic.
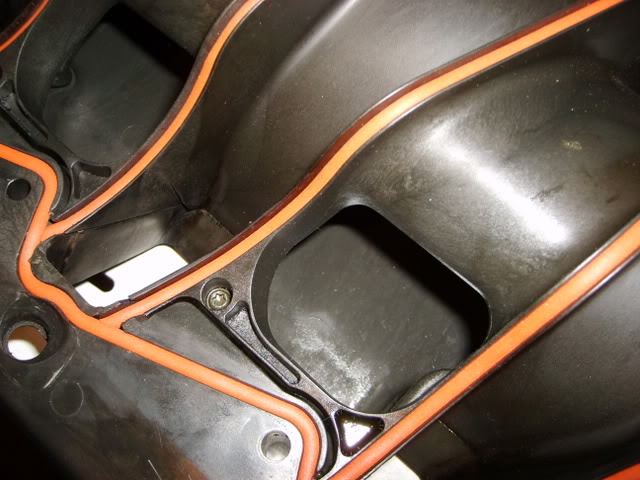
It gets a dab of silicone or glue or whatever you want to use at each joint.
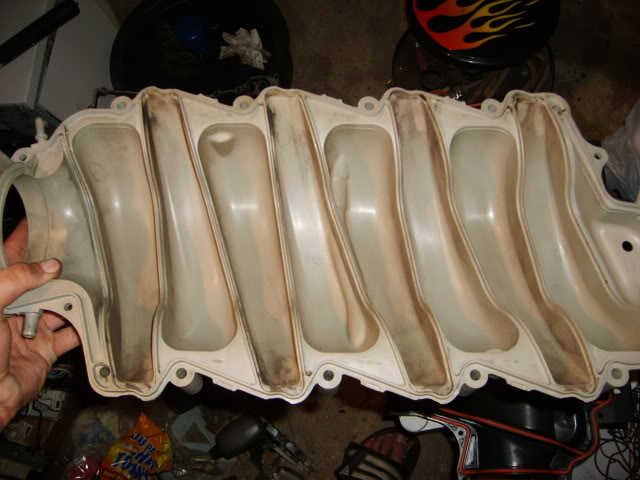
Underside of the upper shell.
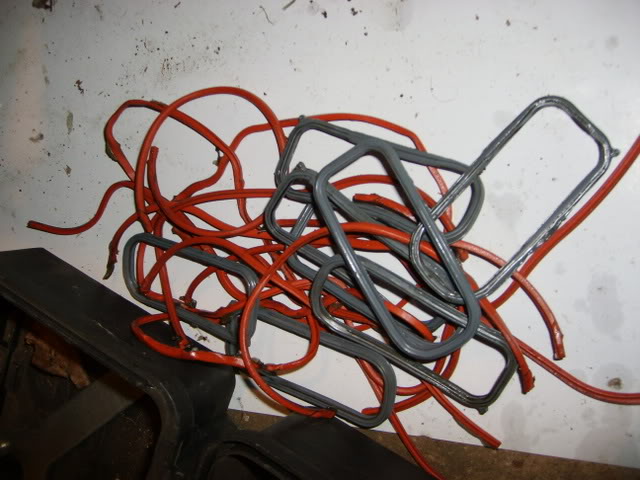
What I took out.
And...
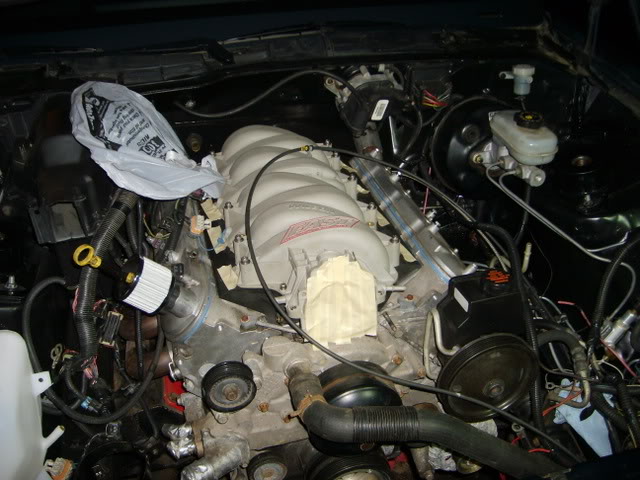
I feel like its sealed 100x better than before. The other gaskets were all flattened and oily and crappy. I actually pulled teh upper shell down to the lower shell with the mount bolts. That rope gasket was pretty thick. So Im feeling pretty good that its sealed tight. Im gonna seal up the MAP sensor real well, and hopefully its good to go.
One last pic. Sorry for the dirt/mess.
J.
Here is the inside. This is after I already laid new seals in for mock up. All the seals going across are short pieces and then there is a single long piece all the way around.
There is also a "mid baffle" which I had already put back on in this pic.
It gets a dab of silicone or glue or whatever you want to use at each joint.
Underside of the upper shell.
What I took out.
And...
I feel like its sealed 100x better than before. The other gaskets were all flattened and oily and crappy. I actually pulled teh upper shell down to the lower shell with the mount bolts. That rope gasket was pretty thick. So Im feeling pretty good that its sealed tight. Im gonna seal up the MAP sensor real well, and hopefully its good to go.
One last pic. Sorry for the dirt/mess.
J.
07-03-2008, 08:45 AM
#184
Supreme Member
Join Date: Sep 2005
Location: Ottawa, ONT
Posts: 1,951
Likes: 0
Received 7 Likes
on
7 Posts
Car: 1987 Firebird
Engine: 355
Transmission: T56
Re: Here we go again. Swap #2 has begun. LOTS of pics...
For someone who was very against you cutting up the car, i must admit, that looks very good (almost as if it belongs).
2 projects in ONE night??? Holy cow batman. Nice work, she'll be cruising in no time. Cant wait to see it finished.
2 projects in ONE night??? Holy cow batman. Nice work, she'll be cruising in no time. Cant wait to see it finished.
07-03-2008, 09:50 AM
#185
Re: Here we go again. Swap #2 has begun. LOTS of pics...
I like how it came out.
And yes...two finished projects. I even amazed myself
The intake took forever. Just a pain laying those seals out and cutting them and adding rtv etc etc. Plus I had that washer bottle and brace in and out like 10 times...then paint....then assemble in the dark. haha. Tonight ide like to get some wiring done, and maybe get the a/c stuff back in along with the radiator. We'll see.
J.
07-03-2008, 01:17 PM
#186
Supreme Member
Join Date: Sep 2005
Location: Ottawa, ONT
Posts: 1,951
Likes: 0
Received 7 Likes
on
7 Posts
Car: 1987 Firebird
Engine: 355
Transmission: T56
Re: Here we go again. Swap #2 has begun. LOTS of pics...
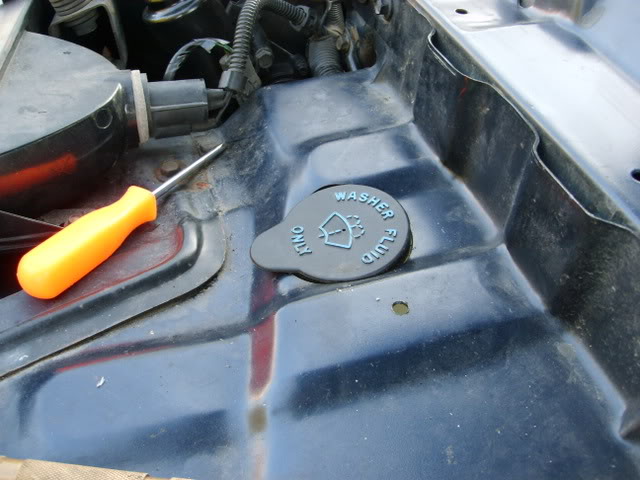
I just noticed something. Theres a drill hole next to (driver side) of the washer fluid lid, whats that for?
07-03-2008, 01:31 PM
#187
Re: Here we go again. Swap #2 has begun. LOTS of pics...
What hole? I dont see a hole there... Do you see a hole? Are you sure its not dirt or dust or something...??? 
Hehe... We'll classify that as an oops. But its ok, I have a plan for it anyway.
J.
Hehe... We'll classify that as an oops. But its ok, I have a plan for it anyway.
J.
07-07-2008, 06:32 AM
#188
Re: Here we go again. Swap #2 has begun. LOTS of pics...
Busy weekend....with everything but the stinking car unfortunetly. Darn holiday weekend filled up very quickly.
Last thursday I was able to get some of the wiring squared away, then had to quit.
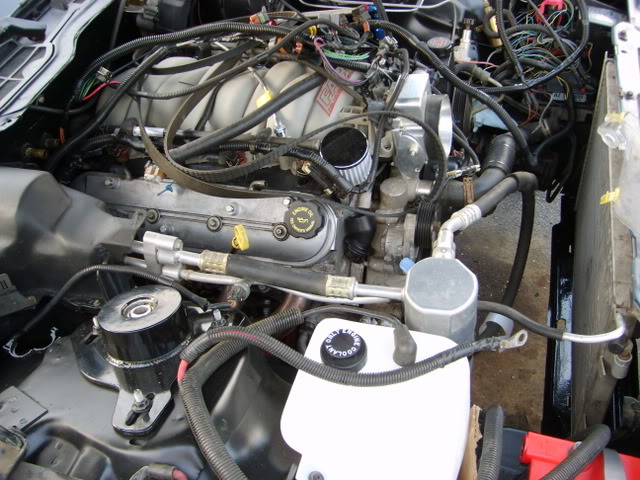
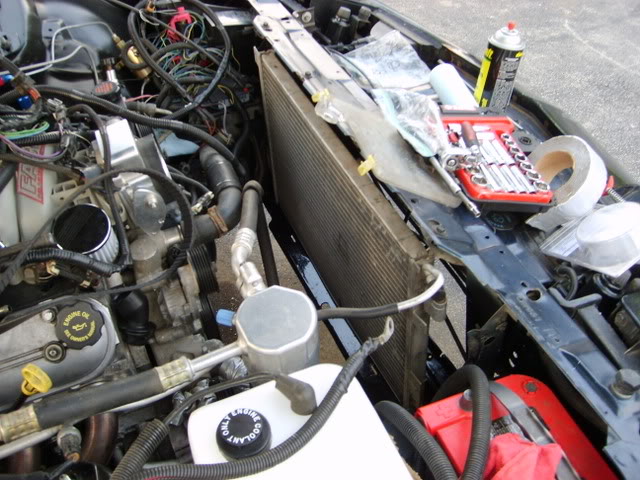
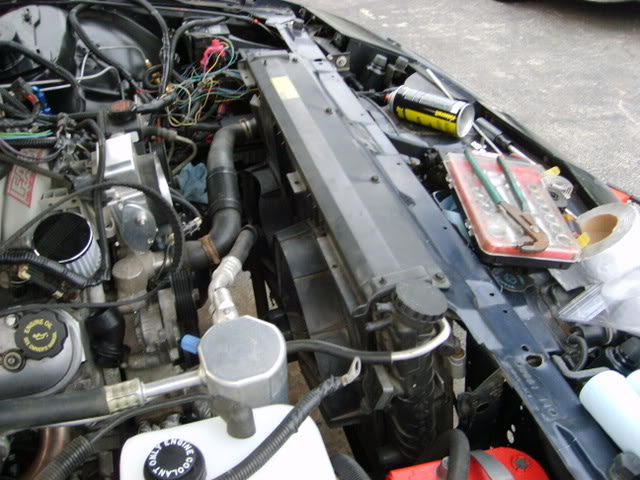
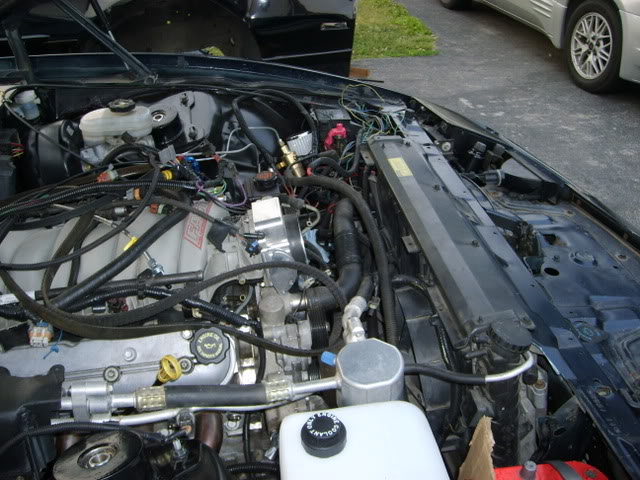
Yesterday I was able to get some more big things done. I got the A/C system installed. It went in as easily as it came out. All as one unit. I spent some time insulating the inside of the HVAC box alittle better to try to get the a/c air temps down. That plus some sort of valve to shut off the heater core should help.
One thing I wanted to do was run a heater control valve. My 87 had two vac lines coming from the firewall. One that used vac to work the vents, and the other operated the heater control valve. The 86 only has the one line that supplys vac to the vents. There was no heater control valve on the 86.... Sooooo I dont know exactly how to proceed. Im trying to see how to swap out the contols from the 87 to the 86 but didnt see an easy way.
Anyway...I got the a/c stuff in, and got the radiator and rad fans installed as well. Kinda got starter wires ran, starter installed, put some heat wrap on some of the wires back there that melted the last time. Not terrible for only having a couple hours to work on it.
On to a couple pictures.
Weather is looking like crap for the next few days. So its not looking good for more work. But Ide like to get the front suspension installed on the next trip out. Another thing Ive been avoiding is inside work. I have to switch the clutch safety switch wiring over to the newer connector. I have to remove all the dash wiring and gauge crap to make way for my new gauges. And I have to get into the 87 and start taking the interior apart...havent started that yet really. So I have a bunch of wiring and what not to take care of inside. Ill keep ya updated.
J.
Last thursday I was able to get some of the wiring squared away, then had to quit.
Yesterday I was able to get some more big things done. I got the A/C system installed. It went in as easily as it came out. All as one unit. I spent some time insulating the inside of the HVAC box alittle better to try to get the a/c air temps down. That plus some sort of valve to shut off the heater core should help.
One thing I wanted to do was run a heater control valve. My 87 had two vac lines coming from the firewall. One that used vac to work the vents, and the other operated the heater control valve. The 86 only has the one line that supplys vac to the vents. There was no heater control valve on the 86.... Sooooo I dont know exactly how to proceed. Im trying to see how to swap out the contols from the 87 to the 86 but didnt see an easy way.
Anyway...I got the a/c stuff in, and got the radiator and rad fans installed as well. Kinda got starter wires ran, starter installed, put some heat wrap on some of the wires back there that melted the last time. Not terrible for only having a couple hours to work on it.
On to a couple pictures.
Weather is looking like crap for the next few days. So its not looking good for more work. But Ide like to get the front suspension installed on the next trip out. Another thing Ive been avoiding is inside work. I have to switch the clutch safety switch wiring over to the newer connector. I have to remove all the dash wiring and gauge crap to make way for my new gauges. And I have to get into the 87 and start taking the interior apart...havent started that yet really. So I have a bunch of wiring and what not to take care of inside. Ill keep ya updated.
J.
07-11-2008, 10:36 AM
#189
Re: Here we go again. Swap #2 has begun. LOTS of pics...
Ok... another job that I was dreading is done. Ended up being more involved than I thought, but not too difficult.
I want to run a heater control valve this time around. However the 86 didnt have a heater control valve. So I had to figure out how get the valve to operate. My solution was to just move all of the 87's stuff over. Also, my 87's wiring was already modified for the 4th gen a/c, as well as power/ground hook ups.
Learned alittle bit about the HVAC system in the process. I started a thread about it...so Ill just link to it, and just post a couple pictures in here. There are more pictures over in this thread.
https://www.thirdgen.org/forums/tech...ml#post3819274
To sum it up...I ended up swapping in the wiring harness, the vaccuum harness, and a vac switch from the 87 controls. Wasnt too bad. Just routing the wiring and hoses took some time.
Couple pics...
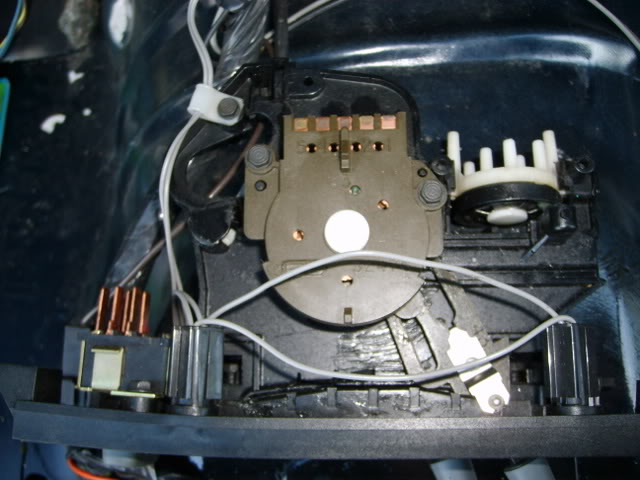
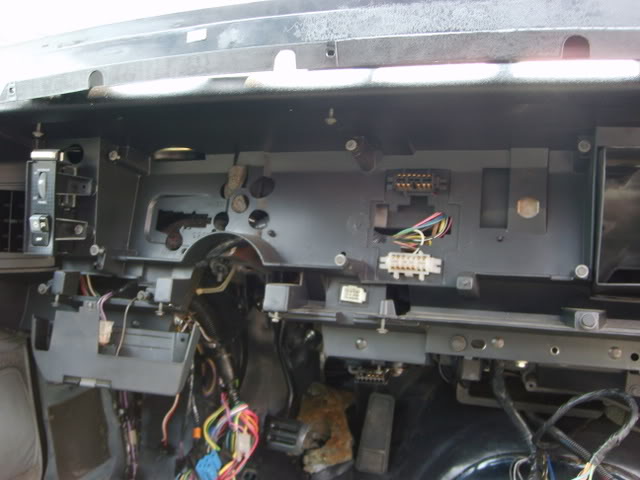
The 86's HVAC controls.
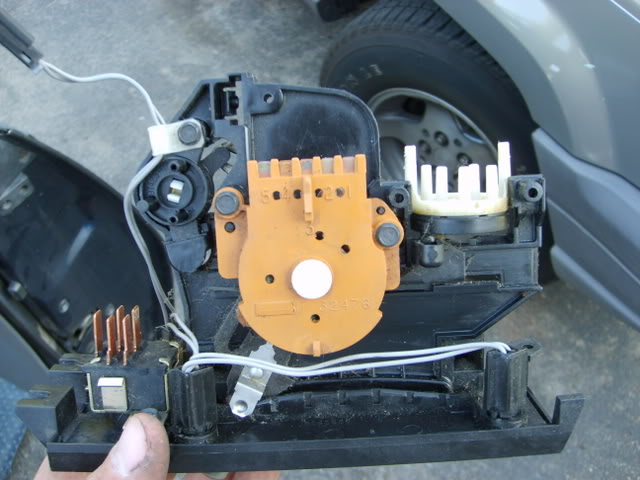
87's controls. Notice that vac switch in the upper left hand corner. Thats what operates the heater control valve. The purple hose is what connects to the hard line that goes to the engine. So its the supply. The purple hose on the 86 just goes to the vent switch. On the 87, it splits. One goes to the vent switch, one goes to the vac switch for the valve. Simple....
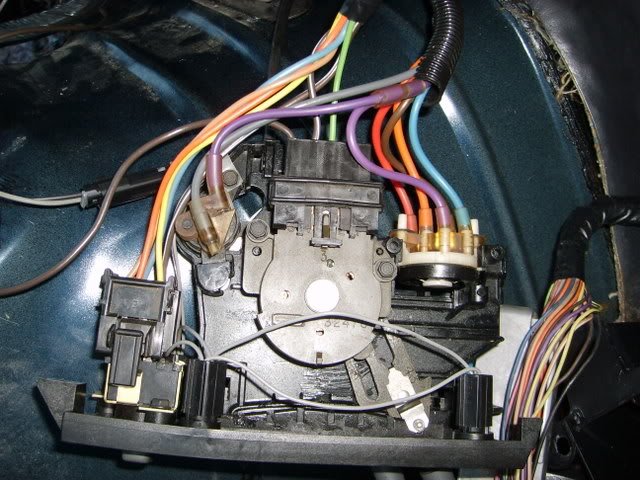
The finished product.
Here is the simplified power hook up. I sort of made it stand alone since I removed most of the 3rd gen wiring. It still works 100% like factory though.
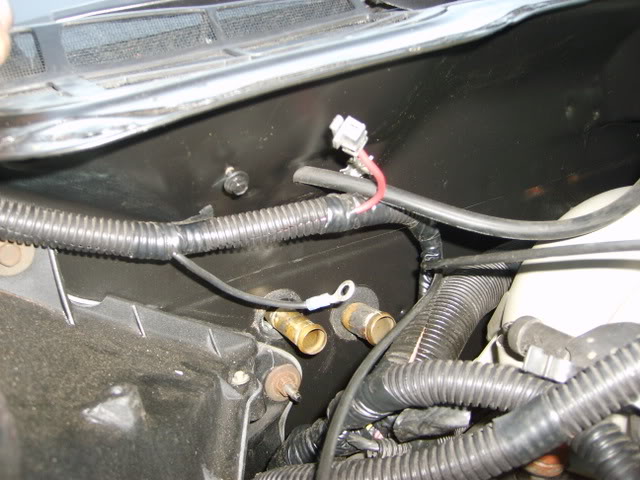
And here are my connections at the box. I got them cleaned up alittle. Things are alittle more tucked in now. The light green wire is my A/C request wire. That goes down through the fender along with the white and blue plugs to the PCM.
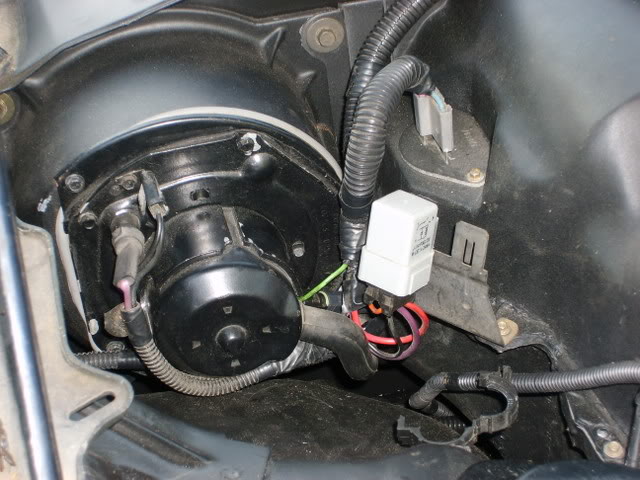
Just a shot of the inside... That rubber boot all the way at the top of the pic is the harness for the HVAC stuff. Hoses and wires go through there. Its not fun getting things in and out of there...Especially with the motor in.
Thats it guys. Today will be more work. Not sure what Im going to do. I want to tear into the dash soon so I can get the steering column back in. I gotta remove the seats and all from the 87 too. So I can start taking that thing apart. We'll see. Ide like to get suspension put back on too so I can set it on its wheels again.
J.
I want to run a heater control valve this time around. However the 86 didnt have a heater control valve. So I had to figure out how get the valve to operate. My solution was to just move all of the 87's stuff over. Also, my 87's wiring was already modified for the 4th gen a/c, as well as power/ground hook ups.
Learned alittle bit about the HVAC system in the process. I started a thread about it...so Ill just link to it, and just post a couple pictures in here. There are more pictures over in this thread.
https://www.thirdgen.org/forums/tech...ml#post3819274
To sum it up...I ended up swapping in the wiring harness, the vaccuum harness, and a vac switch from the 87 controls. Wasnt too bad. Just routing the wiring and hoses took some time.
Couple pics...
The 86's HVAC controls.
87's controls. Notice that vac switch in the upper left hand corner. Thats what operates the heater control valve. The purple hose is what connects to the hard line that goes to the engine. So its the supply. The purple hose on the 86 just goes to the vent switch. On the 87, it splits. One goes to the vent switch, one goes to the vac switch for the valve. Simple....
The finished product.
Here is the simplified power hook up. I sort of made it stand alone since I removed most of the 3rd gen wiring. It still works 100% like factory though.
And here are my connections at the box. I got them cleaned up alittle. Things are alittle more tucked in now. The light green wire is my A/C request wire. That goes down through the fender along with the white and blue plugs to the PCM.
Just a shot of the inside... That rubber boot all the way at the top of the pic is the harness for the HVAC stuff. Hoses and wires go through there. Its not fun getting things in and out of there...Especially with the motor in.
Thats it guys. Today will be more work. Not sure what Im going to do. I want to tear into the dash soon so I can get the steering column back in. I gotta remove the seats and all from the 87 too. So I can start taking that thing apart. We'll see. Ide like to get suspension put back on too so I can set it on its wheels again.
J.
Last edited by ghettocruiser; 07-11-2008 at 10:40 AM.
07-14-2008, 12:33 PM
#190
Re: Here we go again. Swap #2 has begun. LOTS of pics...
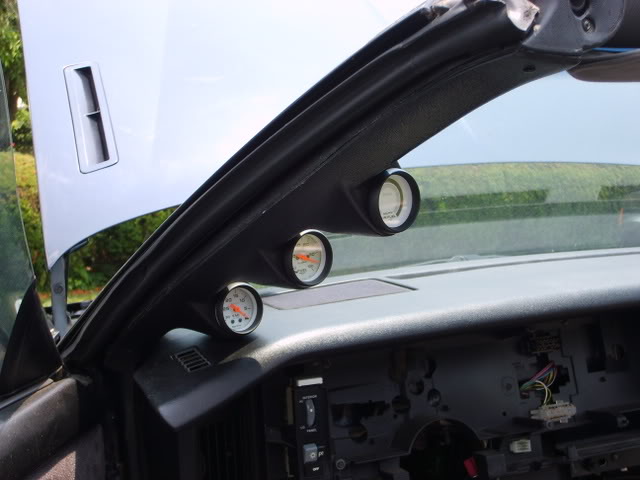
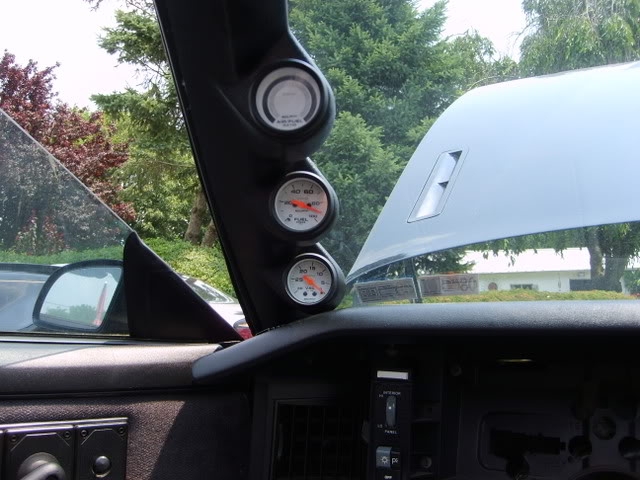
Just a couple pics of what I got done saturday. I pulled apart more of the dash on the 86, and got most of my custom gauge junk out of the 87. Man...I have to re-think/re-work my wiring for those gauges. I want to build in one big connector so I can unhook and remove the gauges without pulling out ALL of the wiring. That is such a royal pain in the butt.
Anyway. I got the pillar pod out of the 87, and installed in the 86. Got some of that wiring cleaned up. I just need to splice in the gauge lighting wires, and the turn signal/high beam wires for the cluster, and the gauges can go in. AT that point, my steering column can go back in...and hopefully I can start test my circuits to make sure its all working. (cranking, delay wiper conversion, headlights, etc etc).
One weird thing... I thought I read that 86's were cable driven speedo? My car definetly is not. I could be mistaken...or it could be that some were cable and some were elec. But I fully intended to see a cable when I dove into this car.
Anyway...just a few pics.
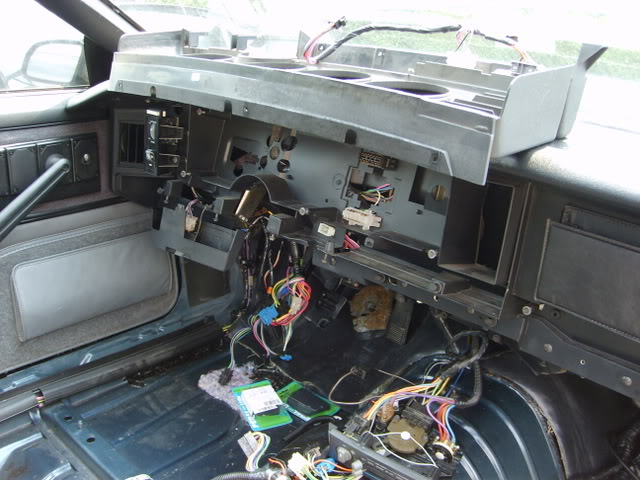
Not pictured...but I cut the reliefs in the dash shell for the extra wiring and all. I said it before...but boy is it nice to have an unmolested car. All the hardware is correct, and in the right spot. Haha...sounds dumb, but its the little things like that that I appreciate about this car.
J.
Anyway. I got the pillar pod out of the 87, and installed in the 86. Got some of that wiring cleaned up. I just need to splice in the gauge lighting wires, and the turn signal/high beam wires for the cluster, and the gauges can go in. AT that point, my steering column can go back in...and hopefully I can start test my circuits to make sure its all working. (cranking, delay wiper conversion, headlights, etc etc).
One weird thing... I thought I read that 86's were cable driven speedo? My car definetly is not. I could be mistaken...or it could be that some were cable and some were elec. But I fully intended to see a cable when I dove into this car.
Anyway...just a few pics.
Not pictured...but I cut the reliefs in the dash shell for the extra wiring and all. I said it before...but boy is it nice to have an unmolested car. All the hardware is correct, and in the right spot. Haha...sounds dumb, but its the little things like that that I appreciate about this car.
J.
07-14-2008, 02:17 PM
#191
Supreme Member
Join Date: Apr 2002
Location: New Jersey
Posts: 3,552
Likes: 0
Received 5 Likes
on
5 Posts
Car: 86 Corvette, 89 IROC, 1999 TA
Engine: 350, 350, LS1
Transmission: 700r4, 700r4, T-56
Axle/Gears: 3.07, 373, 4.10
Re: Here we go again. Swap #2 has begun. LOTS of pics...
the gauges look really cool, your fuel pressure is pretty high though.. 
07-14-2008, 03:01 PM
#192
Re: Here we go again. Swap #2 has begun. LOTS of pics...
Haha I didnt even notice that. Guess it got bumped around. The A/F gauge wont be hooked up. Mostly because narrow band sucks. Its not worth me hooking it up, so it will work as a place holder until I get my wideband gauge.
I wanted to pick it up last month, because autometer was doing $50 cash back on certain gauges. But I couldnt swing it with the move and all that.
J.
I wanted to pick it up last month, because autometer was doing $50 cash back on certain gauges. But I couldnt swing it with the move and all that.
J.
07-15-2008, 05:25 PM
#193
Supreme Member
iTrader: (1)
Join Date: Jun 2006
Location: Guelph, Ontario
Posts: 1,067
Likes: 0
Received 0 Likes
on
0 Posts
Car: 89 IROC/05 RX8
Engine: LS1/LS1
Transmission: T56/T56
Axle/Gears: 3.42 GM/3.55 8.8
Re: Here we go again. Swap #2 has begun. LOTS of pics...
LMK if your gonna sell that narrow band, ill take it
07-15-2008, 08:47 PM
#194
Re: Here we go again. Swap #2 has begun. LOTS of pics...
Sheldon... Its def getting sold. The only thing is I dont know when. Im using it as a place holder right now. Just dont feel like looking at a big empty hole. But Ill let you know first before I advertise when Im ready to ditch it. Probably wont be too long... Maybe Ill pick up a blank for it in the meantime. Ill let ya know.
Got alittle work done tonight. Dash is officially gauged. I have most of the wires in place and somewhat hooked up. Just need to run a few out to the engine bay, and hook some things up inside. My plan was to get the steering column back in, and test some circuits, but ran into a snag. Im installing delay wipers in the 86 using the 87 parts. I would just use the 87 column, but one of the three tilt screws is rattling around inside. So, since I need to take it all the way apart anyway, I figured Ide just pull the wiper switch out and put it in the other column...which is tighter and nicer anyway.
Some pics...
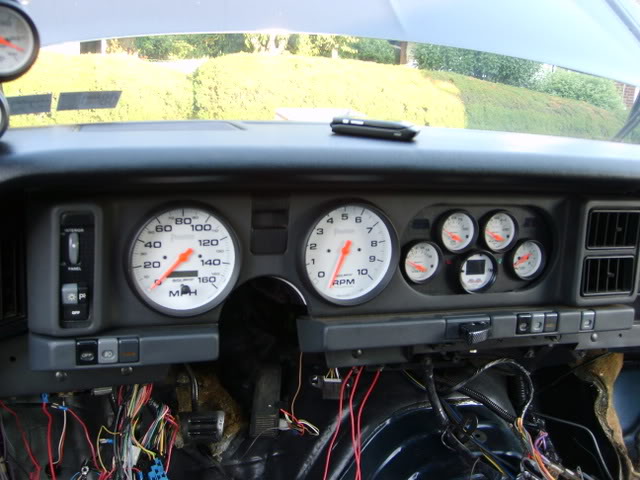

Looks like a mess huh? Thats pretty much my gauge wiring. Some goes out to the engine, some of those are power wires that go to a fuse block, some are grounds, some go to the PCM...Its not bad once they are all routed. But getting them routed and taking them back out is a pain. Ill figure something out later...I just want the car done.
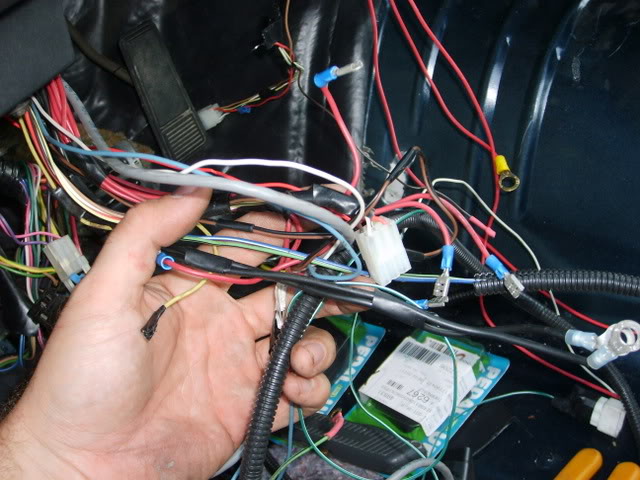
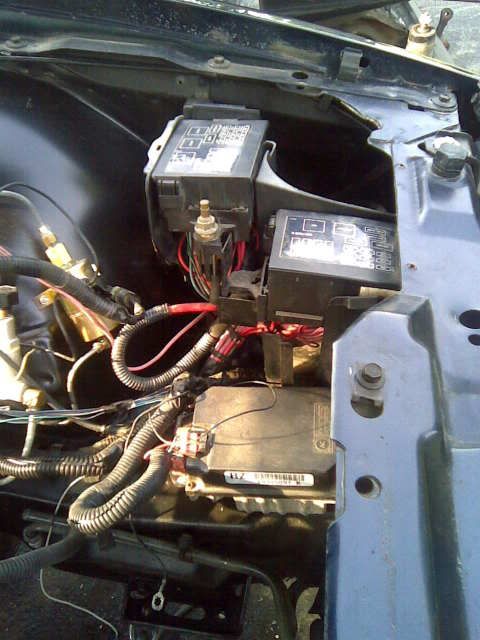
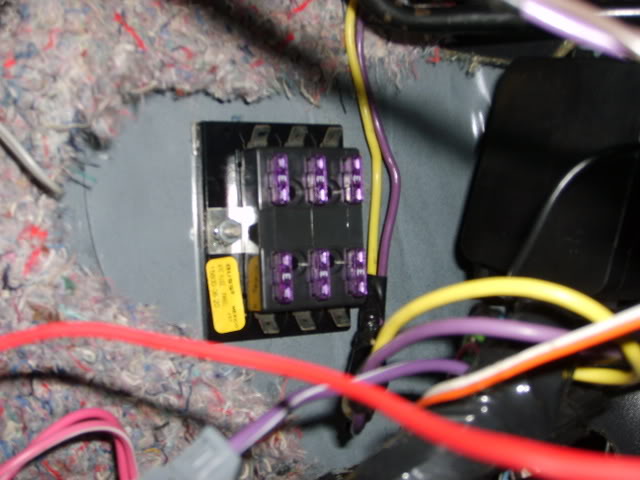
Someone once asked me how I powered/grounded my gauges. I always explain how I fuse each one to be safe and per autometer's advice. But I dont think I ever showed the fuse block I use and where its at... So here it is. For reference, that black plastic cover on the right of the pic is the inside side of the bulk head connector.
Getting there... Once the column is in, I can do the steering shaft. Then Ill probably move on to finishing the underhood wiring, and moving on to front suspension. Hopefully gonna crank her over soonish to make sure my wiring is going to work.
J.
Got alittle work done tonight. Dash is officially gauged. I have most of the wires in place and somewhat hooked up. Just need to run a few out to the engine bay, and hook some things up inside. My plan was to get the steering column back in, and test some circuits, but ran into a snag. Im installing delay wipers in the 86 using the 87 parts. I would just use the 87 column, but one of the three tilt screws is rattling around inside. So, since I need to take it all the way apart anyway, I figured Ide just pull the wiper switch out and put it in the other column...which is tighter and nicer anyway.
Some pics...
Looks like a mess huh? Thats pretty much my gauge wiring. Some goes out to the engine, some of those are power wires that go to a fuse block, some are grounds, some go to the PCM...Its not bad once they are all routed. But getting them routed and taking them back out is a pain. Ill figure something out later...I just want the car done.
Someone once asked me how I powered/grounded my gauges. I always explain how I fuse each one to be safe and per autometer's advice. But I dont think I ever showed the fuse block I use and where its at... So here it is. For reference, that black plastic cover on the right of the pic is the inside side of the bulk head connector.
Getting there... Once the column is in, I can do the steering shaft. Then Ill probably move on to finishing the underhood wiring, and moving on to front suspension. Hopefully gonna crank her over soonish to make sure my wiring is going to work.
J.
Last edited by ghettocruiser; 07-15-2008 at 08:50 PM.
07-16-2008, 02:46 PM
#195
Re: Here we go again. Swap #2 has begun. LOTS of pics...
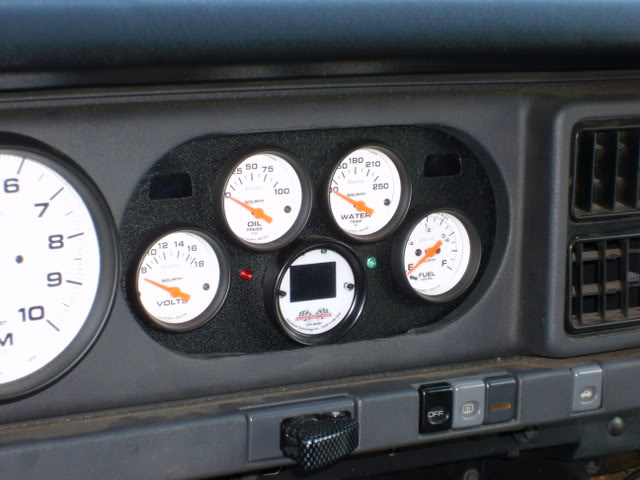
Looking good. I really like your gauge layout, the stock one always bothered me that it took up half the dash for just 6 gauges. Did you take pictures of the redesign (for the secondary gauges) or was that something that was already done? Also, does the autometer gas gauge have the ability to compensate for different ohm ranges? I have the tank and sender off a 2000T/A so it's something like 30-120 ohm instead of 0-90 like the 3rd gens.
Keep up the good work, you're making us all jealous.
Keep up the good work, you're making us all jealous.
07-16-2008, 04:02 PM
#196
Supreme Member
Join Date: Sep 2005
Location: Ottawa, ONT
Posts: 1,951
Likes: 0
Received 7 Likes
on
7 Posts
Car: 1987 Firebird
Engine: 355
Transmission: T56
Re: Here we go again. Swap #2 has begun. LOTS of pics...
Dont say stuff like that!!! You cant redo a whole frikin car, and skimp out on a job like this! You sound like me (who has been saying we're painting the bird THIS saturday, for 4 saturdays......)
Take your time, do it right. Atleast clean it up a little so you can come back and "pretty" it up later, but it should work right.
I think he did this a while ago, and im pretty sure theres a thread about it.
Take your time, do it right. Atleast clean it up a little so you can come back and "pretty" it up later, but it should work right.
I think he did this a while ago, and im pretty sure theres a thread about it.
07-16-2008, 10:50 PM
#197
Re: Here we go again. Swap #2 has begun. LOTS of pics...
Dont worry... Im not really "skimping" on anything. It will still go back together the way it was in the 87. Which wasnt terrible. I can add a bulkhead for the gauges anytime... But I have to order a plug to accomodate all those wires and the different gauges. So that would just set me back at this point for something that isnt really needed.
And yes...I did do a thread on the gauges. The set up is just like it was in the 87... I just moved everything over to the 86. If anyone has any questions about it...just PM me or post. Ill dig up the old thread or answer any questions.
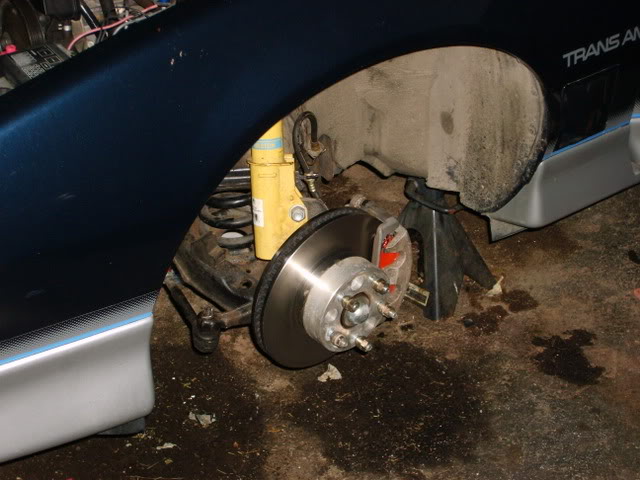
Got some work done tonight. Took care of some little things like O2 sensors, zip tying some wires yadda yadda. Got the front suspension back in. Also managed to get the brakes and wheel spacers installed before dark. Wanted to put the front tires on, but figured why push it.
Here are a couple pics... Not a whole lot to show here.
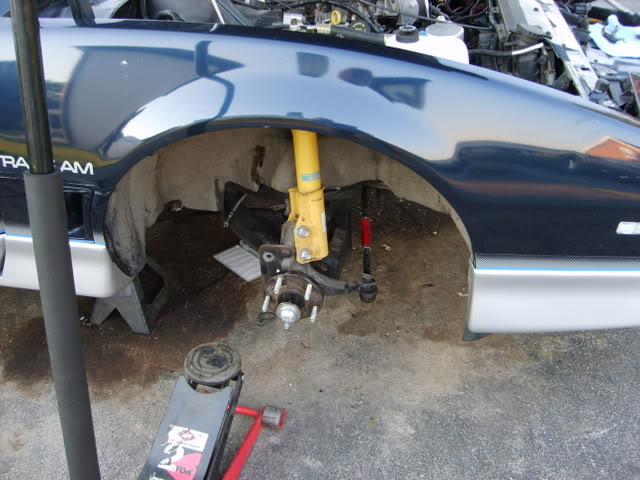
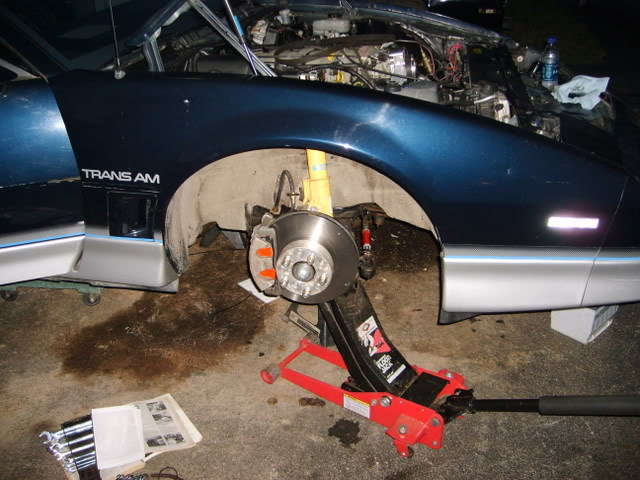
Just a random shot. Im going to clean up that center link and a few other spots and re-paint. I never painted some of it, thats why it rusted over. No biggie, its not like anyone sees under there anyway.
Thats it for now. Tomorrow Im taking a break. Hopefully hitting it hard again friday. I like making big progress...
J.
And yes...I did do a thread on the gauges. The set up is just like it was in the 87... I just moved everything over to the 86. If anyone has any questions about it...just PM me or post. Ill dig up the old thread or answer any questions.
Got some work done tonight. Took care of some little things like O2 sensors, zip tying some wires yadda yadda. Got the front suspension back in. Also managed to get the brakes and wheel spacers installed before dark. Wanted to put the front tires on, but figured why push it.
Here are a couple pics... Not a whole lot to show here.
Just a random shot. Im going to clean up that center link and a few other spots and re-paint. I never painted some of it, thats why it rusted over. No biggie, its not like anyone sees under there anyway.
Thats it for now. Tomorrow Im taking a break. Hopefully hitting it hard again friday. I like making big progress...
J.
07-17-2008, 10:44 AM
#198
Supreme Member
Join Date: Jan 2001
Location: Pittsburgh, PA
Posts: 1,374
Likes: 0
Received 1 Like
on
1 Post
Car: 06 SRM M6 GTO, 98 Grand Prix GTP
Re: Here we go again. Swap #2 has begun. LOTS of pics...
dont you hate when that happens. I installed all new steering parts not too long ago, and like 3 days later they were bright orange like that. Curses!
07-17-2008, 03:00 PM
#199
Supreme Member
Join Date: Sep 2005
Location: Ottawa, ONT
Posts: 1,951
Likes: 0
Received 7 Likes
on
7 Posts
Car: 1987 Firebird
Engine: 355
Transmission: T56
Re: Here we go again. Swap #2 has begun. LOTS of pics...
Its hard to remember to take a pic as you progress. I had a hard time with that while doing y T56 swap, i kept going too far ahead, and didnt want to stop. So nice job keeping up with the pix, and actually updating the thread, i know it takes up alot of time!
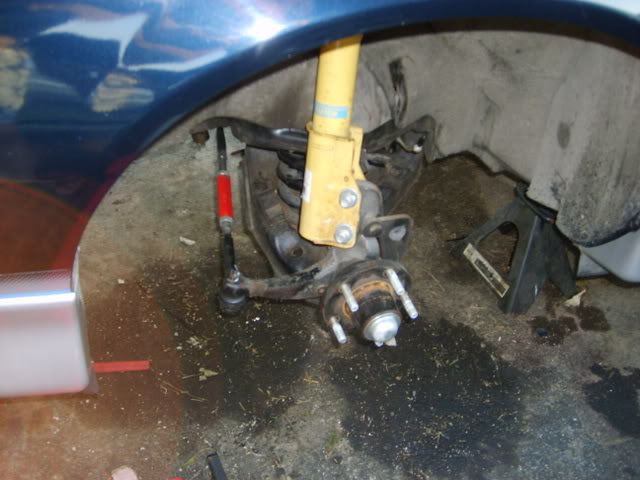
I see you have dual piston calipers, what kind of brakes?
I see you have dual piston calipers, what kind of brakes?
07-17-2008, 03:12 PM
#200
Re: Here we go again. Swap #2 has begun. LOTS of pics...
Yeah installing that stuff sort of went fast. And my hands were so greasy from the tie rod grease and all that I just didnt stop. I was on a roll. Plus its all basic thirdgen stuff for suspension. Nothing special.
Those are LS1 front brakes. Im running LS1 front disc, rear disc, booster, master cylinder, SJM line lock, and a wilwood adjustable valve for the rears... GREAT set up in my opinion. More than enough stopping power, and Im sure if I used something other than stock rotors and pads it would feel even better.
Ill have to do some braking vids to go along with my taking off vids. My G-Tech measures stopping G's I think... I should see what it can pull, because I know the seat belts hurt if I really get on the binders...without locking em up.
J.