first engine swap- LT1/T56
 01-11-2010, 11:57 PM
#151
Member
iTrader: (1)

Join Date: Nov 2008
Location: Lynchburg, VA
Posts: 109
Likes: 0
Received 0 Likes
on
0 Posts
Car: 92 RS
Engine: 305 TBI
Transmission: T-5
Axle/Gears: 4th Gen/3.23/Posi
Re: first engine swap- LT1/T56
Stick a new posi and gears in yours and call it a day
4th gens use the same housing, just slightly longer axle tubes. Ratios are comparable, but with the availability of good aftermarket, why bother
Nab a new yoke of any GM rearend of comparable year. V6 or S10's should also work fine
4th gens use the same housing, just slightly longer axle tubes. Ratios are comparable, but with the availability of good aftermarket, why bother
Nab a new yoke of any GM rearend of comparable year. V6 or S10's should also work fine
Search on here and you'll find all the info about doing the actual swap. There's even a guy who makes conversion cables for the e-brake, but I made mine work 100% with using the stock 4th gen cables. No welding... nothing.
Gears, posi, disks, etc... will def. set you back more than $100... so it's all kind of a matter of what deals you find and how sure you are that the piece you're getting is in good shape. I think that $100 was pretty well spent for me. Held me over till I can get a much stouter rear back there.
Your tires will rub running 3rd gen wheels with a 4th gen axle unless you've got decent travel on a fresh suspension.
Good luck

 01-12-2010, 11:36 AM
#152
Member

Join Date: Sep 2007
Location: Bastrop, Tx
Posts: 322
Likes: 0
Received 1 Like
on
1 Post
Car: 87 Iroc-Z
Engine: 305 tpi
Transmission: 700-r4
Axle/Gears: 3.42
Re: first engine swap- LT1/T56
Pros to the fourth gen rear is that theyre easy to come by and are newer, more likely to be in better condition, and usually have a good ratio 3.23 3.42. The cons to them would be that you will need custom e-brake cables. I couldnt find any that fit except for Eb Miller's. And the personal preference part is that they make stock wheels stick out more. They sit at about perfectly flush with the lip. I cant decide if I like it or not, you should mock your wheels up and see how you like it before you buy one
01-12-2010, 11:43 AM
#153
Supreme Member

iTrader: (34)
Join Date: Jul 2002
Location: Stamford, New York
Posts: 1,983
Likes: 0
Received 6 Likes
on
3 Posts
Car: 80 SE/TTA;88 T/A GTA;86 T/A
Engine: 4.9L Turbo; LT1; empty
Transmission: TH350; T56; empty
Axle/Gears: 3:23 disk; 4:10 disk ; 3.42 disk
Re: first engine swap- LT1/T56
I modified the 4th gen balancer bracket for the e-brake cables so i can run factory 4th gen e-brake cables at a fraction of the cost of the 3rd gen kit, and the balancer is fully functional and adjustable and everything. 4th gen axles aren't bad, but to confirm, without my air shocks my 245s on '88 formula wheels do rub. I got a set of 91/92 camaro wheels with 235s on them i'm going to try and see if they are any better with being a little less wide.
01-12-2010, 03:09 PM
#154
Member
Thread Starter
iTrader: (5)
Join Date: May 2009
Location: Washington D.C.
Posts: 496
Likes: 0
Received 0 Likes
on
0 Posts
Car: 1985 Z28
Engine: LT1
Transmission: T56
Axle/Gears: fourth gen 3.42
Re: first engine swap- LT1/T56
guess ill keep my eye out for one and if i get a good price then ill grab it and look for some vette wheels later on.
today i pulled what i think is the speedo cable from the tail of the transmission and drained more fluid, and removed the bolt through the trans. mount. just gotta get the shifter off and then put the car back on the ground.
today i pulled what i think is the speedo cable from the tail of the transmission and drained more fluid, and removed the bolt through the trans. mount. just gotta get the shifter off and then put the car back on the ground.
01-12-2010, 03:26 PM
#155
Member
iTrader: (1)
Join Date: Nov 2008
Location: Lynchburg, VA
Posts: 109
Likes: 0
Received 0 Likes
on
0 Posts
Car: 92 RS
Engine: 305 TBI
Transmission: T-5
Axle/Gears: 4th Gen/3.23/Posi
Re: first engine swap- LT1/T56
I'll confirm this once more since there's always conflicting info about this - you can use ALL 3rd gen e-brake balancer components with 4th gen e-brake cables. I've done it. Just running all from memory, I re-routed the way the cables ran around the axle, ran the cable guides through the portion that the 3rd gen guides would usually clip to (3rd gen has longer exposed cable length). There was then a bracket in the tunnel that i fastened the end of the 4th gen guides to with some clamps. It's worked perfectly for me for 6 months.
If I wasn't so busy, I'd do a quick tech writeup for this. There's always conflicting info and tons of people say you need to use a 4th gen balancer or conversion cables, but I've been running without either for months... using the e brake every day... working 100%.
If I wasn't so busy, I'd do a quick tech writeup for this. There's always conflicting info and tons of people say you need to use a 4th gen balancer or conversion cables, but I've been running without either for months... using the e brake every day... working 100%.
01-12-2010, 06:02 PM
#156
Member
Thread Starter
iTrader: (5)
Join Date: May 2009
Location: Washington D.C.
Posts: 496
Likes: 0
Received 0 Likes
on
0 Posts
Car: 1985 Z28
Engine: LT1
Transmission: T56
Axle/Gears: fourth gen 3.42
Re: first engine swap- LT1/T56
alright so besides watching the classifieds now for a rear end, i was reading up on the fuel level sender problem for my plastic ls1 tank since it feeds a 40-250 ohm range empty to full, and thirdgen gauges read 0-90. a new sender for the proper range is 100 bucks, and i dont feel like doing the radio shack mod, so heres what im planning on doing-
i am going to leave the tank sealed up like it is now with the regulator removed but the stock sender, wire it in, and then up under the dash mount an Arduino microcontroller (about 30 dollars, i have a bunch from robotics) with its own 12v power that will scale the ls1 sender to 0-90. This should give me an accurate reading and save me a good chunk of change. If i get a simple schematic and code for the controller i will post it up in case somebody else feels inclined. I was also considering running sequential turn signals and other stuff through the arduino, but thats all extra once im done.
i am going to leave the tank sealed up like it is now with the regulator removed but the stock sender, wire it in, and then up under the dash mount an Arduino microcontroller (about 30 dollars, i have a bunch from robotics) with its own 12v power that will scale the ls1 sender to 0-90. This should give me an accurate reading and save me a good chunk of change. If i get a simple schematic and code for the controller i will post it up in case somebody else feels inclined. I was also considering running sequential turn signals and other stuff through the arduino, but thats all extra once im done.
01-13-2010, 07:01 PM
#157
Member
Thread Starter
iTrader: (5)
Join Date: May 2009
Location: Washington D.C.
Posts: 496
Likes: 0
Received 0 Likes
on
0 Posts
Car: 1985 Z28
Engine: LT1
Transmission: T56
Axle/Gears: fourth gen 3.42
Re: first engine swap- LT1/T56
started removing the interior, pushed the shift cable and grommet through so the transmission is ready to come out. i started chaining up the motor and tranny, so the pull will happen by the end of the week.

in other news, pocket has convinced me not to use the plastic ls1 tank- instead its for sale in the classifieds: i am taking the pump out and installing it into a thirdgen sender and retaining my stock tank to make less work for myself in modifications and fuel lines.
in other news, pocket has convinced me not to use the plastic ls1 tank- instead its for sale in the classifieds: i am taking the pump out and installing it into a thirdgen sender and retaining my stock tank to make less work for myself in modifications and fuel lines.
01-14-2010, 04:14 PM
#158
Member
Thread Starter
iTrader: (5)
Join Date: May 2009
Location: Washington D.C.
Posts: 496
Likes: 0
Received 0 Likes
on
0 Posts
Car: 1985 Z28
Engine: LT1
Transmission: T56
Axle/Gears: fourth gen 3.42
Re: first engine swap- LT1/T56
did some miscellaneous stuff today - pulled the cruise control wiring out entirely, disconnected the rest of the stuff from the auto shifter except this one cable that i dont recognize- there was one to the trans. through the tunnel, then the wiring clip, then this:

what is it? it disappears into the depths of my console.
i also cleaned up my blower motor and resistor pack so i can get my firewall cleaned up after paint (which i am now doing black after the motor is out)

also removed the ls1 fuel pump from the plastic tank for re-use.

what is it? it disappears into the depths of my console.
i also cleaned up my blower motor and resistor pack so i can get my firewall cleaned up after paint (which i am now doing black after the motor is out)
also removed the ls1 fuel pump from the plastic tank for re-use.
01-14-2010, 06:00 PM
#159
Supreme Member
iTrader: (24)
Join Date: Jun 2005
Location: NC
Posts: 7,899
Likes: 0
Received 90 Likes
on
54 Posts
Car: 92 Firebird
Engine: Supercharged 6.0
Transmission: T56
Axle/Gears: 8.8 3.73
Re: first engine swap- LT1/T56
Looking good
The cable goes to the column. It prevents you from pulling it out of park unless the key is on
That blower box is flippin sweet
Pulling the pump wasnt so bad was it?
The cable goes to the column. It prevents you from pulling it out of park unless the key is on
That blower box is flippin sweet
Pulling the pump wasnt so bad was it?
01-14-2010, 06:16 PM
#160
Member
Thread Starter
iTrader: (5)
Join Date: May 2009
Location: Washington D.C.
Posts: 496
Likes: 0
Received 0 Likes
on
0 Posts
Car: 1985 Z28
Engine: LT1
Transmission: T56
Axle/Gears: fourth gen 3.42
Re: first engine swap- LT1/T56
no it was easy- i had already had the sender apart before, im always just nervous with the unknown- this is an expensive hobby :P i just snipped the two fuel lines off the pump and left the electrical unplugged, im assuming that will be ok. I also pulled it out of the rubber sleeve and left that in.
can i remove that cable entirely from the shifter and column?
also im going to have to cut the nipple for the condensation hose/vent tube and screw it in to the new box as well.
can i remove that cable entirely from the shifter and column?
also im going to have to cut the nipple for the condensation hose/vent tube and screw it in to the new box as well.
Last edited by kthxbai; 01-14-2010 at 06:25 PM.
01-14-2010, 08:19 PM
#161
Supreme Member
iTrader: (24)
Join Date: Jun 2005
Location: NC
Posts: 7,899
Likes: 0
Received 90 Likes
on
54 Posts
Car: 92 Firebird
Engine: Supercharged 6.0
Transmission: T56
Axle/Gears: 8.8 3.73
Re: first engine swap- LT1/T56
You wont need it for your T56, so yes
Drop the column and pull the switch off. Id suggest putting a shred of cloth under the rod with a piece of tape to keep it from rattling
Drop the column and pull the switch off. Id suggest putting a shred of cloth under the rod with a piece of tape to keep it from rattling
01-14-2010, 10:39 PM
#162
Member
Thread Starter
iTrader: (5)
Join Date: May 2009
Location: Washington D.C.
Posts: 496
Likes: 0
Received 0 Likes
on
0 Posts
Car: 1985 Z28
Engine: LT1
Transmission: T56
Axle/Gears: fourth gen 3.42
Re: first engine swap- LT1/T56
ok perfect.
tomorrow im planning on taking the motor out- everything should be free and i started chaining it up. if it doesnt come out by the end of the day im going to be really disappointed. its going to take a few days of my lab time to clean up the bay and then paint, so i want to get going as soon as i can, plus i have to install the front end steering rebuild kit i have. (my big question there is adjusting everything properly, like the tie rod adjusters, how do i know where to adjust them to haha, and also installing ball joints...?)
anyhow, everything still seems to be in order. i bought paint tonight for the bay, im going to spray the blower motor before i screw it down to the box to clean it up.
01-15-2010, 06:30 AM
#163
Supreme Member
iTrader: (24)
Join Date: Jun 2005
Location: NC
Posts: 7,899
Likes: 0
Received 90 Likes
on
54 Posts
Car: 92 Firebird
Engine: Supercharged 6.0
Transmission: T56
Axle/Gears: 8.8 3.73
Re: first engine swap- LT1/T56
Ball joints are pressed in, borrow the tool from advance auto
You cannot adjust the steering components correctly without an alignment machine. Eyeball it semi strait and drive it directly to a tire shop for a front end alignment
You cannot adjust the steering components correctly without an alignment machine. Eyeball it semi strait and drive it directly to a tire shop for a front end alignment
01-15-2010, 10:12 PM
#164
Member
Thread Starter
iTrader: (5)
Join Date: May 2009
Location: Washington D.C.
Posts: 496
Likes: 0
Received 0 Likes
on
0 Posts
Car: 1985 Z28
Engine: LT1
Transmission: T56
Axle/Gears: fourth gen 3.42
Re: first engine swap- LT1/T56
well today was interesting...
during my lab time i chained up the motor under the bellhousing, then to a lift point on the front of the intake. Everything was disconnected and ready to go, but when tension was put on the chains the whole car came up with it. After a whole lot of shinnanigans with the transmission and a TON of lost fluid on the ground (i know, you guys warned me), it finally started to slip out. It pinched against the exhaust and got stuck on the oil filter, but overall the pull took about 15 minutes once we got it moving. Now on to pics:

my teacher helping me out

me being silly

the old drivetrain

the bay now!
my fuel line stuff also arrived from Jegs today, minus a few fittings that are on backorder.
during my lab time i chained up the motor under the bellhousing, then to a lift point on the front of the intake. Everything was disconnected and ready to go, but when tension was put on the chains the whole car came up with it. After a whole lot of shinnanigans with the transmission and a TON of lost fluid on the ground (i know, you guys warned me), it finally started to slip out. It pinched against the exhaust and got stuck on the oil filter, but overall the pull took about 15 minutes once we got it moving. Now on to pics:
my teacher helping me out
me being silly
the old drivetrain
the bay now!
my fuel line stuff also arrived from Jegs today, minus a few fittings that are on backorder.
Last edited by kthxbai; 01-15-2010 at 11:03 PM.
01-15-2010, 11:21 PM
#165
Senior Member
iTrader: (5)
Join Date: Dec 2006
Location: Augusta, Ga
Posts: 2,212
Likes: 0
Received 0 Likes
on
0 Posts
Car: 1987 Trans Am
Engine: 355ci L98 soon to be turbo'd
Transmission: 700R4
Axle/Gears: 2.73 posi
Re: first engine swap- LT1/T56
looking good man! I'm about to do the same, except the tranny. Its staying in. Can you do me a favor and tell me how many bolts are on the bell housing? Connected to the tranny? I plan to disconnect the tranny from the engine and then slipping it out. I think now that the engine is out, you should get a sponge and bucket and clean around in there...maybe rattle can some of it...keep us updated!
 01-16-2010, 10:02 AM
#167
Senior Member
iTrader: (4)
Join Date: Nov 2007
Location: Mechanicsville Virginia
Posts: 715
Likes: 0
Received 0 Likes
on
0 Posts
Car: 1989 Turbo Trans Am gta
Engine: 383 78mm turbo
Transmission: Th350 rmvb with brake
Axle/Gears: 9 bolt 3.45s
Re: first engine swap- LT1/T56
looking good man! I'm about to do the same, except the tranny. Its staying in. Can you do me a favor and tell me how many bolts are on the bell housing? Connected to the tranny? I plan to disconnect the tranny from the engine and then slipping it out. I think now that the engine is out, you should get a sponge and bucket and clean around in there...maybe rattle can some of it...keep us updated!
01-18-2010, 10:51 PM
#169
Member
Thread Starter
iTrader: (5)
Join Date: May 2009
Location: Washington D.C.
Posts: 496
Likes: 0
Received 0 Likes
on
0 Posts
Car: 1985 Z28
Engine: LT1
Transmission: T56
Axle/Gears: fourth gen 3.42
Re: first engine swap- LT1/T56
so i got a few rattle cans of black engine bay paint in today, still waiting on two back-ordered fuel rail adapters from jegs for the fuel lines. In the meantime i am going to clean out the bay and start my paint prep, as well as install my spohn front end steering kit.
a friend mentioned using aircraft paint remover instead of sanding the bay, then priming the bare metal, then painting- sounds easier than sanding to me. any reason not to?
~Steven
a friend mentioned using aircraft paint remover instead of sanding the bay, then priming the bare metal, then painting- sounds easier than sanding to me. any reason not to?
~Steven
01-19-2010, 12:07 PM
#170
Member
iTrader: (1)
Join Date: Aug 2007
Location: Leicester,Ma.
Posts: 483
Likes: 0
Received 0 Likes
on
0 Posts
Car: 1988 TA
Engine: TPI 350
Transmission: auto
Axle/Gears: 3.27's
Re: first engine swap- LT1/T56
no if it will strip it all off then go for it...where did you get your AC delete box for the firewall? it looks aftermarket and im jealous lol
01-19-2010, 12:09 PM
#171
Member
iTrader: (1)
Join Date: Aug 2007
Location: Leicester,Ma.
Posts: 483
Likes: 0
Received 0 Likes
on
0 Posts
Car: 1988 TA
Engine: TPI 350
Transmission: auto
Axle/Gears: 3.27's
Re: first engine swap- LT1/T56
HCR13 i believe the auto trans bell housing has 6 bolts holding it to the motor...2 at the top being the hardest.
01-19-2010, 04:37 PM
#172
Member
Thread Starter
iTrader: (5)
Join Date: May 2009
Location: Washington D.C.
Posts: 496
Likes: 0
Received 0 Likes
on
0 Posts
Car: 1985 Z28
Engine: LT1
Transmission: T56
Axle/Gears: fourth gen 3.42
Re: first engine swap- LT1/T56
the heater box is from acdelete.com
it was pricey, but i got it as a birthday present. it is really a nice piece, but you have to drill/cut mounting holes for whatever you need yourself. It is dimpled for the stock screw locations, but if you want your resistor pack etc. and the condensation vent...
it was pricey, but i got it as a birthday present. it is really a nice piece, but you have to drill/cut mounting holes for whatever you need yourself. It is dimpled for the stock screw locations, but if you want your resistor pack etc. and the condensation vent...
01-20-2010, 01:44 PM
#173
Member
iTrader: (1)
Join Date: Aug 2007
Location: Leicester,Ma.
Posts: 483
Likes: 0
Received 0 Likes
on
0 Posts
Car: 1988 TA
Engine: TPI 350
Transmission: auto
Axle/Gears: 3.27's
Re: first engine swap- LT1/T56
yeah it really is..i have the stock AC delet box but i may go with that one for a cleaner look
01-20-2010, 06:36 PM
#174
Member
Thread Starter
iTrader: (5)
Join Date: May 2009
Location: Washington D.C.
Posts: 496
Likes: 0
Received 0 Likes
on
0 Posts
Car: 1985 Z28
Engine: LT1
Transmission: T56
Axle/Gears: fourth gen 3.42
Re: first engine swap- LT1/T56

started wiping everything down today, and got the exhaust un clipped and ready to be sawzalled to pieces. I am simple greening the layers of grime out of the bay before i start stripping the paint, maybe not necessary, but makes the process smoother in the end.
i cleaned up my lake of transmission fluid, and cut that cable off of my auto shifter on the column near where it terminates.
I also stopped by autozone and got a ball joint seperator as well as a Haynes manual (finally).
01-20-2010, 09:59 PM
#175
Member
Thread Starter
iTrader: (5)
Join Date: May 2009
Location: Washington D.C.
Posts: 496
Likes: 0
Received 0 Likes
on
0 Posts
Car: 1985 Z28
Engine: LT1
Transmission: T56
Axle/Gears: fourth gen 3.42
Re: first engine swap- LT1/T56
actually after reading the paint instructions again- i am not going to strip the entire bay, its too much of a hassle to roll the car outside multiple times. instead im planning on cleaning the whole area thoroughly, then sanding rough areas and priming over rust- then spraying the actual paint over the existing finish.
i loaded up my car with tape, plastic bags, aluminum foil, and newspapers to mask everything off well.
any objections to that process for paint?
final question for the day- what do i do with the cable going into the firewall that was in the tail of the transmission (speedo i believe)? how do i remove it / do i have to pull the cluster yet?
Last edited by kthxbai; 01-20-2010 at 10:16 PM.
01-23-2010, 02:17 PM
#176
Member
Thread Starter
iTrader: (5)
Join Date: May 2009
Location: Washington D.C.
Posts: 496
Likes: 0
Received 0 Likes
on
0 Posts
Car: 1985 Z28
Engine: LT1
Transmission: T56
Axle/Gears: fourth gen 3.42
Re: first engine swap- LT1/T56
I have a few questions regarding motor mounts:

this is how the old ones are currently- are they supposed to be centered on the k member or is that proper?

one of my new motor mounts looks like this... why?

and this is just me scrubbing the bay down more and more- hopefully it will be painted by next weekend.
this is how the old ones are currently- are they supposed to be centered on the k member or is that proper?
one of my new motor mounts looks like this... why?
and this is just me scrubbing the bay down more and more- hopefully it will be painted by next weekend.
01-23-2010, 02:39 PM
#177
Senior Member
iTrader: (7)
Join Date: Dec 2007
Location: Williamstown, NJ
Posts: 618
Likes: 0
Received 0 Likes
on
0 Posts
Car: '98 Mustang GT
Engine: '03 4.6L
Transmission: T45
Axle/Gears: DK
Re: first engine swap- LT1/T56
That looks like a 4th gen motor mount. Use your third gen motor mounts. The old mount on the k-member looks like it is in the right spot.
01-23-2010, 04:20 PM
#178
Supreme Member
iTrader: (24)
Join Date: Jun 2005
Location: NC
Posts: 7,899
Likes: 0
Received 90 Likes
on
54 Posts
Car: 92 Firebird
Engine: Supercharged 6.0
Transmission: T56
Axle/Gears: 8.8 3.73
Re: first engine swap- LT1/T56
Front mount is for the SBC
Youll see 3 holes behind it for the V6 mount
Your new mount isnt correct. Grab the uber common SBC 3rd gen mounts
Youll see 3 holes behind it for the V6 mount
Your new mount isnt correct. Grab the uber common SBC 3rd gen mounts
01-23-2010, 11:48 PM
#179
Member
Thread Starter
iTrader: (5)
Join Date: May 2009
Location: Washington D.C.
Posts: 496
Likes: 0
Received 0 Likes
on
0 Posts
Car: 1985 Z28
Engine: LT1
Transmission: T56
Axle/Gears: fourth gen 3.42
Re: first engine swap- LT1/T56

and so the wiring begins...
i have the whole ecm side of the old harness chopped up- now I need to sort out my c100 wires and get a fuseblock. Then on to the lt1 harness.
01-25-2010, 05:18 PM
#180
Member
Thread Starter
iTrader: (5)
Join Date: May 2009
Location: Washington D.C.
Posts: 496
Likes: 0
Received 0 Likes
on
0 Posts
Car: 1985 Z28
Engine: LT1
Transmission: T56
Axle/Gears: fourth gen 3.42
Re: first engine swap- LT1/T56

pulled this out from under the drivers side battery tray..?

continued my engine bay prep

and got some paint on the blower motor so its at least all one color
01-26-2010, 01:46 AM
#181
01-26-2010, 04:45 PM
#182
Member
Thread Starter
iTrader: (5)
Join Date: May 2009
Location: Washington D.C.
Posts: 496
Likes: 0
Received 0 Likes
on
0 Posts
Car: 1985 Z28
Engine: LT1
Transmission: T56
Axle/Gears: fourth gen 3.42
Re: first engine swap- LT1/T56
vacuum reservoir goes into the glorious trash can.
progress from this evening:

c100 done...
progress from this evening:
c100 done...
Last edited by kthxbai; 01-26-2010 at 09:45 PM.
01-27-2010, 04:51 PM
#183
Member
Thread Starter
iTrader: (5)
Join Date: May 2009
Location: Washington D.C.
Posts: 496
Likes: 0
Received 0 Likes
on
0 Posts
Car: 1985 Z28
Engine: LT1
Transmission: T56
Axle/Gears: fourth gen 3.42
Re: first engine swap- LT1/T56
dropped the y pipe and most of the exhaust today, also got the wiper motor out and moved the sbc clamshell motor mounts onto the lt1. did a bit more taping- the bay is a few hours of work away from paint.


any advice on getting that surface rust off the k member before i prime it up? right now im just going to town on it with a wire brush.
any advice on getting that surface rust off the k member before i prime it up? right now im just going to town on it with a wire brush.
01-27-2010, 09:26 PM
#185
Member
Thread Starter
iTrader: (5)
Join Date: May 2009
Location: Washington D.C.
Posts: 496
Likes: 0
Received 0 Likes
on
0 Posts
Car: 1985 Z28
Engine: LT1
Transmission: T56
Axle/Gears: fourth gen 3.42
Re: first engine swap- LT1/T56
cant believe i didnt think of that- ill take one in to school tomorrow.

here's my evenings work- just need to dremel out a hole for the resistor pack and get some black sealant between everything.
here's my evenings work- just need to dremel out a hole for the resistor pack and get some black sealant between everything.
01-28-2010, 10:42 AM
#187
Senior Member
iTrader: (5)
Join Date: Dec 2006
Location: Augusta, Ga
Posts: 2,212
Likes: 0
Received 0 Likes
on
0 Posts
Car: 1987 Trans Am
Engine: 355ci L98 soon to be turbo'd
Transmission: 700R4
Axle/Gears: 2.73 posi
Re: first engine swap- LT1/T56
what is the heater box from? S-10? I think I'm going to do the same 
01-28-2010, 11:33 AM
#188
Supreme Member
Re: first engine swap- LT1/T56
the heater box is from acdelete.com
it was pricey, but i got it as a birthday present. it is really a nice piece, but you have to drill/cut mounting holes for whatever you need yourself. It is dimpled for the stock screw locations, but if you want your resistor pack etc. and the condensation vent...
it was pricey, but i got it as a birthday present. it is really a nice piece, but you have to drill/cut mounting holes for whatever you need yourself. It is dimpled for the stock screw locations, but if you want your resistor pack etc. and the condensation vent...
01-28-2010, 06:51 PM
#189
Senior Member
iTrader: (5)
Join Date: Dec 2006
Location: Augusta, Ga
Posts: 2,212
Likes: 0
Received 0 Likes
on
0 Posts
Car: 1987 Trans Am
Engine: 355ci L98 soon to be turbo'd
Transmission: 700R4
Axle/Gears: 2.73 posi
Re: first engine swap- LT1/T56
thats right! 
I guess I didn't go back and re-read. Sorry about that...
I guess I didn't go back and re-read. Sorry about that...
01-28-2010, 07:43 PM
#190
Member
Thread Starter
iTrader: (5)
Join Date: May 2009
Location: Washington D.C.
Posts: 496
Likes: 0
Received 0 Likes
on
0 Posts
Car: 1985 Z28
Engine: LT1
Transmission: T56
Axle/Gears: fourth gen 3.42
Re: first engine swap- LT1/T56
yeah i was really scared drilling into it and while i was threading the screws every time i heard the slightest crack i widened it up a tad. i got some black silicon here tonight so im going to go down now and seal it up and add the resistor pack in.
i also got my fuel sender, 4th gen coolant/wiper reservoirs, and a power dist. block today from Jon
i also got my fuel sender, 4th gen coolant/wiper reservoirs, and a power dist. block today from Jon
01-28-2010, 09:17 PM
#191
Member
Thread Starter
iTrader: (5)
Join Date: May 2009
Location: Washington D.C.
Posts: 496
Likes: 0
Received 0 Likes
on
0 Posts
Car: 1985 Z28
Engine: LT1
Transmission: T56
Axle/Gears: fourth gen 3.42
Re: first engine swap- LT1/T56

got the resistors in and everything sealed up- its ready to install.
now back to wiring...
01-29-2010, 12:20 PM
#192
Member
Thread Starter
iTrader: (5)
Join Date: May 2009
Location: Washington D.C.
Posts: 496
Likes: 0
Received 0 Likes
on
0 Posts
Car: 1985 Z28
Engine: LT1
Transmission: T56
Axle/Gears: fourth gen 3.42
Re: first engine swap- LT1/T56

spent all morning with a grinder- took the k member and other problem areas down to bare metal. I also finished masking things off so Monday i am laying down primer.
01-29-2010, 01:39 PM
#193
Supreme Member
iTrader: (8)
Join Date: Feb 2007
Location: Newburg, MD
Posts: 1,091
Likes: 0
Received 18 Likes
on
18 Posts
Car: '89 RS, '89 Iroc
Engine: L03, LB9
Transmission: 700r4, T5
Axle/Gears: 2.73, 3.08
Re: first engine swap- LT1/T56
damn good work, hope to be able to swap an LT1 into my car by summer/end of summer,
but those pics of the old engine + trans in the middle of the class room, if i walked into my old tech school and saw a thirdgen getting an LT1 swap IN my class room, i would **** my pants right there and want to do mine with you hahahaha
but those pics of the old engine + trans in the middle of the class room, if i walked into my old tech school and saw a thirdgen getting an LT1 swap IN my class room, i would **** my pants right there and want to do mine with you hahahaha
01-29-2010, 11:46 PM
#194
Member
Thread Starter
iTrader: (5)
Join Date: May 2009
Location: Washington D.C.
Posts: 496
Likes: 0
Received 0 Likes
on
0 Posts
Car: 1985 Z28
Engine: LT1
Transmission: T56
Axle/Gears: fourth gen 3.42
Re: first engine swap- LT1/T56
thanks for the compliments.
tonight after swimming districts which took forever...

started on the lt1 harness

my fingers are killing me from fighting with the tape and looming, but whatever. Ill really get into it tomorrow hopefully.
tonight after swimming districts which took forever...
started on the lt1 harness
my fingers are killing me from fighting with the tape and looming, but whatever. Ill really get into it tomorrow hopefully.
01-30-2010, 07:21 AM
#195
Supreme Member
iTrader: (24)
Join Date: Jun 2005
Location: NC
Posts: 7,899
Likes: 0
Received 90 Likes
on
54 Posts
Car: 92 Firebird
Engine: Supercharged 6.0
Transmission: T56
Axle/Gears: 8.8 3.73
Re: first engine swap- LT1/T56
Good progress, its not so bad is it? Just time consuming
Your fingers will love splicing 12-16ga wiring
Your fingers will love splicing 12-16ga wiring
02-01-2010, 12:39 AM
#196
Member
Thread Starter
iTrader: (5)
Join Date: May 2009
Location: Washington D.C.
Posts: 496
Likes: 0
Received 0 Likes
on
0 Posts
Car: 1985 Z28
Engine: LT1
Transmission: T56
Axle/Gears: fourth gen 3.42
Re: first engine swap- LT1/T56
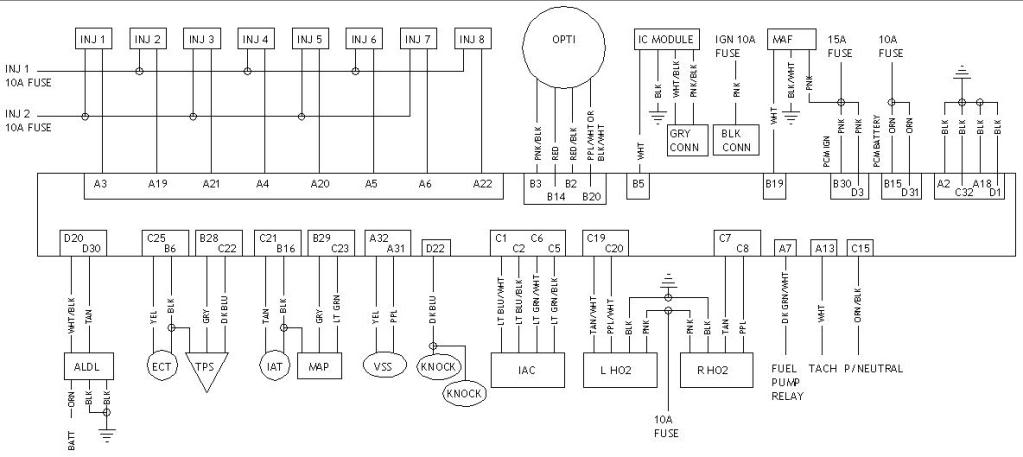
ok so i almost got the whole lt1 harness apart tonight- here are my issues:
i could not find labeling info for the 4 t56 connectors- which is which in this picture?
i know im throwing out CAGS...

heres the rest of my spoils

right now i have three entanglements left- coil/icm/grounds, and two strings of four injectors each with pcm pins.
i really dont know what to do with those, and i untaped the injectors which i really shouldnt have done so i have a bit of a mess to deal with...
i could not find labeling info for the 4 t56 connectors- which is which in this picture?
i know im throwing out CAGS...
heres the rest of my spoils
right now i have three entanglements left- coil/icm/grounds, and two strings of four injectors each with pcm pins.
i really dont know what to do with those, and i untaped the injectors which i really shouldnt have done so i have a bit of a mess to deal with...
02-01-2010, 06:59 AM
#197
Supreme Member
iTrader: (24)
Join Date: Jun 2005
Location: NC
Posts: 7,899
Likes: 0
Received 90 Likes
on
54 Posts
Car: 92 Firebird
Engine: Supercharged 6.0
Transmission: T56
Axle/Gears: 8.8 3.73
Re: first engine swap- LT1/T56
For the T56, connectors the top two are the same connector, but one wire is pink and the other is light green or gray
Light green is reverse lockout
Gray is CAGS
Bottom left is backup lamps
Bottom right VSS
94-95 cars disable CAGS by simply unplugging it. It will still store a code. Since you're knee deep in wiring, you might as well fix it now the right way. Go to radio shack and buy a 2200ohm 1/4W resistor. A pack of 5 should set you back 90some cents. run one wire from the PCM to the resistor, the other leg to IGN 12v. Your PCM will think its locking gears out for you while you're rowing away
You've got a fine start to the rebuild. Fbody harnesses have the injectors wired into banks, while Bbody harnesses have them wired in front/rear 4's. Yours is Fbody so you wont have to separate the individual injector connectors
The coil and module wiring is pretty simple. One to the PCM, several IGN hookups, and several grounds
This should help
Last edited by Pocket; 02-01-2010 at 07:03 AM.
02-01-2010, 09:15 AM
#198
Member
Thread Starter
iTrader: (5)
Join Date: May 2009
Location: Washington D.C.
Posts: 496
Likes: 0
Received 0 Likes
on
0 Posts
Car: 1985 Z28
Engine: LT1
Transmission: T56
Axle/Gears: fourth gen 3.42
Re: first engine swap- LT1/T56
thanks, im pretty comfortable with where im at right now- i just need to make sure i get the commons back in right.
also, i had CAGS removed from the pcm when i got it tuned, so I should be able to toss the connector right?
also, i had CAGS removed from the pcm when i got it tuned, so I should be able to toss the connector right?
02-01-2010, 01:51 PM
#200
Member
Thread Starter
iTrader: (5)
Join Date: May 2009
Location: Washington D.C.
Posts: 496
Likes: 0
Received 0 Likes
on
0 Posts
Car: 1985 Z28
Engine: LT1
Transmission: T56
Axle/Gears: fourth gen 3.42
Re: first engine swap- LT1/T56
so i dont need to do the resistor fix.
at the lab today i took some of the rust off the sending unit, but had issues with the ls1 pump fitting where the old one was, here are some pictures.

the ls1 pump is slightly larger (not a big deal), but i didnt know the wiring connector is larger.
the big issue though is that the metal thing in this picture wont slide onto the new pump since there is a little plastic nib in the way from the connector

also, the ls1 pump has another line fitting coming out the top, what do i do with that?
also should i go back into the ls1 sender and snip the connector for the pump and put it on there?
at the lab today i took some of the rust off the sending unit, but had issues with the ls1 pump fitting where the old one was, here are some pictures.
the ls1 pump is slightly larger (not a big deal), but i didnt know the wiring connector is larger.
the big issue though is that the metal thing in this picture wont slide onto the new pump since there is a little plastic nib in the way from the connector
also, the ls1 pump has another line fitting coming out the top, what do i do with that?
also should i go back into the ls1 sender and snip the connector for the pump and put it on there?