Pulling apart my 87 IROC
 08-07-2009, 03:27 PM
#1
Pulling apart my 87 IROC
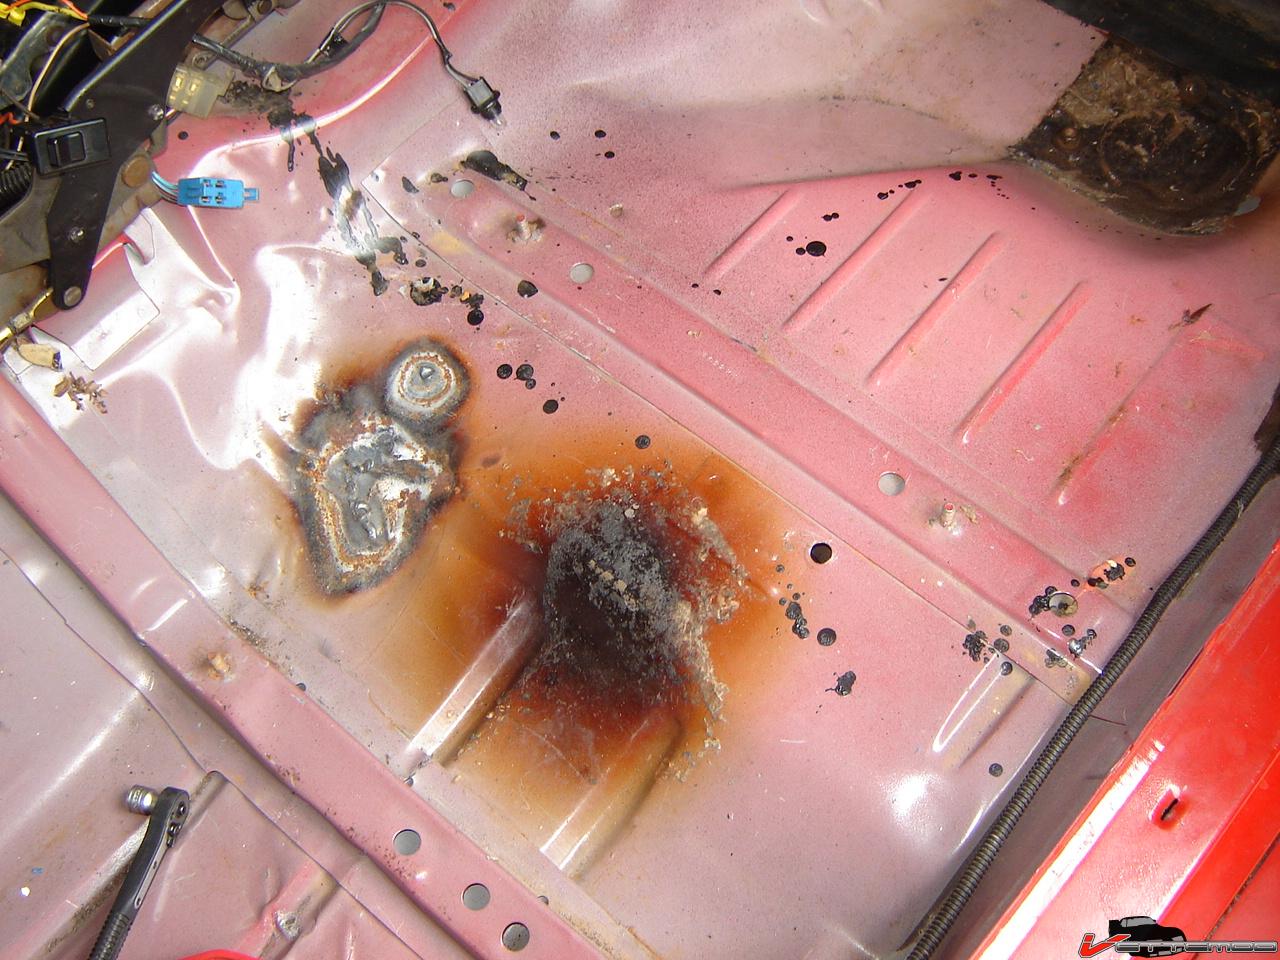
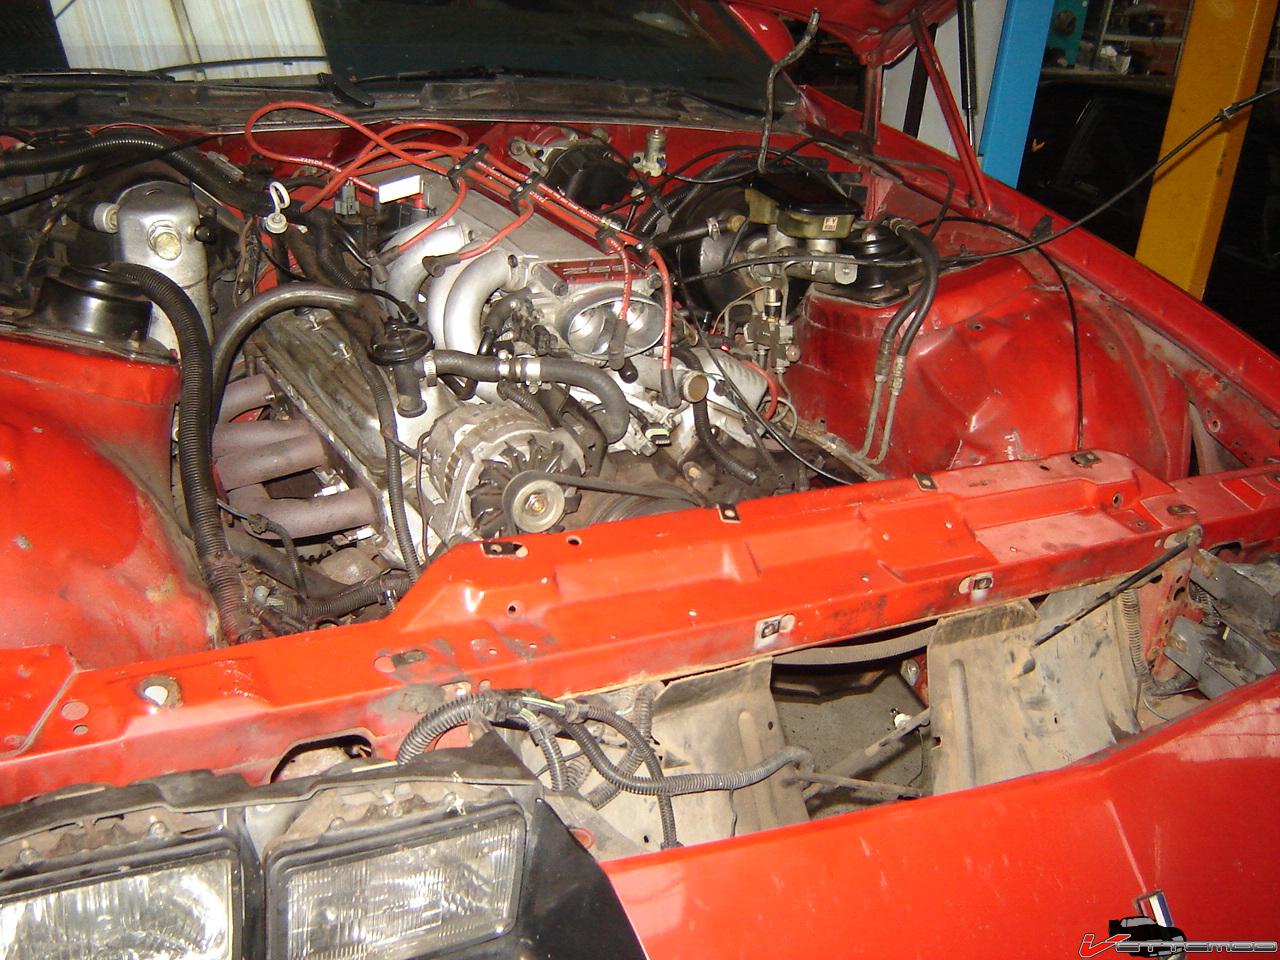
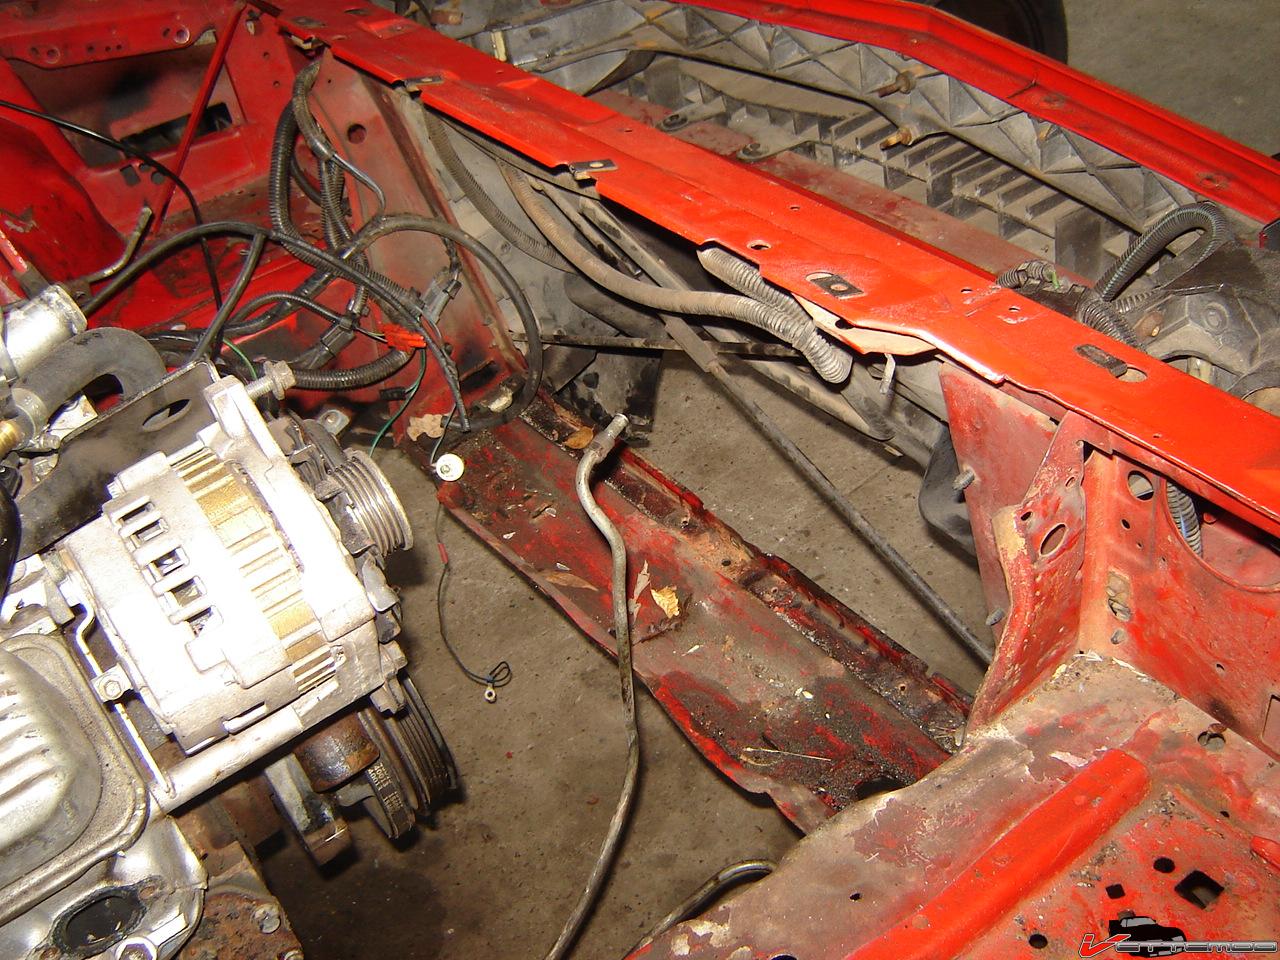
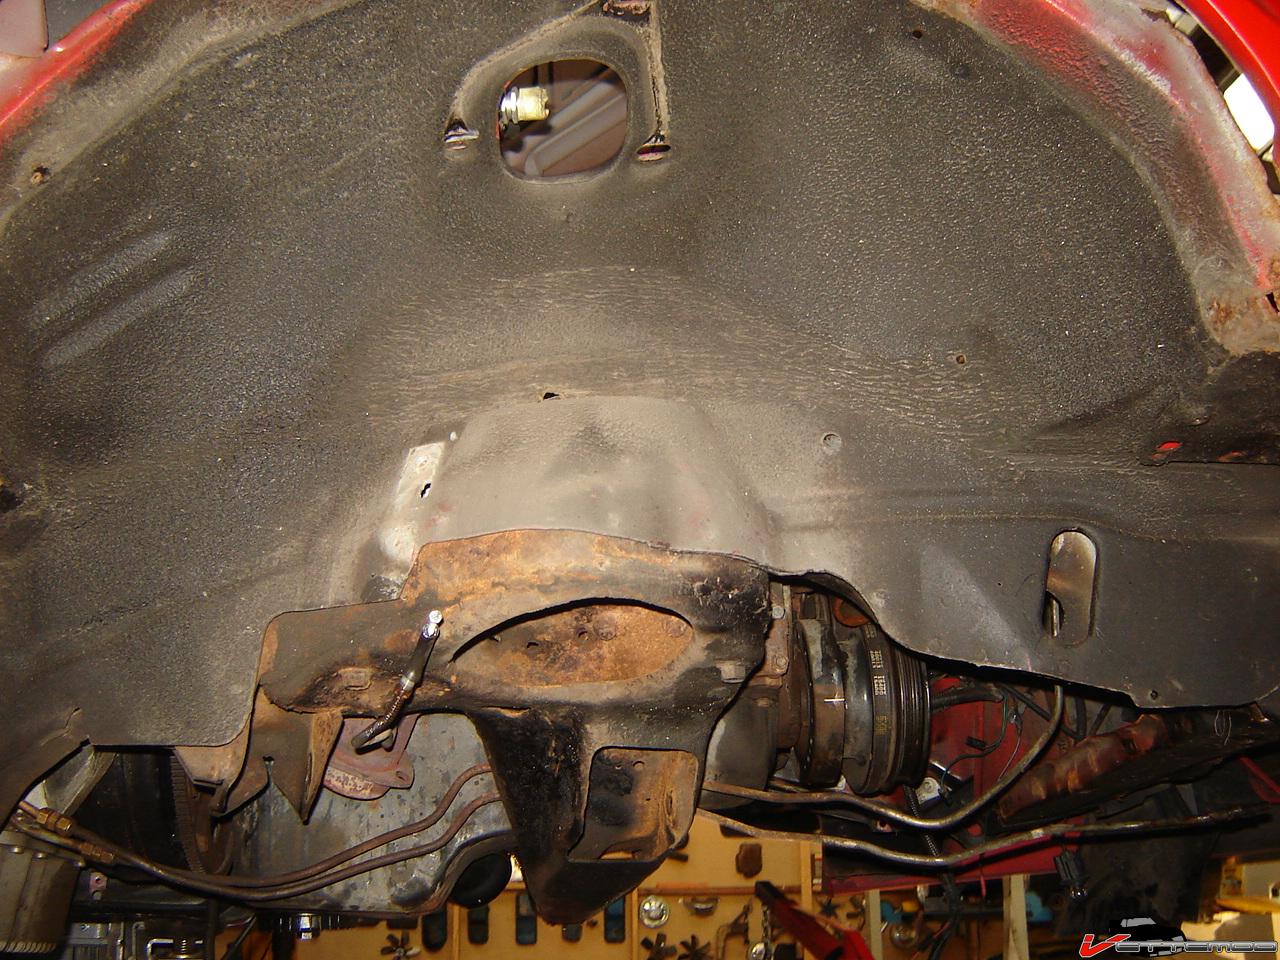
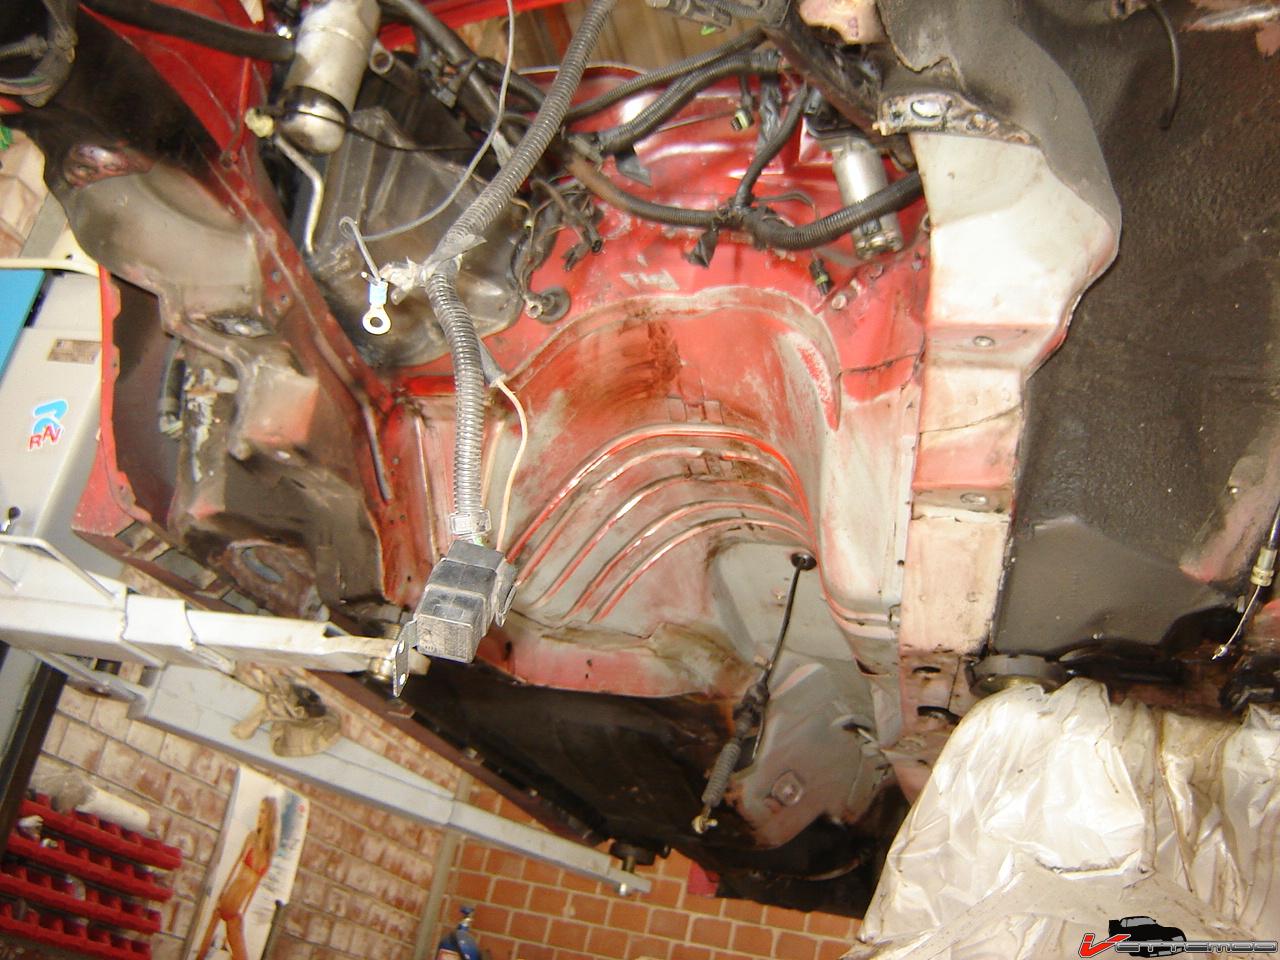
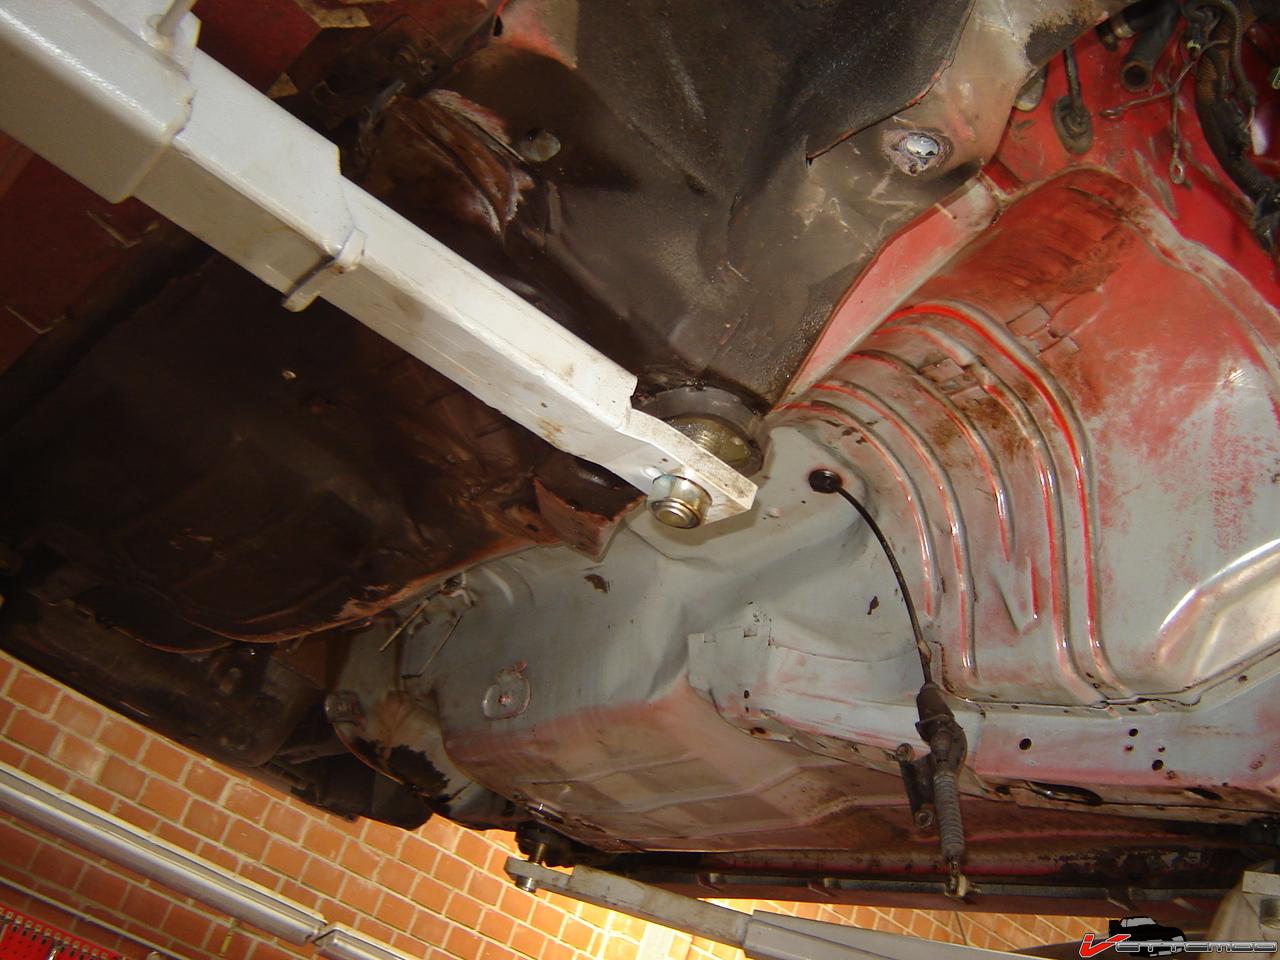
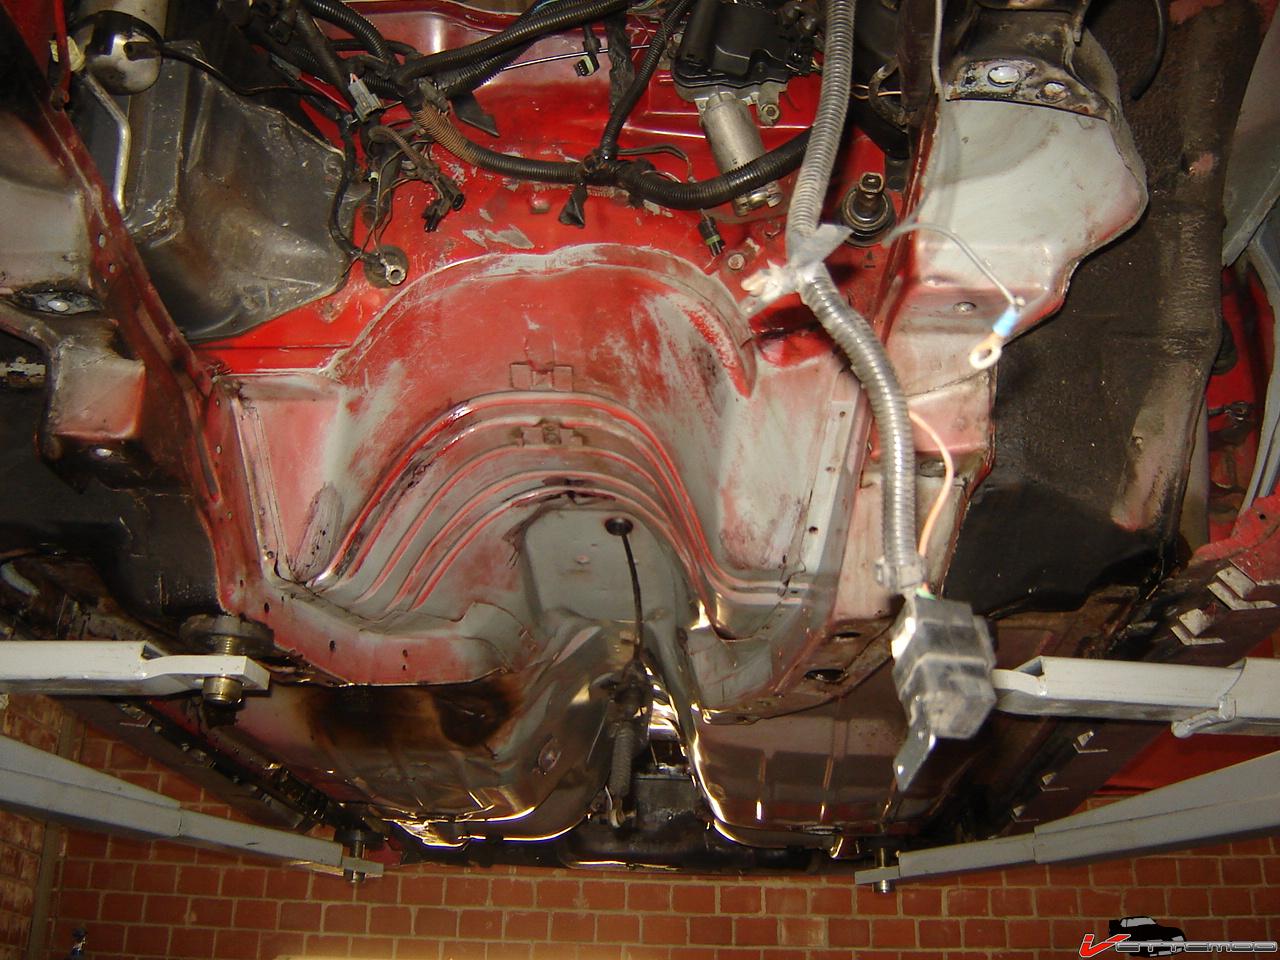
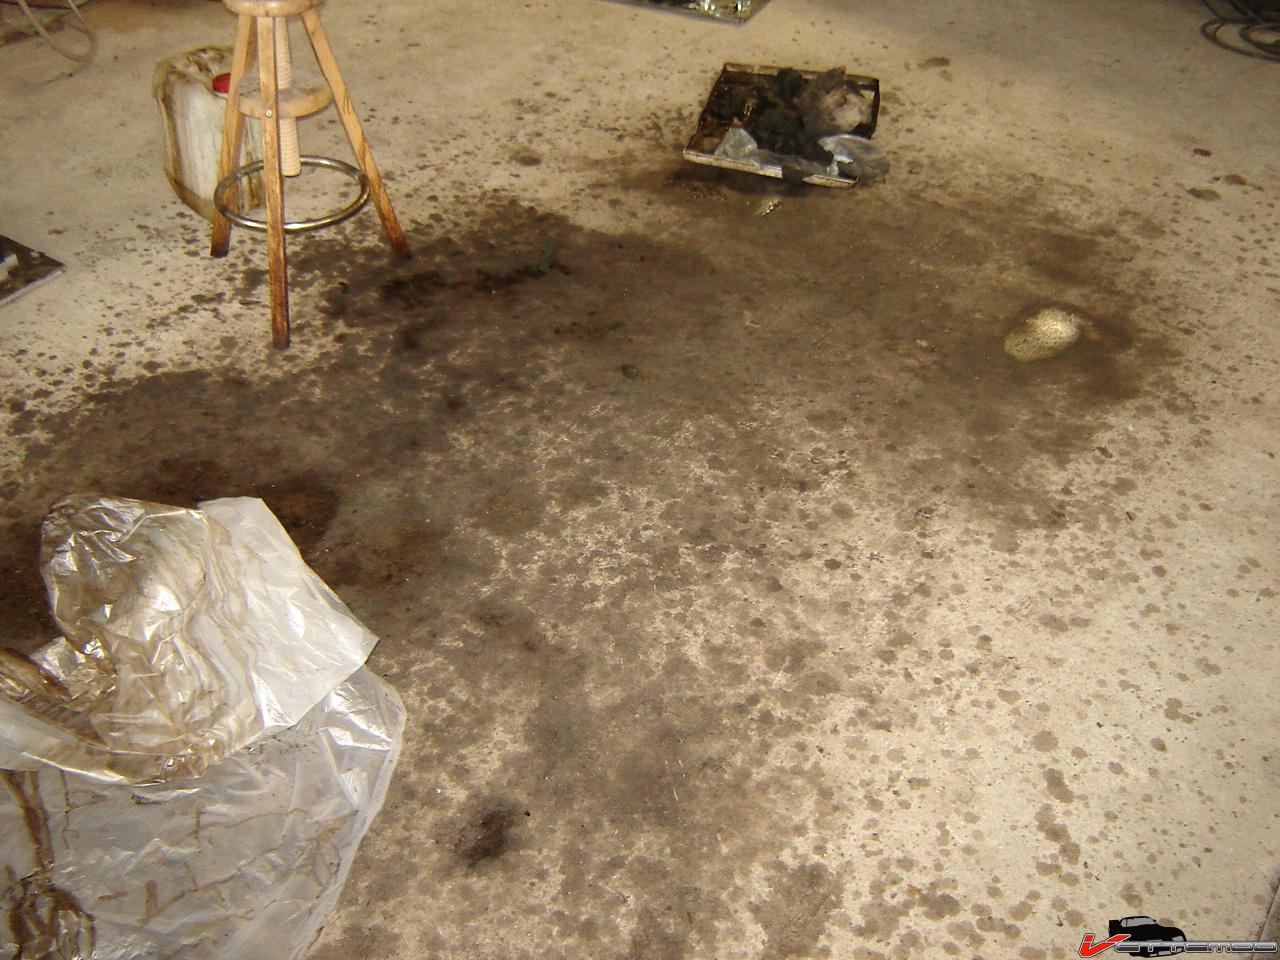
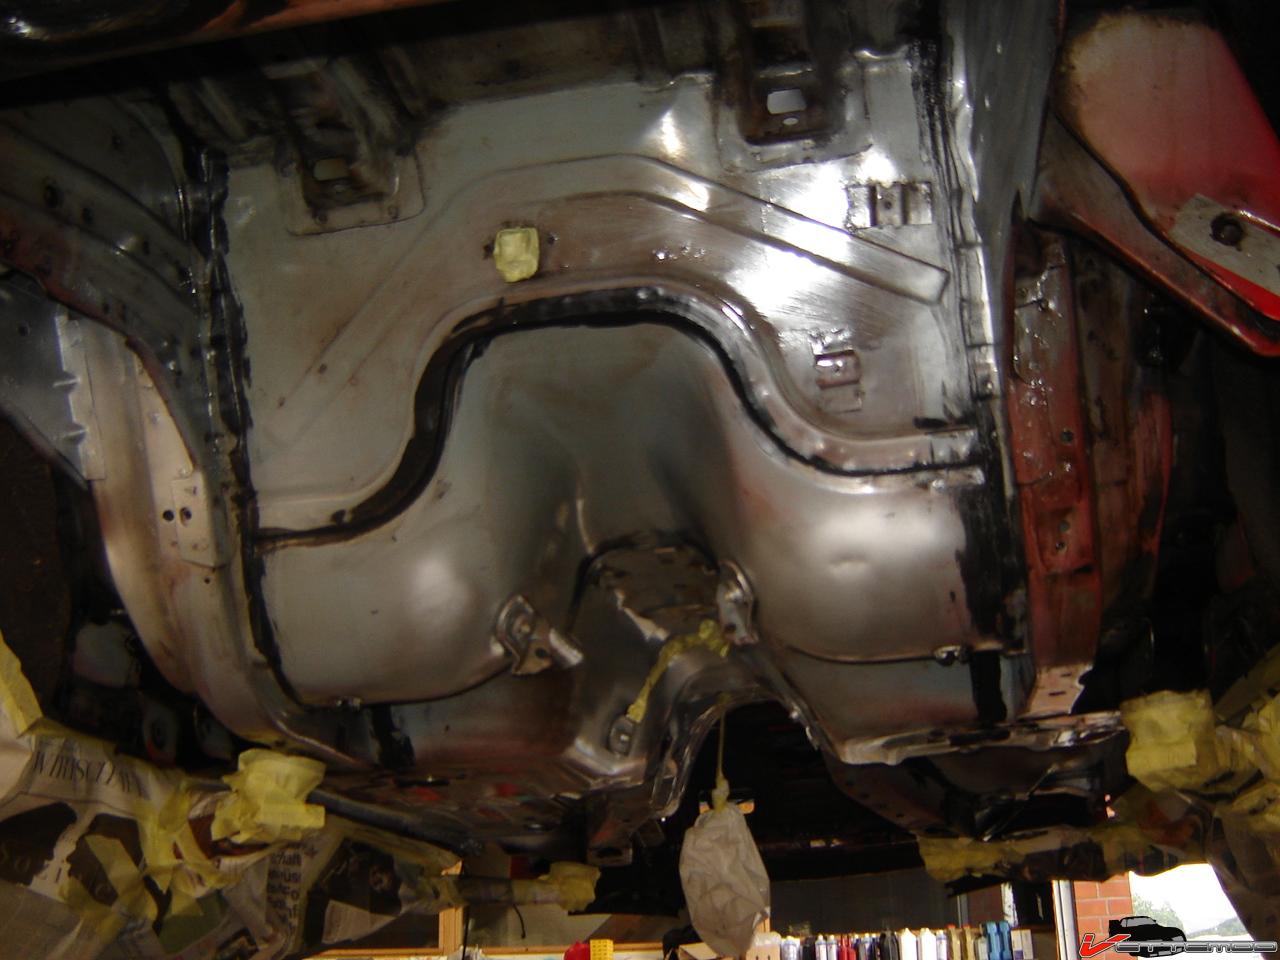
Figured it needed work, the idler arm was toast and I replaced it and the center link w toe rods last month but it wasn't to my liking. Never liked the exhaust with that stupid electric cut out and all the black tar crap underneath and rusty parts. I can't stand that rusty crap. I quickly found out how bad an idea such a cutout really is... a nice burnt undercarpet and big stain. Also, there's welding been done to the floor. Bubba made room for the cutout with a sledge and probably tore through the floor. Nice!! I already reshaped a bunch of it, going to finesse it some more later.
Installed a new hatch pull down motor. Bubba cut off all the wiring and threw the relay under the carpet under the drivers seat. Had to rewire the whole thing from the console backwards. Got it done, it's working flawlessly. I'm psyched, always hated using the key.
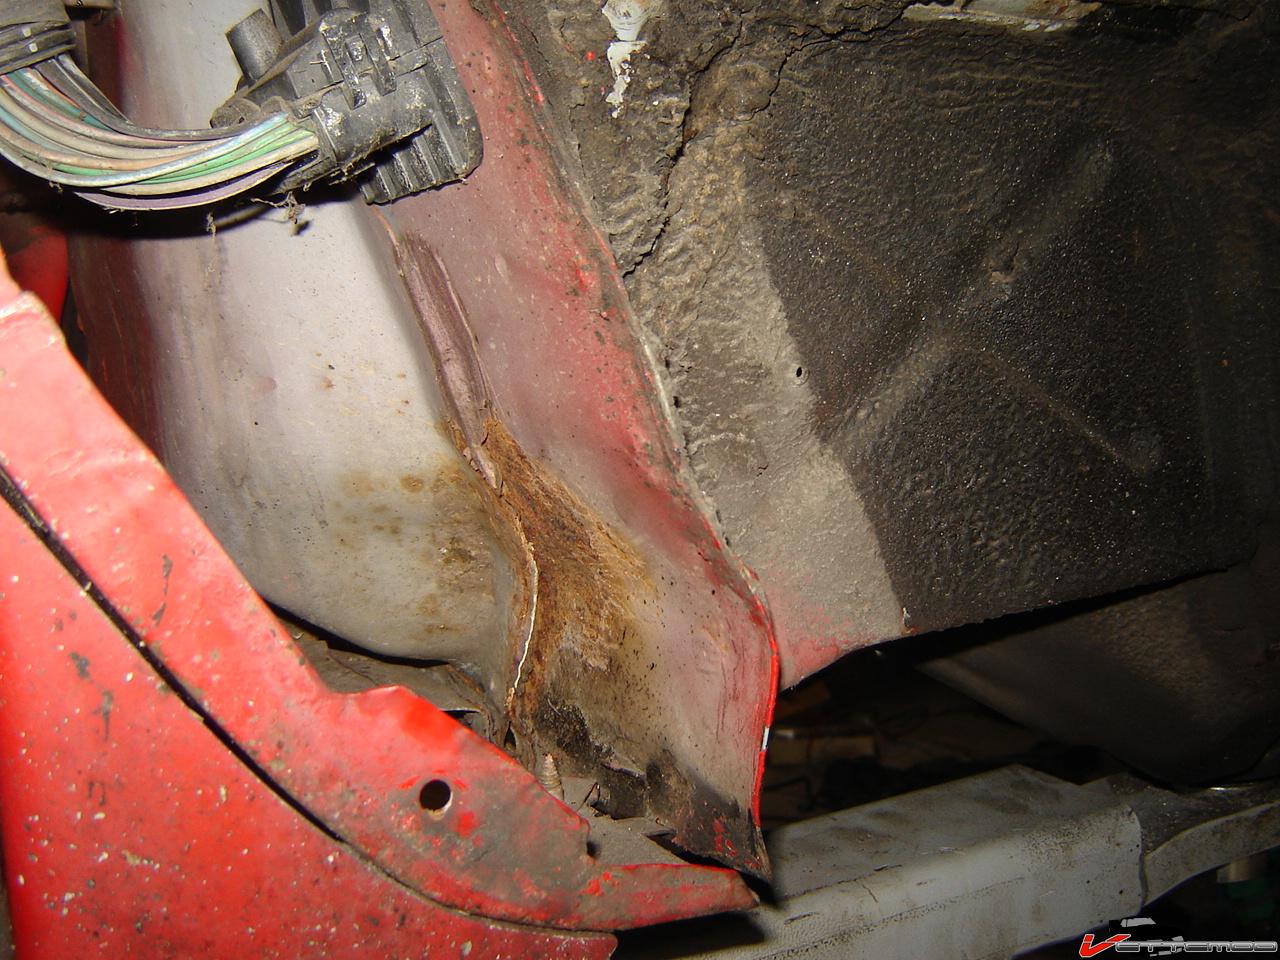
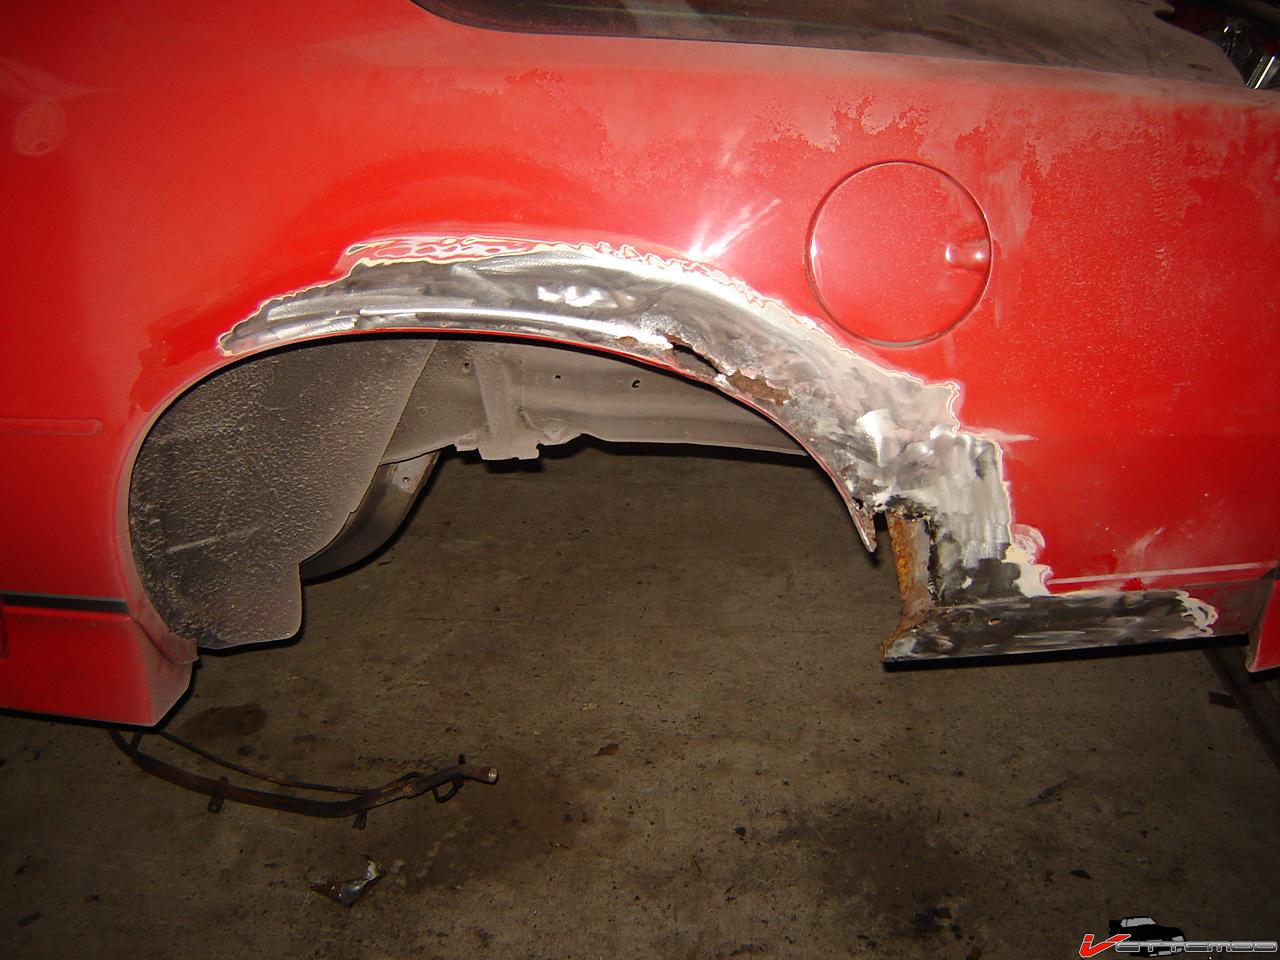
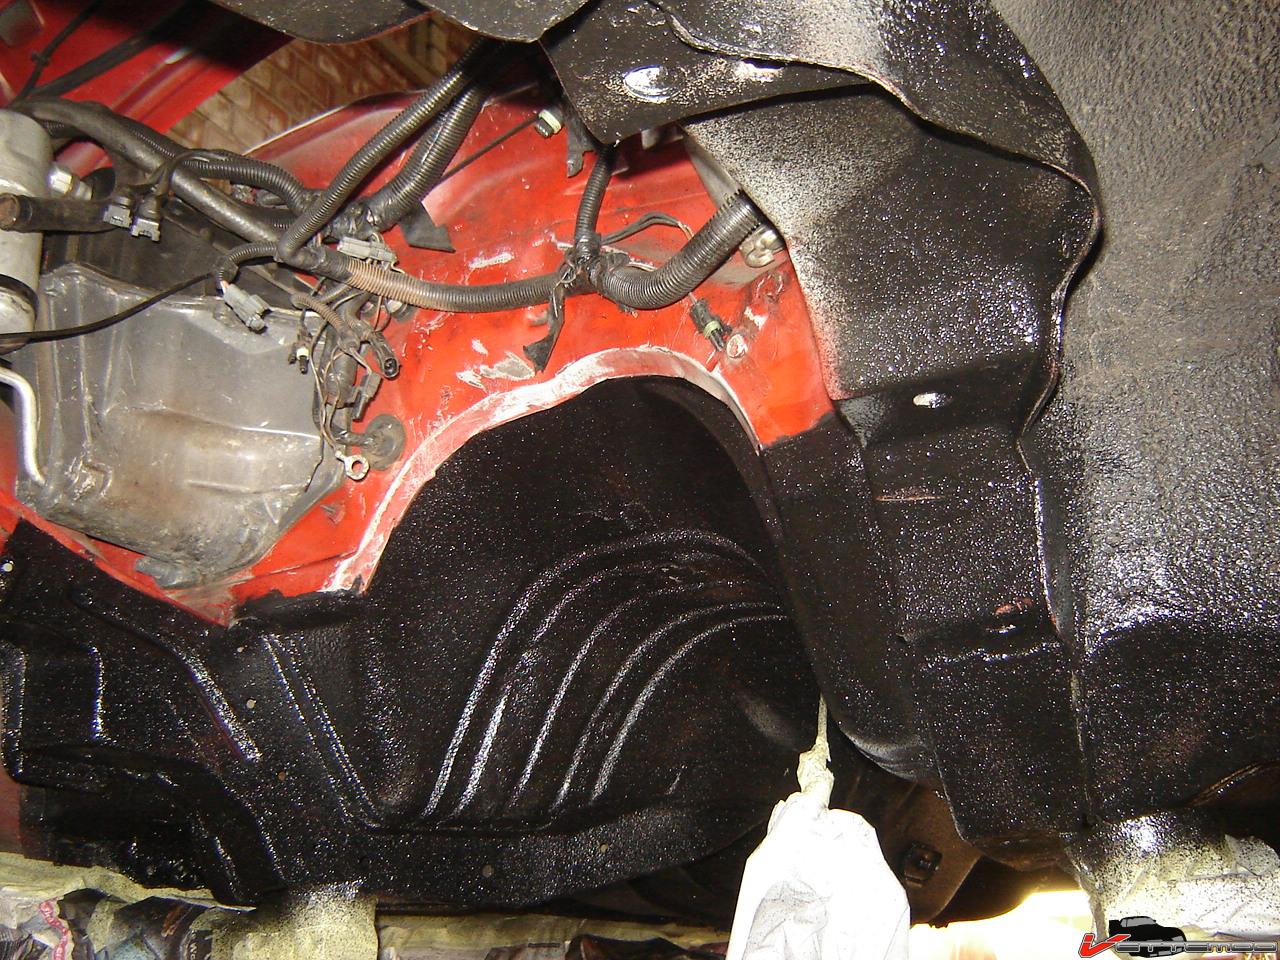
Did find a rust hole in the dr. side rear wheel well and a bunch of mud inside the area under the storage compartment. Removed all that, will weld fresh steel into the wheel well, going to need a patch panel since the outside is showing blisters too. Another shoddy repair, jut a bunch of bondo plastered all over the area.
Also removed the rear hatch panel, water was coming through on the sides and little rust flakes were falling down. The bottom panel was a little pitted. It'll be blasted and powdercoated.
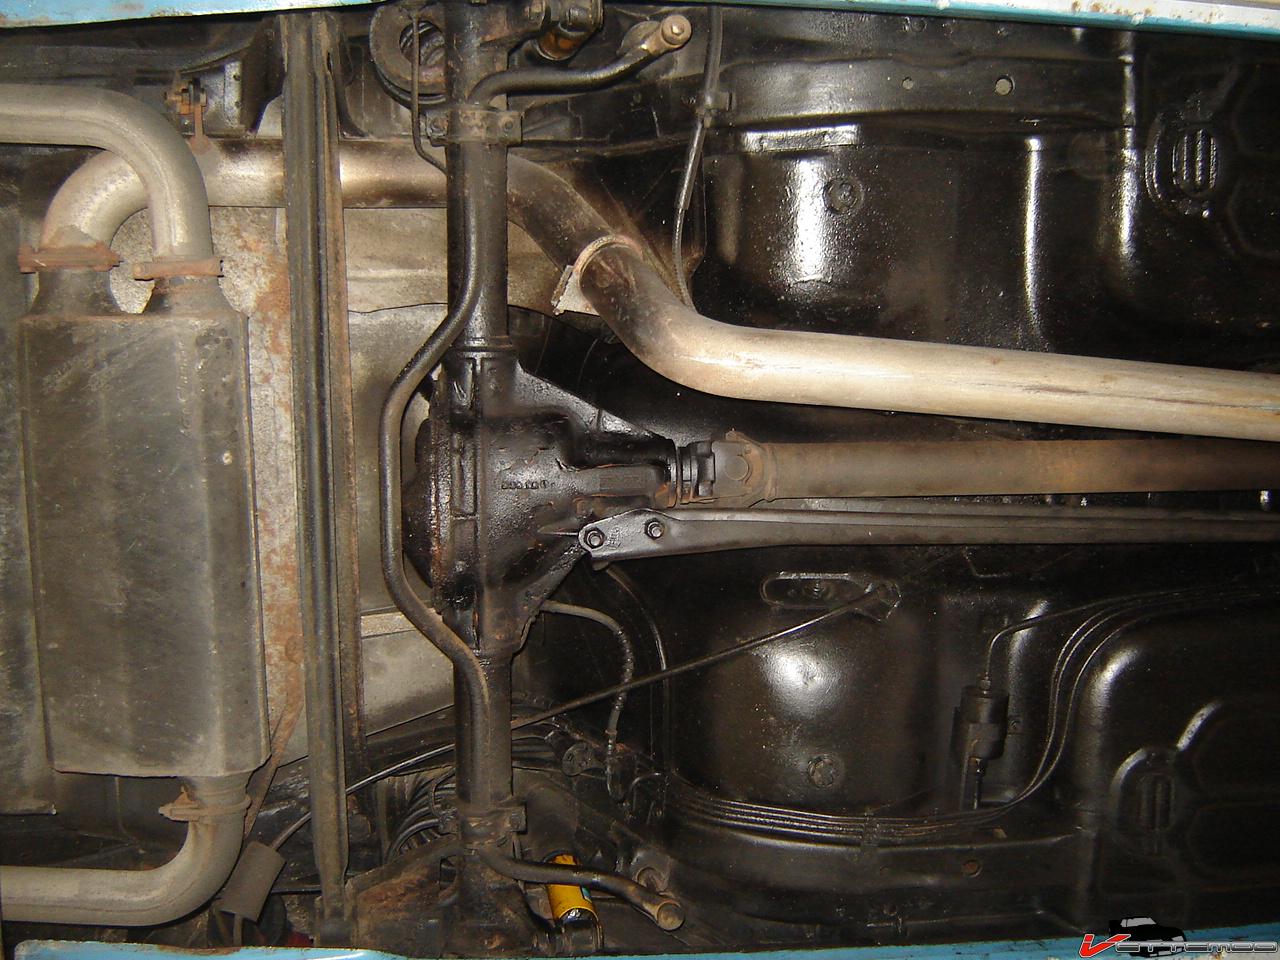
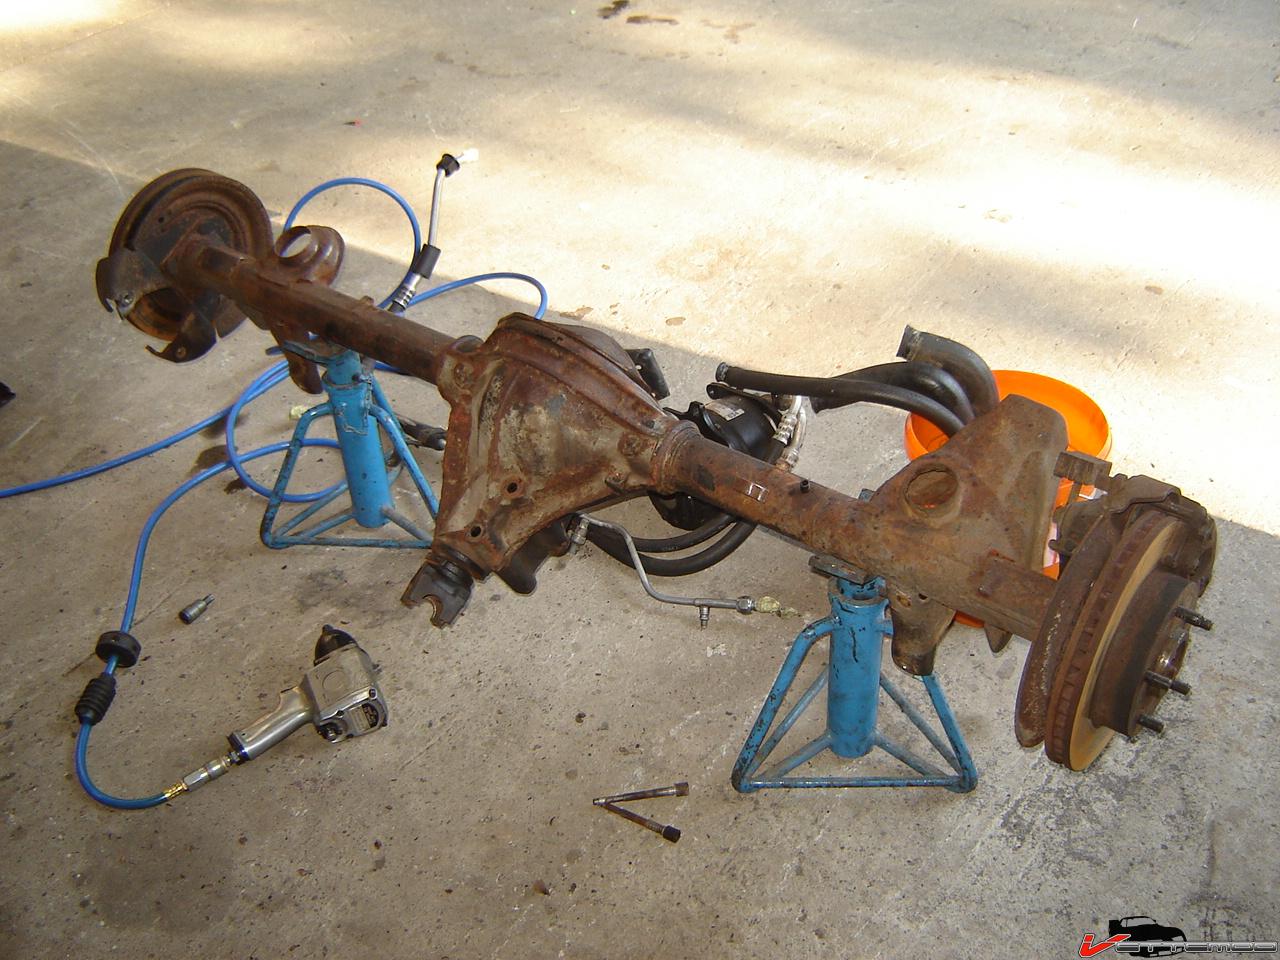
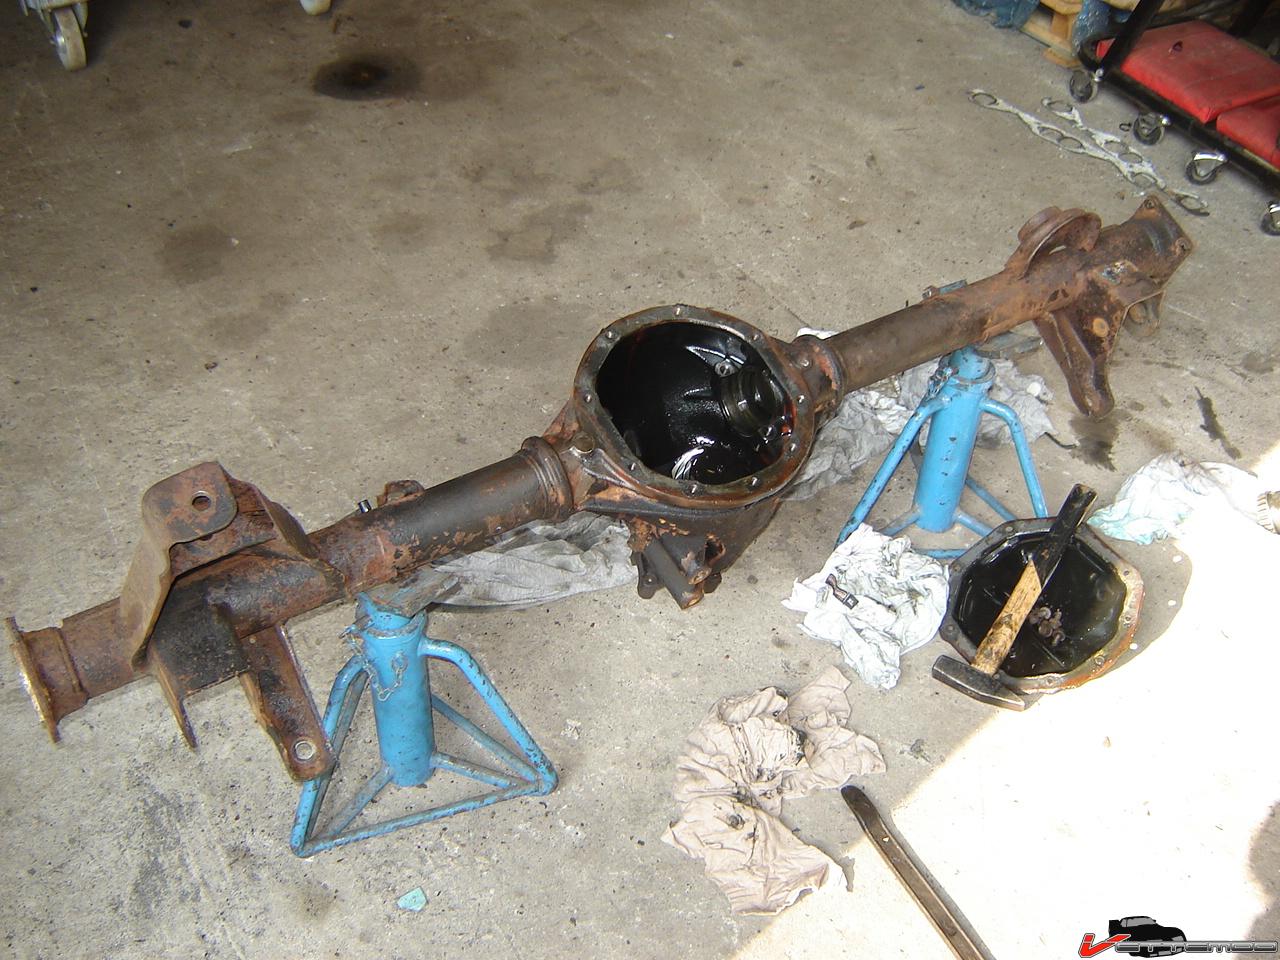
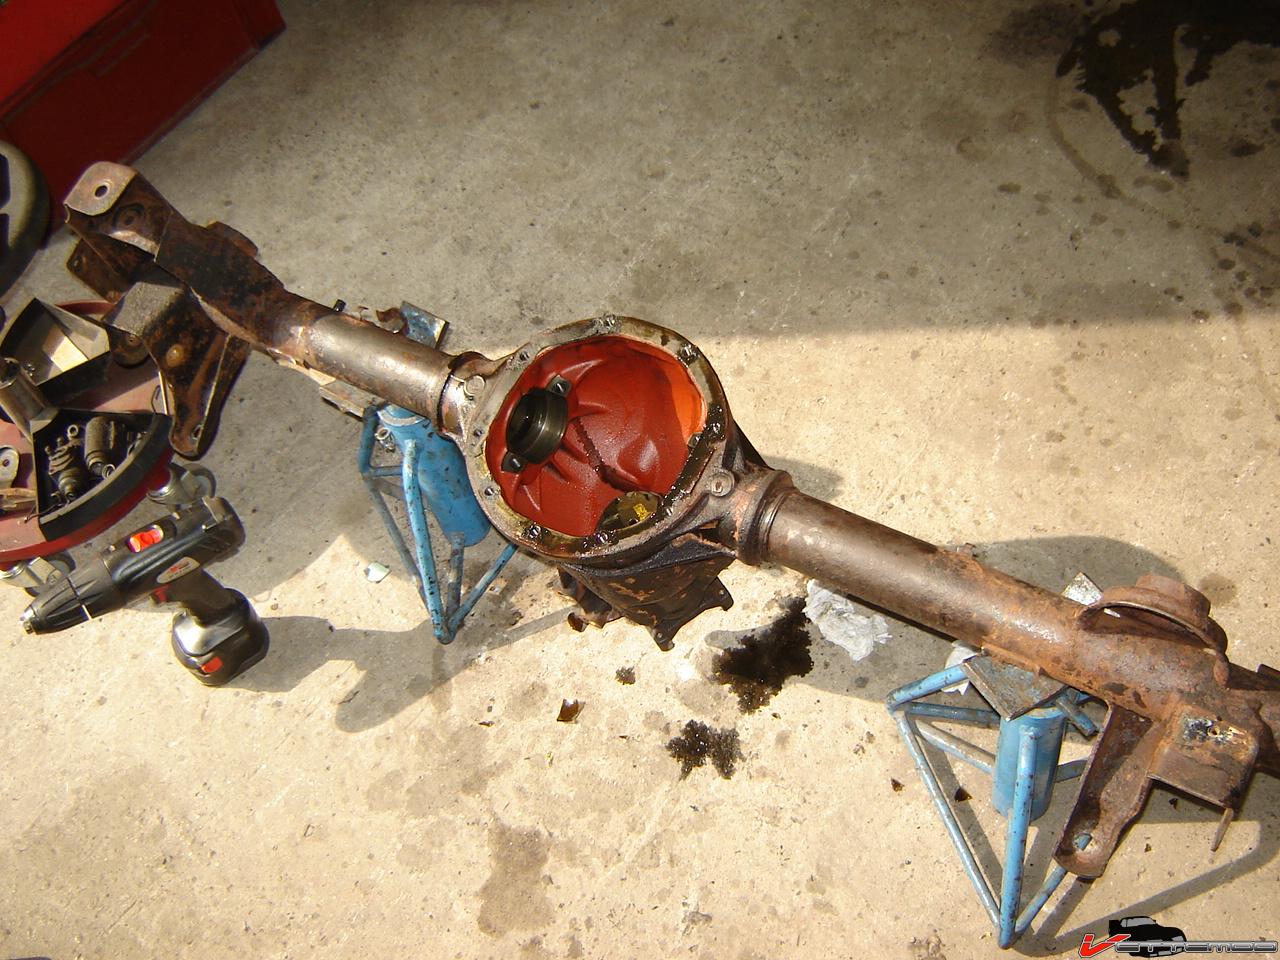
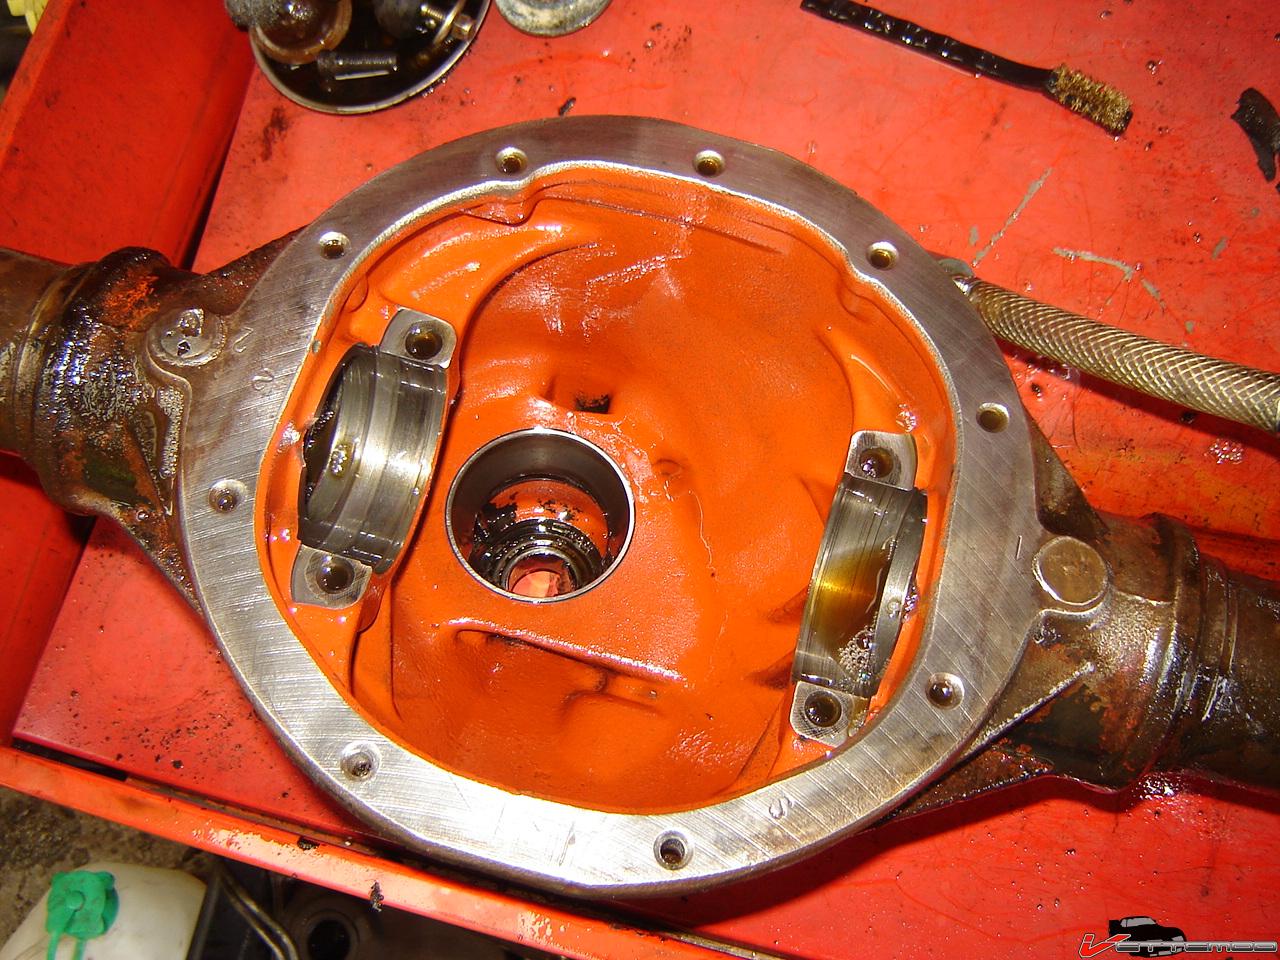
Decided to pull the 9 bolt, the posi is dead. No friction left whatsoever... damn
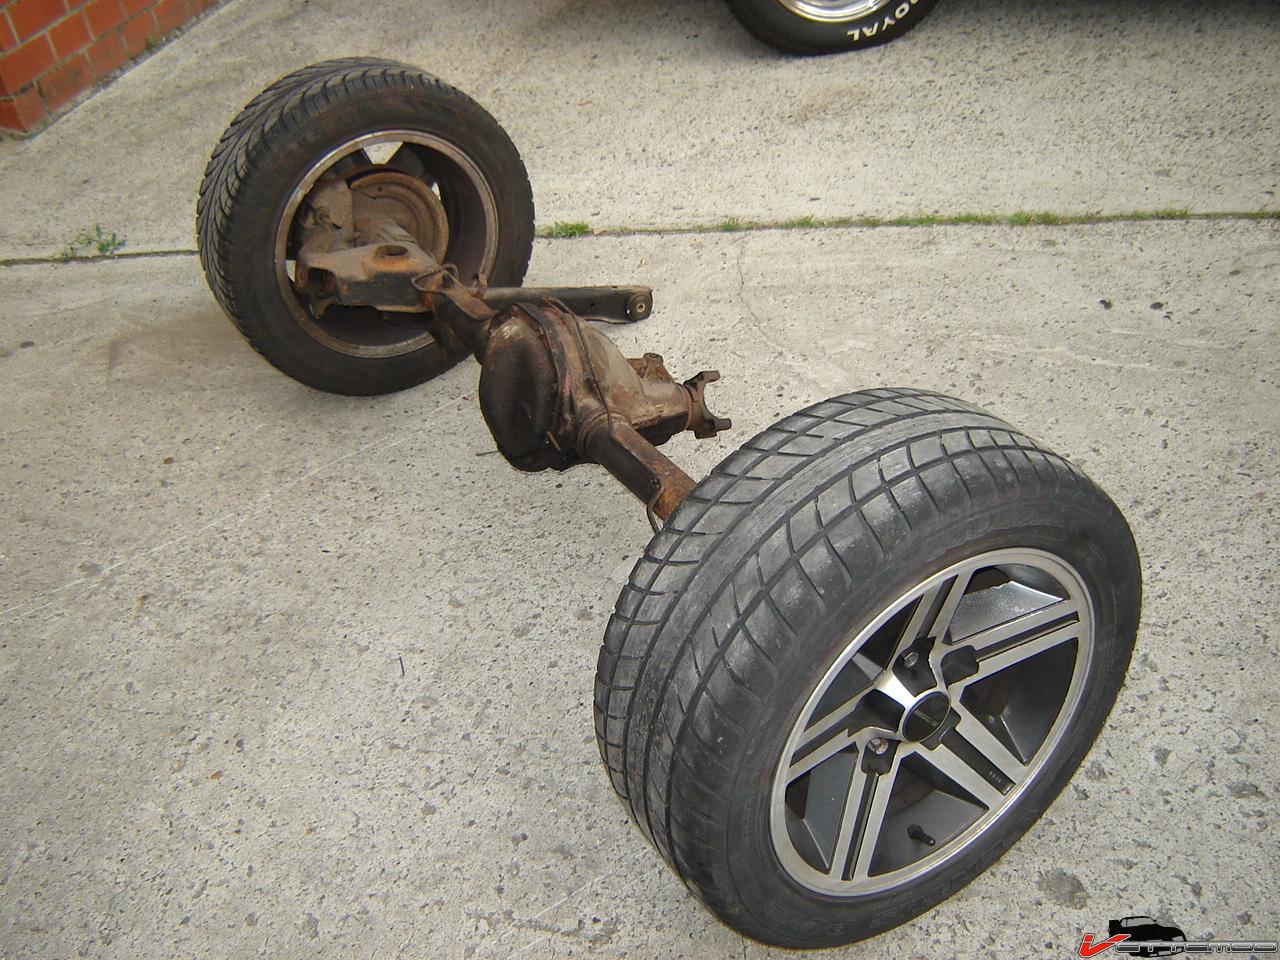
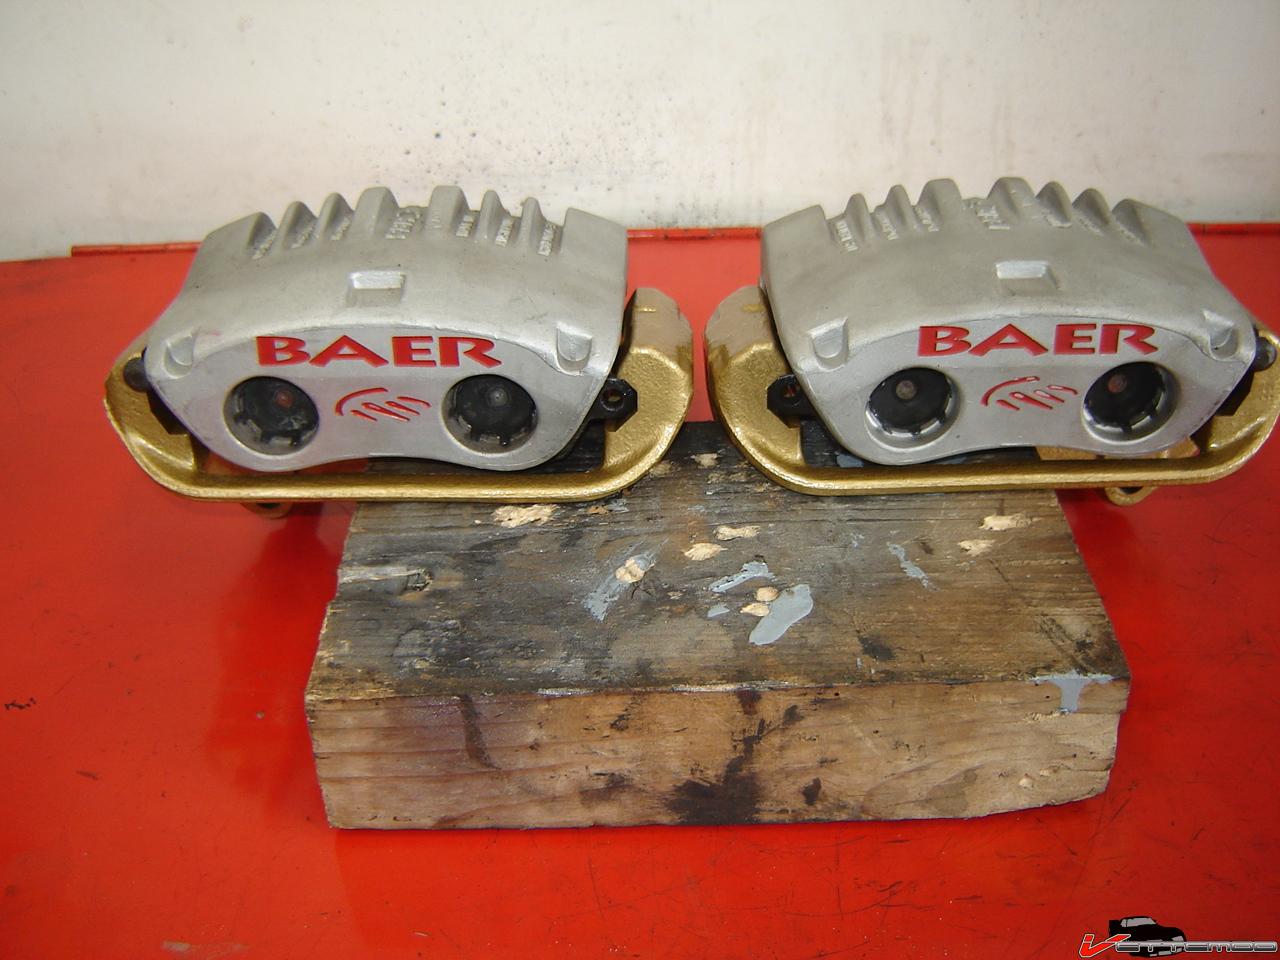
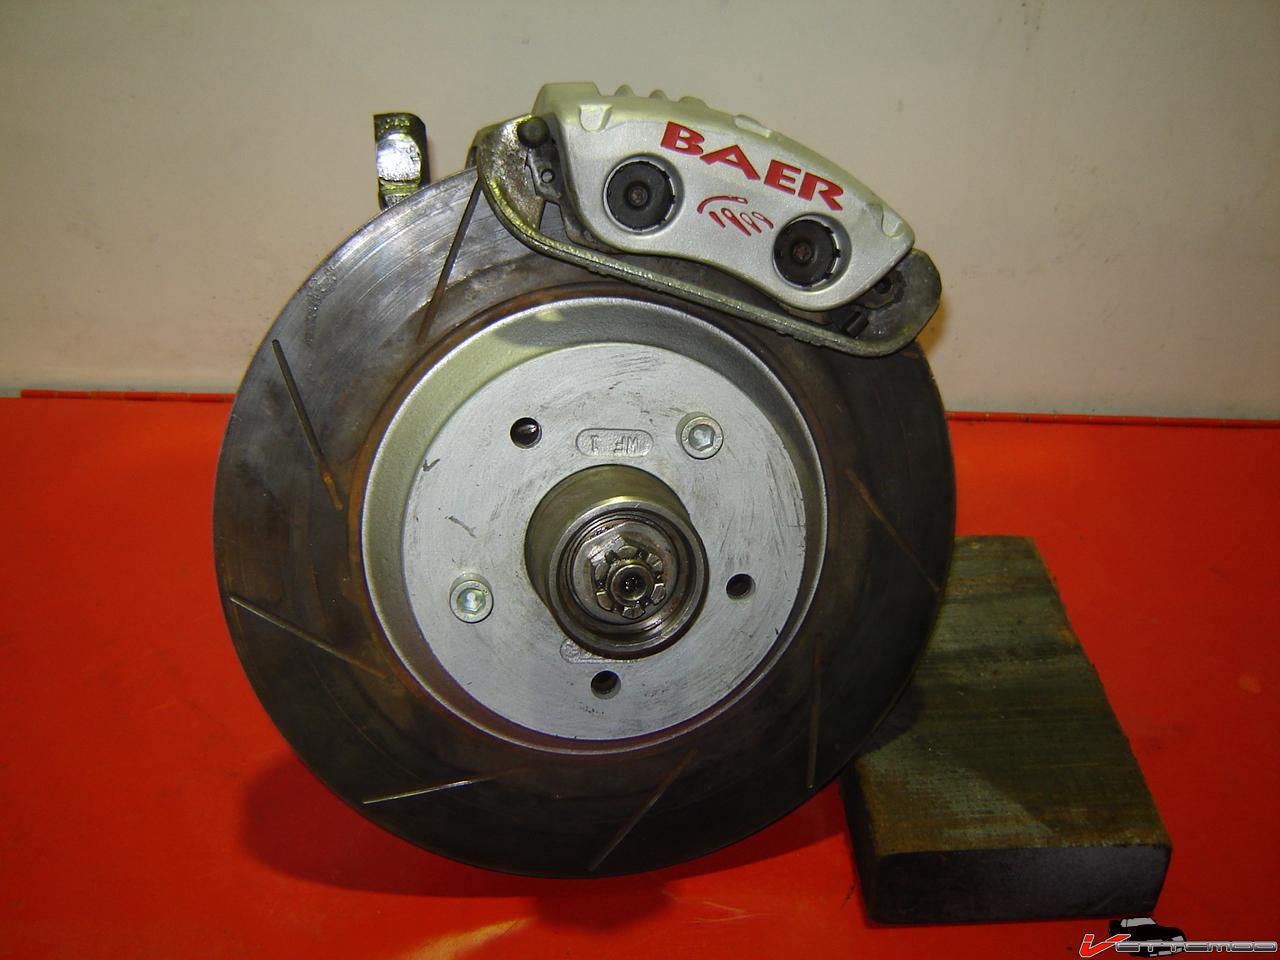
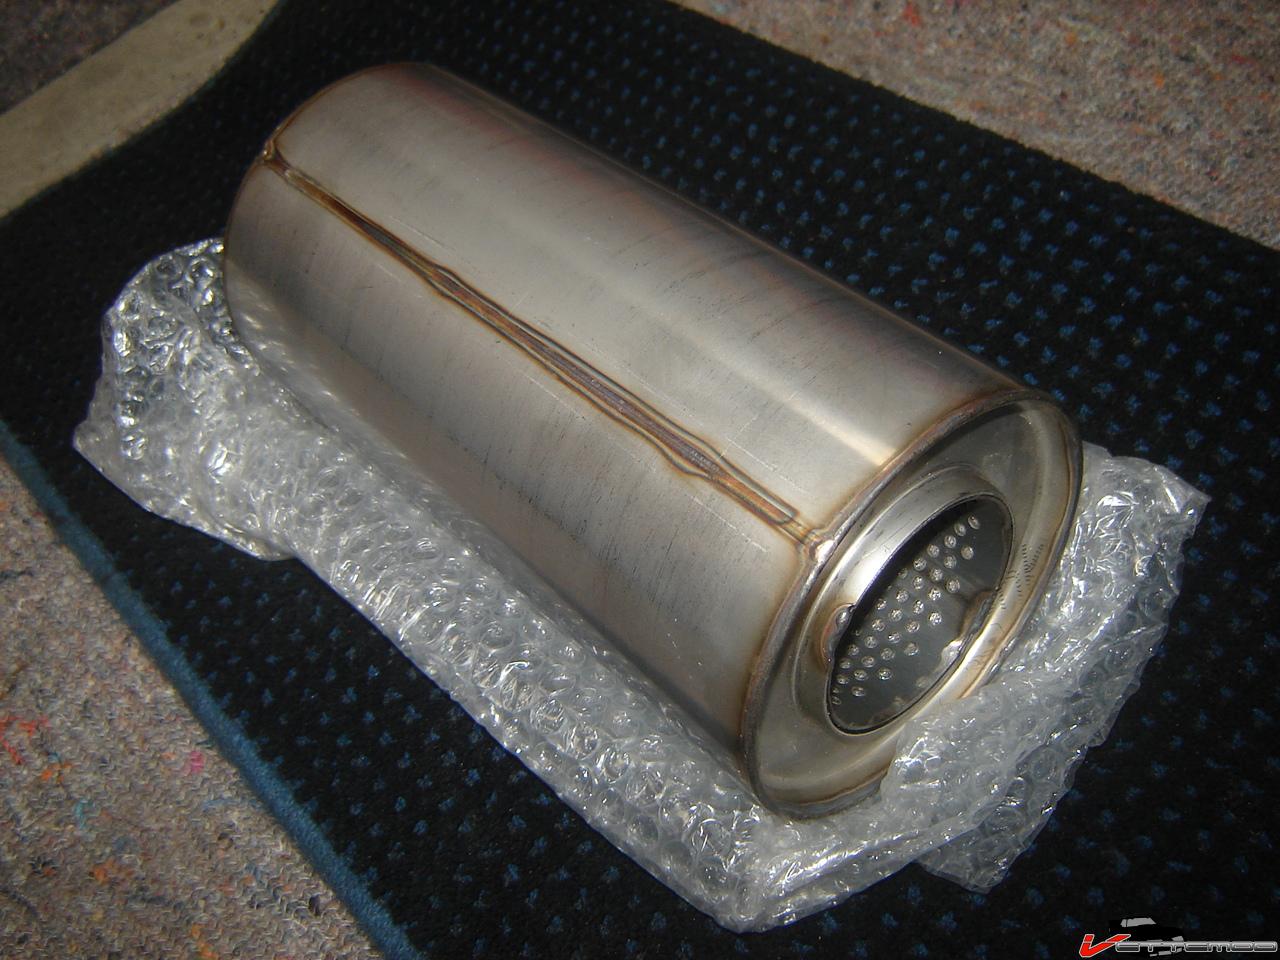
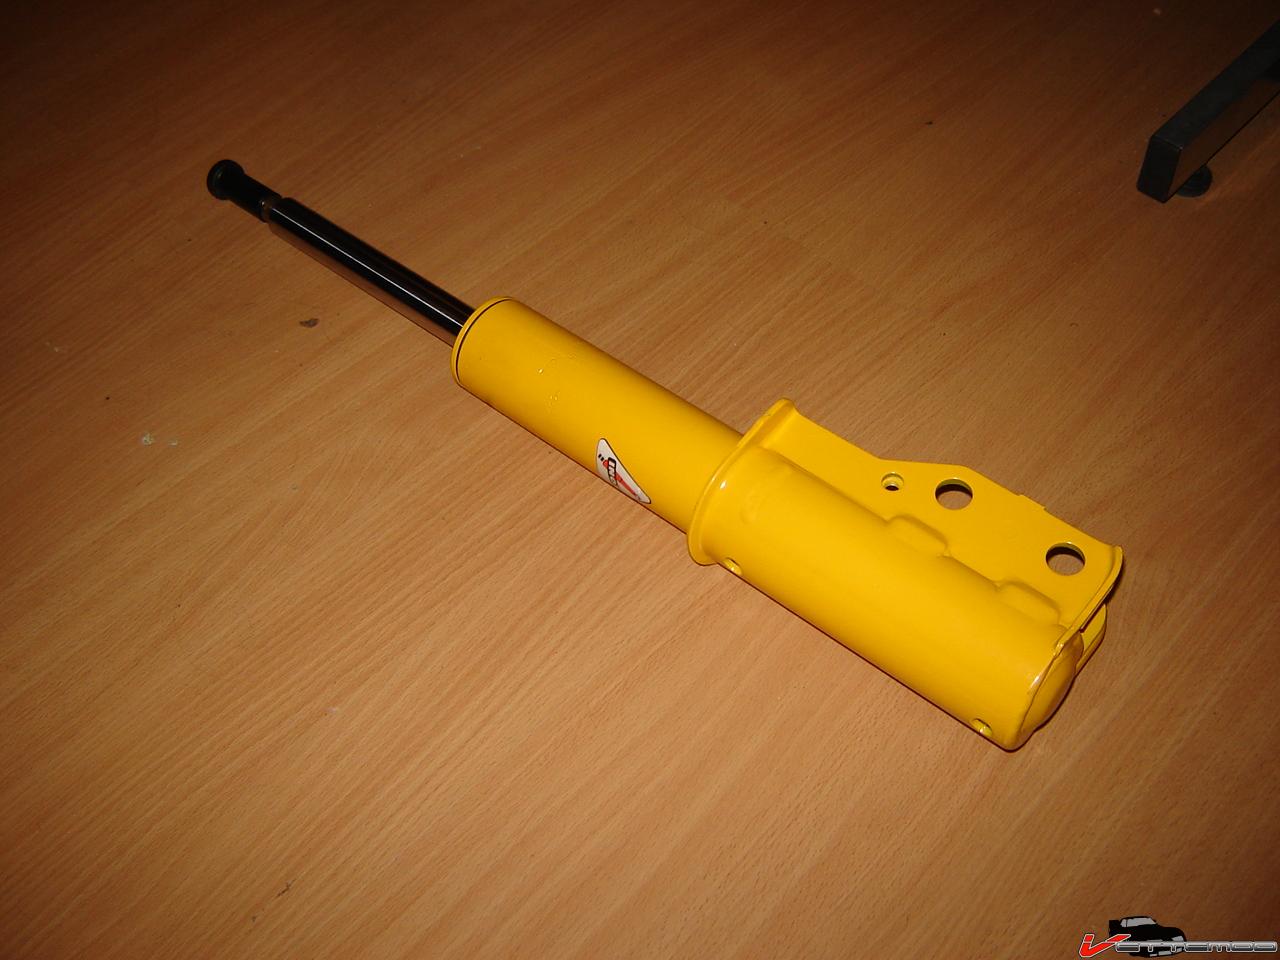
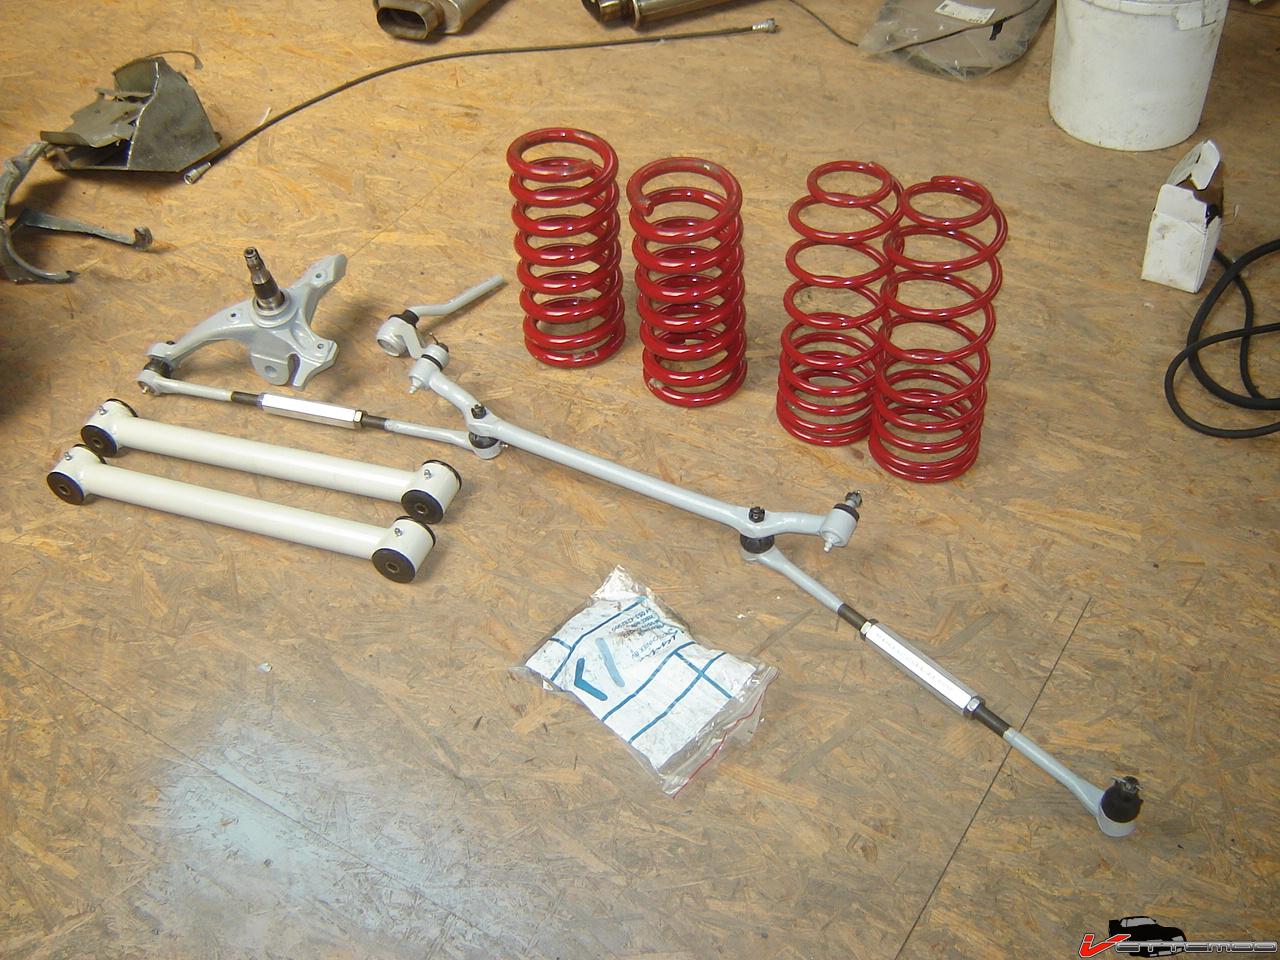
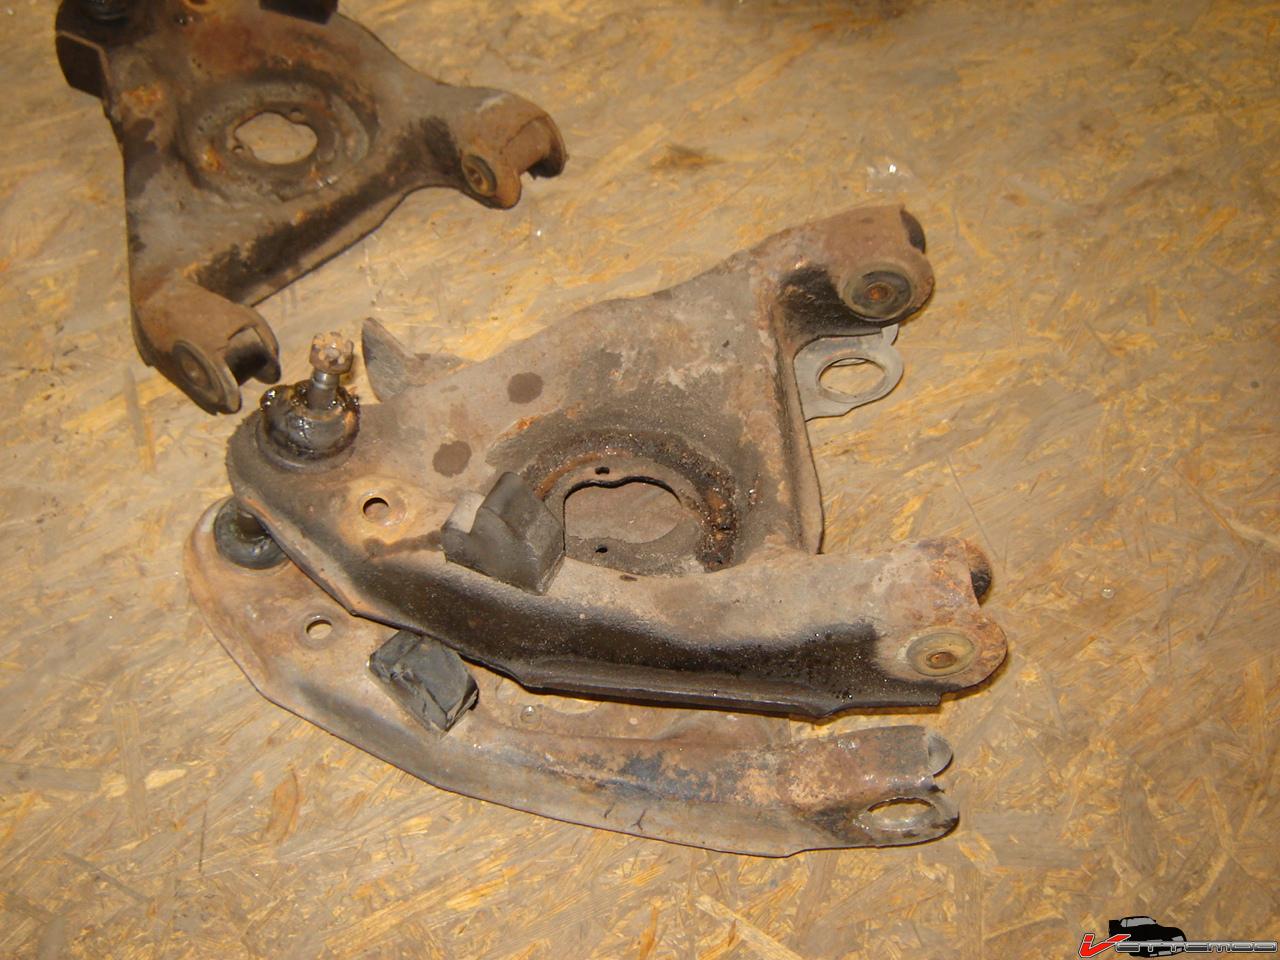
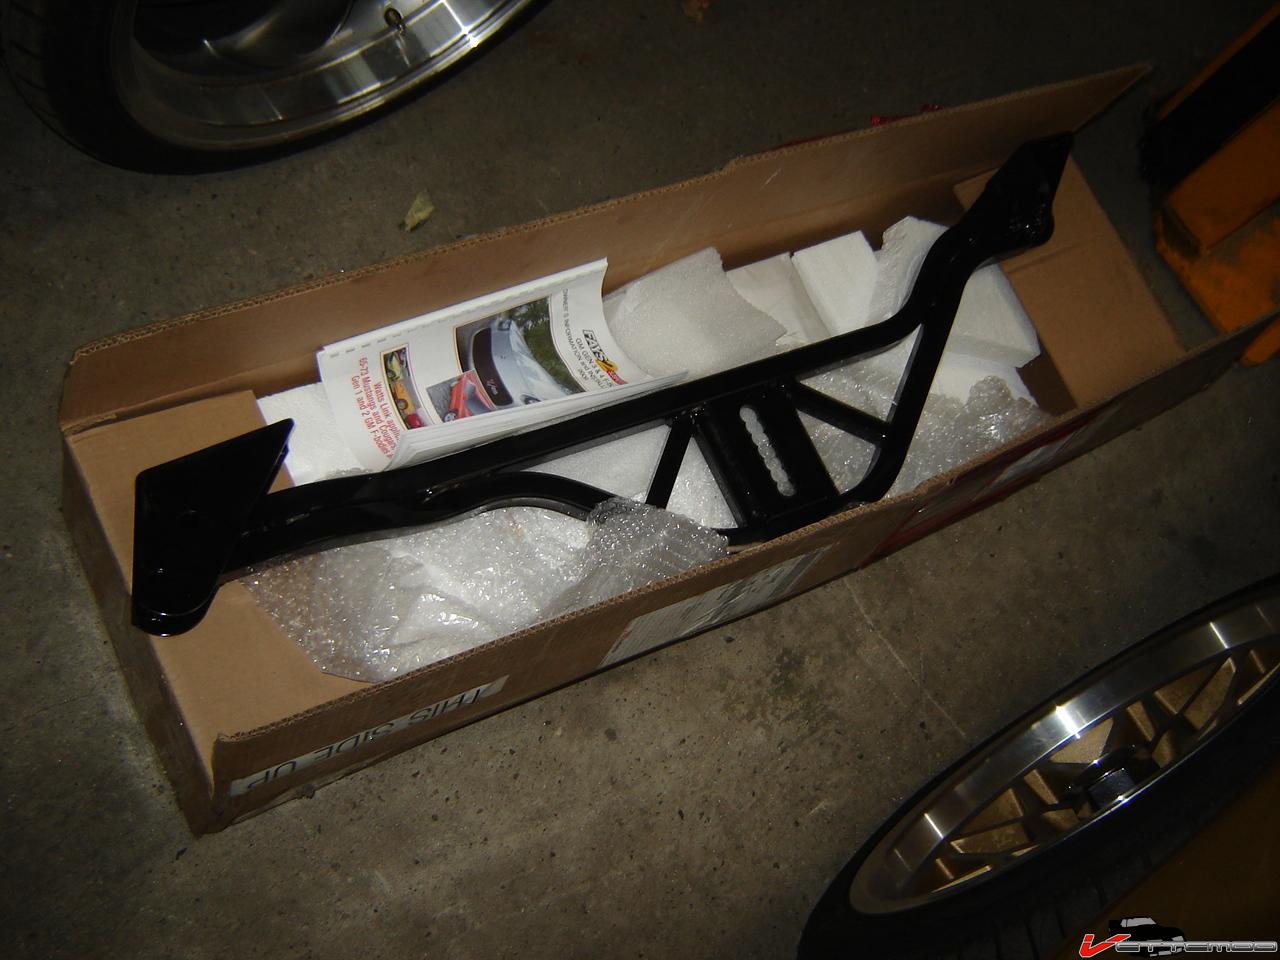
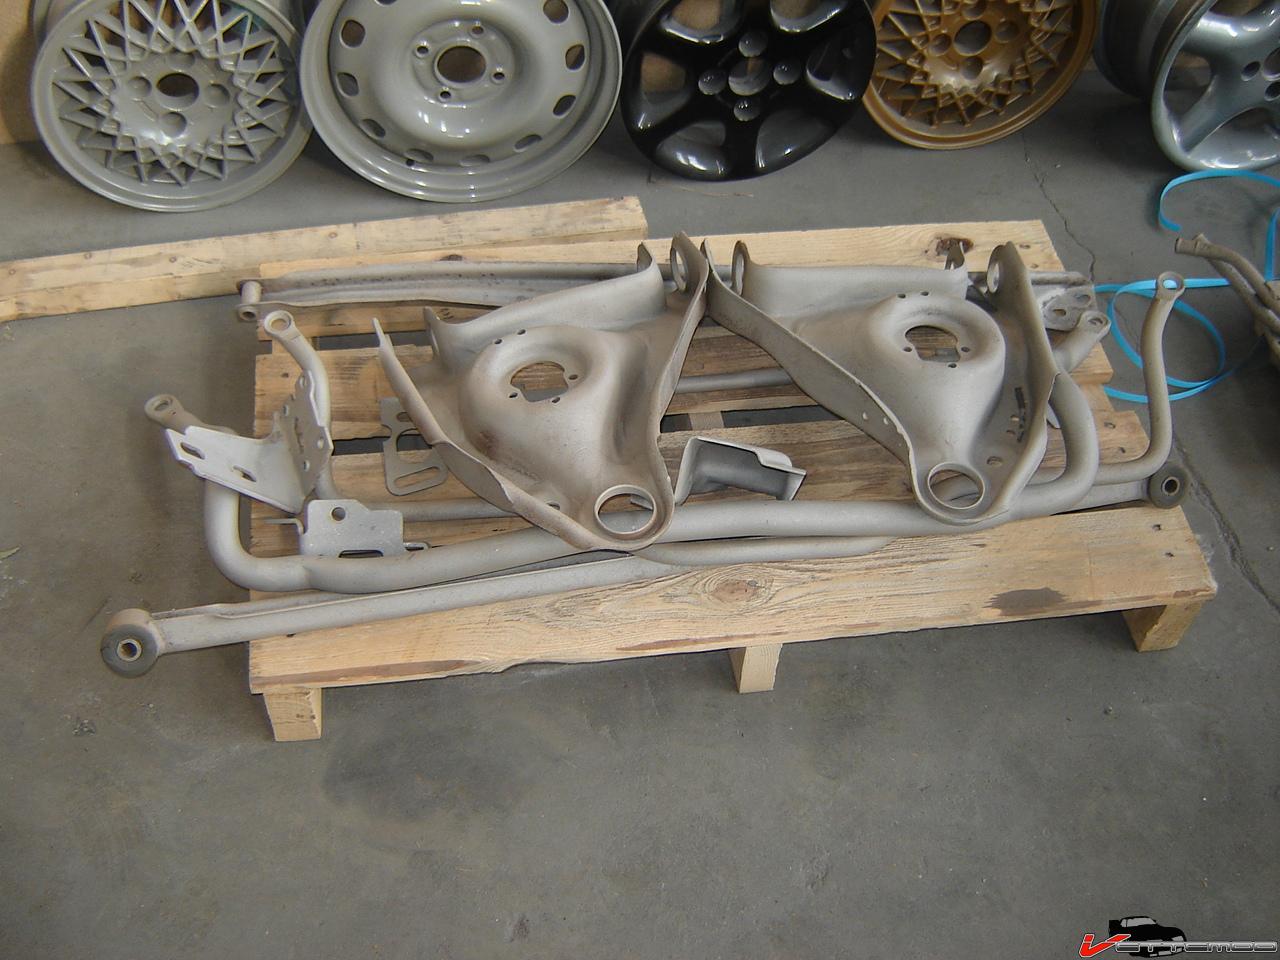
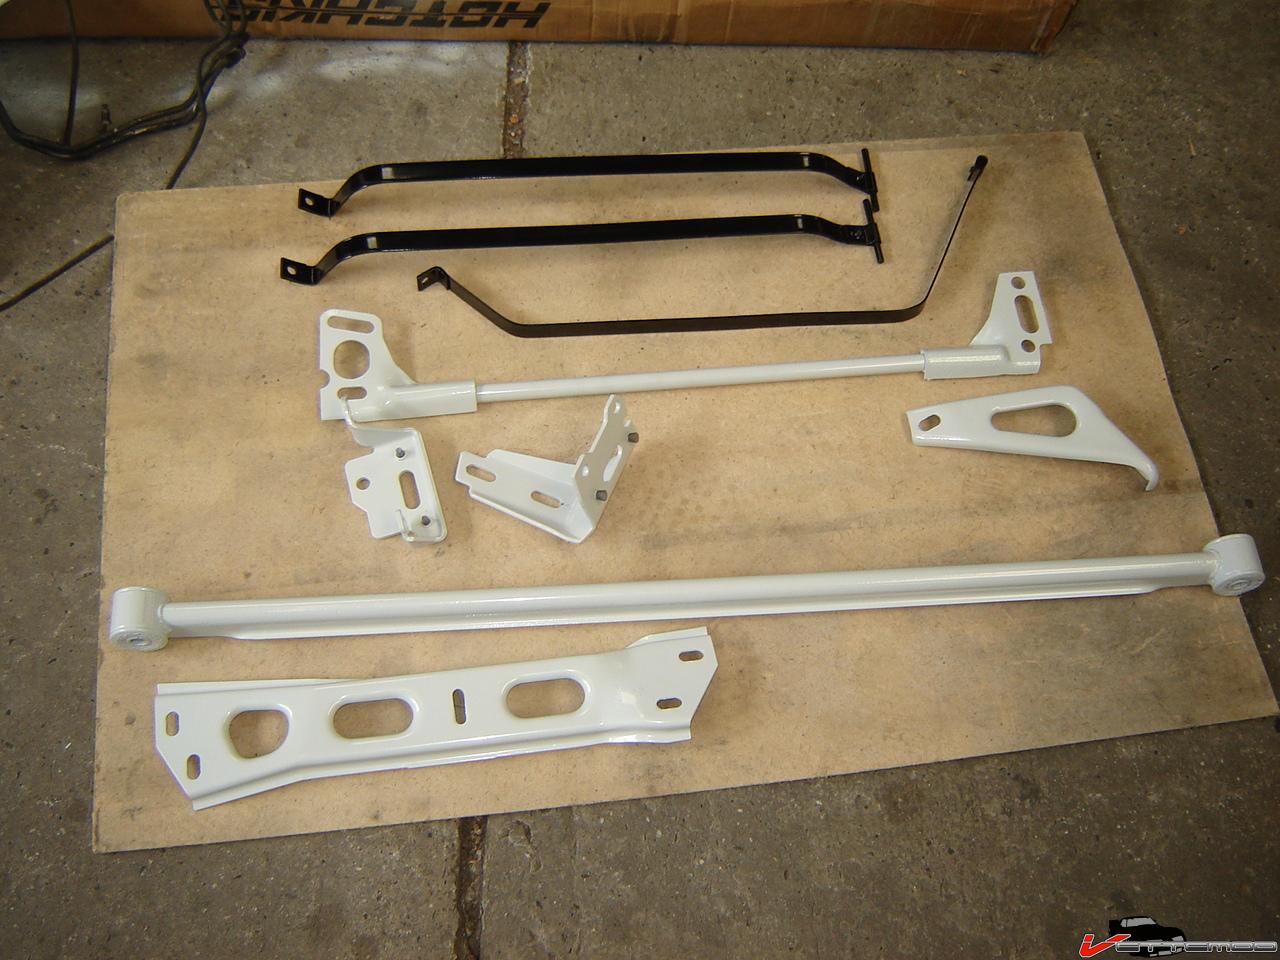
Going to fit a bunch of new stuff, Konis all round, new LCAs, LCA relocation brackets on the axle, Baer Tracks 13" front brakes, PBR rears w 12" vette rotors, Eibach Sport Line Springs, Bimmer M6 wheels, Edelbrock strut tower brace, UMI adjustable strut towers, a full stainless exhaust...probably a dual but not sure it'll fit. i'm going to weld up some SFCs and maybe fab my own adjustable panhard bar and support bar. I'm going w/ gray for the components. Also doing the front A arms with all new bushings, same for the sway bars and all. Everything will be powdercoated. I may end up reinforcing the arms a bit.
Installed a new hatch pull down motor. Bubba cut off all the wiring and threw the relay under the carpet under the drivers seat. Had to rewire the whole thing from the console backwards. Got it done, it's working flawlessly. I'm psyched, always hated using the key.
Did find a rust hole in the dr. side rear wheel well and a bunch of mud inside the area under the storage compartment. Removed all that, will weld fresh steel into the wheel well, going to need a patch panel since the outside is showing blisters too. Another shoddy repair, jut a bunch of bondo plastered all over the area.
Also removed the rear hatch panel, water was coming through on the sides and little rust flakes were falling down. The bottom panel was a little pitted. It'll be blasted and powdercoated.
Decided to pull the 9 bolt, the posi is dead. No friction left whatsoever... damn
Going to fit a bunch of new stuff, Konis all round, new LCAs, LCA relocation brackets on the axle, Baer Tracks 13" front brakes, PBR rears w 12" vette rotors, Eibach Sport Line Springs, Bimmer M6 wheels, Edelbrock strut tower brace, UMI adjustable strut towers, a full stainless exhaust...probably a dual but not sure it'll fit. i'm going to weld up some SFCs and maybe fab my own adjustable panhard bar and support bar. I'm going w/ gray for the components. Also doing the front A arms with all new bushings, same for the sway bars and all. Everything will be powdercoated. I may end up reinforcing the arms a bit.

 08-07-2009, 03:31 PM
#3
Re: Pulling apart my 87 IROC
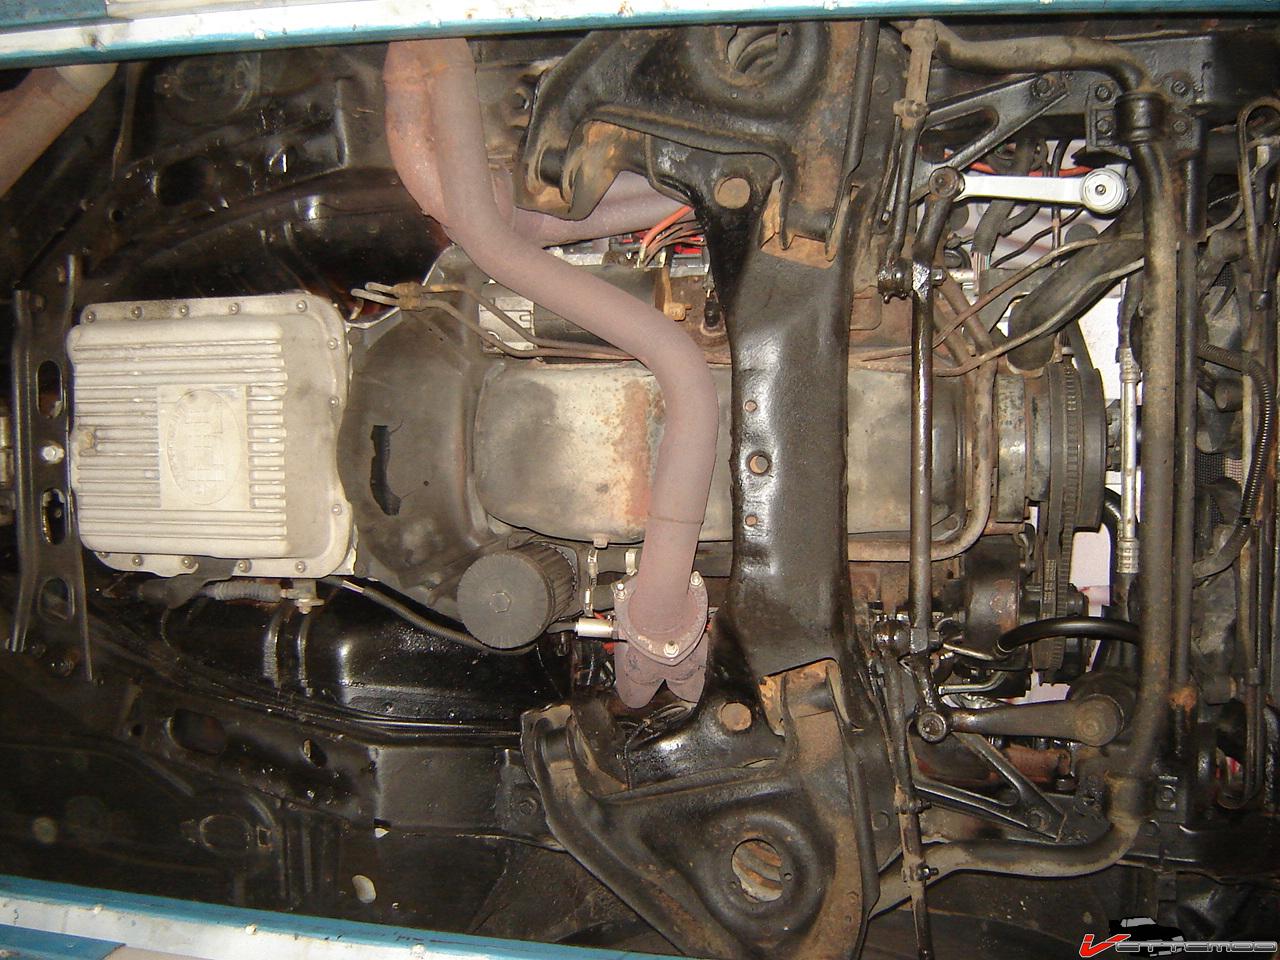
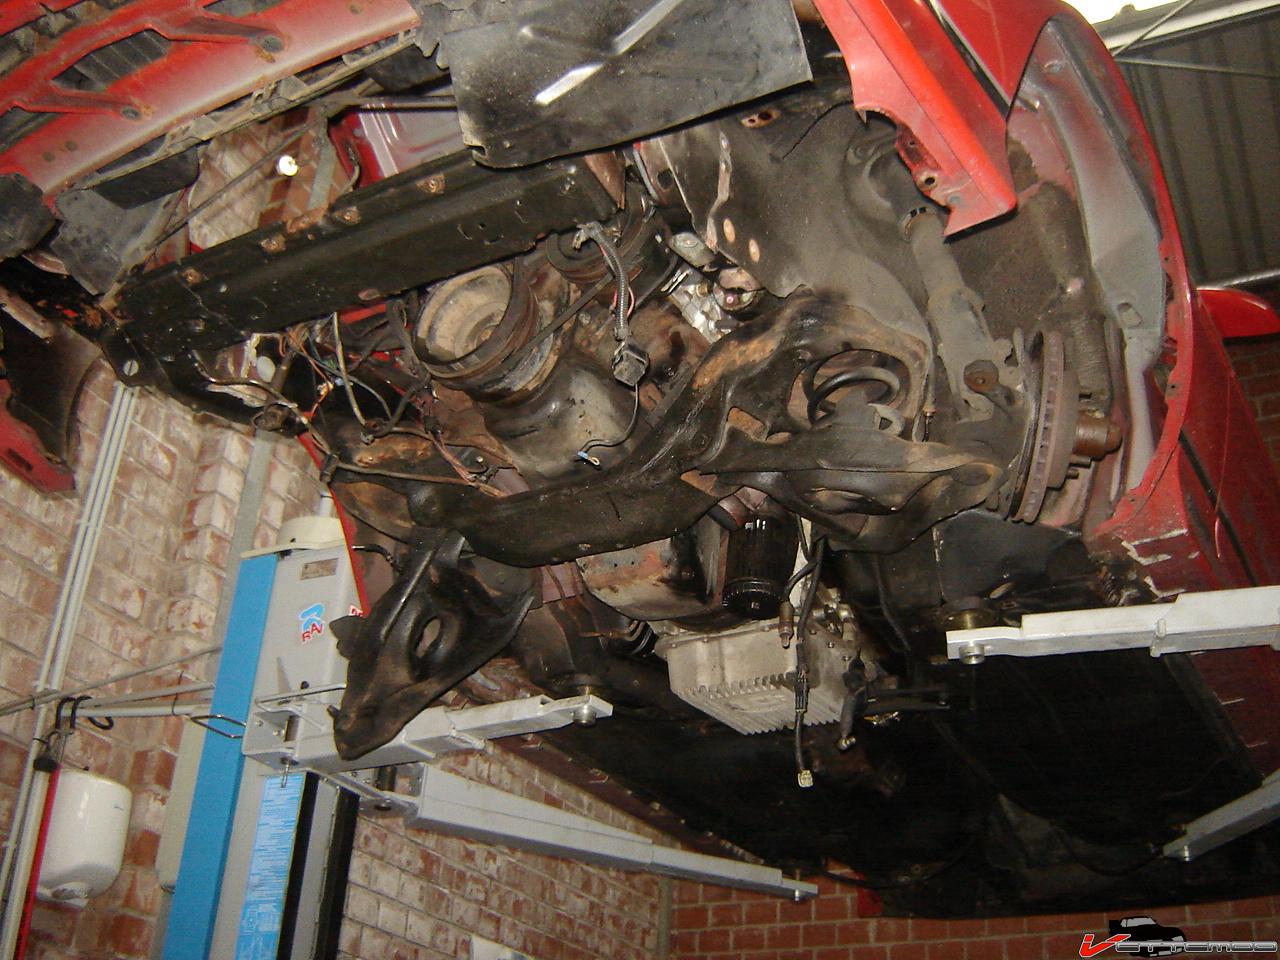
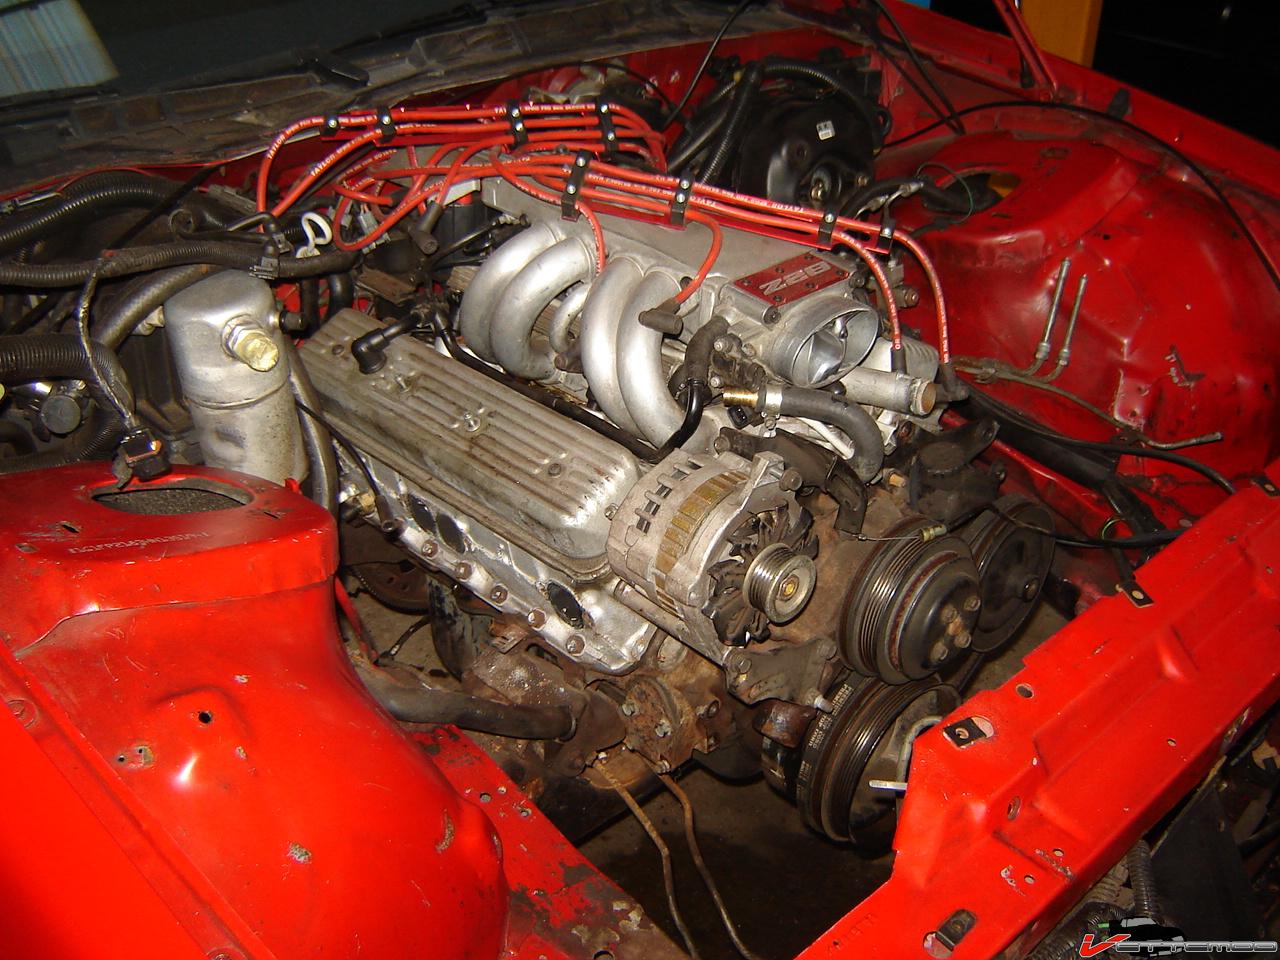
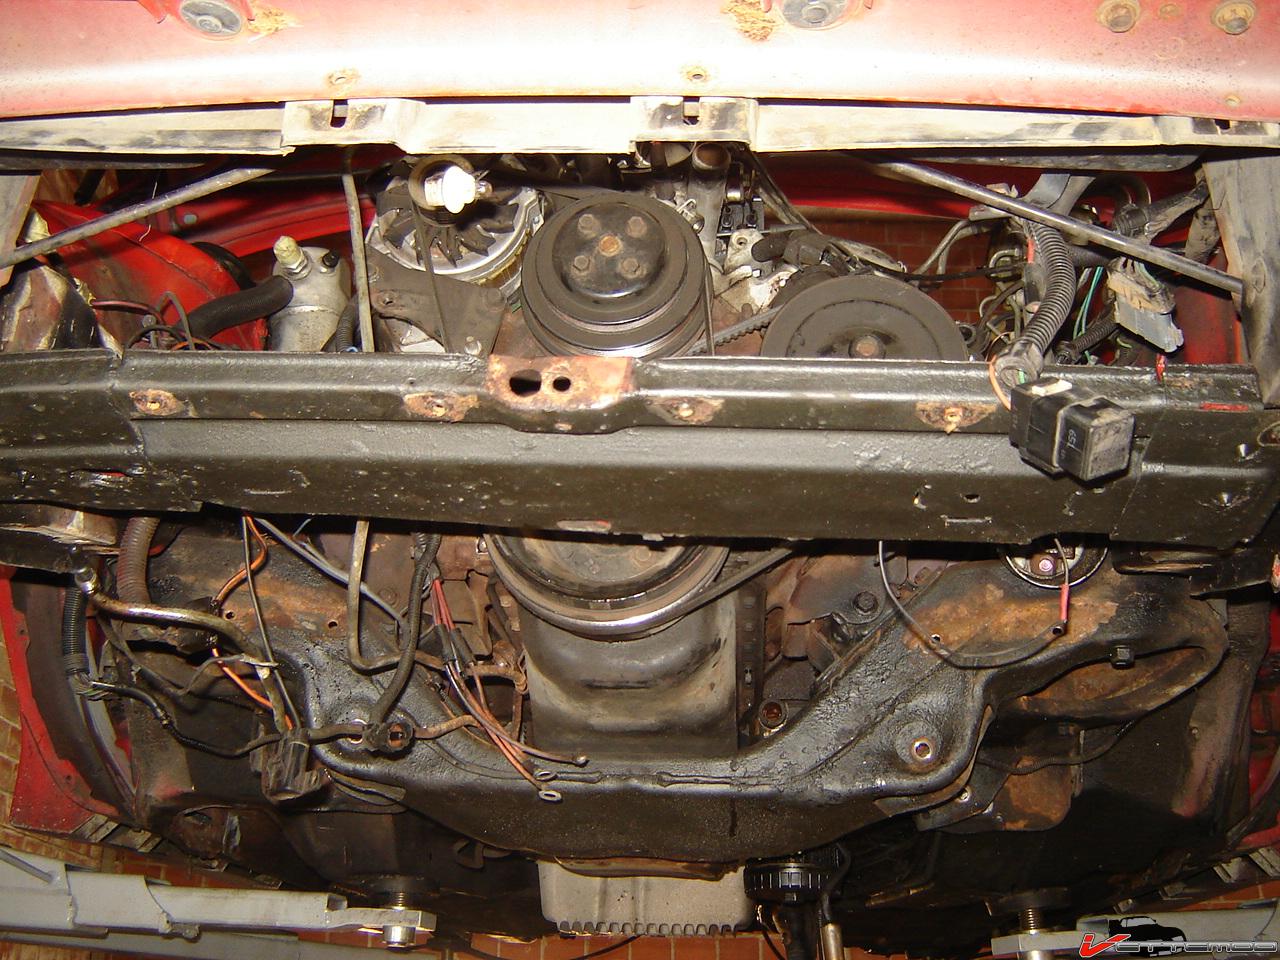
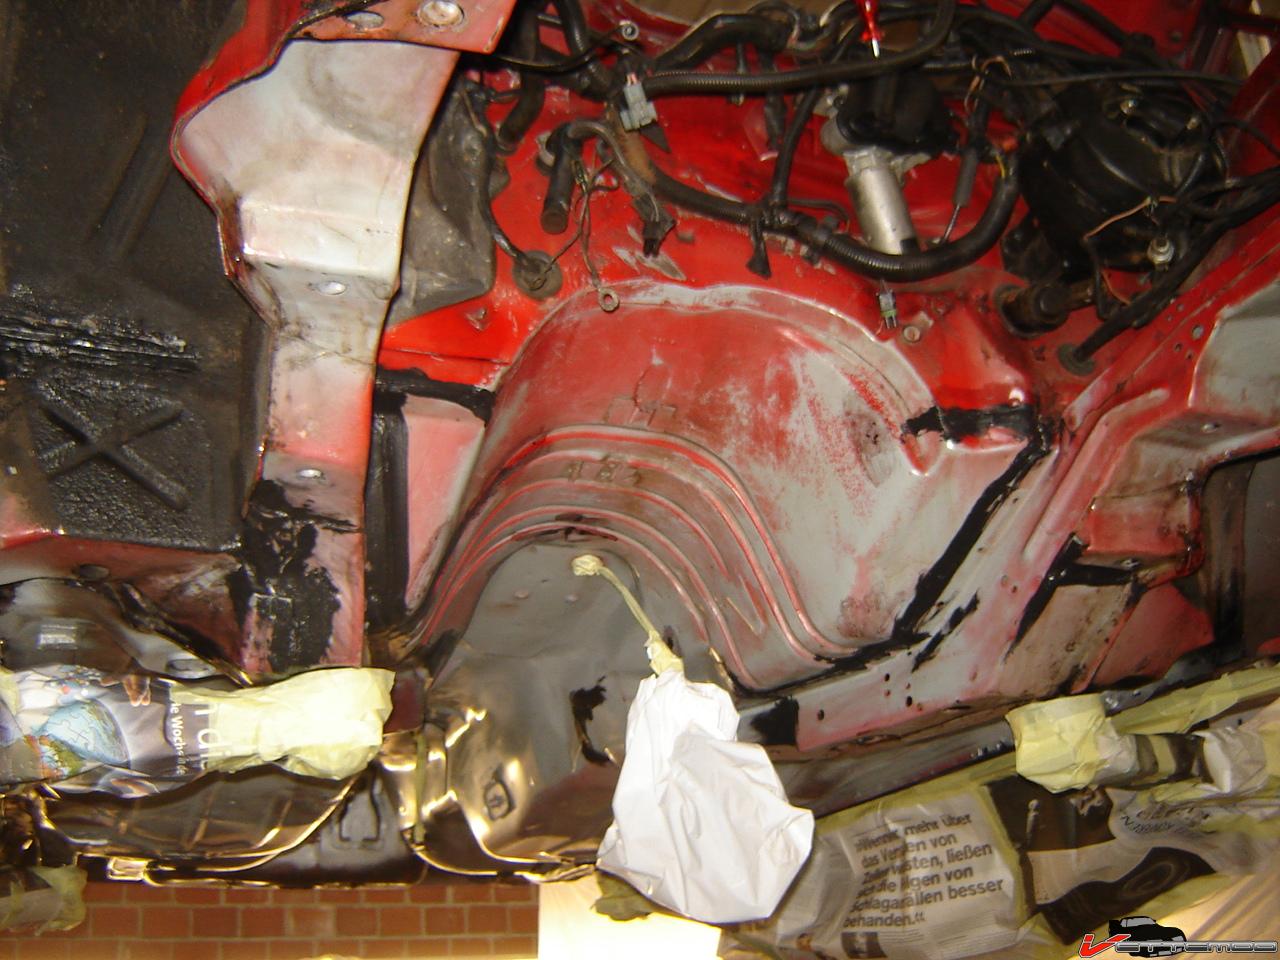
Tomorrow I'm going to pull the radiator and fix the dent in the lower crossmember (some idiot put a jack under there) and I'll probably pull the entire engine too...maybe drop the front crossmember. The whole susp. needs to come off anyway. I'll probably drop the tank too. Something is stinking on the dr. side, I think the seal between the filler tube and tank may be bad. Time to fix that too.
This was before...what a mess.
 '
'
I want it to be clean and grime free, I hate working on sticky crap. It needs to have a detailed look.
This was before...what a mess.
'I want it to be clean and grime free, I hate working on sticky crap. It needs to have a detailed look.
08-10-2009, 05:15 AM
#4
Member

Join Date: Oct 2003
Location: Commerce MI
Posts: 212
Likes: 0
Received 0 Likes
on
0 Posts
Car: 1991 Trans Am
Engine: 5L TPI
Transmission: 700R4
Re: Pulling apart my 87 IROC
Good work so far, TwinTurbo. It's good to 'take the bull by the horns' now with that floorpan, it will just degrade rapidly if left like that due to open-air rust. It's going to be great once all the new parts are in 
08-10-2009, 05:40 AM
#5
Re: Pulling apart my 87 IROC
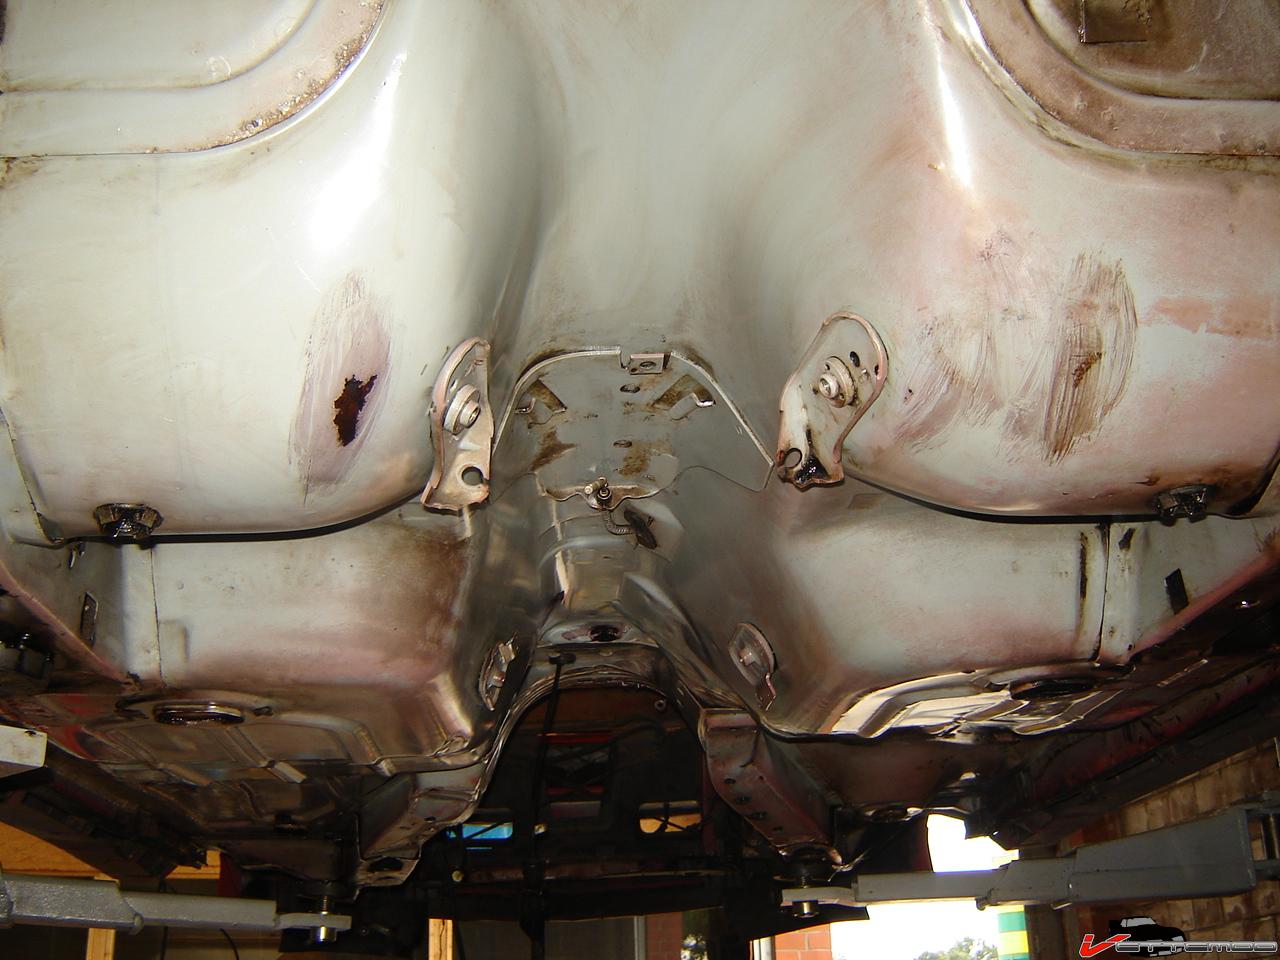
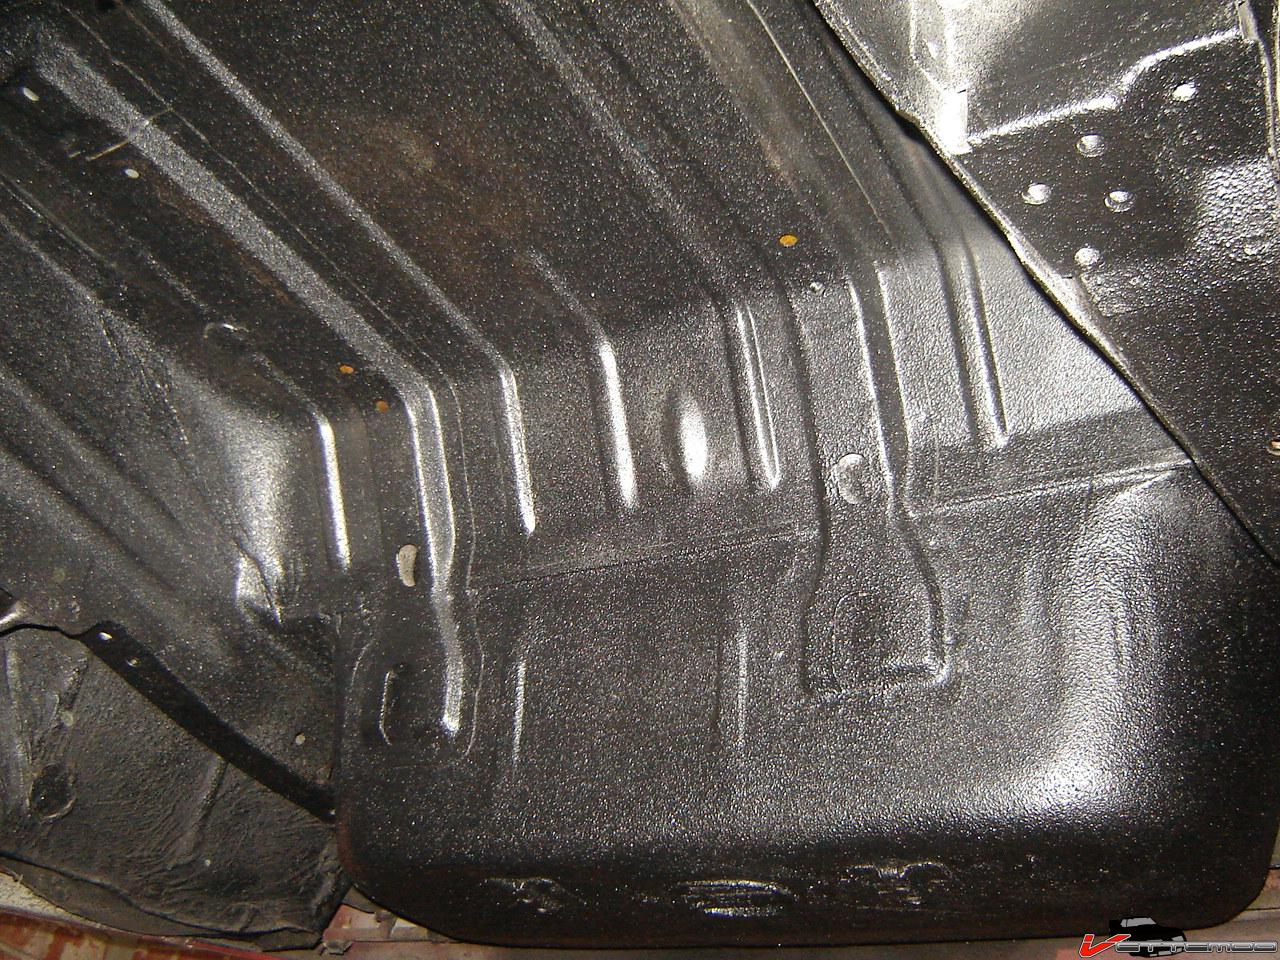
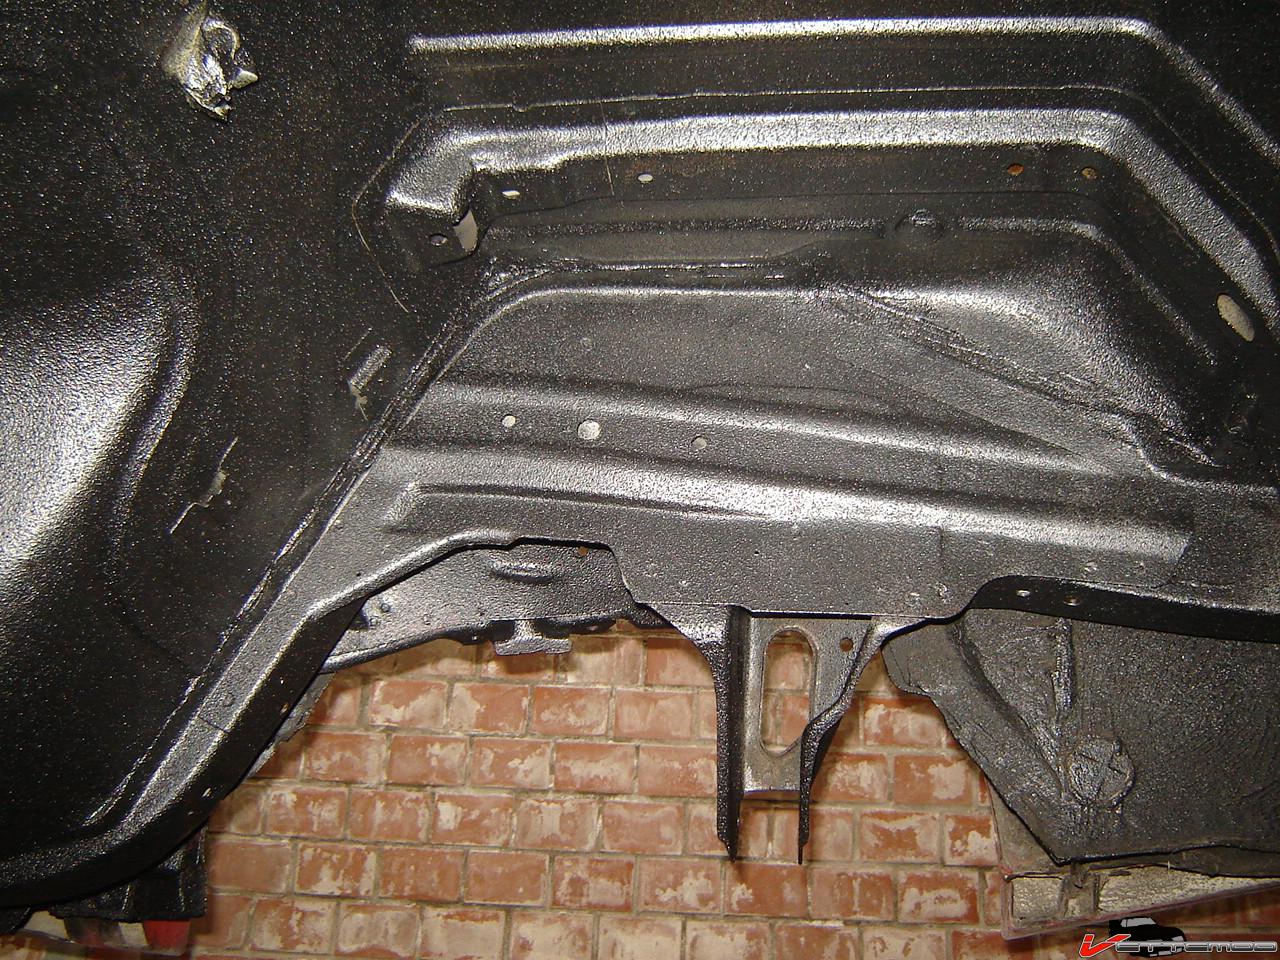
That floor pan has been like that for at least 5 years (have an invoice from the prev. owner from when that stupid cut out was put on) and there's no rust on it whatsoever, not even on the bare welded part or where the scorching heat burned the underlaying carpet. The underside is covered in that tar like crap. I'm going to take most of it off and put some better undercoating under there. I'm also going to metal finish and clean up the welded area and dents around it, then it's going to be epoxied and covered with dynamat or fatmat or something alike.
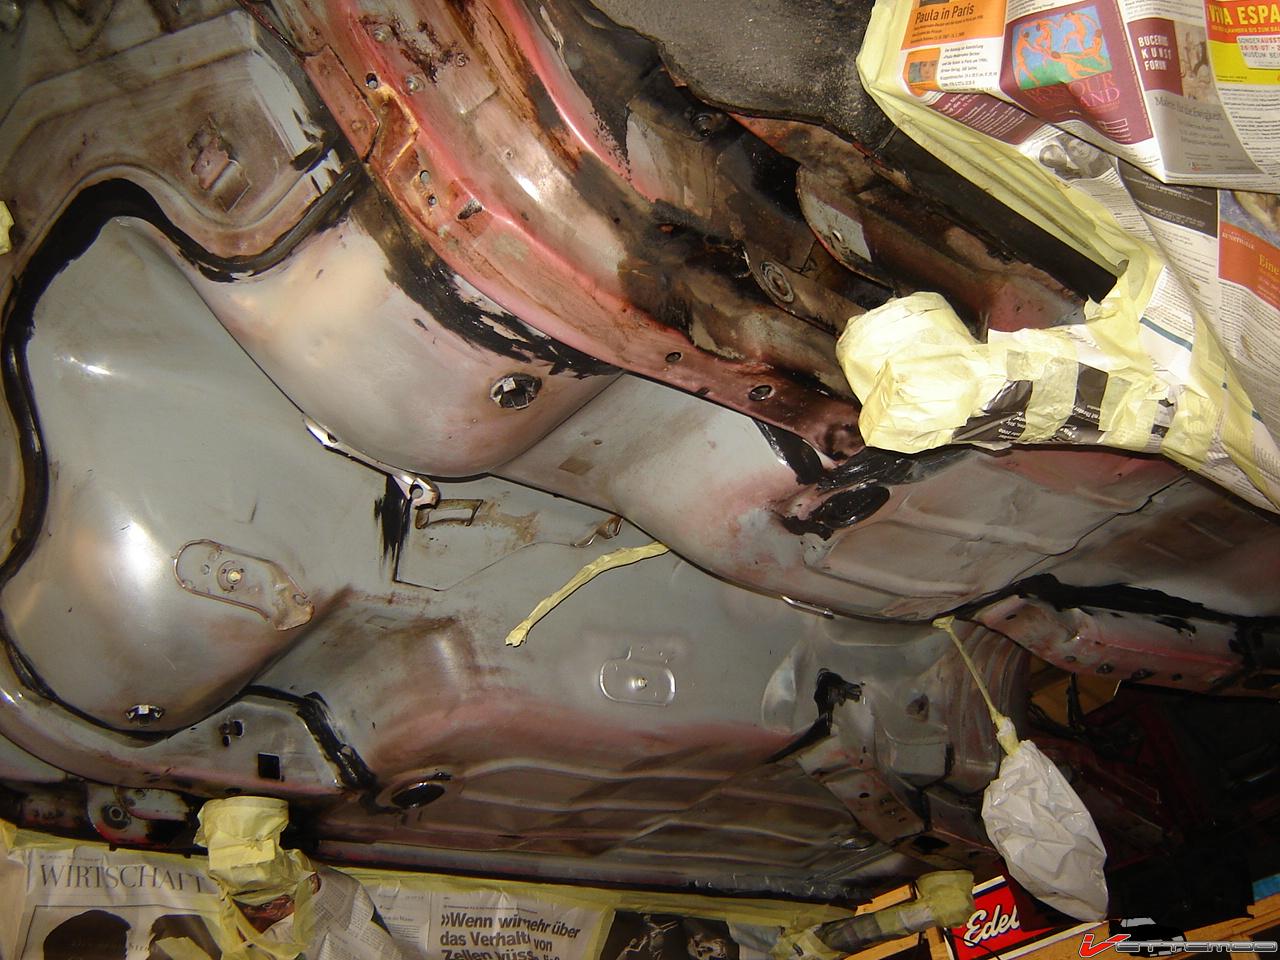
The only rust spots on the car are the rear quarter/fender edge and the seam between the quarter and the rear quarter (there was a bunch of sand under the storage compartment) and the thin metal covering the underside of the rocker area. That profesionally installed exhaust w/ the poor fitting y pipe (leaking all the time) hammered against that and there are some small rust pits there. I cut it out, sandblasted the area, will spray weldable primer in there and weld on a new section of metal. No big deal.
I also folded the lip back where the front quarter bolts up. The quarter was always sticking out, the lip was bent flat outboard. I first pulled it straight down, it pulled the fender back in. Pulled it more inboard and it's close to perfect now. I guess shops working on the car in the past put jacks there. Mind you, these are British shops and they are probably used to working on european cars and most of them are supposed to be jacked under the rails, obviously not so here. So I have some damage from jacking here and there as well as a dent in the front subframe from a stand, probably used on a 4 post and then the car sat on the subframe so they can work on a susp. corner. They do that all the time here. The metal is pretty flimsy too, i'll pull it out and weld a subframe conn. to it so it's nice, tight and strong.
I pulled the axle, the posi is shot, also disassembling the front susp and cooling system and am thinking about dropping the engine and trans w/ the front crossmember. I have all new stuff for that too, powdercoated arms w/ fresh bishings ad balljoints. I'll have the way bars, the corner gussets and the wonderbar powdercoated also along with the crossmember and anything else that comes off.
I'm swapping the heat exchanger/oil cooler for a 92 unit. Those have the later style line attachment that's much like the alu block w/ the center bolt on an AC compressor. It's got alu lines too. Only 92 have those, the earlier ones have hose barbs (yuck) and steel lines. Mine are quite pitted. i'll crimp some new flexible lines on the ends, going w/ Russel ProClassic braided hose. It works like a champ, I crimped that same hose on some hydraulic connectors I sued on a heater core in the 77 Corvette.
Still brainstorming how to do the exhaust. With SFCs I have not figured out how to get dual 2.75" pipes alongside the pass side of the car and exiting in front of the rear wheel (yes a boom tube of sorts ) There would have been so much more room w/ a T5, you could run them down the center of the car.
The only rust spots on the car are the rear quarter/fender edge and the seam between the quarter and the rear quarter (there was a bunch of sand under the storage compartment) and the thin metal covering the underside of the rocker area. That profesionally installed exhaust w/ the poor fitting y pipe (leaking all the time) hammered against that and there are some small rust pits there. I cut it out, sandblasted the area, will spray weldable primer in there and weld on a new section of metal. No big deal.
I also folded the lip back where the front quarter bolts up. The quarter was always sticking out, the lip was bent flat outboard. I first pulled it straight down, it pulled the fender back in. Pulled it more inboard and it's close to perfect now. I guess shops working on the car in the past put jacks there. Mind you, these are British shops and they are probably used to working on european cars and most of them are supposed to be jacked under the rails, obviously not so here. So I have some damage from jacking here and there as well as a dent in the front subframe from a stand, probably used on a 4 post and then the car sat on the subframe so they can work on a susp. corner. They do that all the time here. The metal is pretty flimsy too, i'll pull it out and weld a subframe conn. to it so it's nice, tight and strong.
I pulled the axle, the posi is shot, also disassembling the front susp and cooling system and am thinking about dropping the engine and trans w/ the front crossmember. I have all new stuff for that too, powdercoated arms w/ fresh bishings ad balljoints. I'll have the way bars, the corner gussets and the wonderbar powdercoated also along with the crossmember and anything else that comes off.
I'm swapping the heat exchanger/oil cooler for a 92 unit. Those have the later style line attachment that's much like the alu block w/ the center bolt on an AC compressor. It's got alu lines too. Only 92 have those, the earlier ones have hose barbs (yuck) and steel lines. Mine are quite pitted. i'll crimp some new flexible lines on the ends, going w/ Russel ProClassic braided hose. It works like a champ, I crimped that same hose on some hydraulic connectors I sued on a heater core in the 77 Corvette.
Still brainstorming how to do the exhaust. With SFCs I have not figured out how to get dual 2.75" pipes alongside the pass side of the car and exiting in front of the rear wheel (yes a boom tube of sorts
) There would have been so much more room w/ a T5, you could run them down the center of the car.
08-10-2009, 06:59 PM
#6
Member
Join Date: Oct 2003
Location: Commerce MI
Posts: 212
Likes: 0
Received 0 Likes
on
0 Posts
Car: 1991 Trans Am
Engine: 5L TPI
Transmission: 700R4
Re: Pulling apart my 87 IROC
Makes sense, about the undercoating. Guess I was thinking back to the 83 Z28 that I had.... apparently it got pretty wet once (t-tops?) and had significant floorpan, underseat and other interior rust even though the body exterior was fine. It's good you've not had to deal with that.
Are you in the Netherlands? If so I'll bet you get a lot of attention in your Camaro...
Are you in the Netherlands? If so I'll bet you get a lot of attention in your Camaro...
08-11-2009, 03:56 PM
#7
Re: Pulling apart my 87 IROC
Yes, I live in the Netherlands
Most people think the Camaro is hideous, especialy the interior. They don't "get" that 80s thing
Soon, very soon the engine, tranny and front crossmember are coming out. Almost done deconstructing this thing. Only prob encountered sofar is some clown stripped all the hex off the severely rusted knock sensor. Looks like it's time to weld a nut onto it, it's so damn tight...I don't know what the hell happened there.
Last edited by Twin_Turbo; 08-12-2009 at 03:21 AM.
Trending Topics
08-11-2009, 06:55 PM
#8
Member
Join Date: Oct 2003
Location: Commerce MI
Posts: 212
Likes: 0
Received 0 Likes
on
0 Posts
Car: 1991 Trans Am
Engine: 5L TPI
Transmission: 700R4
Re: Pulling apart my 87 IROC
Don't pay them any heed. They don't know what they're missing
Cool pix above, do keep us posted with the progress...
Cool pix above, do keep us posted with the progress...
08-12-2009, 02:41 PM
#9
Re: Pulling apart my 87 IROC
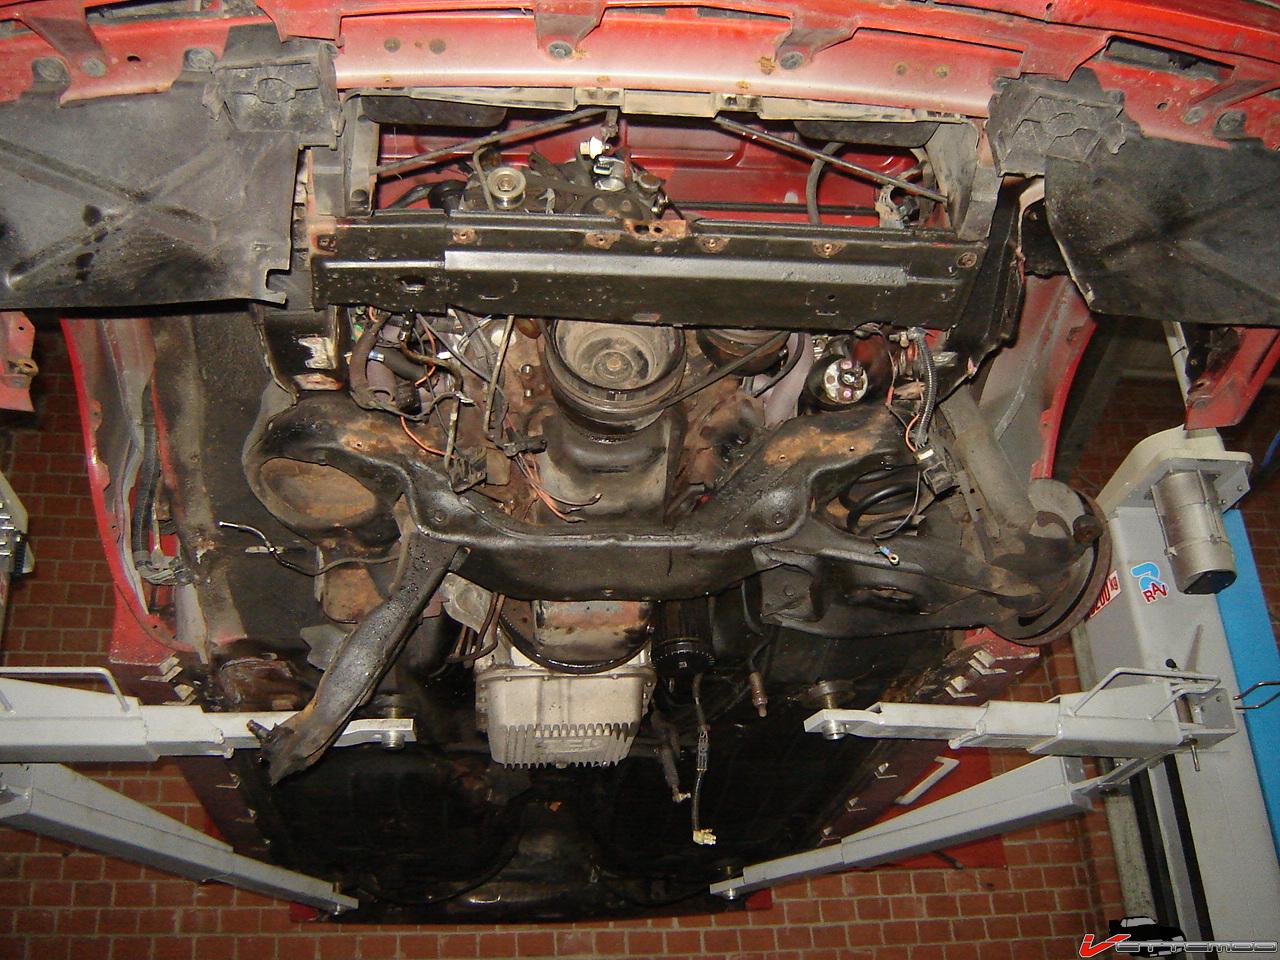
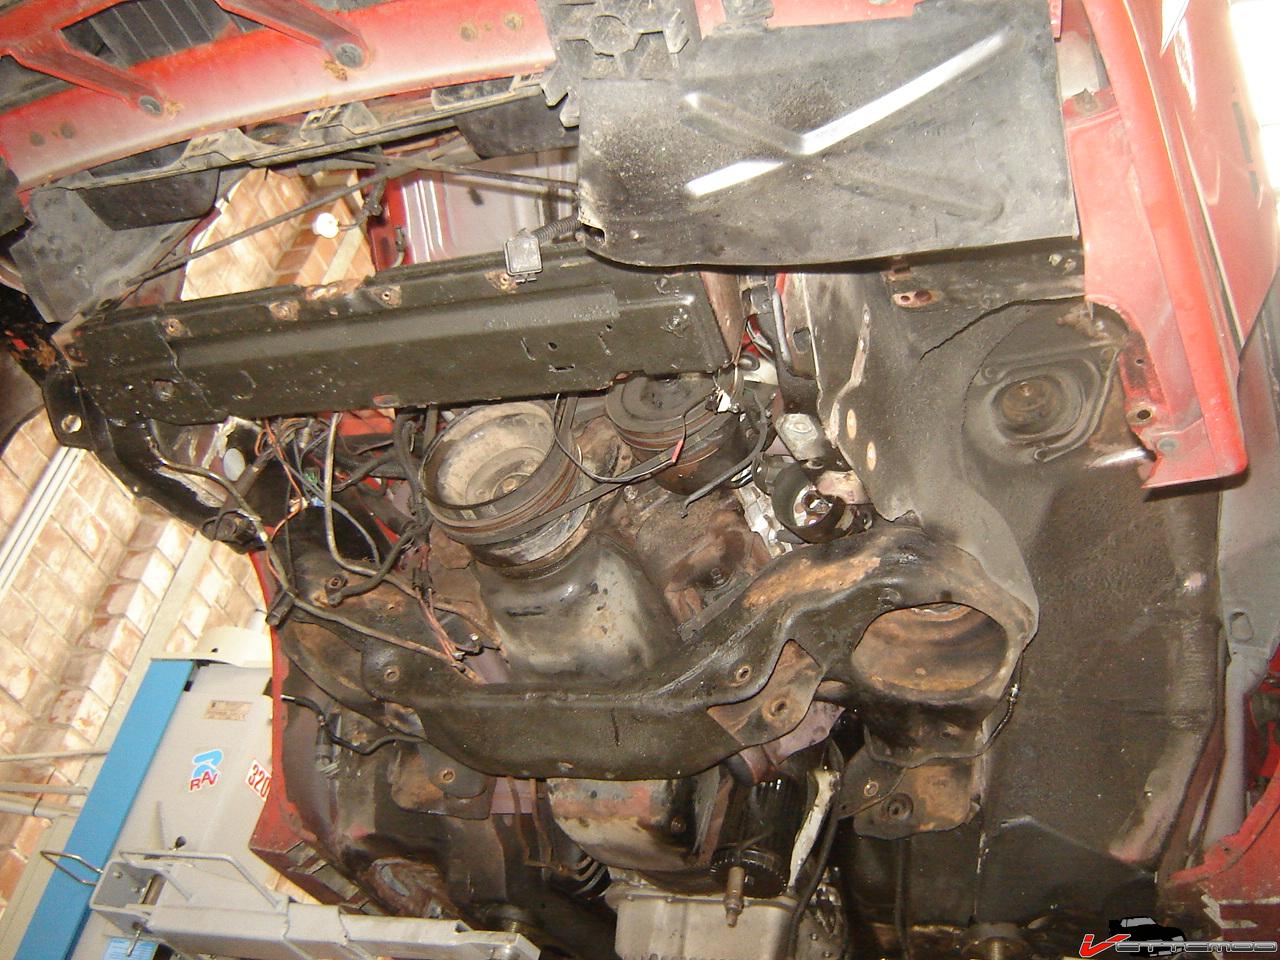
Got more done, everything is off except the engine/trans and front crossmember. Those are next.
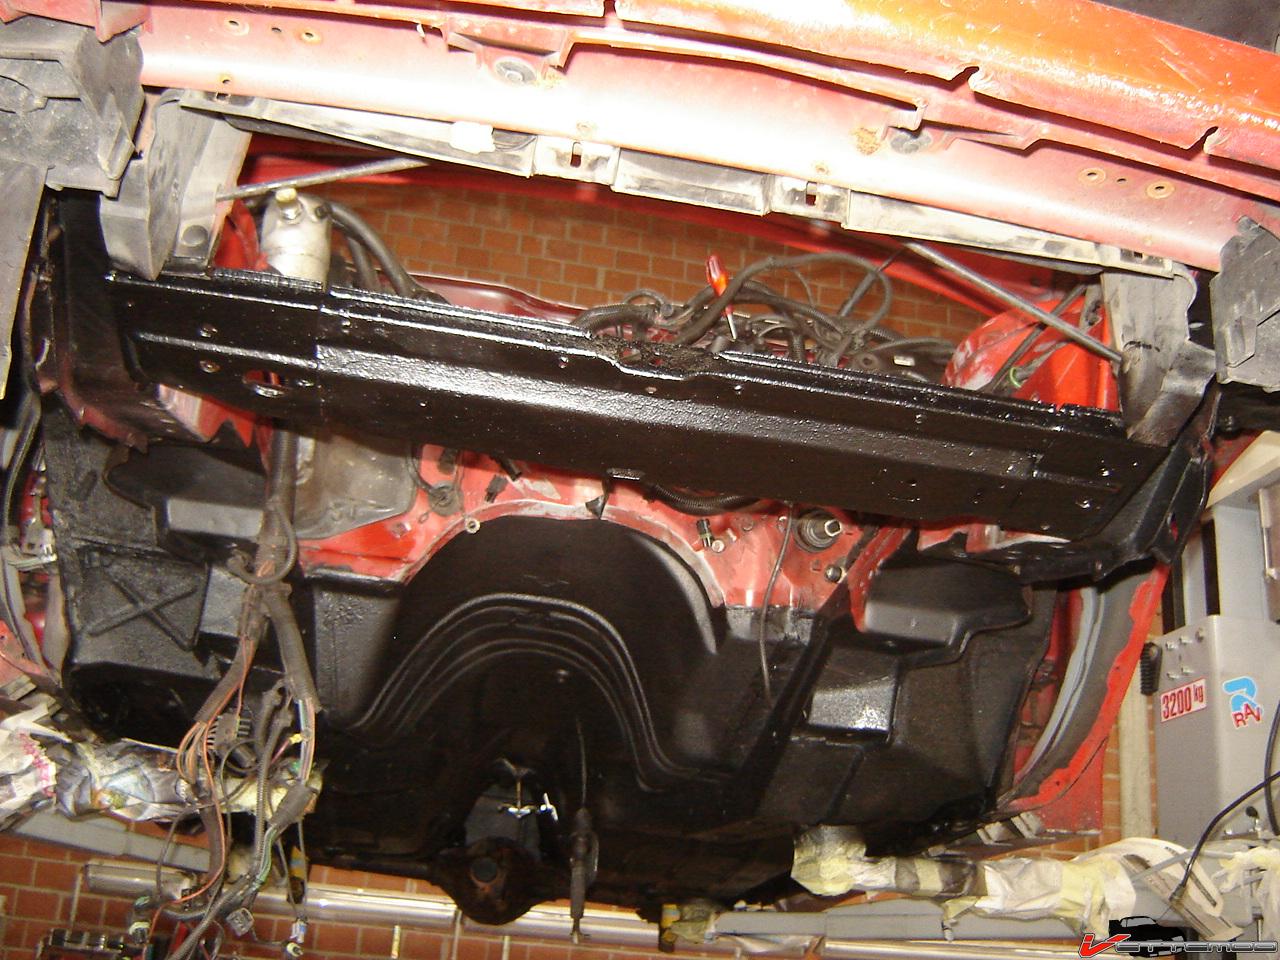
I'm going to have to fix this, the lower rad support is bent from unknown idiot placing a jack under there.
I'm going to have to fix this, the lower rad support is bent from unknown idiot placing a jack under there.
Last edited by Twin_Turbo; 08-12-2009 at 02:54 PM.
08-12-2009, 02:46 PM
#10
Re: Pulling apart my 87 IROC
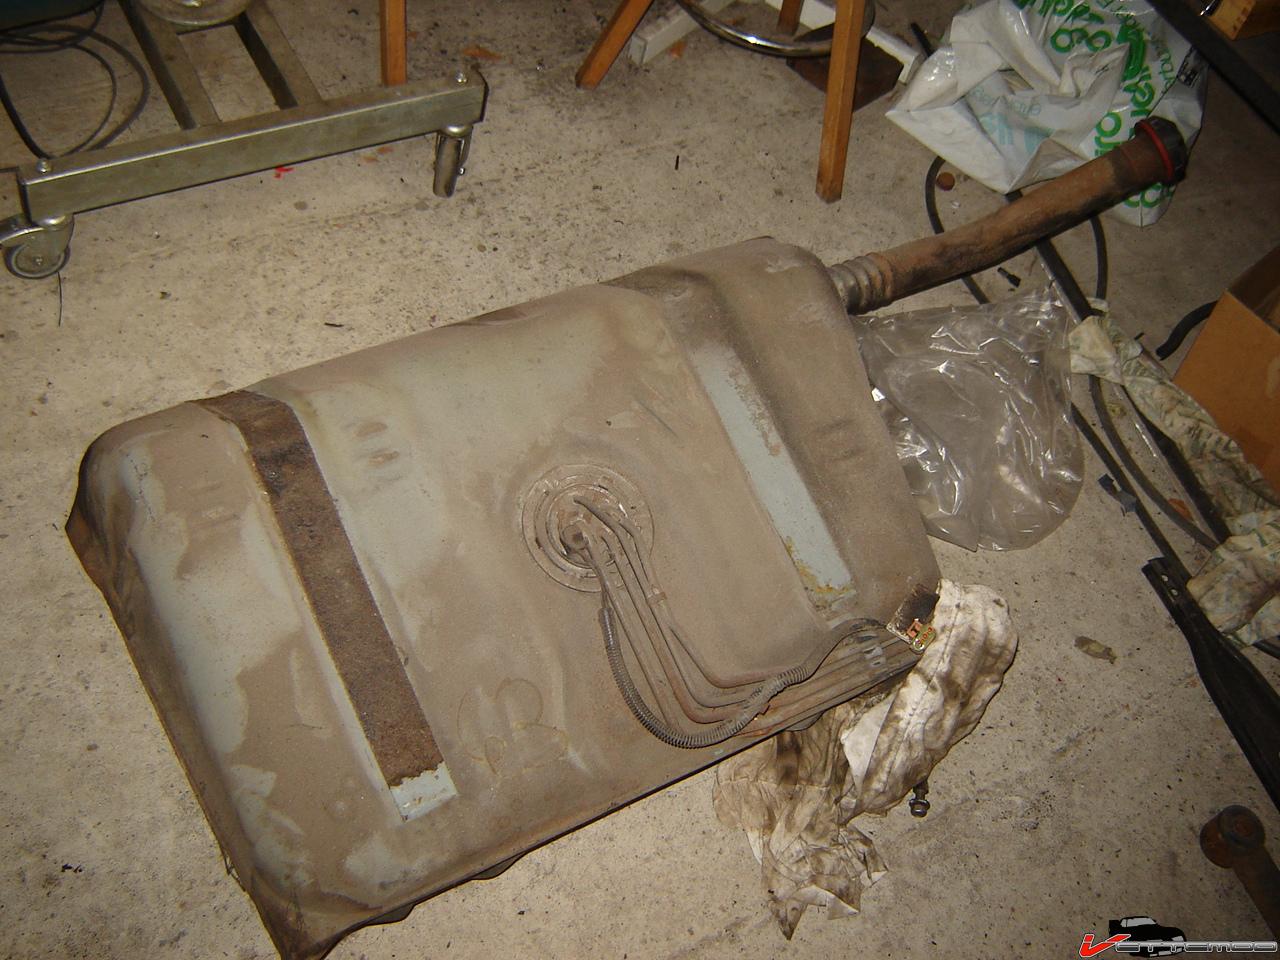
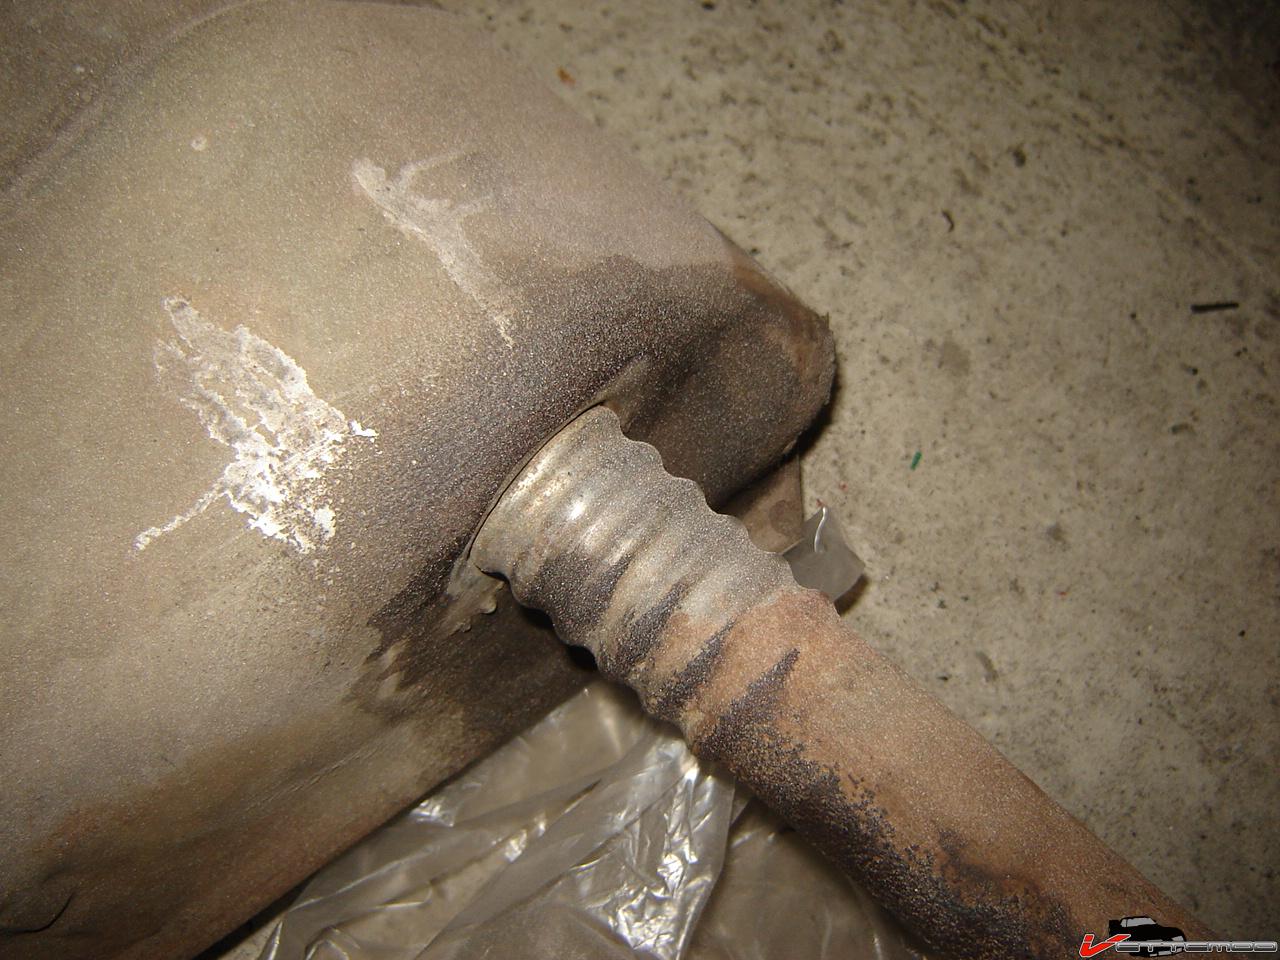
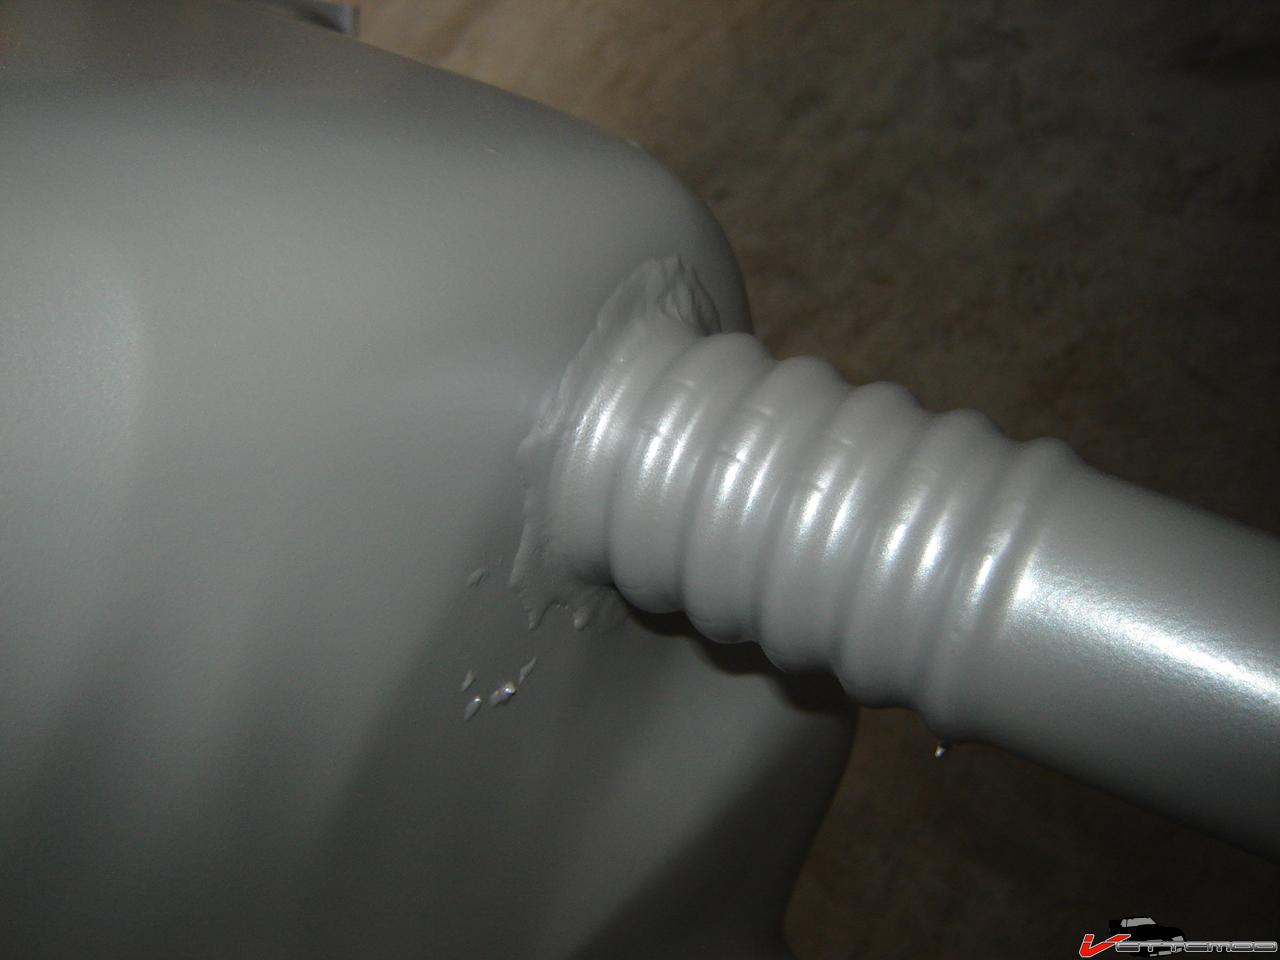
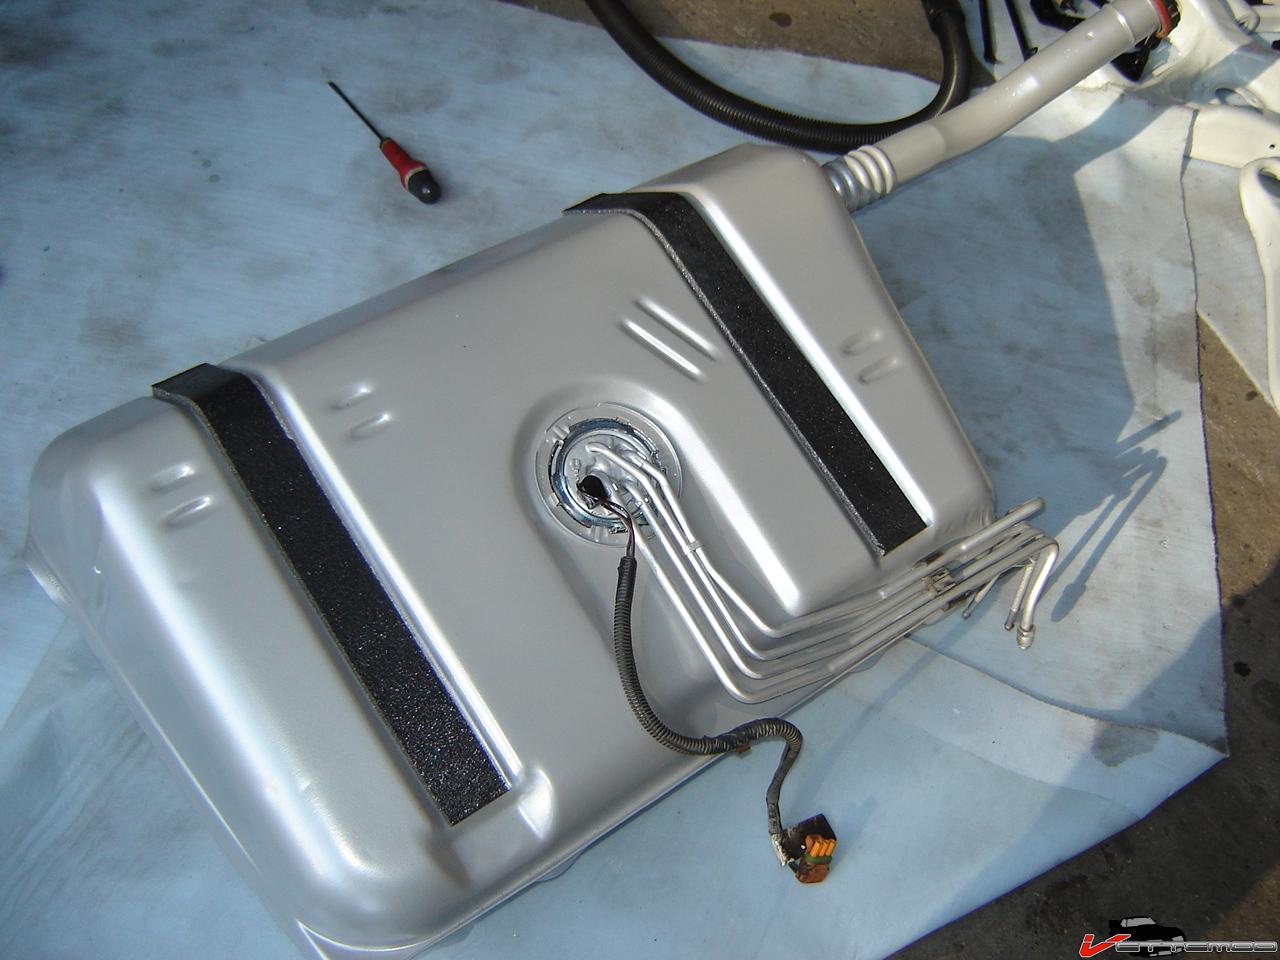
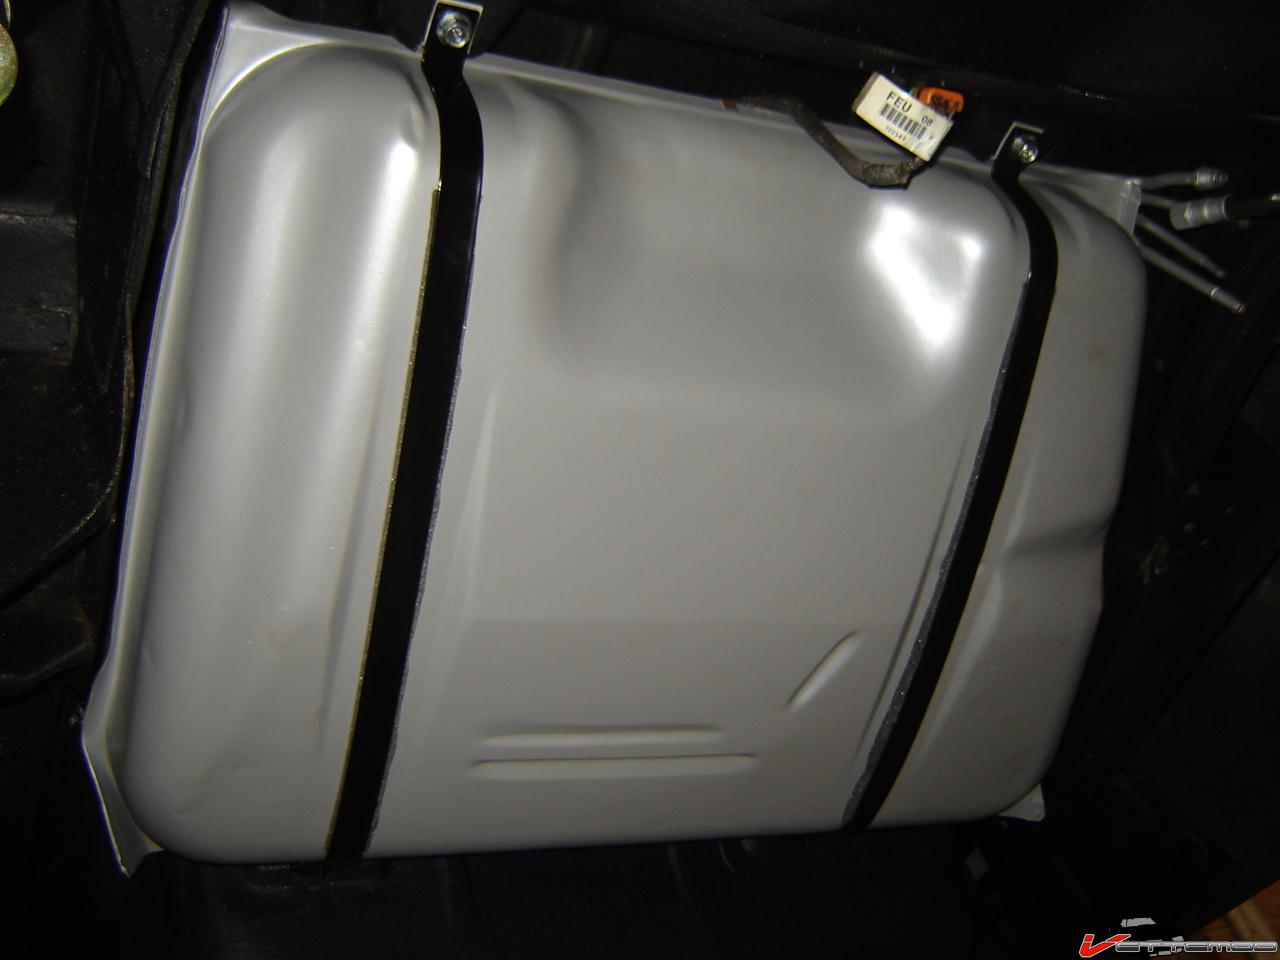
The tank is out too, found out where that fuel smell was coming from. It's leaking around the filler tube, so when I fill it up fuel is actually leaking out there, damnit...no wonder I get crappy mileage LOL
Whoever said that 2nd Gen arms would fit our cars and would provide more camber because the arms are longer was lying...the arms are not just longer, the 2nd gen arms are wider too and the spring pocket is in a significantly different location from the bushings also
 08-12-2009, 02:53 PM
#11
Re: Pulling apart my 87 IROC
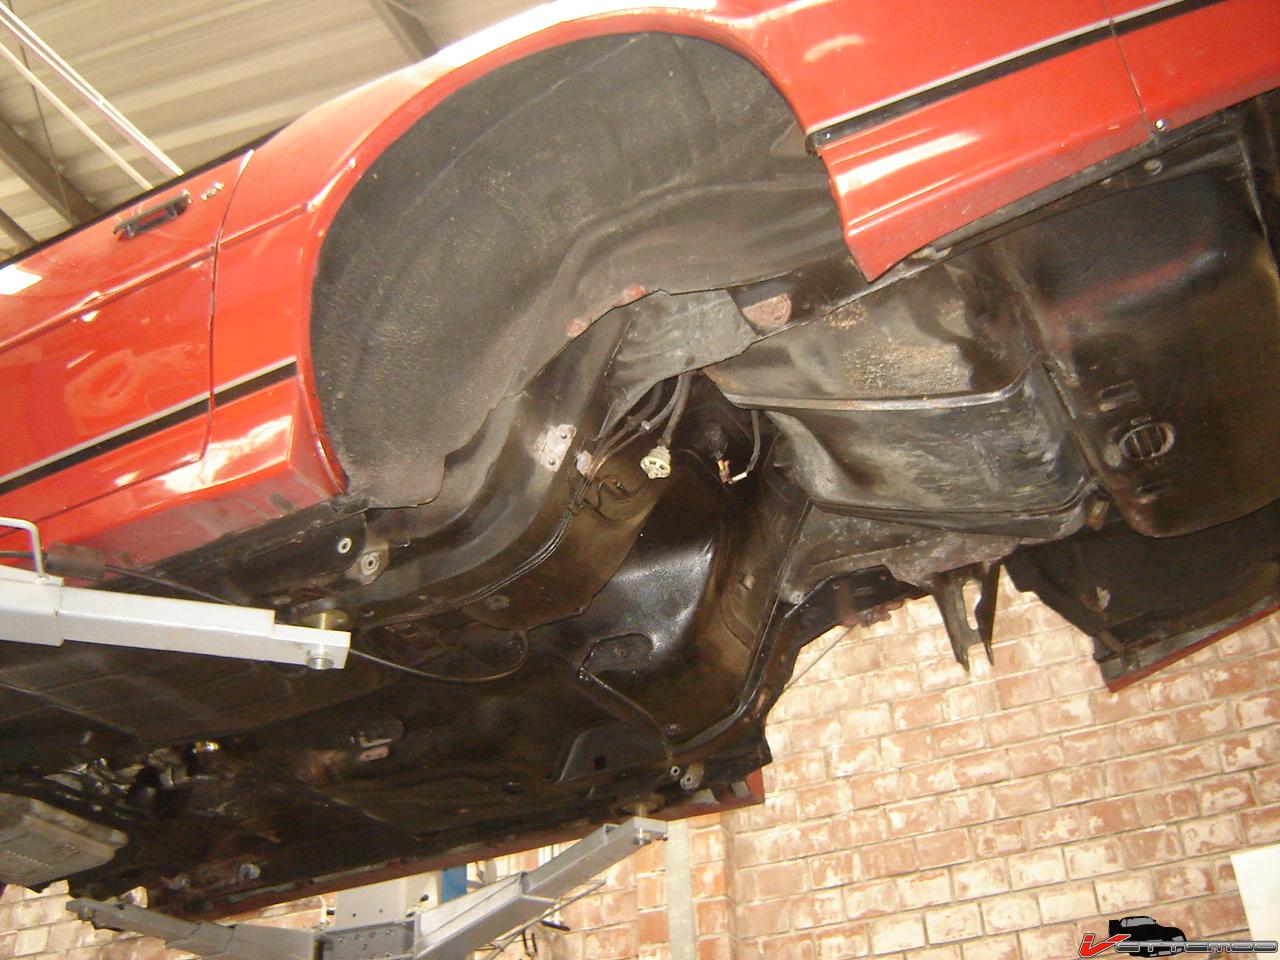
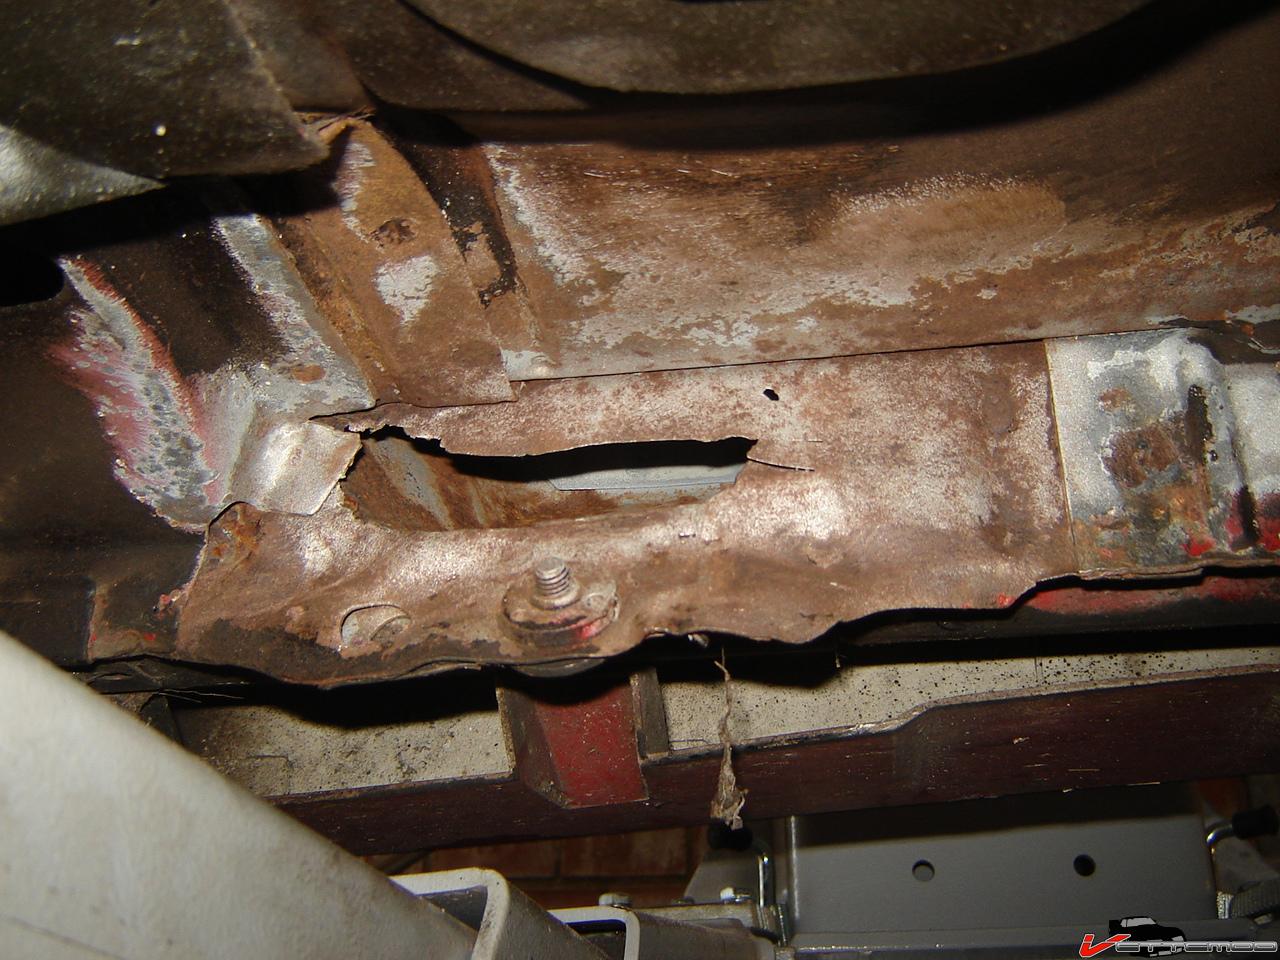
Only found a couple of small rust spots and one really bad one. The crossmember is rusty but it's coming out. Was that thing unpainted from the factory? The white 88's crossmember is rusty too...looking hideous
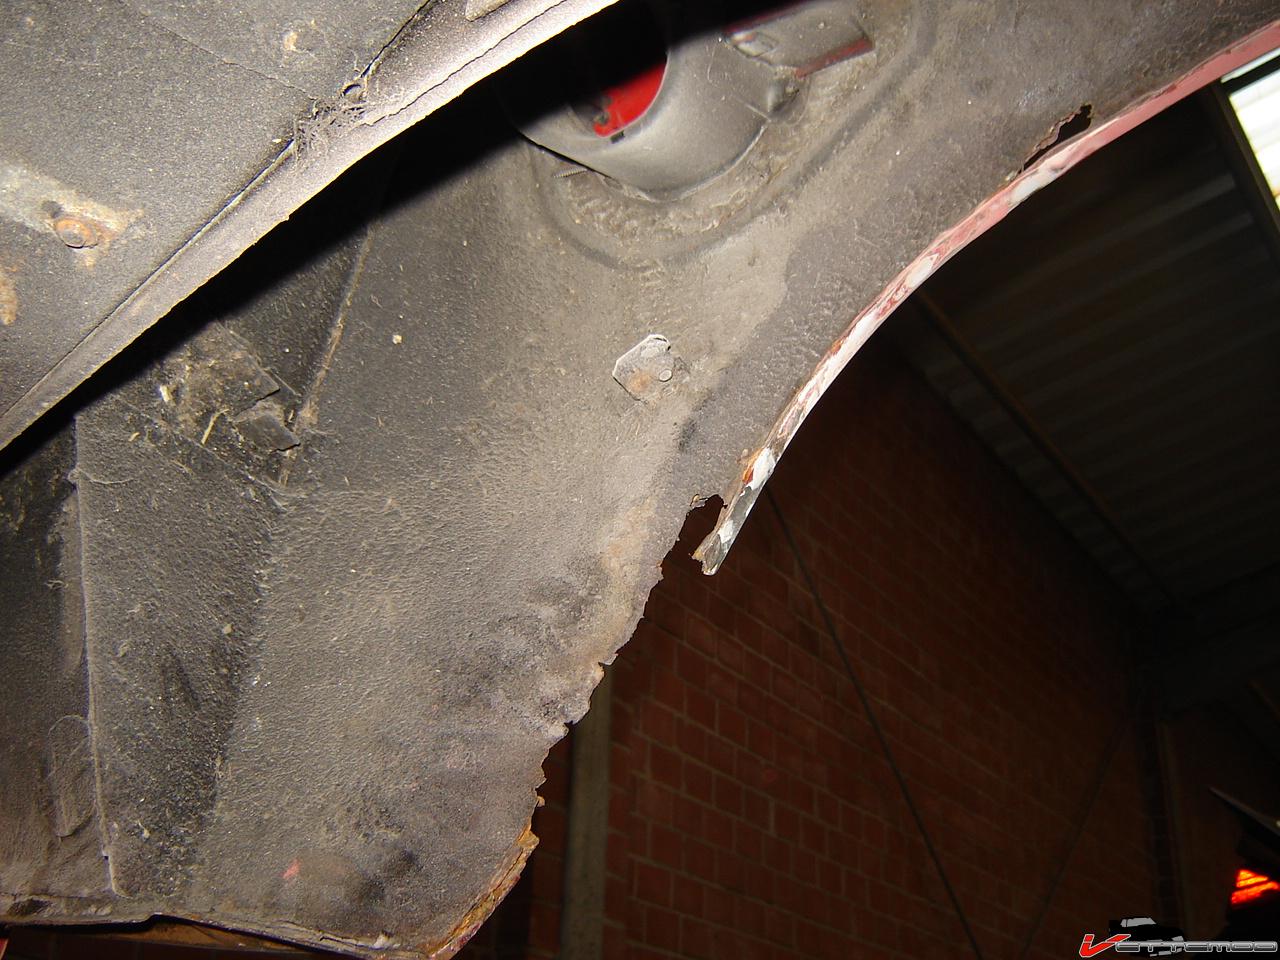
This area on the front, behind the inner fender has a little bit of corrosion but it's superficial, nothing a little sandblasting won't fix after peeling out the rest of the sealer there.
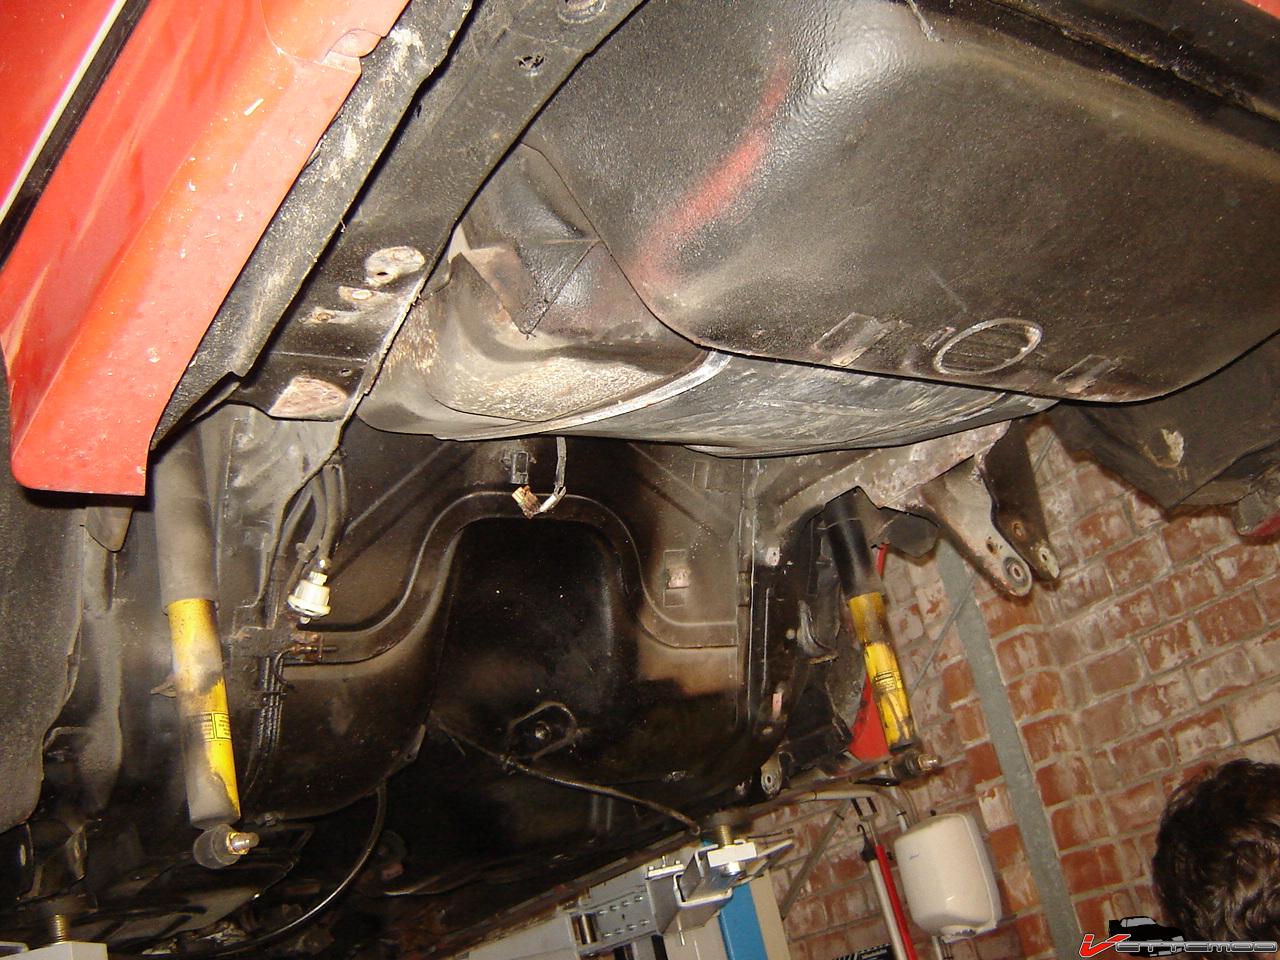
The area on the underside next to the exhaust had a pinhole, I did some light sandblasting and more pinholes appeared. The exhaust had been hitting this spot. So, I cut out a piece w/ the air saw. Time to weld in a fresh piece there, but man...that metal is crazy thin from the factory. I swear my beer can is made of heavier gauge steel LOL (yes, cans are not alu here)
I knew I had bumps and lumps on the rear fender and already found dirt in the rear quarter under the storage compartment. This is why. The holes were all filled with bondo and the large missing piece was covered with a very shoddy repair patch. I guess I'm going to need some donor pieces to fix this.
This area on the front, behind the inner fender has a little bit of corrosion but it's superficial, nothing a little sandblasting won't fix after peeling out the rest of the sealer there.
The area on the underside next to the exhaust had a pinhole, I did some light sandblasting and more pinholes appeared. The exhaust had been hitting this spot. So, I cut out a piece w/ the air saw. Time to weld in a fresh piece there, but man...that metal is crazy thin from the factory. I swear my beer can is made of heavier gauge steel LOL (yes, cans are not alu here)
I knew I had bumps and lumps on the rear fender and already found dirt in the rear quarter under the storage compartment. This is why. The holes were all filled with bondo and the large missing piece was covered with a very shoddy repair patch. I guess I'm going to need some donor pieces to fix this.
08-12-2009, 09:36 PM
#12
Member
Join Date: Oct 2003
Location: Commerce MI
Posts: 212
Likes: 0
Received 0 Likes
on
0 Posts
Car: 1991 Trans Am
Engine: 5L TPI
Transmission: 700R4
Re: Pulling apart my 87 IROC
Interesting pix. Best to attack and stop the rust now.
I didn't know you folks have steel beer cans... guess it makes sense though.
I didn't know you folks have steel beer cans... guess it makes sense though.
08-13-2009, 02:39 AM
#13
Re: Pulling apart my 87 IROC
Yes, but tastes like crap. They are teflon coated but once opened you still taste a metallic taste. The Germans have alu cans
Im going to repair the rust, seal all the areas off w/ epoxy and respray. Then i will put some stuff in all the hollow spaces so it won't rust again, ever.
Im going to repair the rust, seal all the areas off w/ epoxy and respray. Then i will put some stuff in all the hollow spaces so it won't rust again, ever.
 08-16-2009, 01:25 PM
#15
Re: Pulling apart my 87 IROC
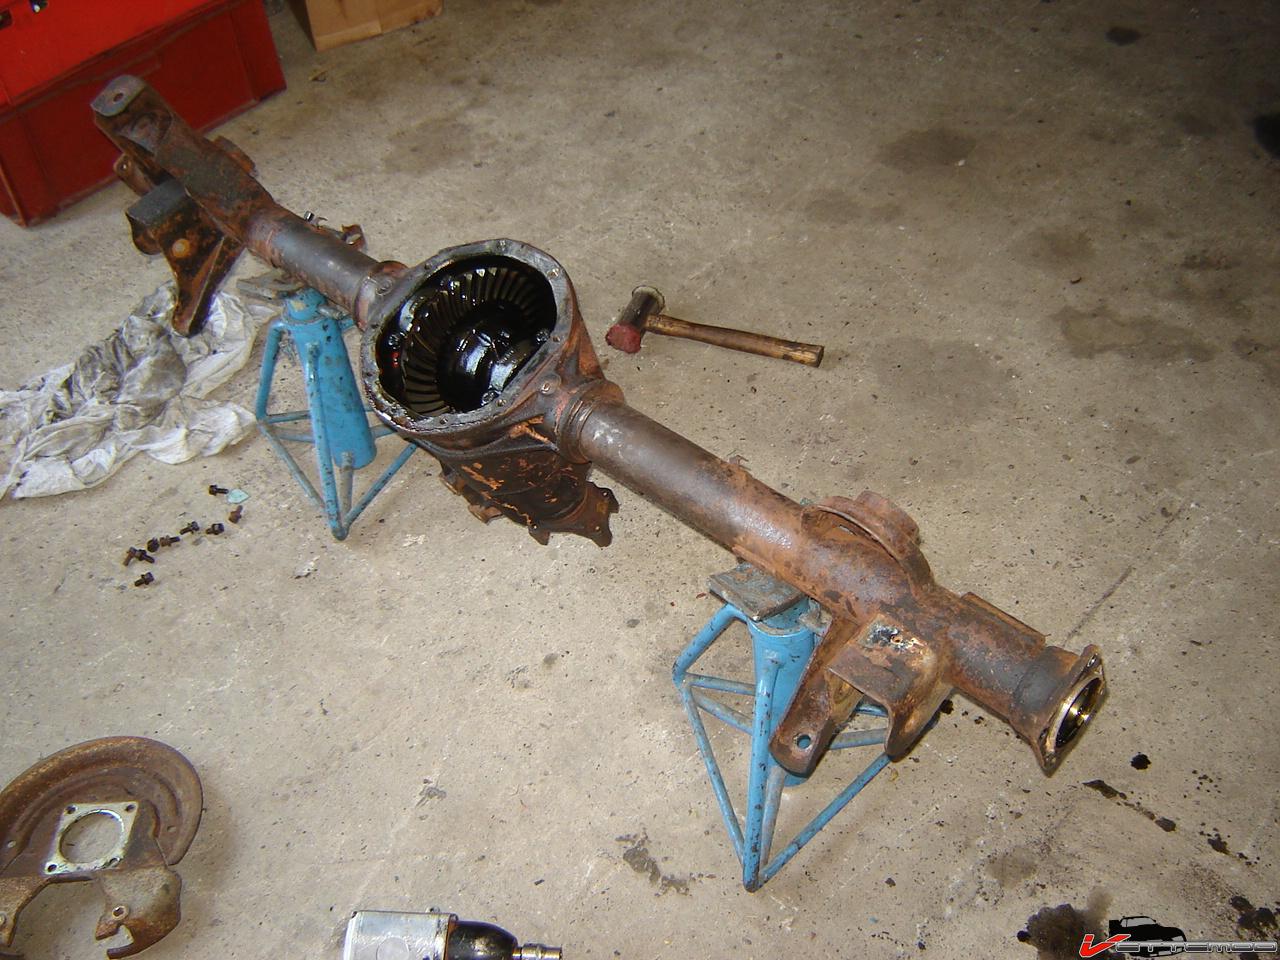
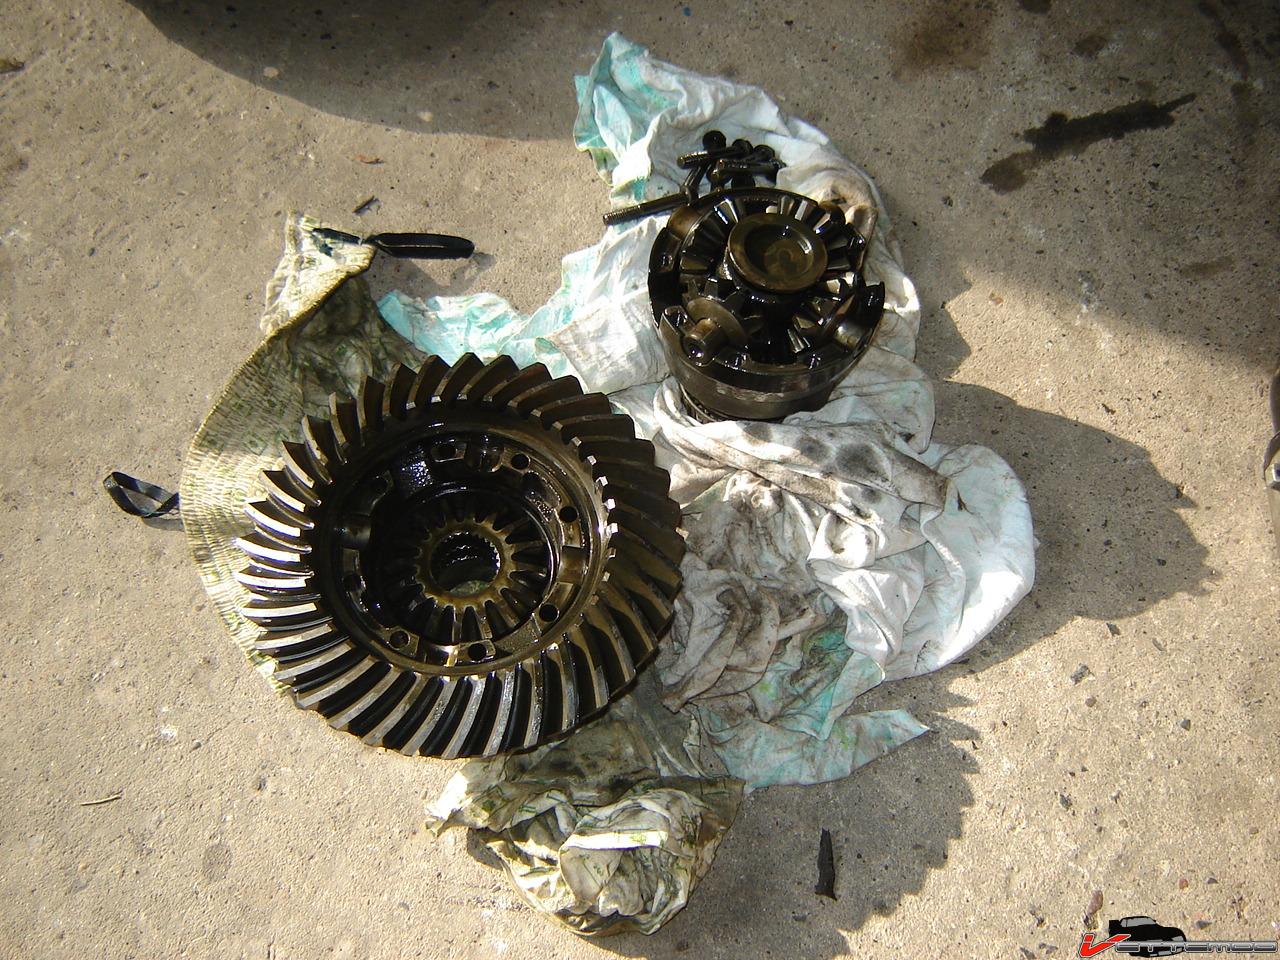
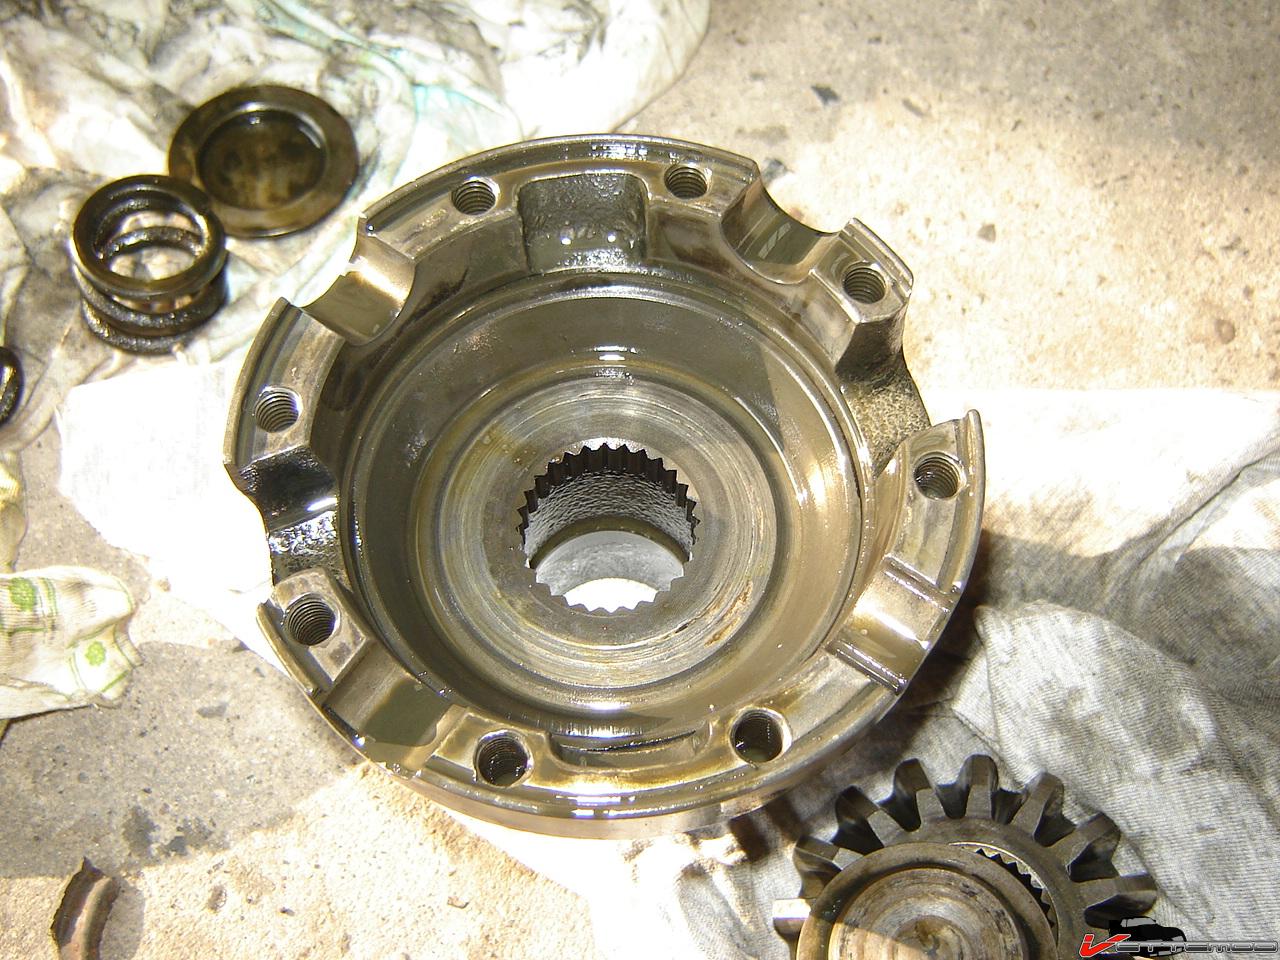
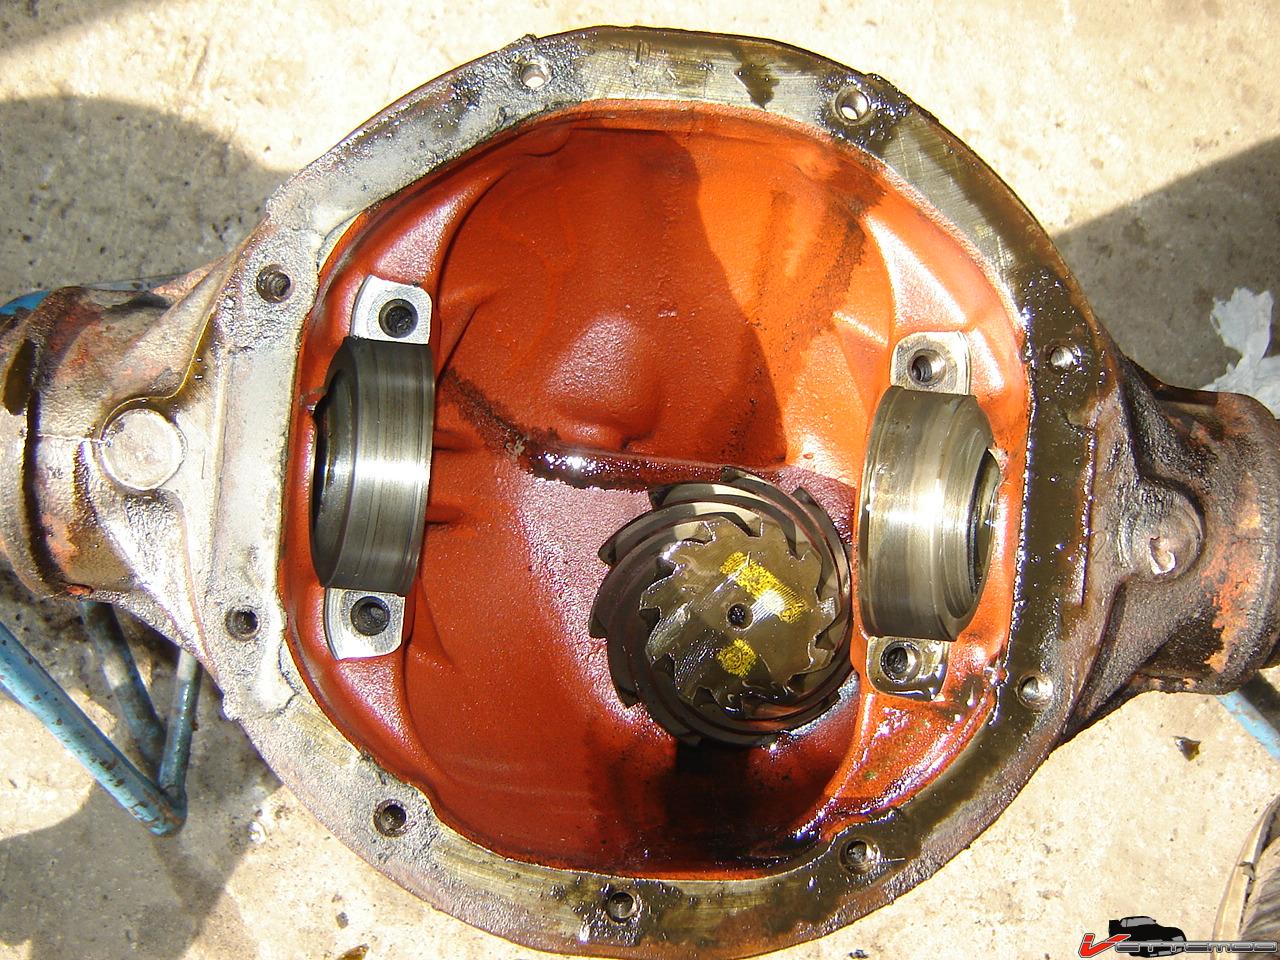
Pulled the axle apart, might as well pull the pinion, replace the pinion seal and bearings and have the axle case blasted & powdercoated.

No posi action left, worn cone, completely hammered flat shim...time do get some new stuff

No posi action left, worn cone, completely hammered flat shim...time do get some new stuff
08-17-2009, 03:24 PM
#16
Re: Pulling apart my 87 IROC
LOL keeping on talking to myself 
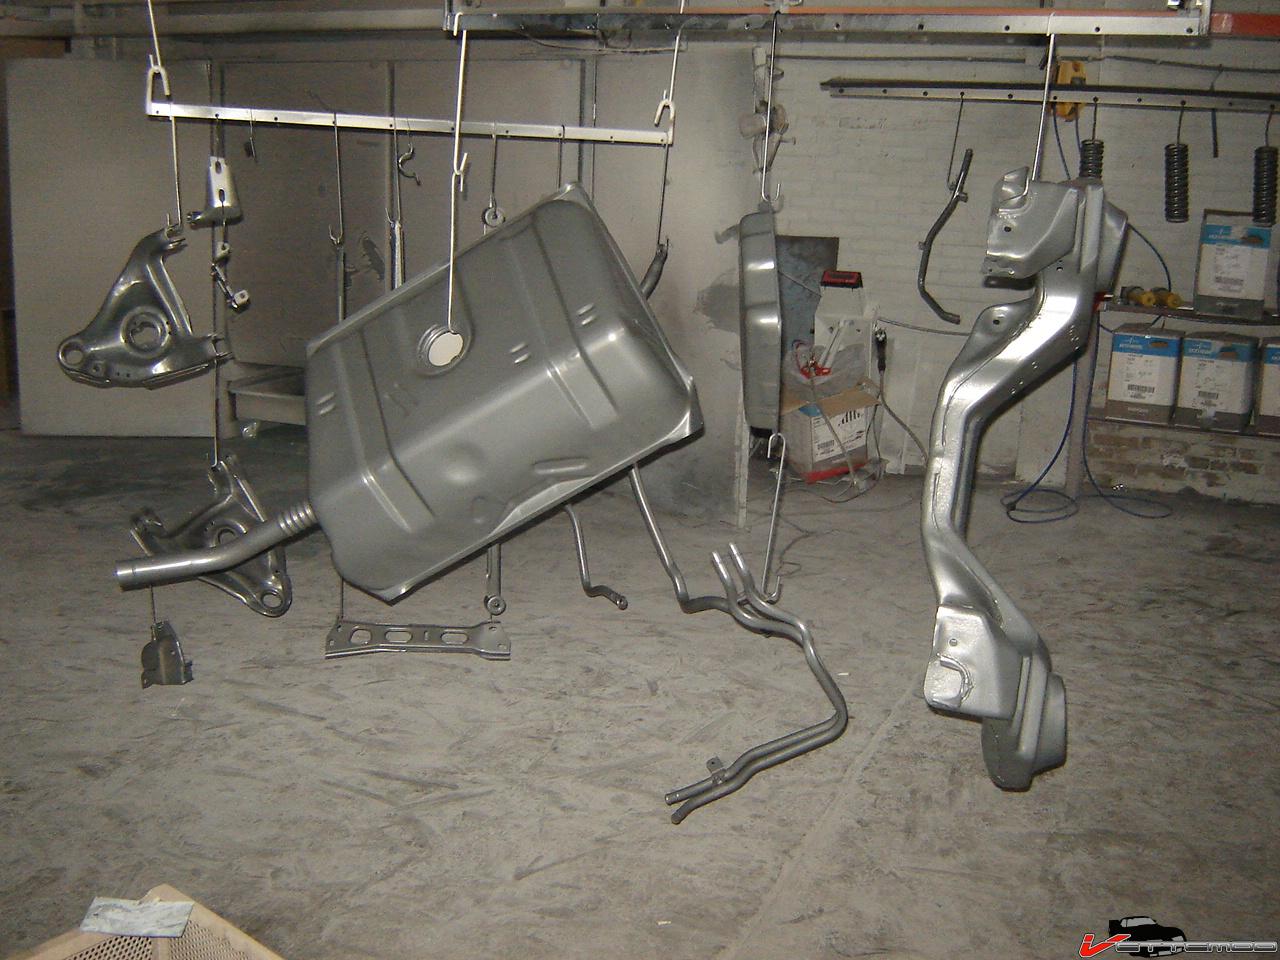
Was surprised to find that these 9 bolts are glyptal coated from the factory....something nice for a change because the posi setup is a junk design. Pulling the pinion tomorrow and then it's going to be blasted and powdercoated like everything else.
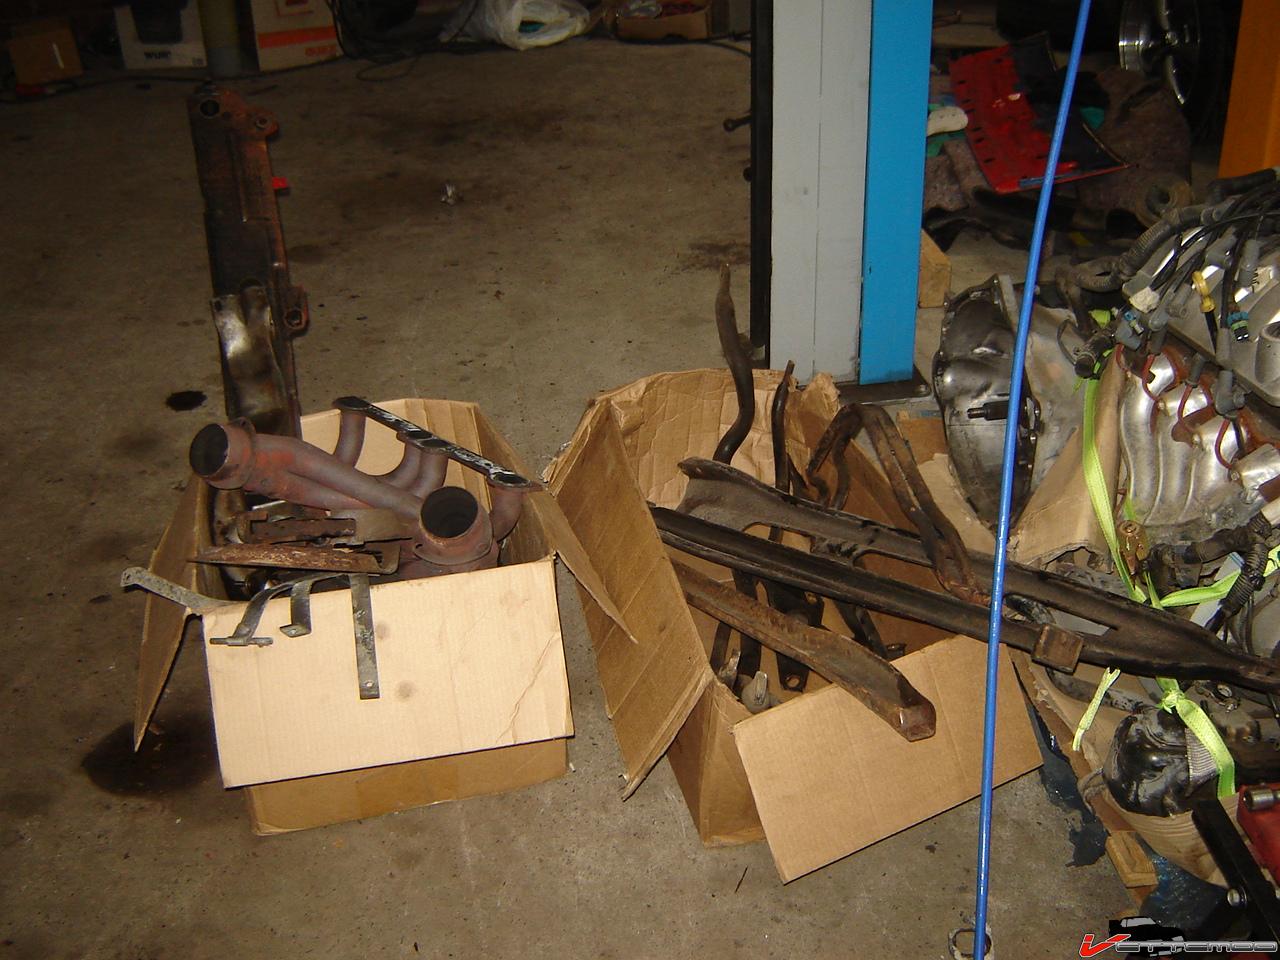
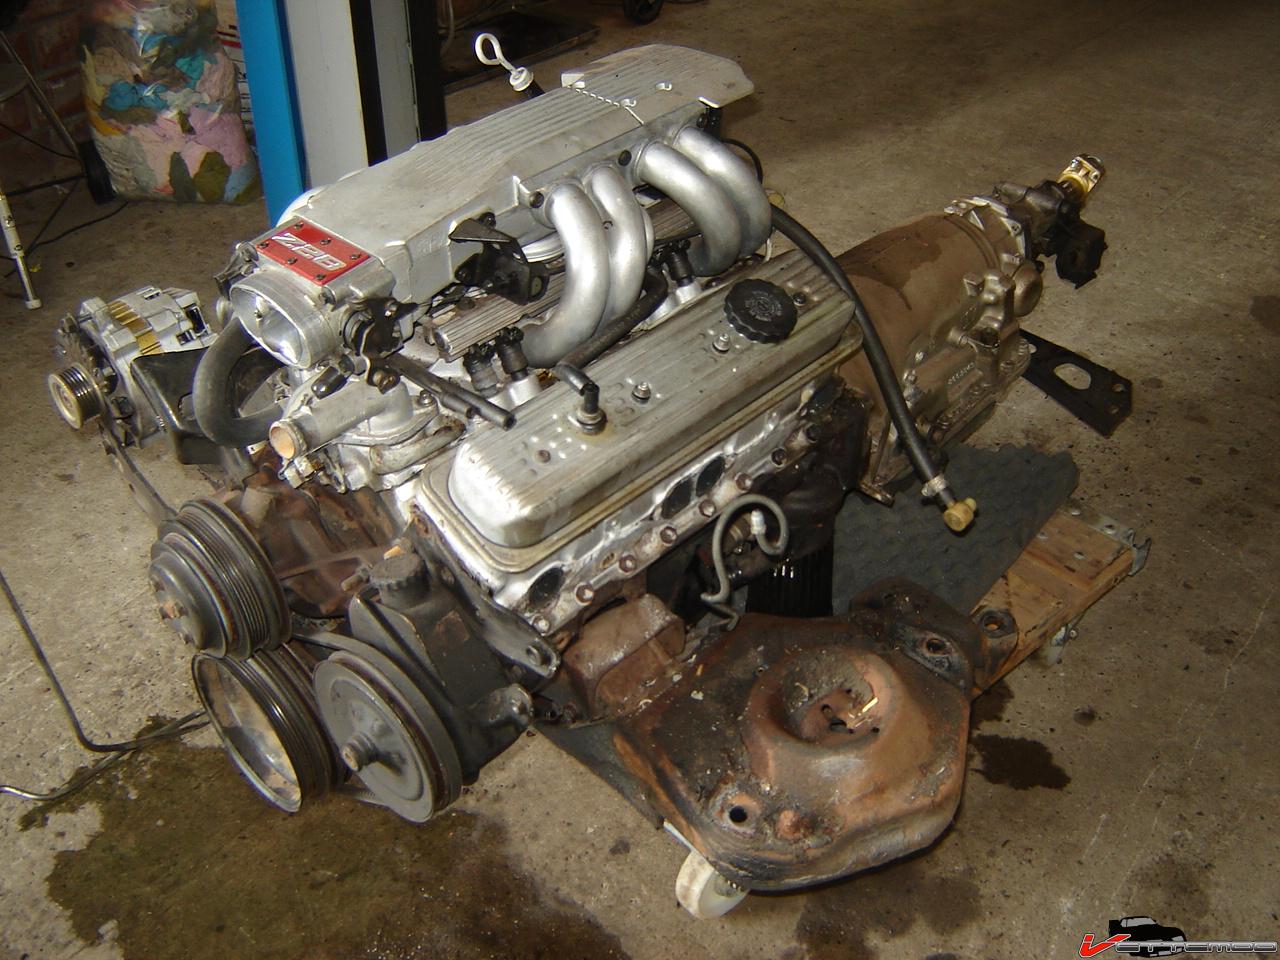
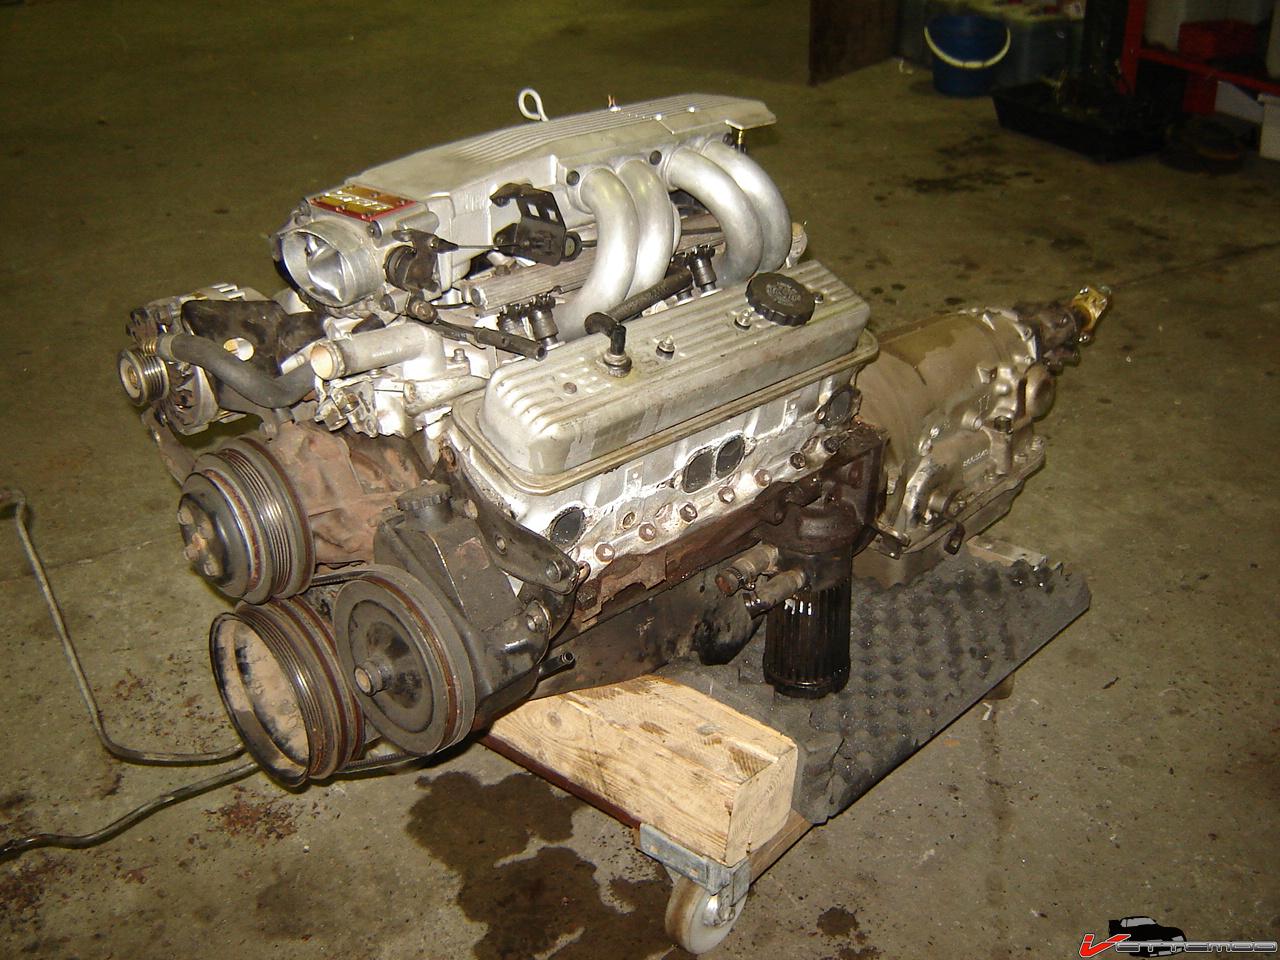
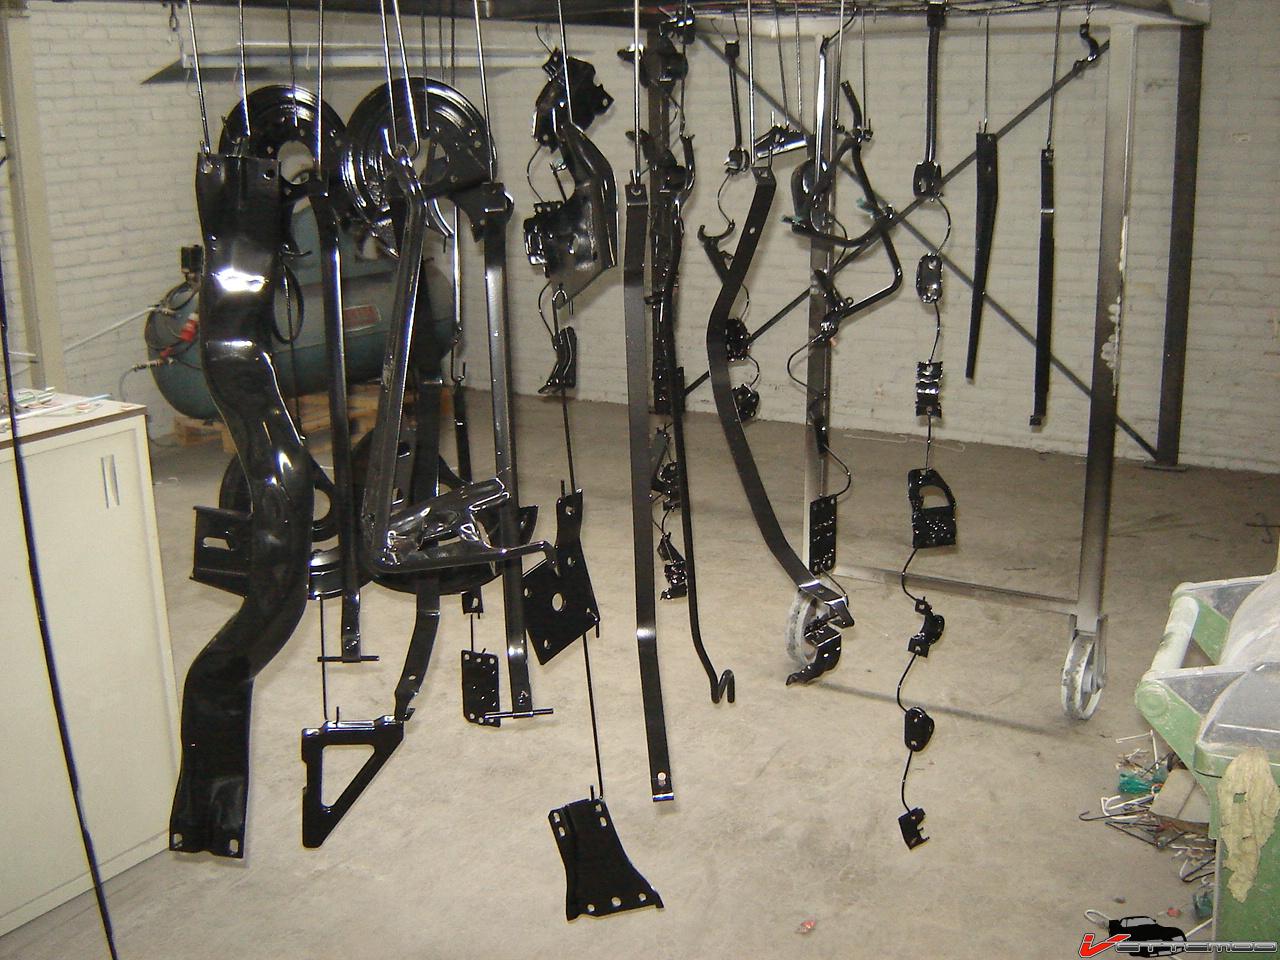
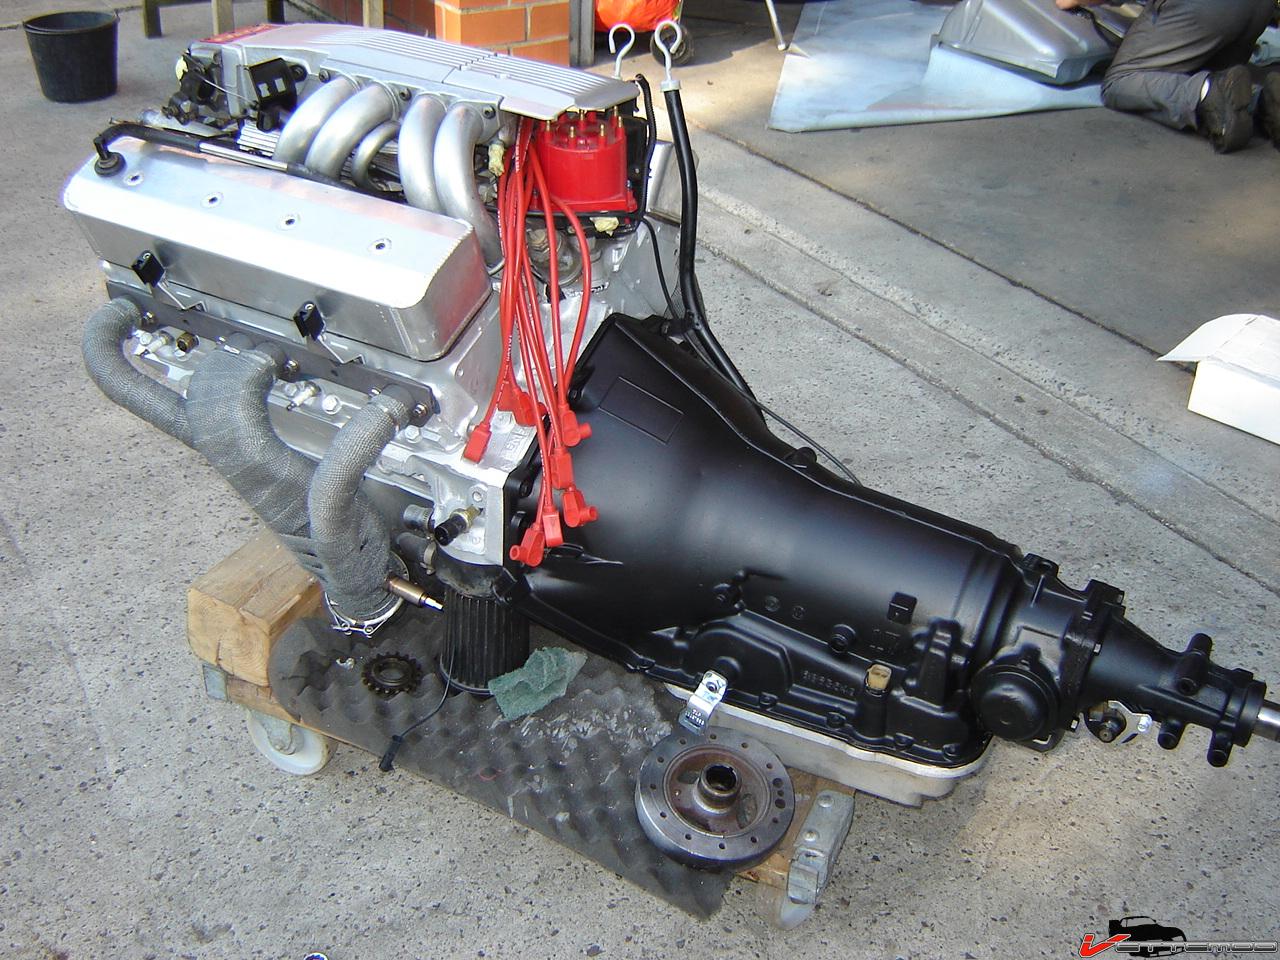
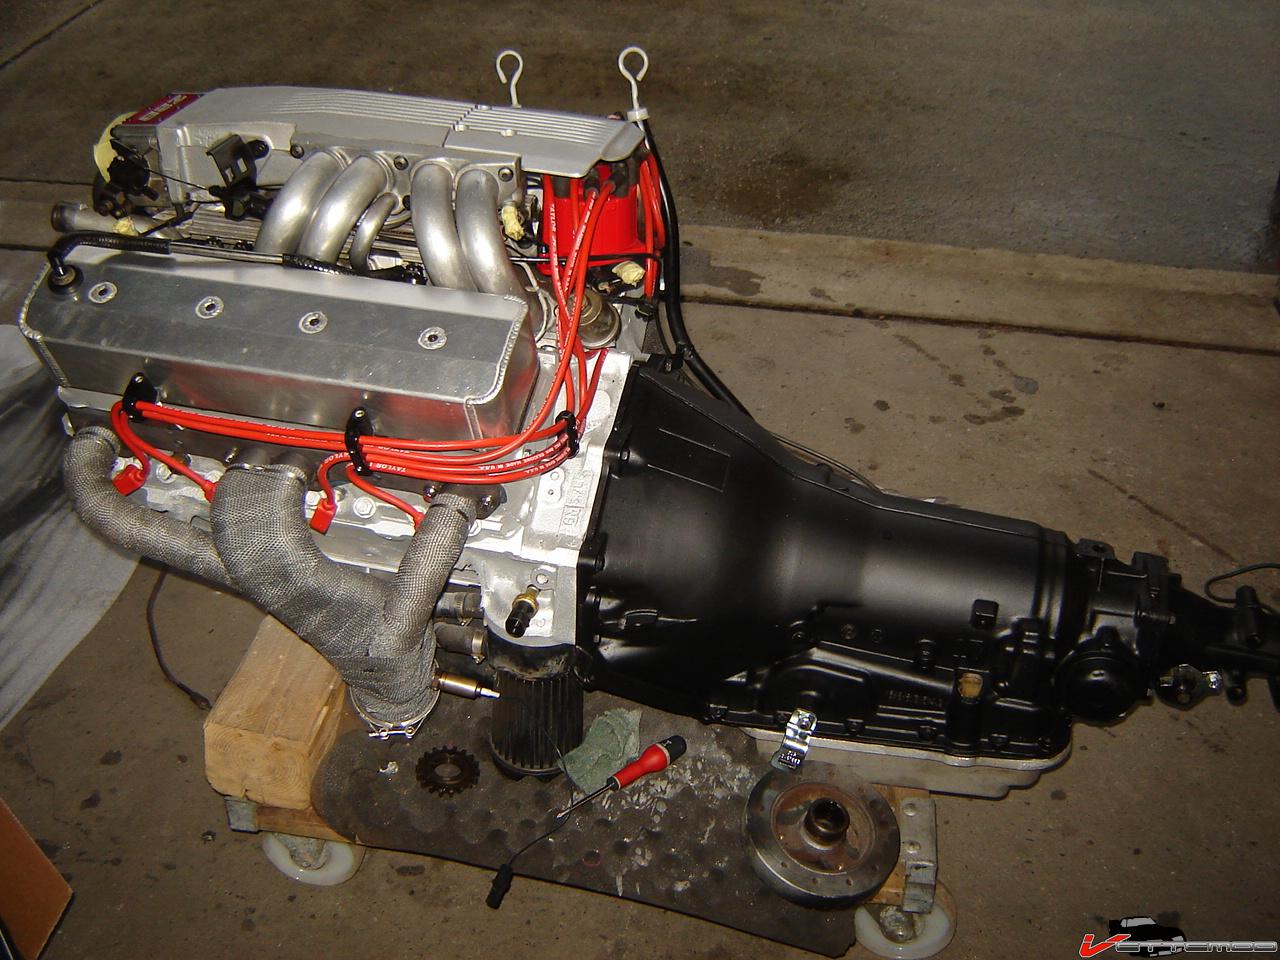
Got the engine out and pulled the crossmember off. It too is going to the powdercoaters. Engine only needs a little cleanup for now and some dress up. Will swap the L98 heads for some old TW G1s I have lying around. Need new valves for those so will do that later. Deconstruction done in a couple of days and only 1 broken bolt. A pretty good score given the rusty bits and pieces everywhere.
Was surprised to find that these 9 bolts are glyptal coated from the factory....something nice for a change because the posi setup is a junk design. Pulling the pinion tomorrow and then it's going to be blasted and powdercoated like everything else.
Got the engine out and pulled the crossmember off. It too is going to the powdercoaters. Engine only needs a little cleanup for now and some dress up. Will swap the L98 heads for some old TW G1s I have lying around. Need new valves for those so will do that later. Deconstruction done in a couple of days and only 1 broken bolt. A pretty good score given the rusty bits and pieces everywhere.
08-17-2009, 03:26 PM
#17
Re: Pulling apart my 87 IROC
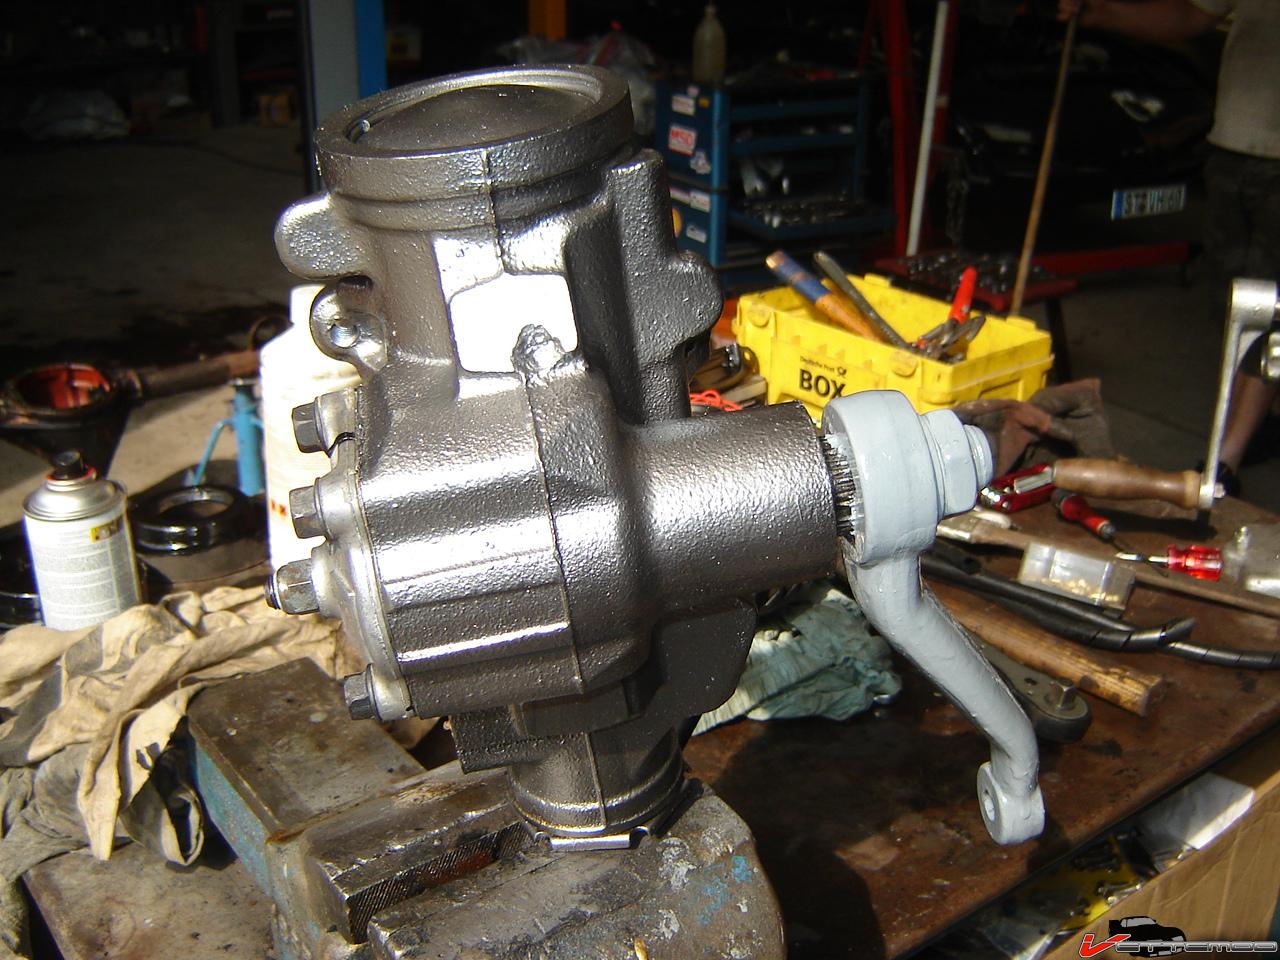
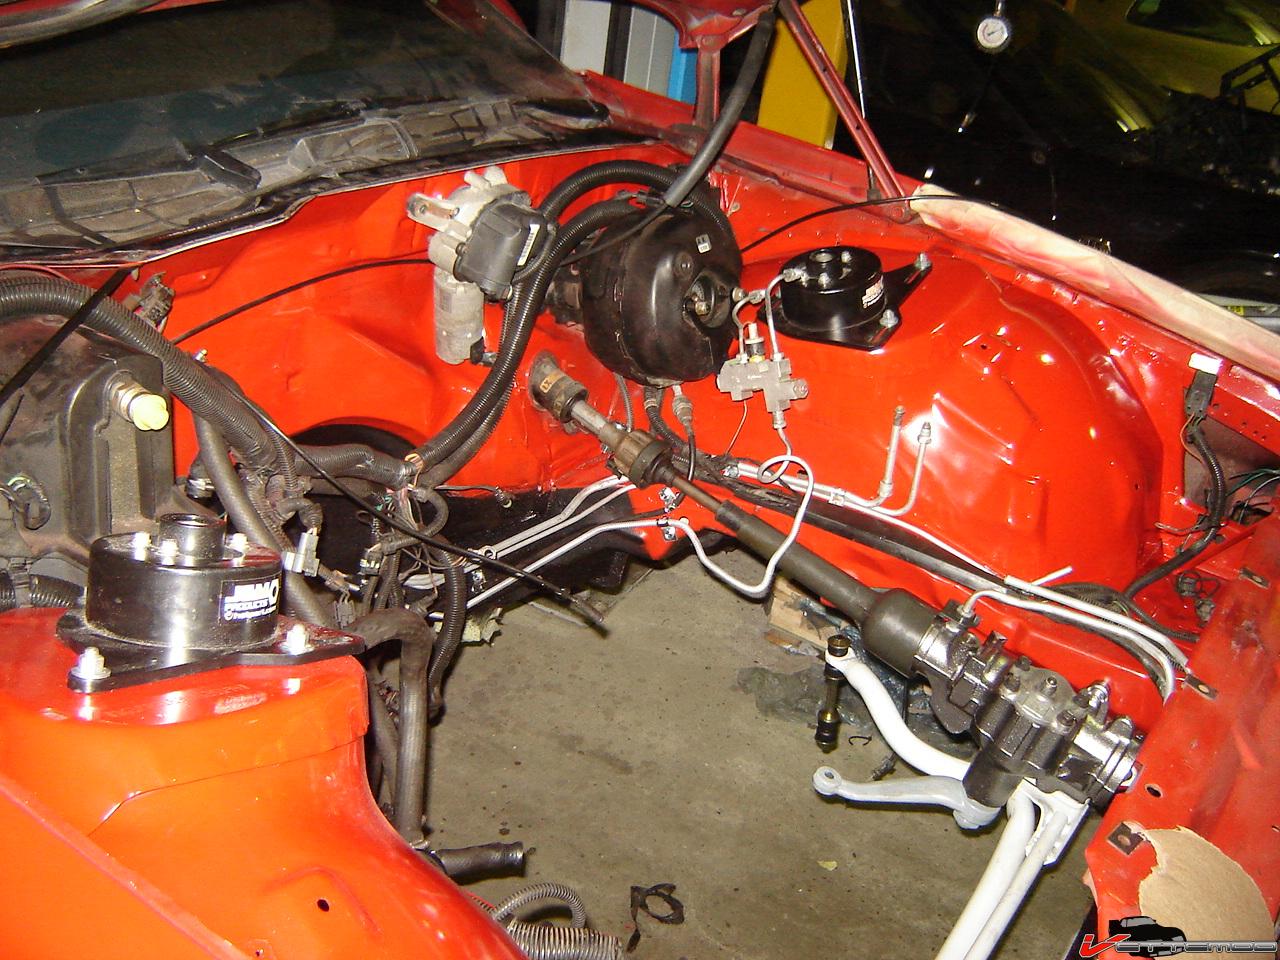
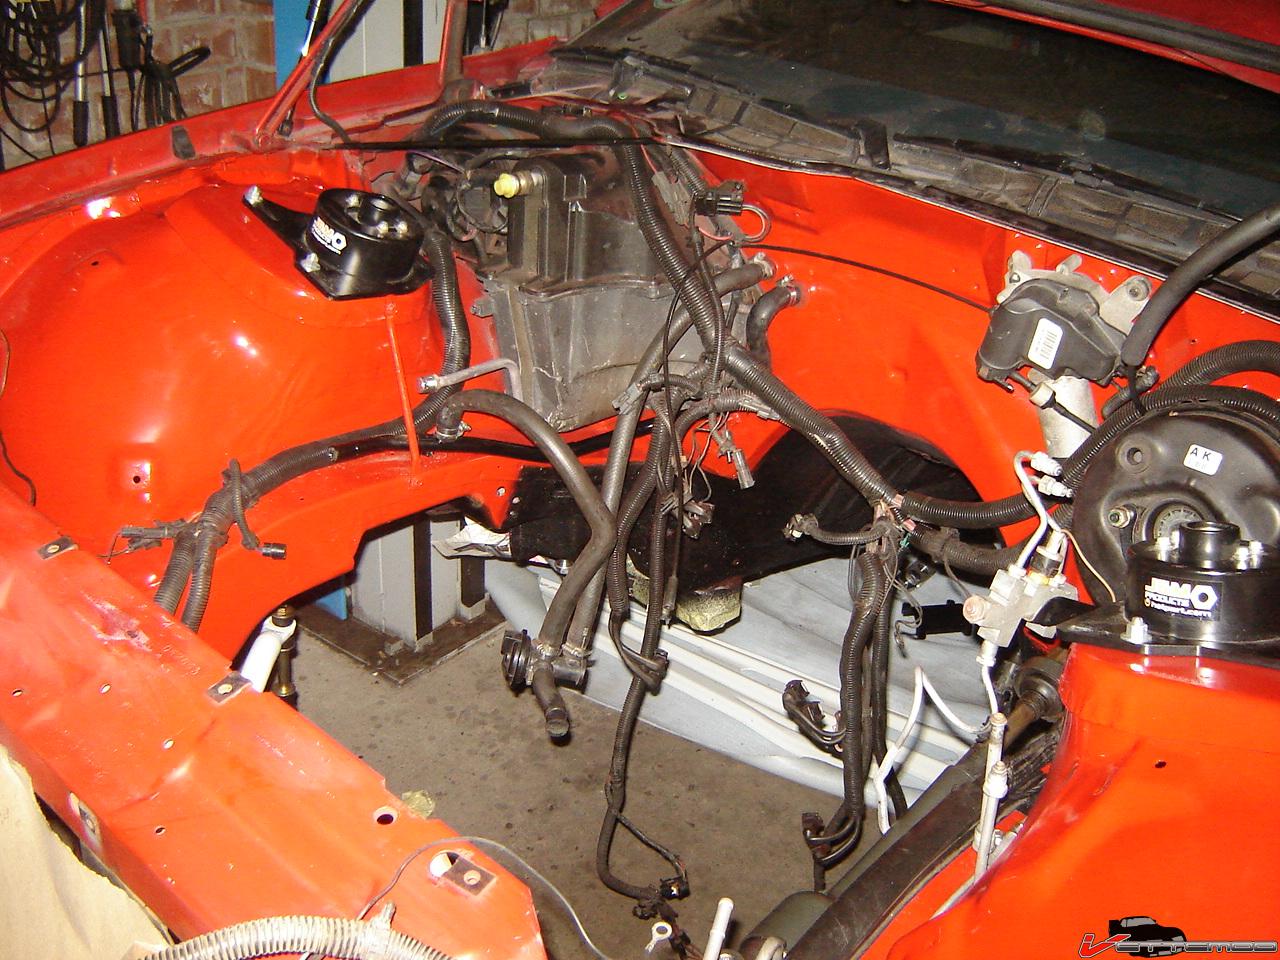
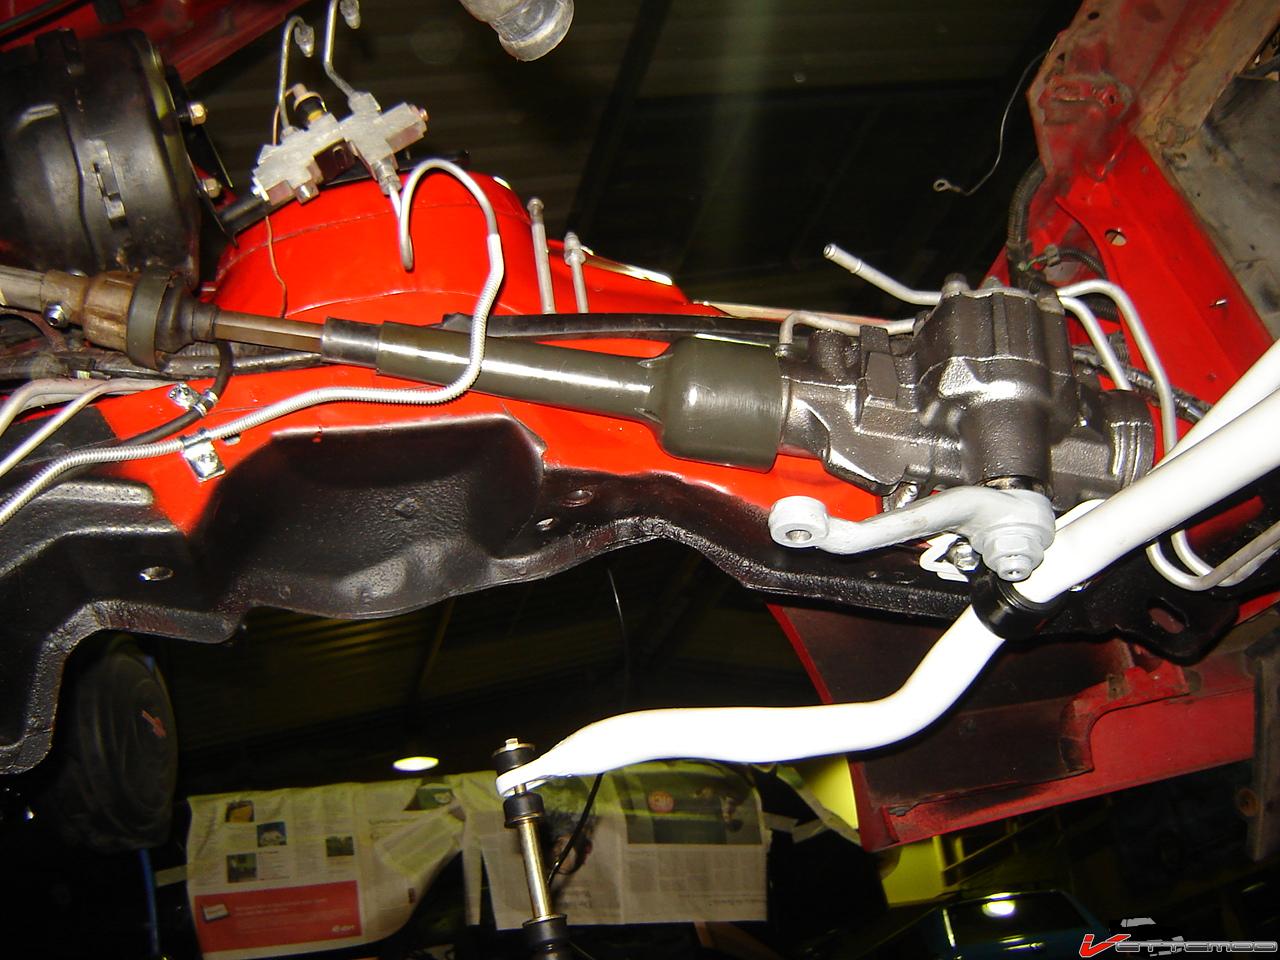
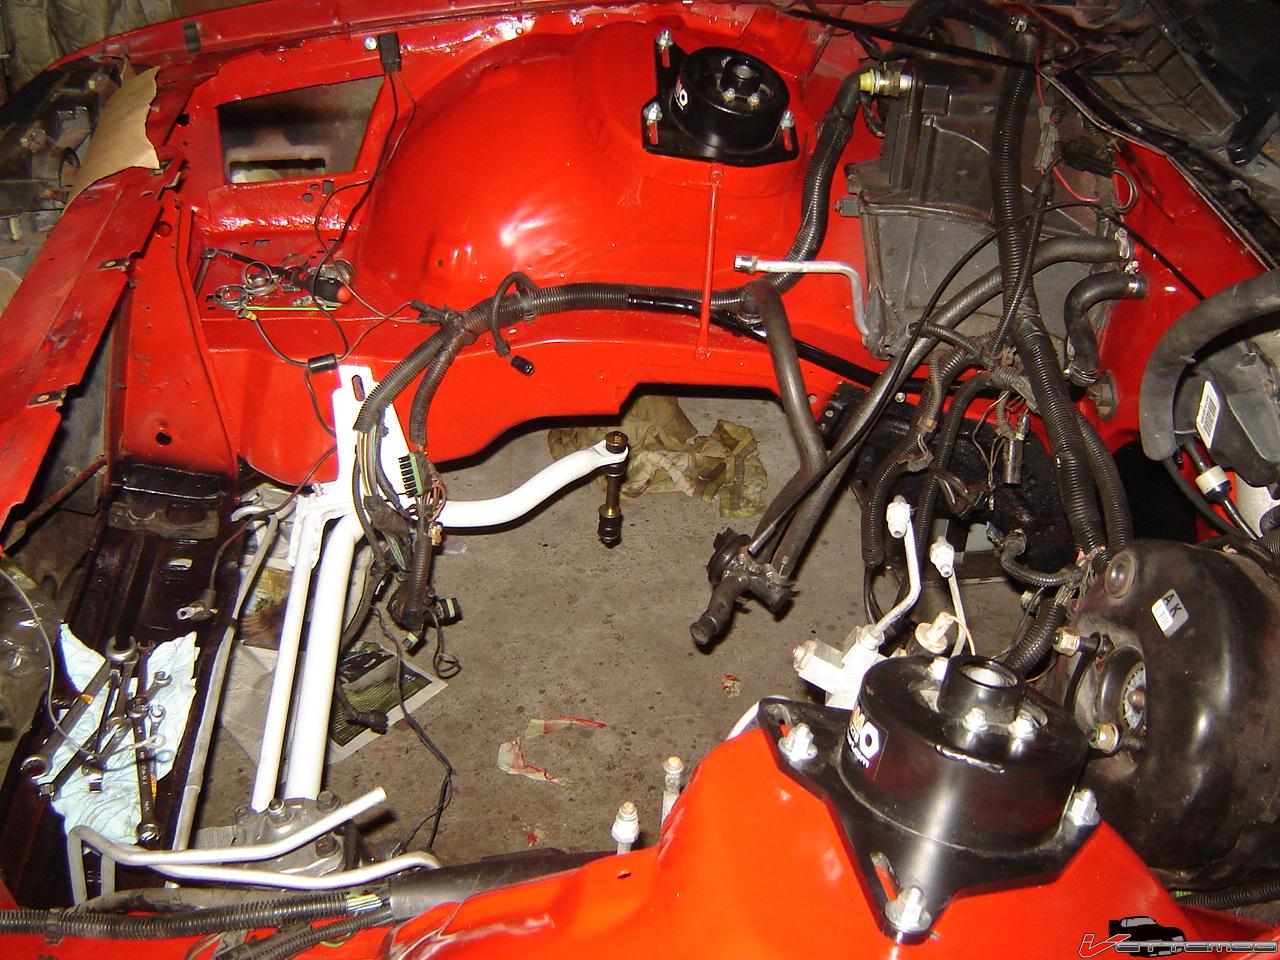
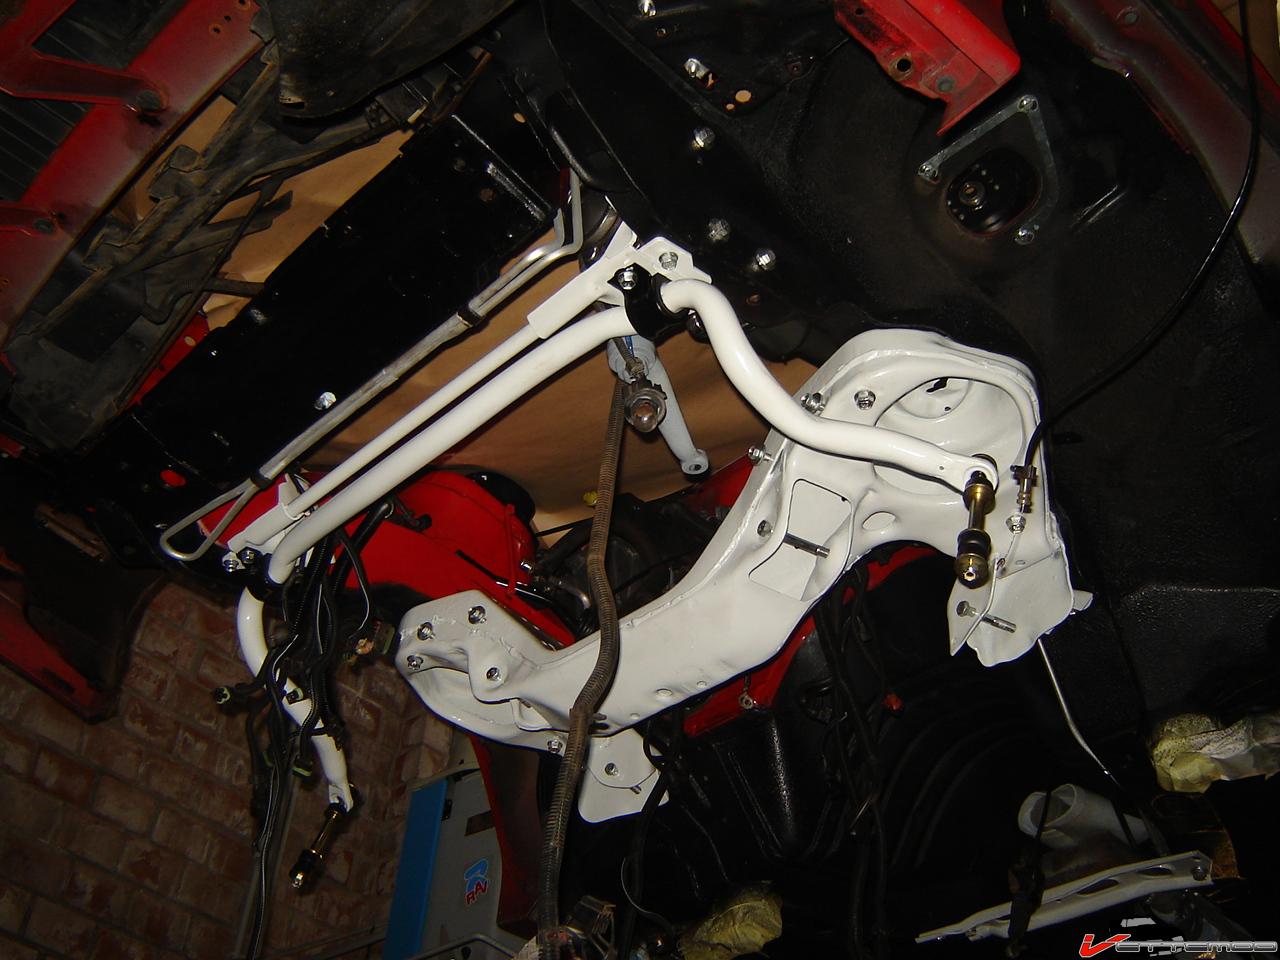
Already cleaned up and painted the steering box. The pitman arm is showing the gray color scheme that all the susp. parts are getting. I already had it on the new steering linkage I had installed before pulling it all apart.
I also removed all the fuel and brake lines. Going to remove the coating and check for corrosion and if needed replace them. (fabricate some new ones, obviously won't be able to get a replacement set here)
Going to clean the underside & engine/tranny tomorrow and hopefully most of the stuff will be back from the coaters soon and the bolts back from the platers so I can start putting it back together again.
08-18-2009, 01:04 PM
#20
Re: Pulling apart my 87 IROC
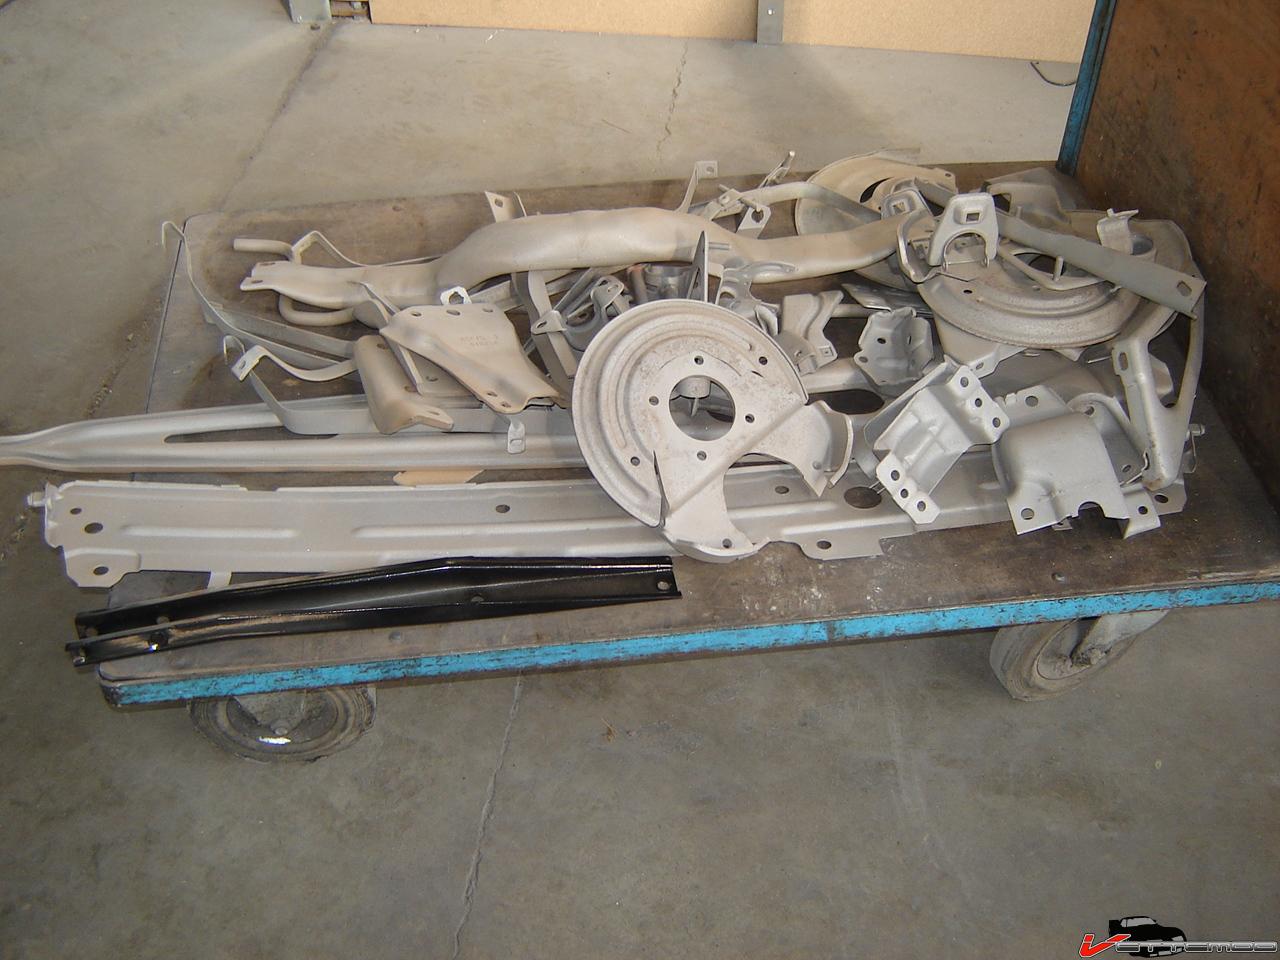
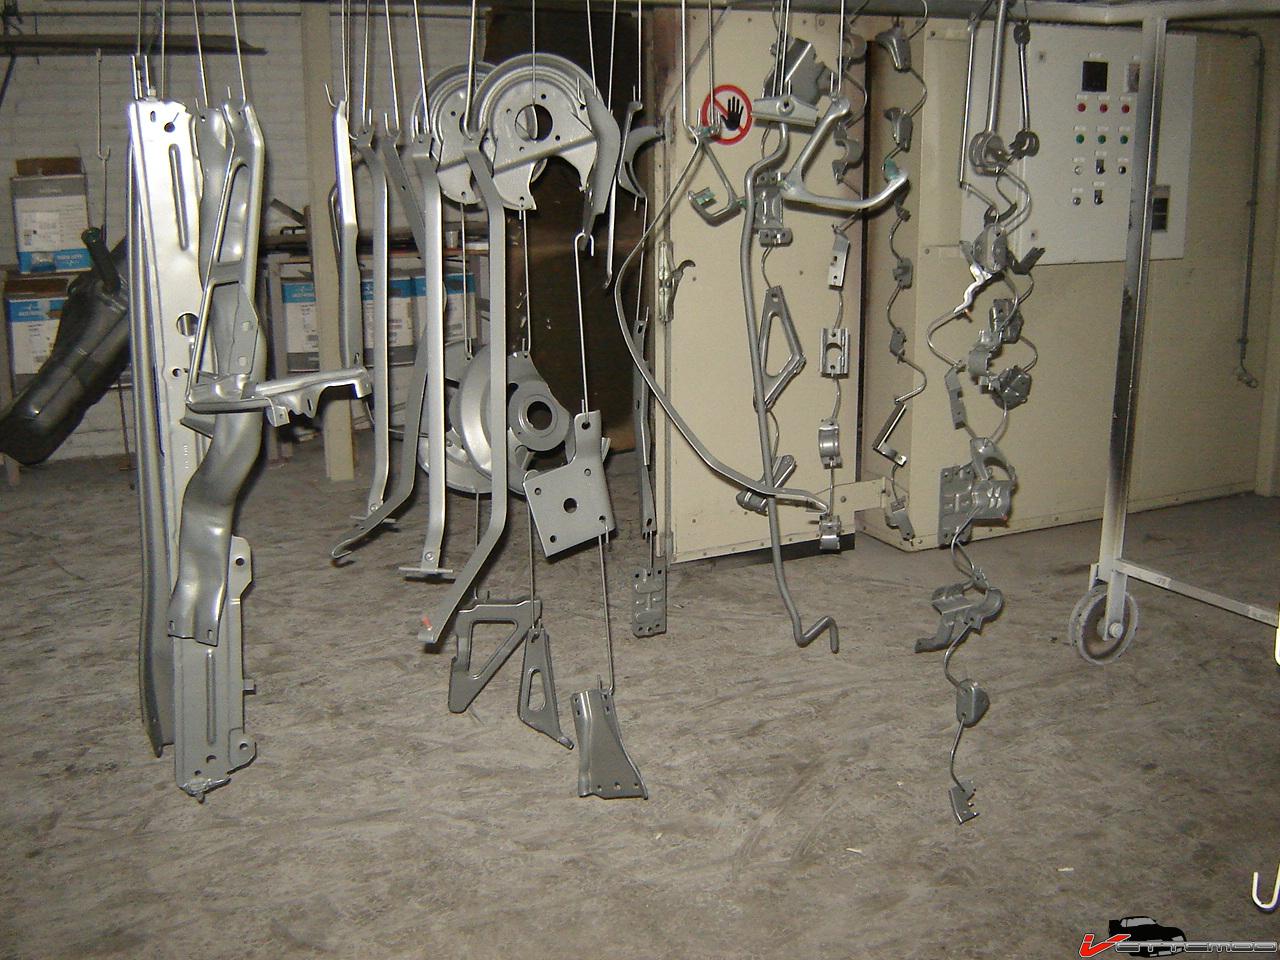
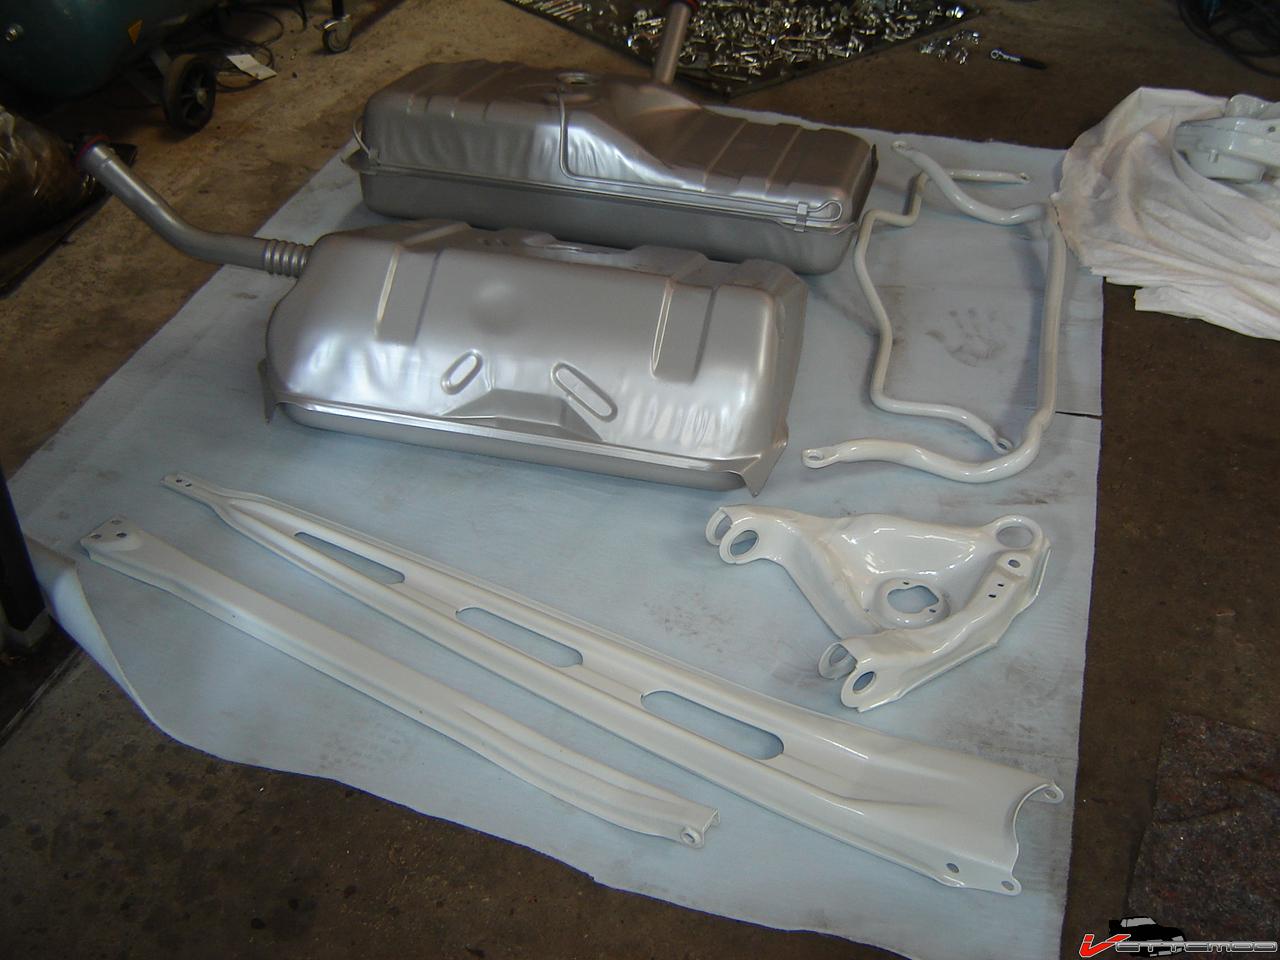
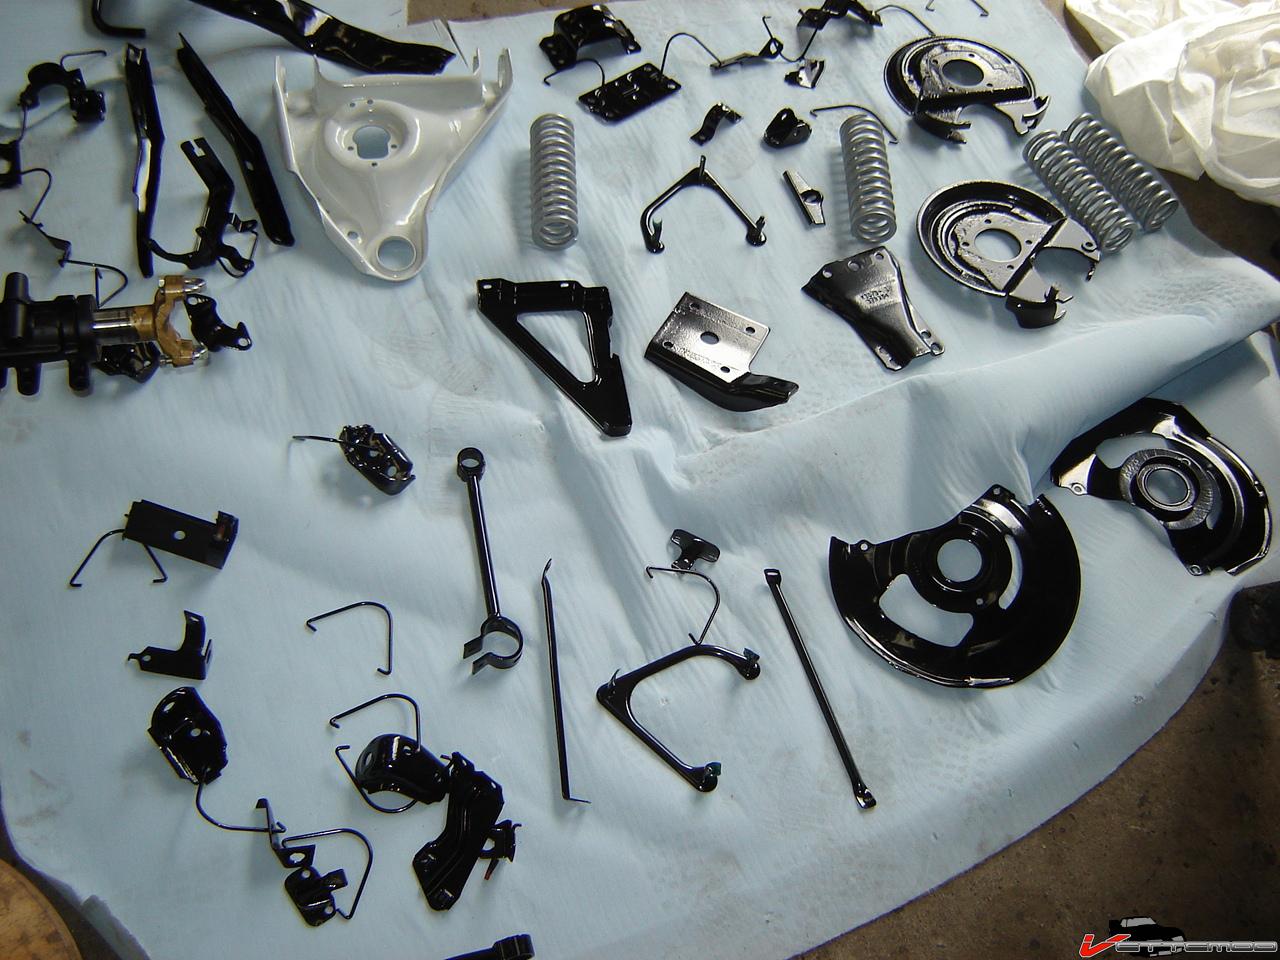
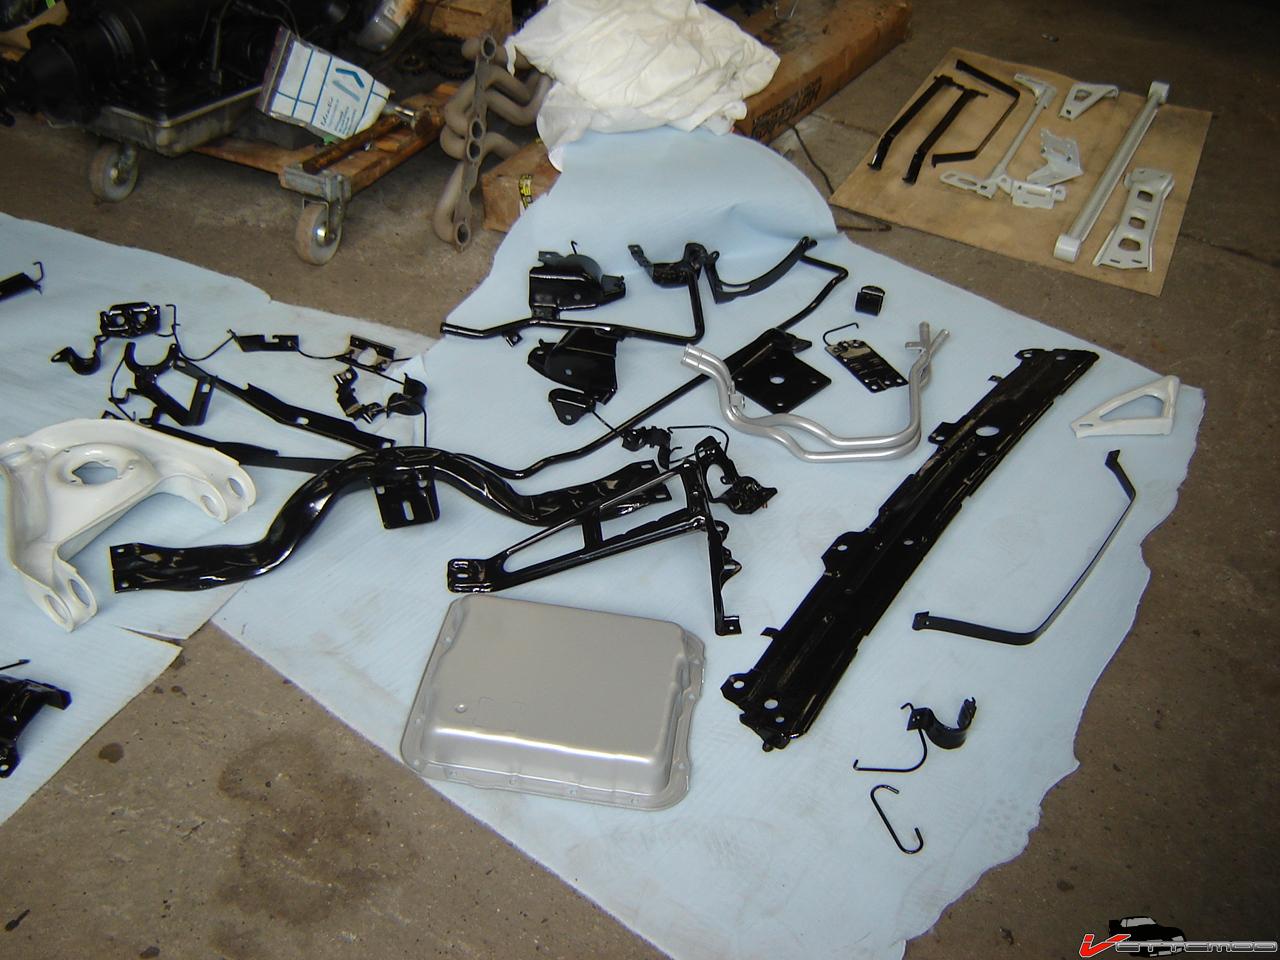
More progress. All parts are sandblasted (there's some stuff from a 79 Z28 in there and some corvette bits and pieces) ready for powdercoating.
Axle cleaned up nicely,will weld the LCA relocation brackets on and then it's off to get blasted and coated too. Still gotta figure out what to do with the cones.
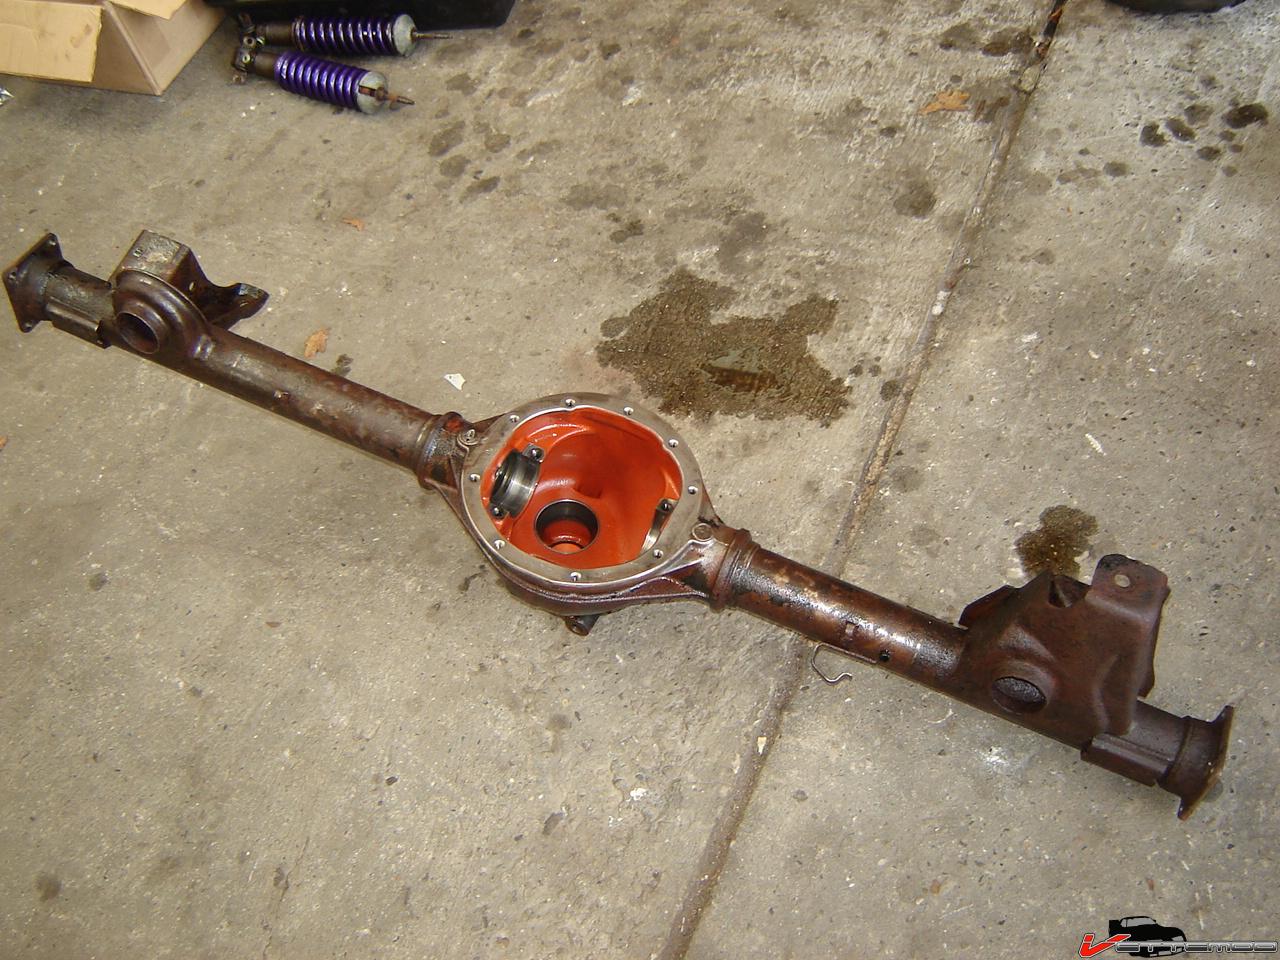
Axle cleaned up nicely,will weld the LCA relocation brackets on and then it's off to get blasted and coated too. Still gotta figure out what to do with the cones.
 08-20-2009, 04:11 PM
#22
Re: Pulling apart my 87 IROC
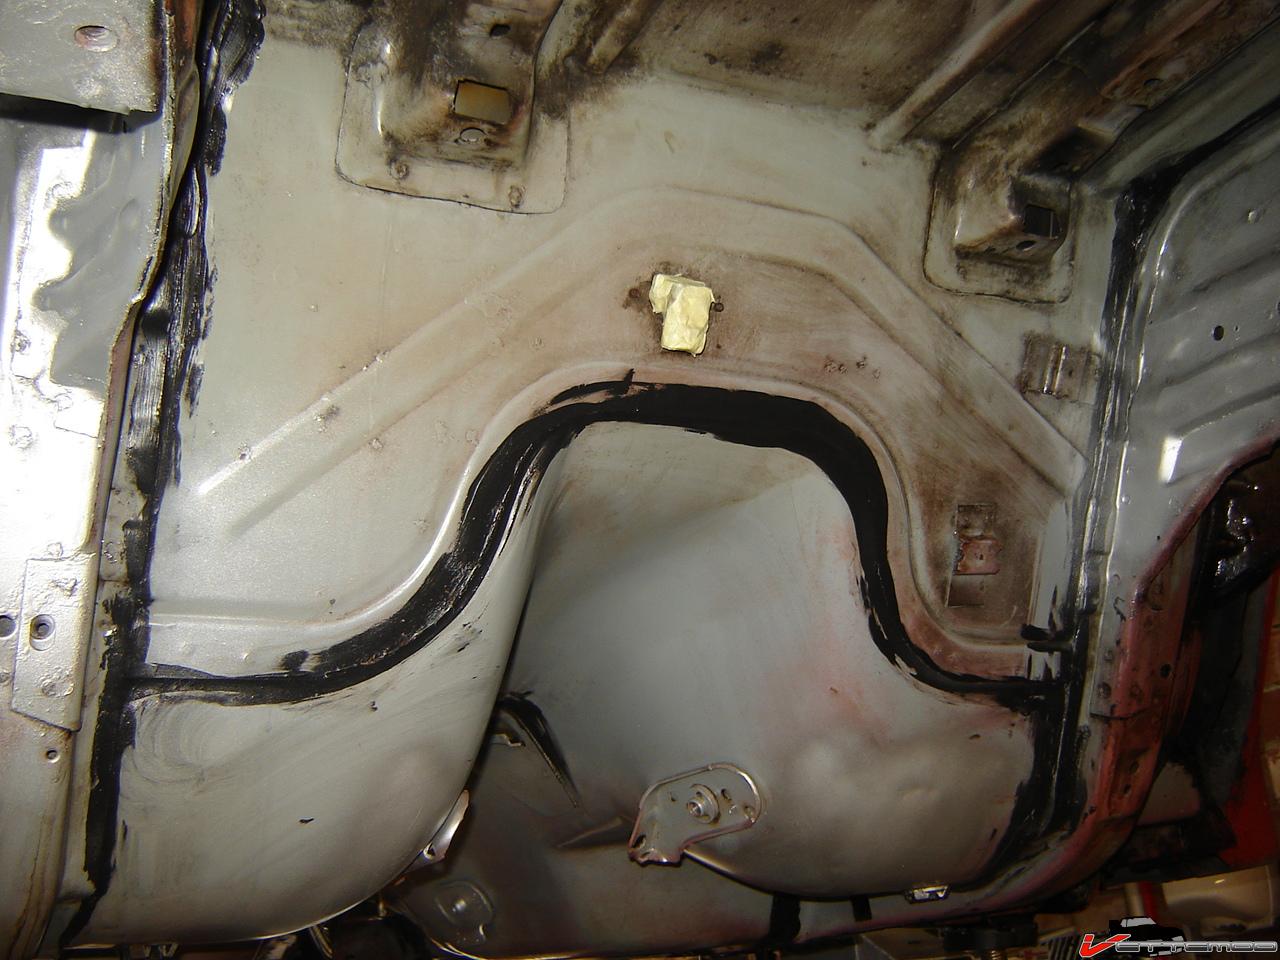
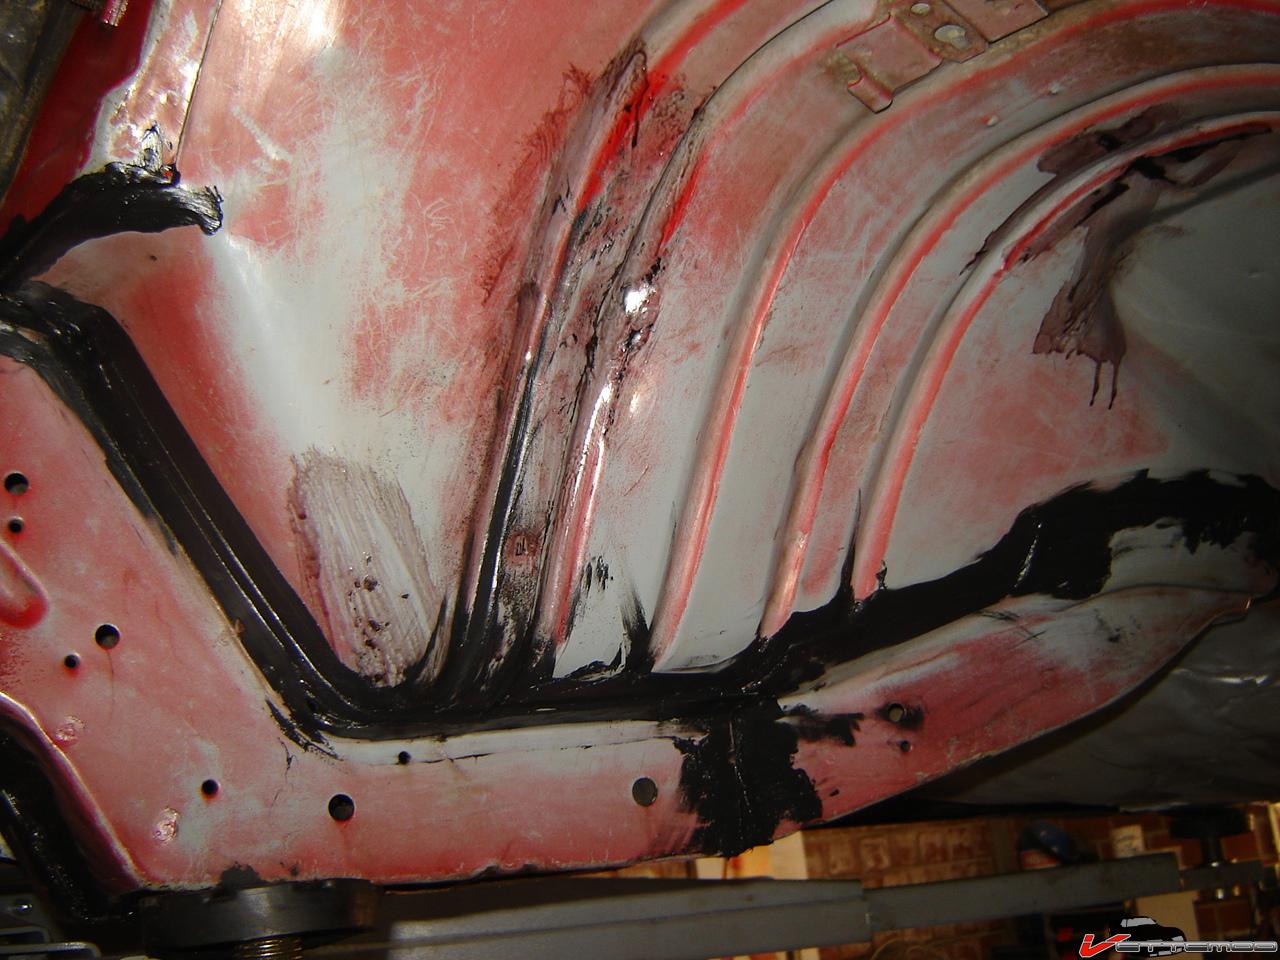
Decided to remove all that sticky undercoating. I hate that tar crap, sticky mess when working on the car and it looks like a total hackjob, sprayed over everything. I can't stand that mess. I'm obsessed with stuff having to be clean and organized. So, I got cracking at a very dirty job, using kerosine to remove all that crap. Got most of it done. The spot where the exhaust cut out was has a nice heat stain and next to it is a stain from where some idiot torched the floor pan for clearance and hammered some nice ugly creases and dings in it. I don't think I can remove all of it, will try to get it as straight as possible. Luckily no rust. Well..here's the messy and smelly job. Almost done now!
The purple brush marks on the floors are a brush on epoxy rust converter/sealer that I like to use. You can see it converts the rust by turning purple and it brushes on fairly thick and leaves a hard epoxy layer. Very nice for converting and stopping surface rust. Once coated over you won't notice it.
Yuck!!!
Last edited by Twin_Turbo; 08-20-2009 at 04:14 PM.
08-20-2009, 04:11 PM
#23
Re: Pulling apart my 87 IROC
Damn, that really messed up the floor....gotta clean that too.
When done, the underside will be sprayed with bed liner with small rubber particles added. It's super stone chip resistant and leaves a nice finish that doesn't show dents as easily.
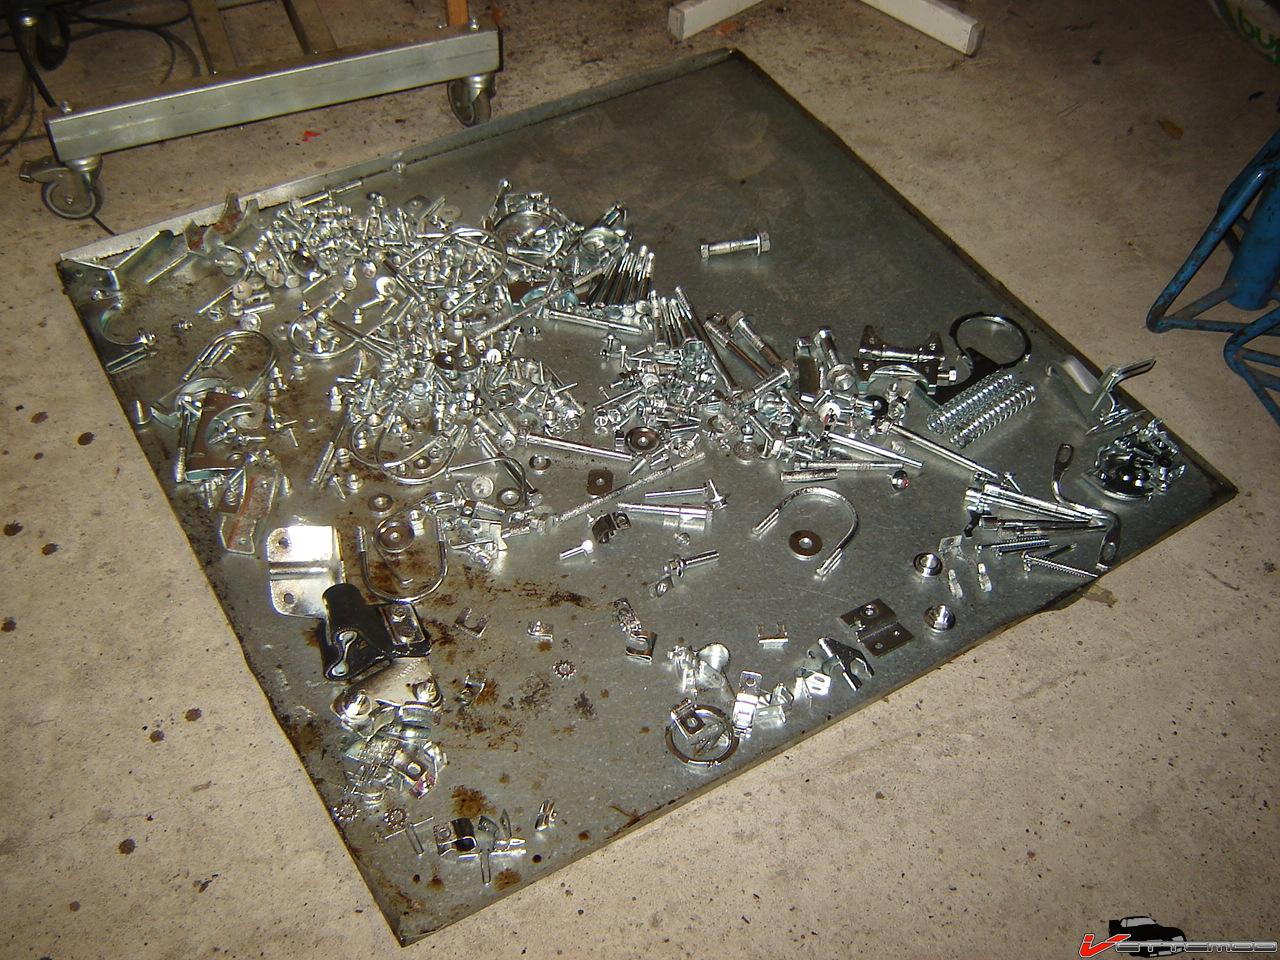
The plater did me a favor and already finished plating all the bolts. Some of the exh. clamps are still rusty but I won't be using them anyway. Just threw them in there, all rusty so I have them on hand for whatever emergency comes along where I need a couple. Price wise it's all the same, you pay by the load...not the amount in a bucket.
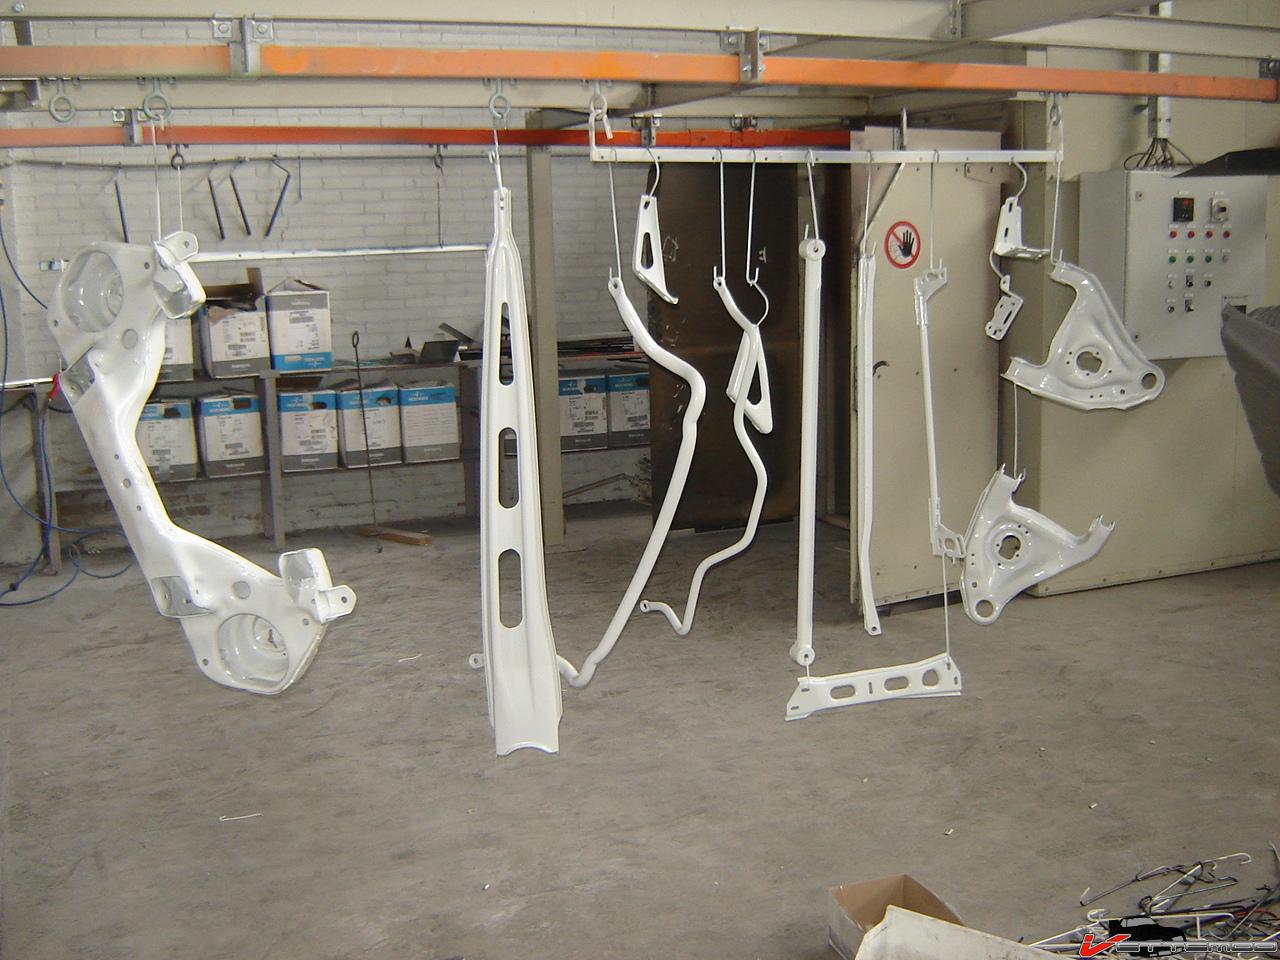
Now it's a matter of time before the powdercoater is done and then I can start assembling again with all new and recond. parts.
When done, the underside will be sprayed with bed liner with small rubber particles added. It's super stone chip resistant and leaves a nice finish that doesn't show dents as easily.
The plater did me a favor and already finished plating all the bolts. Some of the exh. clamps are still rusty but I won't be using them anyway. Just threw them in there, all rusty so I have them on hand for whatever emergency comes along where I need a couple. Price wise it's all the same, you pay by the load...not the amount in a bucket.
Now it's a matter of time before the powdercoater is done and then I can start assembling again with all new and recond. parts.
 08-25-2009, 03:46 PM
#26
Re: Pulling apart my 87 IROC
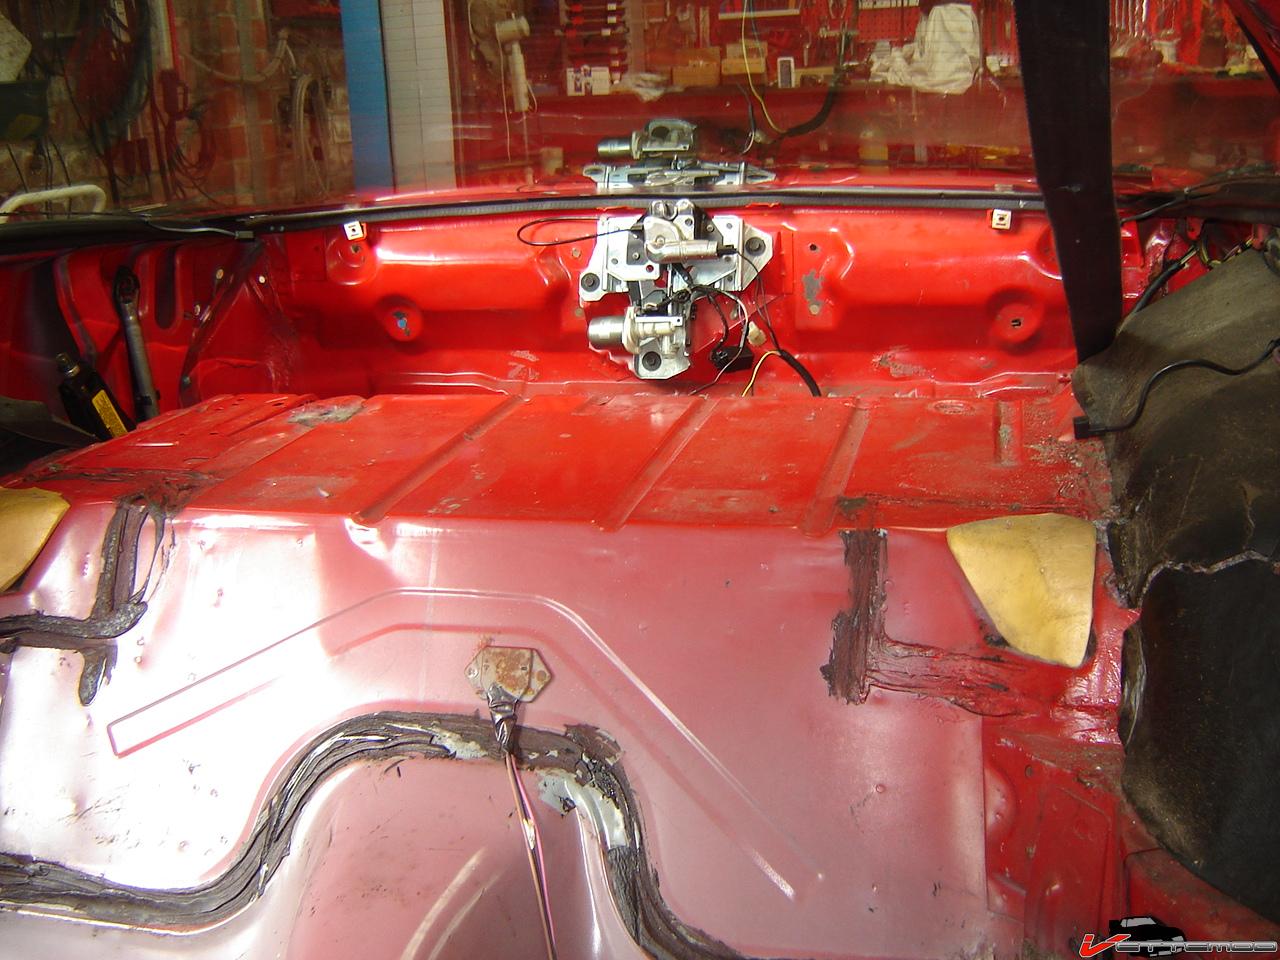
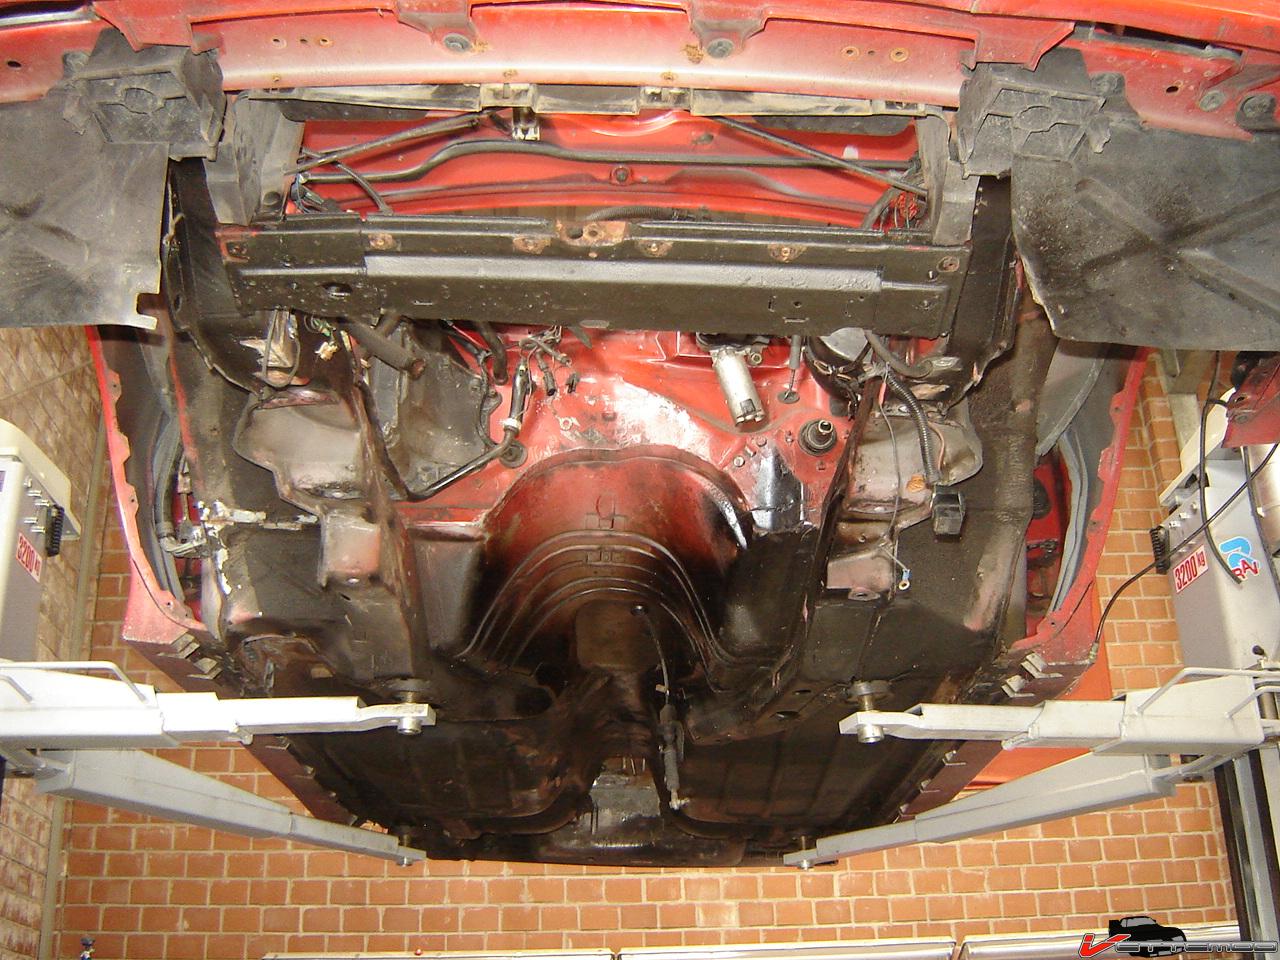
Next up, masking off a bunch of stuff, the surrounding area and the 2 post lift, and applying EZ liner Bed Liner. I love this stuff. Super easy to clean off, never chips off and is resistant to about anything. I leaked a bunch of brake fluid on it, held up perfectly.
Super clean, ready to be built up. Only need to respray the red in the engine bay and after welding in some SFCs I'll have to redo those areas with bedliner as well as where the lift pedestals are now and the outside rockers. Will do that all on the 4 post.
Super clean, ready to be built up. Only need to respray the red in the engine bay and after welding in some SFCs I'll have to redo those areas with bedliner as well as where the lift pedestals are now and the outside rockers. Will do that all on the 4 post.
Last edited by Twin_Turbo; 08-25-2009 at 05:17 PM.
08-25-2009, 03:47 PM
#27
Re: Pulling apart my 87 IROC
Next up, masking off a bunch of stuff, the surrounding area and the 2 post lift, and applying EZ liner Bed Liner. I love this stuff. Super easy to clean off, never chips off and is resistant to about anything. I leaked a bunch of brake fluid on it, held up perfectly.
Super clean, ready to be built up. Only need to respray the red in the engine bay and after welding in some SFCs I'll have to redo those areas with bedliner as well as where the lift pedestals are now and the outside rockers. Will do that all on the 4 post.
Super clean, ready to be built up. Only need to respray the red in the engine bay and after welding in some SFCs I'll have to redo those areas with bedliner as well as where the lift pedestals are now and the outside rockers. Will do that all on the 4 post.
08-26-2009, 02:58 PM
#31
Re: Pulling apart my 87 IROC
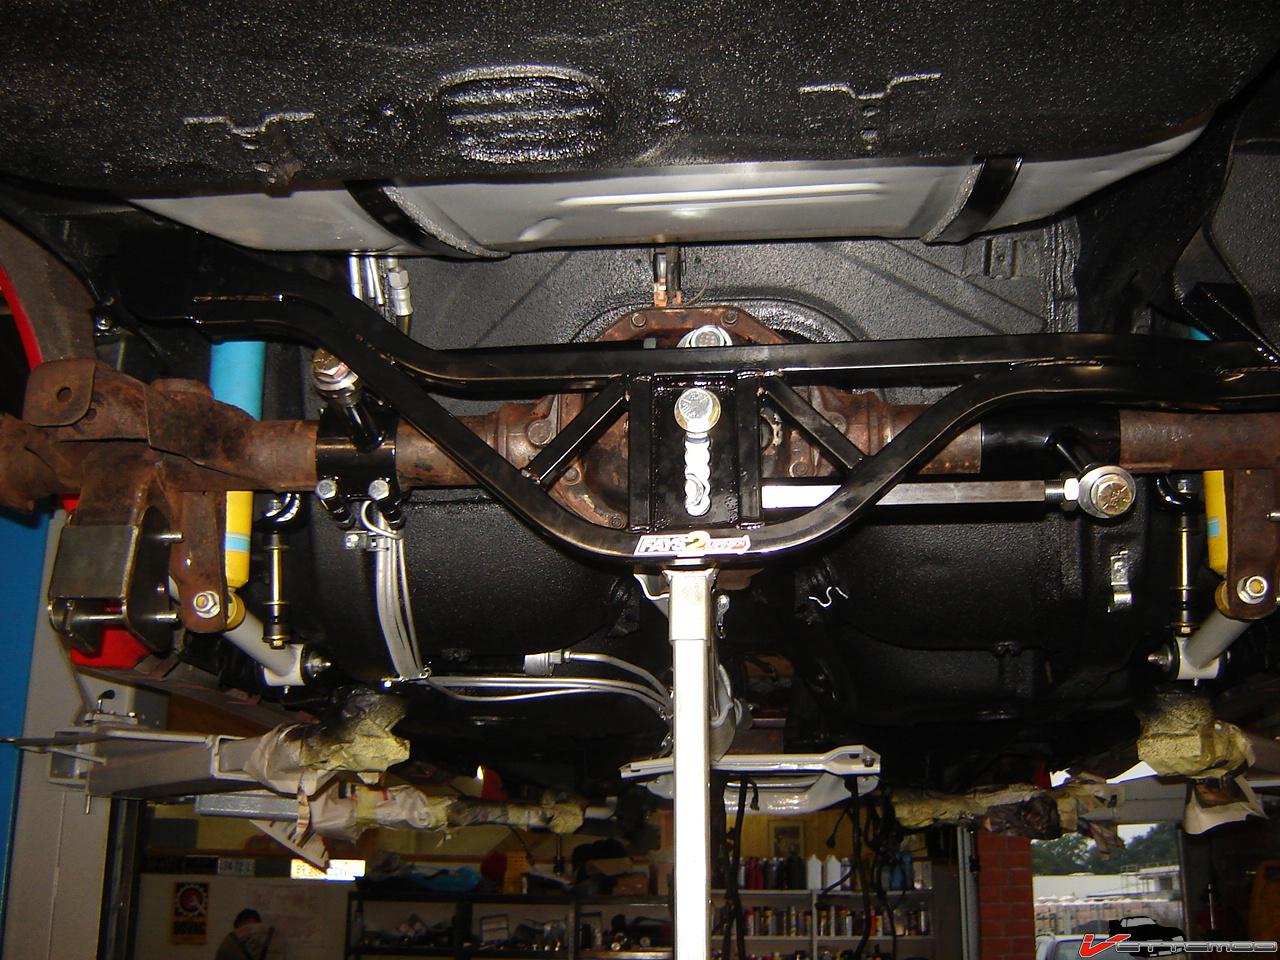
More progress and partial Fays2 install with mocked up axle (still need to weld LCA relocation brackets to the axle), looks like I'm going to have to chop off the parking brake cable guide and brake line retainer tabs so that the axle clamps can move far enough outboard.
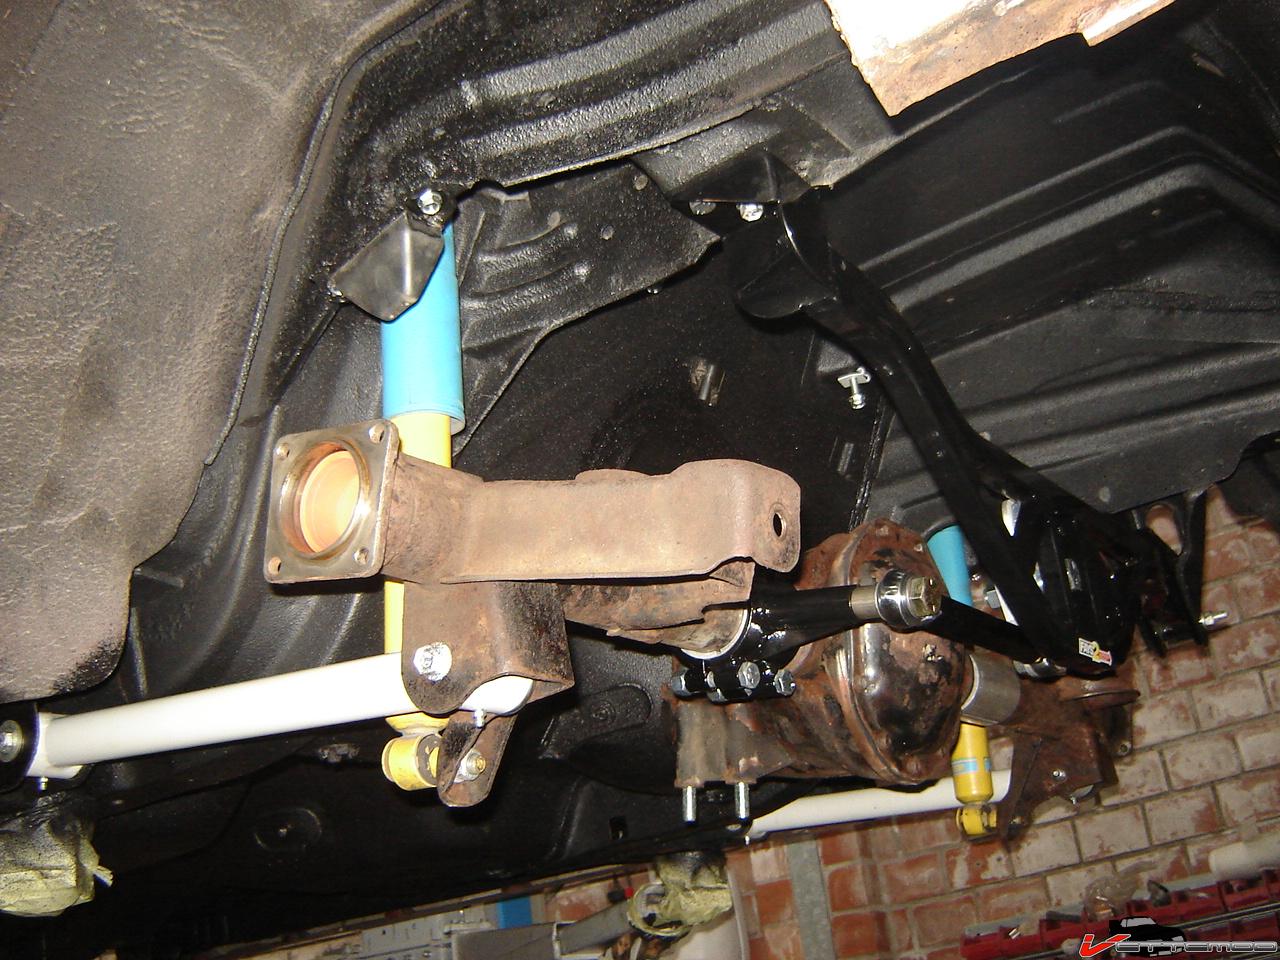
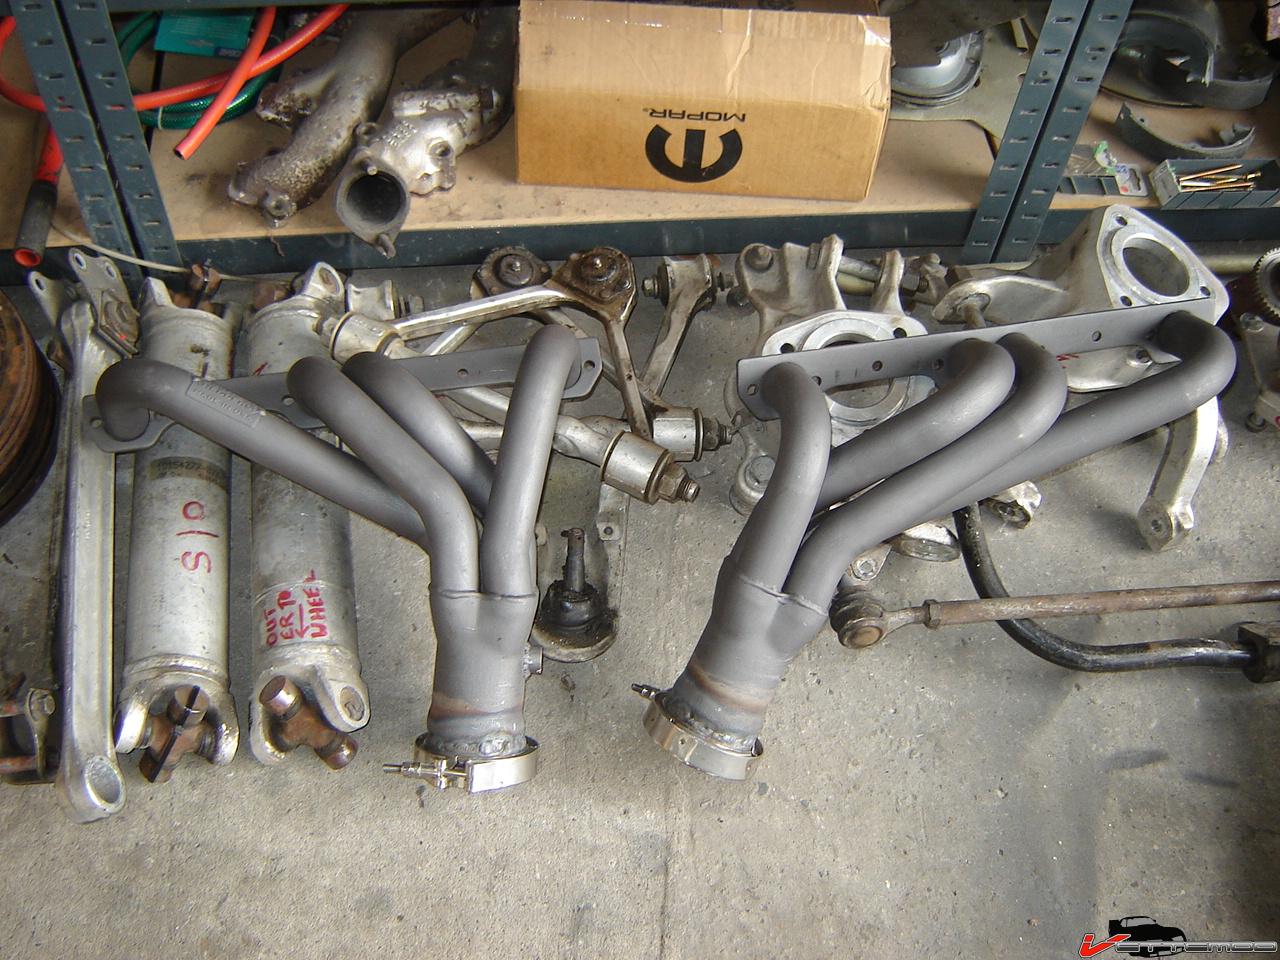
Also cut off the collector retainer rings and welded on V band clamp rings, no more fighting those darned bolts that always seem to work loose and the leaking socket/ball connection. Need to paint the last piece and then wrap them and they can go back on.
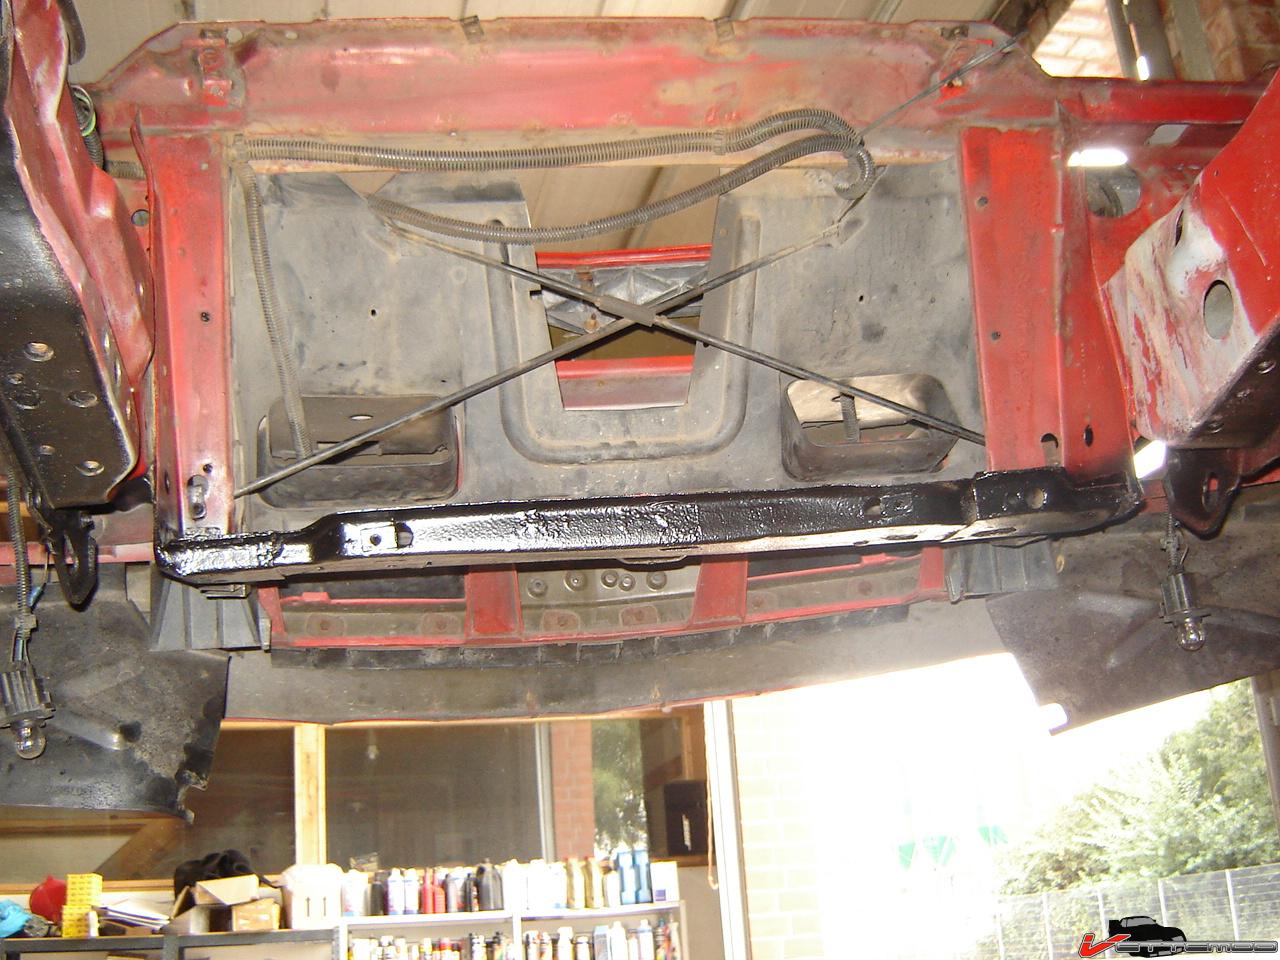
Spend a good amount of time hammering the radiator frame back into shape. This is as close as I could get it.
Also cut off the collector retainer rings and welded on V band clamp rings, no more fighting those darned bolts that always seem to work loose and the leaking socket/ball connection. Need to paint the last piece and then wrap them and they can go back on.
Spend a good amount of time hammering the radiator frame back into shape. This is as close as I could get it.
 08-28-2009, 09:05 AM
#33
Re: Pulling apart my 87 IROC
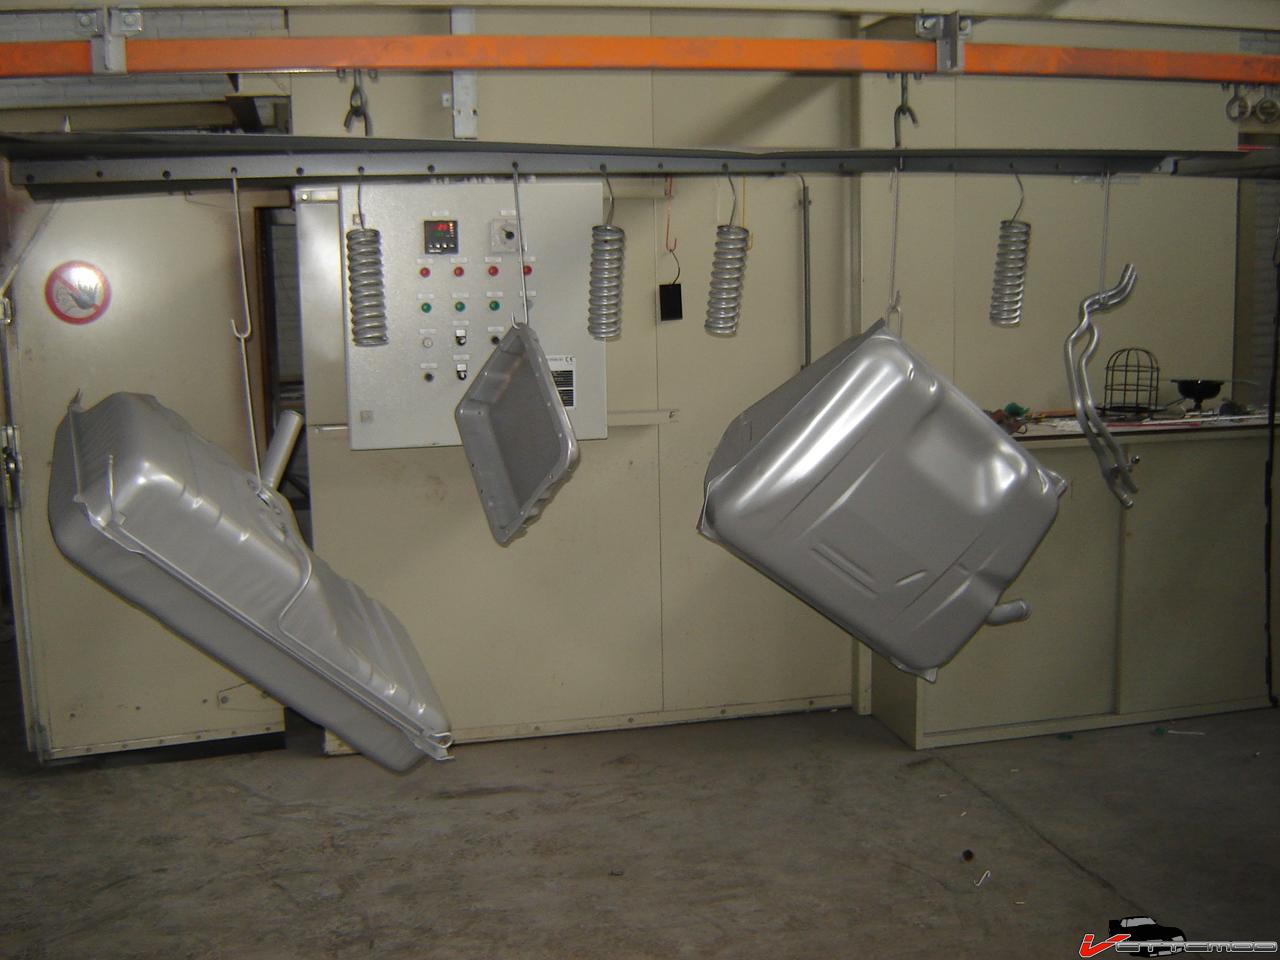
Everything's done. Fixed the tank (soldered the filler), everything powdercoated. Time to start building again, I love working with clean/new parts. I hate grime & rust. Should be rust free for a looong time now.
08-28-2009, 09:06 AM
#34
Re: Pulling apart my 87 IROC
I sure hope my black & light gray color scheme is going to work as I envisioned it would LOL
One of the things I had coated is a stock 700R4 oil pan have a TCI deep sump under there now but it's already scratched from scraping over speed bumps. With the new sport line springs the car will be significantly lower, this is just backup measures in case the other pan is a no go. As a precaution i will weld a removable crossmember to the front subframe between block and trans (under the converter) so that an obstacle won't take out the pan head on.
One of the things I had coated is a stock 700R4 oil pan have a TCI deep sump under there now but it's already scratched from scraping over speed bumps. With the new sport line springs the car will be significantly lower, this is just backup measures in case the other pan is a no go. As a precaution i will weld a removable crossmember to the front subframe between block and trans (under the converter) so that an obstacle won't take out the pan head on.
08-30-2009, 11:31 PM
#36
Junior Member

Join Date: Mar 2008
Location: 813,fl valrico
Posts: 63
Likes: 0
Received 0 Likes
on
0 Posts
Car: 89 camaro
Engine: 68-454,87-nothing yet,88gta-305 tpi
Transmission: stock 700r4
Axle/Gears: borg warner 9-bolt/3:27 gears
Re: Pulling apart my 87 IROC
wow i am dying to see more pics of the build thats amazing how long is it taking you to do this all?
08-31-2009, 04:06 PM
#38
Re: Pulling apart my 87 IROC
More progress.
Cleaned tank and put the sending unit back in and mounted it under the car.
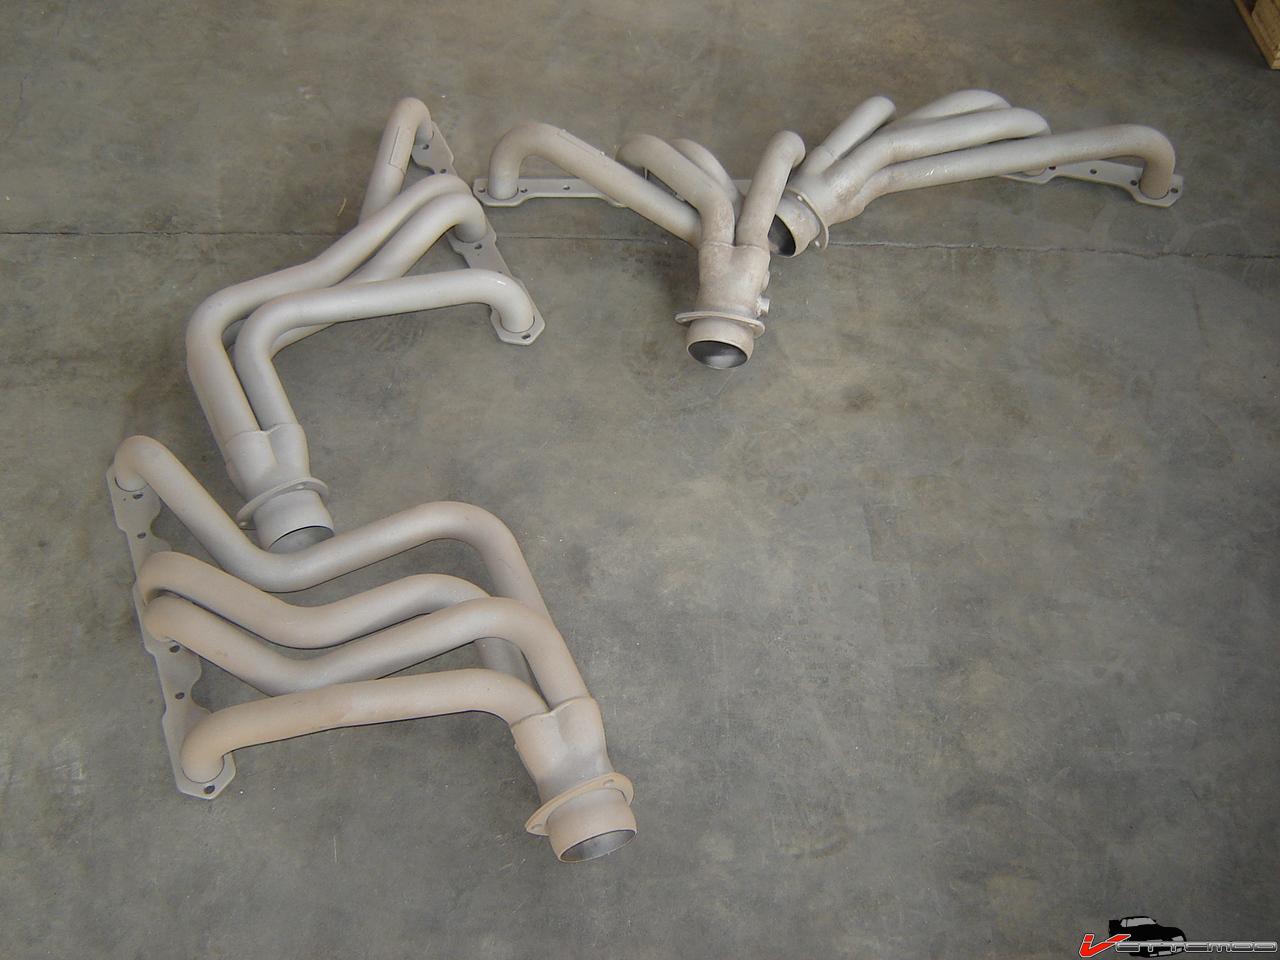
new valve covers on the engine and some little dress up. Will eventually swap the cast iron L98 heads for some trick flow twisted wedges I have lying around after I'm done with then (need a little grinding still here and there) Also wrapped the headers after blasting and painting with high temp por...hope that stuff stays as nice as it is now. Also welded on those V band clamps.
Cleaned tank and put the sending unit back in and mounted it under the car.
new valve covers on the engine and some little dress up. Will eventually swap the cast iron L98 heads for some trick flow twisted wedges I have lying around after I'm done with then (need a little grinding still here and there) Also wrapped the headers after blasting and painting with high temp por...hope that stuff stays as nice as it is now. Also welded on those V band clamps.
08-31-2009, 04:08 PM
#39
Re: Pulling apart my 87 IROC
Some more progress in the engine bay, everything's painted, bunch of harnesses put back in their place, installed fuel & brake lines and a bunch of other stuff....it's getting there
Last edited by Twin_Turbo; 08-31-2009 at 04:11 PM.
 09-01-2009, 01:58 PM
#41
Re: Pulling apart my 87 IROC
more progress....
got the spark plug wires done, the taylor looms work quite well even with the adapters for use on centerolt heads (they bolt to the sides) had to notch the header flanges. Gotta finish the timing setup (billet sprockets I had lying around are for a flat tappet cam, they don't fit)

More progress on the fays2 and the lca relocation brackets. Will set up the angles correctly and weld them on. Found out their sway bar spacers are drilled incorrectly for a 9 bolt axle clamp sway bar mount.

 `
`
got the spark plug wires done, the taylor looms work quite well even with the adapters for use on centerolt heads (they bolt to the sides) had to notch the header flanges. Gotta finish the timing setup (billet sprockets I had lying around are for a flat tappet cam, they don't fit)
More progress on the fays2 and the lca relocation brackets. Will set up the angles correctly and weld them on. Found out their sway bar spacers are drilled incorrectly for a 9 bolt axle clamp sway bar mount.
`
09-01-2009, 02:00 PM
#42
Re: Pulling apart my 87 IROC
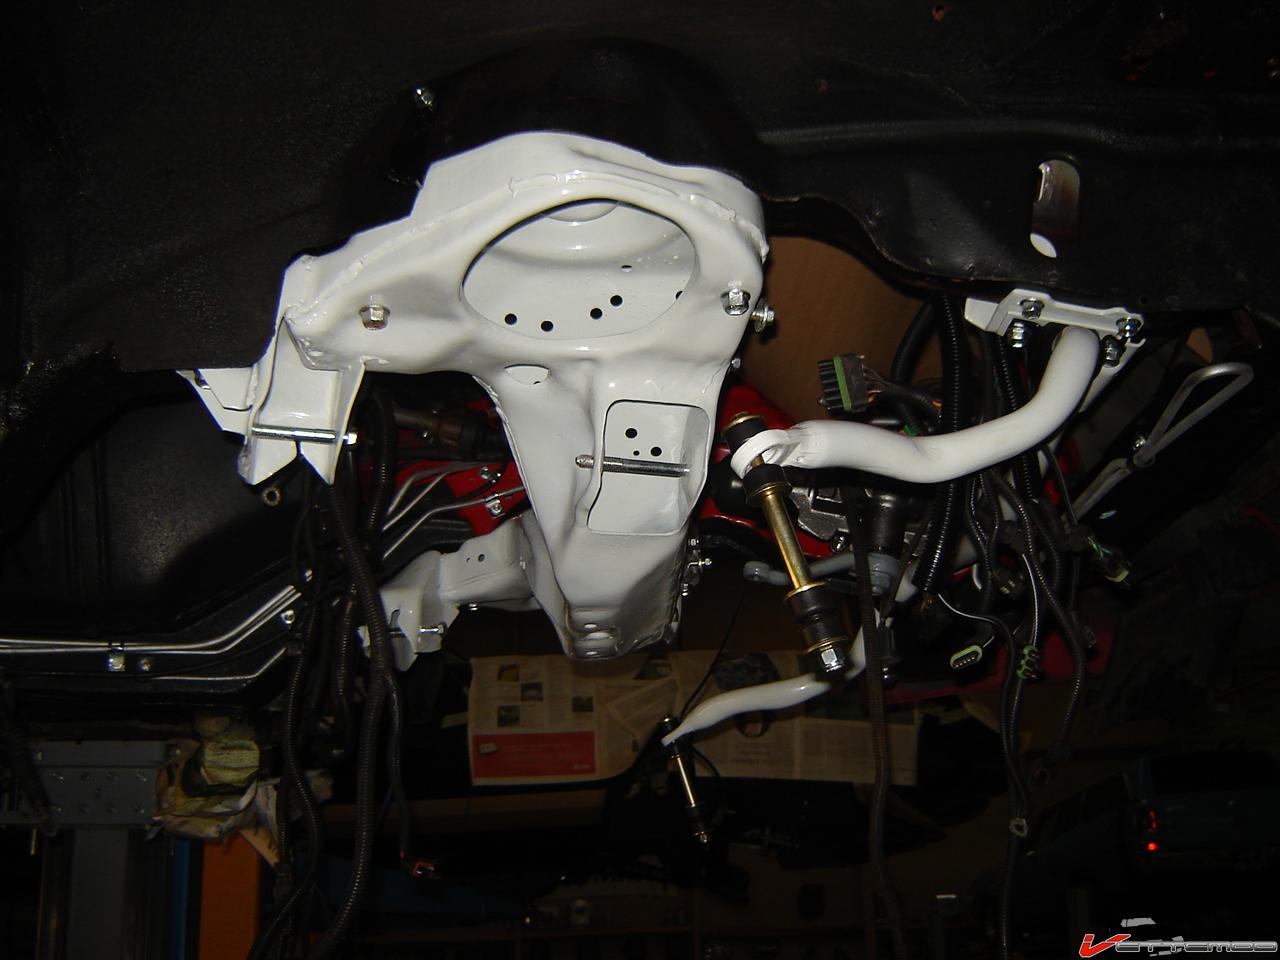
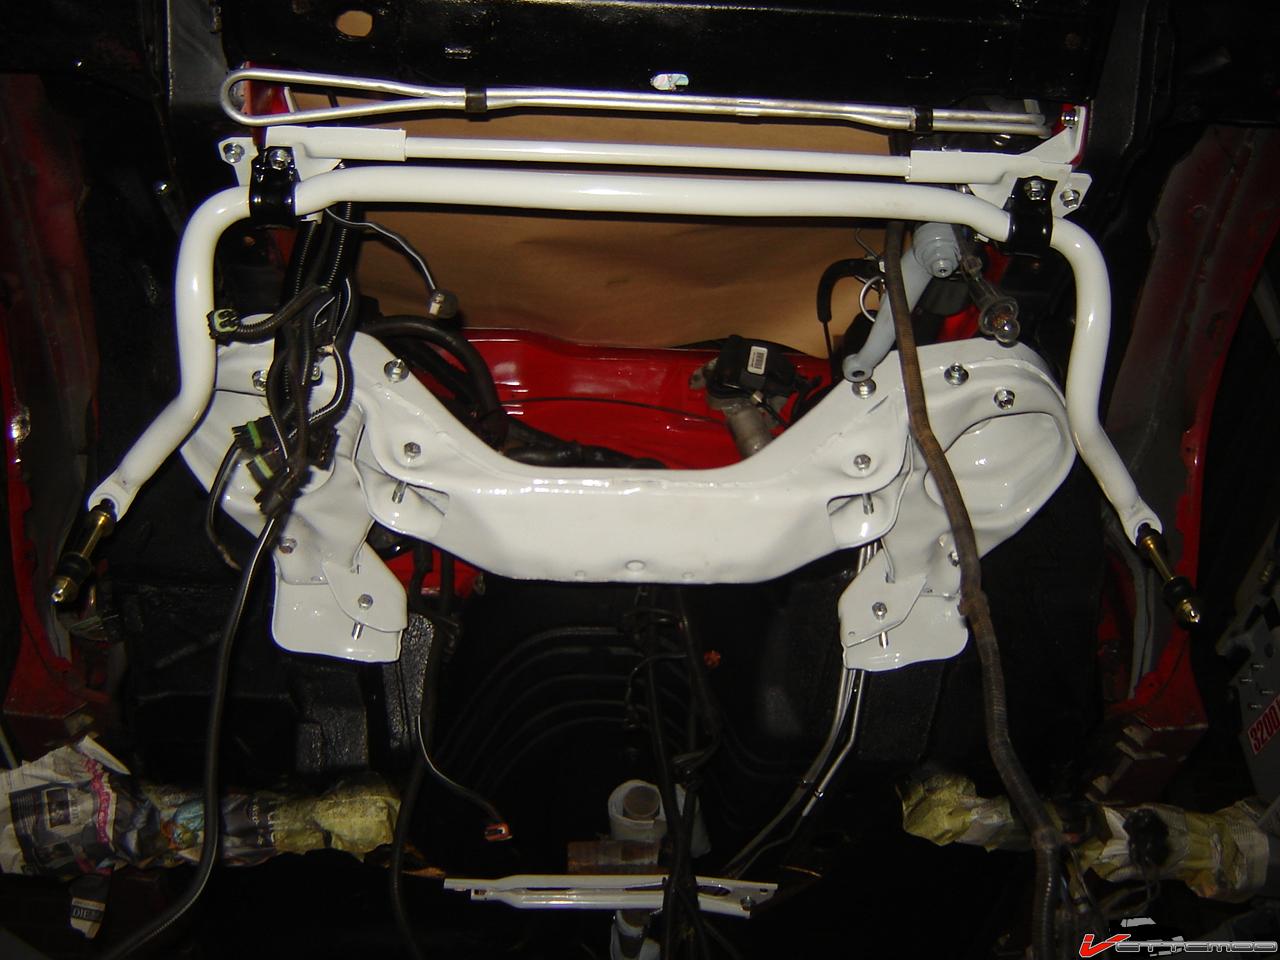
Temporarily put the front crossmember back in to get the brake lines in the exact position. Will drop it down, mount the engine on and lower the car back on the engine and bolt it all together. I dropped the engine like this too...much easier than wrestling a cherry picker or overhead hoist.
09-01-2009, 06:23 PM
#43
Member
Join Date: Aug 2007
Location: ANDERSON SC
Posts: 239
Likes: 0
Received 0 Likes
on
0 Posts
Car: 92 RS
Engine: 305
Transmission: T-5
Axle/Gears: 3.08
Re: Pulling apart my 87 IROC
The bedliner you used was that a spray on or the roll on like from the parts stores? If you stated i missed it sorry.
 09-01-2009, 09:13 PM
#45
Member
Join Date: Aug 2007
Location: ANDERSON SC
Posts: 239
Likes: 0
Received 0 Likes
on
0 Posts
Car: 92 RS
Engine: 305
Transmission: T-5
Axle/Gears: 3.08
Re: Pulling apart my 87 IROC
Thanks man didnt know if it was like that herculiner stuff that rolled on. Got a 92 that I hope to be starting on this winter and I like the way your floors turned out. Oh and by the way where did you get the taylor looms?
09-02-2009, 09:37 AM
#48
Moderator
Join Date: Mar 2001
Location: Doghouse �������������������������������������� Car: 1989 Formula 350 Vert Engine: 350 L98 Transmission: 700R4 Axle/Gears: B&W 3.27
Posts: 14,235
Received 163 Likes
on
118 Posts
Car: 87 Formula T-Top, 87 Formula HT
Engine: 5.1L TPI, 5.0L TPI
Transmission: 700R4, M5
Axle/Gears: Sag 3.73, B&W 3.45
Re: Pulling apart my 87 IROC
way cool... If I could convince my wife to let me do stuff like that I would...
I think I would quickly find a demise becoming disemboweled in my sleep if I tried to do that. Heck even when I took off work to do my yellow car I cought grief even though it did not impose it on her much at all...
John
I think I would quickly find a demise becoming disemboweled in my sleep if I tried to do that. Heck even when I took off work to do my yellow car I cought grief even though it did not impose it on her much at all...
John
09-03-2009, 12:53 PM
#49
Senior Member
iTrader: (1)
Join Date: Jul 1999
Location: New York City
Posts: 503
Likes: 0
Received 0 Likes
on
0 Posts
Car: 1986 IROC
Engine: 355 Tpi
Transmission: 700r4
Axle/Gears: 9 Bolt 3.27
Re: Pulling apart my 87 IROC
Awesome job! You've accomplished more in a month than I've done in 2 years. Can't wait to see it finished.
09-03-2009, 08:48 PM
#50
Junior Member

Join Date: Feb 2008
Location: Blairsville Ga
Posts: 84
Likes: 0
Received 0 Likes
on
0 Posts
Car: 1988 IROC-Z
Engine: 305
Transmission: 5 speed
Axle/Gears: 3.08 posi
Re: Pulling apart my 87 IROC
The work that you are doing is Amazing!!!!!!!................A True Inspiration to us all................
Mike
Mike