When you click on links to various merchants on this site and make a purchase, this can result in this site earning a commission. Affiliate programs and affiliations include, but are not limited to, the eBay Partner Network.
when you unbolt the trunk support you will probably need a good putty knife and start scraping the "Butyl" rubber or at least thats what I thought it was try not to remove the paint my 90 did have some urethane at the ends where the diamond plastic trim that seals to the big rubber hatch seal. when you get it as scraped off as you can I used lacquer thinner and shop towels to get it to clean paint. when I test fit mine both were almost as far forward as the glass holes would allow it really was easier than I thought
Did you have the black putty looking stuff in the bolt holes for the spoiler itself?
The weather's been horrible so I haven't touched the hatch yet unfortunately. I did however get the nose of the car taken off which is a nice step in the right direction. Before I did it, I searched a few threads to see how it's done and they all seemed to make it much more difficult than it actually is, so here's a quick breakdown of what I did.
1. Grab a Busch
2. Open the head lights and unplug the wire for the motors so they'll stay up with the car off. You can also just use the gears to twist them open, but you need to unplug that wire regardless.
3. Remove the black plastic head light surround. 2 small hex bolts on each side, then pull out.
4. Reach your arm under the head light and remove the 2 lower 10mm bolts holding the whole assembly in. Then take off the 2 upper bolts. Super easy.
5. Pull the light assembly out a bit (motor should come too), and pull out the wire going in to the light itself. Whole assembly should be totally free now.
6. Grab celebratory Busch #2.
7. Grab a flat head screw driver and a pair of needle nose pliers and go under the car. There are 3 push tabs holding the bottom of the nose to the car. Use the flat head to push the tab out enough to get a good grip with the pliers, then pull down on the CENTER of the tab.
8. Remove the lower GFX from the nose. I didn't have to do this as mine were broken clean off, but they just looked to be screwed on, so use your noggin for that task.
9. Quick **** and grab another B Latte.
10. Using a deep 10mm socket, remove the nuts holding the nose to the front edge of the fender. This is why you removed the head lights, so look down through the gaping whole, they're super easy to get to. Soak them in penetrating oil first as you're likely going to break a few.
11. Lastly, at the top edge of the nose, there are 10 8mm bolts keeping it attached. They run along the top lip of the nose, and are super accessible and easy to get off. After they're removed, pull the nose forward so the bolts come out of the fender, then lift it up and over the tab that you just un-bolted. Nose should come right off.
12. Over hand lob that big f***er as far as you can. Then, make your way back to the fridge. You've done well and deserve a crisp reward.
Seriously, my driver side fender is pushed in making those bolts pretty difficult to get at, and it still took me all of 30 minutes to get the nose entirely removed. I don't see how it could have possibly taken the writers of the other threads HOURS to do, unless you try to "save time" by not removing the head lights.
Anyways, now I'm trying to find a way to straighten out the front of my fender just enough to so the head light can close again. It's folded in RIGHT at the lip, and though I'll be replacing that fender shortly, I'd like to at least be able to put the lights back in for the time being. That'll be tonight's crowbar finesse project. I also noticed that my driver side fog light lens is broken, does anyone have a cheap replacement floating around? It isn't very high on my priority list as it still works, so I'm not dedicating money to shipping in a new one quite yet.
In similar news, I also picked up the original tan seats from my car, and sold the grey Camaro ones that are in there now. The originals are ripped along the seams in the middle of the seat, and they need a good bath, but at least they're original to the car. I'm also making a 600km trip on Monday to visit a guy with a garage PACKED with Third Gen stuff. Mostly Camaro stuff including 2 dash's, a full set of base seats, 2 sets of interior plastics, and who knows what else. The catch though? Immaculate looking grey cloth GTA seats. Scooping it all for $150, which is about $100USD. Home run in my books. I'll post some pics of everything once I get it home.
Great to see that you are working on getting her back to her former glory. Are you repairing the original tan seats or will you be recovering?
Great to see that you are working on getting her back to her former glory. Are you repairing the original tan seats or will you be recovering?
Got a long way to go but she's coming along. The seats are in there to at least keep everything original looking for now, though I plan on getting a set of tan cloth GTA seats to go in there eventually. The current ones are mostly ripped along the original seams, so I'd like to figure out a way to clean them up for the time being
Here's a shot after putting the seats in last night. I steam cleaned them and gave them a serious scrub so they're still wet in the pics, making them look dirty. They certainly aren't perfect but imo they're a huge leap forward from the grey Camaro seats that were in there before. Now I need a driver side cup holder and door handle, which will come when I pick up Scooter's interior... some day.
Here's how she sits right now, except for the new interior being in. I wanted to have the nose professionally painted but to gain a bit of experience, I'm going to grab myself a 6 pack of liquid courage and take a shot at painting the nose myself. Robbed straight from Google, my plan is to wet sand the nose with 600 grit, then base coat, then let dry, then repeat for a total of 3 rounds. Then 2-3 layers of clear coat. Any paint experts want to chime in with tips? I'm using parts store off the shelf supplies and spray cans, but I'm obviously hoping for at least half decent. I'm going to have the nose properly painted regardless, but this is just practice really.
I'm also picking up a nice door and possibly a fender on the weekend. The door likely won't be from a 91, so the GFX holes will be wrong. Anyone's who's used -90 doors on a 91-92, can you tell me if the original holes for mounting the gfx will still be visible once I put my 91' kit on? Also from what I've read, the only thing I'll need to change IN the door in the mounting bracket for the arm rest. Is there anything else?
The easiest way to remove the headlight assemblies is to just get under the front end, look up and you'll see two bolts that hold the bracket to the rad support flange. Then remove the bolts holding the two obvious brackets to the top and front of the rad support. Then the entire headlight assembly will pull right out. The electrical connections to the motors can be removed from the top, and from the headlight underneath. No need to remove the bezel, and you won't lose the coarse adjustments. Doing it the other way, you make the job of readjusting the headlight assemblies much more difficult since the holes into the bracket are much larger.
I didn't realize it was that easy to pull the whole assembly, so to anyone reading, use Drew's method for the head lights . PULL THE HEAD LIGHTS THOUGH. Don't try and save time by leaving them in.
Seriously, my driver side fender is pushed in making those bolts pretty difficult to get at, and it still took me all of 30 minutes to get the nose entirely removed. I don't see how it could have possibly taken the writers of the other threads HOURS to do, unless you try to "save time" by not removing the head lights.
when i installed my frt bumper cover I had it on and off several times cause my Aluminum crash bar wasn't made for the new style nose- was curved on ends - had to keep sawzall trimming the impact absorber as it "moved" causing cover to fit like OJ's glove, but you are right same for same its pretty darn easy- liking your progress Keats
when i installed my frt bumper cover I had it on and off several times cause my Aluminum crash bar wasn't made for the new style nose- was curved on ends - had to keep sawzall trimming the impact absorber as it "moved" causing cover to fit like OJ's glove, but you are right same for same its pretty darn easy- liking your progress Keats
Haha thanks man!
I dragged my feet with my last GTA and never fixing the annoying issues made me never want to drive it, so now with this one I'm really trying to hammer down on things so I can actually get out there any enjoy it. There's a guy that I follow on Instagram with an excellent looking twin to my car, but with the Hawks 17's. It definitely plays a massive roll in keeping me motivated
So I finished the nose, and I'm not sure how to feel about the end result. The picture makes it look lighter than it actually is, though it is still slightly off from the original colour. I used a spray can so in the light you can see some of the stripes, and there's a spot where my wet sanding just damaged the paint (???), but hey it's not terrible for a back yard $15 bomb job. I'll be getting it painted properly so what did I really have to lose. I'm anxious to get it back on the car but I can't figure out how to unfold the front of my fender, and I don't have a good replacement yet, so that's the next job. I did however take a suction cup to my driver door and was able to pull out the major part of the dent. It certainly isn't perfect but it's much better for the time being until I get my replacement door painted.
Looking good! Keep up the good work. The seats came out nice. Can't wait to see your car.
Originally Posted by RKeats
So I finished the nose, and I'm not sure how to feel about the end result. The picture makes it look lighter than it actually is, though it is still slightly off from the original colour. I used a spray can so in the light you can see some of the stripes, and there's a spot where my wet sanding just damaged the paint (???), but hey it's not terrible for a back yard $15 bomb job. I'll be getting it painted properly so what did I really have to lose. I'm anxious to get it back on the car but I can't figure out how to unfold the front of my fender, and I don't have a good replacement yet, so that's the next job. I did however take a suction cup to my driver door and was able to pull out the major part of the dent. It certainly isn't perfect but it's much better for the time being until I get my replacement door painted.
Looking good! Keep up the good work. The seats came out nice. Can't wait to see your car.
Since you are in the mood to try new things, why not try your hand at body repair? For around $30 you can pick up a few body hammers and "spoons" and watch a few YouTube videos to learn. Years ago, I was a welder at a body shop and the guys there taught me bodywork. It really isn't that hard if you are patient.
DR.K.
Not a bad call really. I was able to get my driver door looking a bit better, but it would certainly be nice to use some better tools and figure out how to get it GOOD looking. There's a dent removal guy that my work uses and I meant to see if I could get some tips from him, but he hasn't been around since covid started. He has an IROC too so I'm hoping he'd be down to help me out
Not a bad call really. I was able to get my driver door looking a bit better, but it would certainly be nice to use some better tools and figure out how to get it GOOD looking. There's a dent removal guy that my work uses and I meant to see if I could get some tips from him, but he hasn't been around since covid started. He has an IROC too so I'm hoping he'd be down to help me out
Sweet. I always like talking to the older car guys.
DR.K.
Last edited by drknow90rs_ss@y; 05-30-2020 at 04:32 PM.
Sweet. I always like talking to the older car guys.
DR.
Got a chance to chat with him yesterday and he said that he'll help me out with my driver door whenever I bring the car in. He seemed pretty confident that my driver door can be fixed up so hopefully it works out!
The Third Gen gods also blessed me with another home run of parts last night. This car really has been nothing but lucky so far, with the exception of the maiden voyage I guess . I picked up a mint wing from a grey 91' and both of my fender GFX for about $300, which is just over $200 USD. I don't know about the southern states, but up here, the cheapest wing I can find in the country is $500 and it's cracked, with those gfx usually selling for $150 a piece. He also has some cup holders and arm rests that may end up in the collection, but we'll see how they are. Also I forgot to grab pics of the stuff, but I'll take some tonight.
I'm pretty happy with how the car's coming along. The bumper is done and ready to go on, I got my spoiler, gfx, the interior is back to stock and presentable, it's clean and doesn't feel like a someone's been squatting in it anymore, and my list has passed the "overwhelming" length.
My chores for my next free day will;
- Sand and paint the GFX and get them on the car
- Find a way to straighten out the folded fender so I can properly re-attached the nose and finally put the front end back together
- Get the old spoiler taken off the original hatch panel and swap the panel on to my current rear glass
Question: the glass I have on my car is from an 80's car, so the tabs to mount the spoiler are different. Is it possible to swap the tabs, or should I just get a new glass?
Over the next few weeks I need to tackle;
- New fender and door
- Tighten the passenger side mirror
- Replace missing driver side arm rest and cup holder
- Replace the front brakes / oil change and fluid flush
- Possibly replace a tab for the head liner as it's hanging a bit in the front. The board, not the fabric.
- Front tires
- Get the panels that I'm spray painting properly painted
- Find a license plate mount for the nose
A lot of minor tinker projects really. The door and fender can be straightened out enough to look decent until I find the replacements and get them painted, and except for the brakes and mechanical things, I'll be ready to drive while I work on the other stuff.
I actually saw a green 91-92 GTA parts car in Massachusetes on FB marketplace, guy had most of what you need if memory serves but the border is closed. You are making nice progress on your car, keep up the good work.
I never liked the plastic mounts that GM put on 91-92 Firebirds (and I didn't want to drill into my brand new bumper cover), so when I did my old car, I had a guy fab up a license plate bracket that mounted to the core support and extended up under the bumper with round bar stock to a flat plate that the license plate mounted to. It's another option anyway.
This is the only picture I could find of the actual mount--- or at least some of the mount...
Good idea actually. My car's pretty low so I'd have to have one made that mounts high enough to keep the plate from hitting the ground, but that shouldn't be an issue. Love your car btw!
Got a chance to chat with him yesterday and he said that he'll help me out with my driver door whenever I bring the car in. He seemed pretty confident that my driver door can be fixed up so hopefully it works out!
You would be surprised what you can fix, with enough time and patience, you can fix almost anything. Back in '91 I had a '90 Celica Alltrac Turbo that I bought at auction. It had a really crunched and creased drivers side front fender. A new one, at the time, was almost $500 (USD), so I left it that way for a while. When I was working at the body shop, one of the techs asked me why I had such a messed up car, when I worked at a place where I could easily fix it. I laughed and said "No way we can fix that, we throw away fenders that are better than that, all the time". He told me to take it off and bring it in. Over the next week, (While I drove around missing a fender) he taught me how to fix it. I did all the work myself, on breaks, while he instructed me. It looked as good as new when we installed it at the end of the week. I really wish I had taken pictures. I did the rest of the bodywork on the car myself and had it painted gunmetal grey ( Toyota calls the color cobalt grey metallic) one weekend at the shop.
Ah, those were the days.....
DR.K.
Finally had a good full day to spend working on the car and made a ton of progress. Got the new nose installed, GFX painted and installed, swapped the original hatch panel on to the glass, tightened up my floppy passenger side mirror, added my missing driver side arm rest, and got a bit of driving in as well. Here are some pics
Here's what I drove over to my mom's place Saturday, vs what I drove home. The nose colour doesn't match perfectly, but considering it wasn't the proper colour, what can I expect. I found the proper colour in a can so I'll be removing the nose again and re-spraying it to the proper colour. Alignment wise, the passenger fender is too far pushed in nose the nose hangs over the driver side of the car. I have my replacement fender and I assume it'll get it lining up better, but we'll see when I get it on. The driver side head light also sits really high and I can't figure out why, but it was getting late and I really only gave it a quick look over to see if anything was obvious. Regardless, it's back together and this nose sure beats the mangled thing that was on there before.
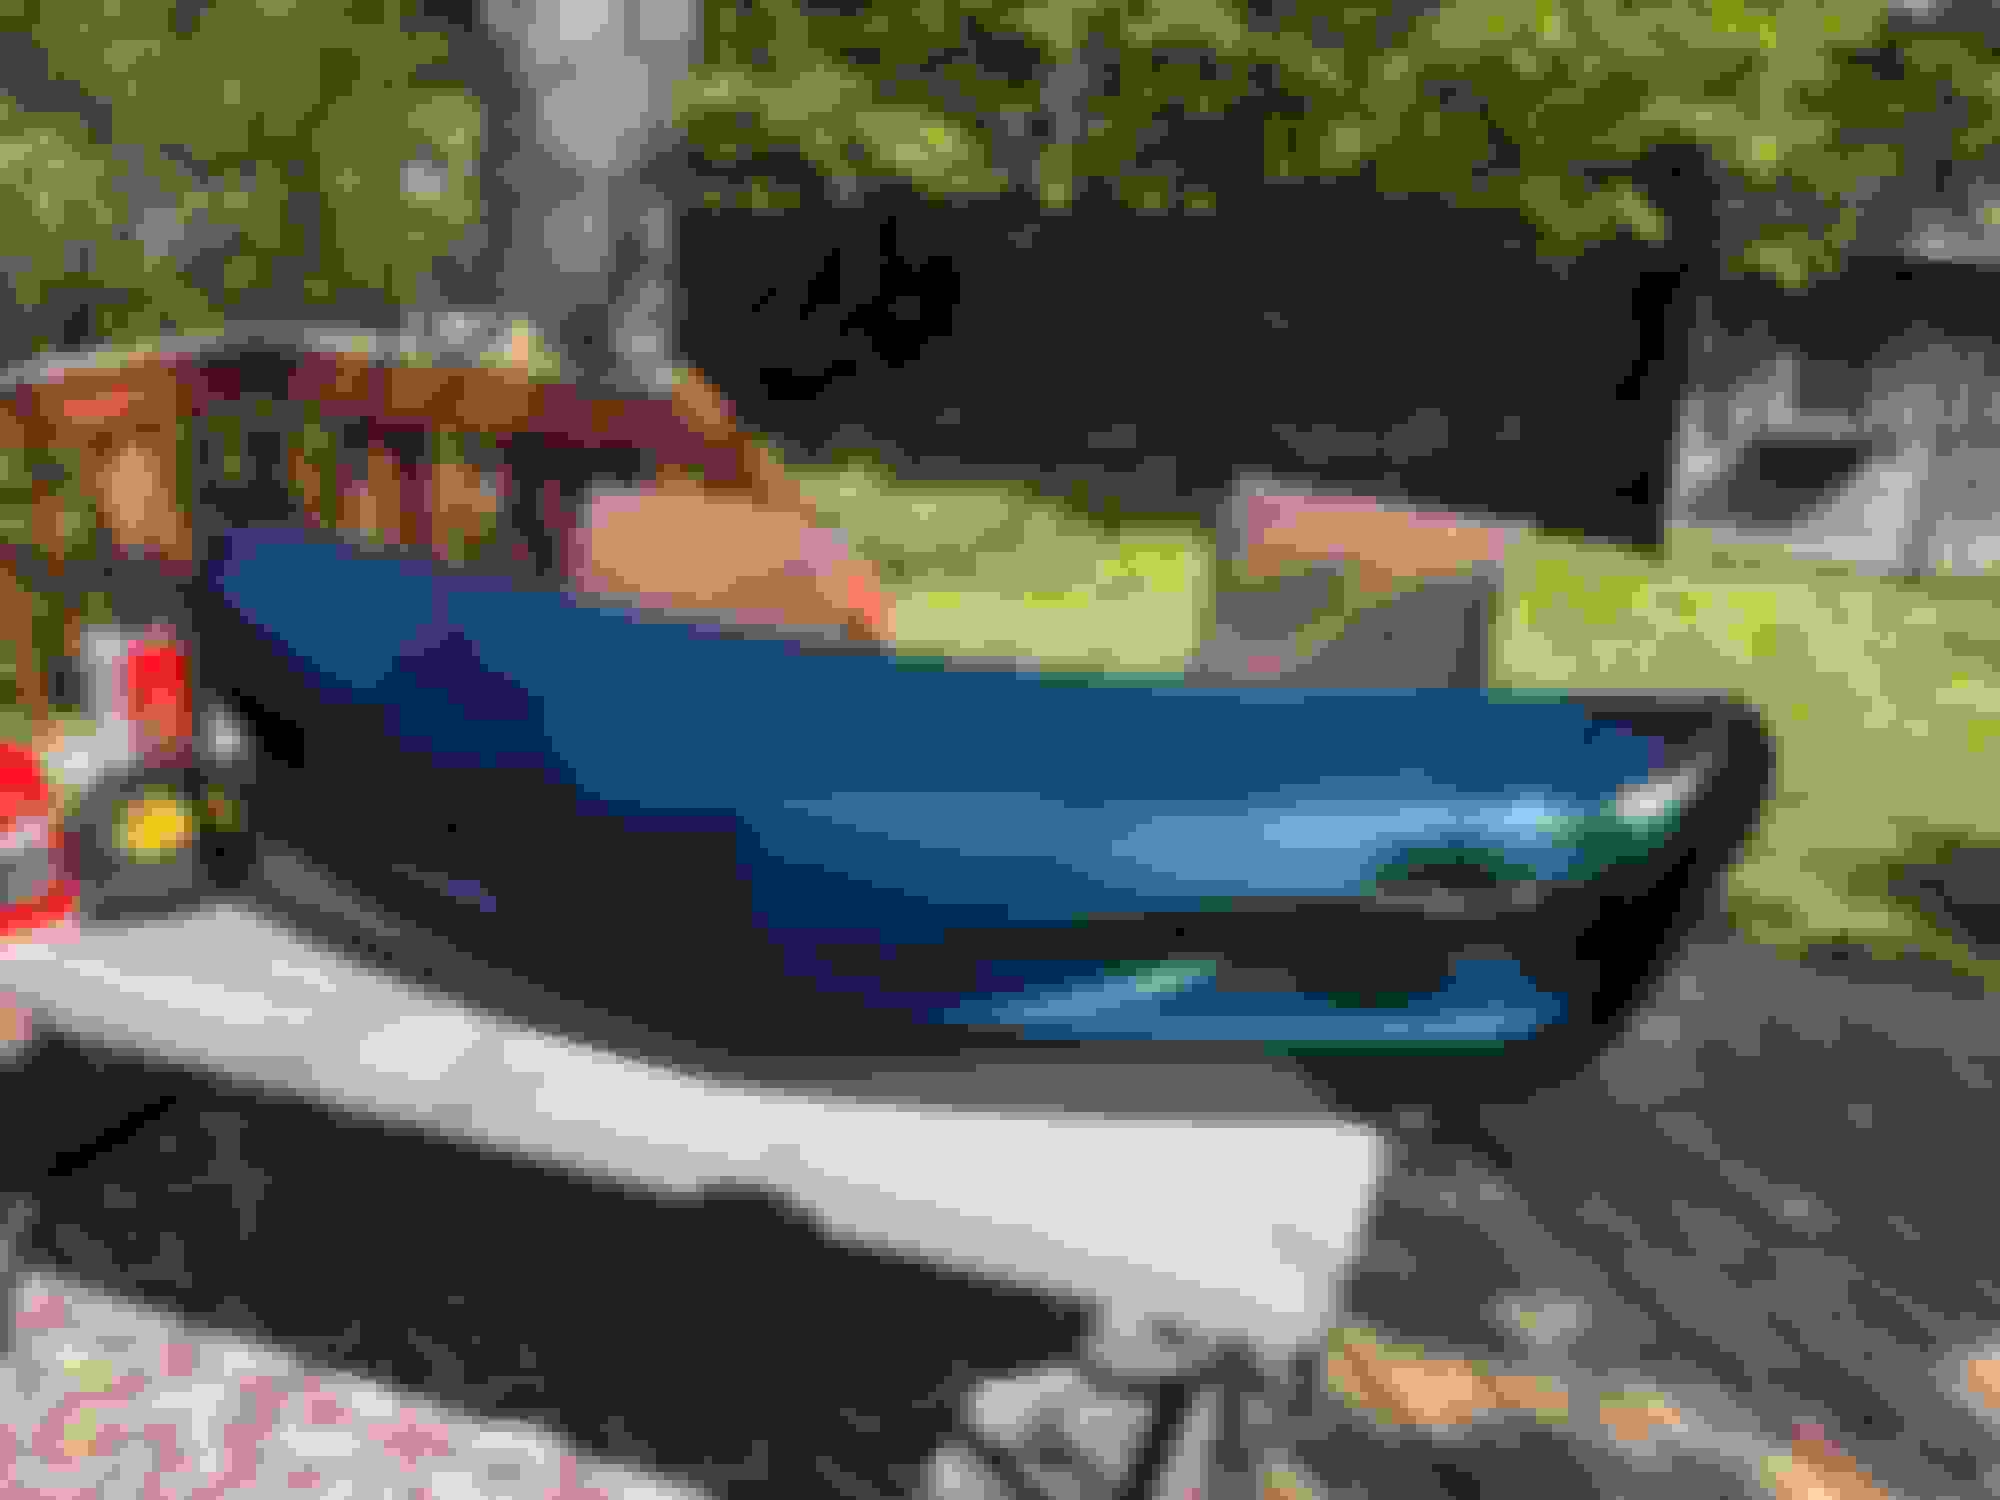
Here's the comparison between the old grungy thing that was on the car, and the original panel with the old broken spoiler still attached. I have the clean replacement spoiler but it needs to get painted, and I need to find glass from a 91-92 so I can mount the side arms properly. This glass is from an 80 something so it has the wrong tabs. Anyways, it looks much better even with the broken spoiler than it did before. Getting the panel off wasn't too bad, but would definitely be easier with 2 people, especially if your hatch struts are still strong. Biggest pain is getting the old adhesive to separate from the glass so you can life the panel off. I took a flat head screw driver and just went along it freeing everything up the best that I could until I could pull it completely off. For re-install, I just set the panel down on the glass and tightened everything from inside the car.
Here's my replacement fender and GFX after getting a coat of the PROPER paint colour. Lines up perfectly on the car except for slightly less shine. The fender's from a 91' as well so the bolt holes line up as they should. Dropping that off today for a professional paint job as I don't want it looking like garbage.
In terms of driving stuff, she's a bit questionable. Smokes like a prostitute on start up, as most of them do, but I can't seem to tell if it's chewing oil while driving too. Dip stick smells a bit gassy but it doesn't seem to be losing anything. She's also in dire need of an oil change as it's been god knows how long. Same story for the tank of gas that's at LEAST a year old. I didn't get a chance to put the new brakes on so they're still horrible and squeaky. It seems to wander a bit driving down the road but seeing as the front tires are still 15 years old, I think I know the culprit. Otherwise, it runs really nicely and all the power is there without hesitation, and it idles like a dream. Shifts hard in to second when you're going slowly, but it's smoother the harder you're on the gas. Definitely still have some stuff to do but I'd say my progress is decent enough.
Some good progress on this car so far RKeats, keep working on it piece by piece, and it'll get there. I'd start with an oil change (grab a couple of jugs of a synthetic oil when it's on sale at Canadian Tire, and a NAPA gold oil filter), these cars deserve synthetic. A transmission fluid change would be good as well, as who knows when it was changed last, and you mentioned the transmission shifted hard. Lastly, get some good newer 245/50/16 tires on the car, as it's a bad idea driving around too much on 15 year old tires.
Some good progress on this car so far RKeats, keep working on it piece by piece, and it'll get there. I'd start with an oil change (grab a couple of jugs of a synthetic oil when it's on sale at Canadian Tire, and a NAPA gold oil filter), these cars deserve synthetic. A transmission fluid change would be good as well, as who knows when it was changed last, and you mentioned the transmission shifted hard. Lastly, get some good newer 245/50/16 tires on the car, as it's a bad idea driving around too much on 15 year old tires.
That's next on the list! The Jeep is being a bastard so my attention has been focused on it for the moment. The back tires are already replaced on the car, and I'll be getting new fronts on within the next week or 2! The car wanders like crazy with this those old dried leaves wrapped around the front rims
That's next on the list! The Jeep is being a bastard so my attention has been focused on it for the moment. The back tires are already replaced on the car, and I'll be getting new fronts on within the next week or 2! The car wanders like crazy with this those old dried leaves wrapped around the front rims
Yep, that's just part of older car ownership, I'm sure you'll get the Jeep figured out, and get back at your GTA soon.
So I ended up getting some offers for my Jeep that I couldn't refuse, so I sold it and am now sticking my trust in to the car as a temporary (or not??) daily driver. We're one day in, and so far I have a valve stem that's ready to let that tire explode, and I smell some gas from the engine bay. I couldn't find any leaks anywhere, and the smell isn't super strong. Injectors don't seem to be leaking, lines don't, I don't see any wetness, so any suggestions for where to look? I'm still burning off gas that's at minimum a year old, so could that have any impact on fumes in the engine bay? Anyways, the car still seems to be running very well. No hesitation, perfect idle, starts in a heart beat, perfect temp, though it seems to shift in to second pretty aggressively at light throttle.
Cosmetically, my freshly painted fender will be ready for pick up on Tuesday, as will my new GTA seats and tan carpet. Definitely looking forward to that. I'd like to paint my replacement spoiler this weekend but we'll see what happens
The fuel smell is odd, any chance it�s the FPR diaphragm? But it seems unlikely the way the car starts and runs. Last guess is does that year have the charcoal canister??? Maybe a vacuum hose to that rotted and your getting some fumes or it�s plugged up? I know mine were all trashed/disintegrating and I just replaced them all.
Also with the trans is your TV cable adjusted? Probly wouldn�t be a bad idea to change the fluid and filter. When I did mine I replaced the pan with a TCI aluminum one with a drain and added a magnetic drain plug to make life easier next time. In a week or so I did another drain and fill and that really seemed to clean it out.
Getting that cosmetic stuff done is great too, really makes it feel like it�s getting closer, look forward to seeing it with the new repairs.
Potentially! The smell was coming from my passenger side mainly, which is where the canister will be. I did a sniff test this morning after the car sat all night and smelled nothing, so it's not like it's leaking and making a puddle somewhere. I'll dive in to it a bit deeper this weekend and see what I can find. Haven't adjusted the TV cable yet, but it seems like a likely culprit based on the other threads I've read through.
Another idea on the fuel smell, I noticed on my car when it would sit on hot days I would almost hear a moo sound come out of the tank area, what cured that excessive pressure was going underneath near the tank and removing the tank vent valve and disassembling and cleaning everything. They are simple to take apart but can be brittle and I�m pretty sure a replacement is hard to come by. That did not cause a fuel smell but it�s all apart of that same system.
You can get a new tank vent valve. GMpartswarehouse has them. I would check/clean/replace your purge valve and lines. Get those new front tires. If you sold the jeep, you have the cash for them. A blowout could really tear up your facia pieces, and some of those are really hard to find.
DR.K.
The issue right now is finding a set of tires. EVERYONE is sold out of the proper size, and I only need 2.
Another issue is that it's official, the car's burning oil and it seems to now be fairly aggressive. I was doing a few interior things yesterday with the door open, and I turned the car on to make sure the battery didn't die. When it started, a big cloud of blue came out so I let it idle for 20 minutes or so to see if it would go away. Gave it a good rev after a while and sure enough, blue cloud. After that, the exhaust at idle still seemed to have some blue in it. With the oil being god knows how old, as well as the gas, is there anything other than valve seals and rings that could be the culprit? Full fluid flush is happening Thursday
 05-06-2020, 02:17 PM


 . PULL THE HEAD LIGHTS THOUGH. Don't try and save time by leaving them in.


 . I picked up a mint wing from a grey 91' and both of my fender GFX for about $300, which is just over $200 USD. I don't know about the southern states, but up here, the cheapest wing I can find in the country is $500 and it's cracked, with those gfx usually selling for $150 a piece. He also has some cup holders and arm rests that may end up in the collection, but we'll see how they are. Also I forgot to grab pics of the stuff, but I'll take some tonight.


