

Here she is...Pics do the color no justice!
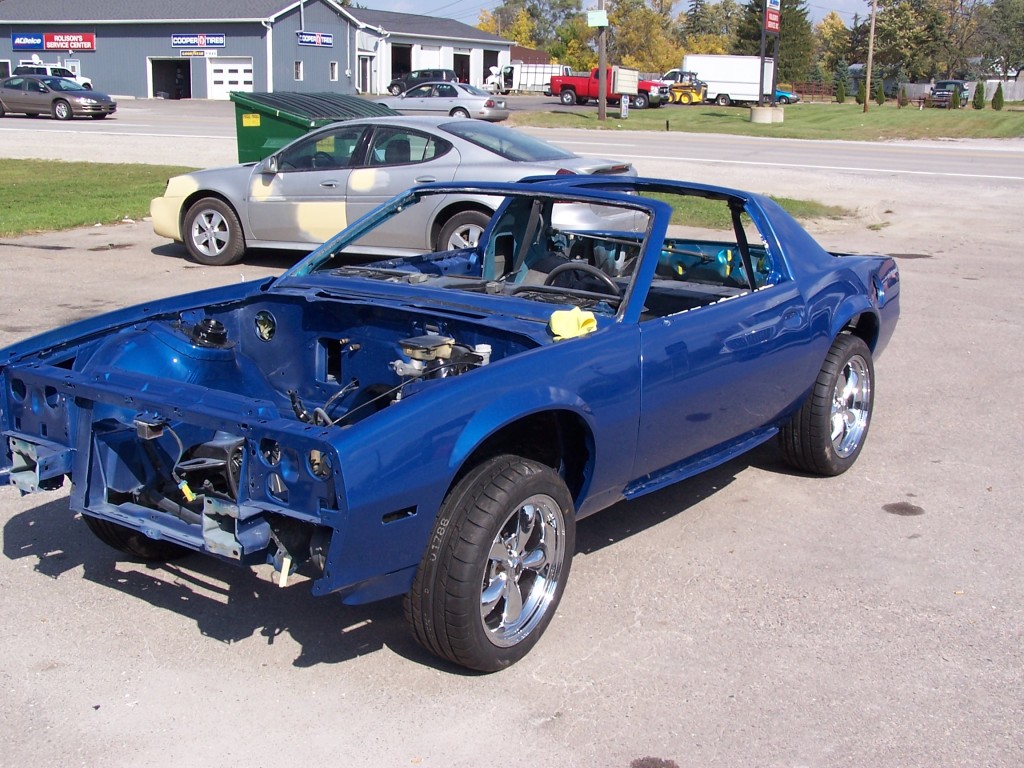
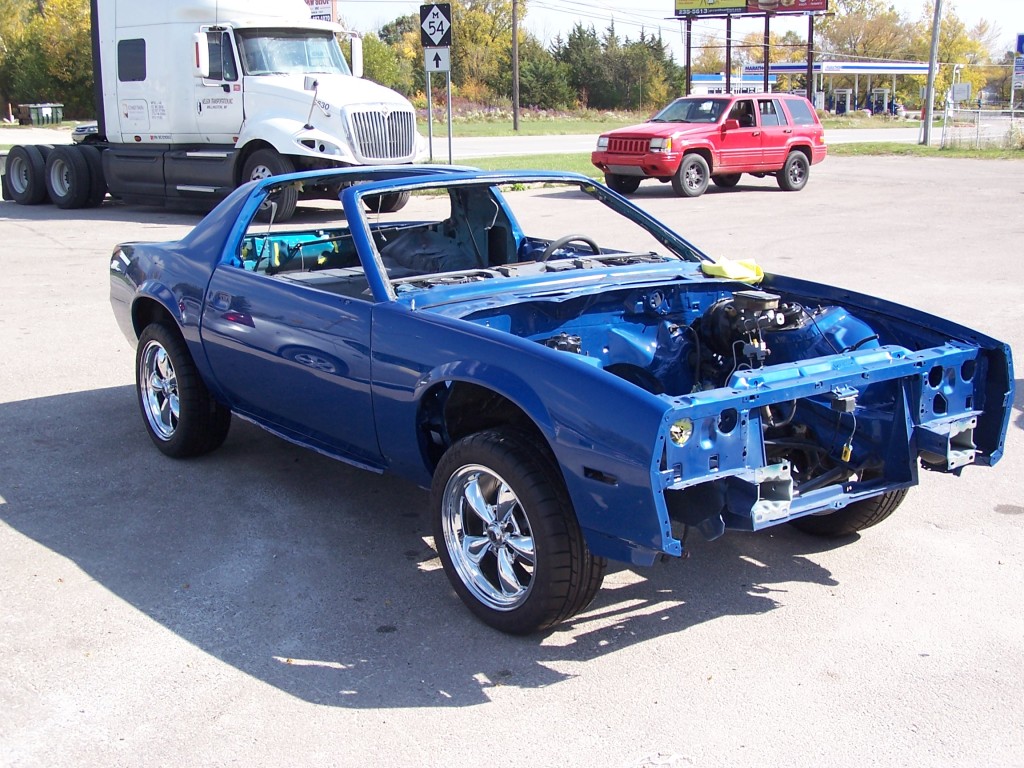
Anyone with any question about her, feel free to ask!
Anyone with any question about her, feel free to ask!
rarebmx
Senior Member
close


Apr 18, 2026
body work looks great and love the iconic blue. WOuld like to see it done. Paint looks slick

Member
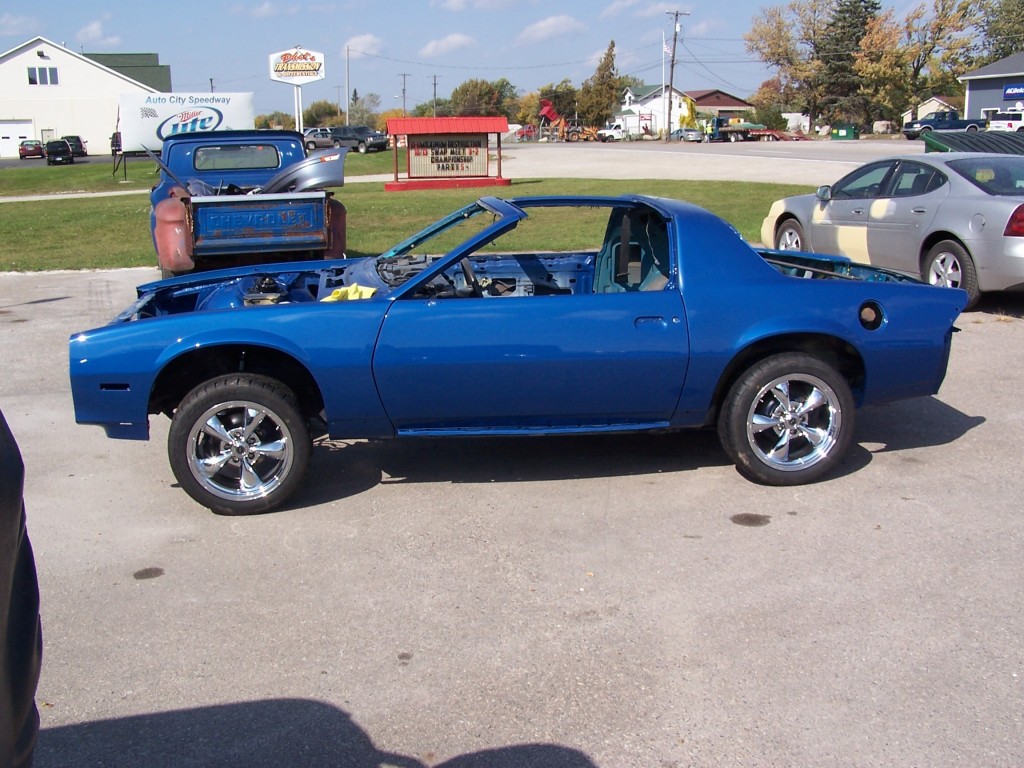
Its remarkable how much that middle pic matches the body shape of the 1st generation camaro.
Supreme Member
Quote:
I really see what you're saying in the back. To me the front looks more 2nd gen than first, but it's a toss up I guess. Nice paint.Originally Posted by lizardkng
Its remarkable how much that middle pic matches the body shape of the 1st generation camaro. 

Junior Member
i can only hope that when mine is finished with the paint it looks that nice great job

Senior Member
What color is that?
Quote:
Thanks. A lot of time trying to get it really straight.Originally Posted by rarebmx
body work looks great and love the iconic blue. WOuld like to see it done. Paint looks slick Quote:
Originally Posted by lizardkng
Its remarkable how much that middle pic matches the body shape of the 1st generation camaro. Quote:
Wow! nice eyes guys...I never really noticed!Originally Posted by afremont
I really see what you're saying in the back. To me the front looks more 2nd gen than first, but it's a toss up I guess. Nice paint. Quote:
The color is ultra blue pearlOriginally Posted by jchaussee
What color is that? Quote:
Originally Posted by motobooks
Looks great! Love the color. Quote:
Thanks!!Originally Posted by Nasty rs
i can only hope that when mine is finished with the paint it looks that nice great job 
Supreme Member
Sweet!!!...

Not a really a fan.
You need to complete it and then it'll look fantastic!!!!!!
You need to complete it and then it'll look fantastic!!!!!!

Member
wouldn't happen to have the paint code would ya?
Supreme Member
Ron U.S.M.C.
Supreme Member
close
Jul 17, 2019
Quote:
Anyone with any question about her, feel free to ask!
OK,was it was done at a Professional shop ,paint booth and all ?Originally Posted by splitface454
Here she is...Pics do the color no justicAnyone with any question about her, feel free to ask!
Base/clear ?
I only ask because its a rarity around here because of price.$$$
Its a great feeling you get driving it with the new paint for the first time.


Looks fantastic! I just painted my engine bay last weekend 4 base coats and 2 clear. Makes me want to rip mine apart and paint the whole thing.
Supreme Member
Quote:
As in Summit Ultra Blue Pearl that costs $90/gallon??? Is it single stage urethane, base/clear or what? It really looks nice.Originally Posted by splitface454
The color is ultra blue pearl Quote:
Originally Posted by coryprine
wouldn't happen to have the paint code would ya? Quote:
The paint is Kirker Black Diamond Ultra Blue Pearl. Which I've heard that summit paint is kirker paint but im not sure. Originally Posted by afremont
As in Summit Ultra Blue Pearl that costs $90/gallon??? Is it single stage urethane, base/clear or what? It really looks nice. Quote:
Base/clear ?
I only ask because its a rarity around here because of price.$$$
Its a great feeling you get driving it with the new paint for the first time. I still stand back looking at mine and get a nice feeling of accomplishment.
It was done at a professional shop, but my buddy owns the shop and its a very small operation. It was sprayed in a makeshift paintbooth that is all up to code.Originally Posted by ronusmc
OK,was it was done at a Professional shop ,paint booth and all ?Base/clear ?
I only ask because its a rarity around here because of price.$$$
Its a great feeling you get driving it with the new paint for the first time. I still stand back looking at mine and get a nice feeling of accomplishment.
I worked out a trade deal with him and helped him do all the work on the car. (any questions about the process I can answer) so all I paid for was just materials. But to be honest if I had to pay for the work would have cost 6 to 8 grand maybe even 10.
Yes its base/clear both kirker black diamond. And tbh It looks as good if not better than the best ppg has to offer cus thats all he sprays.
I cannot wait to get it all together and go for that first drive
Supreme Member
Dear Lord, this is refreshing. Nice work, can't wait to see it finished.
Any in process pics from the bodywork stage?
Any in process pics from the bodywork stage?
Quote:
Any in process pics from the bodywork stage?
Thanks! I will post more pic later today.Originally Posted by puma1552
Dear Lord, this is refreshing. Nice work, can't wait to see it finished.Any in process pics from the bodywork stage?
Supreme Member
It looks.............fantastic!!!!
Senior Member
Very nice! I love the color.
Can't wait to see how it looks all put back together.
Can't wait to see how it looks all put back together.
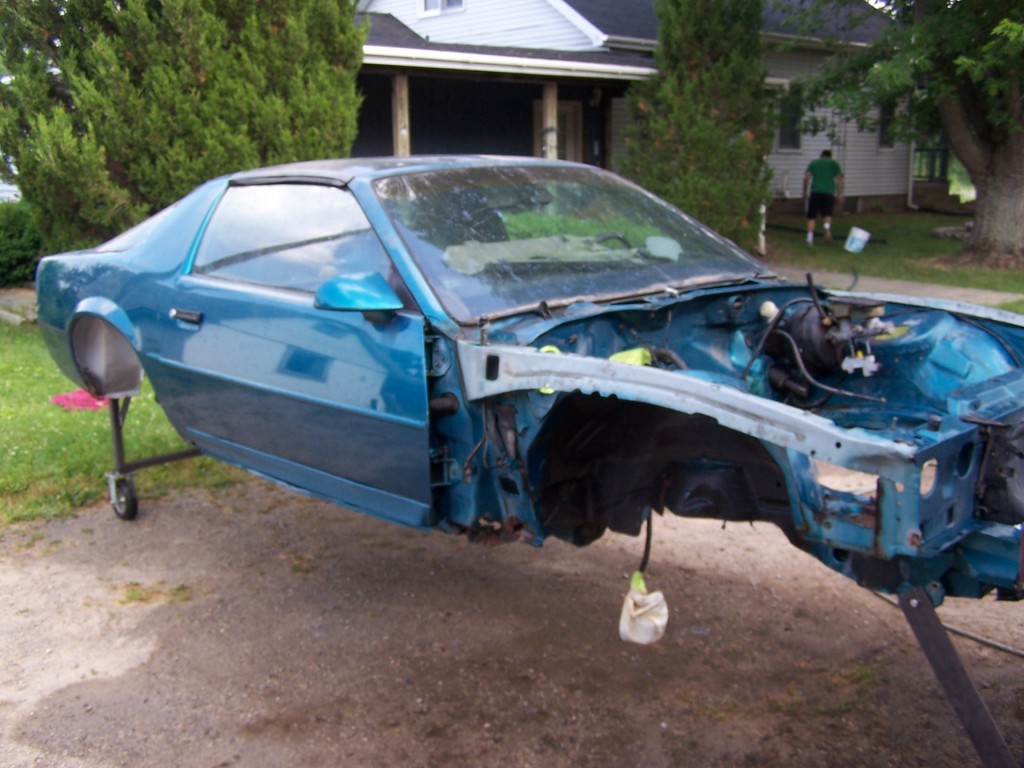
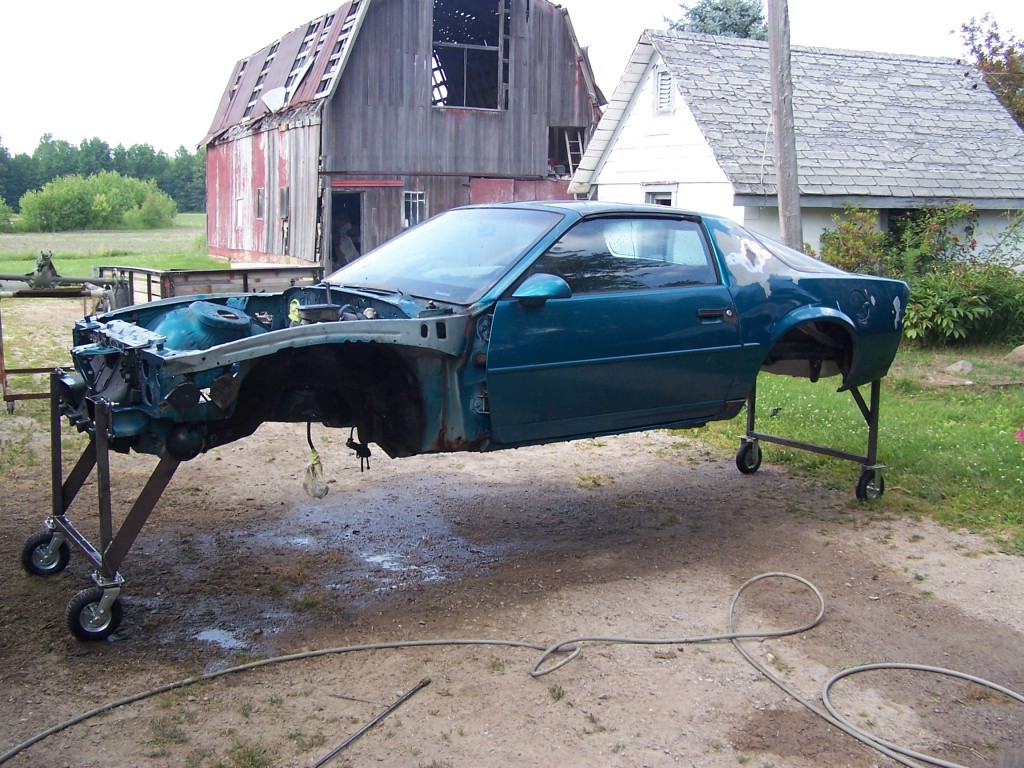
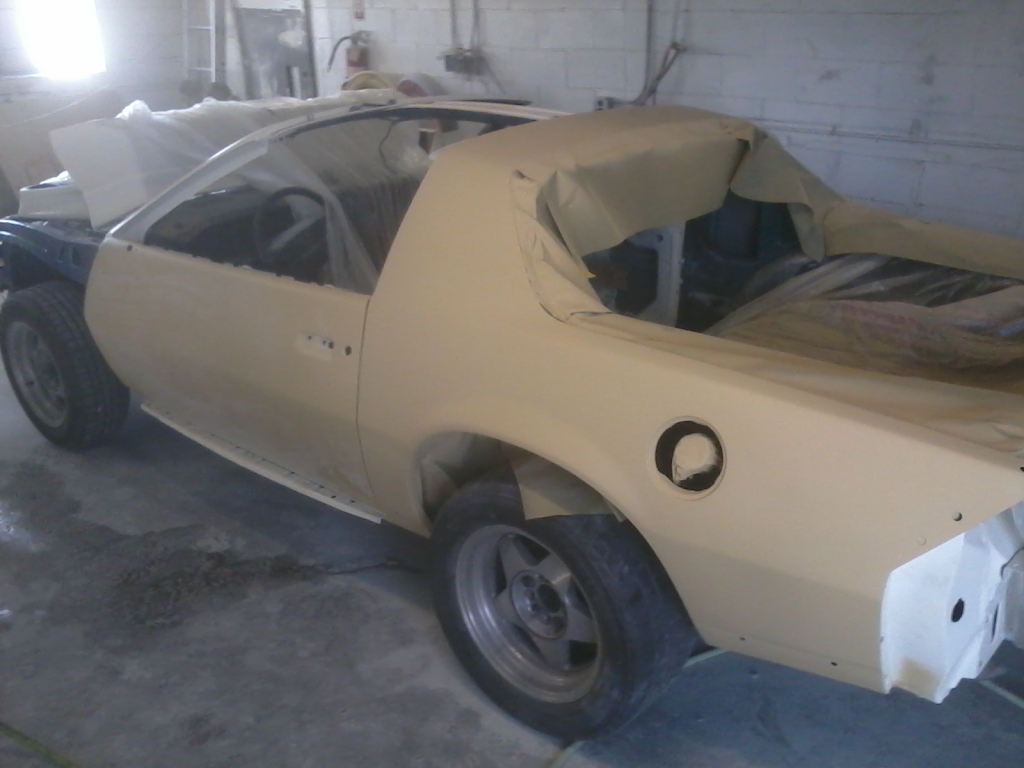
Here are some pics of the body while I was doing all the underbody and chassis work. Lots of rust removal and patches and a new driver side floor pan.
Supreme Member
Sweet! Keep us updated.

Junior Member
Never been to fond of blue on a third gen 'til now. It looks great
Member
Thats a nice rig you have there to get the car off the ground and disassemble the underbody. How did you remove the rust and prep the surface for paint and how long did the underbody work take?

Member
That looks Fan F**kin Tastic! Just don't scratch it putting her back together!
Next car I paint is going to be that color blue even if it is a Volkswagon mini bus.
Great Paint Job!!!
Next car I paint is going to be that color blue even if it is a Volkswagon mini bus.
Great Paint Job!!!
Supreme Member
zenish
Supreme Member
close
Jul 18, 2023
Quote:
i was surprised how short the car looks without the plastic front and back.Originally Posted by lizardkng
Its remarkable how much that middle pic matches the body shape of the 1st generation camaro. Quote:
Originally Posted by 82tarecaro
It looks.............fantastic!!!! Quote:
Can't wait to see how it looks all put back together.
Originally Posted by IW-33
Very nice! I love the color.Can't wait to see how it looks all put back together.
Quote:
Originally Posted by musclecar70sfan
Sweet! Keep us updated. Quote:
Thanks guys! A lot of hard work to get it this far, and glad I can share with people who appreciate it!! Originally Posted by 85firebirdx310
Never been to fond of blue on a third gen 'til now. It looks great Quote:
Thanks! The rig was my brothers idea and it worked out great. I was a little worried about the car flexing but it was not a issue. First I stripped all the factory undercoating with whatever would to the job...wire wheels, paint stripping wheels, and a torch n putty knife mostly. Then the paint using same as before and a DA sander. Once I could see where the rust was I cut out the real bad areas and welded in patches, and sand blasted the light rust out. Cleaned the underbody real good with wax and grease remover and sprayed epoxy primer over it. I then seam sealed any welds and seams, and sprayed a paintable rubber undercoating on the underbody and truck bed liner in the wheel wells and sprayed black tractor enamel over it all. Originally Posted by pound
Thats a nice rig you have there to get the car off the ground and disassemble the underbody. How did you remove the rust and prep the surface for paint and how long did the underbody work take? Took about about a month and a half roughly...had to replace the whole drivers side floor pan also.
Quote:
Next car I paint is going to be that color blue even if it is a Volkswagon mini bus.
Great Paint Job!!!
Im so scared to scratch it! Got her home and have been walking egg shells around the car getting it ready for the motor.Originally Posted by red88tagta
That looks Fan F**kin Tastic! Just don't scratch it putting her back together!Next car I paint is going to be that color blue even if it is a Volkswagon mini bus.
Great Paint Job!!!
The blue is just beautiful. It looks 3 different shades of blue depending on the lighting and angle you look at it.
Member
Sidethumper
Member
close
Apr 6, 2015
- Join DateAug 2012
- LocationBay City,Michigan
- Posts:211
- iTrader Positive Feedback100
- iTrader Feedback Score(1)
- Car87 Pontiac Trans Am
- EngineLapouttre Racing 350
- TransmissionRebuilt 700r4 Mild shift kit
- Axle/Gears10 bolt 3.23 posi w/disc brakes
- Likes:0
- Liked:0 Times in 0 Posts
Quote:
The blue is just beautiful. It looks 3 different shades of blue depending on the lighting and angle you look at it.
I think it looks awsome. Keep up the good work.... Seems like everyone likes them rims. Thats the look mine is going to have as well.Originally Posted by splitface454
Im so scared to scratch it! Got her home and have been walking egg shells around the car getting it ready for the motor.The blue is just beautiful. It looks 3 different shades of blue depending on the lighting and angle you look at it.
Supreme Member
Ron U.S.M.C.
Supreme Member
close
Jul 17, 2019
Do you have any photos of the process. You know prep./primer/paint.etc. Seeing some one actually paint there car in a professional manner is "beyond great" and I'm sure your excited but when you say things like looks better than the best PPG has to offer and quote 6,8, or 10 thousand dollar equivalent paint job,some photos would be nice so we can see how its done. Don't get me wrong your car looks great and am sure it will be top shelf but seeing the process would nice.
Quote:
I see what you're saying. I never thought my car would turn out as good as it did, considering I used the Kirker paint. I am blown away by all the positive comments everyone has left.Originally Posted by ronusmc
Do you have any photos of the process. You know prep./primer/paint.etc. Seeing some one actually paint there car in a professional manner is "beyond great" and I'm sure your excited but when you say things like looks better than the best PPG has to offer and quote 6,8, or 10 thousand dollar equivalent paint job,some photos would be nice so we can see how its done. Don't get me wrong your car looks great and am sure it will be top shelf but seeing the process would nice. To start things off the whole car was taken apart...doors, glass, weatherstripping, entirely stripped. I then used a 8" DA with 40 grit paper to strip the entire car to bare metal.

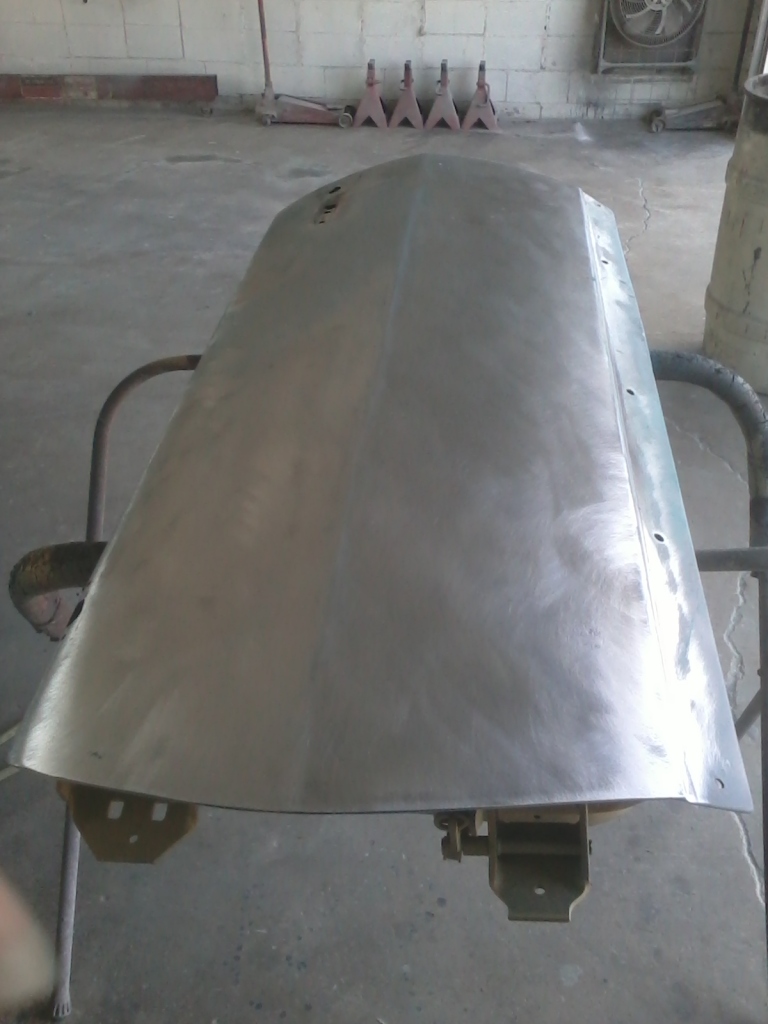
The drivers door had a patch welded in around the key hole and the bottom door skin lip was rusted. So that was pried open and sandbasted. Sprayed epoxy primer in the lip then closed it back up. And the rockers and any other rusty spots were sandblasted too. The entire car was then sanded again with 80 grit on a 6" DA.
Then all body work was done. Car had a big dent behind the door and another behind the rear wheel well and lots of little dents and dings all over. All dents were pulled or pushed out and filled.
Supreme Member
Doing it the right way, just what I like to see. 
Member
Sidethumper
Member
close
Apr 6, 2015
- Join DateAug 2012
- LocationBay City,Michigan
- Posts:211
- iTrader Positive Feedback100
- iTrader Feedback Score(1)
- Car87 Pontiac Trans Am
- EngineLapouttre Racing 350
- TransmissionRebuilt 700r4 Mild shift kit
- Axle/Gears10 bolt 3.23 posi w/disc brakes
- Likes:0
- Liked:0 Times in 0 Posts
Wish my doors looked like that. I need new ones
Supreme Member
OK, OK, I can't wait any more.  We're down to bare metal now. Tell us and show us how you prepped the metal and what kind(s) of chemicals and primers you used.
We're down to bare metal now. Tell us and show us how you prepped the metal and what kind(s) of chemicals and primers you used. Quote: We're down to bare metal now. Tell us and show us how you prepped the metal and what kind(s) of chemicals and primers you used.
OK here we go! Originally Posted by afremont
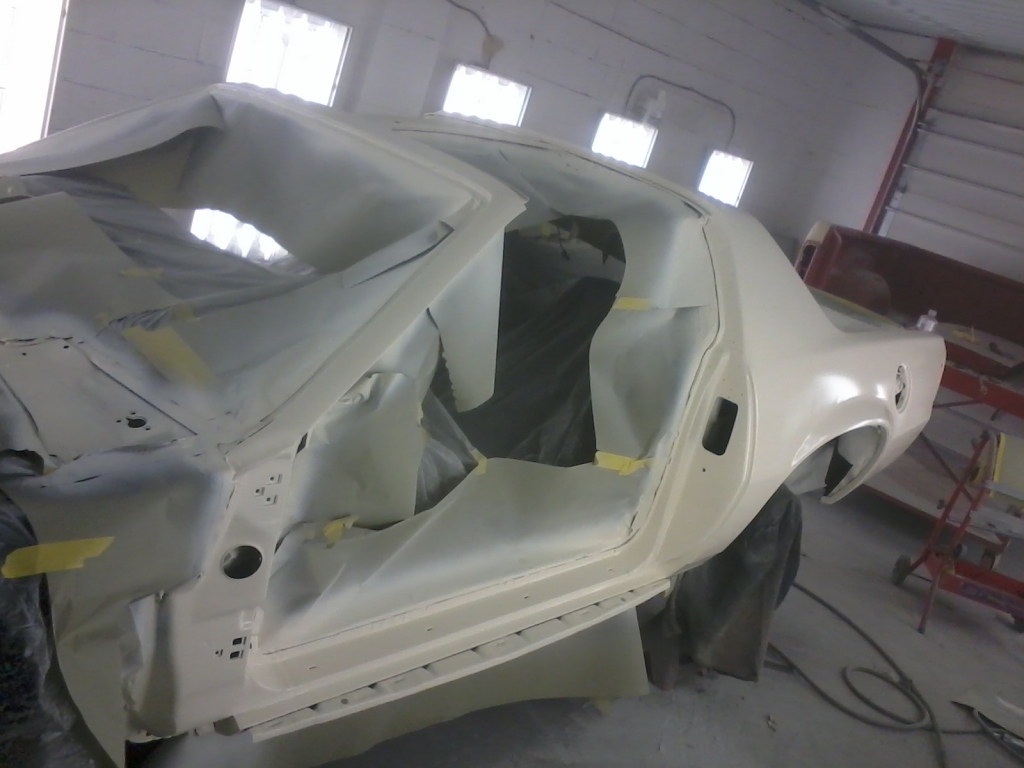
OK, OK, I can't wait any more. We're down to bare metal now. Tell us and show us how you prepped the metal and what kind(s) of chemicals and primers you used. The car got scrubbed real good with a product called acid magic to neutralize all microscopic rust forming, then washed with water(sounds crazy I know) and then wiped with thinner. Sanded the car again with 80 grit and them wiped down with wax and grease remover.
Two coats of epoxy primer and 3 heavy coats of 2k primer were applied.
Supreme Member
Not that strange at all. I wiped mine down yesterday evening with a phosphoric acid based solution to let it dry overnight. A front is coming thru today so it rained just enough to wet everything down good. I rinsed it with a hose again and waiting for it to dry now that the sun is out and the rain is gone. I'll DA it again with some 80 grit, wipe it down with thinner and wax & grease remover and spray it with epoxy primer either later today or tomorrow depending upon the humidity. The acid etch really slows down rust formation on the bare metal.
Supreme Member
Ron U.S.M.C.
Supreme Member
close
Jul 17, 2019
Very,very nice.
Quote:
Yeah, but it seems very odd dumping water onto bare metal! Originally Posted by afremont
Not that strange at all. I wiped mine down yesterday evening with a phosphoric acid based solution to let it dry overnight. A front is coming thru today so it rained just enough to wet everything down good. I rinsed it with a hose again and waiting for it to dry now that the sun is out and the rain is gone. I'll DA it again with some 80 grit, wipe it down with thinner and wax & grease remover and spray it with epoxy primer either later today or tomorrow depending upon the humidity. The acid etch really slows down rust formation on the bare metal. 

Supreme Member
Love the color, looks to me done right. So glad we did not get another spay bomb thread.
Senior Member
Quote:
I know right?Originally Posted by 2007xl50
Love the color, looks to me done right. So glad we did not get another spay bomb thread. I was bracing for a rattle can massacre.
Quote:
I was very surprised, my doors had bondo cracking in them.. not sure why it was even there. Originally Posted by Sidethumper
Wish my doors looked like that. I need new ones Quote:
Originally Posted by 2007xl50
Love the color, looks to me done right. So glad we did not get another spay bomb thread. Quote:
I was bracing for a rattle can massacre.
spray bombs...rattle cans...oh my! Originally Posted by IW-33
I know right?I was bracing for a rattle can massacre.

Ok now that the primer has set for a good week or two we blocked it. Used some black spray paint as a guide coat, we sanded it down using 150grit paper on long blocks and other various blocks to fit the need.
After it was all sanded, any high spots where it sanded back to bare metal were touched up with epoxy and then another 3 heavy coats of 2k primer.
After it was all sanded, any high spots where it sanded back to bare metal were touched up with epoxy and then another 3 heavy coats of 2k primer.

Junior Member
Did you build the rig yourself or did you buy it?
Quote:
My brother and I built them. He came up with the design and they worked out really good.Originally Posted by jbalzola
Did you build the rig yourself or did you buy it? Junior Member
any chance you have the blueprints or designs you can swing my way, I've got my bird on jack stands right now and a little more height and room underneath would make my life easier. I'm doing the same thing you did at the moment, I'm trying to clean up the under body of surface rust and such.
Quote:
I'll have to measure them up, we built them without plans, they're pretty simple.Originally Posted by jbalzola
any chance you have the blueprints or designs you can swing my way, I've got my bird on jack stands right now and a little more height and room underneath would make my life easier. I'm doing the same thing you did at the moment, I'm trying to clean up the under body of surface rust and such. Yeah I know what you mean, jack stands just dont go high enough.
Good luck on your bird, glad to hear you're doing it right.
Supreme Member
Beautiful job on the paint and car stilts. Any plans for restoration of that barn? Being from the midwest I hate seeing the old barns die, never to be replaced. Metal pole barns just don't do it for me.
Quote:
Thanks. The barn is in really rough shape, the beams inside are all splitting and its just a matter of time for that old barn.Originally Posted by afremont
Beautiful job on the paint and car stilts. Any plans for restoration of that barn? Being from the midwest I hate seeing the old barns die, never to be replaced. Metal pole barns just don't do it for me. Junior Member
Quote:
Yeah I know what you mean, jack stands just dont go high enough.
Good luck on your bird, glad to hear you're doing it right.
Any progress on measuring them up?Originally Posted by splitface454
I'll have to measure them up, we built them without plans, they're pretty simple.Yeah I know what you mean, jack stands just dont go high enough.
Good luck on your bird, glad to hear you're doing it right.

Junior Member
Quote:


Anyone with any question about her, feel free to ask!
I like it, would love to see it when its put back together.Originally Posted by splitface454
Here she is...Pics do the color no justice!Anyone with any question about her, feel free to ask!