
Home brew road racer


Thread Starter
Senior Member

Joined: Aug 2007
Posts: 682
Likes: 45
Re: Home brew road racer
This is coming along nicely! I especially like the dimpled seat bracket and roll cage tie in's. Very cool. Your sheet metal brake is pretty neat, and very simple. Sure beats spending big bucks on something that doesn't get used all the time. Welding in that patch for the sunroof will be pretty tricky. I welded in patch panels for my truck box sides, and it was really tough keeping it from warping from the heat. Might it be easier/faster to find a wrecked Camaro and replace the entire roof section? Just a suggestion.
Thread Starter
Senior Member
Joined: Aug 2007
Posts: 682
Likes: 45
Re: Home brew road racer
I have hit a few delays here in working on the car and posting here. My 10 year old computer got infected and wiped out the root directory to where the C drive had to be totally reformatted. I lost most of my files and ended up with an old computer running windows XP. I ended up getting a new computer that came with windows 8. BIG change! I am no tech wiz so it will take awhile to adjust.
The other major setback is that I injured my knee and will require a little surgery to fix it. I am ambulatory but it hurts like H***. I had started to put the rear floor back in and made some progress but now I can't get in or under the car, probably till late March. Not to lose the time I turned my attention to the engine. I can work on that standing up.
I had a .030 over 350 assembled for the car that was probably good for an honest 350hp. I came into possession of a set of Brodix aluminum heads with 200cc runners and 64cc chambers. To use these nice heads, the engine needs to grow so the new plan is to build it into a 383 stroker and shoot for 450hp at the flywheel.
Because I want to run track day events the motor needs to be able to hit 6000 to 6500rpm repeatedly and stay together. Here is what I have picked up to hopefully get me there:
350 4 bolt block, align honed, deck squared, clearanced for stroker
Eagle full competition forged kit, crank, 6.00 rods, 20cc dish pistons
Fluidamper balancer
comp cams solid lifter cam, howards direct lube solid lifters
1.6 ratio rockers from Trick Flow and upgraded rocker studs to 7/16
Cloyes hex adjust roller timing set
8 qt moroso road race pan, melling m55hv oil pump
hedman 1 5/8 elite headers long tube.
Edelbrock RPM air gap intake w/ Holley 750 vacuum secondary carb
I have a buddy that owns an engine shop with a dyno who is going to help me put it together correctly. Since this is not the engine forum and there is little fabrication going on I probably won't post much about the engine till it is finished. If any of you have suggestions please let me know what you think.
Thread Starter
Senior Member
Joined: Aug 2007
Posts: 682
Likes: 45
Re: Home brew road racer
"Since this is not the engine forum and there is little fabrication going on I probably won't post much about the engine till it is finished"
Well I guess I was wrong about that. I have been gathering up parts for this build for some time now when ever I came across something I was pretty sure I could use. Since so much of what I am doing is one of a kind like my rear suspension, the parts I have collected are not specific to 3rd gens or even compatible with one another in their original forms.
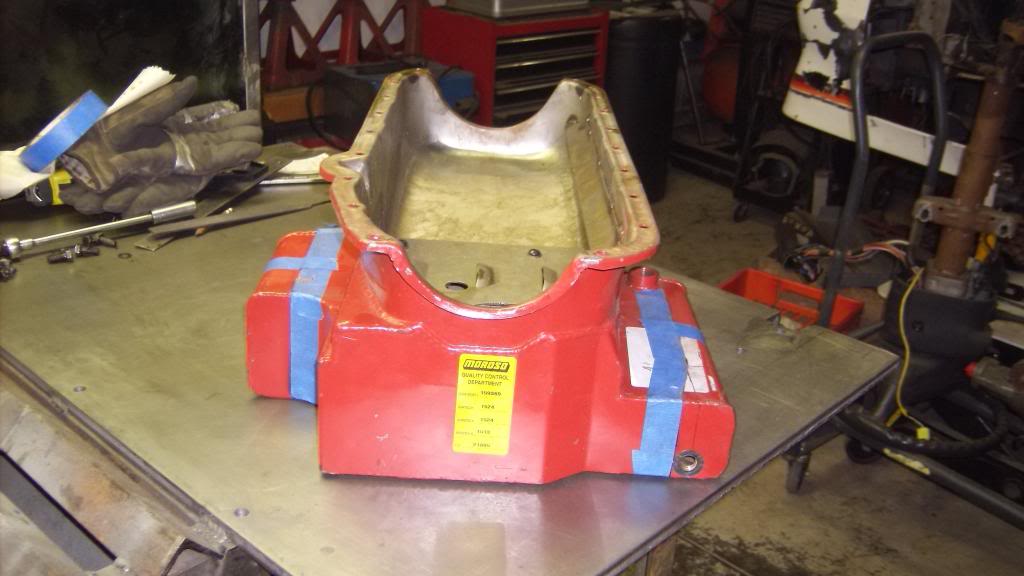
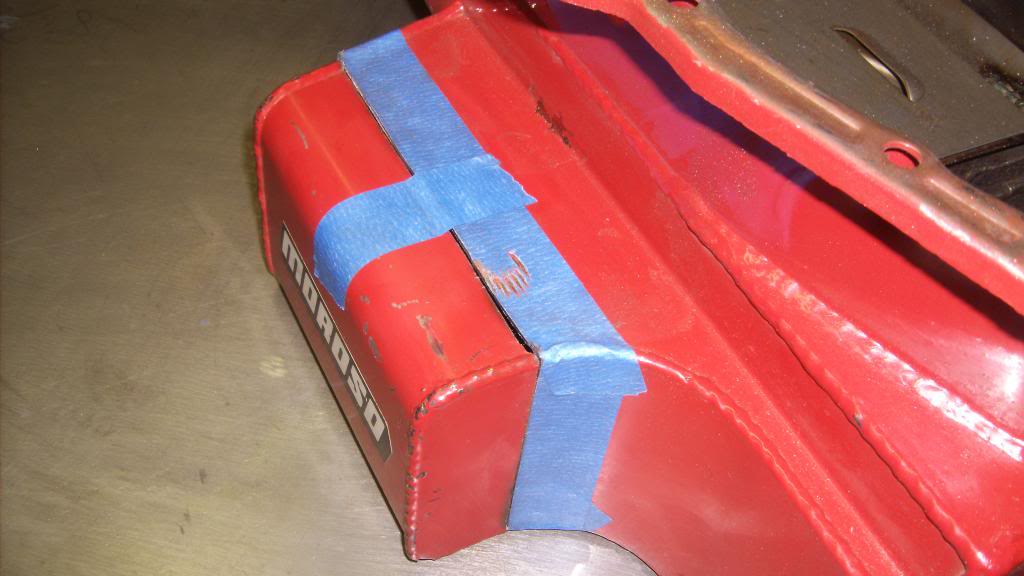
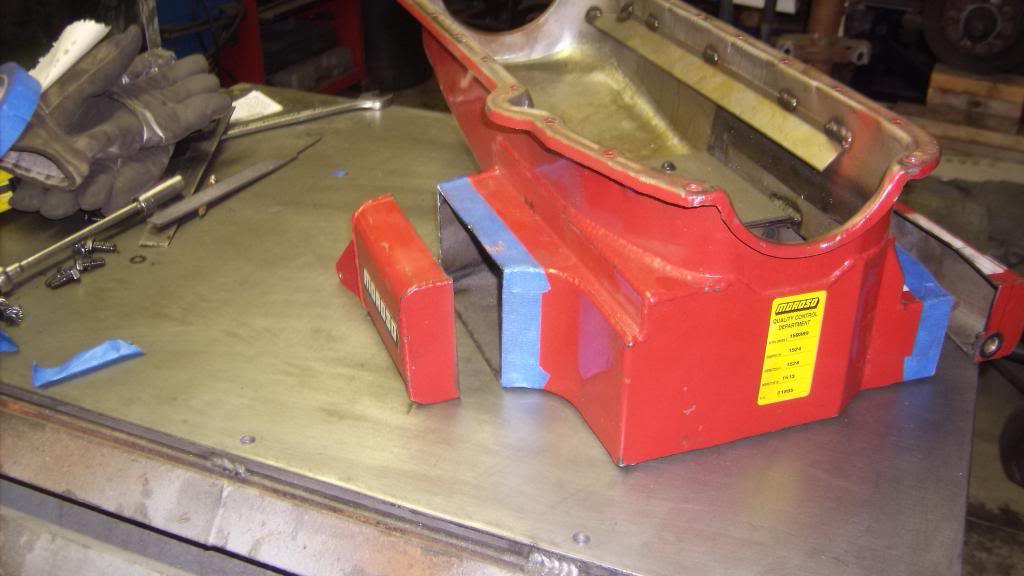
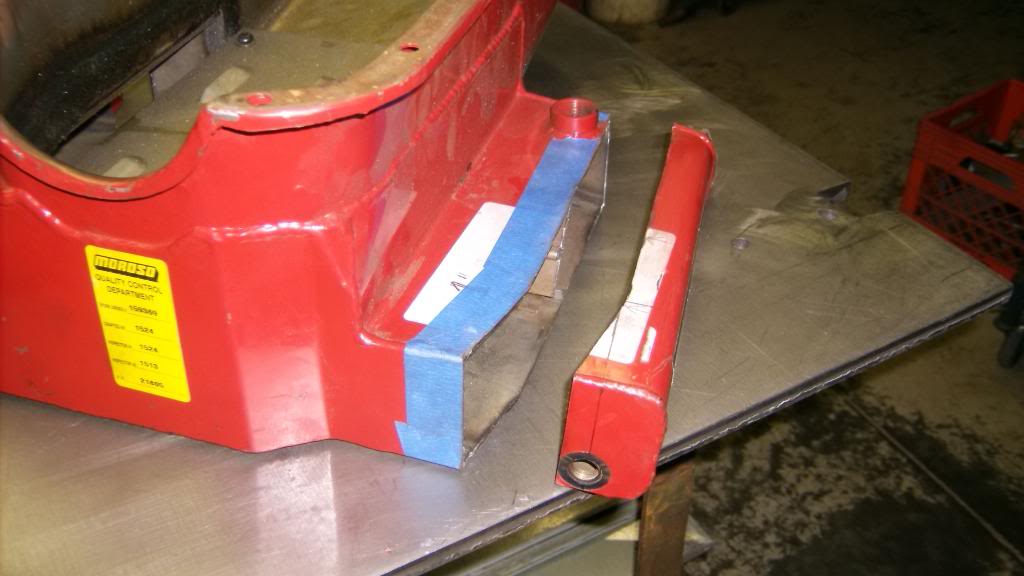
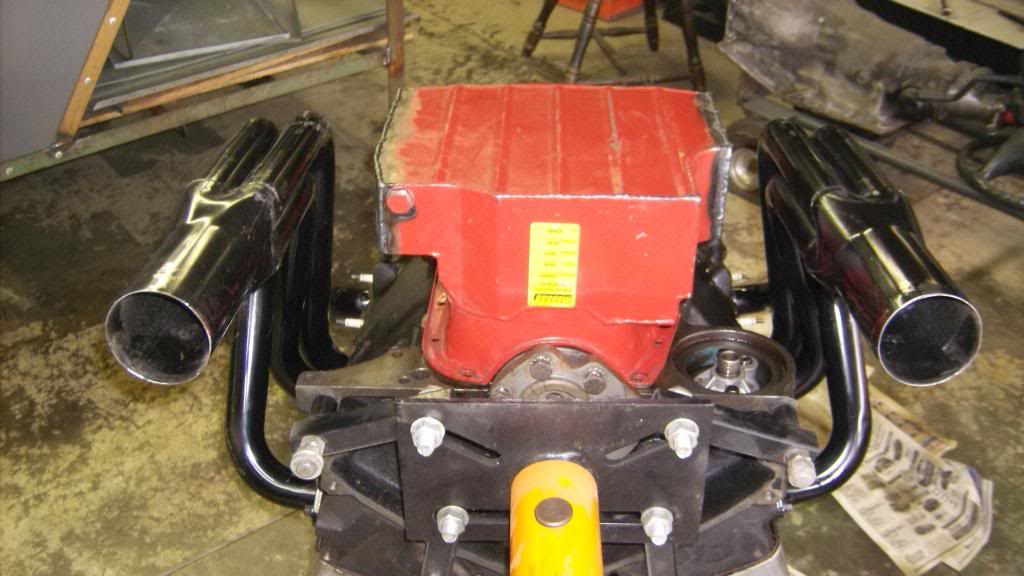
Case in point are the headers and oil pan I picked up off the Summit racing scratch and dent tables. Both parts were brand new and I am assuming they were taken down from some of their showroom displays. The oil pan is a Moroso 8qt road race pan that has been discontinued and the headers are a set of Hedman Elite for a C3 Corvettte. Both parts will work well for the engine I am building and will fit the car with the front K-member and suspension mods that I will be making, but they don't fit together. The pan is about 14.5 inches across and the distance between the primary pipes is only 13 inches. Given that there needs to be some space between the two so the oil doesn't burn in the pan the logical remedy is to narrow the pan about 2.5 inches.
Well I guess I was wrong about that. I have been gathering up parts for this build for some time now when ever I came across something I was pretty sure I could use. Since so much of what I am doing is one of a kind like my rear suspension, the parts I have collected are not specific to 3rd gens or even compatible with one another in their original forms.
Case in point are the headers and oil pan I picked up off the Summit racing scratch and dent tables. Both parts were brand new and I am assuming they were taken down from some of their showroom displays. The oil pan is a Moroso 8qt road race pan that has been discontinued and the headers are a set of Hedman Elite for a C3 Corvettte. Both parts will work well for the engine I am building and will fit the car with the front K-member and suspension mods that I will be making, but they don't fit together. The pan is about 14.5 inches across and the distance between the primary pipes is only 13 inches. Given that there needs to be some space between the two so the oil doesn't burn in the pan the logical remedy is to narrow the pan about 2.5 inches.


Thread Starter
Senior Member
Joined: Aug 2007
Posts: 682
Likes: 45
Re: Home brew road racer
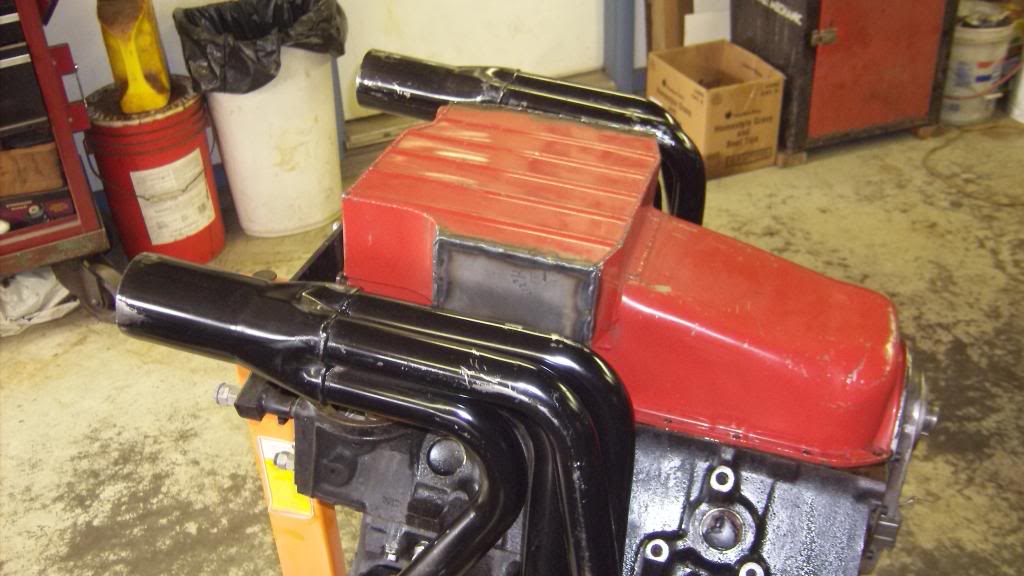
Clearance issued solved.
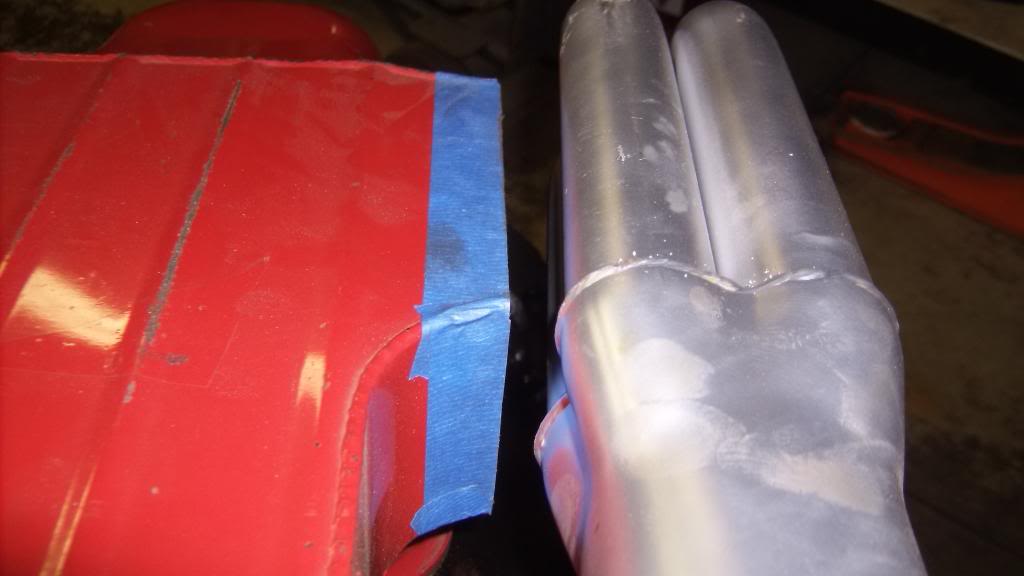
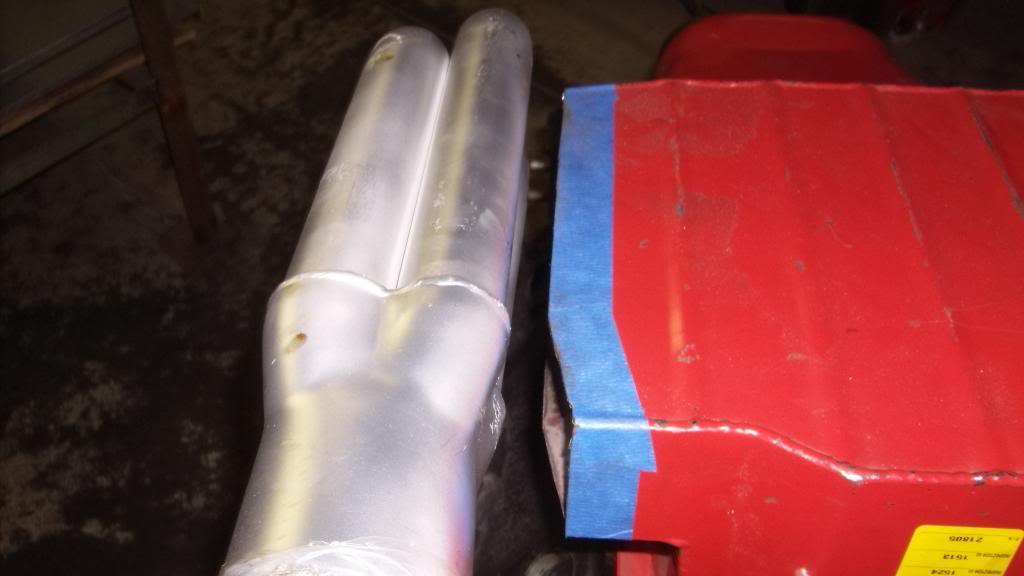
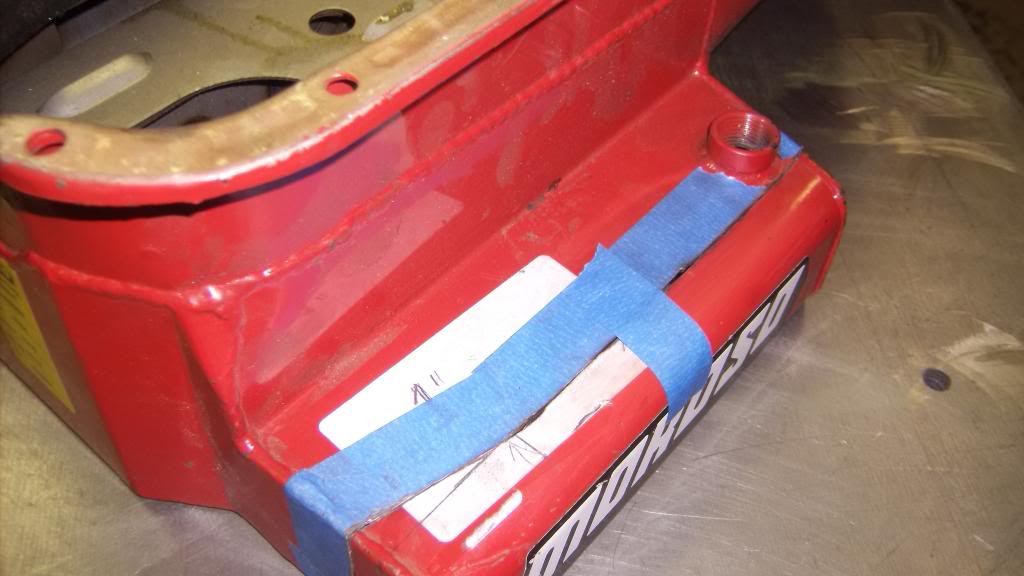
All I have to do is weld some simple flat end caps on and add in a drain plug that got cut away and it will be good to go. I lost about a quart of capacity but still retained all of the 5 trapdoors and removable windage tray.


All I have to do is weld some simple flat end caps on and add in a drain plug that got cut away and it will be good to go. I lost about a quart of capacity but still retained all of the 5 trapdoors and removable windage tray.


Thread Starter
Senior Member
Joined: Aug 2007
Posts: 682
Likes: 45
Re: Home brew road racer
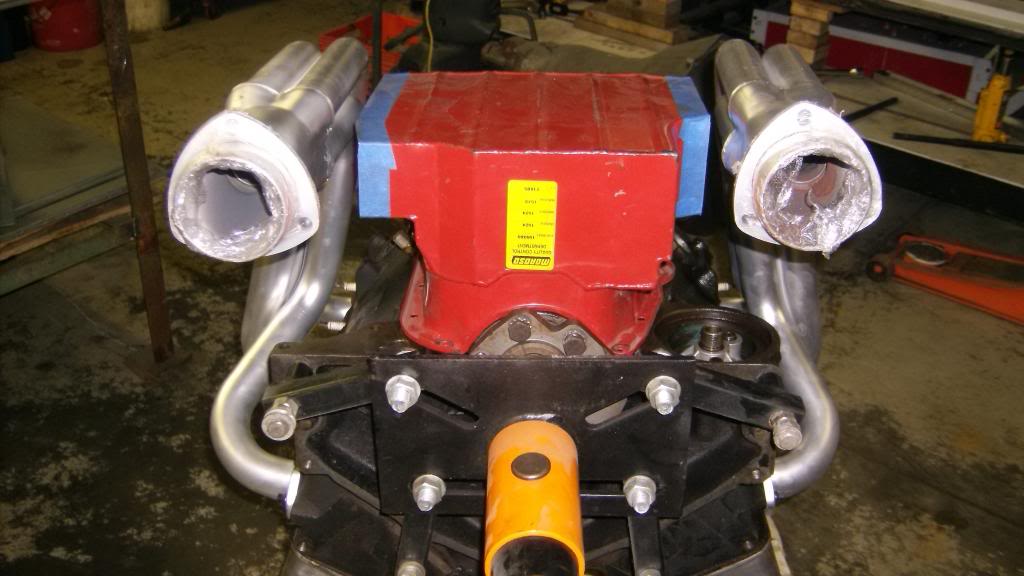
Pics of finished pan. I did a leak check by filling pan with kerosene as it is thinner than water. Had one small pin hole I had to grind out and reweld.

of course I had to shorten the oil pump pickup tube as well.


of course I had to shorten the oil pump pickup tube as well.


Thread Starter
Senior Member
Joined: Aug 2007
Posts: 682
Likes: 45
Re: Home brew road racer
As luck would have it I came across a set of Schoenfield stock car headers designed for modifieds using a stock Chevelle type front clip. These are very similar to the Corvette headers I have but are a little more than two inches shorter in height and a little wider apart. These would have fit the oil pan without modification.
The stock car headers were built for racing, meaning they are very light compared to the Hedman Elite vette headers, probably a good 5 to 7 lbs. They do this by using thin wall 18ga tubing and only 1/4" thick flanges. The Elite headers are 14ga tubing and 3/8 flanges. These are the ones I would prefer to use if I can shorten them to be level to the oil pan. The whole reason to go with the road race pan was its low height will let me lower the engine in the car by an 1 1/2 inches and I can't do that with the pipes hanging below the pan.
The stock car headers were built for racing, meaning they are very light compared to the Hedman Elite vette headers, probably a good 5 to 7 lbs. They do this by using thin wall 18ga tubing and only 1/4" thick flanges. The Elite headers are 14ga tubing and 3/8 flanges. These are the ones I would prefer to use if I can shorten them to be level to the oil pan. The whole reason to go with the road race pan was its low height will let me lower the engine in the car by an 1 1/2 inches and I can't do that with the pipes hanging below the pan.


Thread Starter
Senior Member
Joined: Aug 2007
Posts: 682
Likes: 45
Re: Home brew road racer
I hope so. now if I could just get back to working on it. My knee is just about healed up now but my son brought the jr sprint car over last weekend. We changed colors from bright orange to a cobalt blue metallic. This weekend we will put the body back on, install the new 9hp Honda engine and get it ready for the season.
I have to get the bottle refilled this next week for the mig and next weekend I should be back at it. I am soooo ticked off at myself for getting hurt and losing all this time. And to make it worse I burned a week and a half of vacation over it to boot.
I have to get the bottle refilled this next week for the mig and next weekend I should be back at it. I am soooo ticked off at myself for getting hurt and losing all this time. And to make it worse I burned a week and a half of vacation over it to boot.
Thread Starter
Senior Member
Joined: Aug 2007
Posts: 682
Likes: 45
Re: Home brew road racer
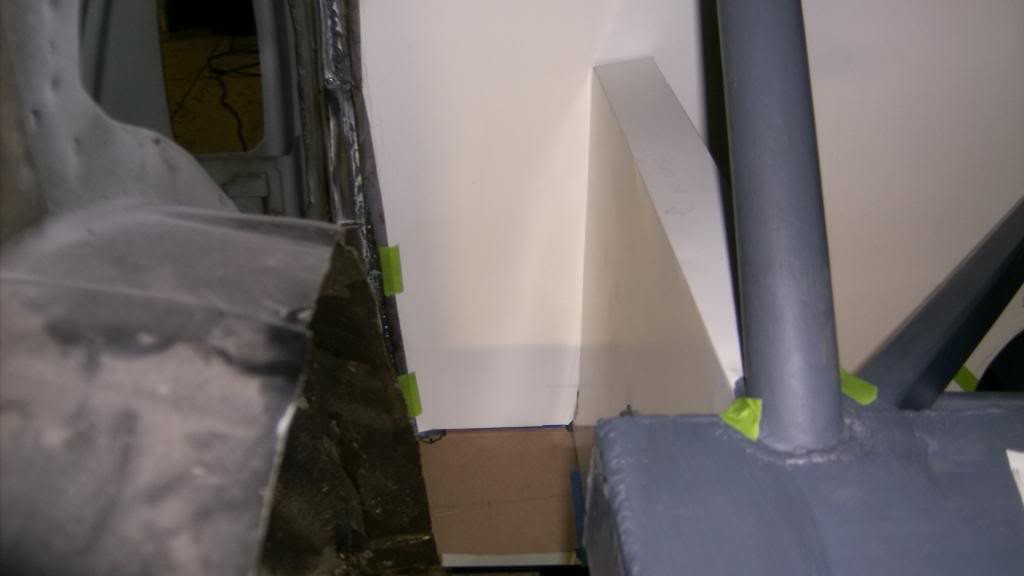
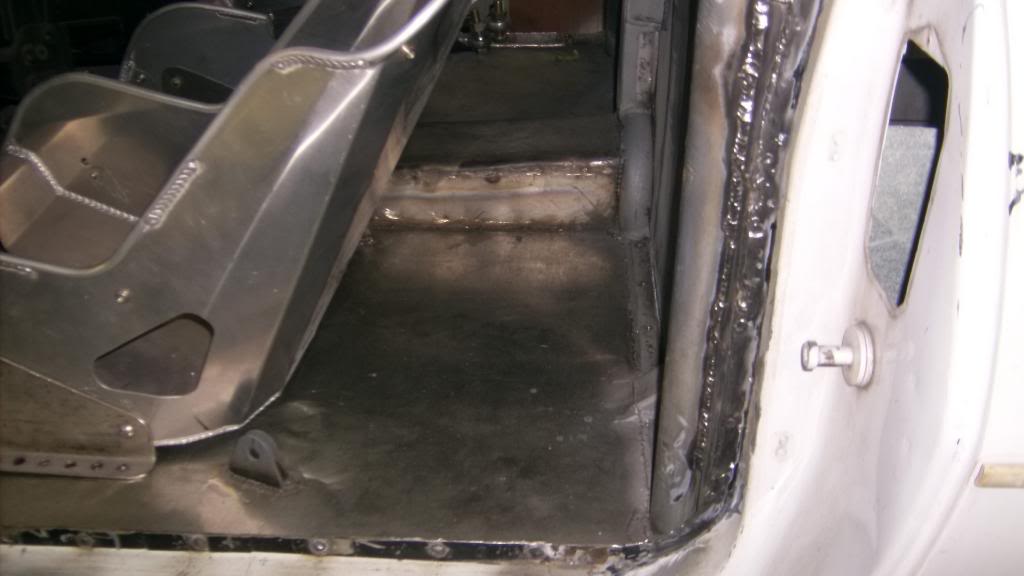
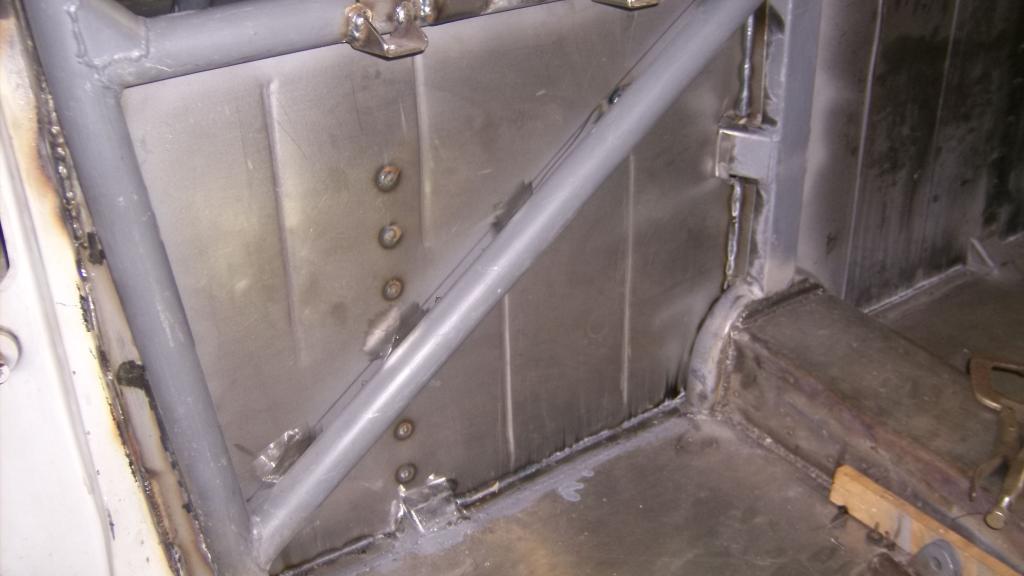
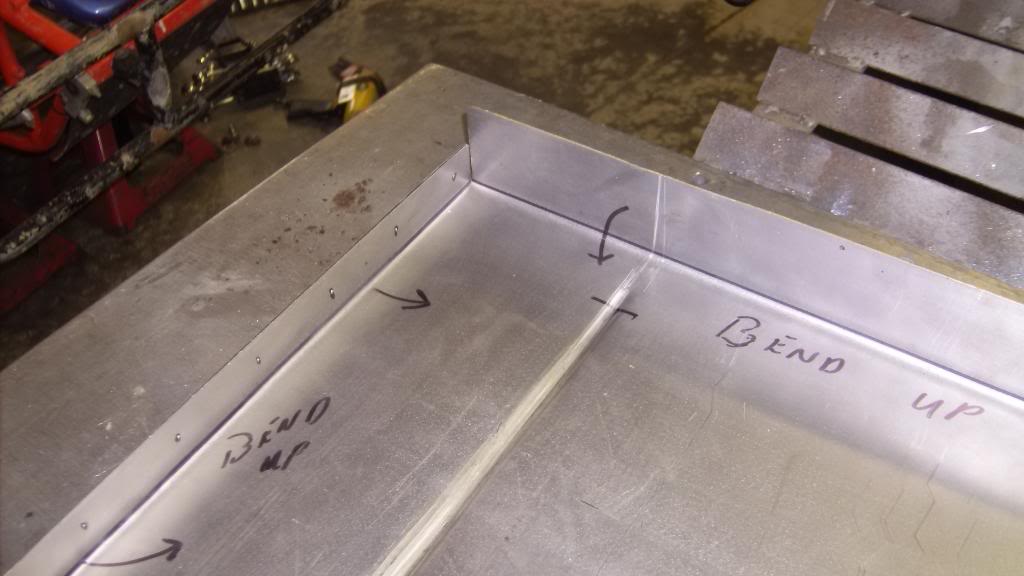
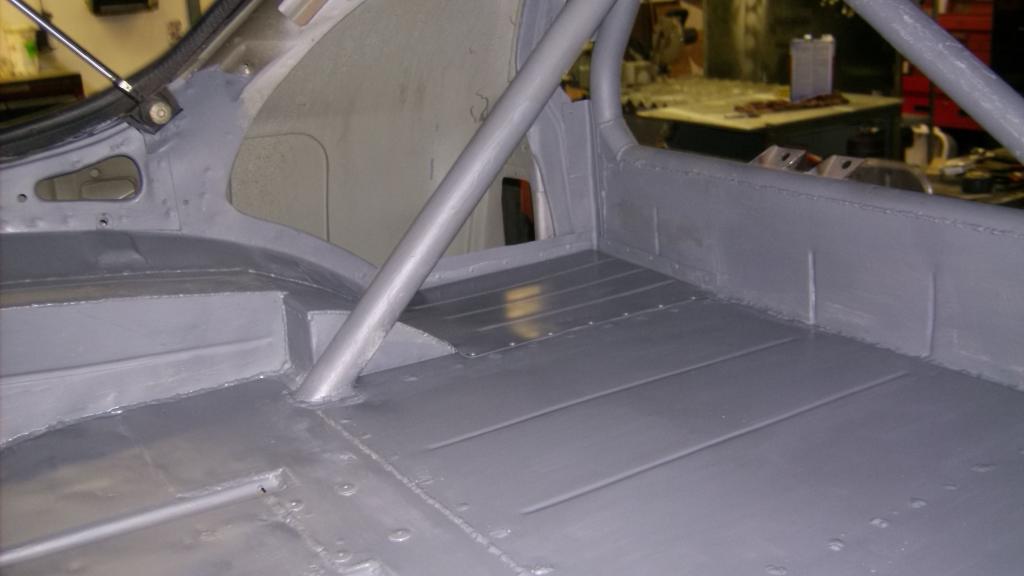
Finally back to working inside the car again. Because of the rear frame mods to fit the three link my interior stops at the main hoop behind the drivers seat. To seal off the interior I have to make a rear firewall. This will be made from 18ga sheet steel and be welded directly to the main hoop. It will extend from the floor to the center of the crossbar on the main hoop and from drivers door to passenger door.
To fill the gap between the pinch weld at the back of the door opening and the lower half of the main hoop I had to make narrow L shaped filler panels. Just like the dimple die panels I installed earlier, the L brackets tie the bottom half of the door opening to the main hoop. Now the entire door opening is welded to the roll cage. I'll post pics later.
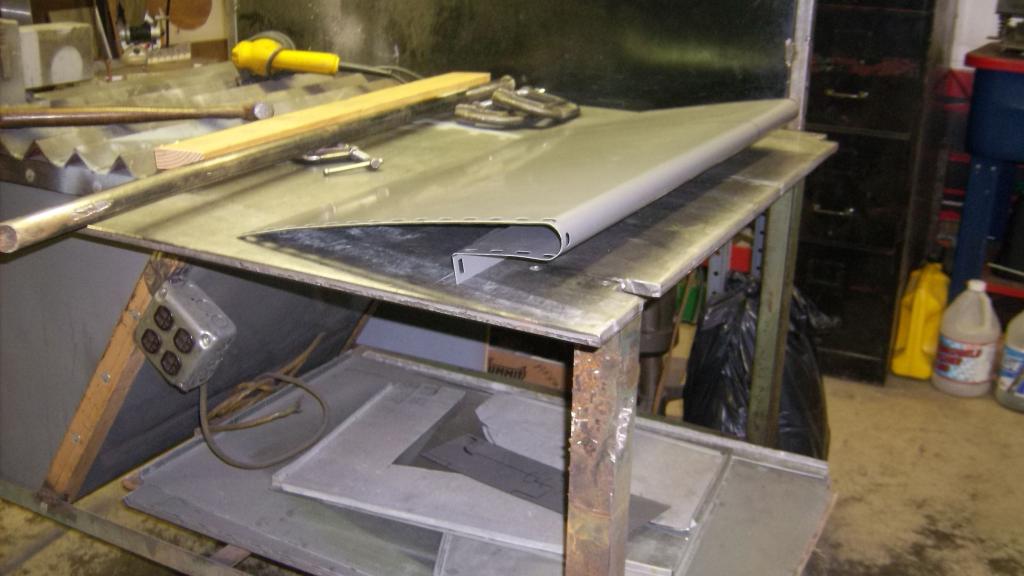
In bending these on my homemade metal brake, a weakness in my design showed up in the form of a broken hinge plate. I had made these from some scrap steel and the pieces I used didn't leave enough metal thickness (about an 1/8) at the top and bottom of the through hole. I broke down and made some of proper size from a piece 3/16 plate. Bending 18ga sheet steel in long lengths really takes quite a bit of force. It will be interesting to see what the next weak link in my design will show up as I have a lot of flanges to bend in making this fire wall.
To fill the gap between the pinch weld at the back of the door opening and the lower half of the main hoop I had to make narrow L shaped filler panels. Just like the dimple die panels I installed earlier, the L brackets tie the bottom half of the door opening to the main hoop. Now the entire door opening is welded to the roll cage. I'll post pics later.
In bending these on my homemade metal brake, a weakness in my design showed up in the form of a broken hinge plate. I had made these from some scrap steel and the pieces I used didn't leave enough metal thickness (about an 1/8) at the top and bottom of the through hole. I broke down and made some of proper size from a piece 3/16 plate. Bending 18ga sheet steel in long lengths really takes quite a bit of force. It will be interesting to see what the next weak link in my design will show up as I have a lot of flanges to bend in making this fire wall.
Thread Starter
Senior Member
Joined: Aug 2007
Posts: 682
Likes: 45
Re: Home brew road racer
Pics of main hoop sealed to C pillar
I also cut out some un needed sheet metal between the door opening and the rear wheel well. minimal weight reduction, maybe 3lbs total both sides. I rolled the edges over to eliminate the sharp edge. I will probably cover the top half with 22ga aluminum.


I also cut out some un needed sheet metal between the door opening and the rear wheel well. minimal weight reduction, maybe 3lbs total both sides. I rolled the edges over to eliminate the sharp edge. I will probably cover the top half with 22ga aluminum.


Thread Starter
Senior Member
Joined: Aug 2007
Posts: 682
Likes: 45
Re: Home brew road racer
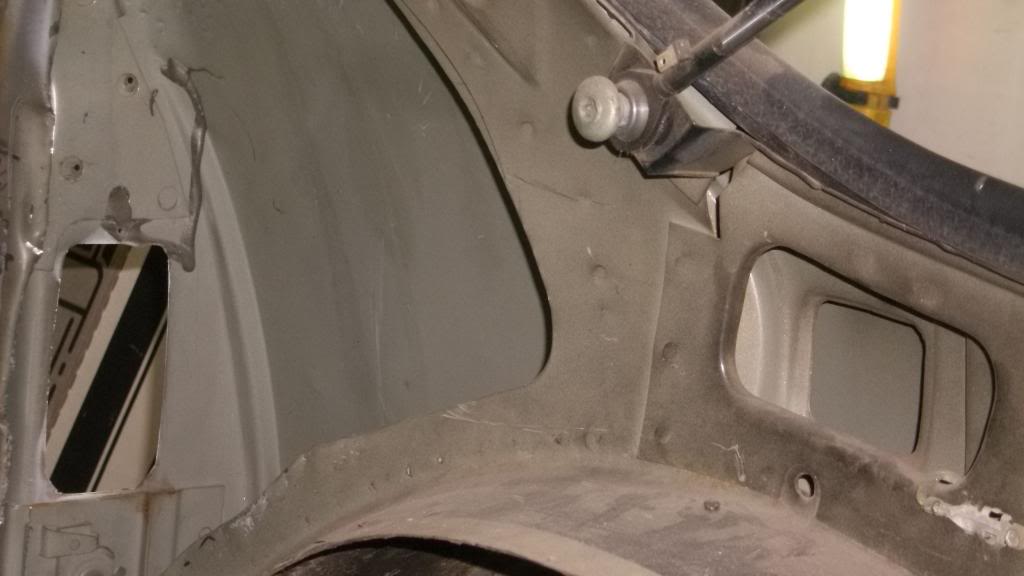
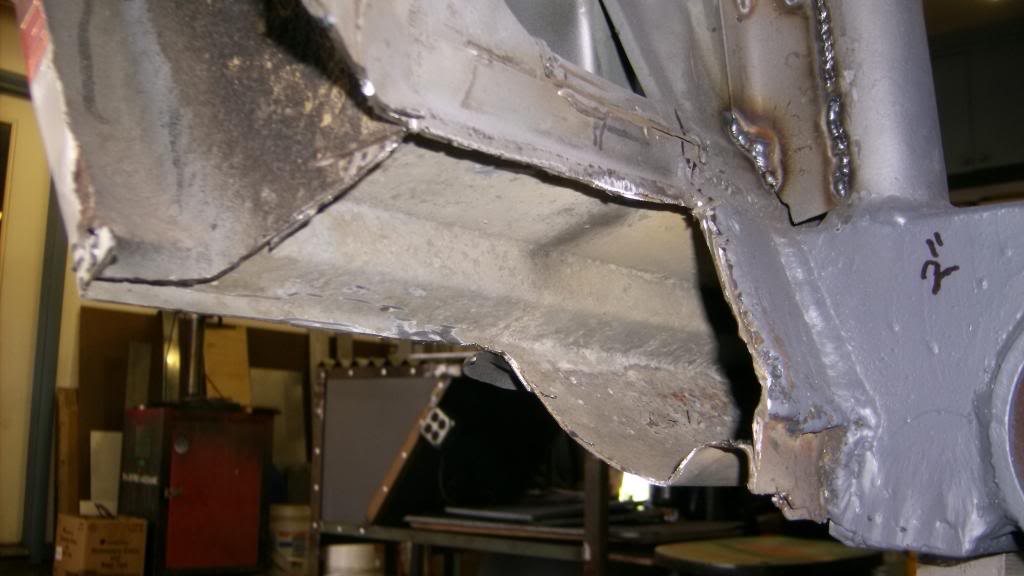
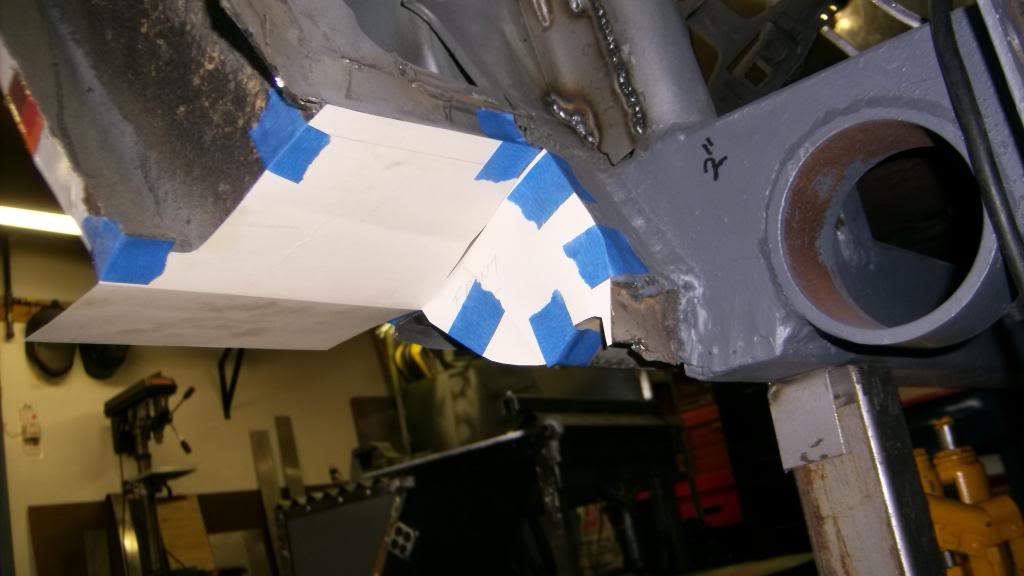
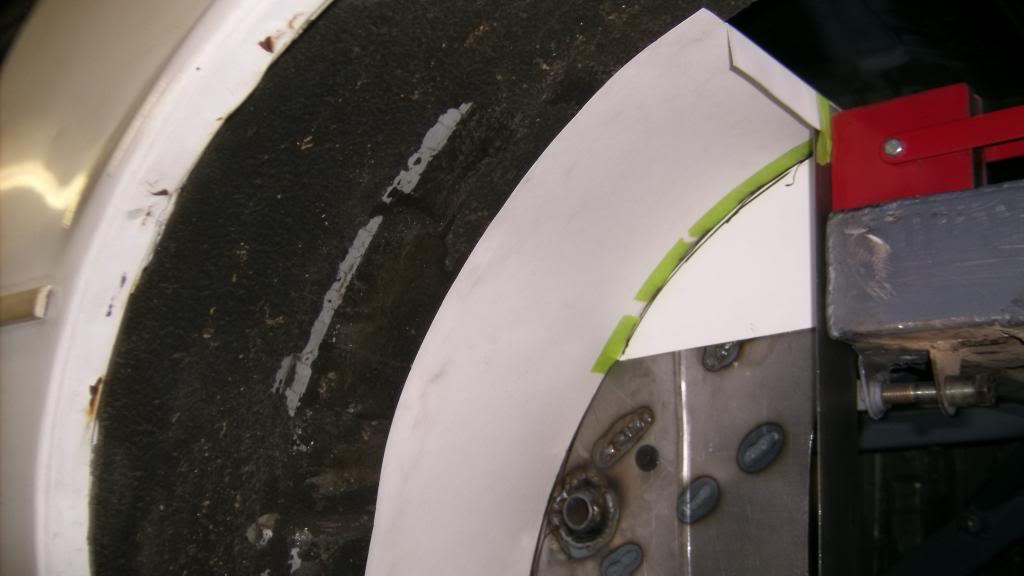
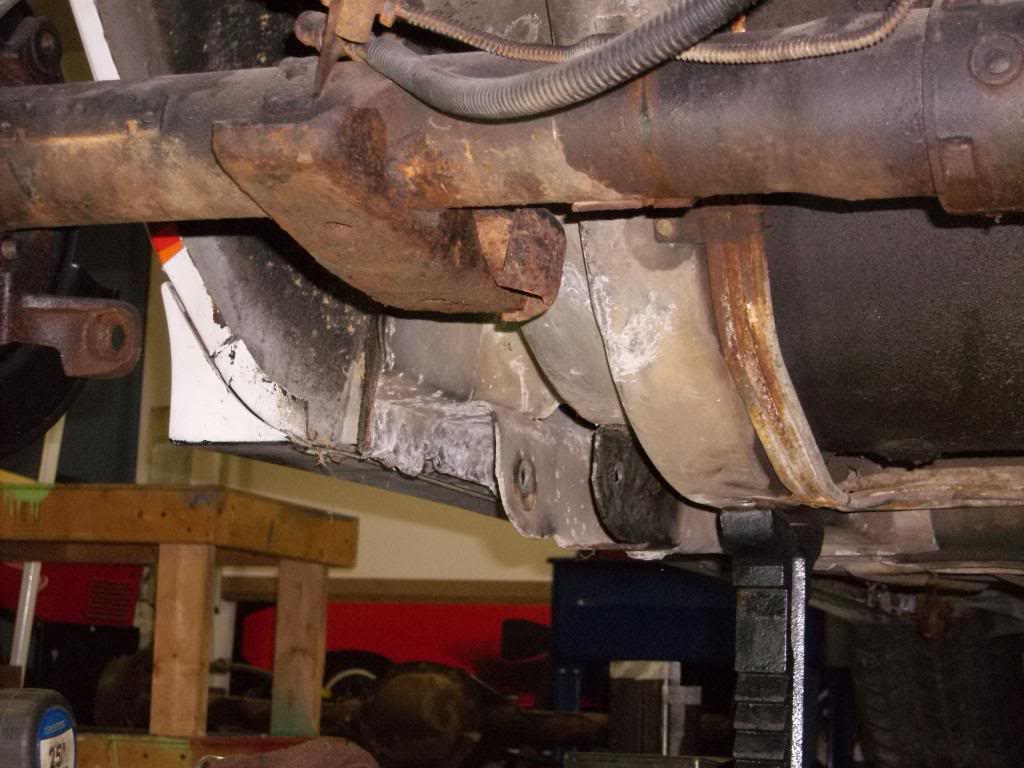
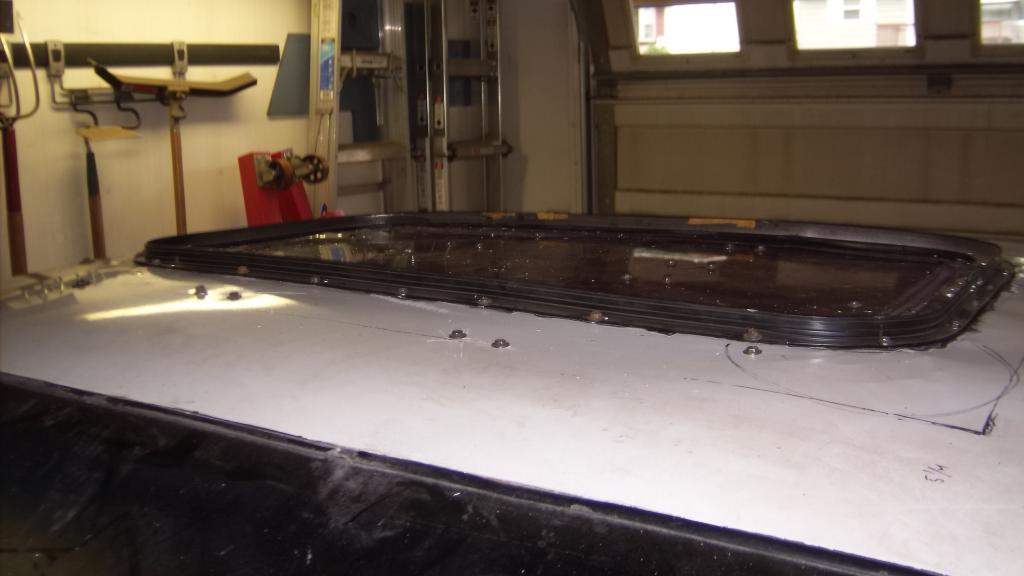
It was time to cut out the opening for my side exit exhaust. The cut is 7" forward from the rear wheel lower edge. I cut the rocker out just below the factory seam at the quarter panel. Some simple poster board templates transferred to my leftover stainless food prep table. I made the patches about an 1/8" oversize on all sides to give mea lip to weld on.


Thread Starter
Senior Member
Joined: Aug 2007
Posts: 682
Likes: 45
Re: Home brew road racer
More templates.
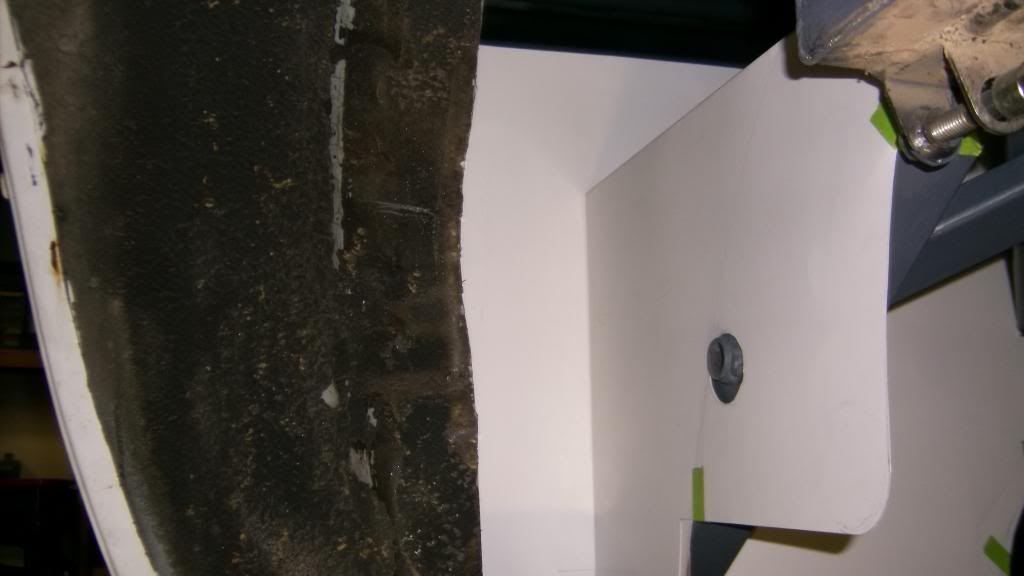
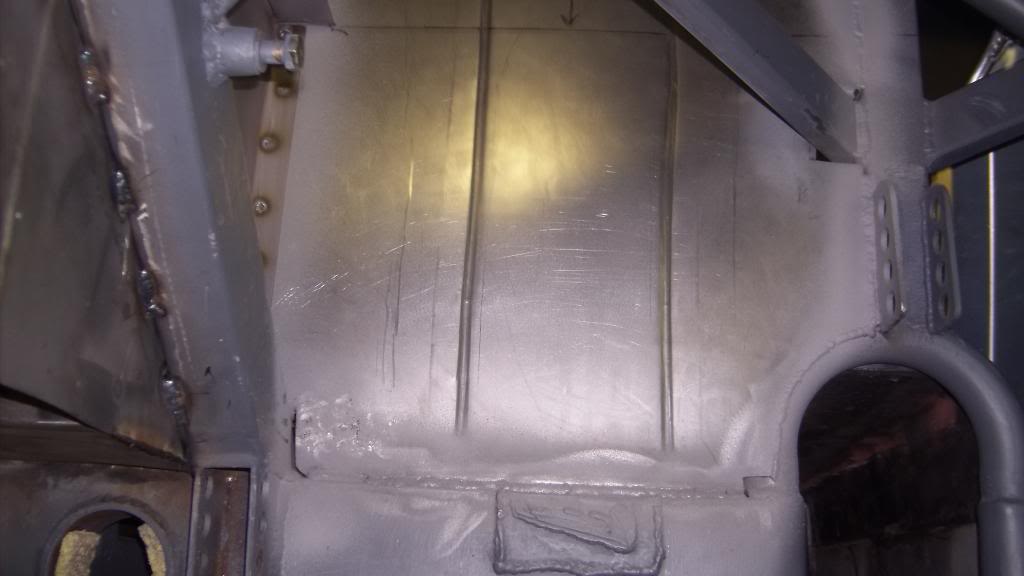
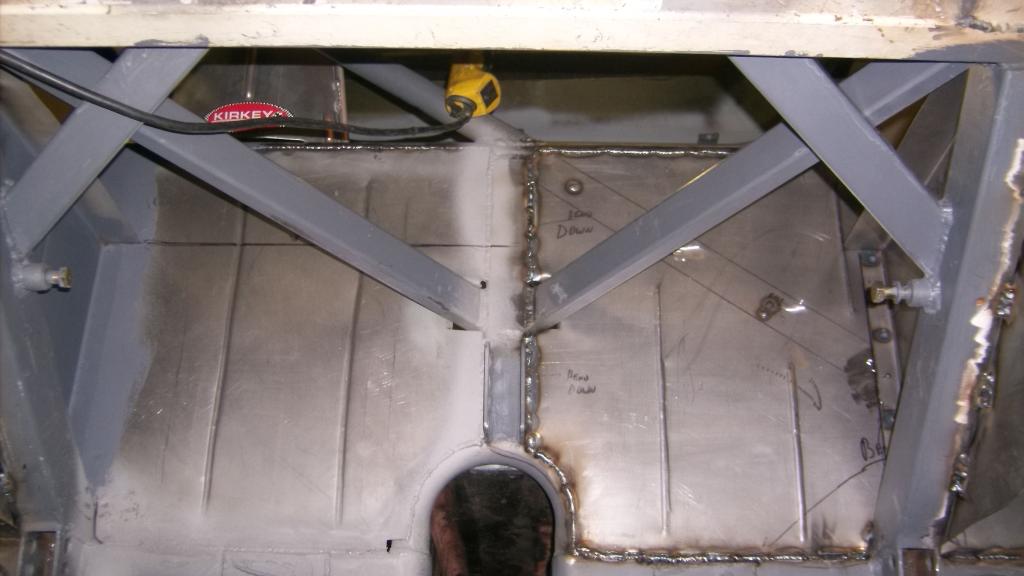
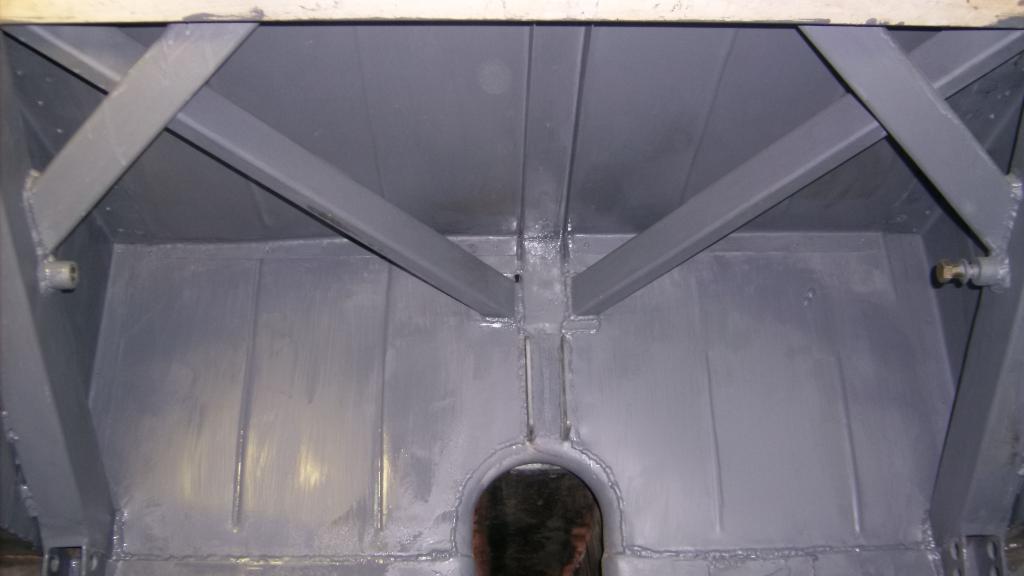
Rear firewall drivers side. The long black lines are approximate position of stiffening beads. I broke down and bought a bead roller, Woodward Fab from Summit.
view from cargo area. The top horizontal flange will provide support and mounting points for the front cargo floor area that was formerly the rear seat area. This floor will extend from C pillar to C pillar.
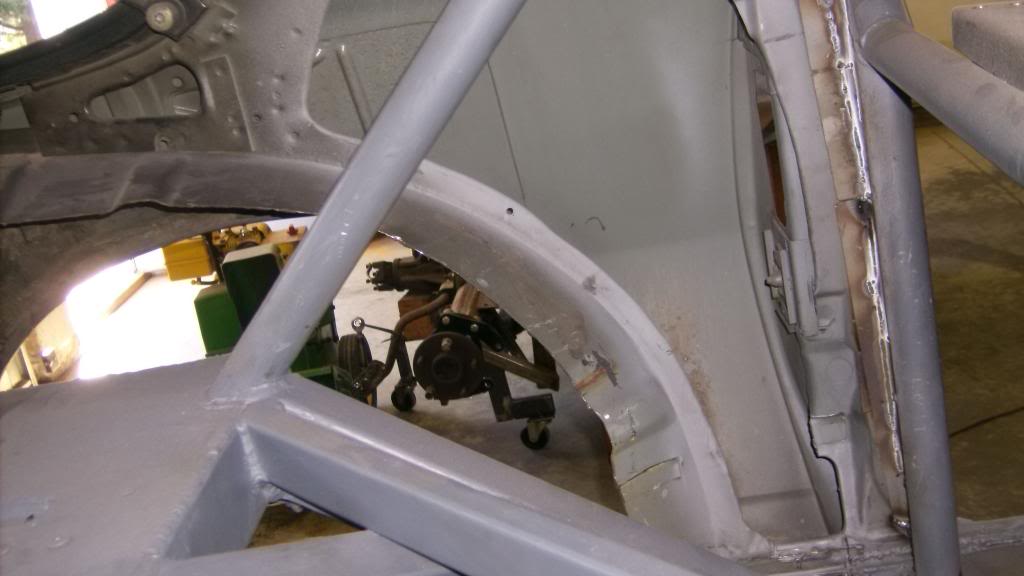
from underneath. I am hoping the extended inner fender panel will keep most of the road wash off the front heim joints and pounding the back of the firewall. I may extend it even lower but I don't want any interference with the LCA.
and from the wheel well. This area will be entirely enclosed once the wheel tub is finished and the front cargo floor installed. It will be pretty much inaccessible dead space. I have been trying to find some way to utilize it, but without making an access door to service what ever is inside its not much good for anything.
Rear firewall drivers side. The long black lines are approximate position of stiffening beads. I broke down and bought a bead roller, Woodward Fab from Summit.


view from cargo area. The top horizontal flange will provide support and mounting points for the front cargo floor area that was formerly the rear seat area. This floor will extend from C pillar to C pillar.


from underneath. I am hoping the extended inner fender panel will keep most of the road wash off the front heim joints and pounding the back of the firewall. I may extend it even lower but I don't want any interference with the LCA.


and from the wheel well. This area will be entirely enclosed once the wheel tub is finished and the front cargo floor installed. It will be pretty much inaccessible dead space. I have been trying to find some way to utilize it, but without making an access door to service what ever is inside its not much good for anything.


Thread Starter
Senior Member
Joined: Aug 2007
Posts: 682
Likes: 45
Re: Home brew road racer
Making up these 3 templates has really helped in deciding what order they need to be installed. I had planned on doing the bottom and then the front, but now realize that the firewall piece has to be installed first to get the other two panels to fit properly.
Installing this firewall panel to the front side of the main hoop would have been much easier because it would have set virtually flush to the front of the tubing. Fitting it to the rear means I have to fit it around the frame rails and bracing but it has two advantages: 1. the back of the firewall will be flush with the main hoop and rear crossmember. This prevents water and road wash from pooling on the frame and cage tubing. and 2. It gives me a shallow recessed area behind the seat that I can enclose with a simple panel. I am considering mounting the fuse box and other electrical items to the rear firewall.
Still struggling with a location for the battery. I initially wanted to mount it between the driveshaft tunnel and the right side lca mount. That puts the weight low and to the right to offset some of the driver's weight. It also eliminates about 6 feet of 2ga wire if the battery were mounted in the spare tire well. The down side is there is no access unless you jack up the car. Also clearance is a little tight for the front lca mounting bolt.
Another option is to make a drop in battery box through the new cargo floor. This would put the battery about 15" higher than the original frame mount idea. Access would be through a bolt down lid in the cargo floor. this could be reached by climbing into the cargo area or from the passenger seat area but would probably need to take the seat out ( 6 bolts, 3 minutes). I guess I'll wait till I get the floor in to see how much trouble it would be to fit the battery box in to the floor.
Thread Starter
Senior Member
Joined: Aug 2007
Posts: 682
Likes: 45
Re: Home brew road racer
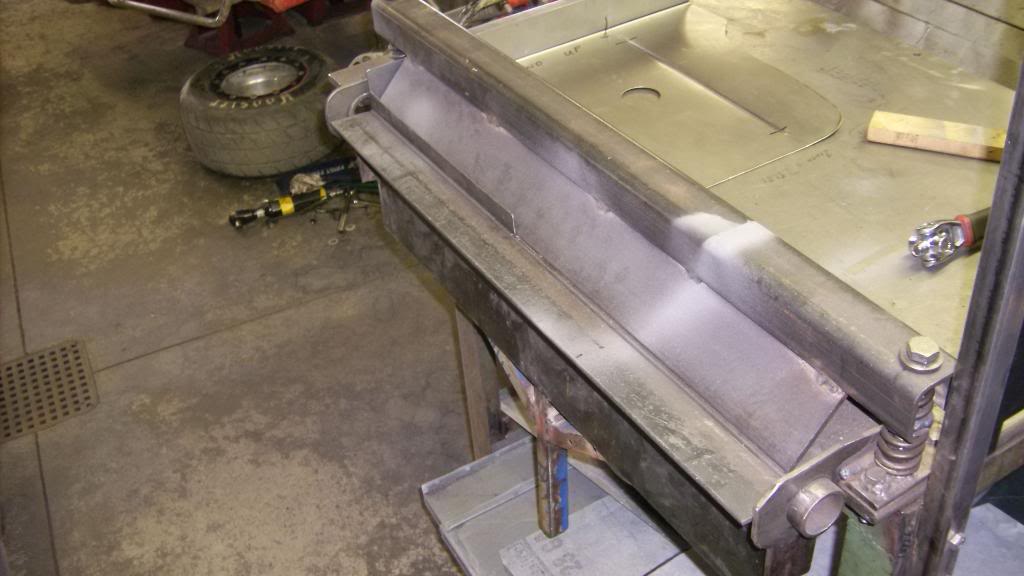
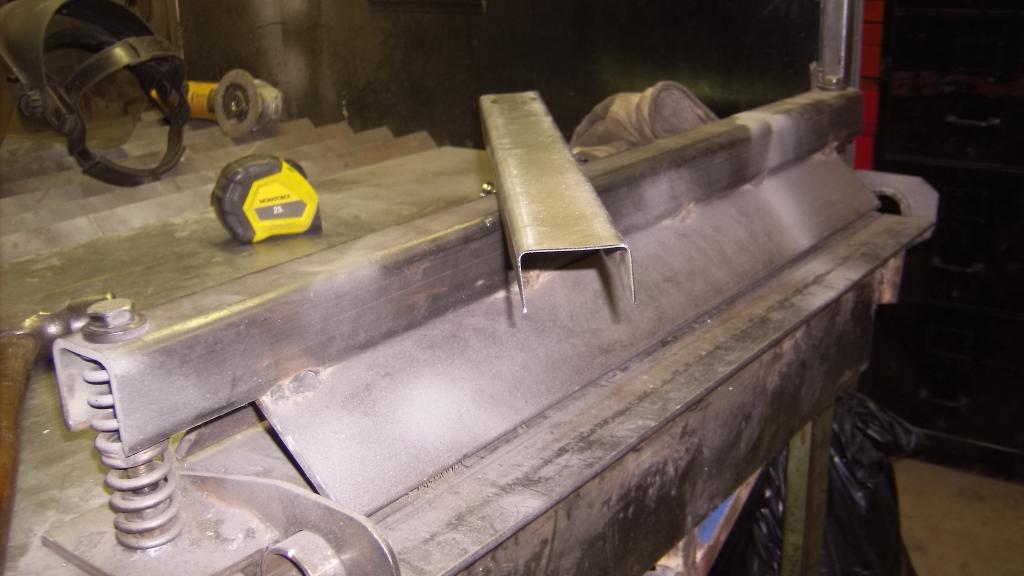
The stars and planets all aligned this past weekend and I pretty much had two full days to work on the car. I am happy to say that the beefed up hinge plates on my sheet metal brake held up great. I was able to make 90* bends up to 24" long in 18ga with no problem. So from poster board to actual metal panels....
from this

to this
and
from this
to this

and


Thread Starter
Senior Member
Joined: Aug 2007
Posts: 682
Likes: 45
Re: Home brew road racer
I dropped the driver seat back in to see how things look. I have quite a bit of usable space behind the seat. I am thinking a floor mounted accusump behind the driver and a fire bottle behind the passenger seat.


Thread Starter
Senior Member
Joined: Aug 2007
Posts: 682
Likes: 45
Re: Home brew road racer
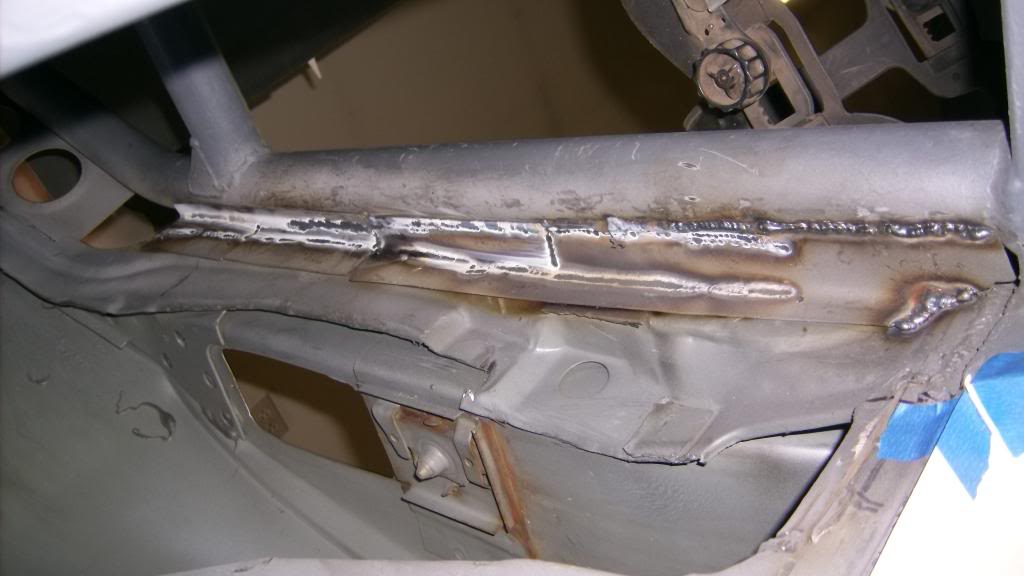
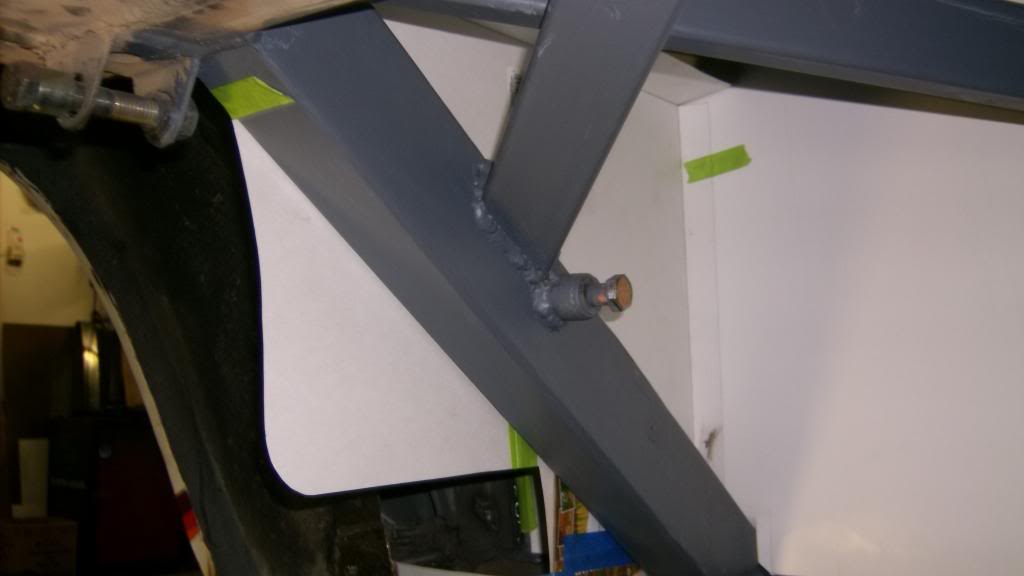
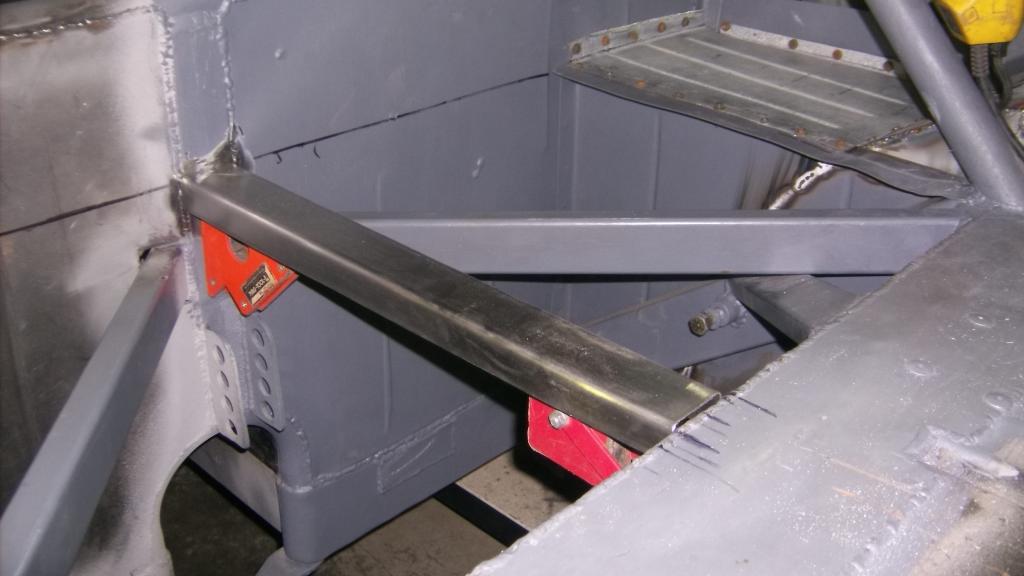
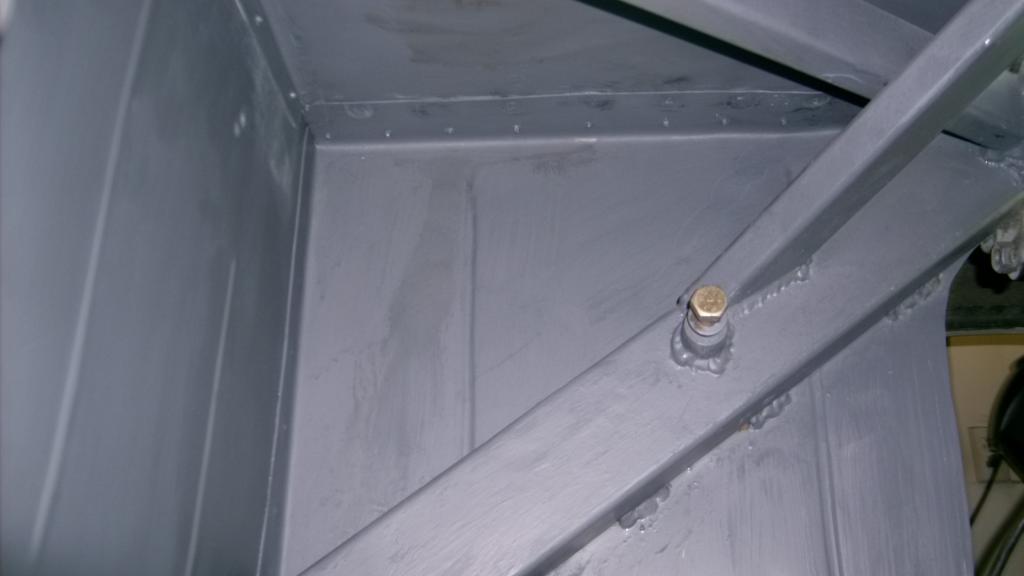
I mentioned the reason for taking the more difficult route in welding the firewall to the back side of the main hoop. The pic below shows the relatively flush fit at the rear crossmember. No ledge to let water and road wash accumulate.
The ugly rectangle on the crossmember is a reinforcement plate that had a cross brace mounted to it. The brace came out and the reinforcement plate will be taken out as well.
There is a nearly identical space on the passenger side, That is where I intended to place the battery but access is not good and I don't want to try and put an access door in the firewall behind the passenger seat.
Member
Joined: May 2001
Posts: 438
Likes: 1
From: state of confusion
Car: '08 Mustang GT
Engine: 4.6L
Transmission: � � 0 . . . |-|-|
Axle/Gears: 8.8", 3.55
Re: Home brew road racer
From what these pictures show, the fore/aft direction is the one you most want to avoid restraining, else you might need some sort of flexible section to absorb the expansion (which could easily exceed 1/4").
Norm
Supreme Member
iTrader: (1)
Joined: Oct 2008
Posts: 1,107
Likes: 0
From: Charleston SC
Car: 1987 Trans Am GTA
Engine: 350 TPI
Transmission: T56
Axle/Gears: Posi 3:42
Re: Home brew road racer
Dude, you are truely kill it with the fab and though!
Just sitting back and enjoying seeing this built.
Love the exhaust! !!!
Just sitting back and enjoying seeing this built.
Love the exhaust! !!!
Thread Starter
Senior Member
Joined: Aug 2007
Posts: 682
Likes: 45
Re: Home brew road racer
"Give some thought to the thermal expansion of your exhaust tubing before you locate and design your supports for it. If it can't expand freely in the directions it wants to expand in, it'll tend to pop out of shape in unexpected directions in unexpected places and by more than you might expect. Over-restrained exhaust tubing will also tend to give you problems at clamped joints and with gaskets. I did power plant pipe stress analysis for 30 years, and once I started using what I'd learned at work in my own exhaust systems I started getting much better results.
From what these pictures show, the fore/aft direction is the one you most want to avoid restraining, else you might need some sort of flexible section to absorb the expansion (which could easily exceed 1/4").
Norm "
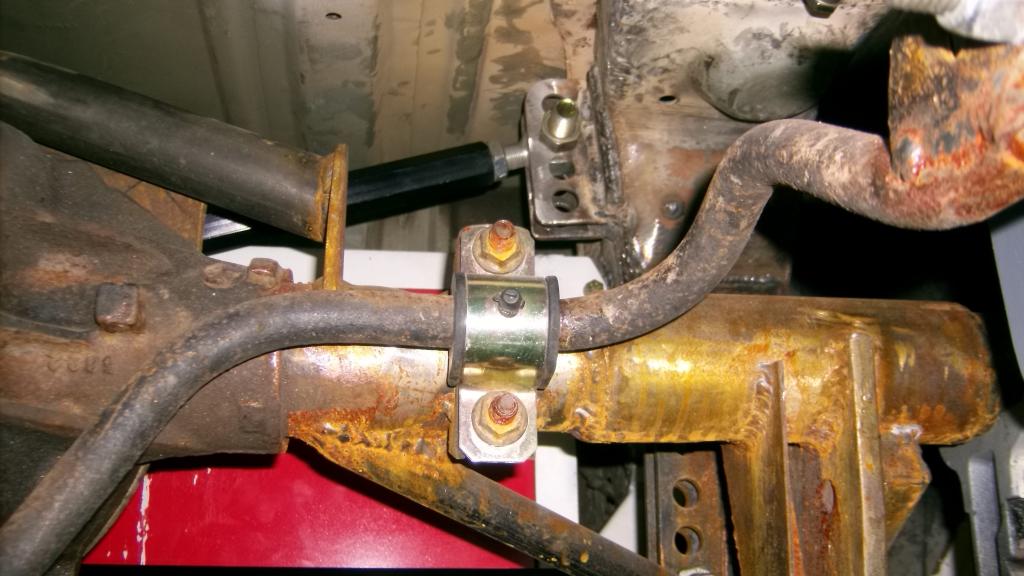
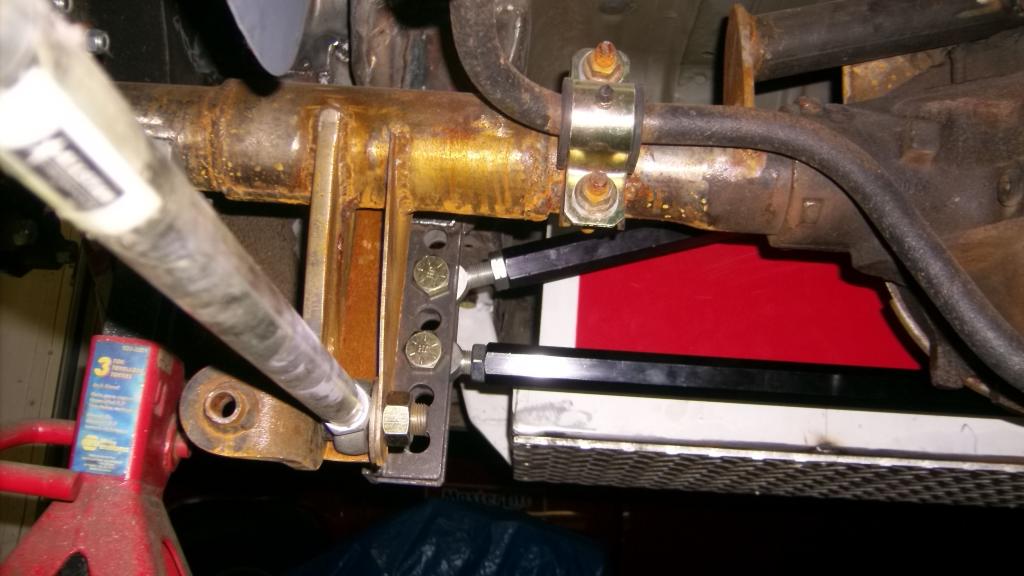
Thanks for the heads up Norm and glad to see your still following along. I haven't finalized the exhaust yet but have given some thought about the hangers just because of the tight clearance I need to keep under the floor pans. I am leaning toward the style that looks like an elongated C made from 1/8 flat steel strap. These hangers slide into a rectangular slot cut into a rubber mounting block. If I mount these in a linear fashion (front to back) it should let the tubing expand but not move side to side or up and down.
https://sp3.yimg.com/ib/th?id=HN.608...01071&pid=15.1
https://sp3.yimg.com/ib/th?id=HN.608...48079&pid=15.1
From what these pictures show, the fore/aft direction is the one you most want to avoid restraining, else you might need some sort of flexible section to absorb the expansion (which could easily exceed 1/4").
Norm "
Thanks for the heads up Norm and glad to see your still following along. I haven't finalized the exhaust yet but have given some thought about the hangers just because of the tight clearance I need to keep under the floor pans. I am leaning toward the style that looks like an elongated C made from 1/8 flat steel strap. These hangers slide into a rectangular slot cut into a rubber mounting block. If I mount these in a linear fashion (front to back) it should let the tubing expand but not move side to side or up and down.
https://sp3.yimg.com/ib/th?id=HN.608...01071&pid=15.1
https://sp3.yimg.com/ib/th?id=HN.608...48079&pid=15.1
Thread Starter
Senior Member
Joined: Aug 2007
Posts: 682
Likes: 45
Re: Home brew road racer
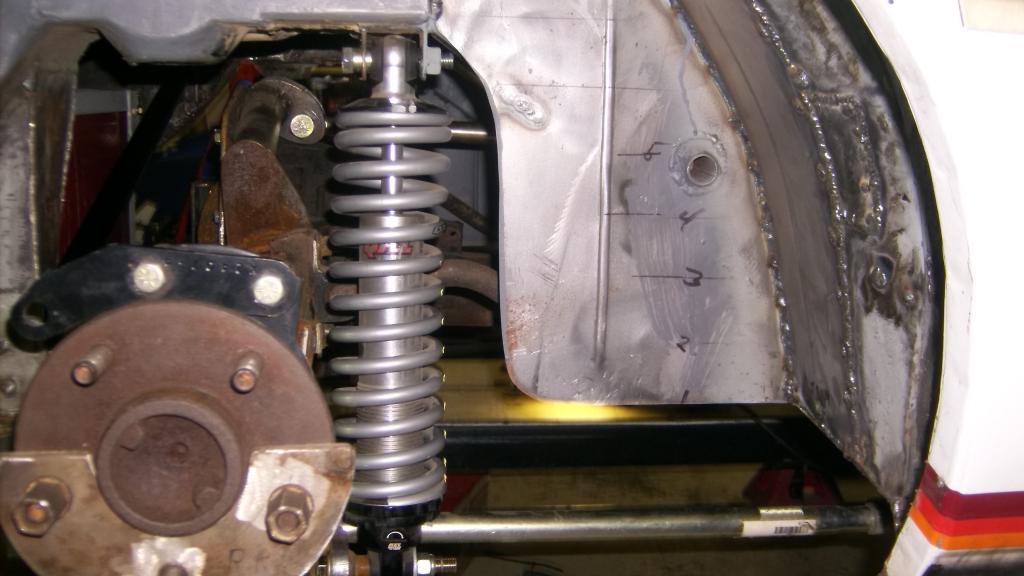
The side exit exhaust was something I thought would look cool, but to achieve it I had to design the rear suspension around it as it dictated where I could place the lower control arms. It was also one of the reasons to raise the floor pans so the mufflers could tuck up under the car. A simple idea to improve the look of the car and it took a few hundred hours to accomplish.
Thread Starter
Senior Member
Joined: Aug 2007
Posts: 682
Likes: 45
Re: Home brew road racer
I got a couple of good days in over the last two weeks and have a nearly completed left rear wheel tub to show for it. Making these from scratch is like making each part three times, cardboard pattern, rough cut part that needs trimmed and fit and finally assembly of all the pieces. Also because there is nothing symmetrical in the rear of the car none of the patterns will work on the right side so we will start from square one on that next weekend.
Here are some pics
front half of tub, pattern
To part

test fit, held in with sheet metal screws
Patterns for top and sides
view from underneath
and in steel

Final part welded in place
Here are some pics
front half of tub, pattern

To part

test fit, held in with sheet metal screws

Patterns for top and sides


view from underneath

and in steel


Final part welded in place


Junior Member
iTrader: (1)
Joined: Feb 2008
Posts: 70
Likes: 1
From: Michigan
Car: '91 Firebird
Engine: 305 TBI w/LT1 cam
Transmission: T5 swapped in
Axle/Gears: 9 bolt 3.27 w/discs
Re: Home brew road racer
Impressive work!
As far as the trans is concerned, what about a 4-speed manual? A T-10 or Muncie will way cheaper than a 5 or 6 speed. You don't really need O/D on a race course anyhow.
As far as the trans is concerned, what about a 4-speed manual? A T-10 or Muncie will way cheaper than a 5 or 6 speed. You don't really need O/D on a race course anyhow.
Member
Joined: May 2001
Posts: 438
Likes: 1
From: state of confusion
Car: '08 Mustang GT
Engine: 4.6L
Transmission: � � 0 . . . |-|-|
Axle/Gears: 8.8", 3.55
Re: Home brew road racer
A different take is to gear it so that a close-ratio 5th becomes a usable gear, leaving 1st for (easier) driving around in the pits and less abusive standing starts.
I'd guess that a TKO would be at least as strong as any T-10 or Muncie, anyway.
Norm
I'd guess that a TKO would be at least as strong as any T-10 or Muncie, anyway.
Norm
Thread Starter
Senior Member
Joined: Aug 2007
Posts: 682
Likes: 45
Re: Home brew road racer
My trans of choice would be a tko 600 with the 2.87 1st gear and the .80 overdrive. This is a close ratio unit and is rated at 600lbs/ft of torque. it weighs about 100lbs without a clutch or bellhousing. They run about 2300.00 new but if anybody has a lead on a GOOD used one I am very interested. I really don't want to put that big, heavy, power sucking, 4L60E in this car but will have to if I can't find an affordable 5 speed.

Junior Member
iTrader: (1)
Joined: May 2014
Posts: 20
Likes: 0
From: Mid-Tennessee
Car: 1991 Trans Am
Engine: 5.7L
Transmission: 700R4
Axle/Gears: G92 / 3.23
Re: Home brew road racer
This is awesome! I'll be following this thread as a learning exercise. Much of it is way outside my very limited skillset, but that just makes it an opportunity to learn more. Nice job. Thanks for taking the time to lay down all this knowledge for those of us less experienced. I've wanted to learn to weld for years and this thread is a wealth of info for a noob like me.
I noticed that you had to upgrade to Windows 8, which is offputting to many people. My day job is in IT, so if you want some tips for how to tame Win8 and make it more usable, I can help with that. Otherwise, I won't stray from topic unless you ask.
I'm going to eventually swap out the rear end on my 91 T/A. It came from the factory with the 3.27, but that was replaced by (best I can tell) 2.73 at some point. Grrr!
Anyway, what I want to know is will the ZR2 rear end just bolt in to my 91? I wasn't able to quite pick that info out, because you've been discussing it in the context of the mods you're making. If you or anyone else can help me get an answer to this, I'd greatly appreciate it because I'd like to start planning the swap well in advance.
Thread Starter
Senior Member
Joined: Aug 2007
Posts: 682
Likes: 45
Re: Home brew road racer
Doc91b, thanks for following along. I am a self taught welder for the most part. I took a couple of evening classes years ago at the local vo-ed school and read a few how- to- weld books. If you can get someone to show you the basics then its just practice from there on out. And the quality of the welder is important too. My Lincoln Pro mig 130 is out dated now but was a $450.00 piece when purchased about 10 years ago. It is the minimum I would consider for any type of fabrication.
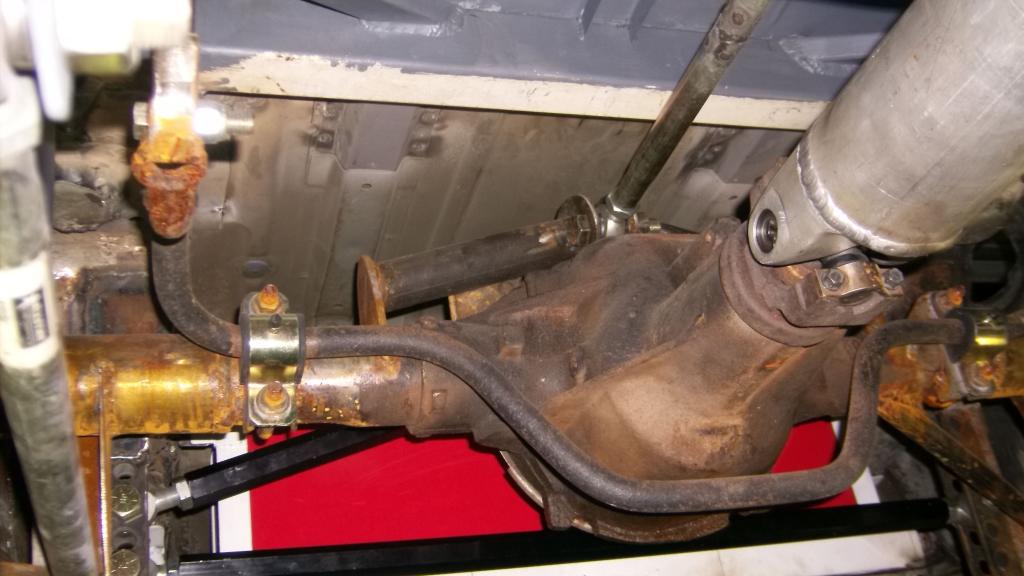
As for the rear axle the ZR2 is 1 1/2 inches longer axle flange to axle flange. It is also about 1 3/8 longer so you'll need to shorten the drive shaft. These axles only come with 3.73 gears and a posi. The posi is the GM rev-loc and has a reputation of not being real durable if you beat on regularly. The axle housing itself is the same as in any 1/2 ton GM truck or suv from 1998 on up so its a pretty strong diff. GM modified axle tubes so they could retain the standard S10 brakes and the wheel bolt pattern is the same as the camaro. Also the Camaro sway bars will bolt right up.
As it comes from the factory the only brackets welded to it are for the leaf springs and you'll need to cut them off. You can cut off the brackets from the Camaro axle and weld them in place on the ZR2 and be good to go. Try to get a complete axle assembly with all the disc brake parts and it will save you a lot of extra expense.
Here are some pics for comparison.
Diff in rear is ZR2
here is where the axle tubes get smaller. The small diameter is the same as the Camaro axle tubes.
This is only bracket that you need to remove
unmodified axle positioned under the car
let me know if you have any more questions or need more pics.
As for the rear axle the ZR2 is 1 1/2 inches longer axle flange to axle flange. It is also about 1 3/8 longer so you'll need to shorten the drive shaft. These axles only come with 3.73 gears and a posi. The posi is the GM rev-loc and has a reputation of not being real durable if you beat on regularly. The axle housing itself is the same as in any 1/2 ton GM truck or suv from 1998 on up so its a pretty strong diff. GM modified axle tubes so they could retain the standard S10 brakes and the wheel bolt pattern is the same as the camaro. Also the Camaro sway bars will bolt right up.
As it comes from the factory the only brackets welded to it are for the leaf springs and you'll need to cut them off. You can cut off the brackets from the Camaro axle and weld them in place on the ZR2 and be good to go. Try to get a complete axle assembly with all the disc brake parts and it will save you a lot of extra expense.
Here are some pics for comparison.
Diff in rear is ZR2

here is where the axle tubes get smaller. The small diameter is the same as the Camaro axle tubes.

This is only bracket that you need to remove

unmodified axle positioned under the car


let me know if you have any more questions or need more pics.
Junior Member
iTrader: (1)
Joined: May 2014
Posts: 20
Likes: 0
From: Mid-Tennessee
Car: 1991 Trans Am
Engine: 5.7L
Transmission: 700R4
Axle/Gears: G92 / 3.23
Re: Home brew road racer
Thanks for the pics and info and taking some of your time to explain this stuff to a noob. I know I'll find that invaluable come time to swap it out, and I'm sure others will too.
I was thinking that I'd hit up a buddy of mine that has a welder to let me use his equipment to practice on some scrap metal if I covered the cost of the gas and supplies I use. That way I can gain at least some basic competency before I run out and buy my own welder. I need to do some reading on the types of welders (MIG, TIG, etc.) and their differences and which would best suit my needs.
One of the things that drew me to read this entire thread is that you're not building for the drag strip. I may eventually run my T/A at the strip once or twice just to get a baseline idea of it's capabilities (and mine) but mostly I like spirited driving, carving up winding country roads and eating up the occasional straight stretch of pavement. I don't really see myself doing much street racing either, but I can't say that I wouldn't given the right circumstance. Point being, I don't intend to beat hard on the car, just give it a good run now and then, which makes this thread appropriate and your concept more than adequate for my intended usage.
I realized after I posted that I kinda hijacked the thread a bit, and I apologize to anyone that was bothered by it. I let my curiosity and enthusiasm get in the way of my better judgement which would've told me to start my own thread. On that note, I'll take my seat and get back to watching your progress and learning. Looking forward to seeing this project unfold.
Also, that homebrew lift rack is freakin' ingenious. I'd love to build one of those bad boys for my garage. Thanks for showing us how you did it, and inspiring us to be creative and do it ourselves.
Last edited by Doc91b; Jul 4, 2014 at 12:02 PM. Reason: Additional comment.
Thread Starter
Senior Member
Joined: Aug 2007
Posts: 682
Likes: 45
Re: Home brew road racer
Doc91 by all means jump into your project. Experience is the best teacher. When I started this project I built the ramps first just to prove to myself that I could make identical copies of the same part and hold tolerances to less than 1/16". If I couldn't build those I had no reason to try and build my suspension from scratch. also it had been a while since I had done any welding so that helped sharpen those skills at least for the heavier gauge stuff. I am still learning on the sheet metal but i can see improvement from one day to the next.
The ramps are cool but they took a year to design and build. I made dozens of sketches, scale drawings, cardboard templates and full size wood models. The original design for the bases which would have required almost no fabrication on my part had to be scraped as the weld shop wanted $750 to cut, bend and drill the plates.
The triangulated stands that I settled on were relatively inexpensive made from 1x3x.125 tubing. The problem making them was that each of the 4 stands had to be identical so that the ramps would sit level and not rock like a table at a cheap diner. Each stand is made from 2 triangles with different length legs meaning i had to make 3 different sets of 8 legs and each leg in a set had to be identical. I had to build jigs to cut the metal to proper length and angles. Build more jigs to drill the holes for the notches and finally build jigs to hold the 3 legs together so they could be welded together. It took an entire summer to construct the ramps.
Thread Starter
Senior Member
Joined: Aug 2007
Posts: 682
Likes: 45
Re: Home brew road racer
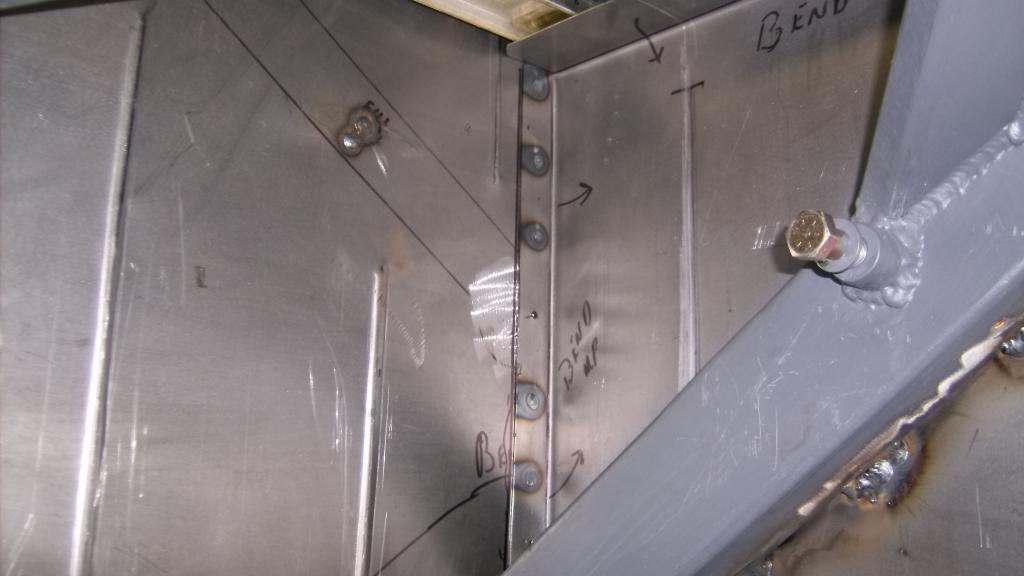
Back to the car.I got two full days in and have the rear firewall behind the passenger seat finished, a completed right rear wheel tub and a couple cover panels to show for it.
Rear firewall from interior view
Firewall from under the car
making panel in my brake. You can see the upgraded hinge plates on the brake in some of the pics and crank handle from bead roller
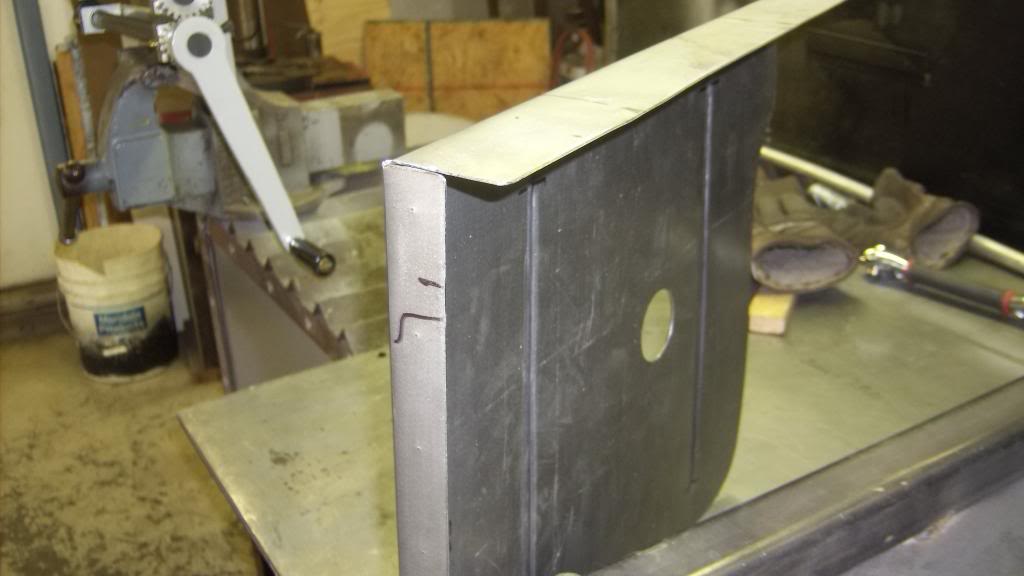
Panel welded in place
The sheet metal bake has been a great asset. I am glad I took the time to make one.
Rear firewall from interior view

Firewall from under the car

making panel in my brake. You can see the upgraded hinge plates on the brake in some of the pics and crank handle from bead roller


Panel welded in place

The sheet metal bake has been a great asset. I am glad I took the time to make one.


Thread Starter
Senior Member
Joined: Aug 2007
Posts: 682
Likes: 45
Re: Home brew road racer
Here is a tip to help fitment and hold panels in place while welding. If you notice I have used sheet metal screws to hold the various panels together that made up the wheel tubs rather than clikos. I find that the screws work better and pull the panels tighter together than the clikos do especially when working with odd shaped panels like these that need a little persuasion to conform to the mating piece. The OE sheet metal is quite thin and many of the screws would strip out and just spin before they pulled the panels together. To solve this i used the j-nuts that I scavenged when I stripped the interior out on the back side of the panels. There were dozens of these J-nuts used in the car and I keep all of the sheet metal screws also. Much cheaper than clikos and I think work better.


Thread Starter
Senior Member
Joined: Aug 2007
Posts: 682
Likes: 45
Re: Home brew road racer
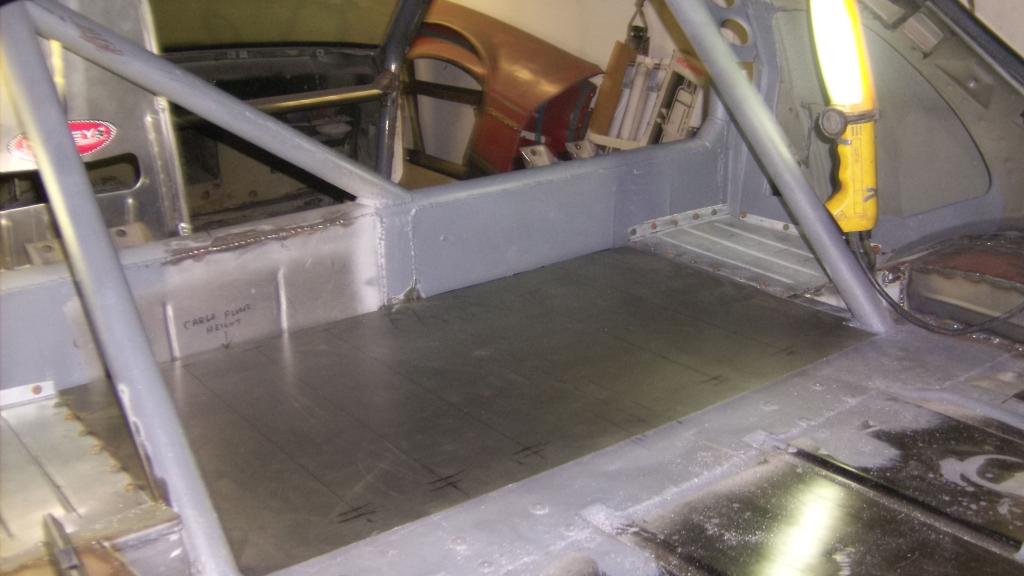
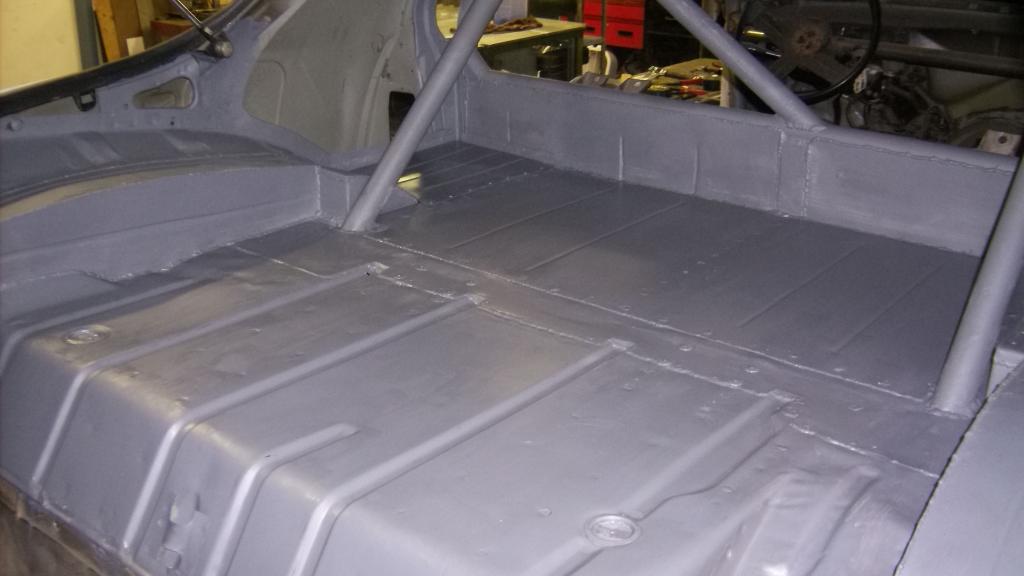
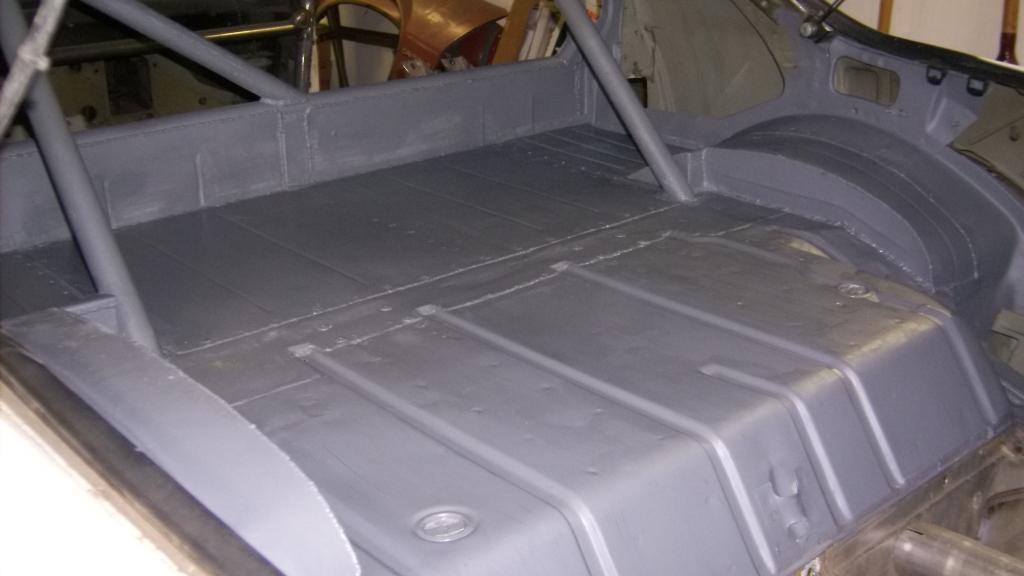
The rain gods smiled on me the last two weekends (it rained) and I was forced to spend time out in the garage. The result was that for the first time since January 2012 the Camaro has a full floor and wheel tubs in the cargo area.
filler panels in front of wheel tubs
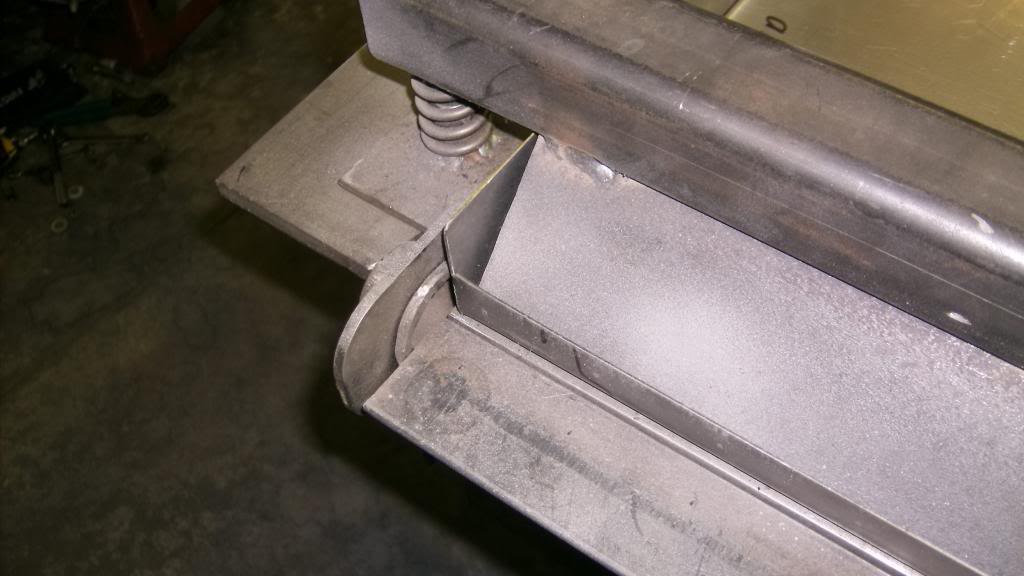
I needed a 2x1x19 brace for the center floor support. Sheet metal brake to the rescue.
filler panels in front of wheel tubs


I needed a 2x1x19 brace for the center floor support. Sheet metal brake to the rescue.


Thread Starter
Senior Member
Joined: Aug 2007
Posts: 682
Likes: 45
Re: Home brew road racer
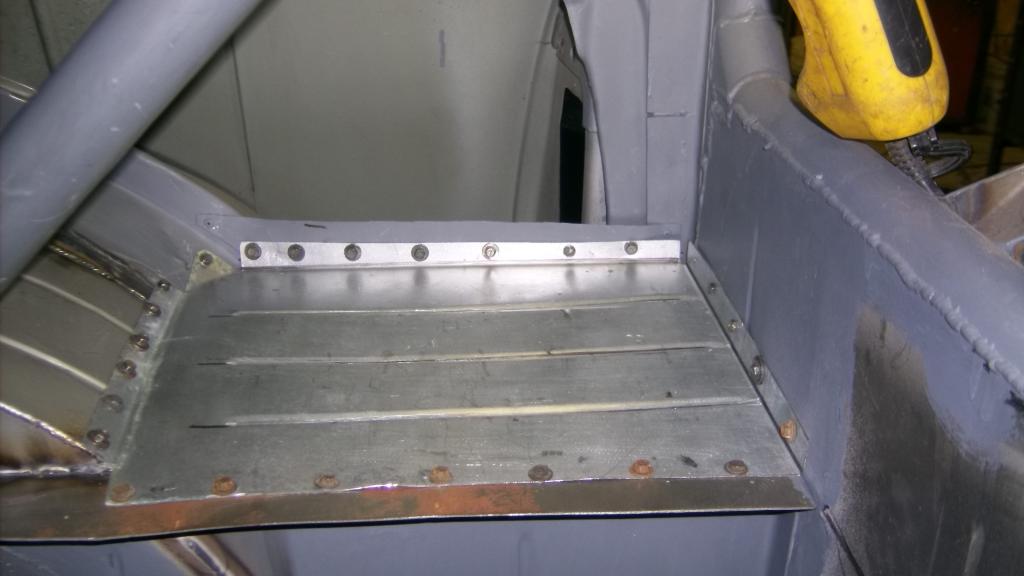
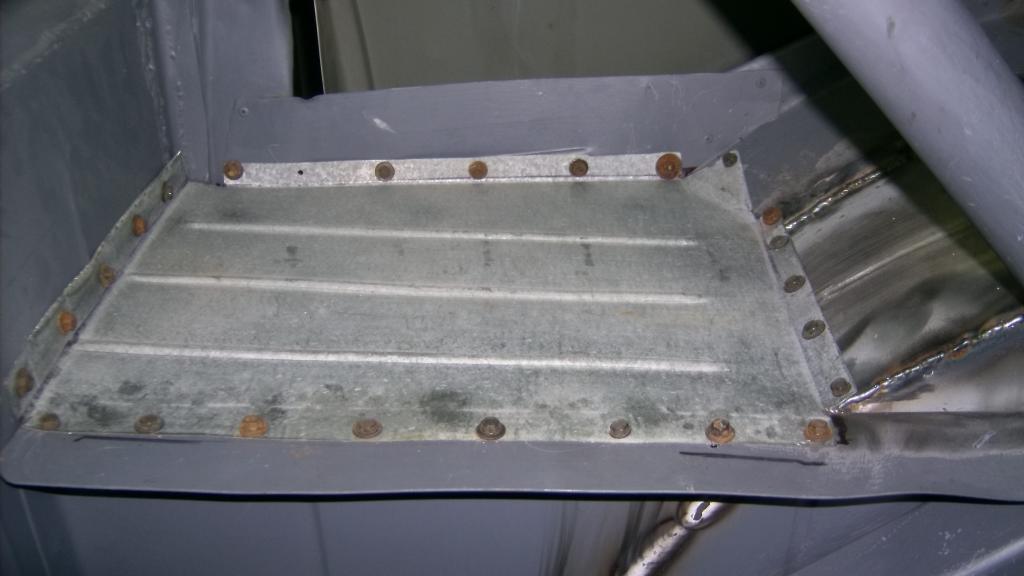
Once the center brace was welded in I had to access the cargo area from above. Since it is about 40" off the floor getting in and out was a real pain. The other problem is that this panel is 36" long and my plan called for a 1" wide flange across it's length to butt up against the firewall behind the seats. Problem was the brake can only handle up to 29". I had to go back to bending it over the edge of my weld table. The result was that the two bends (there is a gap in the flange to clear the center brace) were not quite equal creating a gap on the left side. after welding all of the fitted sides in I used a 1" wide chisel with a blunt, rounded edge to gradually stretch and reform the bad side to fit tight to the firewall.
Final floor panel, initial fitment
and finished piece with stiffening beads
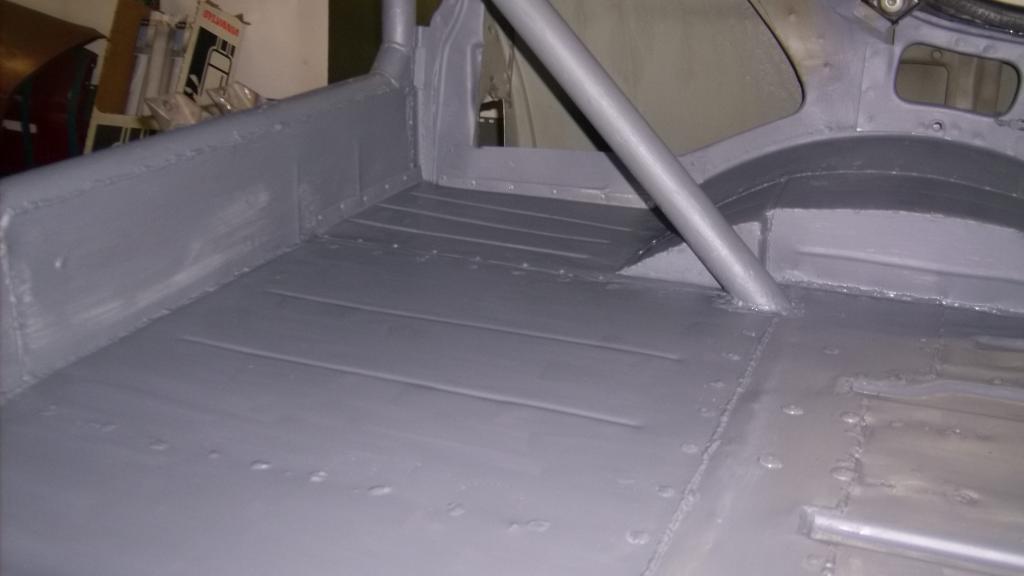
and from underneath
And overall view.
Final floor panel, initial fitment

and finished piece with stiffening beads


and from underneath


And overall view.


Thread Starter
Senior Member
Joined: Aug 2007
Posts: 682
Likes: 45
Re: Home brew road racer
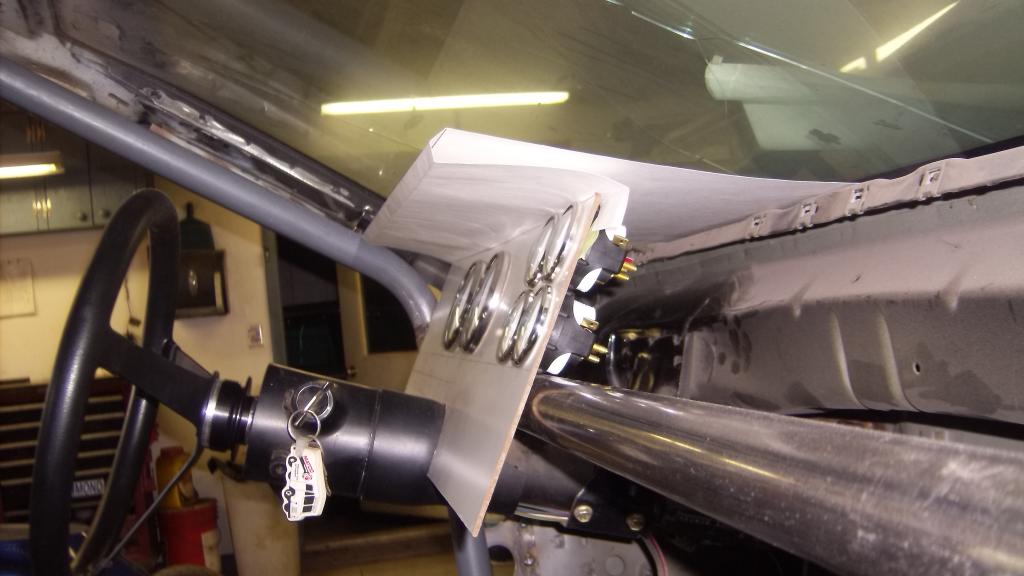
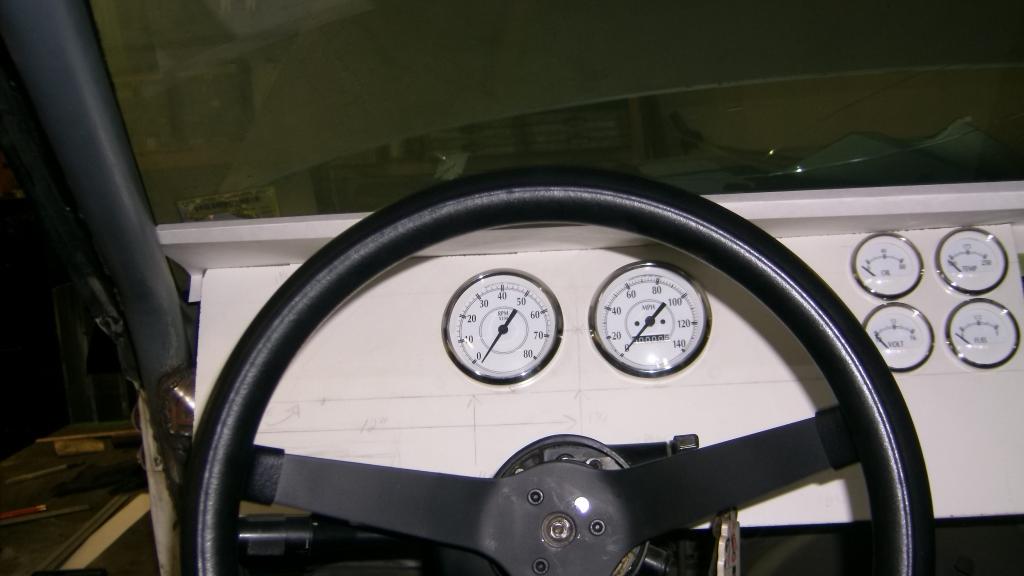
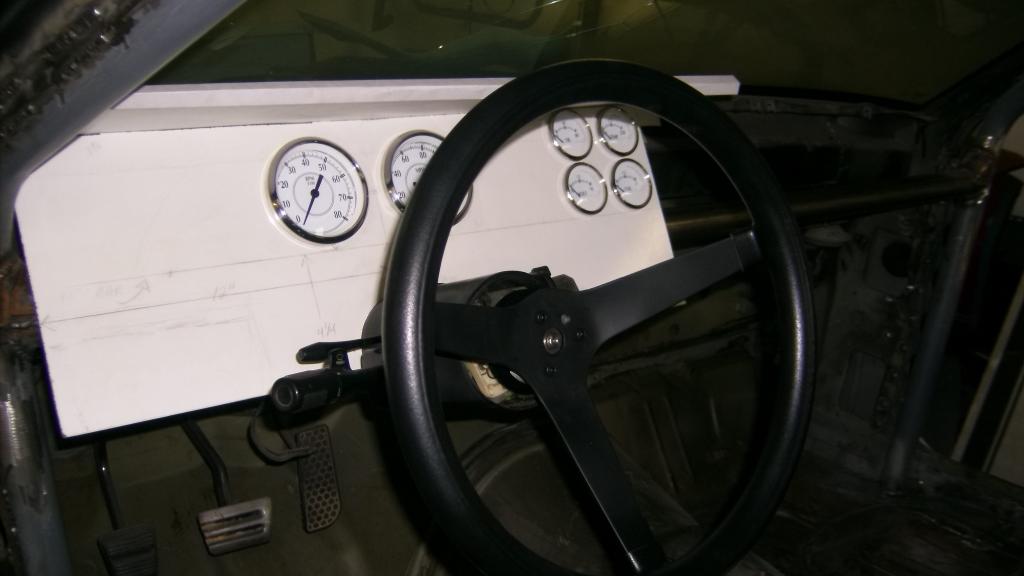
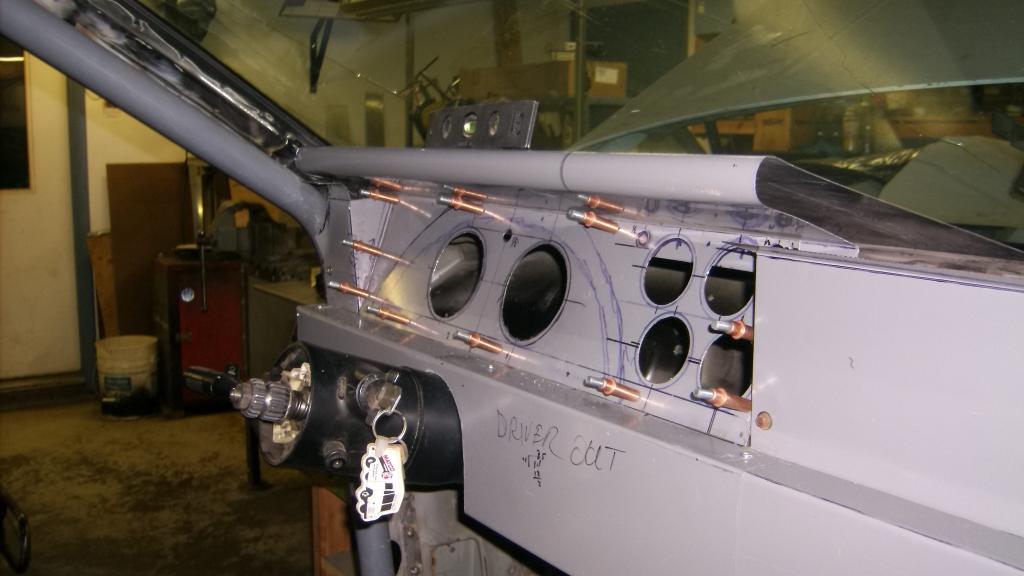
With the cargo area back together I moved on to the dashboard and placing the instruments. I wanted all of the auxiliary gauges grouped close together so you could see all of them at one quick glance. Also I wanted to have the gauges recessed back 3 to 4 inches to keep them from reflecting into the windshield at night. Let me know what you think.


Member
Joined: Nov 2011
Posts: 142
Likes: 0
From: Fort Gordon, GA
Car: 83 Z28
Engine: LG4
Transmission: T5
Re: Home brew road racer
One thing you may want to consider is dummy lights on the gauges. The way you have them now may be a bit too close together or too close to the edge if you were going to do that.
Thread Starter
Senior Member
Joined: Aug 2007
Posts: 682
Likes: 45
Re: Home brew road racer
I made good progress on the dash over the weekend. Keep in mind the gauges are just mocked up on a piece of scrap paneling. An aluminum panel will be made shortly.


The dash is made from 22 or 24ga sheet steel (about .028 thick but painted both sides so actual steel is maybe .024-.022. it is pretty flimsy until you bend an edge in it. What your looking at is 4 separate pieces, not including the gauge panel, that overlap in the center and at the ledge between upper and lower halves.
I had started with the idea of a flat face panel but after sitting in the driver seat with the belts on I found I could barely reach the surface so it would be difficult to activate any switches or levers mounted in the dash. The ledge is 1 1/2 wide and moving out that small amount made a big difference in accessibility.
Thread Starter
Senior Member
Joined: Aug 2007
Posts: 682
Likes: 45
Re: Home brew road racer
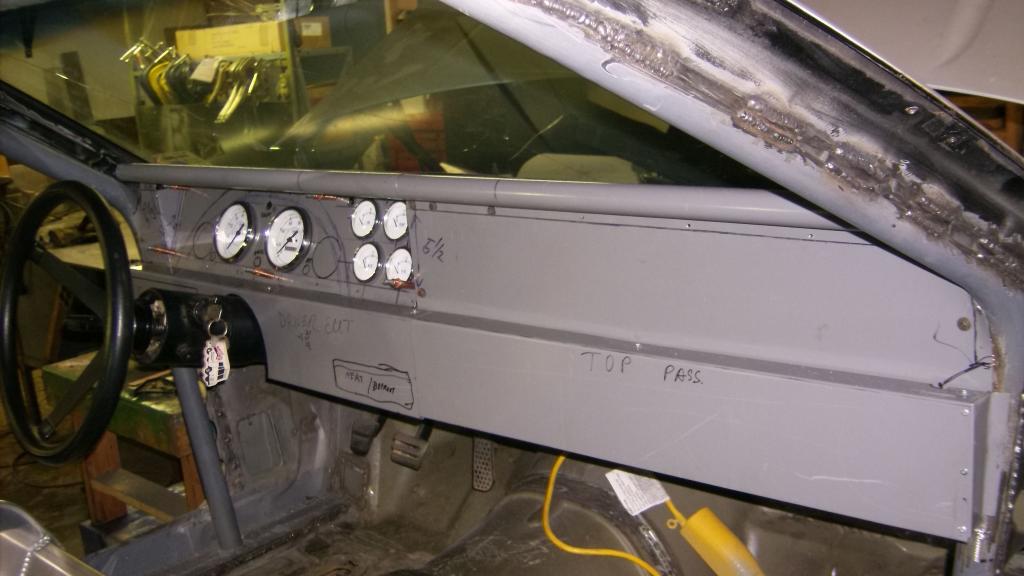
Ok I got the dash pretty much finished until paint and final assembly. I will have to secure the front edge along the windshield but that will be easier once the glass is out.
I boxed in the ends and bolted the bottom to a welded tab on the down tube of the cage.
Using the suggestion from Flash I reconfigured the cluster of auxiliary gauges by shifting the top two to the left. This made room for the warning lights and gives the dash a little sense of style.
With gauge holes cut out.
I boxed in the ends and bolted the bottom to a welded tab on the down tube of the cage.

Using the suggestion from Flash I reconfigured the cluster of auxiliary gauges by shifting the top two to the left. This made room for the warning lights and gives the dash a little sense of style.

With gauge holes cut out.

Thread Starter
Senior Member
Joined: Aug 2007
Posts: 682
Likes: 45
Re: Home brew road racer
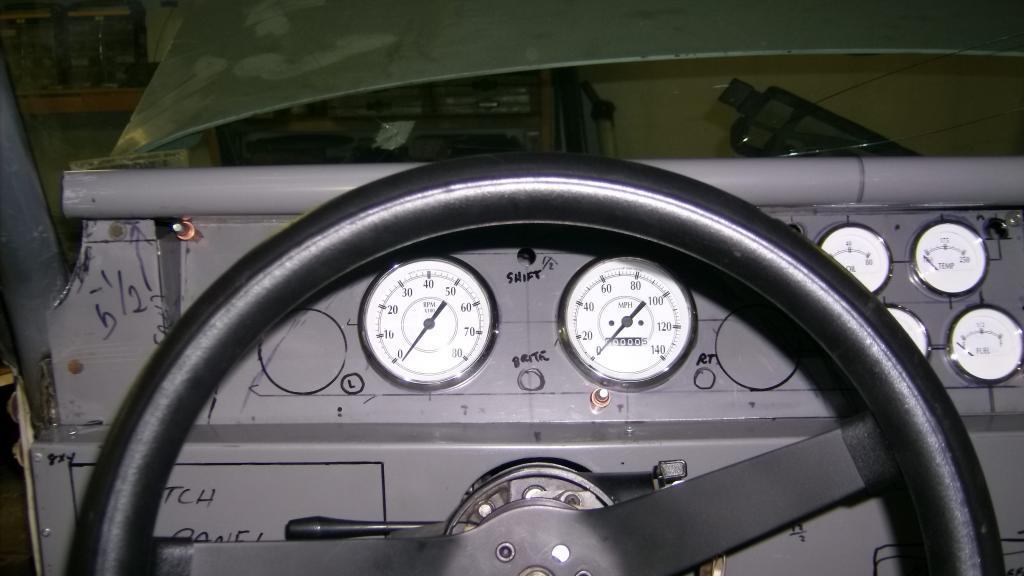
When I was designing up the dash one of the features that I wanted to include was some type of lip or ledge that would extend out past the gauge faces about 4 inches to keep the gauges from reflecting into the windshield. I made a flat aluminum dash for my son's 84 and at night it looks like a heads up display in the windshield. I also didn't want just a flat sheet of metal sticking out with a thin edge that could possibly cause an injury. I could have made a squared off edge on my brake but I really wanted a rounded edge.
A piece of 3/4" black pipe and a piece of wood was all it took.
A piece of 3/4" black pipe and a piece of wood was all it took.


Thread Starter
Senior Member
Joined: Aug 2007
Posts: 682
Likes: 45
Re: Home brew road racer
With the gauges installed
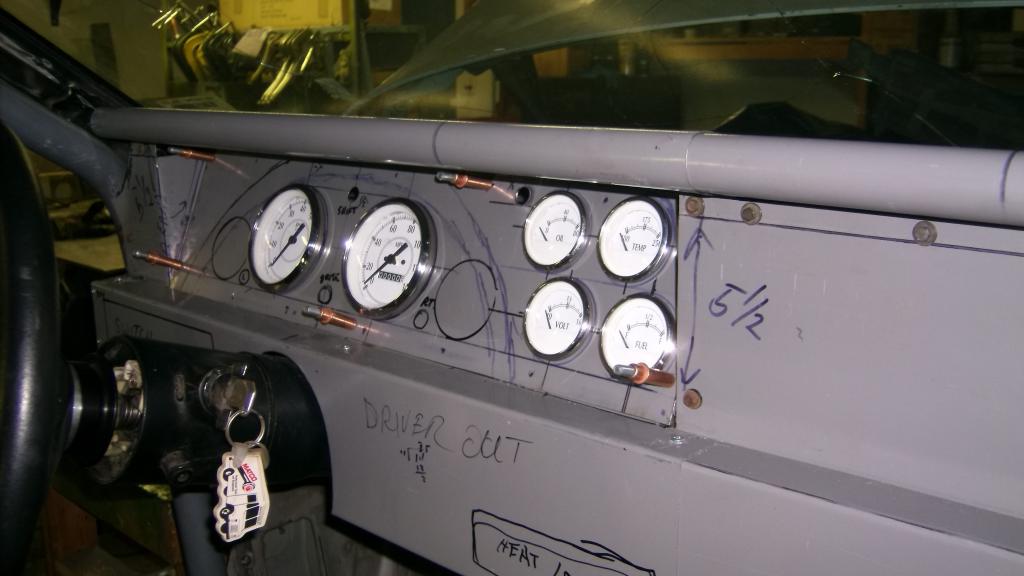
I have room on the lower left to mount a 6 switch, switch panel that will have toggle ignition switch and push button start. Also switches for lights, fans and fuel pump.
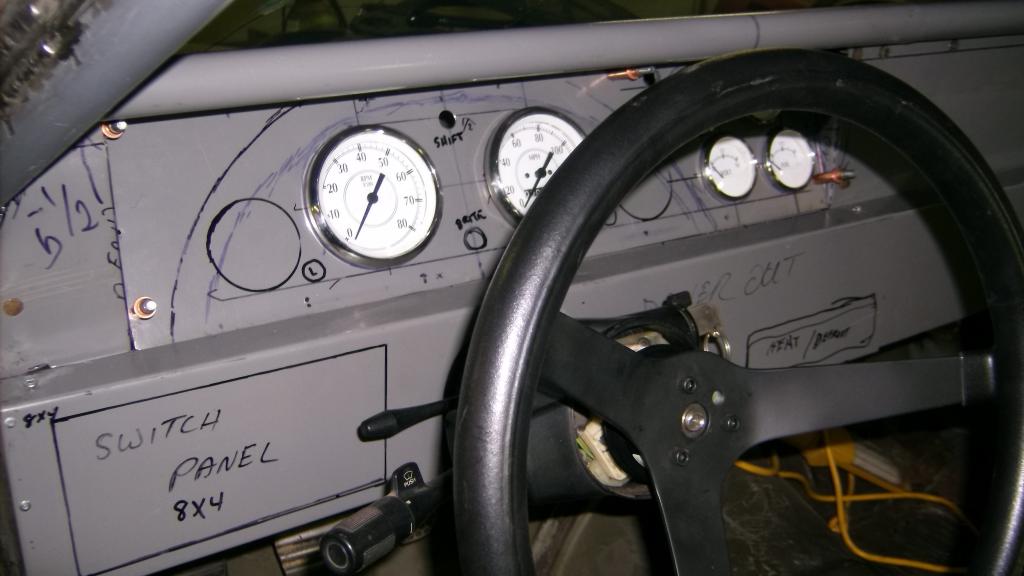


I have room on the lower left to mount a 6 switch, switch panel that will have toggle ignition switch and push button start. Also switches for lights, fans and fuel pump.

Thread Starter
Senior Member
Joined: Aug 2007
Posts: 682
Likes: 45
Re: Home brew road racer
I am very surprised but quite pleased at how the dash came out considering my meager metal working skills. It seems to be quite sturdy. Its straight and level. It has enough useable panel space that I can mount more gauges and switches if needed. There is also room on the upper right for a glove box and maybe a slick pull out aluminum snack tray on the lower right for at the drive in or on a road trip. The wife is pushing hard for A/C.

Thread Starter
Senior Member
Joined: Aug 2007
Posts: 682
Likes: 45
Re: Home brew road racer
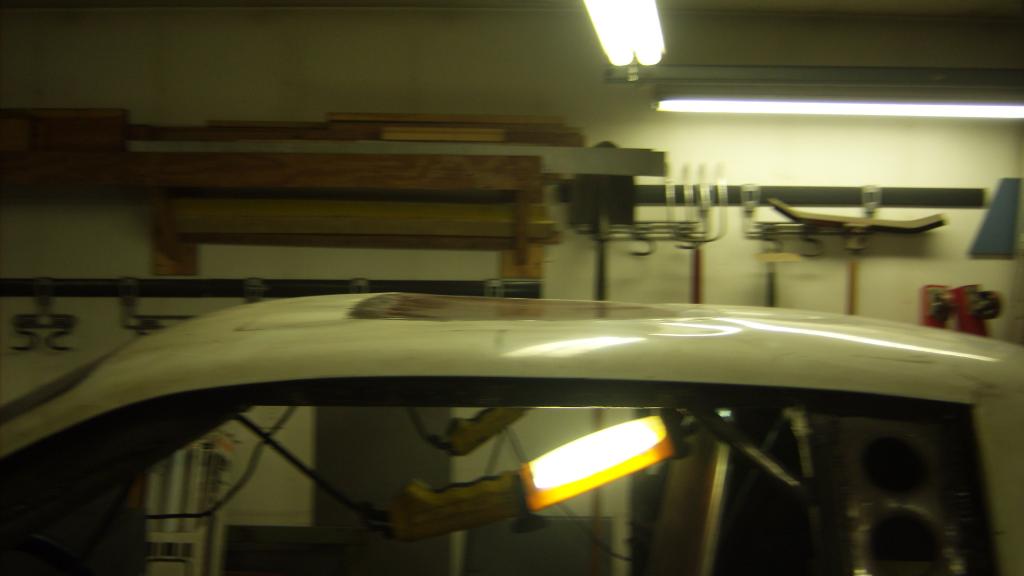
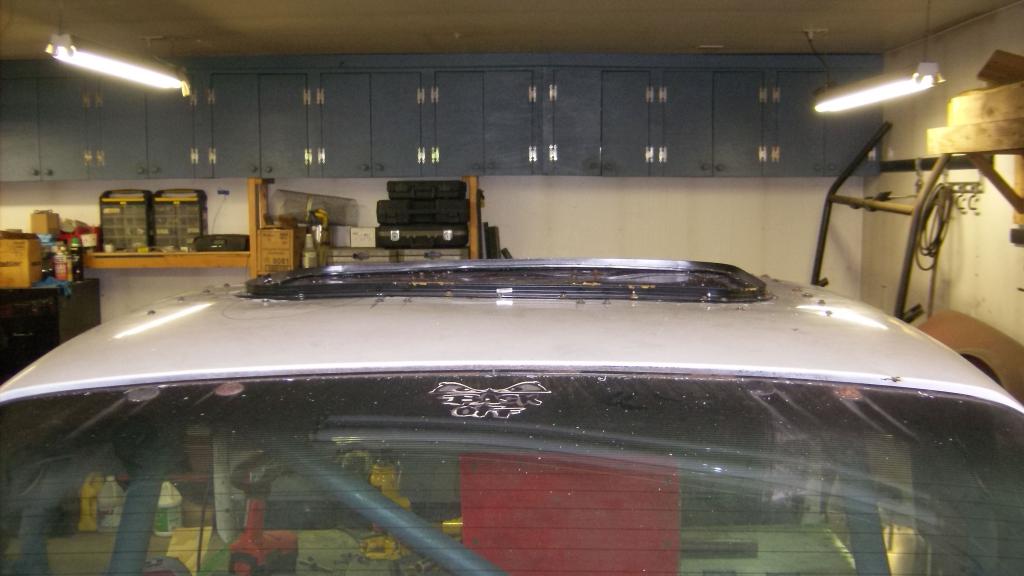
As you can tell I am pretty pleased with my self over the dashboard. With my confidence up I am going to tackle welding in the patch panel to fill the hole where the sun roof was. I cut out a large piece of the roof from my 1995 C1500 truck that I scrapped last summer. I strapped it down tight to the Camaro roof with a couple of ratchet straps.
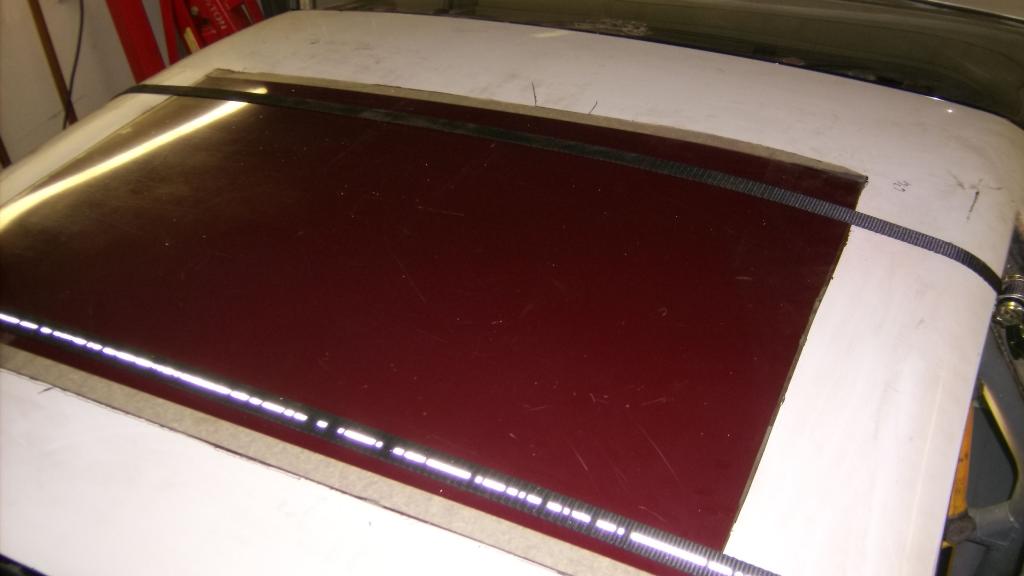
This made the panel and the factory roof conform to each other pretty well. I have marked the location of the corners of the patch so I can take it off and reinstall it in the same place. I should probably put 4 sheet metal screws in it so it will go back exactly in place.
Inside looking up
My plan is to scribe the outline of the sun roof hole from inside the car onto the bottom of the patch panel. Take the panel out and cut it out a little over size and then fit it as well as I can. I am going to hold it in place with 16 butt weld clamps I picked up a HF. these should hold the panel in place, level with the factory roof. They also create a .040 wide gap between the patch and the roof that will insure full weld penetration so that the top of the weld can be ground down flush.
i'll be using .023 wire in my 135 mig and set on the lowest heat range. I am going to lay wet towels around the weld area and on the patch panel to help control any warpage and I plan on taking several hours to weld this in, one little tack weld at a time.

This made the panel and the factory roof conform to each other pretty well. I have marked the location of the corners of the patch so I can take it off and reinstall it in the same place. I should probably put 4 sheet metal screws in it so it will go back exactly in place.
Inside looking up

My plan is to scribe the outline of the sun roof hole from inside the car onto the bottom of the patch panel. Take the panel out and cut it out a little over size and then fit it as well as I can. I am going to hold it in place with 16 butt weld clamps I picked up a HF. these should hold the panel in place, level with the factory roof. They also create a .040 wide gap between the patch and the roof that will insure full weld penetration so that the top of the weld can be ground down flush.
i'll be using .023 wire in my 135 mig and set on the lowest heat range. I am going to lay wet towels around the weld area and on the patch panel to help control any warpage and I plan on taking several hours to weld this in, one little tack weld at a time.
Thread Starter
Senior Member
Joined: Aug 2007
Posts: 682
Likes: 45
Re: Home brew road racer
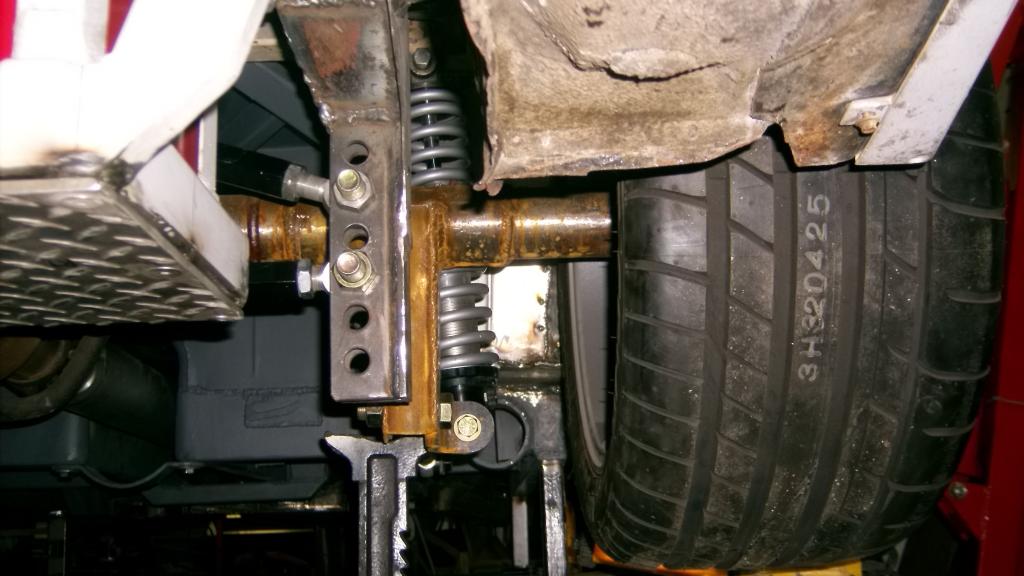
To occupy my time between welds I am going to start prepping the front of the car for my suspension mods. What I am planning to do is fit the spindles, steering rack, and control arms from a 4th gen onto the 3rd gen frame rails. I will be fabbing my own K member, upper control arm and shock mounts. I will be using aftermarket coil overs, not 4th gen pieces. Oh and one thing more, I will be moving the spindle centerline about 4.5" forward from stock making the wheel base about 105" in stead of the stock 101".
I picked this up last week. 2000 LS1 complete k member.
I picked this up last week. 2000 LS1 complete k member.

Member
Joined: Nov 2011
Posts: 142
Likes: 0
From: Fort Gordon, GA
Car: 83 Z28
Engine: LG4
Transmission: T5
Re: Home brew road racer
Dash looks good! You have some fab talent, my friend!
One more suggestion, maybe weld a 1/2" or 3/4" piece of sheet metal centered around the butt seam when you fill in that sun roof. I'm a little concerned that even with a filler panel in there, it may not be strong enough under load and you may break some welds.
One more suggestion, maybe weld a 1/2" or 3/4" piece of sheet metal centered around the butt seam when you fill in that sun roof. I'm a little concerned that even with a filler panel in there, it may not be strong enough under load and you may break some welds.
Thread Starter
Senior Member
Joined: Aug 2007
Posts: 682
Likes: 45
Re: Home brew road racer
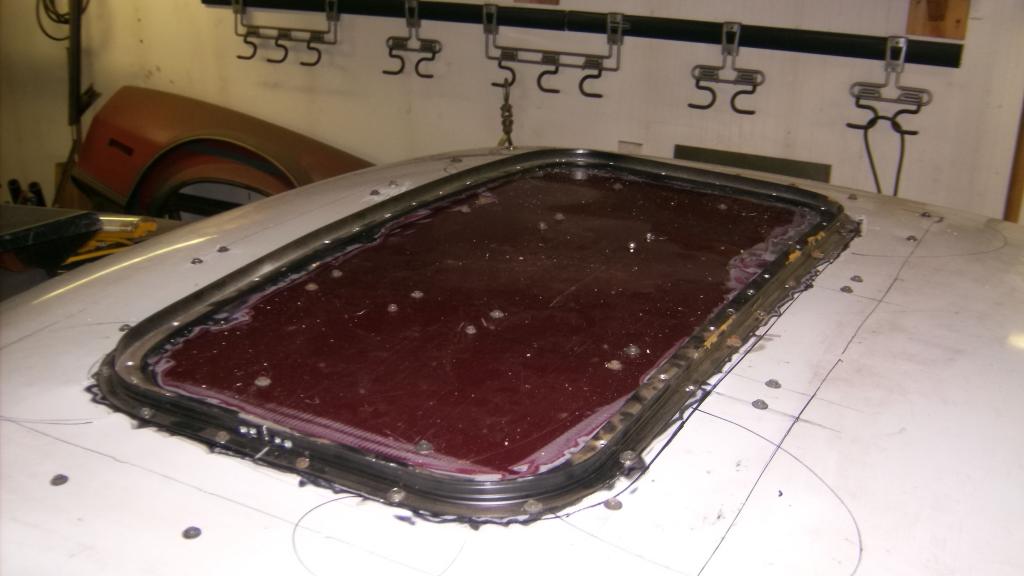
[QUOTE=flash2042;5811467]Dash looks good! You have some fab talent, my friend!
I maybe able to cut and bend the thin sheet metal but I need a lot more practice and probably some training to weld it correctly. The roof turned out far from stellar.
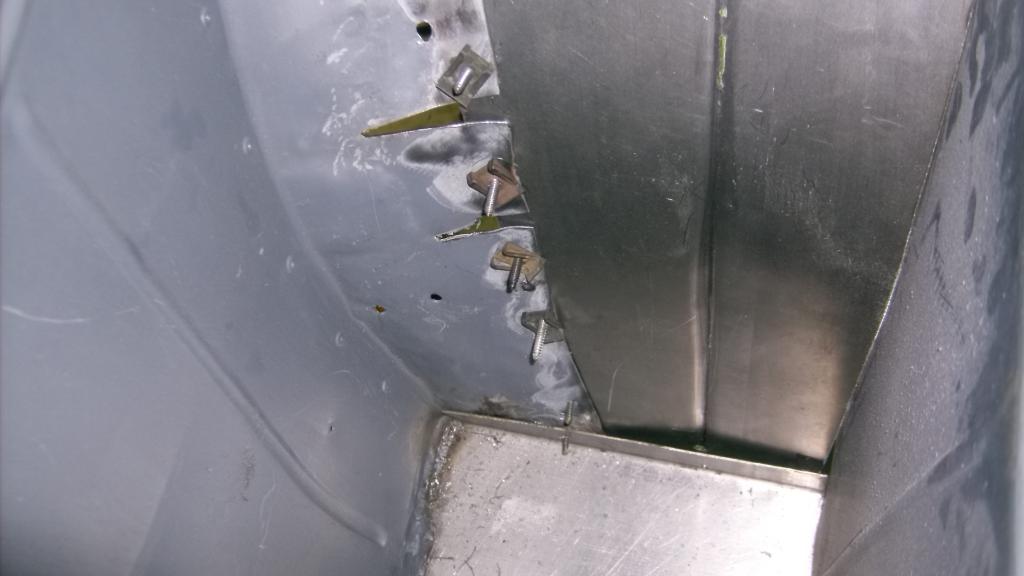
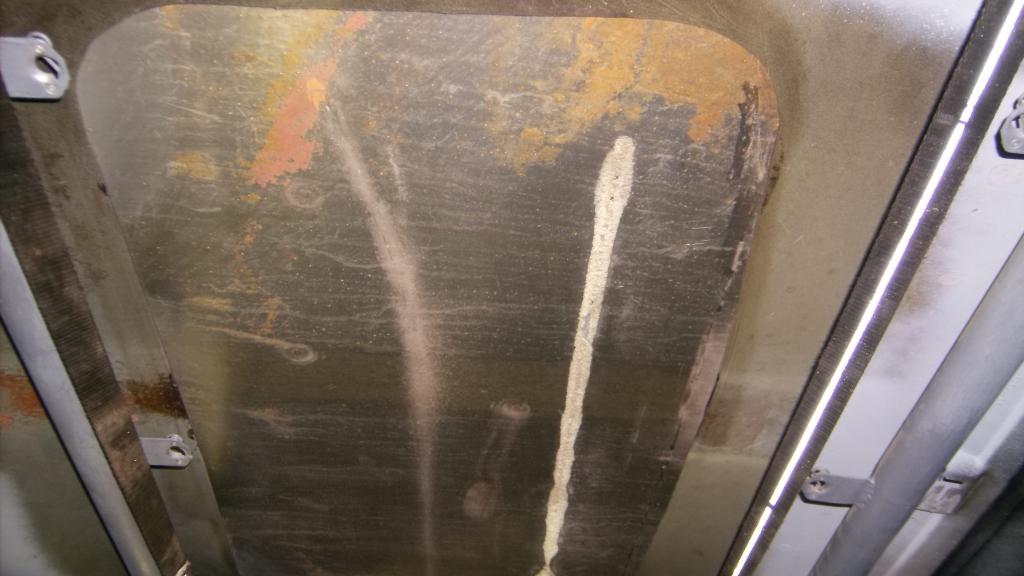
I spent a good hour trimming and fitting the patch panel and it looked very promising, but looks can be deceiving. I fit the patch panel up with the 16 butt weld clamps. I did notice that there seemed to be some distortion in the factory roof with the front driver's side high and the rear passenger's side high. Not extreme but enough to notice.
looks pretty good here:
I surrounded the perimeter with wet rags and placed a wet hand towel on the patch panel to absorb heat and minimize warpage. I limited my spot welds to 5 per side, alternating between pass and driver, quenching each weld before I made the next. It took about three hours to weld it completely.
It looked real good at first but by the time I was half way or so I noticed the panel had sagged and flattened out. when I was finished and removed all of the rags and towel you could see that at all four corners of the repair, the original roof panel puckered and the noticeable distortion mentioned earlier had increased greatly.
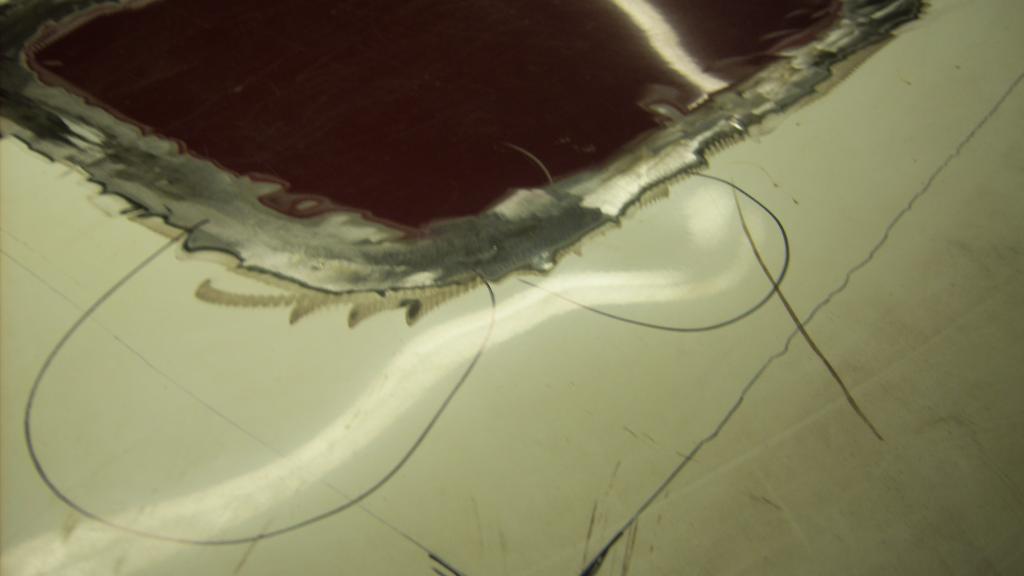
I was bummed.
I maybe able to cut and bend the thin sheet metal but I need a lot more practice and probably some training to weld it correctly. The roof turned out far from stellar.
I spent a good hour trimming and fitting the patch panel and it looked very promising, but looks can be deceiving. I fit the patch panel up with the 16 butt weld clamps. I did notice that there seemed to be some distortion in the factory roof with the front driver's side high and the rear passenger's side high. Not extreme but enough to notice.
looks pretty good here:


I surrounded the perimeter with wet rags and placed a wet hand towel on the patch panel to absorb heat and minimize warpage. I limited my spot welds to 5 per side, alternating between pass and driver, quenching each weld before I made the next. It took about three hours to weld it completely.
It looked real good at first but by the time I was half way or so I noticed the panel had sagged and flattened out. when I was finished and removed all of the rags and towel you could see that at all four corners of the repair, the original roof panel puckered and the noticeable distortion mentioned earlier had increased greatly.


I was bummed.
Thread Starter
Senior Member
Joined: Aug 2007
Posts: 682
Likes: 45
Re: Home brew road racer
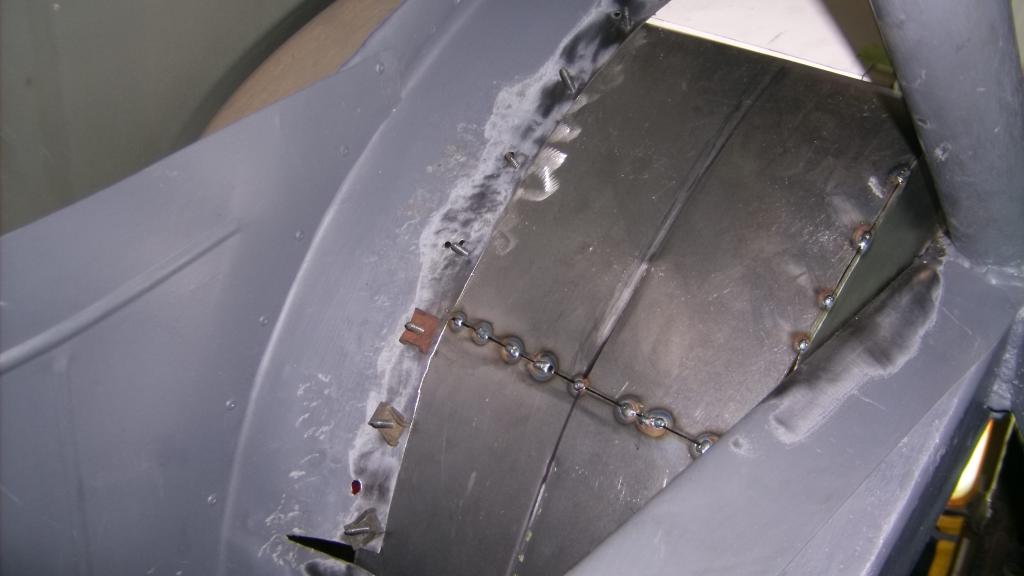
I dug around the garage and found the aluminum frame from the original sun roof. It was curved to the original roof line. I aligned it with the patch and secured it to the roof with about 30 sheet metal screws, This smoothed out some of the puckers but not all and it did not pull the patch back up to match the curve of the original roof.
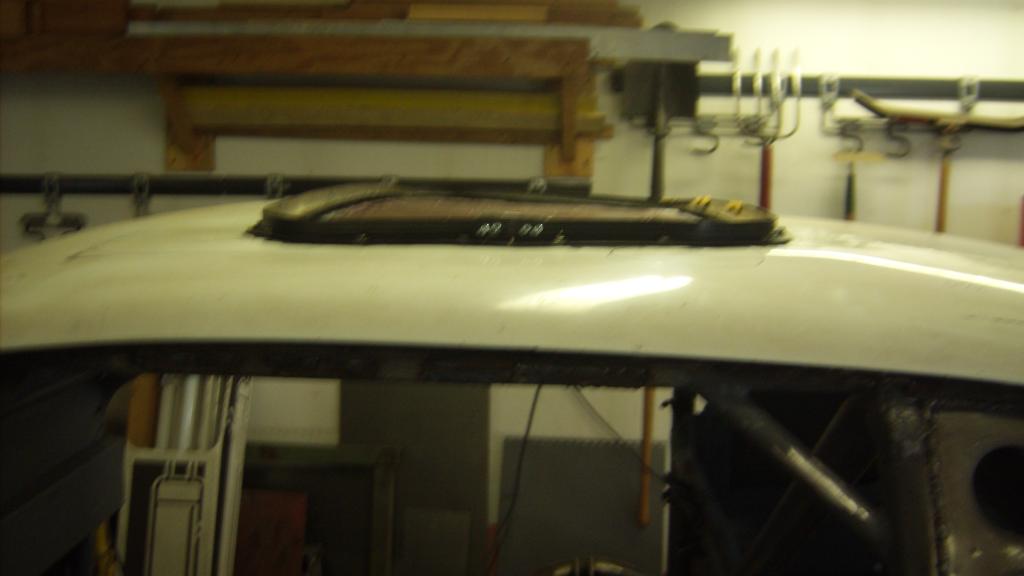
Better but not good. the distortion was still pretty bad and there were some good size puckers between the door opening and the patch. With no seats in the car I was able to place a 2'x4'x16" table inside the car and by using bottle jacks and 6"x30" strips of 1/2" plywood I found I could push the roof back into shape from underneath. I cut up some similar size pieces of 18ga left over from the cargo floor, laid it between the plywood and the roof and jacked the roof back into shape again. This time I drilled and screwed the 18ga to the underside of the roof. When I took jacks and plywood away the roof between the door and the patch looked much better with about 90% of the puckers gone and distortion was not as bad.
I made a couple similar 2 1/2" wide spars to fit in the middle of the patch and using the bottle jacks pushed the center of the roof up to more closely match the contour of the original roof.
I guess I didn.t take a pic after I removed the sunroof frame but the roof did settle some when it came off. I am not at all pleased with this. I don't want a show car but I do want it to be respectable. If Flash or any of you out there have any suggestions I am all ears.


Better but not good. the distortion was still pretty bad and there were some good size puckers between the door opening and the patch. With no seats in the car I was able to place a 2'x4'x16" table inside the car and by using bottle jacks and 6"x30" strips of 1/2" plywood I found I could push the roof back into shape from underneath. I cut up some similar size pieces of 18ga left over from the cargo floor, laid it between the plywood and the roof and jacked the roof back into shape again. This time I drilled and screwed the 18ga to the underside of the roof. When I took jacks and plywood away the roof between the door and the patch looked much better with about 90% of the puckers gone and distortion was not as bad.


I made a couple similar 2 1/2" wide spars to fit in the middle of the patch and using the bottle jacks pushed the center of the roof up to more closely match the contour of the original roof.


I guess I didn.t take a pic after I removed the sunroof frame but the roof did settle some when it came off. I am not at all pleased with this. I don't want a show car but I do want it to be respectable. If Flash or any of you out there have any suggestions I am all ears.
Thread Starter
Senior Member
Joined: Aug 2007
Posts: 682
Likes: 45
Re: Home brew road racer
I was really miffed about the roof and decided I needed somebody with more sheet metal skills than I to try and fix it. I put all the tools away and cleaned up the garage some. Because my next project is the front suspension I had to make room around the front of the car so I could work. That meant reinstalling all of the rear suspension and fuel cell in the rear. Getting all this back in place for the first time with the rear wheel wells and floor in made me feel a lot better.

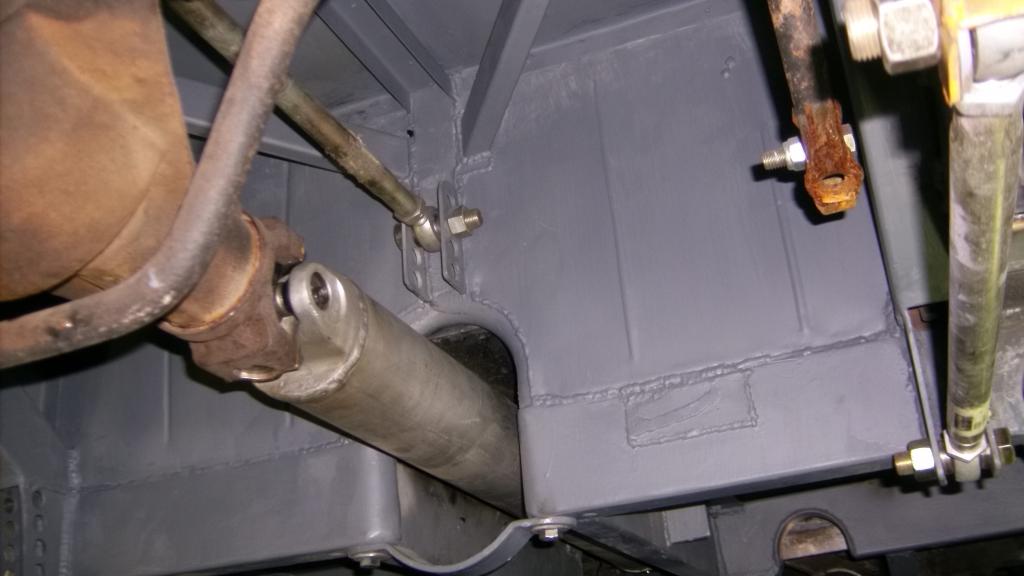
This is the picture I am the most proud of. Everything you see was designed and/or fabbed from scratch or modified to work by myself in my garage. The only things not reworked are the QA1 shocks and springs and the RCI fuel cell.


This is the picture I am the most proud of. Everything you see was designed and/or fabbed from scratch or modified to work by myself in my garage. The only things not reworked are the QA1 shocks and springs and the RCI fuel cell.

Thread Starter
Senior Member
Joined: Aug 2007
Posts: 682
Likes: 45
Re: Home brew road racer
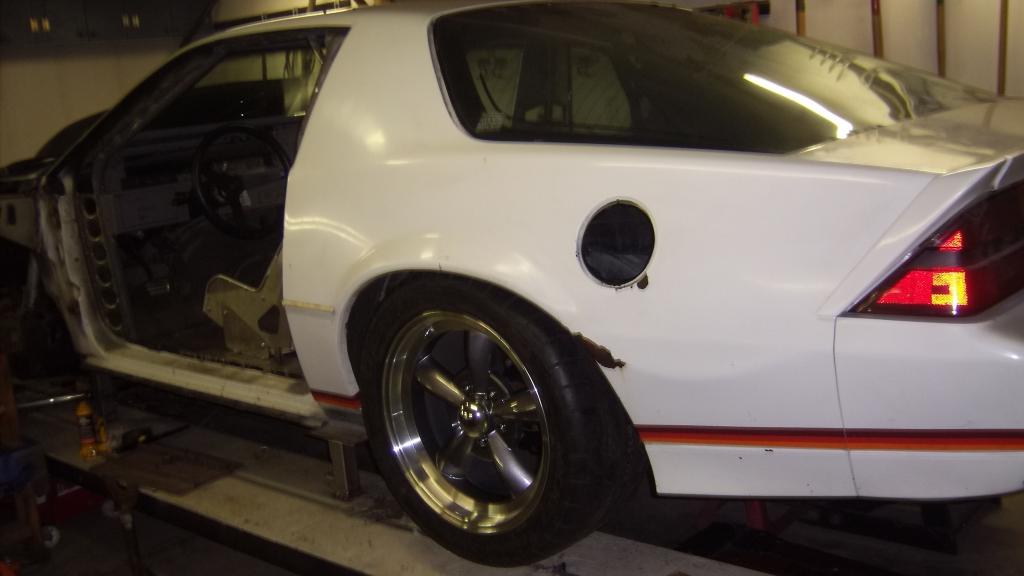
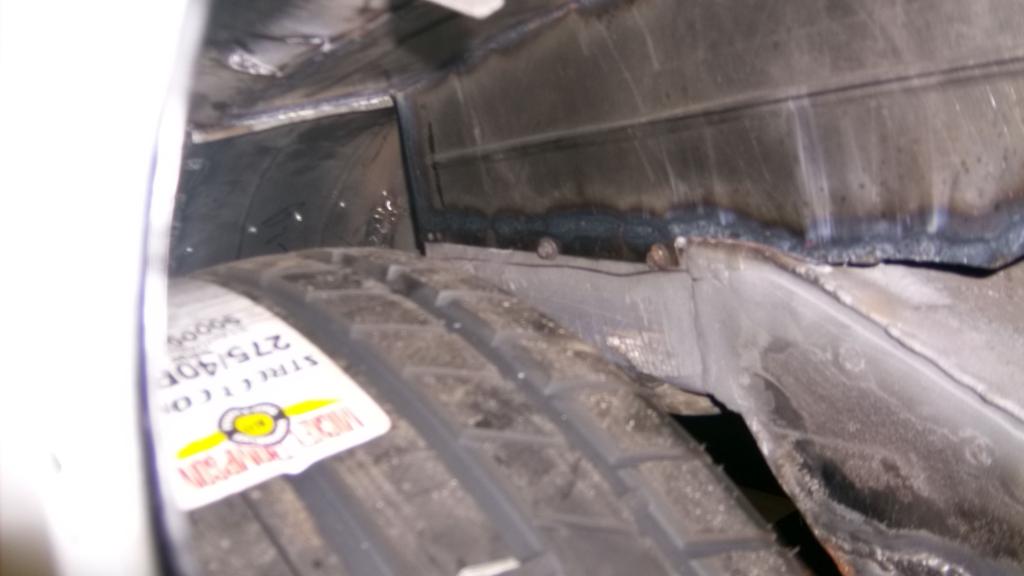
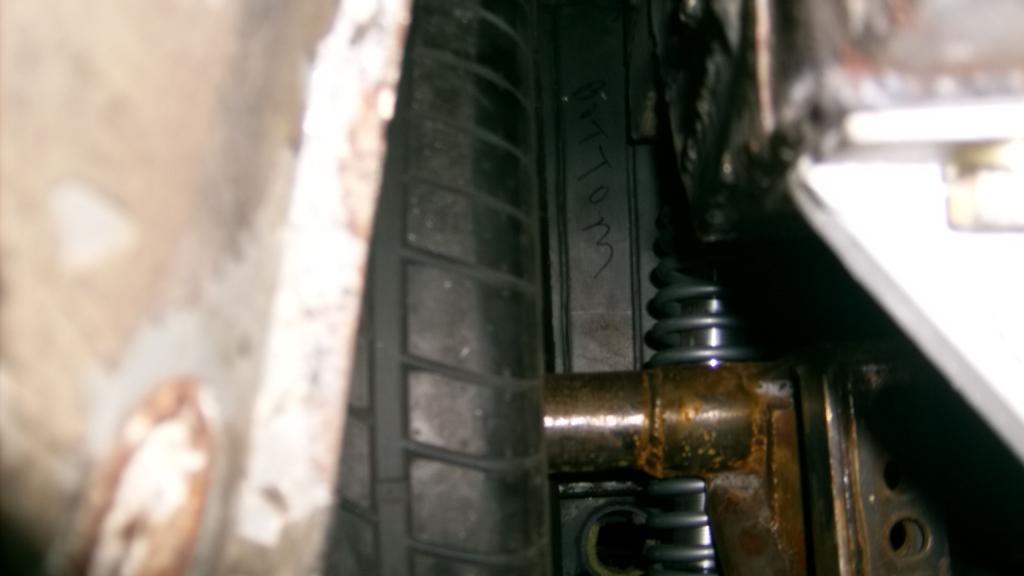
Here are some pics with the tires on and the axle at ride height. Top of fender lip will be at 26". I have 3 " clearance on the inside of the left rear tire, almost an inch more on the right side. The wheels are 17x9 with 6" back space (Summit Legends) with Mickey Thompson Street Sport radials 275/40R17 and will be same in the front. Track day setup will be ZR1 17x11 and 8" back space and probably Nitto NT05 315/30R17 tires. fronts will be ZR1 17x9, 6" back space with 275/40r17 NT05.
Looking through gas door opening:
and from behind:


Looking through gas door opening:

and from behind:


Member
Joined: Nov 2011
Posts: 142
Likes: 0
From: Fort Gordon, GA
Car: 83 Z28
Engine: LG4
Transmission: T5
Re: Home brew road racer
It looks to me like some of that warping was there even before you started. That could be some of it. Sheet metal can be a pain sometimes. It definitely does take practice to get right. There are a few things you can do to help with warping:
1. SLOW DOWN!
You took three hours, but others may try to do it in 10 minutes. Big no-no. I see you tried the wet rag technique. I've heard a lot of people saying it helps, but I've never really seen the necessity.
2. Weld randomly.
Starting in one spot and going around is GOING to create warping.
3. Make it fit!
Clecos or clamps should only hold your piece in place, not to clamp it down for welding. Having metal under stress is asking for trouble when heated. I fear that this may have been a major contributing factor in your case.
4. Brace it.
Flat magnets help, but anything that will help hold the shape will be to your benefit.
5. Tack it.
Tacking the panel in place before welding everything up solid will allow you to remove your clecos or clamps and REALLY look at it. If you're not satisfied, cutting a few tacks is easier than removing the entire panel.
6. Practice.
This should sound like a no-brainer, but I see too often people just going straight into welding a panel on with a mis-adjusted welder or lack of experience. Research if you have to!
7. Avoid butt welding if possible.
This should be number one, IMO. I hate it. Plain and simple. Lap welds are preferred, to me at least. Whenever I can, I weld onto a "stepped" edge. Stepping the edge down gives you more "meat" to weld to without having the edge that may blow out and cause more headaches when you try to re-fill it. It also disperses the heat a little better. You can also place a few tacks on the back for added strength. (Here's a good page that explains this: http://www.hotrodhotline.com/md/html/patch_panels.php)
Last edited by flash2042; Sep 17, 2014 at 10:27 AM.