LS1 swap for my '89 GTA
 10-13-2013, 08:42 AM
#551
Supreme Member

Thread Starter
iTrader: (1)
Join Date: Mar 2007
Location: Apopka, Florida
Posts: 1,237
Likes: 0
Received 7 Likes
on
6 Posts
Car: 1989 Pontiac Trans Am GTA
Engine: cammed LS1
Transmission: Monster SS 4L65E
Axle/Gears: 9 bolt posi w/ 3.70 gears
Re: LS1 swap for my '89 GTA
Here are a few update pics...
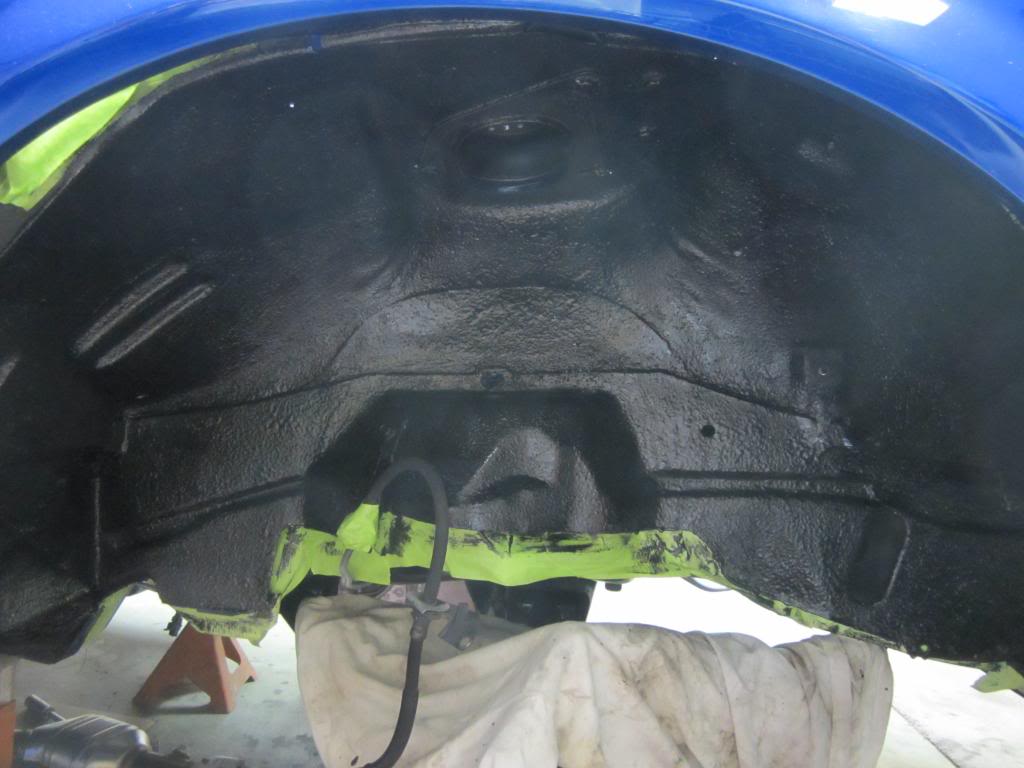
Passenger side inner fender well coated with Herculiner. I coated the underside of the battery tray as well.
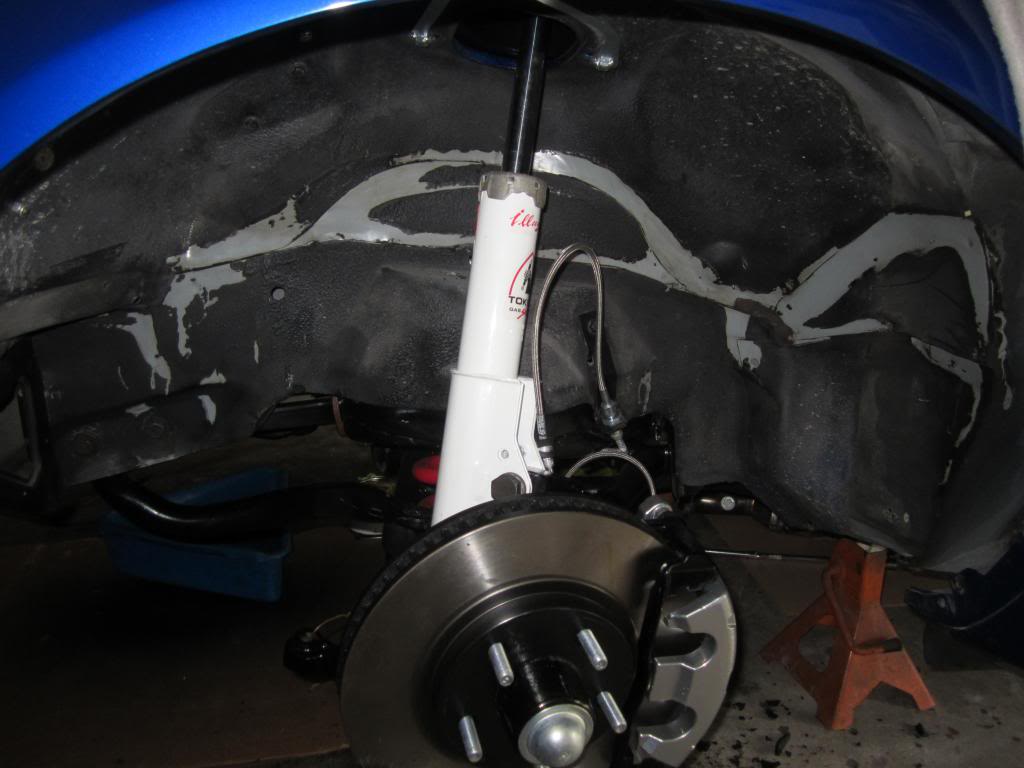
Still cleaning-up the driver's side.
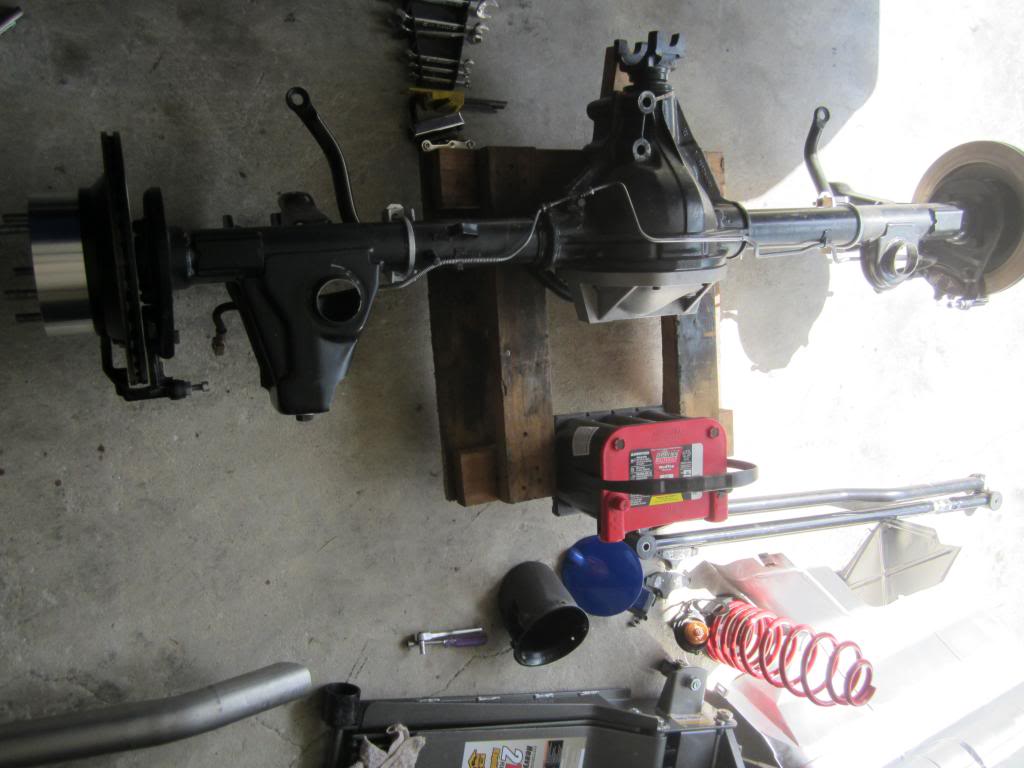
Differential back out of the car so that I can replace the fuel tank.
I left as much as possible in place & removed the calipers from the differential so that I didn't have to mess with the E-brake cables.
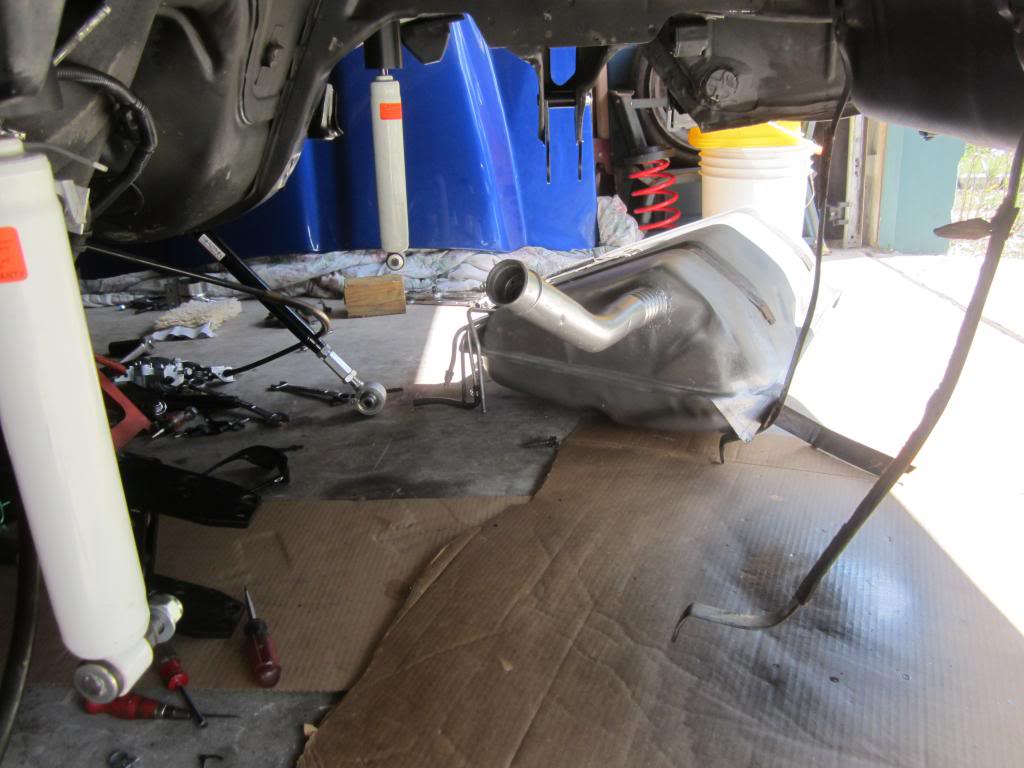
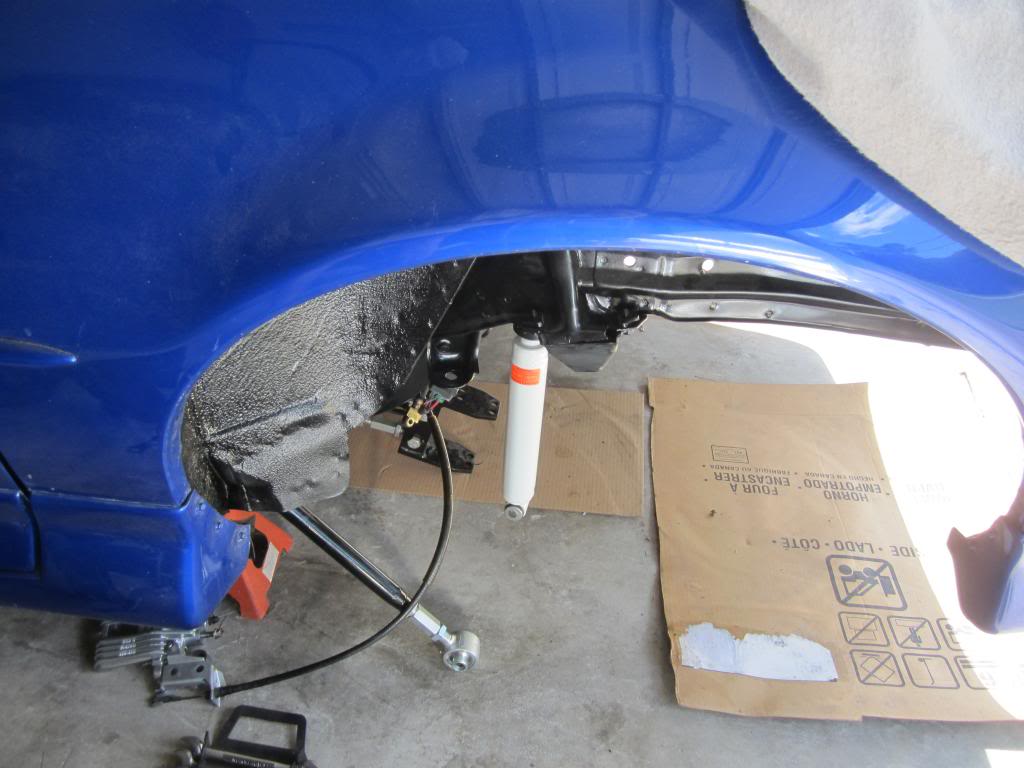
Fuel tank is back out of the car. It would have been a little easier if the car would have been jacked-up just a little higher.

Passenger side inner fender well coated with Herculiner. I coated the underside of the battery tray as well.

Still cleaning-up the driver's side.

Differential back out of the car so that I can replace the fuel tank.

I left as much as possible in place & removed the calipers from the differential so that I didn't have to mess with the E-brake cables.

Fuel tank is back out of the car. It would have been a little easier if the car would have been jacked-up just a little higher.
 10-13-2013, 09:40 AM
#552
Supreme Member
Thread Starter
iTrader: (1)
Join Date: Mar 2007
Location: Apopka, Florida
Posts: 1,237
Likes: 0
Received 7 Likes
on
6 Posts
Car: 1989 Pontiac Trans Am GTA
Engine: cammed LS1
Transmission: Monster SS 4L65E
Axle/Gears: 9 bolt posi w/ 3.70 gears
Re: LS1 swap for my '89 GTA
OMG... what a mess!
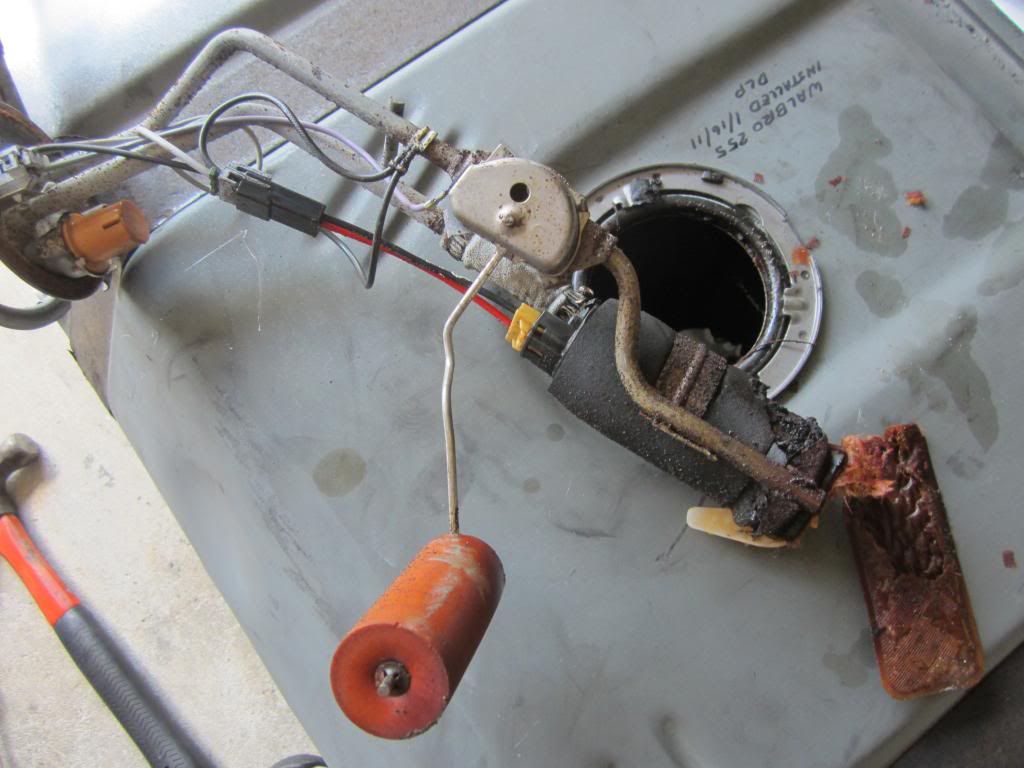
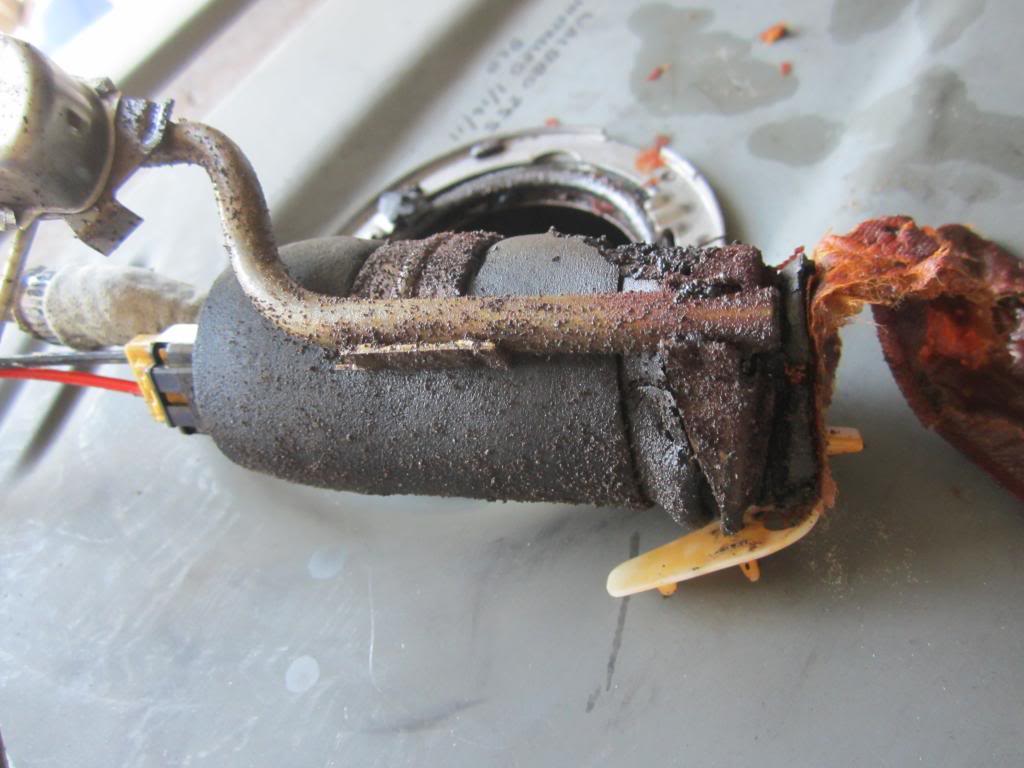
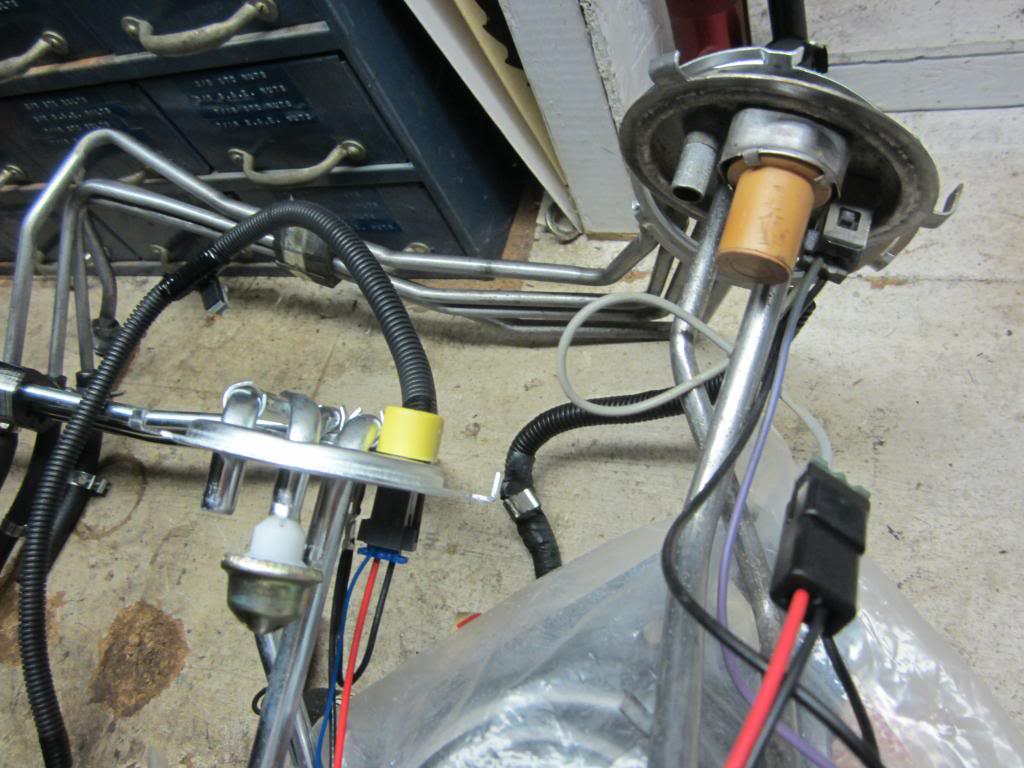
When I was looking for a new fuel tank I can across an article that says that Ethanol absorbs water, then the two combined turns into an acid. And we put this into all of our internal combustion engines? Anyways... judging by the looks of the sending unit I removed, I'd say the Florida humidity was absorbed by the ethanol in my tank. You can see the pump sock was almost completely eaten away. Also, while I was disconnecting everything for the fuel tank to remove it, some gas spilled on shorts. After a few minutes it started burning my leg! I ended up having to change my shorts & I have to wash my leg with soap to stop the burning.
I thought the sending unit was rusted-out, but it turned out to be okay.
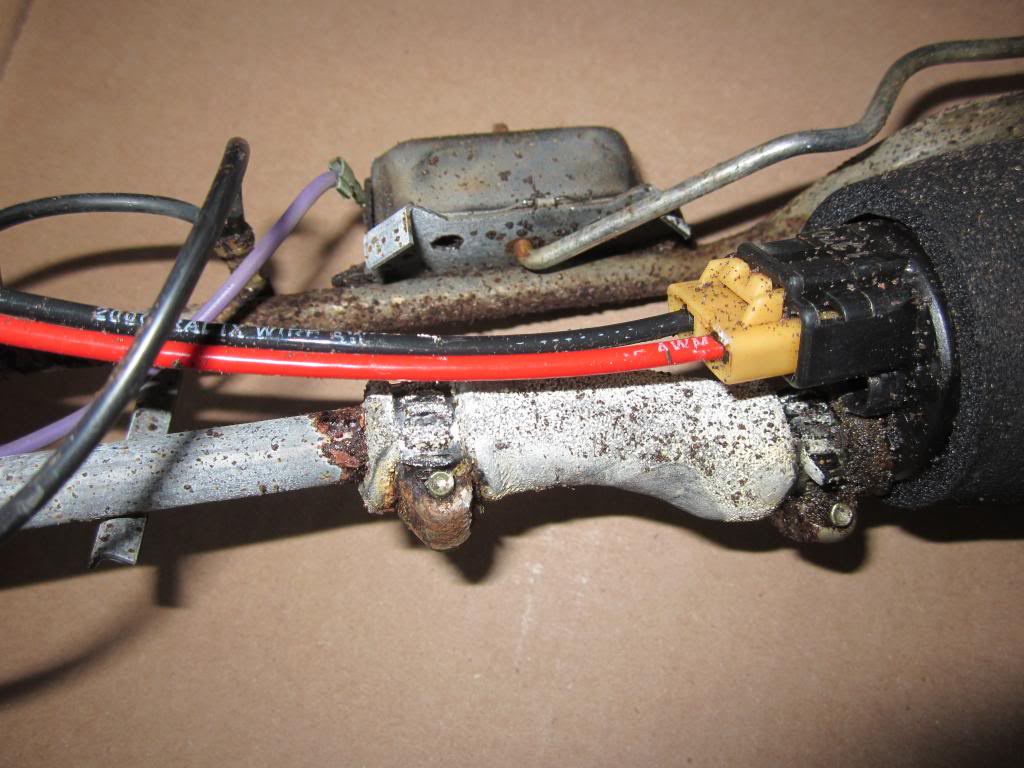
The hose that connects the pump to the sending unit turned white & was pretty much dissolving.
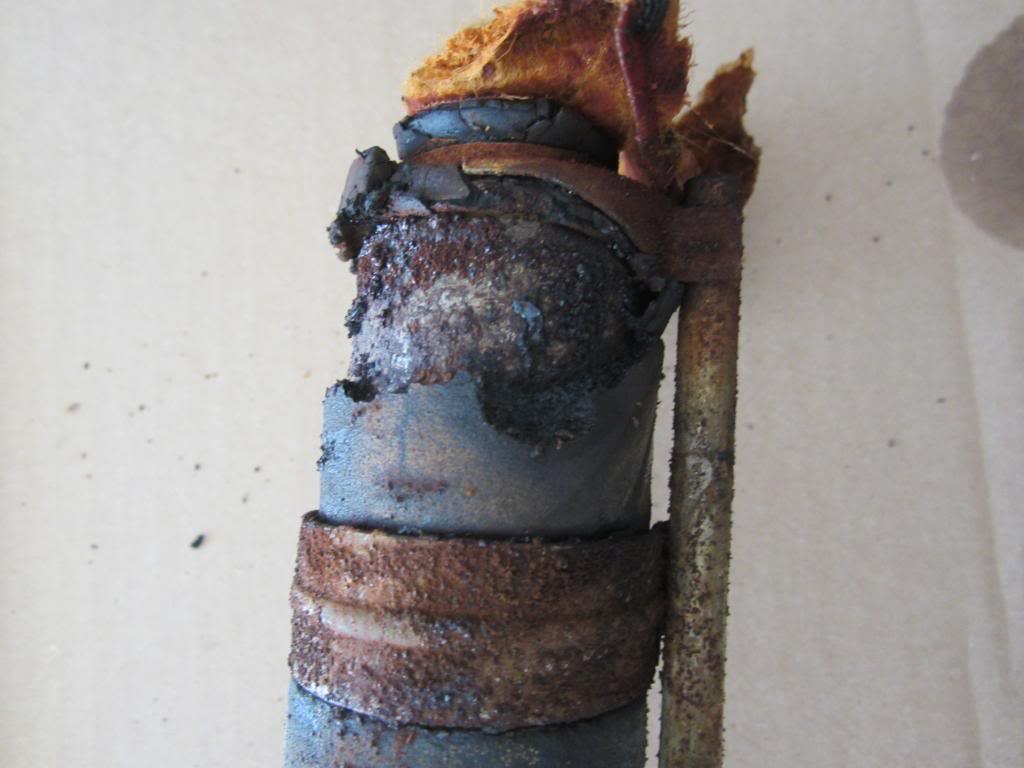
pretty much brand new pump rusting-out from that damn gas.

When I was looking for a new fuel tank I can across an article that says that Ethanol absorbs water, then the two combined turns into an acid. And we put this into all of our internal combustion engines?
Anyways... judging by the looks of the sending unit I removed, I'd say the Florida humidity was absorbed by the ethanol in my tank. You can see the pump sock was almost completely eaten away. Also, while I was disconnecting everything for the fuel tank to remove it, some gas spilled on shorts. After a few minutes it started burning my leg! I ended up having to change my shorts & I have to wash my leg with soap to stop the burning.
I thought the sending unit was rusted-out, but it turned out to be okay.

The hose that connects the pump to the sending unit turned white & was pretty much dissolving.

pretty much brand new pump rusting-out from that damn gas.
10-13-2013, 10:37 AM
#553
Supreme Member
Thread Starter
iTrader: (1)
Join Date: Mar 2007
Location: Apopka, Florida
Posts: 1,237
Likes: 0
Received 7 Likes
on
6 Posts
Car: 1989 Pontiac Trans Am GTA
Engine: cammed LS1
Transmission: Monster SS 4L65E
Axle/Gears: 9 bolt posi w/ 3.70 gears
Re: LS1 swap for my '89 GTA
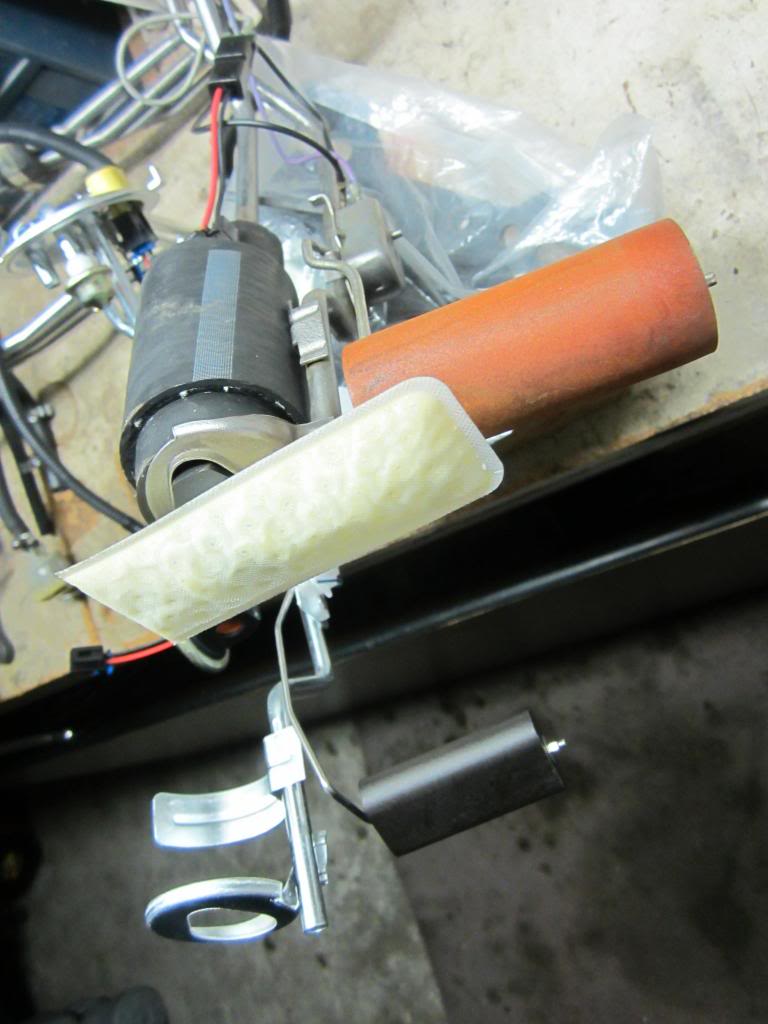
The new pump I received didn't come with a boot to wrap the pump in. I took the new pump & sending unit over to my friend Larry's NAPA store to see what he could come up with to remedy that.
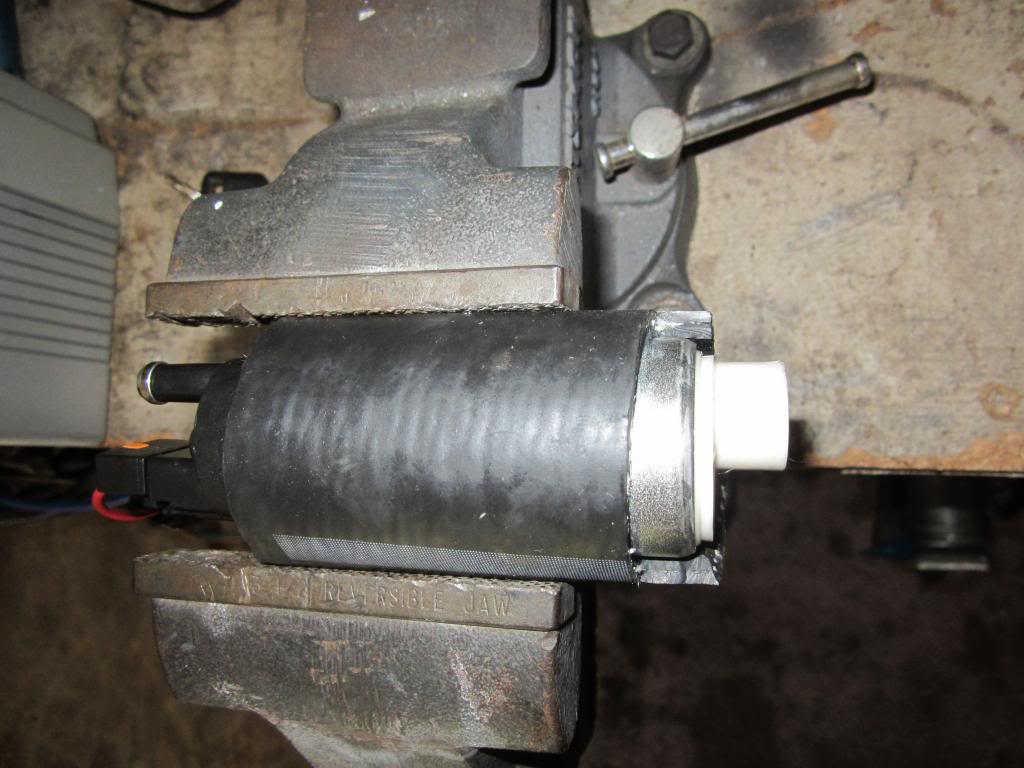
He found a short piece of 2" Neoprene hose that fit the pump perfectly. Neoprene is necessary so that it doesn't dissolve in the tank. I was glad I only needed a short piece of that hose since he said it was like $16/foot! This is the only way I will do it from now on. Those sleeves that they supply with the new fuel pumps are worthless. Both of the ones I have removed have been mostly dissolved, were falling apart & made a big mess in the tank. You can see in the picture above that I had to cut the hose back a bit so that the end boot could be installed.
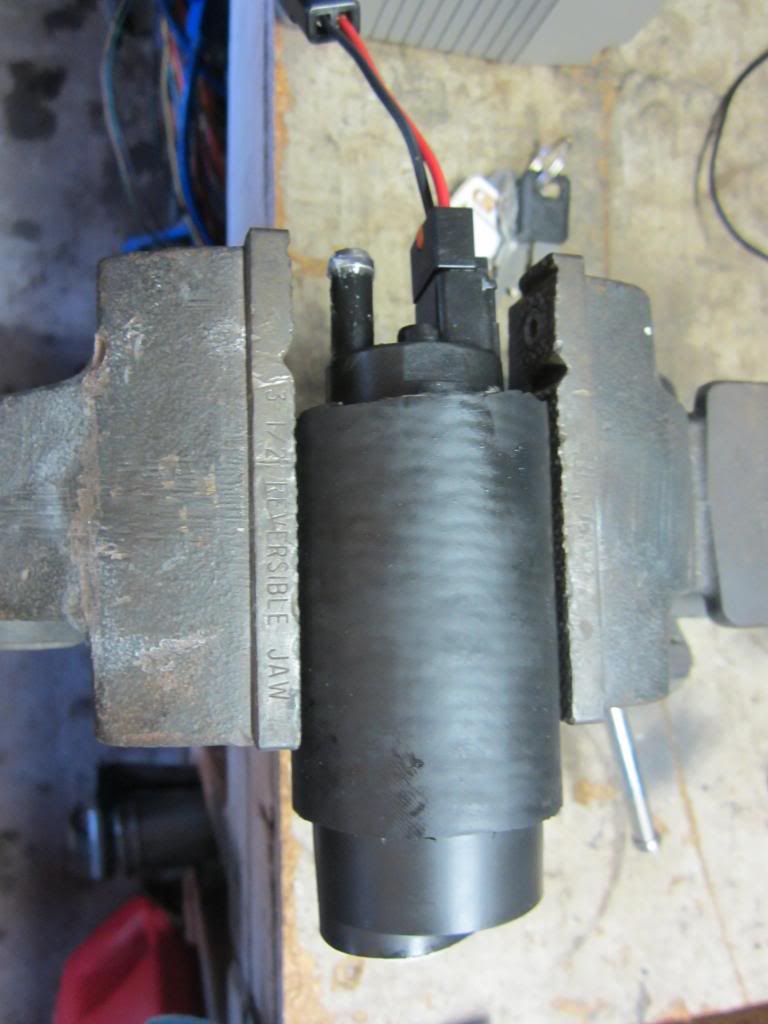
And here it is installed.

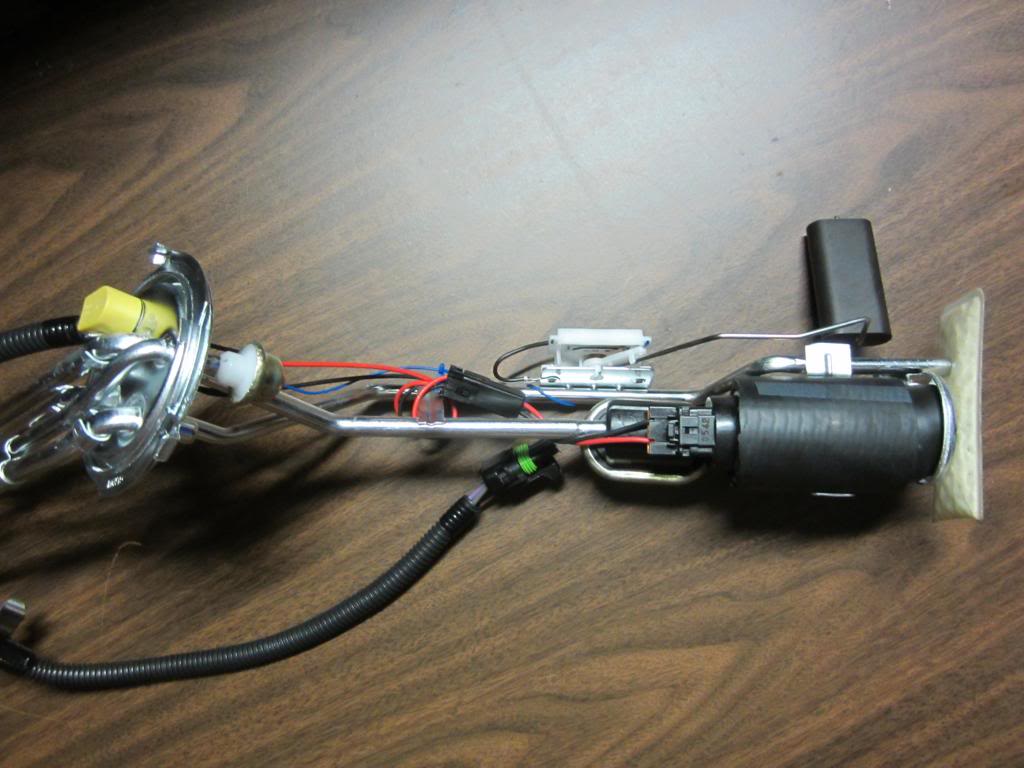
And here is the finally assembly. I ended up putting the pulsator back on. Larry said that it smooths-out the flow from the pump. Couldn't prove it by me, but I figured there was a reason for it or GM wouldn't have spent the money on it.
I had to refurbish the actual sending unit for the fuel gauge, but I will post that on the next post separately.
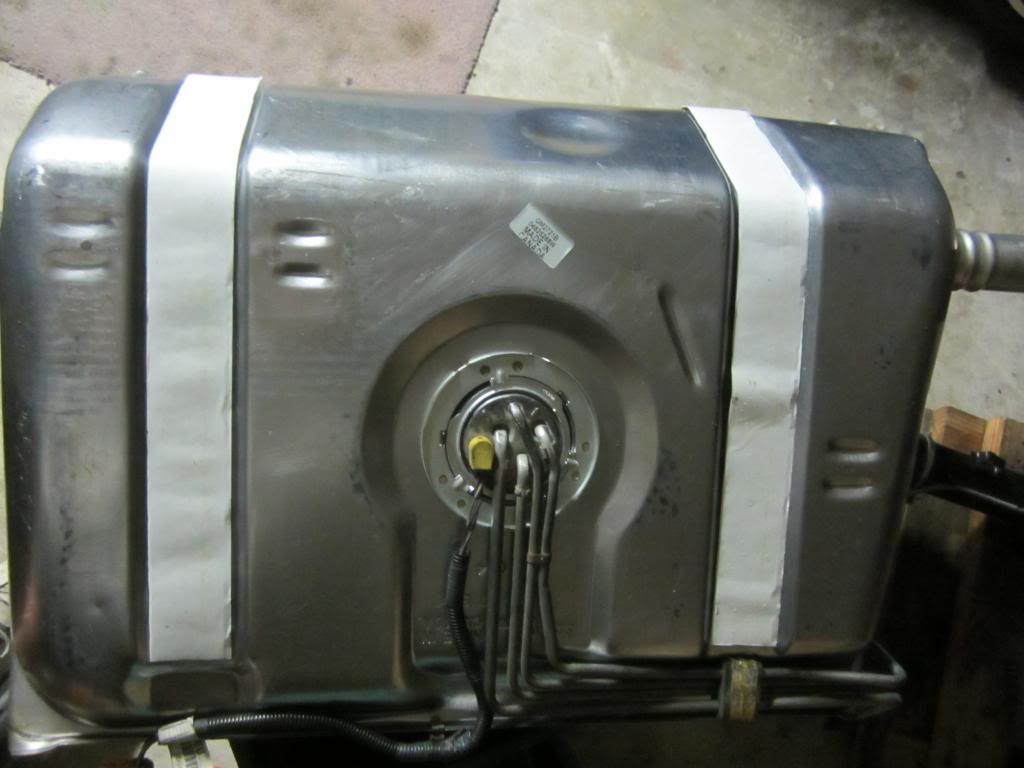
Here's the new tank with the refurbished sending unit installed. I used Dum Dum in place of the factory insulating strips used to prevent noise transfer into the car. The white covering was removed right before I put the tank in place.
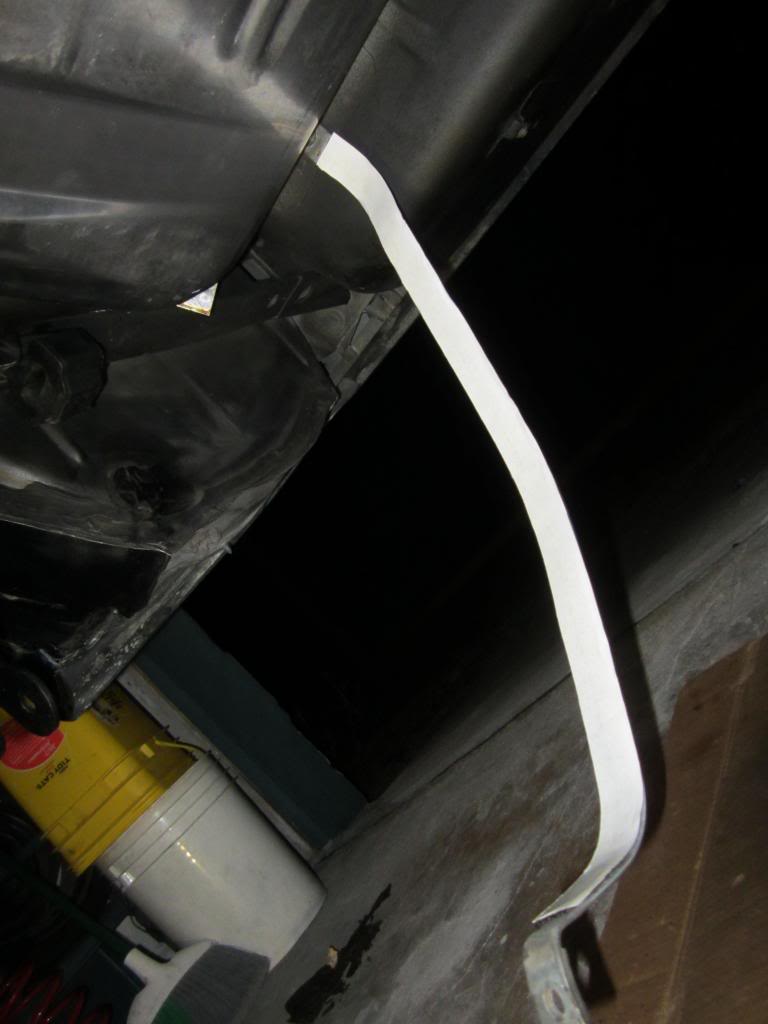
I also removed the factory insulation strips from the tanks straps since they were in real rough shape. Then I measured a strip of Dum Dum to replace the factory strips. I cut the new strip in half and put them on the tank straps as seen in the picture above. Again, the white covering was removed during installation.
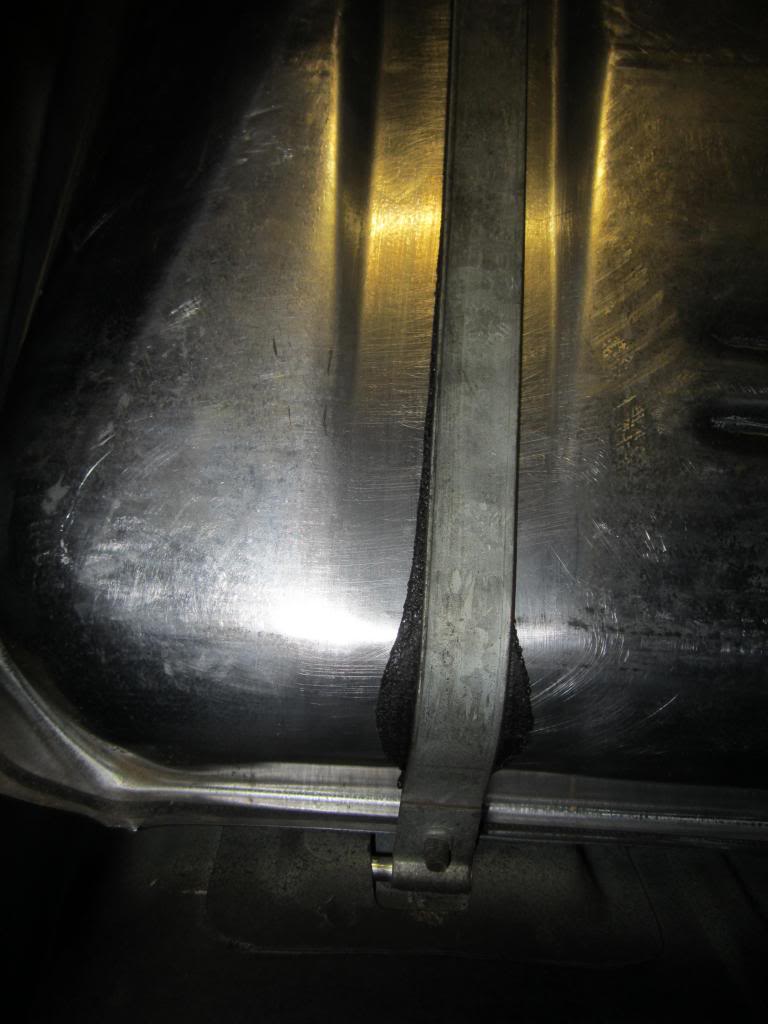
You can see how the Dum Dum was pressed-out as the straps were tightened. I may take a utility knife and remove the excess. I haven't decided on that yet.
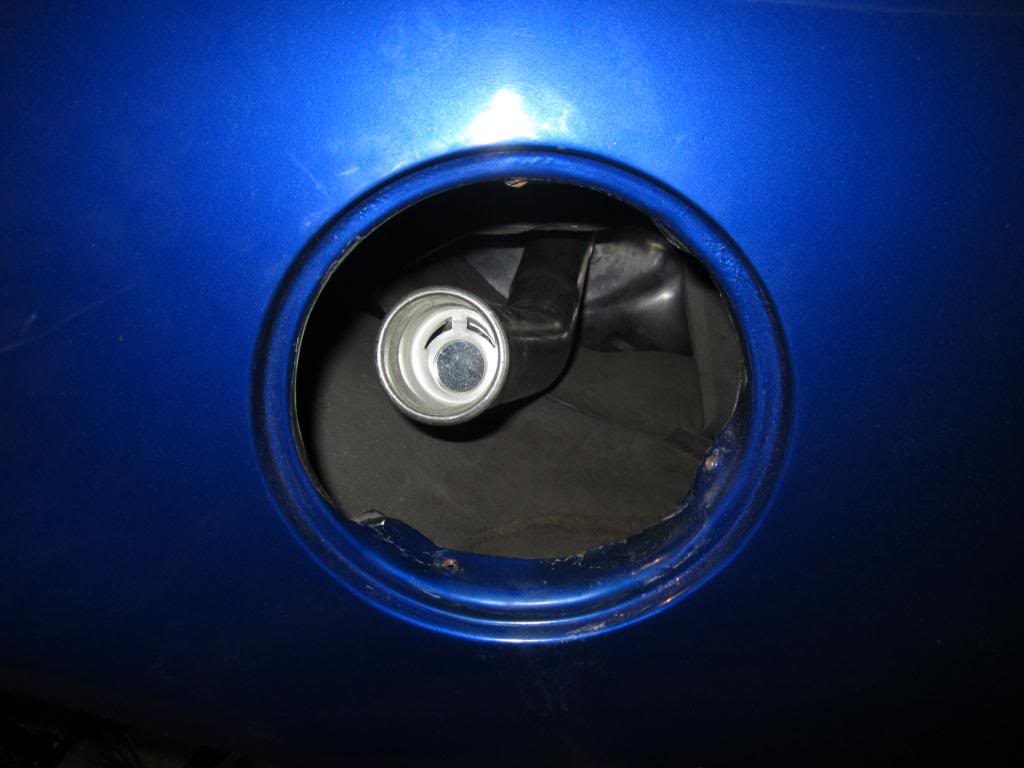
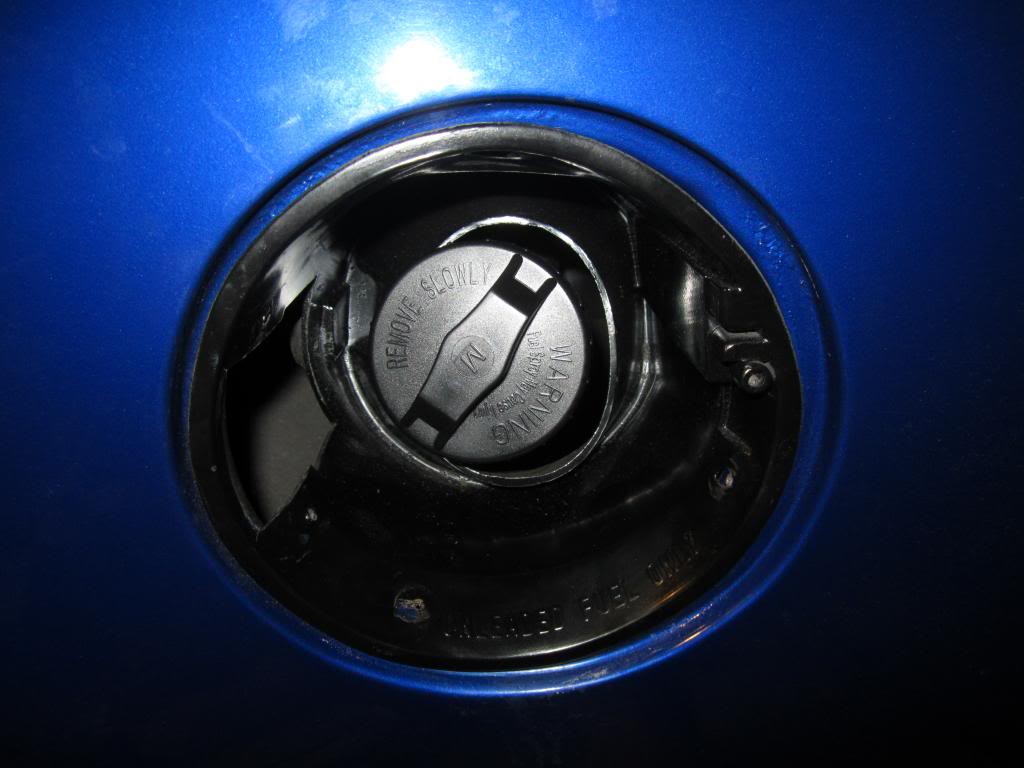
Problem... the filler neck is off center of the hole. I was already expecting this. I had read reviews that said people were having this problem with the Spectre tanks. Overall though, these are really nice tanks and I would recommend them. I just pulled on the neck toward the back of the car until it aligned better.
I finally finished at 1am!

He found a short piece of 2" Neoprene hose that fit the pump perfectly. Neoprene is necessary so that it doesn't dissolve in the tank. I was glad I only needed a short piece of that hose since he said it was like $16/foot! This is the only way I will do it from now on. Those sleeves that they supply with the new fuel pumps are worthless. Both of the ones I have removed have been mostly dissolved, were falling apart & made a big mess in the tank. You can see in the picture above that I had to cut the hose back a bit so that the end boot could be installed.

And here it is installed.

And here is the finally assembly. I ended up putting the pulsator back on. Larry said that it smooths-out the flow from the pump. Couldn't prove it by me, but I figured there was a reason for it or GM wouldn't have spent the money on it.
I had to refurbish the actual sending unit for the fuel gauge, but I will post that on the next post separately.

Here's the new tank with the refurbished sending unit installed. I used Dum Dum in place of the factory insulating strips used to prevent noise transfer into the car. The white covering was removed right before I put the tank in place.

I also removed the factory insulation strips from the tanks straps since they were in real rough shape. Then I measured a strip of Dum Dum to replace the factory strips. I cut the new strip in half and put them on the tank straps as seen in the picture above. Again, the white covering was removed during installation.

You can see how the Dum Dum was pressed-out as the straps were tightened. I may take a utility knife and remove the excess. I haven't decided on that yet.

Problem... the filler neck is off center of the hole. I was already expecting this. I had read reviews that said people were having this problem with the Spectre tanks. Overall though, these are really nice tanks and I would recommend them. I just pulled on the neck toward the back of the car until it aligned better.

I finally finished at 1am!
Last edited by dprest68; 10-13-2013 at 10:41 AM.
10-13-2013, 11:34 AM
#554
Supreme Member
Thread Starter
iTrader: (1)
Join Date: Mar 2007
Location: Apopka, Florida
Posts: 1,237
Likes: 0
Received 7 Likes
on
6 Posts
Car: 1989 Pontiac Trans Am GTA
Engine: cammed LS1
Transmission: Monster SS 4L65E
Axle/Gears: 9 bolt posi w/ 3.70 gears
Re: LS1 swap for my '89 GTA
Fixing the fuel gauge sending unit
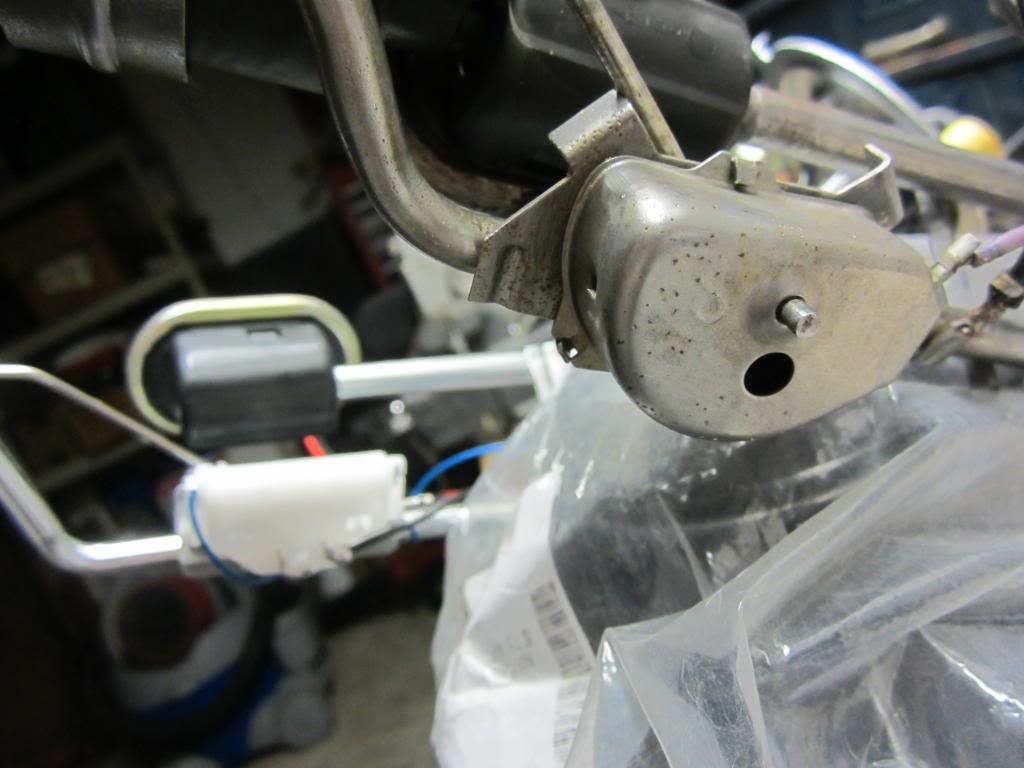
Larry from my local NAPA store showed me how to test the sender for the fuel gauge & it did actually work. It just didn't work correctly. So the next step was to refurbish it. The sender worked a little towards the empty side of the gauge & at full, but there was nothing in between. Option 1: buy a new sending unit which ranged from $120 to $180 and would push back my tank reinstall. Option 2: fix what I have so that I can get it all back together & back in the car. So here's how I fixed it.
Step one: bend the two top tabs up so that the cover can be removed.

You can see the arm inside that sweeps the potentiometer. The arm is connected to the float & goes back and forth depending on your fuel level.
Step two:
Using a volt meter set on 200 ohms, check the resistance across the potentiometer strip located inside the sender housing (no pics, sorry). Ground one of the meter leads to the housing. Using the other lead, drag it slowly across the potentiometer strip from one end to the other. If your sender is good, the volt meter should read somewhere around 10 ohms on the "empty" end of the strip (tank float up beside the fuel pump) and the ohms should gradually increase as you slowly drag the lead toward the "full" end of the strip. I got a reading of around 120 ohms at full. If you get similar results, then your sender is working properly.

You can see the potentiometer strip inside the housing.
So at this point I knew my sender was working fine. So the ground had to be the problem.
Step three:
Clean-up the grounding points to make the sender work properly again.

You can see the rust where the float arm enters the housing. I used my Dremel tool with a little wire brush to remove all of the rust. It is important to make sure the small washer is rust free as well. Once clean, I coated the washer with some dielectric grease.
Step four:
Reassemble the housing with the sending unit making sure that the arm goes back in the housing properly.

Make sure the end of the arm goes back into the lower hole on the housing as shown. Also, make sure the spring is inside. That's important for making the ground!

Step five:
Using the volt meter with the housing fully closed (not like shown) put one lead on ground and the other on the wire that connects to the housing.

Slowly lift the float arm from empty to full and verify on the volt meter has a smooth gradual increase in ohms from around 10 ohms empty to around 120 ohms full. If so, crimp the tabs back down and you are good to go. If not, go back and work on your grounds some more.
My gauge now works across the full range.

Before I wasn't getting any reading between a quarter tank and full.
10-13-2013, 11:45 AM
#555
Supreme Member
Thread Starter
iTrader: (1)
Join Date: Mar 2007
Location: Apopka, Florida
Posts: 1,237
Likes: 0
Received 7 Likes
on
6 Posts
Car: 1989 Pontiac Trans Am GTA
Engine: cammed LS1
Transmission: Monster SS 4L65E
Axle/Gears: 9 bolt posi w/ 3.70 gears
Re: LS1 swap for my '89 GTA
I am going over to the marina today to get some Ethanol-free gas to put in the car. I am going to start using that in my lawn equipment too! I also bought some Amsoil Saber Outboard 100:1 oil to start putting in my cars to use with the Ethanol gas. The guys at NAPA swear by this stuff. They said it makes their cars run smoother & gave them better mileage without smoking. So I am going to give it a try.
I also found a cool website for locating Ethanol-free gas stations around the country. http://pure-gas.org/index.jsp?stateprov=FL
I also found a cool website for locating Ethanol-free gas stations around the country. http://pure-gas.org/index.jsp?stateprov=FL
 10-15-2013, 07:38 AM
#558
Re: LS1 swap for my '89 GTA
Just found your build thread and had a look at the sending unit part.
The old in-tank filter looks kinda delicious... like zipped up chili or something O.o
They're selling the Ethanol crap here as well and the price difference to regular gas is about as high as you report it to be at your place.
A friend of mine kept using the stuff and he replaced his pump a short while back.
The pump had dissolved more or less, was gummed up with some black stuff and broke apart. Even the injectors died because that stuff had been pumped into them.
Didn't our manuals say that these cars were ethanol compatible?
Damn. I'm never going to start using this stuff, no matter how the price for regular gas increases.
11-23-2013, 11:00 PM
#560
Supreme Member
Thread Starter
iTrader: (1)
Join Date: Mar 2007
Location: Apopka, Florida
Posts: 1,237
Likes: 0
Received 7 Likes
on
6 Posts
Car: 1989 Pontiac Trans Am GTA
Engine: cammed LS1
Transmission: Monster SS 4L65E
Axle/Gears: 9 bolt posi w/ 3.70 gears
Re: LS1 swap for my '89 GTA
Just found your build thread and had a look at the sending unit part.
The old in-tank filter looks kinda delicious... like zipped up chili or something O.o
They're selling the Ethanol crap here as well and the price difference to regular gas is about as high as you report it to be at your place.
A friend of mine kept using the stuff and he replaced his pump a short while back.
The pump had dissolved more or less, was gummed up with some black stuff and broke apart. Even the injectors died because that stuff had been pumped into them.
Didn't our manuals say that these cars were ethanol compatible?
Damn. I'm never going to start using this stuff, no matter how the price for regular gas increases.
The old in-tank filter looks kinda delicious... like zipped up chili or something O.o
They're selling the Ethanol crap here as well and the price difference to regular gas is about as high as you report it to be at your place.
A friend of mine kept using the stuff and he replaced his pump a short while back.
The pump had dissolved more or less, was gummed up with some black stuff and broke apart. Even the injectors died because that stuff had been pumped into them.
Didn't our manuals say that these cars were ethanol compatible?
Damn. I'm never going to start using this stuff, no matter how the price for regular gas increases.
It's pretty difficult to avoid the Ethanol gas around here. I guess I will just have to keep my car running.
I don't know what the manual says about Ethanol gas. I don't even know if it was around when our cars were built.
11-23-2013, 11:37 PM
#561
Supreme Member
Thread Starter
iTrader: (1)
Join Date: Mar 2007
Location: Apopka, Florida
Posts: 1,237
Likes: 0
Received 7 Likes
on
6 Posts
Car: 1989 Pontiac Trans Am GTA
Engine: cammed LS1
Transmission: Monster SS 4L65E
Axle/Gears: 9 bolt posi w/ 3.70 gears
Re: LS1 swap for my '89 GTA
Oh man, now I have this weird whirring noise coming from the back of my car. Oh wait... that's the fuel pump running! YAY! I almost forgot what it sounded like.
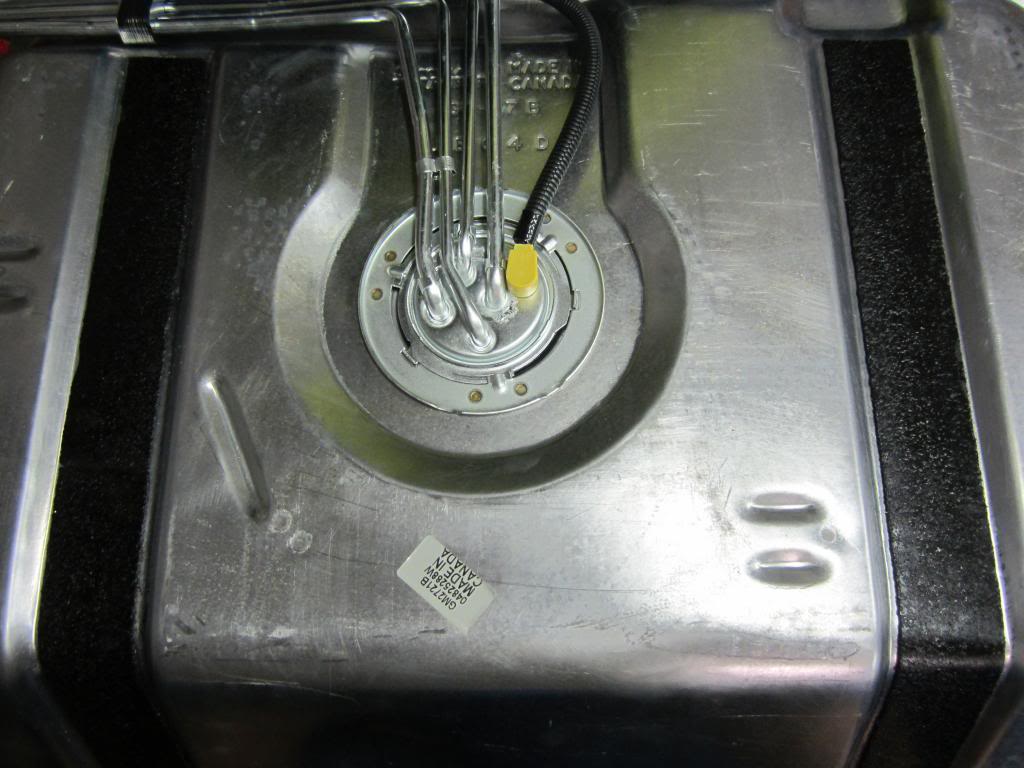
Anyways... Thursday night I finally got the tank back out from under the car and got the new sending unit installed. I snapped a few comparison pics of the stock sender and the Spectre Premium sender. It's a real nice piece with some nice improvements.
You can see that the charcoal canister filters are a little different. The wiring is a little different as well with a much better ground set-up.
You can see the two different gauge senders here. The whole gauge sender on the new unit is a much better design IMO.
They both have different floats as well. The new sending unit came with a bag of hardware, but I already had most of the stuff that I needed. It had a new sleeve for the pump, but I am not using those things anymore. They dissolve to easily.
Ready to put it back in the tank. You can see the new and improved gauge sender in this pic. I wrapped the pump wiring around the brace so that it's not flopping around. I also made sure it was nowhere near the float arm in any position.
All ready to go back under the car. I tested the sender under the car before I put it back in the tank to verify that it moves the gauge correctly. Everything is now new, so there shouldn't be anything else that can be a problem back there. I removed all of the Dum-Dum that I had put on there previously and put new fresh strips on since the other stuff got kind of messed-up. Within no time I had it back up under the car. Actually having it installed wasn't quite as easy.
I got one of the bolts installed pretty quick and easy. The other bolt was being a total PITA! I couldn't, for the life of me, get that bolt started for some reason. Well, I know the Dum-Dum is a little thicker than the factory felt strips. So I'm sure that had something to do with it. Long story short, after quite awhile of messing with it, bruising the palm of my hand and many bad word I finally bent the end of the strap up with a hammer where the bolt goes through it. That finally made it to where I could get the bolt to start into the threads of the nut.
After all of that I added a few gallons of gas & plugged in the pump and tested it to make sure it worked. Thank God it did.
Anyways... Thursday night I finally got the tank back out from under the car and got the new sending unit installed. I snapped a few comparison pics of the stock sender and the Spectre Premium sender. It's a real nice piece with some nice improvements.

You can see that the charcoal canister filters are a little different. The wiring is a little different as well with a much better ground set-up.

You can see the two different gauge senders here. The whole gauge sender on the new unit is a much better design IMO.

They both have different floats as well. The new sending unit came with a bag of hardware, but I already had most of the stuff that I needed. It had a new sleeve for the pump, but I am not using those things anymore. They dissolve to easily.

Ready to put it back in the tank. You can see the new and improved gauge sender in this pic. I wrapped the pump wiring around the brace so that it's not flopping around. I also made sure it was nowhere near the float arm in any position.

All ready to go back under the car. I tested the sender under the car before I put it back in the tank to verify that it moves the gauge correctly. Everything is now new, so there shouldn't be anything else that can be a problem back there. I removed all of the Dum-Dum that I had put on there previously and put new fresh strips on since the other stuff got kind of messed-up. Within no time I had it back up under the car. Actually having it installed wasn't quite as easy.
I got one of the bolts installed pretty quick and easy. The other bolt was being a total PITA! I couldn't, for the life of me, get that bolt started for some reason. Well, I know the Dum-Dum is a little thicker than the factory felt strips. So I'm sure that had something to do with it. Long story short, after quite awhile of messing with it, bruising the palm of my hand and many bad word I finally bent the end of the strap up with a hammer where the bolt goes through it. That finally made it to where I could get the bolt to start into the threads of the nut.
After all of that I added a few gallons of gas & plugged in the pump and tested it to make sure it worked. Thank God it did.
11-24-2013, 12:19 AM
#562
Supreme Member
Thread Starter
iTrader: (1)
Join Date: Mar 2007
Location: Apopka, Florida
Posts: 1,237
Likes: 0
Received 7 Likes
on
6 Posts
Car: 1989 Pontiac Trans Am GTA
Engine: cammed LS1
Transmission: Monster SS 4L65E
Axle/Gears: 9 bolt posi w/ 3.70 gears
Re: LS1 swap for my '89 GTA
Varooom! Yes, today I finally got the car to start without using starting fluid. It was quite an adventure to get to that point. It will only run for a few seconds though, so I'm pretty sure I have a VATS issue to get resolved.
I had a few little odds & ends to take care of before I started the car, so I got them taken care of within a few hours. So I finally decided to crank the car over. After much cranking I finally weakened the battery quite a bit. I stuck the charger on the battery while I tried to figure out why it wouldn't start. I was assuming it wasn't getting gas still.
Since I can hear that the pump does in fact work, I figured my next item to check was the fuel filter. After removing it, I determined that it was in fact flowing just fine. The next item inline was to see if I was getting fuel to the fuel rail. I kind of made a mess, but I determined that yes, the fuel is in fact getting there.
Next I decided to remove the Schrader valve to make sure there was no fuel in the fuel rail. And there there wasn't any. So the only thing left was the pressure regulator on the fuel rail. I removed it and it looked fine, but it wasn't letting any fuel through for some reason. There are two O-rings on the regulator. One seals it to the housing. The other keeps the fuel from bypassing the regulator. I figured the only way to get fuel to my fuel rail was to remove the second O-ring. After that I finally got fuel to come out the open Schrader valve opening. Yay! So now I have to buy a new regulator for it. After buttoning everything back up I was finally about to get it to start, but only briefly like I said.
I thought I told Rodney over at Spare ECM to disable VATS on the ECM he sent me, but I don't think he did. I am going to see if I can take it to someone local to have it fixed. That would be much easier than sending it back to Ohio.
I also got the cooling system buttoned-up today and filled the radiator with anti-freeze & distilled water. I'm sure I will have to top it off again though once the car gets up to temperature & get the coolant circulating through the entire system.
I still haven't resolved the issue of my oil pan touching my K-member yet. I am pretty sure I am going to go ahead and buy a tubular K-member for it and be done. I have UMI tubular A-arms, so I was thinking about going with the UMI K-member as well. I know I can't use the BMR piece with my A-arms and I haven't heard great things about the Spohn piece. What do you guys think about it?
Tomorrow I am going to try to finish up the wiring by the A/C box and attempt to get the A/C housing in place for good. I'd like to try to get the rearend back under the car too. We'll see how it goes. Stay tuned...
I had a few little odds & ends to take care of before I started the car, so I got them taken care of within a few hours. So I finally decided to crank the car over. After much cranking I finally weakened the battery quite a bit. I stuck the charger on the battery while I tried to figure out why it wouldn't start. I was assuming it wasn't getting gas still.
Since I can hear that the pump does in fact work, I figured my next item to check was the fuel filter. After removing it, I determined that it was in fact flowing just fine. The next item inline was to see if I was getting fuel to the fuel rail. I kind of made a mess, but I determined that yes, the fuel is in fact getting there.
Next I decided to remove the Schrader valve to make sure there was no fuel in the fuel rail. And there there wasn't any. So the only thing left was the pressure regulator on the fuel rail. I removed it and it looked fine, but it wasn't letting any fuel through for some reason. There are two O-rings on the regulator. One seals it to the housing. The other keeps the fuel from bypassing the regulator. I figured the only way to get fuel to my fuel rail was to remove the second O-ring. After that I finally got fuel to come out the open Schrader valve opening. Yay!
So now I have to buy a new regulator for it. After buttoning everything back up I was finally about to get it to start, but only briefly like I said.I thought I told Rodney over at Spare ECM to disable VATS on the ECM he sent me, but I don't think he did. I am going to see if I can take it to someone local to have it fixed. That would be much easier than sending it back to Ohio.
I also got the cooling system buttoned-up today and filled the radiator with anti-freeze & distilled water. I'm sure I will have to top it off again though once the car gets up to temperature & get the coolant circulating through the entire system.
I still haven't resolved the issue of my oil pan touching my K-member yet. I am pretty sure I am going to go ahead and buy a tubular K-member for it and be done. I have UMI tubular A-arms, so I was thinking about going with the UMI K-member as well. I know I can't use the BMR piece with my A-arms and I haven't heard great things about the Spohn piece. What do you guys think about it?
Tomorrow I am going to try to finish up the wiring by the A/C box and attempt to get the A/C housing in place for good. I'd like to try to get the rearend back under the car too. We'll see how it goes. Stay tuned...
 11-25-2013, 11:52 AM
#567
Supreme Member
Thread Starter
iTrader: (1)
Join Date: Mar 2007
Location: Apopka, Florida
Posts: 1,237
Likes: 0
Received 7 Likes
on
6 Posts
Car: 1989 Pontiac Trans Am GTA
Engine: cammed LS1
Transmission: Monster SS 4L65E
Axle/Gears: 9 bolt posi w/ 3.70 gears
Re: LS1 swap for my '89 GTA
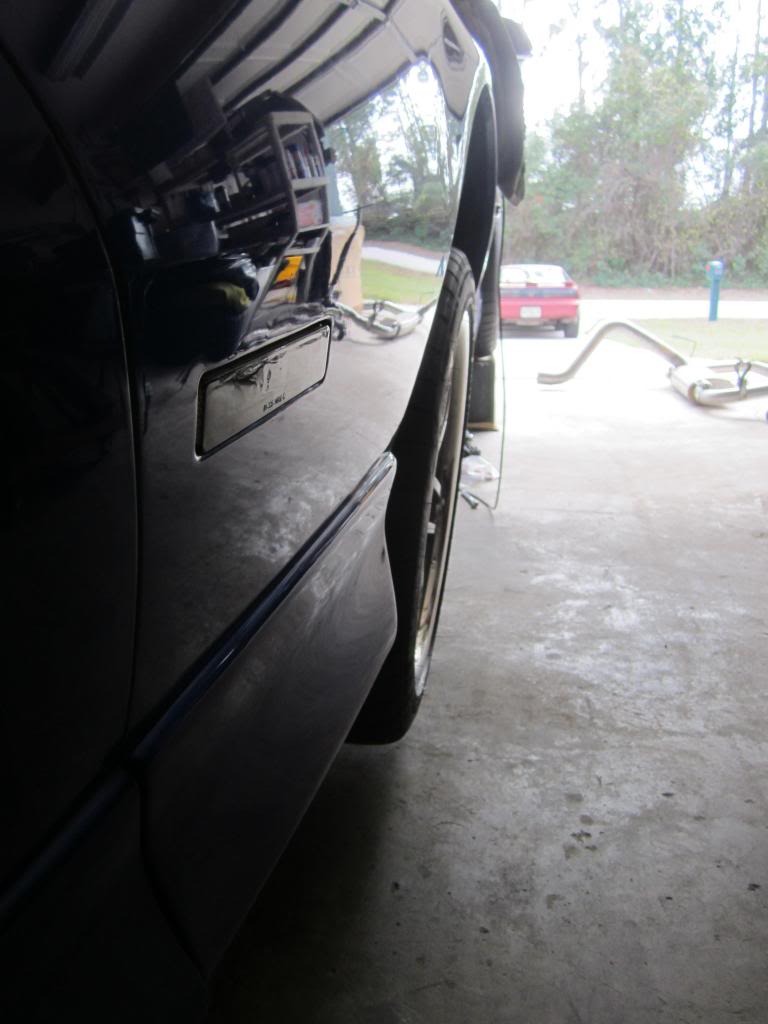
I got the differential back under the car yesterday. Put the rear wheels on it and now have the rear of the car up on ramps. So now I can tighten all of the rear suspension bolts while the car is sitting at ride height. It's sitting a little high in the rear, but I know the springs need to settle in. I'm glad I bought the adjustable LCA's since it now looks like the differential needs to be moved forward to get the wheels back to being centered in the wheel wells.
My ramps are just a slight bit too narrow for my 285's
I currently have 2" spacers on the rear wheels, but they stick out a bit too much for my taste.
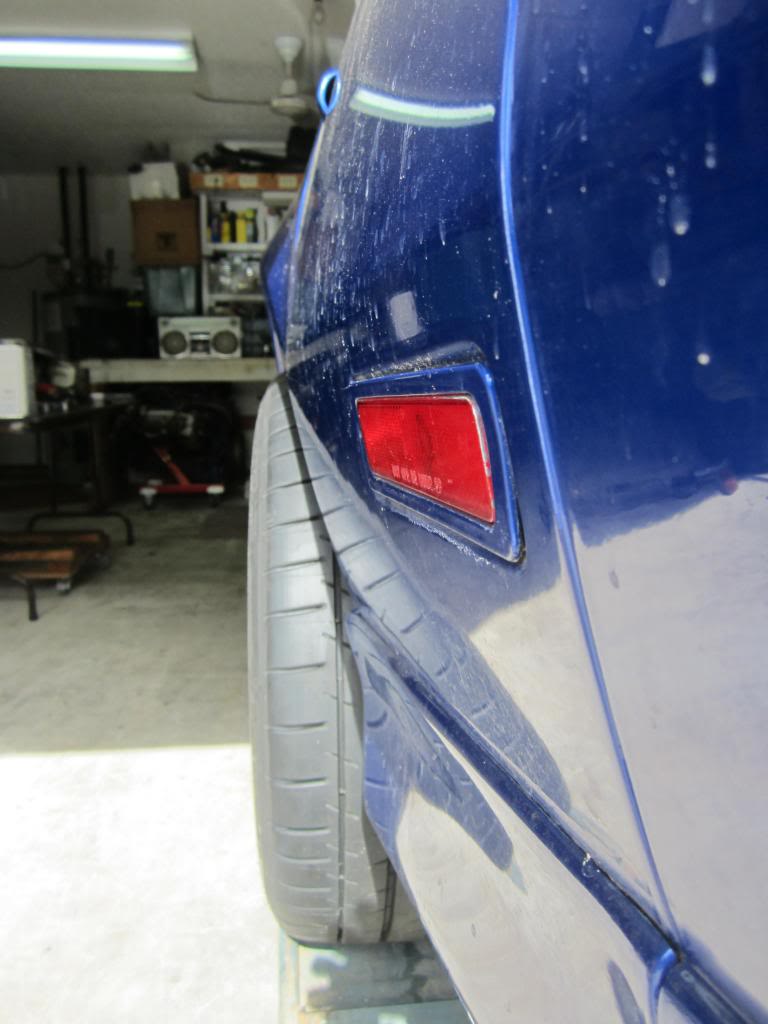
I would like to go to 1�" spacers, but that wouldn't give me any clearance between the side of the wheel and the bumpstop when the suspension is completely extended. Looks like I could get away with 1�" spacers though and still have about a �" clearance from the bumpstops. Worse case, I have about an inch from the side of the tire to the side of the inner wheel well. So maybe if I can somehow move the bumpstops inward I can move the wheels in as well.
 11-25-2013, 12:04 PM
#568
Supreme Member
Thread Starter
iTrader: (1)
Join Date: Mar 2007
Location: Apopka, Florida
Posts: 1,237
Likes: 0
Received 7 Likes
on
6 Posts
Car: 1989 Pontiac Trans Am GTA
Engine: cammed LS1
Transmission: Monster SS 4L65E
Axle/Gears: 9 bolt posi w/ 3.70 gears
Re: LS1 swap for my '89 GTA
I installed the front wheel with �" spacers at each stud to see how it looked.
I like it, but it doesn't work. I am a good �" from getting the hub cover on the wheel.
I was contemplating �" spacers for the front, but then I would have to install longer studs and might still not be able to get the hub cover on. So I went ahead and purchased a pair of 1" spacers. Hopefully it doesn't push the wheels too far out.

I like it, but it doesn't work. I am a good �" from getting the hub cover on the wheel.

I was contemplating �" spacers for the front, but then I would have to install longer studs and might still not be able to get the hub cover on. So I went ahead and purchased a pair of 1" spacers. Hopefully it doesn't push the wheels too far out.
11-27-2013, 12:04 PM
#569
Supreme Member
Thread Starter
iTrader: (1)
Join Date: Mar 2007
Location: Apopka, Florida
Posts: 1,237
Likes: 0
Received 7 Likes
on
6 Posts
Car: 1989 Pontiac Trans Am GTA
Engine: cammed LS1
Transmission: Monster SS 4L65E
Axle/Gears: 9 bolt posi w/ 3.70 gears
Re: LS1 swap for my '89 GTA
I finally tackled the A/C box area last night. I have been avoiding it, but it had to be done. It sure felt good once it was completed. My goal was to wrap-up all of my loose ends in that area and get the lower A/C housing installed. Mission accomplished! Here are some progress pics
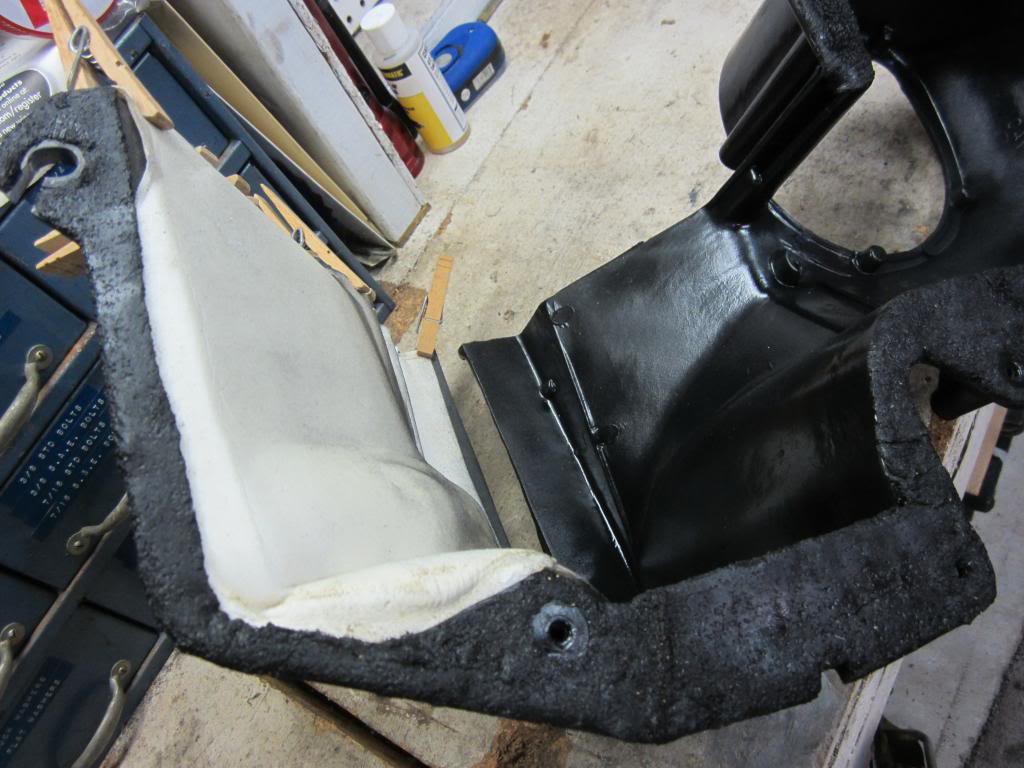
Before:
After:
You can see where I had to trim some of the firewall grommet so that the lower A/C housing would fit correctly.
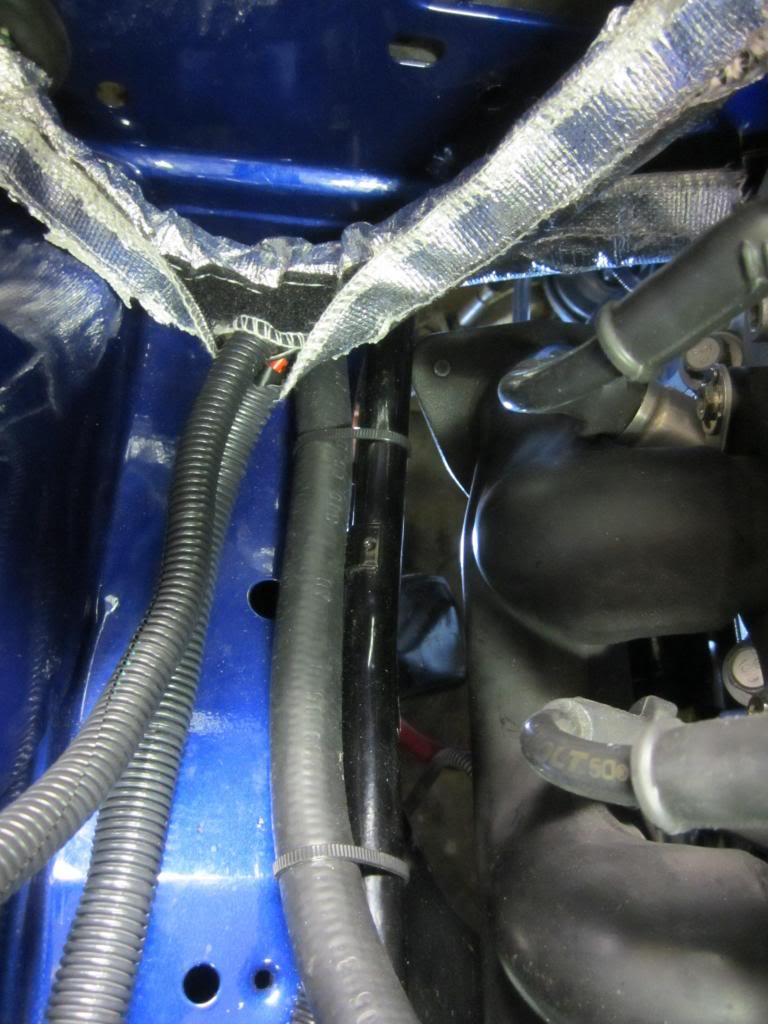
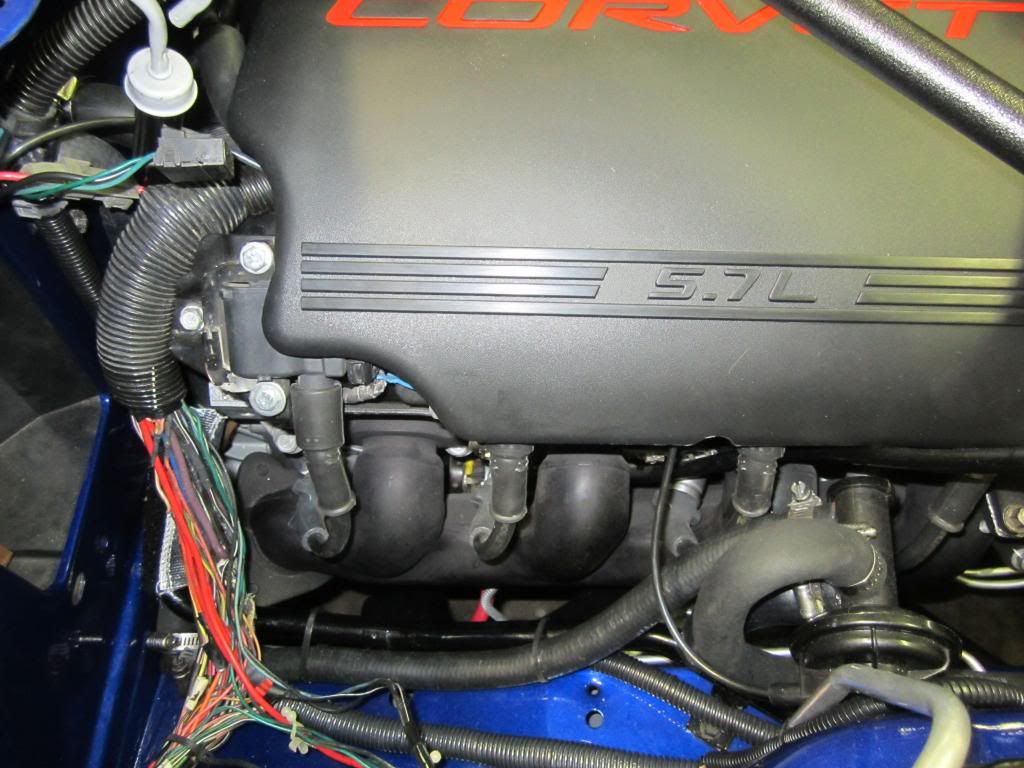
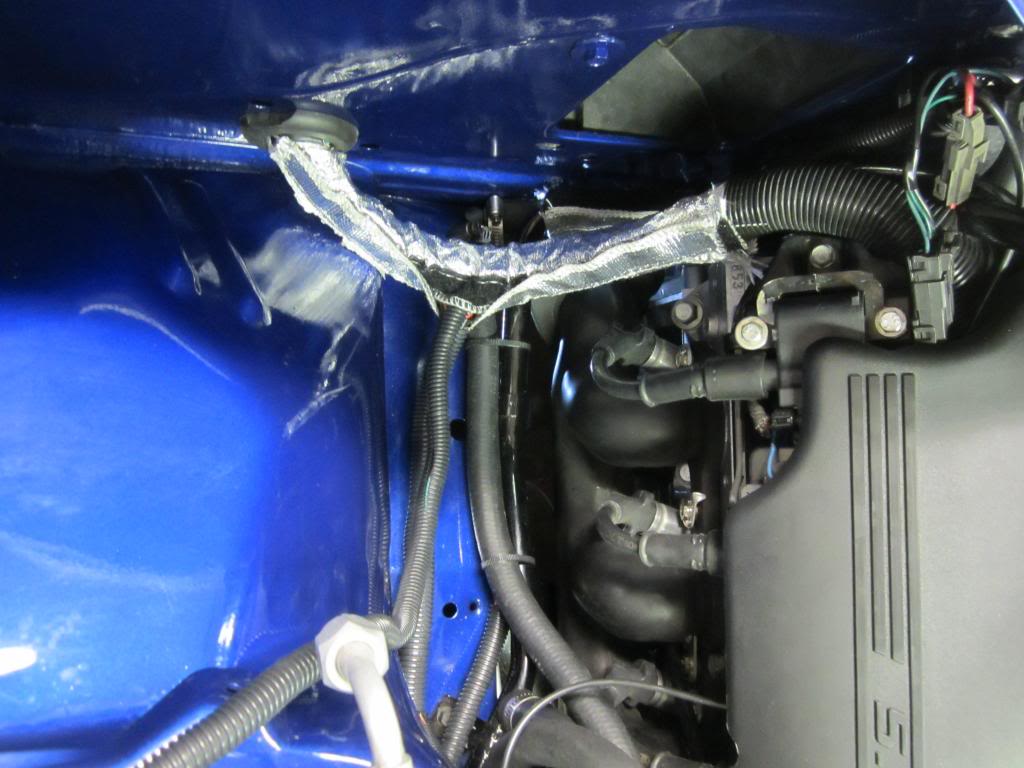
As you can see, there is plenty of clearance from the manifold for everything. I wouldn't really recommend the DSE heat insulating wrap to anyone. It was somewhat falling apart on me last night. The stitching was coming off some of the Velcro and some of the silver coating was coming off too. It will serve its purpose though. I kept the heater hoses mostly hidden, which was one of my goals. It wasn't easy to get everything to fit in that area, but I was finally able to make it work.
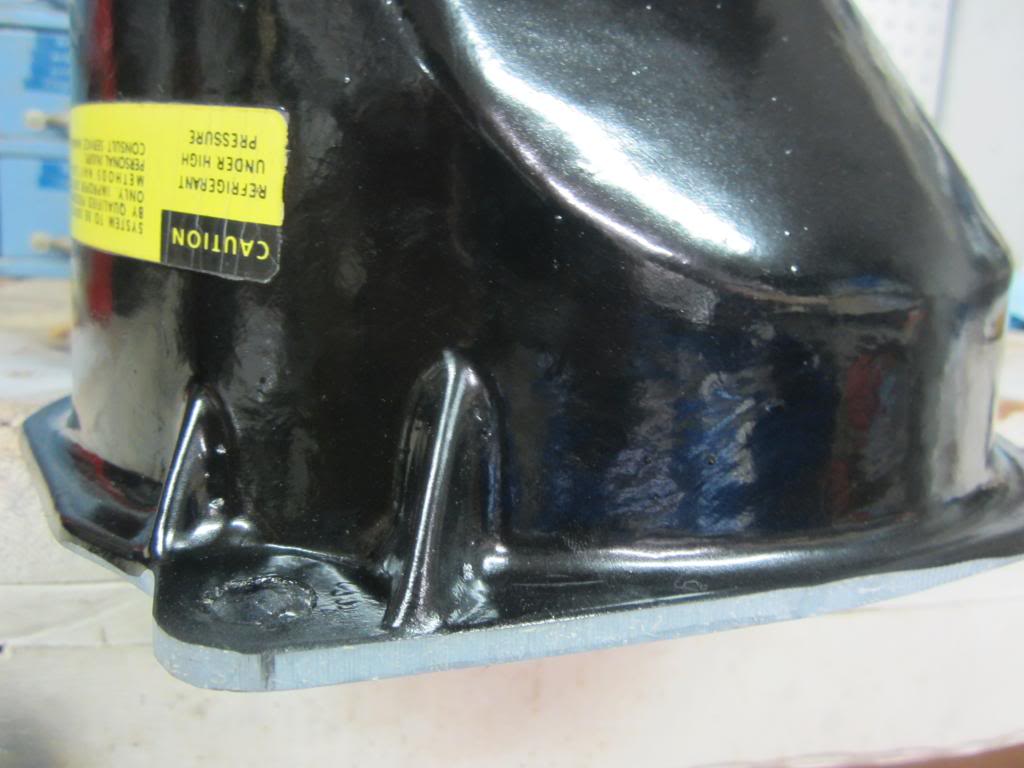
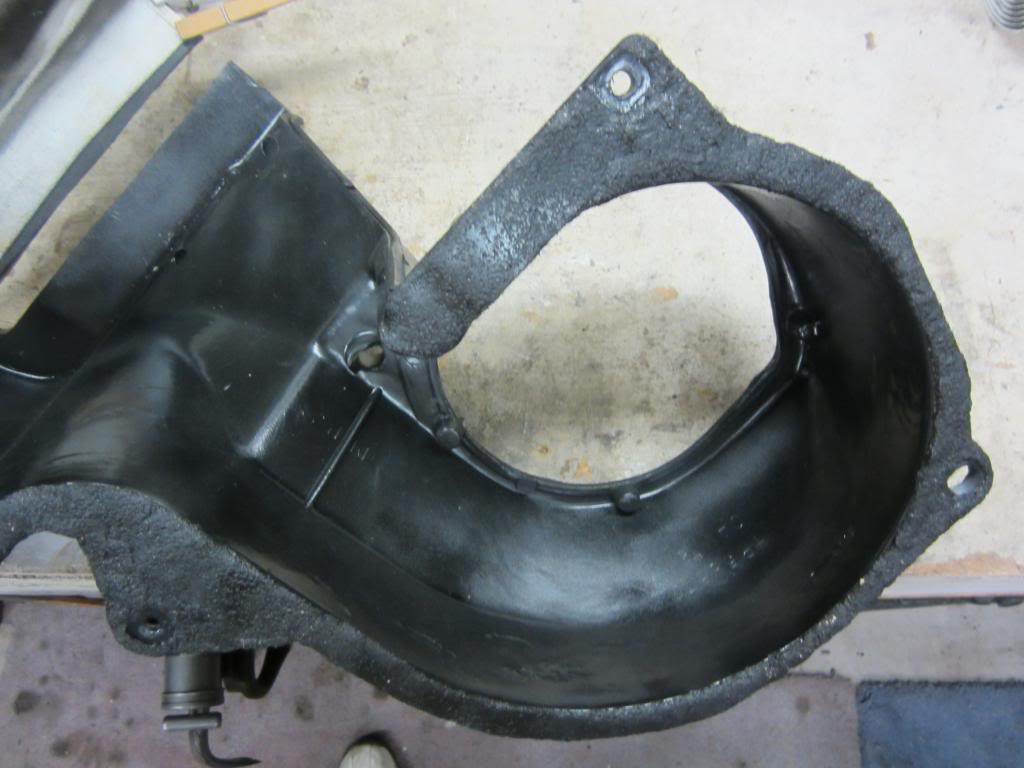
Next up was modifying the lower A/C housing to fit. First I ground a little off of the side of the housing to make it easier to drop it down past the frame rail when installing it. This is an effort to avoid putting too much stress on the housing by trying to force it down in there. I cracked the last housing pretty bad because of that.
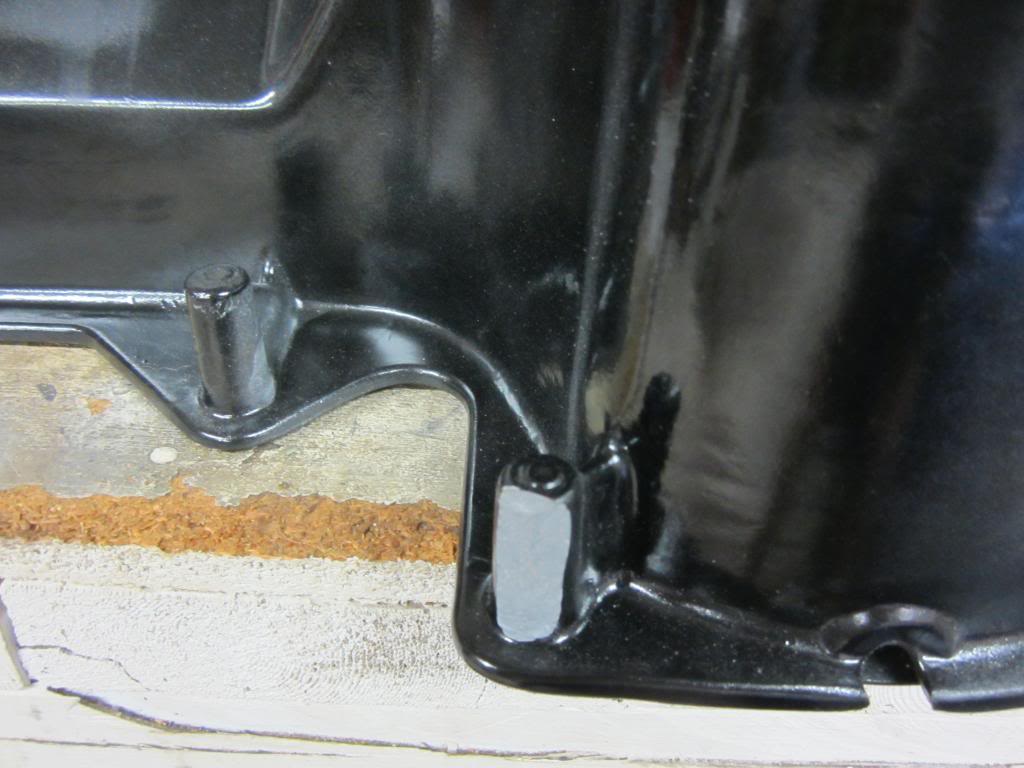
Next up was to remove some material from this bolt boss since my wiring harness crosses under it. Again, trying to remove as much stress from the housing as I can.
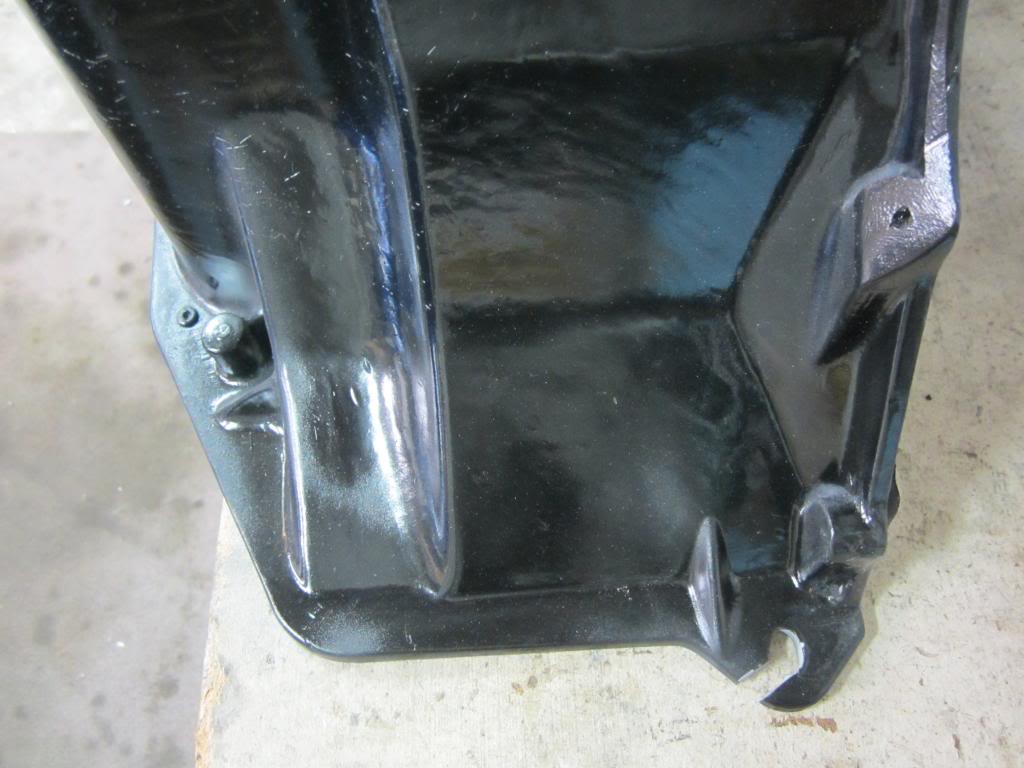
And finally, I laid back the bolt boss that is next to the rear coil (upper right side of the picture) & I cut an opening for the bolt hole (lower right side) so that I could just slide the housing into place instead of putting pressure on the housing trying to get it over the stud. I figured all of this out with my old housing. Luckily I had an extra one. I have about 1/16" clearance between the rear coil & that laid-back bolt boss.
Next, I adjusted the inner liner & glued it into the correct position.
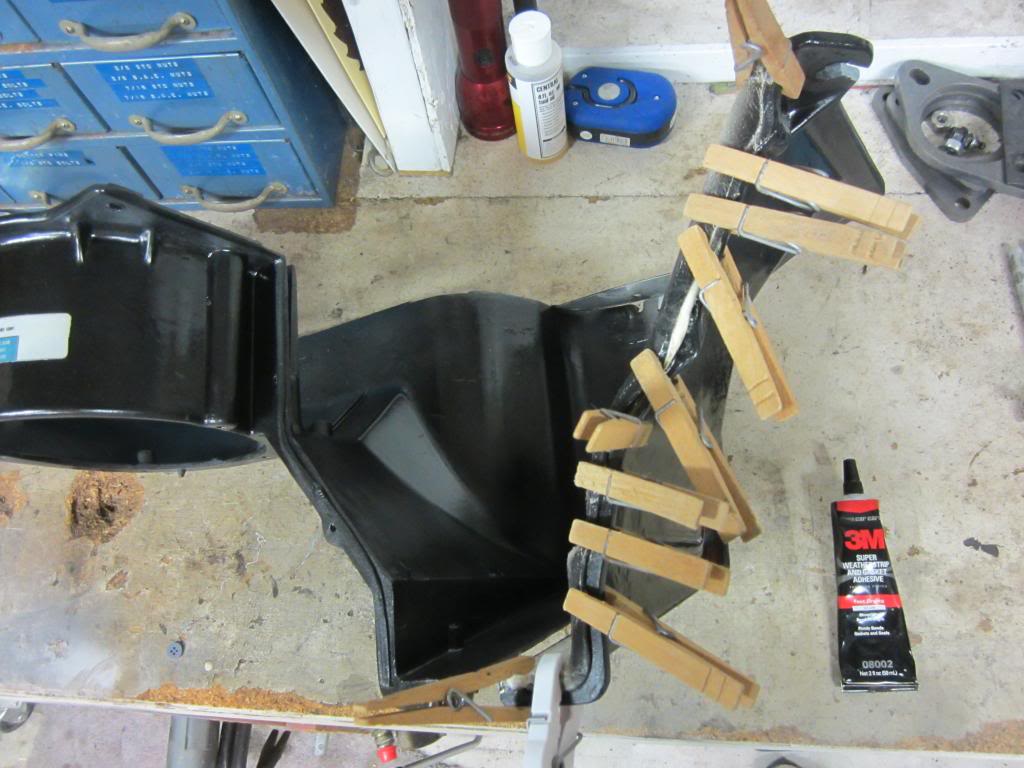
I knew I kept those old clothes pins for a reason!
And then came the fun part... Bear-Crap... I mean Dum-Dum for the seal to the firewall. My dad calls Dum-Dum Bear-Crap.
Having the Dum-Dum on there makes it a bit challenging to get the housing into place correctly since it wants to stick as soon as it touches anything.
And the housing is now in place. I was determined to get it in there even though it was pushing 4am!
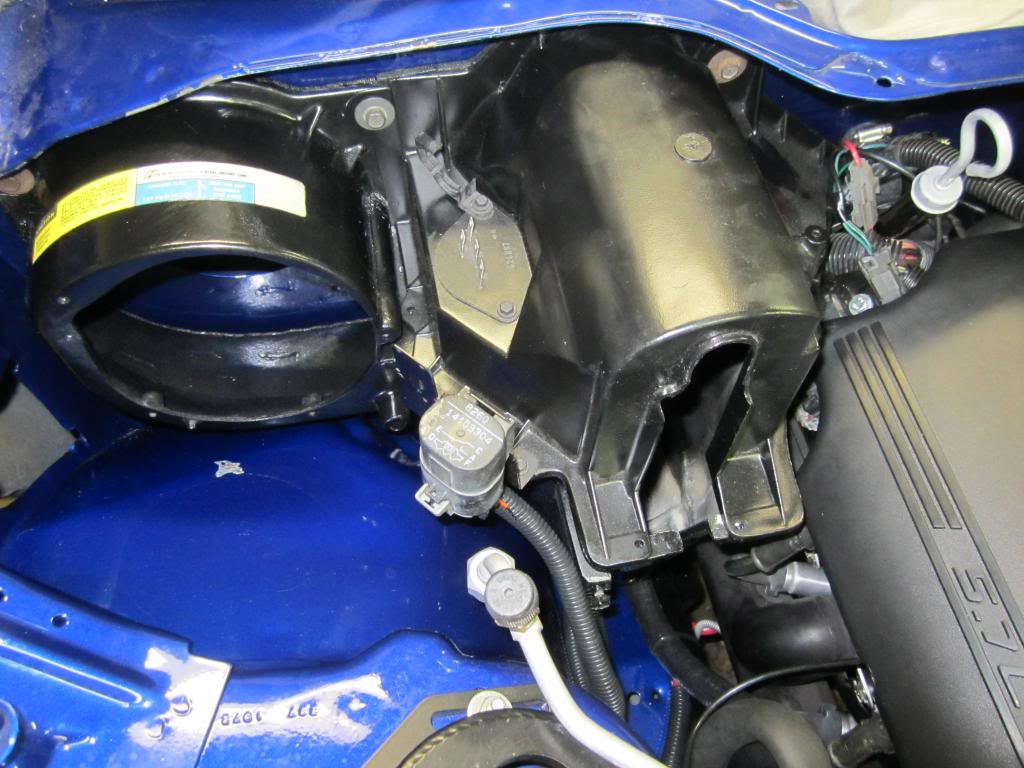
The rusty bolts are just there to hold it in place for now. I will be removing them & painting them black to match. I also need to touch-up that spot on the inner fender where I knocked the paint off.
Before:

After:

You can see where I had to trim some of the firewall grommet so that the lower A/C housing would fit correctly.

As you can see, there is plenty of clearance from the manifold for everything. I wouldn't really recommend the DSE heat insulating wrap to anyone. It was somewhat falling apart on me last night. The stitching was coming off some of the Velcro and some of the silver coating was coming off too. It will serve its purpose though. I kept the heater hoses mostly hidden, which was one of my goals. It wasn't easy to get everything to fit in that area, but I was finally able to make it work.
Next up was modifying the lower A/C housing to fit. First I ground a little off of the side of the housing to make it easier to drop it down past the frame rail when installing it. This is an effort to avoid putting too much stress on the housing by trying to force it down in there. I cracked the last housing pretty bad because of that.

Next up was to remove some material from this bolt boss since my wiring harness crosses under it. Again, trying to remove as much stress from the housing as I can.

And finally, I laid back the bolt boss that is next to the rear coil (upper right side of the picture) & I cut an opening for the bolt hole (lower right side) so that I could just slide the housing into place instead of putting pressure on the housing trying to get it over the stud. I figured all of this out with my old housing. Luckily I had an extra one. I have about 1/16" clearance between the rear coil & that laid-back bolt boss.

Next, I adjusted the inner liner & glued it into the correct position.

I knew I kept those old clothes pins for a reason!
And then came the fun part... Bear-Crap... I mean Dum-Dum for the seal to the firewall. My dad calls Dum-Dum Bear-Crap.


Having the Dum-Dum on there makes it a bit challenging to get the housing into place correctly since it wants to stick as soon as it touches anything.
And the housing is now in place. I was determined to get it in there even though it was pushing 4am!

The rusty bolts are just there to hold it in place for now. I will be removing them & painting them black to match. I also need to touch-up that spot on the inner fender where I knocked the paint off.
Last edited by dprest68; 11-27-2013 at 12:14 PM.
 11-27-2013, 02:10 PM
#572
Supreme Member
Thread Starter
iTrader: (1)
Join Date: Mar 2007
Location: Apopka, Florida
Posts: 1,237
Likes: 0
Received 7 Likes
on
6 Posts
Car: 1989 Pontiac Trans Am GTA
Engine: cammed LS1
Transmission: Monster SS 4L65E
Axle/Gears: 9 bolt posi w/ 3.70 gears
Re: LS1 swap for my '89 GTA
Thanks guys! Yeah, I was thinking that would be a great spot for a Motor Book Store sticker. 
Look like 71� and a 10% chance of rain. I think we will be okay for the Turkey Rod Run. I am looking forward to it. I tried to get my car ready to go there last night, but I just couldn't quite get there!
Look like 71� and a 10% chance of rain. I think we will be okay for the Turkey Rod Run.
I am looking forward to it. I tried to get my car ready to go there last night, but I just couldn't quite get there!
11-27-2013, 07:09 PM
#573
Supreme Member
Thread Starter
iTrader: (1)
Join Date: Mar 2007
Location: Apopka, Florida
Posts: 1,237
Likes: 0
Received 7 Likes
on
6 Posts
Car: 1989 Pontiac Trans Am GTA
Engine: cammed LS1
Transmission: Monster SS 4L65E
Axle/Gears: 9 bolt posi w/ 3.70 gears
Re: LS1 swap for my '89 GTA
The 1" spacers came in today along with the fuel pressure regulator. Unfortunately the spacers don't work.
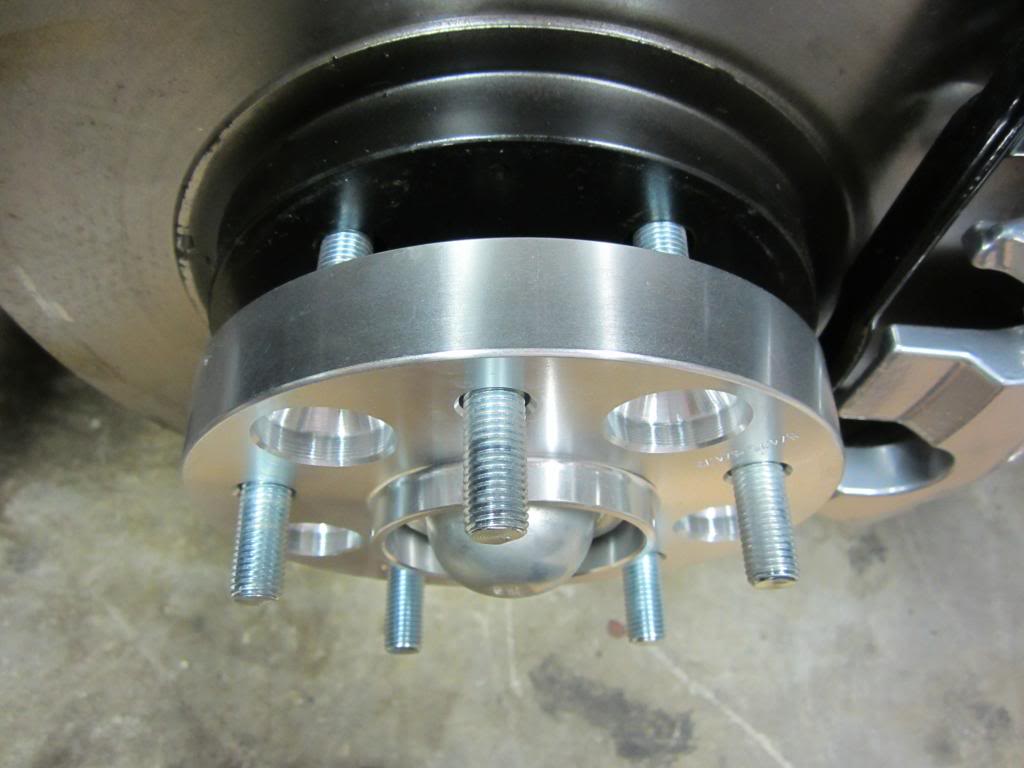
Amazon said they would fit the car, but they lied. Because they are "hubcentric", the raised part there by the hub cover intrudes on the area where the hub needs to pass through. So what you see in the picture is all the farther the adapter/spacer would slide on.
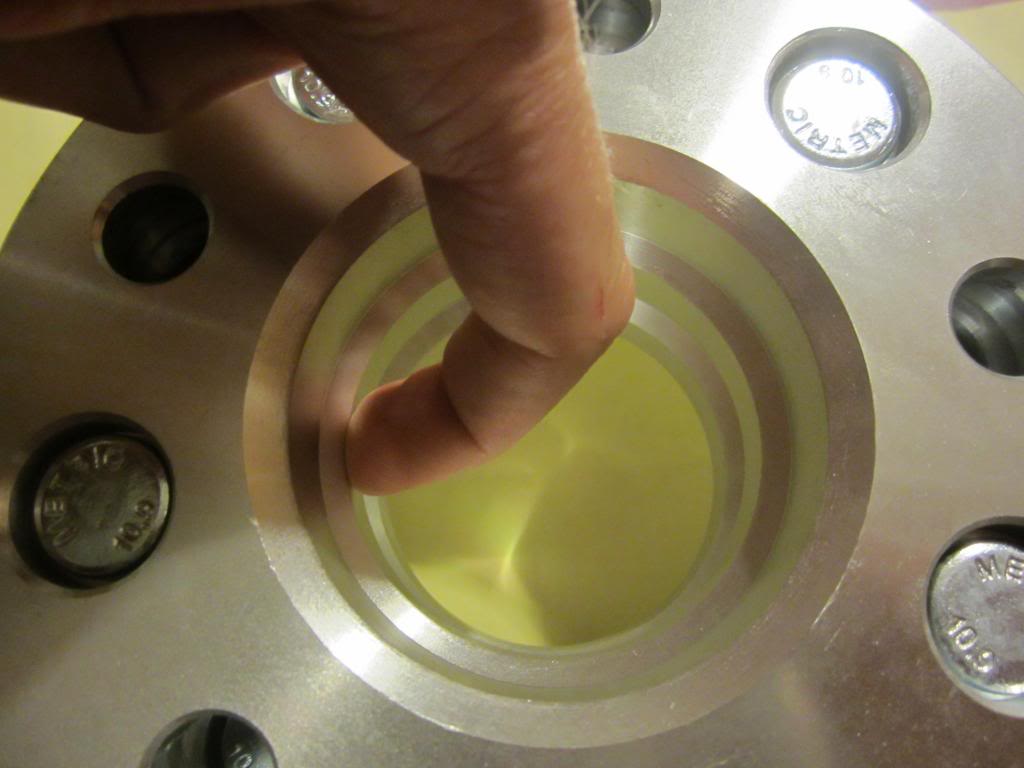
My finger is on the raised lip that intrudes on the area where the hub need to pass through. Hopefully this will help someone avoid this issue in the future.
I haven't had time to put the new regulator on yet.
Just in case some of you didn't get notified, Hawks, Spohn, BMR & UMI are all having Thanksgiving sales until 12/2. And I am thankful I am ordering a UMI tubular K-member now and it says I get free ground shipping (saved me $70 for shipping of k-member & SFC's) & 15% off ($93 off)... SCORE! I am ordering it directly from UMI's site.
Happy Thanksgiving everyone! Enjoy.

Amazon said they would fit the car, but they lied. Because they are "hubcentric", the raised part there by the hub cover intrudes on the area where the hub needs to pass through. So what you see in the picture is all the farther the adapter/spacer would slide on.

My finger is on the raised lip that intrudes on the area where the hub need to pass through. Hopefully this will help someone avoid this issue in the future.
I haven't had time to put the new regulator on yet.
Just in case some of you didn't get notified, Hawks, Spohn, BMR & UMI are all having Thanksgiving sales until 12/2. And I am thankful
I am ordering a UMI tubular K-member now and it says I get free ground shipping (saved me $70 for shipping of k-member & SFC's) & 15% off ($93 off)... SCORE! I am ordering it directly from UMI's site.Happy Thanksgiving everyone! Enjoy.
Last edited by dprest68; 11-27-2013 at 07:38 PM.
11-30-2013, 11:16 PM
#574
Senior Member
iTrader: (1)
Join Date: Aug 2006
Location: Bethlehem, CT
Posts: 632
Likes: 0
Received 4 Likes
on
4 Posts
Car: 1983 Firebird SE
Engine: C5 LS1
Transmission: 6 speed
Axle/Gears: 3.42
Re: LS1 swap for my '89 GTA
Glad to see you are moving ahead nicely. Two things come to mind from your recent posts.
I remember having to carefully check the I.D. of the spacers I got. Some are big enough to fit, others are a no go.
The car will settle some, but I don't think it will go that much. For me, the LS1's lighter weight put me way up in the air. To get the back of my car down from 4 X 4 ride height I went to Sportlines (from Pro Kits) and chucked the spring isolators for very thin after market ones. I use two now… about 3/8" total. I think the stockers are about 1" thick.
Up front are coil overs.
You'll be driving all the time soon… nice work.
12-02-2013, 09:23 AM
#575
Supreme Member
Thread Starter
iTrader: (1)
Join Date: Mar 2007
Location: Apopka, Florida
Posts: 1,237
Likes: 0
Received 7 Likes
on
6 Posts
Car: 1989 Pontiac Trans Am GTA
Engine: cammed LS1
Transmission: Monster SS 4L65E
Axle/Gears: 9 bolt posi w/ 3.70 gears
Re: LS1 swap for my '89 GTA
Glad to see you are moving ahead nicely. Two things come to mind from your recent posts.
I remember having to carefully check the I.D. of the spacers I got. Some are big enough to fit, others are a no go.
The car will settle some, but I don't think it will go that much. For me, the LS1's lighter weight put me way up in the air. To get the back of my car down from 4 X 4 ride height I went to Sportlines (from Pro Kits) and chucked the spring isolators for very thin after market ones. I use two now… about 3/8" total. I think the stockers are about 1" thick.
Up front are coil overs.
You'll be driving all the time soon… nice work.
I remember having to carefully check the I.D. of the spacers I got. Some are big enough to fit, others are a no go.
The car will settle some, but I don't think it will go that much. For me, the LS1's lighter weight put me way up in the air. To get the back of my car down from 4 X 4 ride height I went to Sportlines (from Pro Kits) and chucked the spring isolators for very thin after market ones. I use two now… about 3/8" total. I think the stockers are about 1" thick.
Up front are coil overs.
You'll be driving all the time soon… nice work.
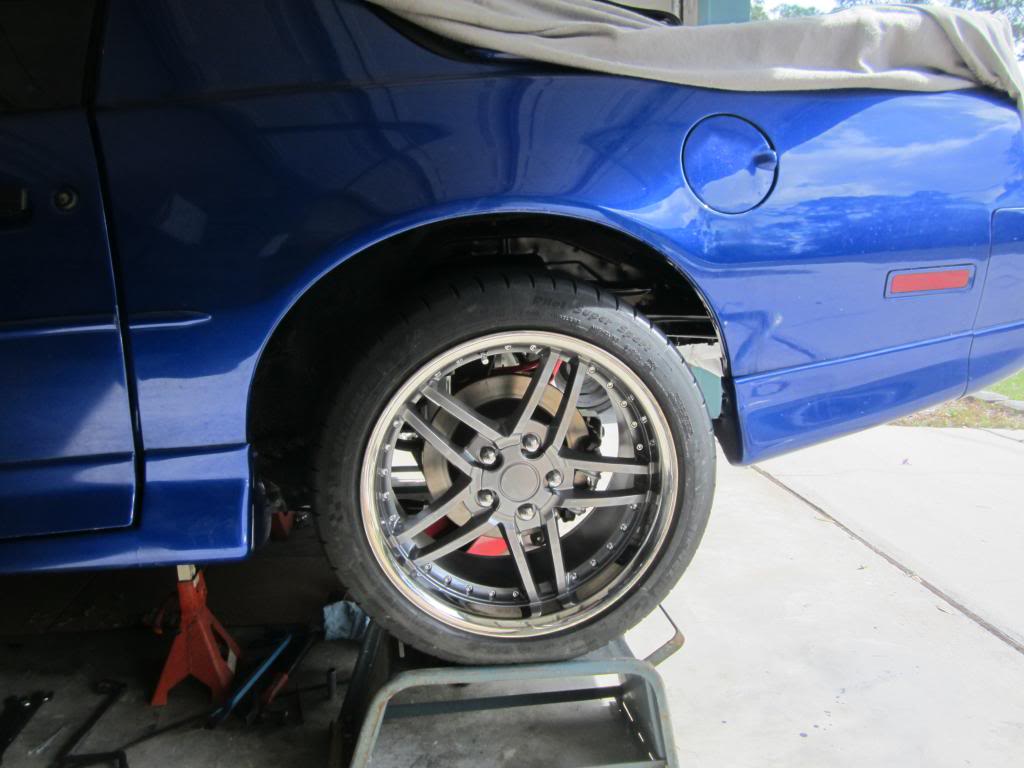
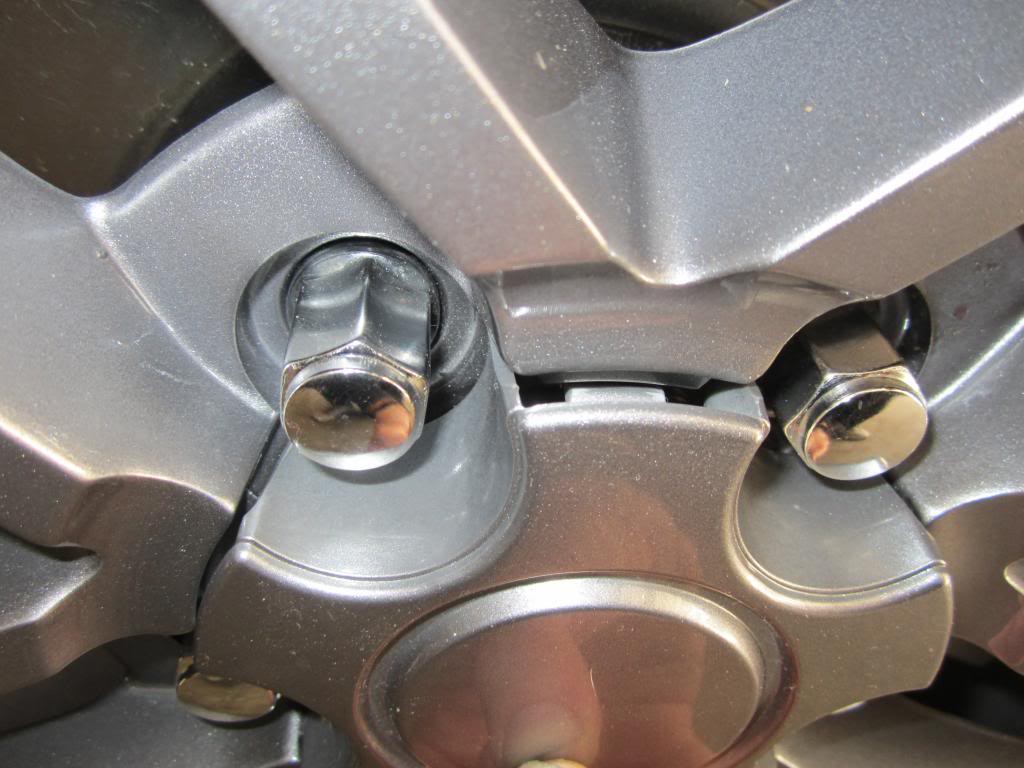
I went to the Turkey Rod Run this past weekend at the Daytona International Speedway and found all four of the wheel spacers I needed to make it look right. I ended up with 1" spacers for the front & 1�" for the rear.
Front 1" spacer installed

Luckily the wheels are dimpled between the mounting holes because the wheels studs are 1�" long and extend past the spacer


Because of that the wheels mount-up with no problem. I may paint the spacers black to try to make them blend in with the rotors.
Last edited by dprest68; 10-30-2014 at 05:15 PM. Reason: typo
12-02-2013, 06:12 PM
#576
Supreme Member
Thread Starter
iTrader: (1)
Join Date: Mar 2007
Location: Apopka, Florida
Posts: 1,237
Likes: 0
Received 7 Likes
on
6 Posts
Car: 1989 Pontiac Trans Am GTA
Engine: cammed LS1
Transmission: Monster SS 4L65E
Axle/Gears: 9 bolt posi w/ 3.70 gears
Re: LS1 swap for my '89 GTA
Jaysz28 is my hero! I asked him to call me a little bit ago to talk about my fuel regulator issue since he sold me the fuel rail. Right away he said I needed to switch the two lines going to the fuel rail. I'm like "you know what... that makes complete sense!" I don't know why it never occurred to me to try that.  Feeling pretty dumb, but I am really glad that it runs now and I can move on. I have a few leaks I have to fix now that it's running and I think I have a vacuum leak that I need to find. What's funny is that I have talked to a few people about this fuel issue including my friend over at NAPA & a guy from Hawks Third Gen and Jason was the only one smart enough to figure it out. Thanks Jason!
Feeling pretty dumb, but I am really glad that it runs now and I can move on. I have a few leaks I have to fix now that it's running and I think I have a vacuum leak that I need to find. What's funny is that I have talked to a few people about this fuel issue including my friend over at NAPA & a guy from Hawks Third Gen and Jason was the only one smart enough to figure it out. Thanks Jason!
12-02-2013, 07:21 PM
#577
Senior Member
iTrader: (1)
Join Date: Aug 2006
Location: Bethlehem, CT
Posts: 632
Likes: 0
Received 4 Likes
on
4 Posts
Car: 1983 Firebird SE
Engine: C5 LS1
Transmission: 6 speed
Axle/Gears: 3.42
Re: LS1 swap for my '89 GTA
On jacks, take the wheels off, disconnect the shocks. Then move it through it's range. Maybe an angles off, maybe two suspension pieces are working against each other, maybe ???
Good luck. Car is nice.
12-02-2013, 11:36 PM
#578
Supreme Member
Thread Starter
iTrader: (1)
Join Date: Mar 2007
Location: Apopka, Florida
Posts: 1,237
Likes: 0
Received 7 Likes
on
6 Posts
Car: 1989 Pontiac Trans Am GTA
Engine: cammed LS1
Transmission: Monster SS 4L65E
Axle/Gears: 9 bolt posi w/ 3.70 gears
Re: LS1 swap for my '89 GTA
If you are still way up in the air with Sportlines, you might check your axle for binding.
On jacks, take the wheels off, disconnect the shocks. Then move it through it's range. Maybe an angles off, maybe two suspension pieces are working against each other, maybe ???
Good luck. Car is nice.
On jacks, take the wheels off, disconnect the shocks. Then move it through it's range. Maybe an angles off, maybe two suspension pieces are working against each other, maybe ???
Good luck. Car is nice.
12-02-2013, 11:45 PM
#579
Supreme Member
Thread Starter
iTrader: (1)
Join Date: Mar 2007
Location: Apopka, Florida
Posts: 1,237
Likes: 0
Received 7 Likes
on
6 Posts
Car: 1989 Pontiac Trans Am GTA
Engine: cammed LS1
Transmission: Monster SS 4L65E
Axle/Gears: 9 bolt posi w/ 3.70 gears
Re: LS1 swap for my '89 GTA
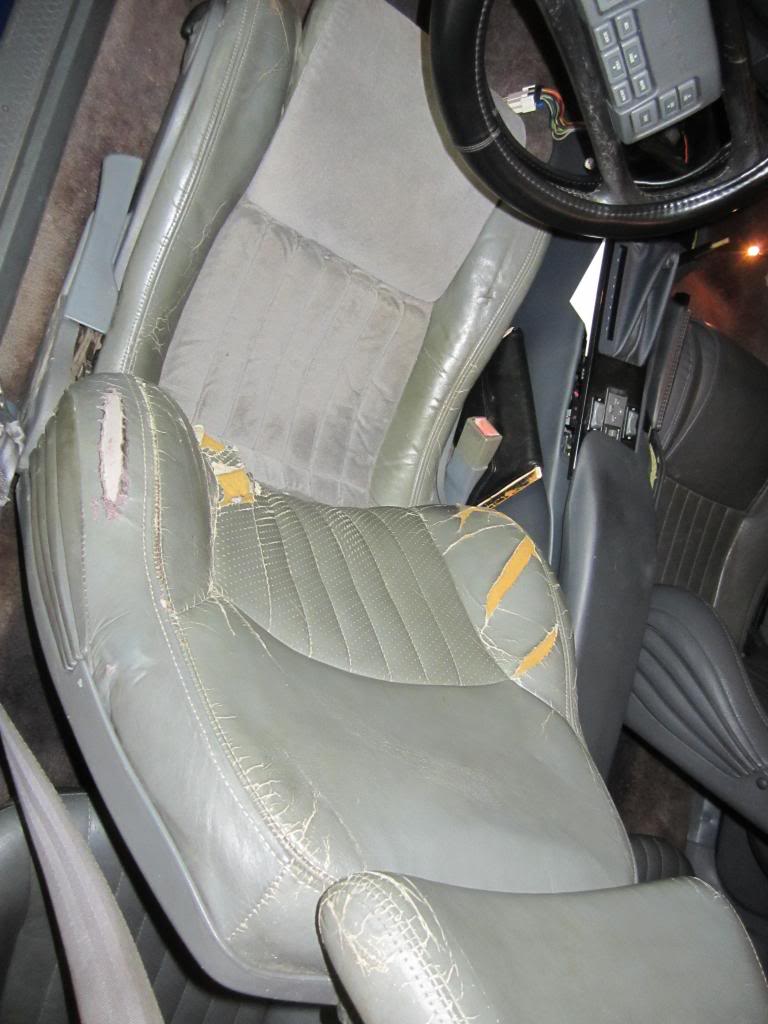
Found a nice pair of 4th gen seats the last day of the Turkey Rod Run for $100. Thanks Luis!
Before:
After:
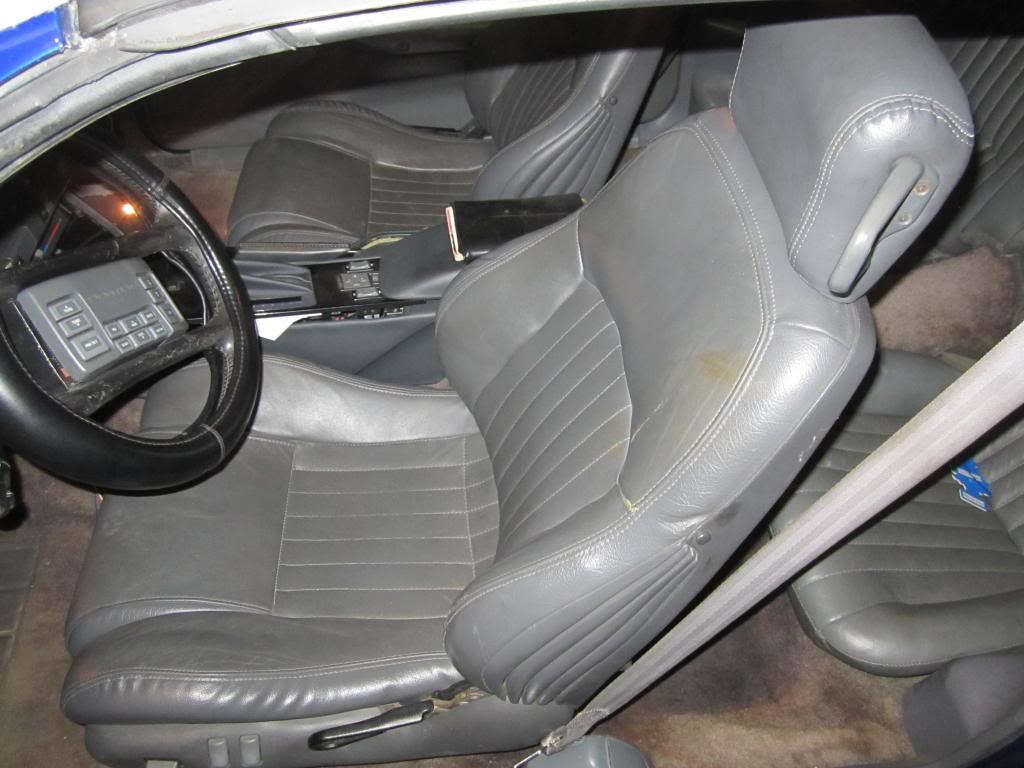
They aren't perfect, but well worth the price. And I like them better. Any ideas on how to adapt the connections from the seats to the car since they are different?
Before:

After:

They aren't perfect, but well worth the price. And I like them better. Any ideas on how to adapt the connections from the seats to the car since they are different?
12-03-2013, 07:25 AM
#580
Senior Member
iTrader: (3)
Join Date: Aug 2008
Location: Dixon, IL
Posts: 706
Likes: 0
Received 0 Likes
on
0 Posts
Car: 91 RS
Engine: LTwon
Transmission: T-56
Axle/Gears: Both
Re: LS1 swap for my '89 GTA
Looking good! Glad im not the only one taking their sweet time, been a long time coming man!!
12-03-2013, 07:27 AM
#581
Supreme Member
iTrader: (30)

Join Date: Jul 2000
Location: Fort Myers, FL
Posts: 1,513
Received 17 Likes
on
10 Posts
Car: 91 Firebird
Engine: 6.0
Transmission: T56
Axle/Gears: 3.73
Re: LS1 swap for my '89 GTA
Glad I could help out! My school of hard knocks training finally helped out someone! LOL
Don't forget to check your fuel pressure. Should be 58 PSI at the rail. If it isn't you might have blown the rubber hose in the tank......(like I did)
btw, are those old seats 3rd or 4th gen seats??? I am looking for a set of Grey GTA seats
Speaking of springs, do me a favor and post a pic of your rear springs where they meet the axle perch. I have an idea......
Last edited by Jaysz28; 12-03-2013 at 07:31 AM.
12-03-2013, 10:15 AM
#582
Supreme Member
Thread Starter
iTrader: (1)
Join Date: Mar 2007
Location: Apopka, Florida
Posts: 1,237
Likes: 0
Received 7 Likes
on
6 Posts
Car: 1989 Pontiac Trans Am GTA
Engine: cammed LS1
Transmission: Monster SS 4L65E
Axle/Gears: 9 bolt posi w/ 3.70 gears
Re: LS1 swap for my '89 GTA
I haven't seen an update on your thread in awhile. Hopefully you got everything sorted out.
12-03-2013, 10:28 AM
#583
Supreme Member
Thread Starter
iTrader: (1)
Join Date: Mar 2007
Location: Apopka, Florida
Posts: 1,237
Likes: 0
Received 7 Likes
on
6 Posts
Car: 1989 Pontiac Trans Am GTA
Engine: cammed LS1
Transmission: Monster SS 4L65E
Axle/Gears: 9 bolt posi w/ 3.70 gears
Re: LS1 swap for my '89 GTA
Glad I could help out! My school of hard knocks training finally helped out someone! LOL
Don't forget to check your fuel pressure. Should be 58 PSI at the rail. If it isn't you might have blown the rubber hose in the tank......(like I did)
btw, are those old seats 3rd or 4th gen seats??? I am looking for a set of Grey GTA seats
Speaking of springs, do me a favor and post a pic of your rear springs where they meet the axle perch. I have an idea......
Don't forget to check your fuel pressure. Should be 58 PSI at the rail. If it isn't you might have blown the rubber hose in the tank......(like I did)
btw, are those old seats 3rd or 4th gen seats??? I am looking for a set of Grey GTA seats
Speaking of springs, do me a favor and post a pic of your rear springs where they meet the axle perch. I have an idea......
Yeah, I just bought a gauge to stick on the fuel rail so that I can check the pressure.
They are 3rd gen GTA seats. Driver's side is rough, passenger side is decent. You'd probably have to thumb wrestle Luis for them though!
 He has been trying to get me to sell him my tan cloth GTA seats for awhile.
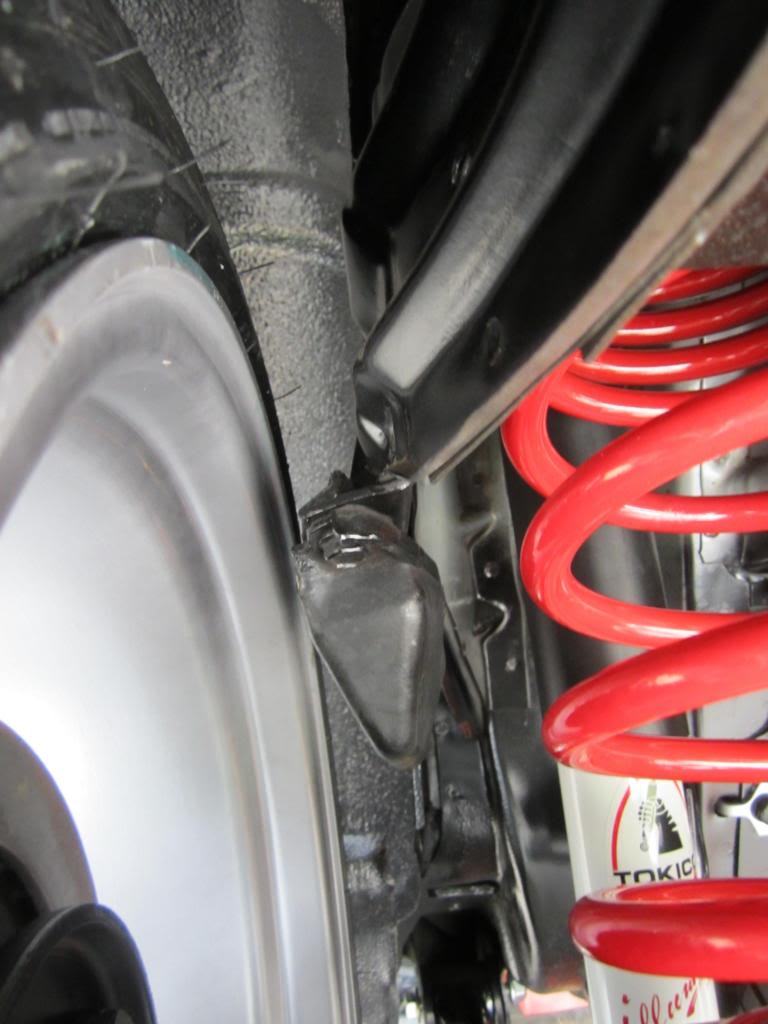
Driver's side spring perch:

Passenger's side:

What's your idea?
12-03-2013, 10:33 AM
#584
Supreme Member
Thread Starter
iTrader: (1)
Join Date: Mar 2007
Location: Apopka, Florida
Posts: 1,237
Likes: 0
Received 7 Likes
on
6 Posts
Car: 1989 Pontiac Trans Am GTA
Engine: cammed LS1
Transmission: Monster SS 4L65E
Axle/Gears: 9 bolt posi w/ 3.70 gears
Re: LS1 swap for my '89 GTA
Thanks to my bud Luis, I got my seat harness issue resolved. I just need to hook up the orange power wire & black ground wire under the driver's seat and connect this harness between the seats
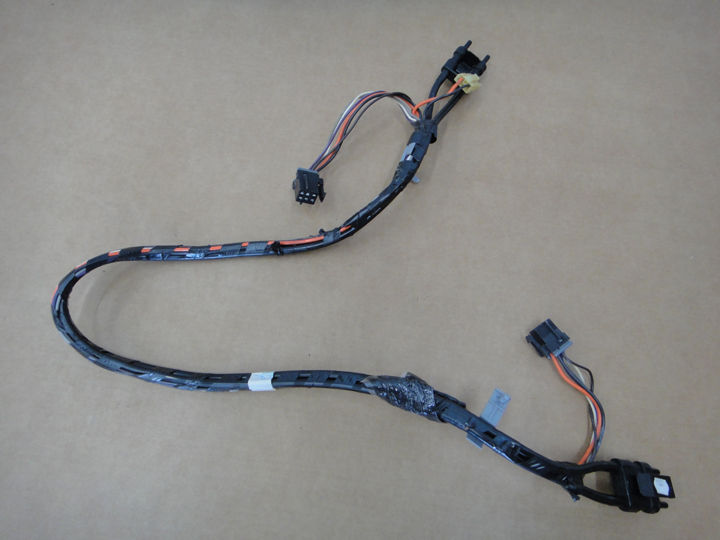
And it should make everything work correctly. I found the above harness on E-bay. It should be here in a week or so. One more problem solved.

And it should make everything work correctly. I found the above harness on E-bay. It should be here in a week or so. One more problem solved.
12-03-2013, 11:53 AM
#586
Supreme Member
Thread Starter
iTrader: (1)
Join Date: Mar 2007
Location: Apopka, Florida
Posts: 1,237
Likes: 0
Received 7 Likes
on
6 Posts
Car: 1989 Pontiac Trans Am GTA
Engine: cammed LS1
Transmission: Monster SS 4L65E
Axle/Gears: 9 bolt posi w/ 3.70 gears
Re: LS1 swap for my '89 GTA
Good find on that seat wiring harness. I think this upgrade will be a piece of cake. Those 4th gen seats look great. We should go to Ben's to see if we can find a good paint match for the door panels and get those done.
And you might as well order a new carpet and B-Quiet sound deadener
BTW, I think this is what I used: http://www.b-quiet.com/ultimate.html
And you might as well order a new carpet and B-Quiet sound deadener
BTW, I think this is what I used: http://www.b-quiet.com/ultimate.html
Man, you sure are good at spending my money! I think you are better at it than my X-wife was!
 But seriously, the carpet & sound deadener is on my list... after I get this swap done & get my SFC's welded-in place. Hopefully that will be sooner than later.
I will start a new thread in a different section for the rest of the restoration after this swap is finished.
12-03-2013, 11:56 AM
#587
Supreme Member
Thread Starter
iTrader: (1)
Join Date: Mar 2007
Location: Apopka, Florida
Posts: 1,237
Likes: 0
Received 7 Likes
on
6 Posts
Car: 1989 Pontiac Trans Am GTA
Engine: cammed LS1
Transmission: Monster SS 4L65E
Axle/Gears: 9 bolt posi w/ 3.70 gears
Re: LS1 swap for my '89 GTA
BTW, I think this is what I used: http://www.b-quiet.com/ultimate.html
12-03-2013, 12:15 PM
#588
Supreme Member
Thread Starter
iTrader: (1)
Join Date: Mar 2007
Location: Apopka, Florida
Posts: 1,237
Likes: 0
Received 7 Likes
on
6 Posts
Car: 1989 Pontiac Trans Am GTA
Engine: cammed LS1
Transmission: Monster SS 4L65E
Axle/Gears: 9 bolt posi w/ 3.70 gears
Re: LS1 swap for my '89 GTA
I keep forgetting to post that my tach isn't working. Yet another thing to try to figure out. I know... 
12-03-2013, 04:18 PM
#590
Supreme Member
iTrader: (30)
Join Date: Jul 2000
Location: Fort Myers, FL
Posts: 1,513
Received 17 Likes
on
10 Posts
Car: 91 Firebird
Engine: 6.0
Transmission: T56
Axle/Gears: 3.73
Re: LS1 swap for my '89 GTA
Ok, well, it could be the rubber isolators are not centered on the round centering bumps that are up at the top of the spring pocket.....
as far as the tach is concerned, did your tuner change the tach signal? the stock LS1 tach signal is basically a 4 cyl signal. You can change it in the PCM, or make a pullup circuit and feed 12v+ through a resistor to make it strong enough for the stock tach to work. I did the latter.....
If Luis wants them, then so be it..... I have been looking for a set to recover... or mint if the price wasnt' terrible....
gotta get my headliner done next though..... it just never ends....
12-09-2013, 11:56 AM
#591
Supreme Member
Thread Starter
iTrader: (1)
Join Date: Mar 2007
Location: Apopka, Florida
Posts: 1,237
Likes: 0
Received 7 Likes
on
6 Posts
Car: 1989 Pontiac Trans Am GTA
Engine: cammed LS1
Transmission: Monster SS 4L65E
Axle/Gears: 9 bolt posi w/ 3.70 gears
Re: LS1 swap for my '89 GTA
Ok, well, it could be the rubber isolators are not centered on the round centering bumps that are up at the top of the spring pocket.....
as far as the tach is concerned, did your tuner change the tach signal? the stock LS1 tach signal is basically a 4 cyl signal. You can change it in the PCM, or make a pullup circuit and feed 12v+ through a resistor to make it strong enough for the stock tach to work. I did the latter.....
If Luis wants them, then so be it..... I have been looking for a set to recover... or mint if the price wasnt' terrible....
gotta get my headliner done next though..... it just never ends....
as far as the tach is concerned, did your tuner change the tach signal? the stock LS1 tach signal is basically a 4 cyl signal. You can change it in the PCM, or make a pullup circuit and feed 12v+ through a resistor to make it strong enough for the stock tach to work. I did the latter.....
If Luis wants them, then so be it..... I have been looking for a set to recover... or mint if the price wasnt' terrible....
gotta get my headliner done next though..... it just never ends....
It doesn't appear that the tuner adjusted the PCM correctly to make the tachometer work according to my receipt. I'll get it fixed one way or another.
Luis said he isn't interested in the grey seats in case you still are. They even come with custom seat belt guide buttons.
12-09-2013, 12:02 PM
#592
Supreme Member
Thread Starter
iTrader: (1)
Join Date: Mar 2007
Location: Apopka, Florida
Posts: 1,237
Likes: 0
Received 7 Likes
on
6 Posts
Car: 1989 Pontiac Trans Am GTA
Engine: cammed LS1
Transmission: Monster SS 4L65E
Axle/Gears: 9 bolt posi w/ 3.70 gears
Re: LS1 swap for my '89 GTA
Thanks to my bud Luis, I got my seat harness issue resolved. I just need to hook up the orange power wire & black ground wire under the driver's seat and connect this harness between the seats

And it should make everything work correctly. I found the above harness on E-bay. It should be here in a week or so. One more problem solved.
And it should make everything work correctly. I found the above harness on E-bay. It should be here in a week or so. One more problem solved.
12-09-2013, 12:28 PM
#593
Supreme Member
iTrader: (30)
Join Date: Jul 2000
Location: Fort Myers, FL
Posts: 1,513
Received 17 Likes
on
10 Posts
Car: 91 Firebird
Engine: 6.0
Transmission: T56
Axle/Gears: 3.73
Re: LS1 swap for my '89 GTA
The passenger side isolator is centered, but the driver side is not. But that's because the differential is slightly ****-eyed under the car. The driver's side is a half inch more toward the rear of the car than the passenger side. And the driver side spring is at a weird angle because of it. Do you supposed it could be from adjusting the panhard bar to center the rear? I have adjustable LCA's. Would it be weird to have them adjusted to different lengths to get the differential back to where it should be?
If not, you can eliminate the upper isolator and use a piece of heater hose. I've done it with good results.
Originally Posted by dprest68
It doesn't appear that the tuner adjusted the PCM correctly to make the tachometer work according to my receipt. I'll get it fixed one way or another.
Originally Posted by dprest68
Luis said he isn't interested in the grey seats in case you still are. They even come with custom seat belt guide buttons.
12-09-2013, 03:07 PM
#595
Supreme Member
Thread Starter
iTrader: (1)
Join Date: Mar 2007
Location: Apopka, Florida
Posts: 1,237
Likes: 0
Received 7 Likes
on
6 Posts
Car: 1989 Pontiac Trans Am GTA
Engine: cammed LS1
Transmission: Monster SS 4L65E
Axle/Gears: 9 bolt posi w/ 3.70 gears
Re: LS1 swap for my '89 GTA
Santa stopped by today in a brown suit and brought me a UMI K-member. Yay! Thanks Santa! Looks like a nice piece. We'll see how well it fits.
Looks like a nice piece. We'll see how well it fits.
12-19-2013, 06:24 PM
#599
Supreme Member
Thread Starter
iTrader: (1)
Join Date: Mar 2007
Location: Apopka, Florida
Posts: 1,237
Likes: 0
Received 7 Likes
on
6 Posts
Car: 1989 Pontiac Trans Am GTA
Engine: cammed LS1
Transmission: Monster SS 4L65E
Axle/Gears: 9 bolt posi w/ 3.70 gears
Re: LS1 swap for my '89 GTA
Hey look guys... I made the cover of High Peformance Pontiac!
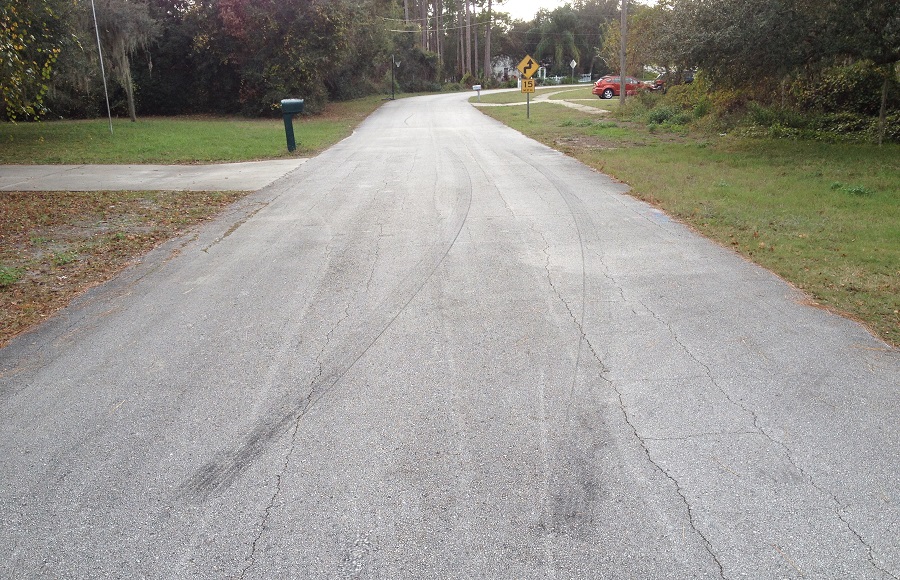
Jason (JaysZ28) came by last week to buy my seats. We figured out a few issues with the car & he got a coolant bath. Sorry Jason & thanks for your help. He took Luis & I for a ride in his car. That thing is nasty! I want to get mine on the road even more now if that's even possible. He left his signature on my road during my ride-along
There's a video Luis took of it too, but I was being too goofy in it to post it!
I haven't really had time to work on the car since he was here until tonight.

Jason (JaysZ28) came by last week to buy my seats. We figured out a few issues with the car & he got a coolant bath. Sorry Jason & thanks for your help. He took Luis & I for a ride in his car. That thing is nasty! I want to get mine on the road even more now if that's even possible. He left his signature on my road during my ride-along

There's a video Luis took of it too, but I was being too goofy in it to post it!
I haven't really had time to work on the car since he was here until tonight.
12-19-2013, 06:43 PM
#600
Supreme Member
Thread Starter
iTrader: (1)
Join Date: Mar 2007
Location: Apopka, Florida
Posts: 1,237
Likes: 0
Received 7 Likes
on
6 Posts
Car: 1989 Pontiac Trans Am GTA
Engine: cammed LS1
Transmission: Monster SS 4L65E
Axle/Gears: 9 bolt posi w/ 3.70 gears
Re: LS1 swap for my '89 GTA
I spotted a G8 GT this evening on Facebook with a Vararam Ram Air box on it. That gave me an idea which lead to more ideas, then a bunch of cutting on my ram air box. During the process I came up with an idea to make my box work. I cut the oval intake opening off of a V6 4th gen air box & I cut the outlet off of my air box. One thing lead to another and I came up with this idea.
Keep in mind that I still have a lot to do to finish it, but I at least have an idea now that will work.
Here's what it looks like now inside the box
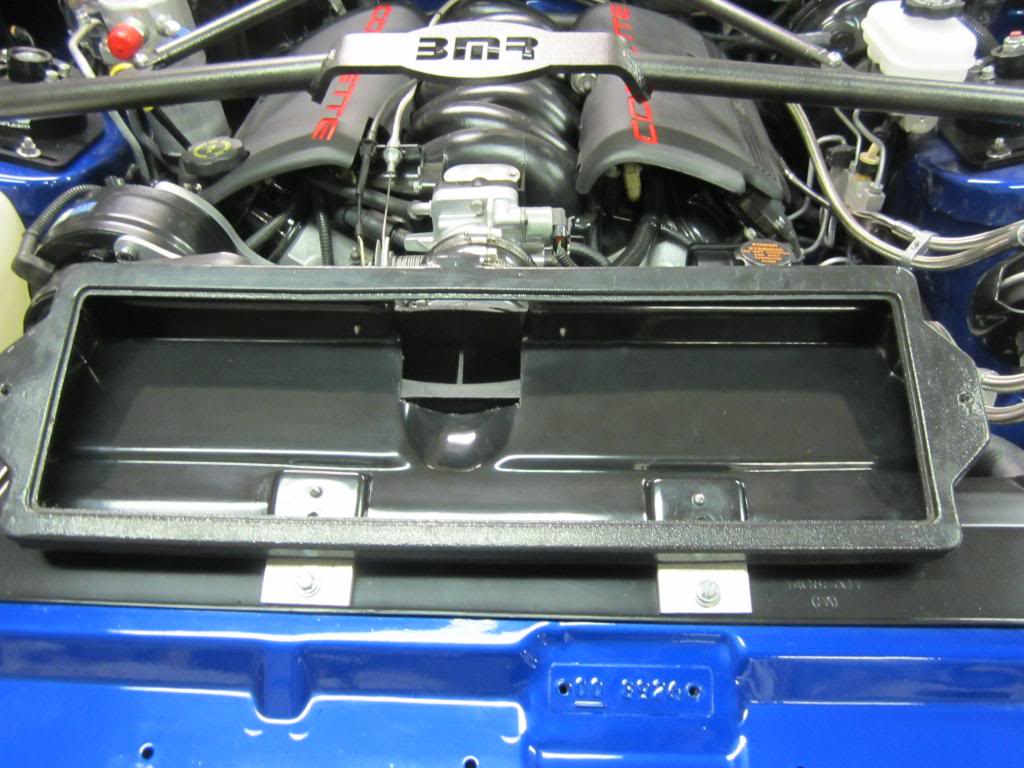
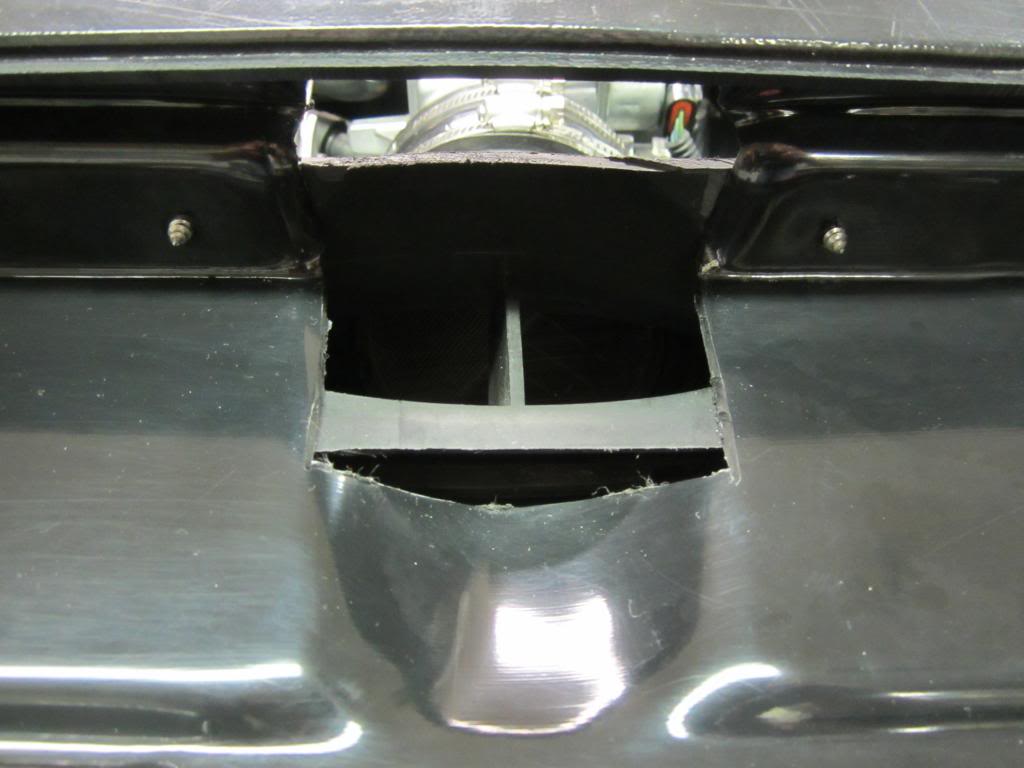
Final product (unfinished)
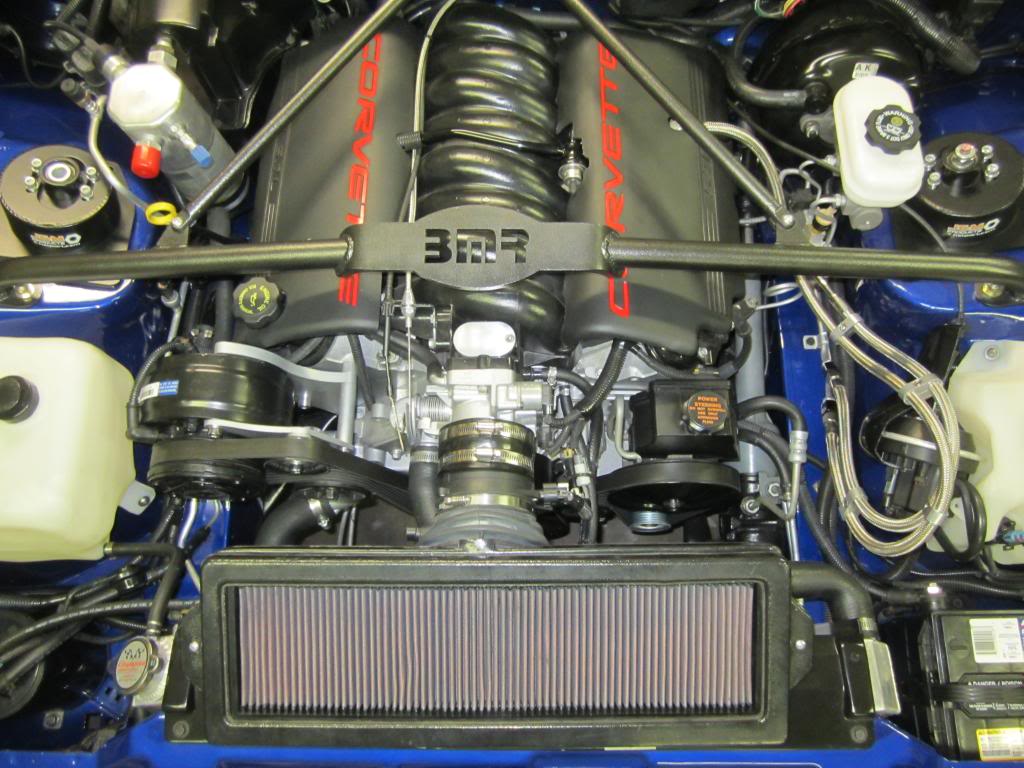
I still need to cut the hump off the bottom of the box, put a plate across the hole & seal it all up. Their are a few other areas on the box to address still too.