
LS1/6 build and swap .. so long SBC

Thread Starter

Joined: Nov 2006
Posts: 537
Likes: 4
From: Calgary, Alberta, Canada
Car: 89 WS6 TransAm
Engine: LQ408
Transmission: T56 Magnum
Axle/Gears: Strange S60, 4.10s
Re: LS1/6 build and swap .. so long SBC
xpndbl3 - I am from the same school and never thought it would be an issue either and after getting it fixed up, I still don't think the oil was coming from the rear seal. When I pulled the install tool from my new GM rear seal to reinstall it in the cover for reinstallation, I noticed it was lubricated with what looked like vaseline, right from the GM factory.
So it seems I did get the leak fixed. Cranked it over numerous times with over 200kPa oil pressure reading on the gauge and all stayed dry. Never really did much to fix it. Reused the same rear seal, only this time installed completely dry and same rear cover gasket. Before installing the gasket and cover, I made sure there was sufficient silicone (both sides of the gasket) to seal the corners between the rear cover and the oil pan junctions. I am thinking this is where my leak was coming from.
Only other concern I have now is the new fibre clutch disc being contaiminated with engine oil. Cleaned it up in the varsol tank, then sprayed it down with brake cleaner, but not sure if I should still use this one or get a replacement?
So with this set back and with work going to be real busy for the next few month's, I decided to pull a few other things apart. Headers are off and are going to get V-bands installed for the ghettocruiser Y-pipe addition, then will be sent out for ceramic coating. With headers out of the way, motor mounts are coming out to replace the stock rubber mounts with polys.
Will be picking up a used 4th gen x-member mounted torque arm which I will be converting to the same setup as the BMR Trac Pak, only with a double cross brace to go between the SFCs. Here is the one I will be converting. Comes with both front and rear driveshaft loops.
http://www.spohn.net/shop/1998-2002-...ersY-Pipe.html
This has all has been a step back, but in the end it will be a better build ... and better prepared for future mods.

Joined: Mar 2001
Posts: 10,439
Likes: 2,093
Car: '89 Firebird
Engine: 7.0L
Transmission: T56
Re: LS1/6 build and swap .. so long SBC
Liked the pictures of the Quick Time bellhousing clearance for header. I will have to do the same thing. I was warned about it by Bruce at Hawks but it is good to see what you did. Thanks.
Senior Member


Joined: Jun 2001
Posts: 922
Likes: 33
From: Kansas
Car: 91 Z28
Engine: 6.0L LQ9
Transmission: T56
Axle/Gears: Dana 44 3.92
Re: LS1/6 build and swap .. so long SBC
i would definitely check into the clutch situation, maybe call ACT and see if they have any suggestions(hopefully they will try and earn your business again, and have a solution or something you can try other than, "just buy a new disc"). its no fun to get the car going only to have to take the tranny off again. i had to do it 3 times on one of our race cars two summers ago - not fun!
p.s. i love my monster level 3 so far.
p.s. i love my monster level 3 so far.
Re: LS1/6 build and swap .. so long SBC
Also, before you throw the trans back in there, check out the pilot bushing area on the crank. There is a plug in the end of the crank that can be knocked in too far creating a massive oil leak
Thread Starter
Joined: Nov 2006
Posts: 537
Likes: 4
From: Calgary, Alberta, Canada
Car: 89 WS6 TransAm
Engine: LQ408
Transmission: T56 Magnum
Axle/Gears: Strange S60, 4.10s
Re: LS1/6 build and swap .. so long SBC
Discussed the oil contamination of my fiber disc with ACT today and they do not recommend running it, but suggest it be relined. Will be sending the disc back to ACT to get this done, as well, tech support set me up with a good deal on a G6 spring centered pad disc (upgrade from the fibre disc), so order that up in the mean time. Tech support indicated that the pad discs can be run even after oil contamination occurs, just clean up and a few hard dumps and they are good.
Discussed my DTC code issues with my programmer today ... PCM will be going back for another tune up.
Thread Starter
Joined: Nov 2006
Posts: 537
Likes: 4
From: Calgary, Alberta, Canada
Car: 89 WS6 TransAm
Engine: LQ408
Transmission: T56 Magnum
Axle/Gears: Strange S60, 4.10s
Re: LS1/6 build and swap .. so long SBC
So the oil leak is fixed. From all I did to seal it, I have to believe it was the additional silicone at the two lower corners of the rear cover gasket that sealed up the problem. When I had installed my front and rear covers, I installed them dry and only added the silicone dabs at the four corners when I installed the oil pan. All future builds will have 1/2" of silicone on each side of the rear seal lower corners.
Sent off the clutch disc to ACT for reline and awaiting arrival of the 6 pad disc. Thinking I might hold off using the 6 pad disc until after the rear end gets upgraded. Counting on soft clutch engagement and tire slippage to keep the 10 bolt living for awhile.
Dropped the headers off to get the V Band clamps installed. While I was at the shop, I checked out a couple other projects he was working on; 67 Mustang running a 565 BBF with 8/71 blower and a Nissan GTR that is getting a few tweaks to run in a local event called Race the Base, one mile max speed event. This guy builds incredible stuff, I was very impressed! I am going to get him to build up my Y pipe and do the mods to fit the 4th gen torque arm crossbar in as well.
Talked to my programmer today as he received my PCM. After numerous emails back and forth, he indicated that his tune was not in my PCM??? Almost accused me of swapping PCMs
 Called him up and talked through the issues. Revised PCM is back on its way home.
Thought I would get the motor mounts changed out today, but the recently installed alternator and A/C pump need to come back out. It will be better, it will be better, it will be better ....
Sent off the clutch disc to ACT for reline and awaiting arrival of the 6 pad disc. Thinking I might hold off using the 6 pad disc until after the rear end gets upgraded. Counting on soft clutch engagement and tire slippage to keep the 10 bolt living for awhile.
Dropped the headers off to get the V Band clamps installed. While I was at the shop, I checked out a couple other projects he was working on; 67 Mustang running a 565 BBF with 8/71 blower and a Nissan GTR that is getting a few tweaks to run in a local event called Race the Base, one mile max speed event. This guy builds incredible stuff, I was very impressed! I am going to get him to build up my Y pipe and do the mods to fit the 4th gen torque arm crossbar in as well.
Talked to my programmer today as he received my PCM. After numerous emails back and forth, he indicated that his tune was not in my PCM??? Almost accused me of swapping PCMs
Called him up and talked through the issues. Revised PCM is back on its way home.Thought I would get the motor mounts changed out today, but the recently installed alternator and A/C pump need to come back out.
It will be better, it will be better, it will be better .... Senior Member
Joined: Jun 2001
Posts: 922
Likes: 33
From: Kansas
Car: 91 Z28
Engine: 6.0L LQ9
Transmission: T56
Axle/Gears: Dana 44 3.92
Re: LS1/6 build and swap .. so long SBC
keep your head up man, it will get better! after i spent 2 days fabbing up my y-pipe, i put it up and realized it was hitting the front torque arm mount and causing ground cleanrance issues after all was said and done.
Thread Starter
Joined: Nov 2006
Posts: 537
Likes: 4
From: Calgary, Alberta, Canada
Car: 89 WS6 TransAm
Engine: LQ408
Transmission: T56 Magnum
Axle/Gears: Strange S60, 4.10s
Re: LS1/6 build and swap .. so long SBC
Oh yeah, its all good. Every time there is any set back, I see it as an opportunity for improvement. 
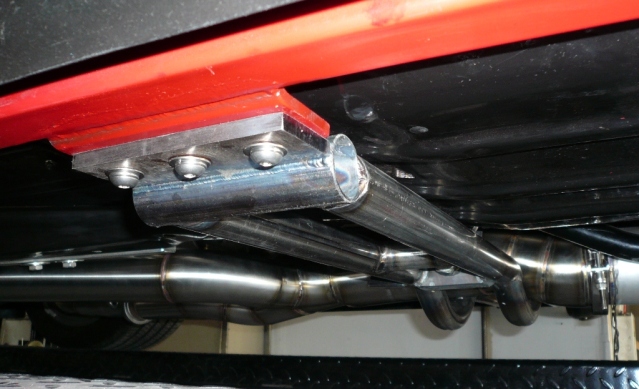
Got the headers back with the new V clamps installed. These are the shops own custom clamp they have made up for them. Strong looking pieces. He said they designed them to handle low hanging Mustang exhausts from coming off when doing high speed passses over railway tracks.
Got the headers back with the new V clamps installed. These are the shops own custom clamp they have made up for them. Strong looking pieces. He said they designed them to handle low hanging Mustang exhausts from coming off when doing high speed passses over railway tracks.
Thread Starter
Joined: Nov 2006
Posts: 537
Likes: 4
From: Calgary, Alberta, Canada
Car: 89 WS6 TransAm
Engine: LQ408
Transmission: T56 Magnum
Axle/Gears: Strange S60, 4.10s
Re: LS1/6 build and swap .. so long SBC
Few updates, got the poly motor mount inserts installed and bolted back together. Glad this is done, as I am not sure if I would have installed them until the next motor removal.
New clutch disc showed up, looks like a nice piece. The 6 pad disc has 3 of the pads offset to spread the wear across the PP and flywheel surface.
The retuned PCM showed up also, got it installed and turned the key to the on position and .... fuel pump ran for the expected 2 seconds. Things are looking up!
Hoping to get the tranny back in the next day or two.
Supreme Member
iTrader: (1)
Joined: Mar 2007
Posts: 1,237
Likes: 7
From: Apopka, Florida
Car: 1989 Pontiac Trans Am GTA
Engine: cammed LS1
Transmission: Monster SS 4L65E
Axle/Gears: 9 bolt posi w/ 3.70 gears
Re: LS1/6 build and swap .. so long SBC
Nice! Interesting how they offset the pads on the clutch disk. Good to hear that you are getting your issues resolved. 
Thread Starter
Joined: Nov 2006
Posts: 537
Likes: 4
From: Calgary, Alberta, Canada
Car: 89 WS6 TransAm
Engine: LQ408
Transmission: T56 Magnum
Axle/Gears: Strange S60, 4.10s
Re: LS1/6 build and swap .. so long SBC
I thought that was interesting as well, I don't know if any other manufacturers are doing a similiar design. We will see if it is an improvement, or ...
Planning to get the tranny and headers back in within the next few days and get her fired up. Hopefully I don't run into any further issues. I need to head back out to work in a couple of days to do some site commissioning of a pump station, so having an engine sound clip would really help the work days go by faster.
Planning to get the tranny and headers back in within the next few days and get her fired up. Hopefully I don't run into any further issues. I need to head back out to work in a couple of days to do some site commissioning of a pump station, so having an engine sound clip would really help the work days go by faster.
Thread Starter
Joined: Nov 2006
Posts: 537
Likes: 4
From: Calgary, Alberta, Canada
Car: 89 WS6 TransAm
Engine: LQ408
Transmission: T56 Magnum
Axle/Gears: Strange S60, 4.10s
Re: LS1/6 build and swap .. so long SBC
No leaks! 
Sorry for the blurry vid, new camera, old operator. Very loud with being open, microphone was overwhelmed when I cracked the throttle.
Sorry for the blurry vid, new camera, old operator. Very loud with being open, microphone was overwhelmed when I cracked the throttle.
Supreme Member
iTrader: (35)
Joined: Aug 2006
Posts: 1,470
Likes: 1
From: Mississauga,Ont,Canada
Car: 89 IROC
Engine: LSX 6.0 370, TU2 Cam, Fast intake
Transmission: T56 w/ lots of goodies
Axle/Gears: 8.8, Posi, 4.10, 31 Spline
Re: LS1/6 build and swap .. so long SBC
NICE!!!!!!!!!!!!
Supreme Member
iTrader: (35)
Joined: Aug 2006
Posts: 1,470
Likes: 1
From: Mississauga,Ont,Canada
Car: 89 IROC
Engine: LSX 6.0 370, TU2 Cam, Fast intake
Transmission: T56 w/ lots of goodies
Axle/Gears: 8.8, Posi, 4.10, 31 Spline
Re: LS1/6 build and swap .. so long SBC
I was wondering when you put the v bands on did the passenger side get really close to the frame rail as mine is so close that I need to bend the tube at the end for some clearance to fit
Thread Starter
Joined: Nov 2006
Posts: 537
Likes: 4
From: Calgary, Alberta, Canada
Car: 89 WS6 TransAm
Engine: LQ408
Transmission: T56 Magnum
Axle/Gears: Strange S60, 4.10s
Re: LS1/6 build and swap .. so long SBC
Still had about a 1/4 " clearance on the passenger side with the V bands installed. These bands are very low profile to the flange itself. There is just enough room to slide it by between the end of the flange and the body.
How is your fuel pump issue going?
How is your fuel pump issue going?
Supreme Member
iTrader: (35)
Joined: Aug 2006
Posts: 1,470
Likes: 1
From: Mississauga,Ont,Canada
Car: 89 IROC
Engine: LSX 6.0 370, TU2 Cam, Fast intake
Transmission: T56 w/ lots of goodies
Axle/Gears: 8.8, Posi, 4.10, 31 Spline
Re: LS1/6 build and swap .. so long SBC
I got about 3/16ths clearance on mine. May just wack the frame rail a couple times to give me a few mm clearance.
Pocket got back to me and seems like theres a extra wire going to it that doesnt need to be there. I will be trying it out on the weekend as the last couple days its been -15 to -20C out and the garage isnt heated. Too dam cold to be workin on it plus im sick as hell. It will get done as soon as I get the fuel pump running I will be posting videos of it
Pocket got back to me and seems like theres a extra wire going to it that doesnt need to be there. I will be trying it out on the weekend as the last couple days its been -15 to -20C out and the garage isnt heated. Too dam cold to be workin on it plus im sick as hell. It will get done as soon as I get the fuel pump running I will be posting videos of it
Senior Member
Joined: Jun 2001
Posts: 922
Likes: 33
From: Kansas
Car: 91 Z28
Engine: 6.0L LQ9
Transmission: T56
Axle/Gears: Dana 44 3.92
Re: LS1/6 build and swap .. so long SBC
good work! glad to hear it running...now for all the fine tuning and little stuff!
Last edited by STREETDEMON; Jan 23, 2012 at 08:13 AM.
Senior Member
iTrader: (5)
Joined: Dec 2008
Posts: 719
Likes: 0
From: Alabama
Car: 1986 camaro
Engine: ls2
Transmission: FLT stage 6 60e
Axle/Gears: 8.8 with 3.73's
Re: LS1/6 build and swap .. so long SBC
UMMMMMM i believe you owe us an update???????????????????????????
Thread Starter
Joined: Nov 2006
Posts: 537
Likes: 4
From: Calgary, Alberta, Canada
Car: 89 WS6 TransAm
Engine: LQ408
Transmission: T56 Magnum
Axle/Gears: Strange S60, 4.10s
Re: LS1/6 build and swap .. so long SBC
Don't have really anything more to report at the moment. When I get back home, I will post up a better video than the poor production clip I posted in post #113 ... can't wait to hear it run again  .
.
Beyond that, just waiting to get the Spohn torque arm so I can get that customized and installed with the new Y pipe.
.Beyond that, just waiting to get the Spohn torque arm so I can get that customized and installed with the new Y pipe.
Thread Starter
Joined: Nov 2006
Posts: 537
Likes: 4
From: Calgary, Alberta, Canada
Car: 89 WS6 TransAm
Engine: LQ408
Transmission: T56 Magnum
Axle/Gears: Strange S60, 4.10s
Re: LS1/6 build and swap .. so long SBC
As I had neglected to provide the information on my throttle cable install as to the cable connection at the throttle body end, I have been receiving a few questions. The cable used was the Lokar LS1 cable with the clevis end removed and replaced with a brass cable end adapter from a motorcycle clutch cable. If you go to your local motorcycle shop they should be able to set you up with one of these ends.
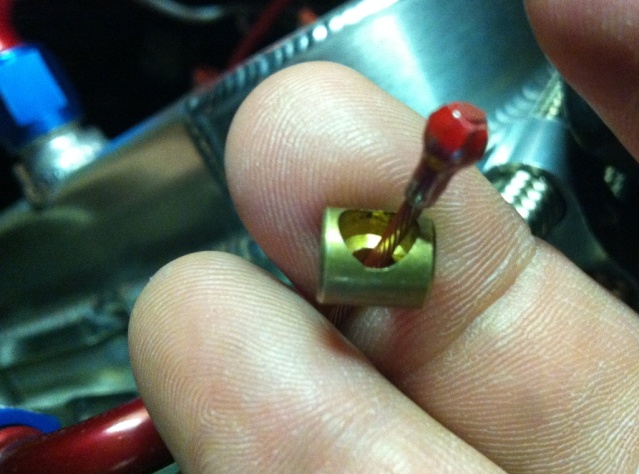
Here is how it fit in to the throttle body. Took a very slight amount of internal clearancing to get a bind free fit.
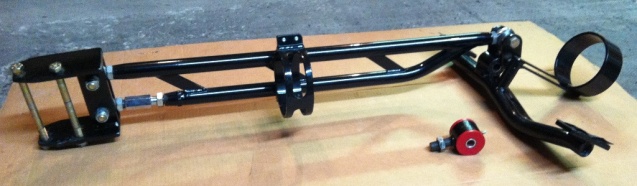
Picked up my used 4th Gen torque arm which I am going to convert to the 3rd gen. Here is what I am starting with.
My first thought was to convert the front mount to a similar setup as the BMR track pac, chopping off the floor mount ends and extending the dual tubes out to my SFCs. Another option I am wondering about is if it may be easier and cleaner to just build some brackets off the floor boards themselves, having it bolt on and removeable. My concern here is the floor strength, which I am thinking that adding some reinforcement plates would suffice. Thoughts?
I am going to throw the arm on today and will get some pics of where the front mount lines up with the floor.
Here is how it fit in to the throttle body. Took a very slight amount of internal clearancing to get a bind free fit.
Picked up my used 4th Gen torque arm which I am going to convert to the 3rd gen. Here is what I am starting with.
My first thought was to convert the front mount to a similar setup as the BMR track pac, chopping off the floor mount ends and extending the dual tubes out to my SFCs. Another option I am wondering about is if it may be easier and cleaner to just build some brackets off the floor boards themselves, having it bolt on and removeable. My concern here is the floor strength, which I am thinking that adding some reinforcement plates would suffice. Thoughts?
I am going to throw the arm on today and will get some pics of where the front mount lines up with the floor.
Last edited by HP52TA; Feb 11, 2012 at 12:42 PM.
Member
iTrader: (2)
Joined: Mar 2004
Posts: 250
Likes: 0
From: NE Pa
Car: 1989 Iroc-Z Convertible
Engine: 6.0 LQ4 LSX
Transmission: T56
Axle/Gears: Moser 12 bolt w/4.11s
Re: LS1/6 build and swap .. so long SBC
Thanks for the pic.....very helpful! Congrats on the build also.

Supreme Member
Joined: May 2009
Posts: 1,032
Likes: 0
Re: LS1/6 build and swap .. so long SBC
How is that ACT clutch?? I'm seriously thinking about getting one for my build (good price). I cannot decide if I want the 6 puck or street version. So far, it's a stock ls1 build.
Your the only person I found that has one installed and have the 6 puck as well as organic disk. How do you like it?
Your the only person I found that has one installed and have the 6 puck as well as organic disk. How do you like it?
Thread Starter
Joined: Nov 2006
Posts: 537
Likes: 4
From: Calgary, Alberta, Canada
Car: 89 WS6 TransAm
Engine: LQ408
Transmission: T56 Magnum
Axle/Gears: Strange S60, 4.10s
Re: LS1/6 build and swap .. so long SBC
Sorry Blake but she hasn't spun a wheel yet to give you any review of the clutch setup. Hoping to get the torque arm and Y pipe tied in within the next couple weeks.
Supreme Member
iTrader: (1)
Joined: Mar 2007
Posts: 1,237
Likes: 7
From: Apopka, Florida
Car: 1989 Pontiac Trans Am GTA
Engine: cammed LS1
Transmission: Monster SS 4L65E
Axle/Gears: 9 bolt posi w/ 3.70 gears
Thread Starter
Joined: Nov 2006
Posts: 537
Likes: 4
From: Calgary, Alberta, Canada
Car: 89 WS6 TransAm
Engine: LQ408
Transmission: T56 Magnum
Axle/Gears: Strange S60, 4.10s
Re: LS1/6 build and swap .. so long SBC
Checked it out,  . I like your creativity in trying something different. I was thinking of reusing the stock metal hose as well, but it didn't work well with my coil relocation. Hope you have no issues with hose clearance at the rear of the motor, mine was very tight back there.
. I like your creativity in trying something different. I was thinking of reusing the stock metal hose as well, but it didn't work well with my coil relocation. Hope you have no issues with hose clearance at the rear of the motor, mine was very tight back there. Thread Starter
Joined: Nov 2006
Posts: 537
Likes: 4
From: Calgary, Alberta, Canada
Car: 89 WS6 TransAm
Engine: LQ408
Transmission: T56 Magnum
Axle/Gears: Strange S60, 4.10s
Re: LS1/6 build and swap .. so long SBC
Long overdue update. Been real busy working this year, with a lot of time away from home since the start of the year. Then throw in a house move to boot and I haven't had much time for completing the swap. The house move forced me into some late hours to get the car into a roller state and with the possession date of the house looming, trailered the car over to my welder to get the torque arm and new Y pipe fabricated.
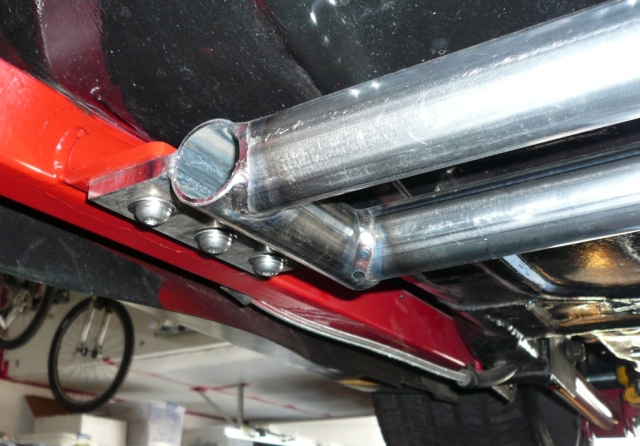
Y pipe was custom built using stainless steel throughout, 3" from header collectors into the Y, then 4" to match up with my existing Mufflex system.
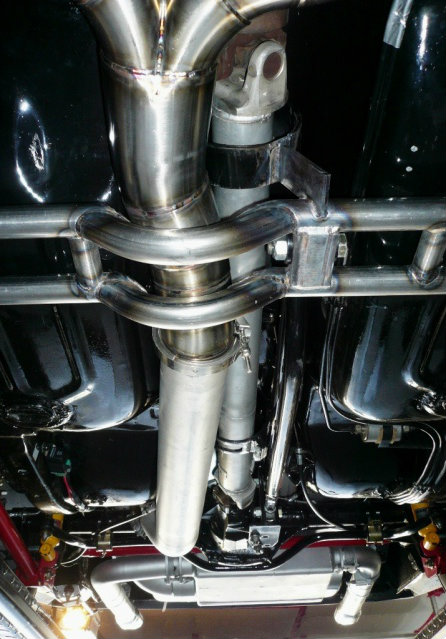
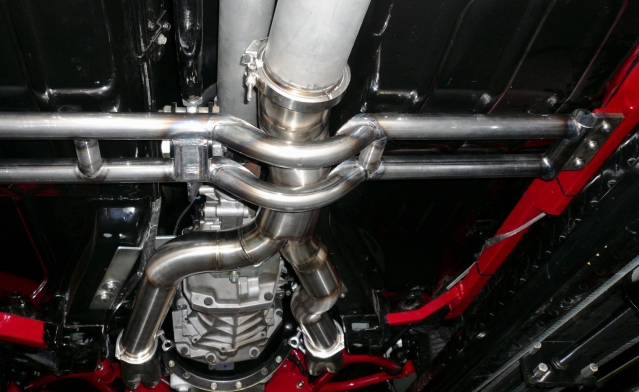
We added a little length to the passenger side in order to maintain the same length of pipe from each collector to the center of the Y connection. This was done to keep the timing of the exhaust pulses equal from each bank.
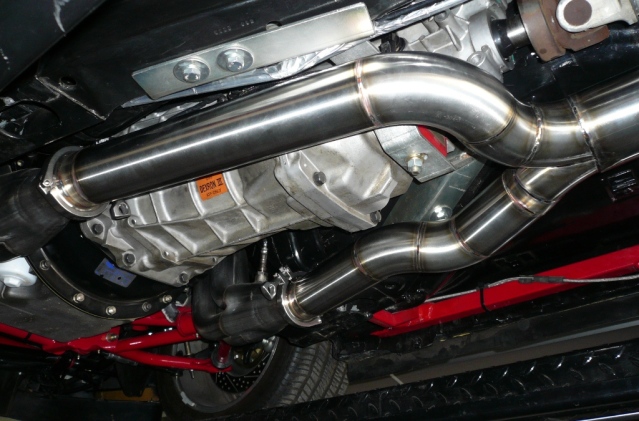
Some mad welding skills this guy possesses...
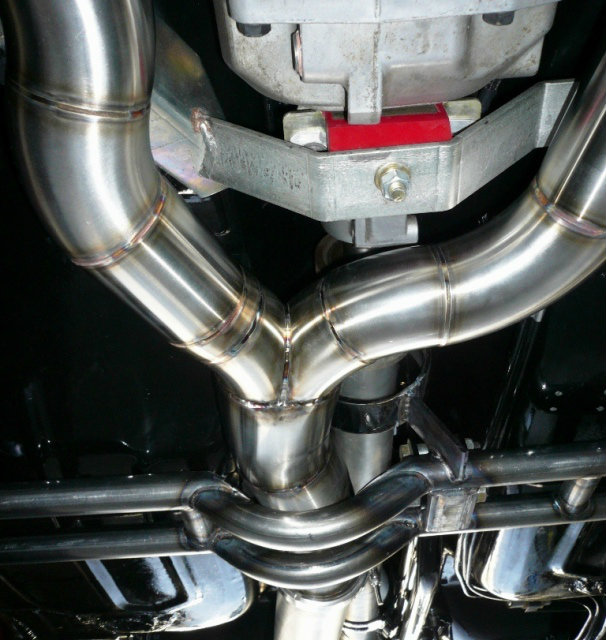
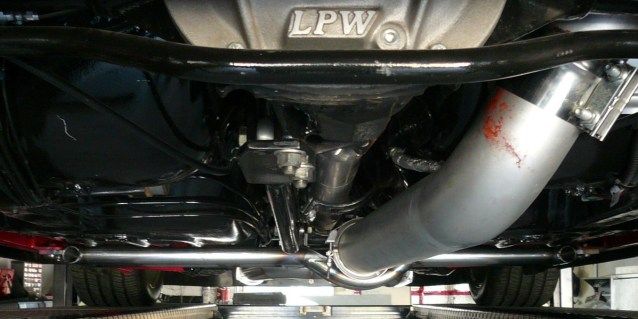
And going out the back through my existing Mufflex system.
My plan for the torque arm mount was to reuse the 4th Gen x-member and modify it to connect to the SFCs, but after some deliberation, we decided to build from scratch, as the cost difference was minimal. Only thing reused was the front driveshaft loop.
Out came the chrome moly tubing and here is where it ended up.
We were trying to replicate the 4th Gen mount, using the same concept as the BMR trac-pac for the 3rd gen in mounting to the SFCs, but I also wanted to allow the x-member to be removable for ease of maintenance down the road. Brackets were drilled and threaded for SS mounting bolts, then welded to the SFCs.
Clearance is definatly of concern with this concept and the 4" exhaust. I had replaced my front springs with a softer rate for the swap, with them adjusted to there lowest setting, the front tires are sitting with only a 1/2" clearance from the fender in this picture. After scrapping the x-member entering my garage, I will need to raise the front a bit. It was a little too low and raked anyway with the current rear springs.
Will be removing the x-member this winter for powder coating, as for now I want to drive her!
Blake - IRT the ACT clutch. Pedal pressure seems to be pretty tough at the moment, slowly getting better...
The paddle disc is a pretty abrupt connection as well. Very tough to get things moving from a stop without chirping the tires. I will give an update once I get some miles on it and things are broken in.
Y pipe was custom built using stainless steel throughout, 3" from header collectors into the Y, then 4" to match up with my existing Mufflex system.
We added a little length to the passenger side in order to maintain the same length of pipe from each collector to the center of the Y connection. This was done to keep the timing of the exhaust pulses equal from each bank.
Some mad welding skills this guy possesses...
And going out the back through my existing Mufflex system.
My plan for the torque arm mount was to reuse the 4th Gen x-member and modify it to connect to the SFCs, but after some deliberation, we decided to build from scratch, as the cost difference was minimal. Only thing reused was the front driveshaft loop.
Out came the chrome moly tubing and here is where it ended up.
We were trying to replicate the 4th Gen mount, using the same concept as the BMR trac-pac for the 3rd gen in mounting to the SFCs, but I also wanted to allow the x-member to be removable for ease of maintenance down the road. Brackets were drilled and threaded for SS mounting bolts, then welded to the SFCs.
Clearance is definatly of concern with this concept and the 4" exhaust. I had replaced my front springs with a softer rate for the swap, with them adjusted to there lowest setting, the front tires are sitting with only a 1/2" clearance from the fender in this picture. After scrapping the x-member entering my garage, I will need to raise the front a bit. It was a little too low and raked anyway with the current rear springs.
Will be removing the x-member this winter for powder coating, as for now I want to drive her!
Blake - IRT the ACT clutch. Pedal pressure seems to be pretty tough at the moment, slowly getting better...
The paddle disc is a pretty abrupt connection as well. Very tough to get things moving from a stop without chirping the tires. I will give an update once I get some miles on it and things are broken in.

Member
Joined: Mar 2004
Posts: 408
Likes: 0
Car: 1984 Camaro
Engine: LS1
Transmission: T56
Axle/Gears: Ford 9"/4.30
Re: LS1/6 build and swap .. so long SBC
Man, that exhaust is hot rod eye candy!! Nice work for sure. Good idea on the crossmember, definately no strength problems there. However, it does look super low to the ground, I'm curious how it does for you with normal driving. My exhaust is a lot more tucked and I still have to be careful at gas stations, driveways, speed bumps, etc. It sure does looks nice though, and at the track if should be a worry free setup. I'm thinking about doing some welding to beef but my tq arm mount too, worried about leverage on the frame during launch and hard braking.
Thread Starter
Joined: Nov 2006
Posts: 537
Likes: 4
From: Calgary, Alberta, Canada
Car: 89 WS6 TransAm
Engine: LQ408
Transmission: T56 Magnum
Axle/Gears: Strange S60, 4.10s
Re: LS1/6 build and swap .. so long SBC
Never had any issue with driving home from the welders shop and did hit some pretty good sized road bumps. No bottoming or scraping until I pulled into my garage. It has a slight grade up to the garage floor and as I was pulling in there was a quick little grind.
I then adjusted the front springs to give me 1" clearance between the front tires and the fenders and it pulled out without issue. The front springs were set to their lowest position in the previous pics and the car was sitting with too much rake as it was. Will definatly need to be on the watch for raised manholes and speed bumps though .
.
I then adjusted the front springs to give me 1" clearance between the front tires and the fenders and it pulled out without issue. The front springs were set to their lowest position in the previous pics and the car was sitting with too much rake as it was. Will definatly need to be on the watch for raised manholes and speed bumps though
. Senior Member
Joined: Jun 2001
Posts: 922
Likes: 33
From: Kansas
Car: 91 Z28
Engine: 6.0L LQ9
Transmission: T56
Axle/Gears: Dana 44 3.92
Re: LS1/6 build and swap .. so long SBC
your exhaust looks very sharp, and that torque-arm cross member makes me drool....very nice!
Thread Starter
Joined: Nov 2006
Posts: 537
Likes: 4
From: Calgary, Alberta, Canada
Car: 89 WS6 TransAm
Engine: LQ408
Transmission: T56 Magnum
Axle/Gears: Strange S60, 4.10s
Re: LS1/6 build and swap .. so long SBC
Cold morning, cold start idle. Got to love EFI.
A lot of pedaling had to happen with the chokeless carb setup under these conditions.
Senior Member
Joined: Jun 2001
Posts: 922
Likes: 33
From: Kansas
Car: 91 Z28
Engine: 6.0L LQ9
Transmission: T56
Axle/Gears: Dana 44 3.92
Re: LS1/6 build and swap .. so long SBC
really there has been no change in 1300 miles, other than the fact i have learned how to use it in a street friendly manner. i called monster around 6-700 miles to ask them what i was doing wrong. they told me there is no "break-in" procedure for the level 3. he asked me if i had been driving like an old lady, and then directed me to take it out and beat on it. haha, now there is a company that believes in its product! now i just need to finish up my 8.8 build so i can really beat on it....
Thread Starter
Joined: Nov 2006
Posts: 537
Likes: 4
From: Calgary, Alberta, Canada
Car: 89 WS6 TransAm
Engine: LQ408
Transmission: T56 Magnum
Axle/Gears: Strange S60, 4.10s
Re: LS1/6 build and swap .. so long SBC
Well now that I have a few miles on the road, I thought I would provide some updates of how things are running.
Tach (Stock 89 Firebird) - At first nothing. Installed the 680 ohm pullup resistor mod, now reads about half what it should. I am hoping this can be resolved with computer tuning. I believe adjusting the PCM Tach Output should resolve this not?
The 4" exhaust with the LS1 2" header primaries is quite a bit louder than the SBC with the Hooker 1 3/4" long tubes using the same exhaust. Not much difference at idle, but when cracking the throttle, it is a whole new level of loudness. EVERYONE hears you coming!
Clutch has broken in some now and seems to allow a smoother transition, but there is still no slipping it when trying to sneak out of the neighbourhood. It feels good though, solid and hooks great when leaving a stop light around 3K. More RPM = More fun.
BMR 4th gen track bar install, car hooks quite a bit better than the old torque arm setup. A litte noisy with the heim joints, so may switch it to the poly joint setup to get rid of the rattle. Other than that it rides and works well. Haven't had any clearance issues other than the run into the garage. Been avoiding mall speed bumps like the plague.
Mail order tune is still in, but is running a little lean. Have a dyno tune scheduled for the end of the month, so should have some numbers soon.
Haven't sprayed any N2O yet, likely save that for the tune day to get things dialed in first on motor, then bring it in.
Rev limiter is way more fun set at 6800 than 5000. I was a little conservative on the break in settings. LOL The LS1 hype was kind of disappointing from my previous 406 SBC at first, but that all changed once the rev limiter was adjusted. Vengence cam HP peaks around 6900, so may raise it a few more RPM once it gets tuned.
Need to stuff the computer up under the dash and start with the stereo install next, although I haven't been bored with the engine melody yet.
Thread Starter
Joined: Nov 2006
Posts: 537
Likes: 4
From: Calgary, Alberta, Canada
Car: 89 WS6 TransAm
Engine: LQ408
Transmission: T56 Magnum
Axle/Gears: Strange S60, 4.10s
Re: LS1/6 build and swap .. so long SBC
Hey guys, finally got the car over to the tuner to finalize the PCM tune. Car runs much smoother now with the few adjustments that were made to the fuel tables.
Numbers on the Superflow 30 chassis dyno came in as follows:
Motor alone
344 rwhp @ 7050 rpm
285 rwtq @ 5800 rpm
With 50 shot N2O
395 rwhp @ 7050 rpm
332 rwtq @ 5800 rpm
These two runs are overlayed in the first sheet.
Wasn't too happy with the numbers as I was expecting a lot more out of her. Tuner indicated his dyno is accurate though and provided some runs from a couple of ZO6 corvettes for comparrison which indicated the stock corvette making only 297 rwhp and the vortech supercharged version making only 419 rwhp.
Seeing these comparisons of course brought a smile to my face, but all these numbers don't seem to jive. I have seen stock ZO6 corvette numbers from other dynos runs indicating around 450 rwhp for these cars.
Sheet two has these two ZO6 comparison runs overlayed with my motor only run.
Are these numbers making any sense to you guys?
Hoping to get it on another chassis dyno tomorrow to see what numbers come up. Will keep you posted.
Supreme Member
iTrader: (2)
Joined: Dec 2006
Posts: 5,538
Likes: 0
From: Hou. TX
Car: 86 TA, 91 B4C
Engine: 5.3, 4.8
Transmission: 4L80 4000, T56
Axle/Gears: 4.30 M12, 23.42 10 bolt
Re: LS1/6 build and swap .. so long SBC
For one, that elbow is probably a culprit, and for two, i have no idea if that tuner knows his stuff as well as some of the guys out here in my area, 3, what is your altitude? I am at seal level, so we run harder and make more to the ground that others up high.
Thread Starter
Joined: Nov 2006
Posts: 537
Likes: 4
From: Calgary, Alberta, Canada
Car: 89 WS6 TransAm
Engine: LQ408
Transmission: T56 Magnum
Axle/Gears: Strange S60, 4.10s
Re: LS1/6 build and swap .. so long SBC
This was my first time ever on a chassis dyno so I am just trying to figure out the low numbers overall. If I am making 50 horse more than a stock ZO6 vette on motor alone and within 25 horse of a Supercharged ZO6 with a little N2O, I am happy with these results ... for now. Some day I hope to make you all proud with forced induction through that elbow.
Chassis dyno is located at 2470' of elevation.
I thought the STP correction accounted for elevation, but I think this is where my misunderstanding is. When I engine dynoed my previous 406, it was only making around 350 hp at elevation, but when corrected for sea level jumped up by about 100 horse. (this was at 3450' of elevation)
My search of STP correction identified the following base conditions:
"Power is corrected to reference conditions of 29.92 InHg (103.3 kPa) of dry air and 60 F (15.5�C)."
Is there a way to correct these numbers from 2470' to sea level?
Last edited by HP52TA; Aug 12, 2012 at 10:57 AM.
Senior Member
Joined: Jun 2001
Posts: 922
Likes: 33
From: Kansas
Car: 91 Z28
Engine: 6.0L LQ9
Transmission: T56
Axle/Gears: Dana 44 3.92
Re: LS1/6 build and swap .. so long SBC
you also have to remember, every dyno shows different numbers. mustangs traditionally read lower than dyno-jets, etc, etc, blah blah blah. if you are making more hp than a stock LS7, I wouldn't worry about it(505 crank hp from the factory). you're there, the dyno just reads lower than what you are used to seeing everyone post. track times will prove my point....we had a dyno in my home town that was called the "heartbreaker" for this very reason.

Joined: Feb 2008
Posts: 504
Likes: 1
From: newfoundland canada
Car: 1989 camaro rs
Engine: ls 5.3 carb
Transmission: t56 six speed
Axle/Gears: 3:73
Re: LS1/6 build and swap .. so long SBC
awesome work!! your build is almost the same as mine! love it, might have a few questions for ya though, any other info what you did to get you t56 set up properly? mine is soon going in, quick time bell, tick master, and remote bleeder, any other surprises to the install? love your exhaust, I'm gone with stainless 3'' true duals, and how does your car run with the tick master and t56? thanks
Thread Starter
Joined: Nov 2006
Posts: 537
Likes: 4
From: Calgary, Alberta, Canada
Car: 89 WS6 TransAm
Engine: LQ408
Transmission: T56 Magnum
Axle/Gears: Strange S60, 4.10s
Re: LS1/6 build and swap .. so long SBC
Nothing really more to report for install issues. Header interference was the biggest issue, with the 2" primaries.
Centering the bell and spacing the clutch properly are important to have it all work smoothly. Tick master totally transforms the shifting of the already good T56 allowing high RPM shifts that weren't possible with the stock master, even after the drill mod. Amazing difference! You should be very happy with the setup.
If I had to complain, I wish I would have gone with a dual disc clutch, as the heavy clutch spring and paddle disc is a little much for the street, but hooks hard without slippage. OK on street, awesome for drag racing, but a little tough for road racing, as down shifts can be abrupt and break the rear wheels loose when coming hot into corners.
I replaced the shifter bushing in the tranny from nylon to brass as well, it makes for a definitive shift, again great for drag, but a little stiff for street. Takes away the smoothness between gears and almost feels a little notchy, as it is very positive.

Junior Member
Joined: Aug 2015
Posts: 2
Likes: 0
Re: LS1/6 build and swap .. so long SBC
Thanks. I remembered seeing that post, now subscribed.
I tried talking the wife into it but .... it didn't go well.
Been real busy with work so haven't been making too much progress, mostly small tasks as time allows. Been working on the wiring and have it mostly complete, but still sorting out a few connections ...Many Thanks to Pocket for his excellent wiring how to coverage. We are lucky to have members like him that donate that amount of information and time.
Decided this was a good time to do the battery relocation with all the other wiring going on.
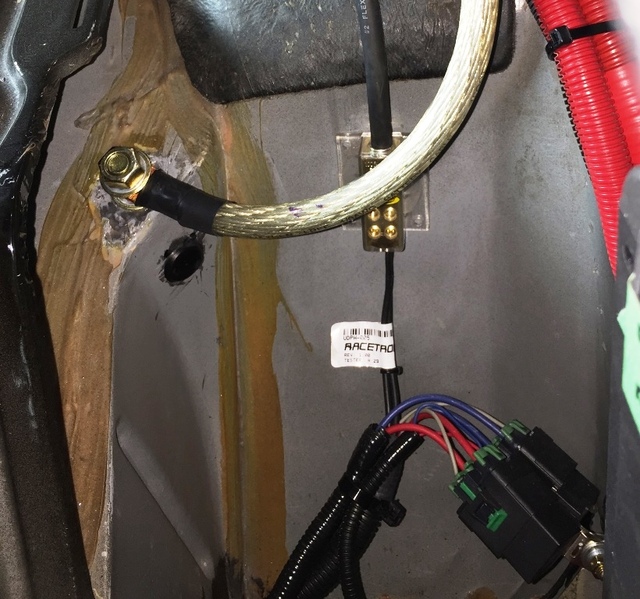
Got the Racetronics fuel pump installed but am wondering about powering it. With the regular battery location, power distribution is at the alternator, but with the relocation, I am going to power it from the battery itself.
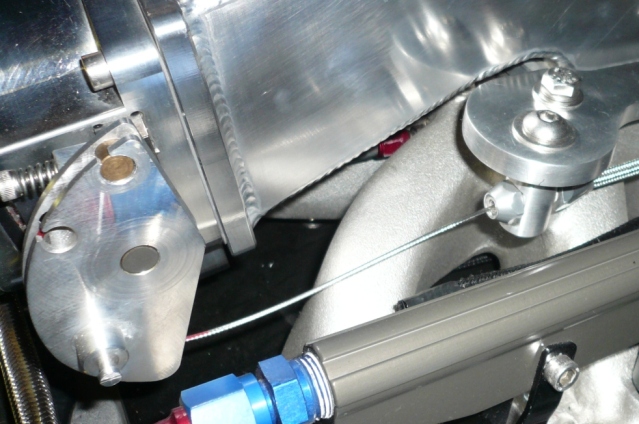
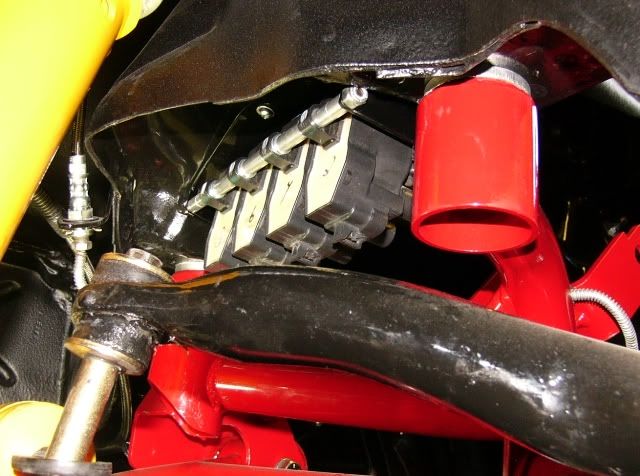
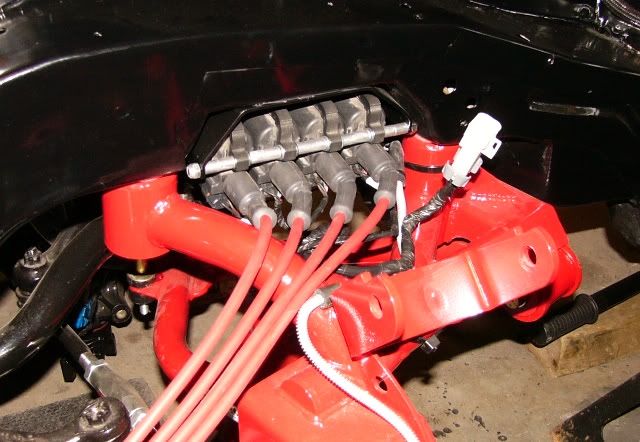
With no coil brackets on my valve covers and running coilovers up front, I decided to get creative with the coil location and mounted them in the old spring buckets. Mades some brackets to hide them up and away from harm. Let me know what you think.
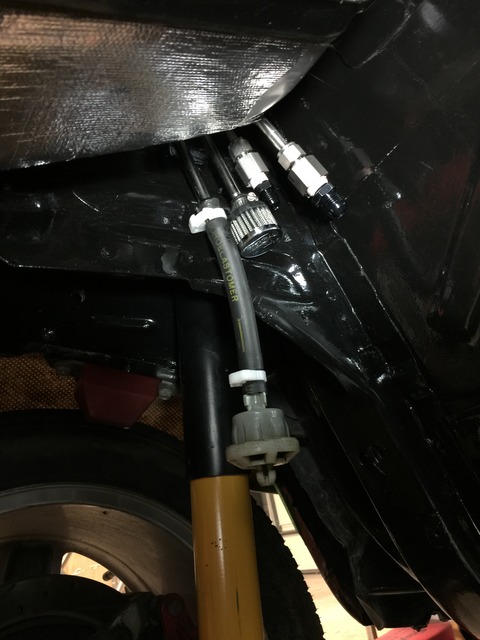
Got the brake lines relocated as well to add some more header clearance. Hoping to get the bell and clutch on tomorrow.
I tried talking the wife into it but .... it didn't go well.
Been real busy with work so haven't been making too much progress, mostly small tasks as time allows. Been working on the wiring and have it mostly complete, but still sorting out a few connections ...Many Thanks to Pocket for his excellent wiring how to coverage. We are lucky to have members like him that donate that amount of information and time.
Decided this was a good time to do the battery relocation with all the other wiring going on.
Got the Racetronics fuel pump installed but am wondering about powering it. With the regular battery location, power distribution is at the alternator, but with the relocation, I am going to power it from the battery itself.
With no coil brackets on my valve covers and running coilovers up front, I decided to get creative with the coil location and mounted them in the old spring buckets. Mades some brackets to hide them up and away from harm. Let me know what you think.
Got the brake lines relocated as well to add some more header clearance. Hoping to get the bell and clutch on tomorrow.
Thread Starter
Joined: Nov 2006
Posts: 537
Likes: 4
From: Calgary, Alberta, Canada
Car: 89 WS6 TransAm
Engine: LQ408
Transmission: T56 Magnum
Axle/Gears: Strange S60, 4.10s
Re: LS1/6 build and swap .. so long SBC
Coil mounts = Custom everything.
I was lucky enough to acquire the coils with spacers and extended MSD plug wires with the LS1 when I purchased the engine used. The coils had been remotely mounted in the previous fourth gen TransAm that they were removed from.
From there, brackets were then custom made out of some 3" flat steel for mounting inside the spring pockets. Coil wiring was extended when I rewired the LS1 PCM for the third gen swap. It can easily be replicated per the pictures.
Not sure what the MSD part number is for the extended plug wires, however I would suggest just buying bulk wire and boots separately from MSD and then build them to the exact length yourself.
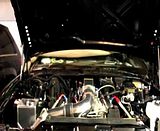
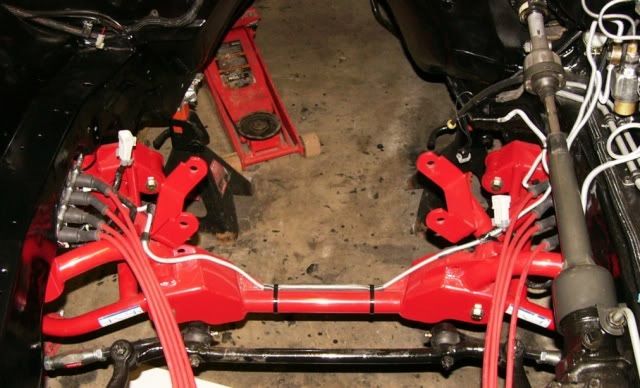
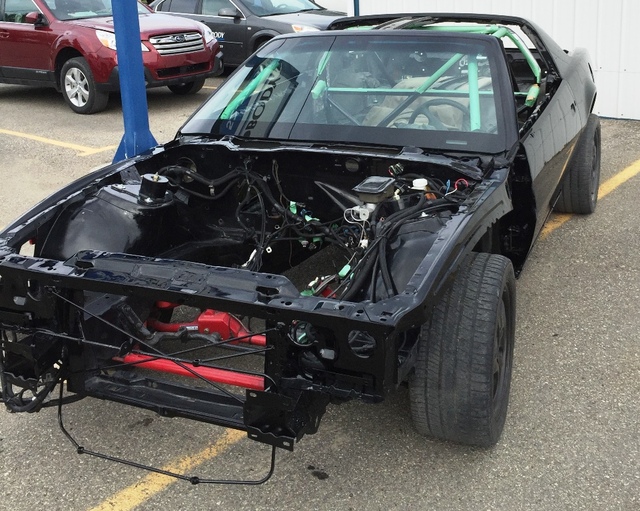
Funny that you re-posted these pics of the empty engine bay, as that is again how it is currently sitting. Bigger and much badder things to come with the next engine. Coils and wiring will remain the same.
I was lucky enough to acquire the coils with spacers and extended MSD plug wires with the LS1 when I purchased the engine used. The coils had been remotely mounted in the previous fourth gen TransAm that they were removed from.
From there, brackets were then custom made out of some 3" flat steel for mounting inside the spring pockets. Coil wiring was extended when I rewired the LS1 PCM for the third gen swap. It can easily be replicated per the pictures.
Not sure what the MSD part number is for the extended plug wires, however I would suggest just buying bulk wire and boots separately from MSD and then build them to the exact length yourself.
Funny that you re-posted these pics of the empty engine bay, as that is again how it is currently sitting. Bigger and much badder things to come with the next engine. Coils and wiring will remain the same.
Thread Starter
Joined: Nov 2006
Posts: 537
Likes: 4
From: Calgary, Alberta, Canada
Car: 89 WS6 TransAm
Engine: LQ408
Transmission: T56 Magnum
Axle/Gears: Strange S60, 4.10s
Re: LS1/6 build and swap to S/C LQ408
Thought its time to update this thread with my latest car status since starting it's next incarnation. Looking for more power, so have been storing parts for a while now to support this next build. This go round she is getting additional support and some needed lipstick.
The new engine is an LQ4 6.0L iron block which is being bored and stroked to 408 and built to support an F1C Procharger. I have another thread under power adders where all the details of the engine build and supercharger setup will reside, but I'll keep the rest of the build/mods here. https://www.thirdgen.org/forums/powe...ged-style.html
In the last incarantion the LS1 worked very well. Managed to race a season of Time Attack on Castrol Raceways road course in Edmonton before the start of this recent rebuild. The car was pretty worn after six day sessions, brakes and tires were completely gone. It was a blast tearing down the straights reving past 7 grand! Having technical difficulties trying to get a video up, in the meantime...
4th Gen wheels with 275s on all four, even with the ten year old tires, she worked pretty well for my first time on a road course. Slippery tires makes you drive smooth, or else...
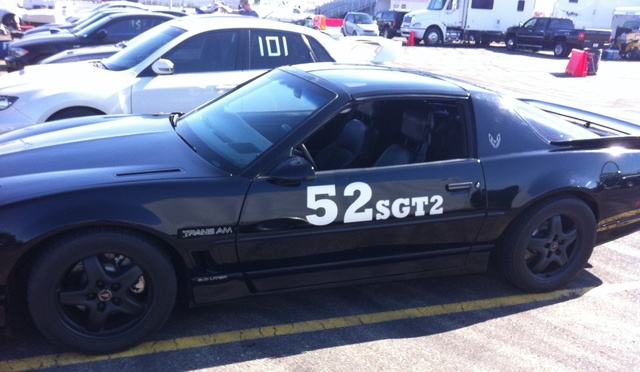
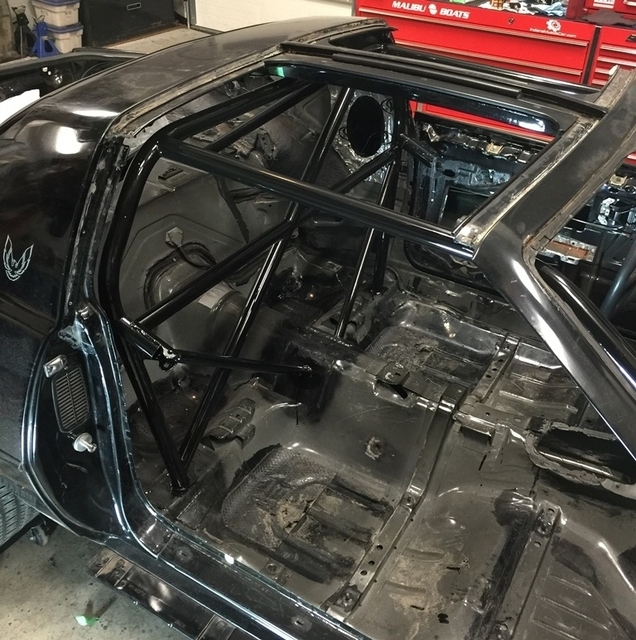
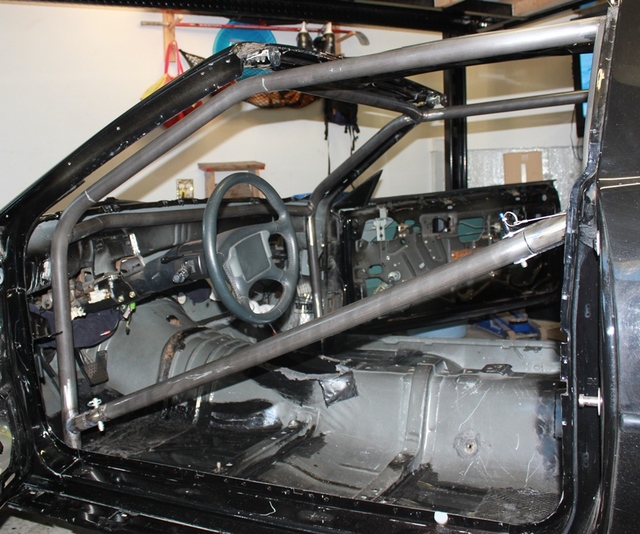
Car now has a 10 point cage which has some additional diagonal bracing to also keep it legal for Time Attack racing when running slicks. Plan is to eventually have two tire/suspension setups so I can switch betweeen drag and road course settings. There are lots of plans for additional road courses in the province, however drag racing is the main attraction for now, until another track gets built.
Main chassis is now back from paint so the build is back on.


The new engine is an LQ4 6.0L iron block which is being bored and stroked to 408 and built to support an F1C Procharger. I have another thread under power adders where all the details of the engine build and supercharger setup will reside, but I'll keep the rest of the build/mods here. https://www.thirdgen.org/forums/powe...ged-style.html
In the last incarantion the LS1 worked very well. Managed to race a season of Time Attack on Castrol Raceways road course in Edmonton before the start of this recent rebuild. The car was pretty worn after six day sessions, brakes and tires were completely gone. It was a blast tearing down the straights reving past 7 grand! Having technical difficulties trying to get a video up, in the meantime...
4th Gen wheels with 275s on all four, even with the ten year old tires, she worked pretty well for my first time on a road course. Slippery tires makes you drive smooth, or else...

Car now has a 10 point cage which has some additional diagonal bracing to also keep it legal for Time Attack racing when running slicks. Plan is to eventually have two tire/suspension setups so I can switch betweeen drag and road course settings. There are lots of plans for additional road courses in the province, however drag racing is the main attraction for now, until another track gets built.


Main chassis is now back from paint so the build is back on.


Joined: Mar 2001
Posts: 10,439
Likes: 2,093
Car: '89 Firebird
Engine: 7.0L
Transmission: T56
Re: LS1/6 build and swap .. so long SBC
Glad to see you back. Four years ago I stole some of your ideas when building my car. Your car looks great and I'm going to be watching this thread!
Thread Starter
Joined: Nov 2006
Posts: 537
Likes: 4
From: Calgary, Alberta, Canada
Car: 89 WS6 TransAm
Engine: LQ408
Transmission: T56 Magnum
Axle/Gears: Strange S60, 4.10s
Re: LS1/6 build and swap .. so long SBC
Thanks guys. Sure feels good to start putting parts back on it again.
Thread Starter
Joined: Nov 2006
Posts: 537
Likes: 4
From: Calgary, Alberta, Canada
Car: 89 WS6 TransAm
Engine: LQ408
Transmission: T56 Magnum
Axle/Gears: Strange S60, 4.10s
Re: LS1/6 build and swap .. so long SBC
Time for an update... Lots has been happening with the car and engine build although not much of my progress has made it to the thread. With only weekends to work on the car I have been focusing on progress with the hope of having the car on the road this summer, so the thread hasn't been getting much attention.
Being that the car was torn down to a skeleton and with the supercharger addition for this build, I decided it was time to rid myself of all the nitrous wiring, as even at low boost settings it will be a huge increase in power over the previous setup even with nitrous. Between the throttle position sensor, fuel pressure switch, arming and activation controls, bottle heater and remote bottler opener... wow, it all added up to a ton of wiring to remove, but it feels oh so good to have it all cleaned up.
With the supercharger, the alternator now relocates from the LS1 location at driver bottom, over to the passenger side top. As my battery with disconnect are in the rear, it was also time to relocate and shorten my alternator charge wiring to the unswitched side of the battery as well. Cleaner and lighter is the plan this round. Other wiring revised was the alternator control circuit and decided to update the cam position sensor to the front mount LS2 version as well. My tuner is recommending going back to MAF for improved driveability, so additional wiring was ran from ECM as well.
While I was on a roll with the wiring and having the full interior accessible, I decided it was also time for a stereo upgrade as well.
Dual fuel pumps have been added to the tank which I covered all the details in another thread here.
https://www.thirdgen.org/forums/powe...umps-plug.html
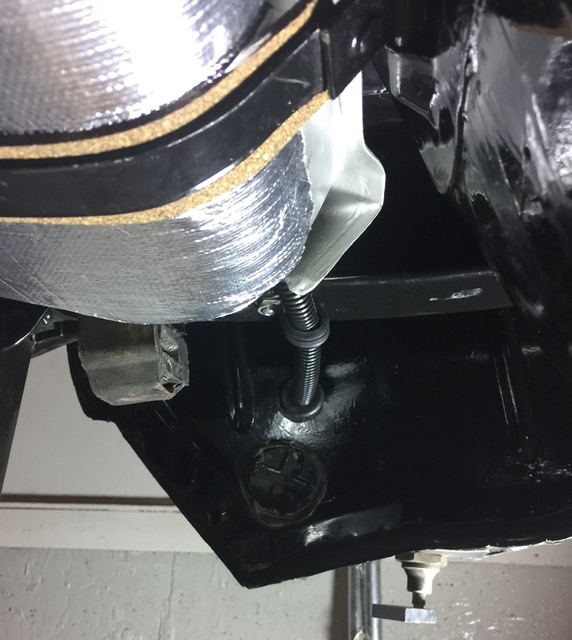
In an attempt to prevent fuel in the tank from being heated by the muffler, I covered the tank bottom with a self adhesive reflective barrier, as fuel boil could be heard after a hard run previously.
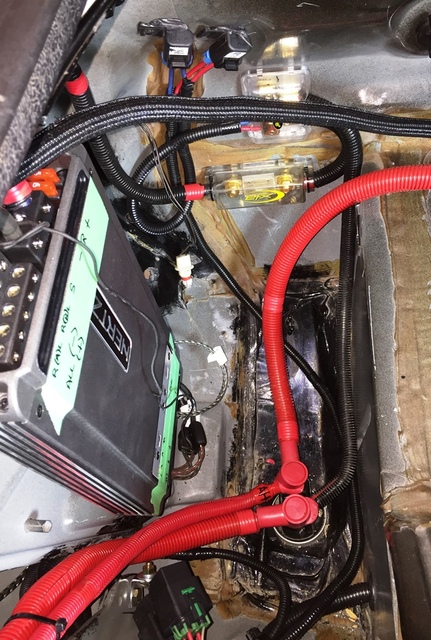
A quick bit of modification to the fuel pump relay wiring harness and the relays are now mounted in the spare tire location, right near the battery therefore voltage drop to the pumps should be very minimal.
Fuel connection ready for the new teflon lines.
Being that the car was torn down to a skeleton and with the supercharger addition for this build, I decided it was time to rid myself of all the nitrous wiring, as even at low boost settings it will be a huge increase in power over the previous setup even with nitrous. Between the throttle position sensor, fuel pressure switch, arming and activation controls, bottle heater and remote bottler opener... wow, it all added up to a ton of wiring to remove, but it feels oh so good to have it all cleaned up.
With the supercharger, the alternator now relocates from the LS1 location at driver bottom, over to the passenger side top. As my battery with disconnect are in the rear, it was also time to relocate and shorten my alternator charge wiring to the unswitched side of the battery as well. Cleaner and lighter is the plan this round. Other wiring revised was the alternator control circuit and decided to update the cam position sensor to the front mount LS2 version as well. My tuner is recommending going back to MAF for improved driveability, so additional wiring was ran from ECM as well.
While I was on a roll with the wiring and having the full interior accessible, I decided it was also time for a stereo upgrade as well.
Dual fuel pumps have been added to the tank which I covered all the details in another thread here.
https://www.thirdgen.org/forums/powe...umps-plug.html
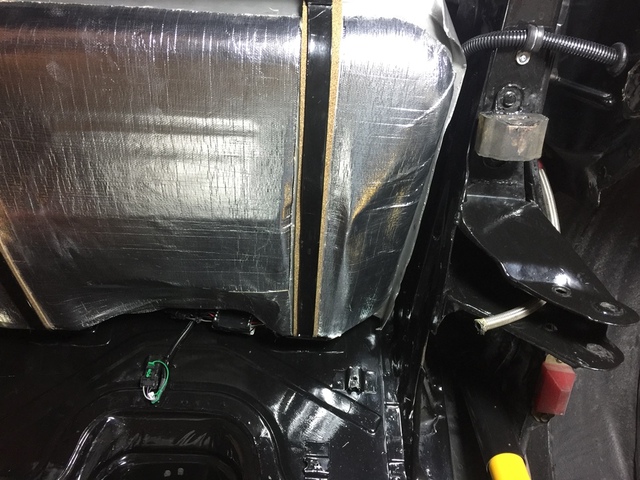
In an attempt to prevent fuel in the tank from being heated by the muffler, I covered the tank bottom with a self adhesive reflective barrier, as fuel boil could be heard after a hard run previously.

A quick bit of modification to the fuel pump relay wiring harness and the relays are now mounted in the spare tire location, right near the battery therefore voltage drop to the pumps should be very minimal.

Fuel connection ready for the new teflon lines.

Thread Starter
Joined: Nov 2006
Posts: 537
Likes: 4
From: Calgary, Alberta, Canada
Car: 89 WS6 TransAm
Engine: LQ408
Transmission: T56 Magnum
Axle/Gears: Strange S60, 4.10s
Re: LS1/6 build and swap .. so long SBC
Stereo upgrade started with removal of the old school four channel and sub amps, replaced by a single five channel Hertz HDP5 amp, which I again located in the rear spare tire area to conceal it in a hidden location. This replacement amp removed about 10 pounds and provide 950 watts of RMS power in an amazingly small and light package.
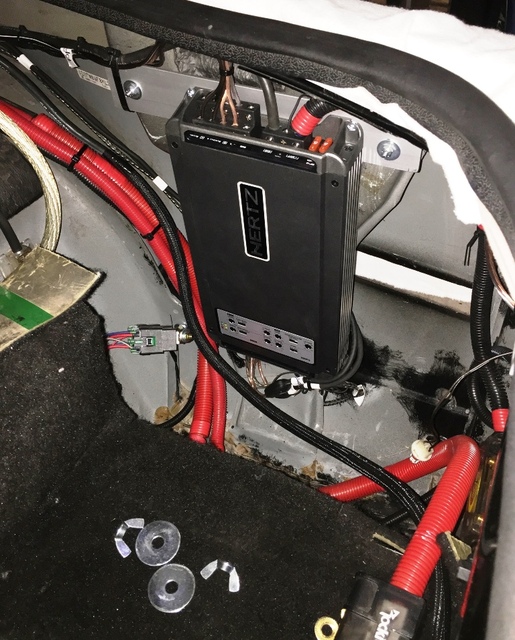
With having the battery located in the rear, I have additional power distribution, allowing short cable runs for the dual fuel pumps and amp, minimizing voltage drop. I hate drilling holes in the body unless necessary, therefore the distribution blocks and fuse holders are mounted to the body with a thick layer of silicone, held in position with duct tape until dry, then tape removed to provide a clean and drill free install.
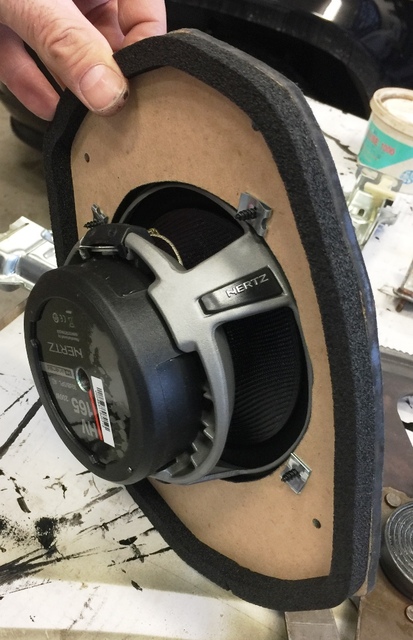
Rear 6x9s were replaced by a set of 6.5" Hertz HV165 component speakers. Custom panels built to house the woofer in the old location. Tweeter housings will replace the coat hooks that mount the sail panels in the upper sections. The adjustable crossover fits nicely below the rear passenger arm rests, for easy access.
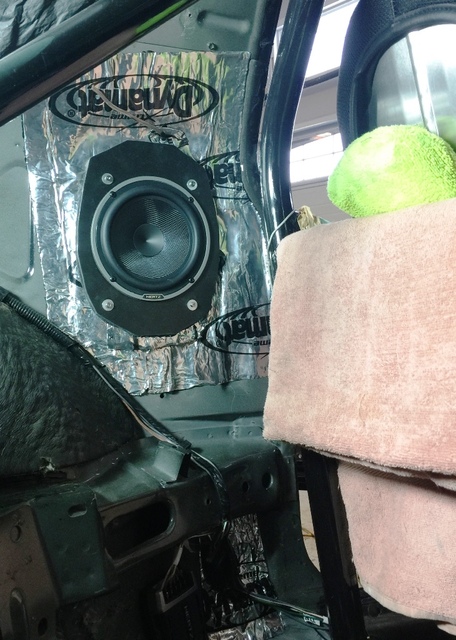
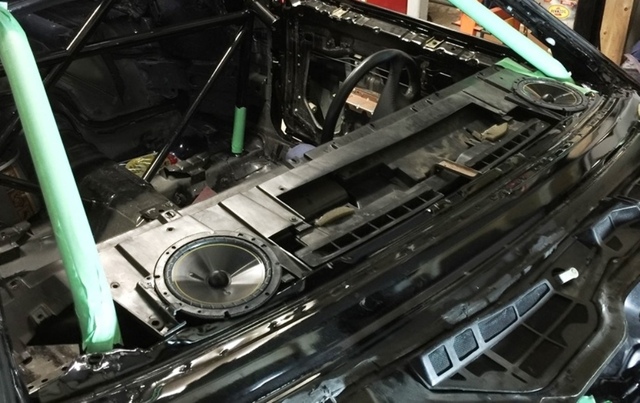
Front speakers are upgraded to Kicker 6.5 components, woofer in dash with tweeters to be mounted on top of dash. With the cage crossbar behind the dash, I lost my side and window vent ducts, which with them removed leaves a nice area for the woofer to fit into.
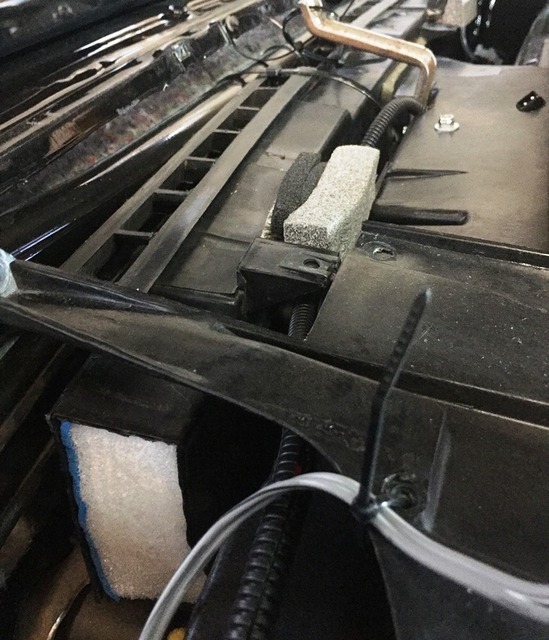
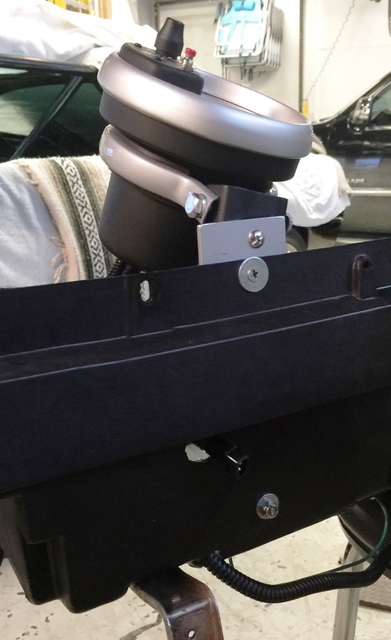
Moving onto the dash, I installed an aluminum plate to help the plastic dash frame support the weight of the new tach addition. Tach will reside under the dash cover between the voltage and oil pressure gauges, allowing them to viewed with minor head movement.
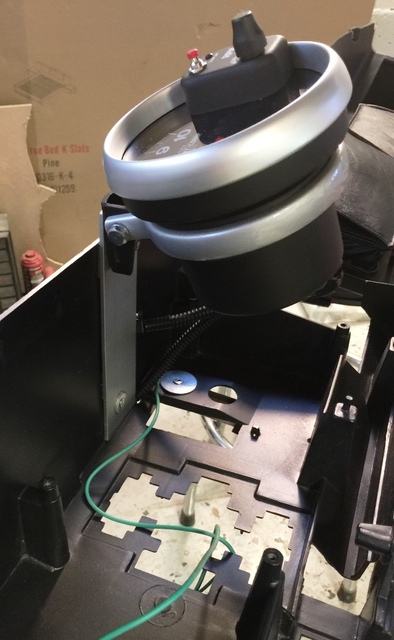
To the right of the plate addition, you can see a large washer that bolts the plastic dash to the metal dash support. If you have a loose dash, this is one area to check, as the plastic standoff may be broken like mine. Shift light cable run through upper support, ready for future connection.
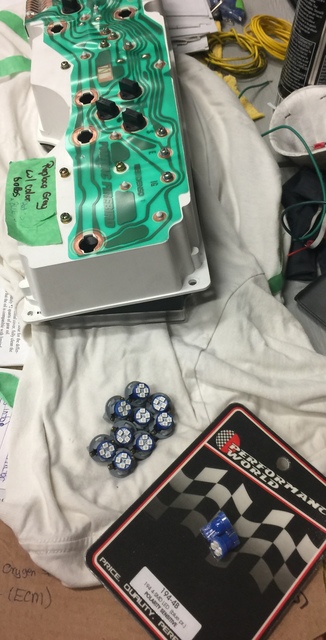
While I had the dash apart, also upgraded the gauge cluster bulbs to LEDs. These smaller LED bulbs are polarity sensitive, so takes a little research of the gauge circuit board and bulb testing to ensure the polarities match correctly.
One of my dash mounting tabs was broken, which was a perfect opportunity to try out my new Bondic plastic welder. This little unit is pretty slick. It is a two component system where you first apply a thin layer of liquid plastic to the location, followed by a few seconds of of UV light which hardens the liquid in seconds. You can add multiple layers to build up the strength of the area as required. I was quite impressed with the final results and the final weld seems as strong, if not stronger than the flimsy stock mount.


With having the battery located in the rear, I have additional power distribution, allowing short cable runs for the dual fuel pumps and amp, minimizing voltage drop. I hate drilling holes in the body unless necessary, therefore the distribution blocks and fuse holders are mounted to the body with a thick layer of silicone, held in position with duct tape until dry, then tape removed to provide a clean and drill free install.


Rear 6x9s were replaced by a set of 6.5" Hertz HV165 component speakers. Custom panels built to house the woofer in the old location. Tweeter housings will replace the coat hooks that mount the sail panels in the upper sections. The adjustable crossover fits nicely below the rear passenger arm rests, for easy access.


Front speakers are upgraded to Kicker 6.5 components, woofer in dash with tweeters to be mounted on top of dash. With the cage crossbar behind the dash, I lost my side and window vent ducts, which with them removed leaves a nice area for the woofer to fit into.


Moving onto the dash, I installed an aluminum plate to help the plastic dash frame support the weight of the new tach addition. Tach will reside under the dash cover between the voltage and oil pressure gauges, allowing them to viewed with minor head movement.

To the right of the plate addition, you can see a large washer that bolts the plastic dash to the metal dash support. If you have a loose dash, this is one area to check, as the plastic standoff may be broken like mine. Shift light cable run through upper support, ready for future connection.

While I had the dash apart, also upgraded the gauge cluster bulbs to LEDs. These smaller LED bulbs are polarity sensitive, so takes a little research of the gauge circuit board and bulb testing to ensure the polarities match correctly.

One of my dash mounting tabs was broken, which was a perfect opportunity to try out my new Bondic plastic welder. This little unit is pretty slick. It is a two component system where you first apply a thin layer of liquid plastic to the location, followed by a few seconds of of UV light which hardens the liquid in seconds. You can add multiple layers to build up the strength of the area as required. I was quite impressed with the final results and the final weld seems as strong, if not stronger than the flimsy stock mount.


Thread
Thread Starter
Forum
Replies
Last Post
LT1Formula
Engine/Drivetrain/Suspension Parts for Sale
7
Aug 20, 2015 09:36 PM
Hello, Michael
Engine Swap
8
Aug 20, 2015 03:19 PM