
Stroked LQ4 Build Thread

Thread Starter

Joined: Mar 2000
Posts: 43,187
Likes: 46
From: Littleton, CO USA
Car: 82 Berlinetta/57 Bel Air
Engine: L92/LQ4 (both w/4" stroke)
Transmission: 4L80E/4L80E
Axle/Gears: 12B-3.73/9"-3.89
I called Manley tech support yesterday to make sure I understood their torque instructions and values. They reiterated to use 30w oil, and no other lube. They wanted the stretch to occur within the specified torque range. Multiple torque cycles not required.
I took them to 90 ft-lbs and made sure the stretch was within the specified range. All were within at that torque, most of them right at .0050". A couple were a little over that, but well under the max. So, all 8 slugs are installed now.
The Melling oil pump and Cloyes timing set didn't play very well together, even with the spacers Cloyes supplied. I had to do a little die grinding on the back side of the pump to get sufficient clearance.
After that I discovered some rod bolts hit the oil pan baffle, not entirely unexpected. I had other places to be so had to quit working on it, but I got some flat washers to put under the baffle and will try again. May end up modifying the baffle if the washers doesn't do the trick.


Thread Starter
Joined: Mar 2000
Posts: 43,187
Likes: 46
From: Littleton, CO USA
Car: 82 Berlinetta/57 Bel Air
Engine: L92/LQ4 (both w/4" stroke)
Transmission: 4L80E/4L80E
Axle/Gears: 12B-3.73/9"-3.89
check this out, I thought it was useful info and maybe you will too.
http://www.youtube.com/watch?v=6-XXVk_vwKw
http://www.youtube.com/watch?v=6-XXVk_vwKw
But, stretch can't be measured on main caps or head bolts. I used the ARP thread lube on their main cap studs, and I'll use it on their head bolts when it comes time to install the heads.
Senior Member

Joined: May 2006
Posts: 589
Likes: 86
From: Pittsburgh, PA
Car: 91 Formula
Engine: 2012 LS9
Transmission: 4L80E
Axle/Gears: Strange 60 3.54:1
Re: Stroked LQ4 Build Thread
If you got the stretch right, you are OK...
They state oil, as if you are not using the stretch method, this eliminates most potential to overtighten the bolt. Also different moly pastes work differently, whereas oils are pretty similar. I only use ARP bolts with ARP lube (I referred to this as moly, although it is Ultra torque) using their specs.
My point is that with moly, stretch would be achieved with more like 70ft/lb.
You would not be putting as much twisting force on the bolt either with 70 vs 90ft/lb. hence my recommendation.
Last edited by Lonnie P; Jan 6, 2013 at 09:35 PM.
Thread Starter
Joined: Mar 2000
Posts: 43,187
Likes: 46
From: Littleton, CO USA
Car: 82 Berlinetta/57 Bel Air
Engine: L92/LQ4 (both w/4" stroke)
Transmission: 4L80E/4L80E
Axle/Gears: 12B-3.73/9"-3.89
Yes, I fully understand. I happen to be a mechanical engineer, and have done plenty of work with fasteners over the years (including attending a torque vs. clamping workshop by ARP in the early 90's). I advocated ultrasonic stretch verification equipment on a program at work when we had a blank sheet, but they decided to go with traditional torque verification instead - opportunity wasted, in my opinion.
I was a little surprised Manley didn't just use the ARP lube and torque recommendations with their rods, as that would seem to keep it simple. But, with the stretch verified, I don't anticipate any issues.
I upgraded the rod bolts with ARP's when I put the LS1 in Berlinetta #1. The ARP instructions included with the bolts recommended stretch verification, but gave an alternative torque method if bolt stretch wasn't used. I didn't have a stretch gauge back then, so just did the alternative torque method. But, that engine wasn't as hairy a build as this one - all factory internals except the rod bolts, head bolts, and oil pump; it has seen 7000 RPMs on more than one occasion without any issues. I didn't want to take any chances with this build, though, so got the stretch gauge.
Senior Member
Joined: May 2006
Posts: 589
Likes: 86
From: Pittsburgh, PA
Car: 91 Formula
Engine: 2012 LS9
Transmission: 4L80E
Axle/Gears: Strange 60 3.54:1
Re: Stroked LQ4 Build Thread
If I knew we were talking engineer to engineer, I could have left out some details...
A good point for aftermarket rods... measure the bolt lengths before loosening the rod bolts, this verifies the setting used when the rod was sized. If it is different from the recommended setting, there is a chance the rod will be slightly distorted when tightened to a different value. I'll typically measure the supplied stretch setting, then retorque the bolt to the recommended stretch setting if different, then measure the rod bore concentricty. Just a little detail, but it cannot hurt when building something you plan to put on the edge of sanity.
A good point for aftermarket rods... measure the bolt lengths before loosening the rod bolts, this verifies the setting used when the rod was sized. If it is different from the recommended setting, there is a chance the rod will be slightly distorted when tightened to a different value. I'll typically measure the supplied stretch setting, then retorque the bolt to the recommended stretch setting if different, then measure the rod bore concentricty. Just a little detail, but it cannot hurt when building something you plan to put on the edge of sanity.
Thread Starter
Joined: Mar 2000
Posts: 43,187
Likes: 46
From: Littleton, CO USA
Car: 82 Berlinetta/57 Bel Air
Engine: L92/LQ4 (both w/4" stroke)
Transmission: 4L80E/4L80E
Axle/Gears: 12B-3.73/9"-3.89
A story from that ARP workshop: He took a new bolt and washer, unlubricated, and torqued them down in his clamping force measuring device. He then loosened it, retorqued to the same value, and the clamping force was less. He removed the bolt & washer, passed them around the room for us to examine (probably 50 or so in attendance), then put them back in the device and torqued them up again - Voila, same clamping force as the first time. Why was the clamping force restored? Lots of speculation, but nothing that seemed reasonable. His explanation - The oil from our fingers as we passed it around the room "lubricated" the threads and restored the clamping force. He loosened it again, torqued to the same value, and clamping was again reduced. Fascinating demonstration, to be sure.

Senior Member
Joined: Jun 2003
Posts: 828
Likes: 3
From: Rockville, MD
Car: 1989 Camaro RS
Engine: Ellis Juan
Transmission: t-56
Re: Stroked LQ4 Build Thread
technically you should degree every cam no matter the build =p.
though... with that size engine.. its begging SO much for a good set of heads. even just some LS6 heads. hell, a set of TFS castings would make that thing a badass streeter.
though... with that size engine.. its begging SO much for a good set of heads. even just some LS6 heads. hell, a set of TFS castings would make that thing a badass streeter.
Thread Starter
Joined: Mar 2000
Posts: 43,187
Likes: 46
From: Littleton, CO USA
Car: 82 Berlinetta/57 Bel Air
Engine: L92/LQ4 (both w/4" stroke)
Transmission: 4L80E/4L80E
Axle/Gears: 12B-3.73/9"-3.89
So LS6 heads are better than L92 heads?

Joined: Aug 2011
Posts: 2,381
Likes: 10
From: San Diego, California For Now
Car: 88 Formula, 90 Iroc RIP, 92 RS Sold
Engine: 305 to 350
Transmission: 700r4
Axle/Gears: 10 Bolt
Re: Stroked LQ4 Build Thread
subscribed
i dont know if this any help but couple links i had saved
i hear that ther about the same just the price between them is different dont qoute me i could be wrong
http://www.hotrod.com/techarticles/e...t/viewall.html
http://www.performancetrucks.net/for...g-info-434396/
i dont know if this any help but couple links i had saved
i hear that ther about the same just the price between them is different dont qoute me i could be wrong
http://www.hotrod.com/techarticles/e...t/viewall.html
http://www.performancetrucks.net/for...g-info-434396/
Last edited by Zach/90\irocZ; Jan 10, 2013 at 06:33 PM. Reason: edit
Thread Starter
Joined: Mar 2000
Posts: 43,187
Likes: 46
From: Littleton, CO USA
Car: 82 Berlinetta/57 Bel Air
Engine: L92/LQ4 (both w/4" stroke)
Transmission: 4L80E/4L80E
Axle/Gears: 12B-3.73/9"-3.89
Joined: Aug 2011
Posts: 2,381
Likes: 10
From: San Diego, California For Now
Car: 88 Formula, 90 Iroc RIP, 92 RS Sold
Engine: 305 to 350
Transmission: 700r4
Axle/Gears: 10 Bolt
Supreme Member
iTrader: (5)
Joined: Jan 2002
Posts: 13,622
Likes: 5
From: Orland Park, IL
Car: 1984 Z28
Engine: SLOW carbed ls
Transmission: TH400 with brake, 8" PTC converter
Axle/Gears: moser 9" 4.11
Senior Member
Joined: Jun 2003
Posts: 828
Likes: 3
From: Rockville, MD
Car: 1989 Camaro RS
Engine: Ellis Juan
Transmission: t-56
Re: Stroked LQ4 Build Thread
L92's are ok'ish. however.. they are very picky about cam selection. to the point that its been learned that the big donkey dangler cams are regularly beat out by aggressive ramp rate smaller lobes like the LSR/LSL/LSK lobes (think lobes like 215 @.050 with ~.6xx + lift). they like fairly large splits as well as the exhaust side is a bit on the weak side flow wise. your 8* split will probably work well but i personally wouldve used a more aggressive lobe on the exhaust to keep exhaust velocity as high as possible.
the LS3/L92 heads flow very well for what they are but there are a lot of funky quirks about them. ie: a lot of their volume comes from the shear length the intake runners, lower velocities hurting torque. TFS and PRC have VERY nice ls3 type heads out or coming out. they WILL outperform the l92/ls3 oem stuff and with smaller runners at that.
the LS3/L92 heads flow very well for what they are but there are a lot of funky quirks about them. ie: a lot of their volume comes from the shear length the intake runners, lower velocities hurting torque. TFS and PRC have VERY nice ls3 type heads out or coming out. they WILL outperform the l92/ls3 oem stuff and with smaller runners at that.
Thread Starter
Joined: Mar 2000
Posts: 43,187
Likes: 46
From: Littleton, CO USA
Car: 82 Berlinetta/57 Bel Air
Engine: L92/LQ4 (both w/4" stroke)
Transmission: 4L80E/4L80E
Axle/Gears: 12B-3.73/9"-3.89
I'll be happy if it makes as much or more power than the 396 did. Better driveability will be a bonus. I don't think it's going to have any problem meeting those goals.
A little more assembly progress - baffle and pickup installed:
Had to shim the baffle a bit to clear the rod bolts:
I took out one washer and put the pickup tube mount under the baffle. Figured that would keep the pickup where it belonged with respect to the pan, and give more thread for the nut. All nuts were Loctite'd for a little extra security.
This is the GM "Musclecar" pan kit. The f-body doesn't work well in shoeboxes.
I didn't realize the LQ4 block has one pan bolt hole missing. The original pan didn't have the hole, but the gasket did.
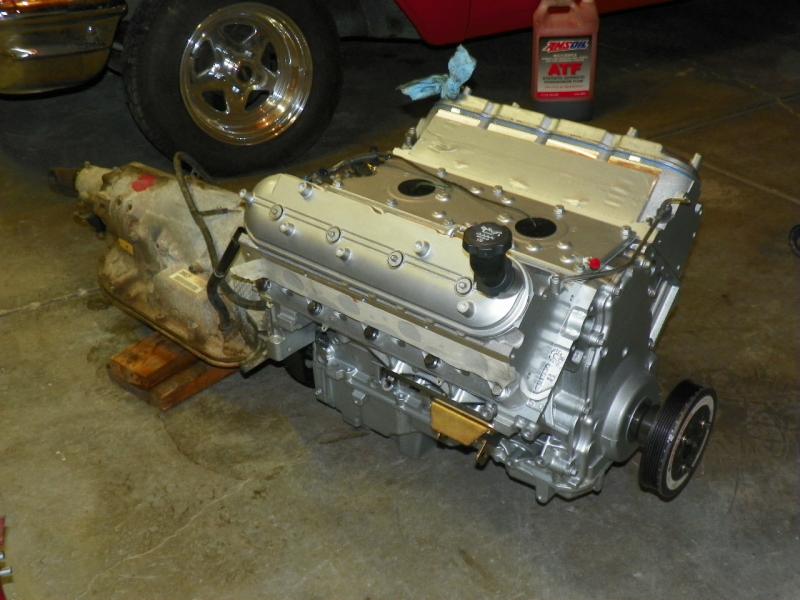
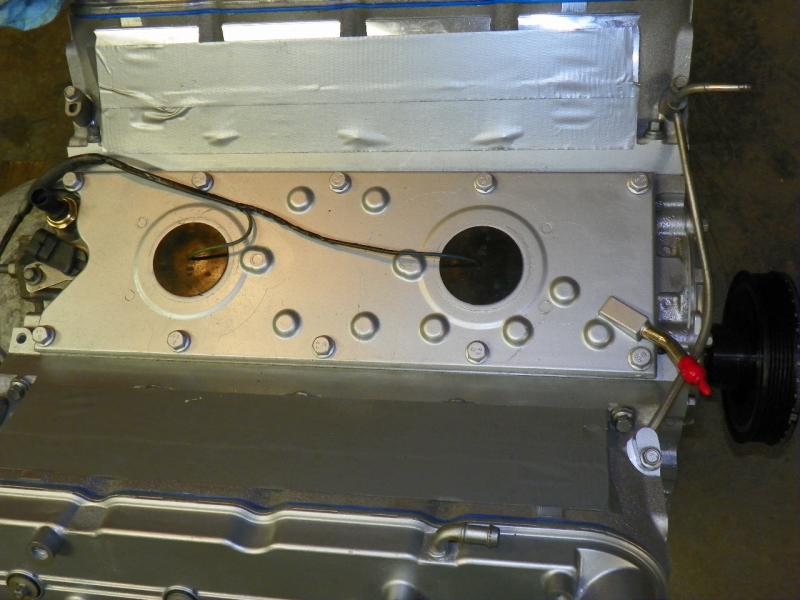
The front cover was nasty from corrosion (Florida salty air, I guess), even after being run through the shop cleaner (I should have taken a "before" pic). I took fine steel wool to it, then aluminum paint.
Ready for lifters & heads.
A little more assembly progress - baffle and pickup installed:
Had to shim the baffle a bit to clear the rod bolts:
I took out one washer and put the pickup tube mount under the baffle. Figured that would keep the pickup where it belonged with respect to the pan, and give more thread for the nut. All nuts were Loctite'd for a little extra security.
This is the GM "Musclecar" pan kit. The f-body doesn't work well in shoeboxes.
I didn't realize the LQ4 block has one pan bolt hole missing. The original pan didn't have the hole, but the gasket did.
The front cover was nasty from corrosion (Florida salty air, I guess), even after being run through the shop cleaner (I should have taken a "before" pic). I took fine steel wool to it, then aluminum paint.
Ready for lifters & heads.
Thread Starter
Joined: Mar 2000
Posts: 43,187
Likes: 46
From: Littleton, CO USA
Car: 82 Berlinetta/57 Bel Air
Engine: L92/LQ4 (both w/4" stroke)
Transmission: 4L80E/4L80E
Axle/Gears: 12B-3.73/9"-3.89
Manley pieces the kits together to order, I'm afraid. I have their p/n for the pistons and rods (and rings, which they buy, not make), but not the crank. The shop ordered it all and balanced it, and didn't provide the p/n with the invoice. I didn't see anything on the crank either (and can't say I looked on it too closely either - sorry).
Not sure on the power curve. Hoped to get that from the dyno when I get it tuned.
Not sure on the power curve. Hoped to get that from the dyno when I get it tuned.
Thread Starter
Joined: Mar 2000
Posts: 43,187
Likes: 46
From: Littleton, CO USA
Car: 82 Berlinetta/57 Bel Air
Engine: L92/LQ4 (both w/4" stroke)
Transmission: 4L80E/4L80E
Axle/Gears: 12B-3.73/9"-3.89
It's been awhile since I looked. The shop called them up (uses their stuff regularly), told them what I had, what I wanted, and they shipped it to the shop.
Thread Starter
Joined: Mar 2000
Posts: 43,187
Likes: 46
From: Littleton, CO USA
Car: 82 Berlinetta/57 Bel Air
Engine: L92/LQ4 (both w/4" stroke)
Transmission: 4L80E/4L80E
Axle/Gears: 12B-3.73/9"-3.89
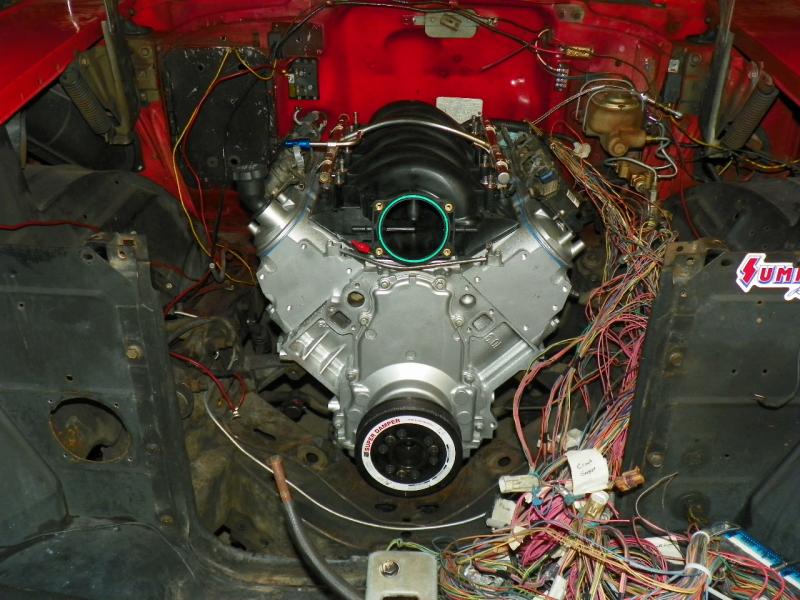
Okay, as of my last update, I couldn't find the head pins, so I had to order new ones. I think gmpartsdirect finds the slowest possible way to ship things, even though they charge you 2nd day prices.
So, the new pins arrived (my son also needed new ones for his 5.7 assembly). Finally got the heads installed last night.
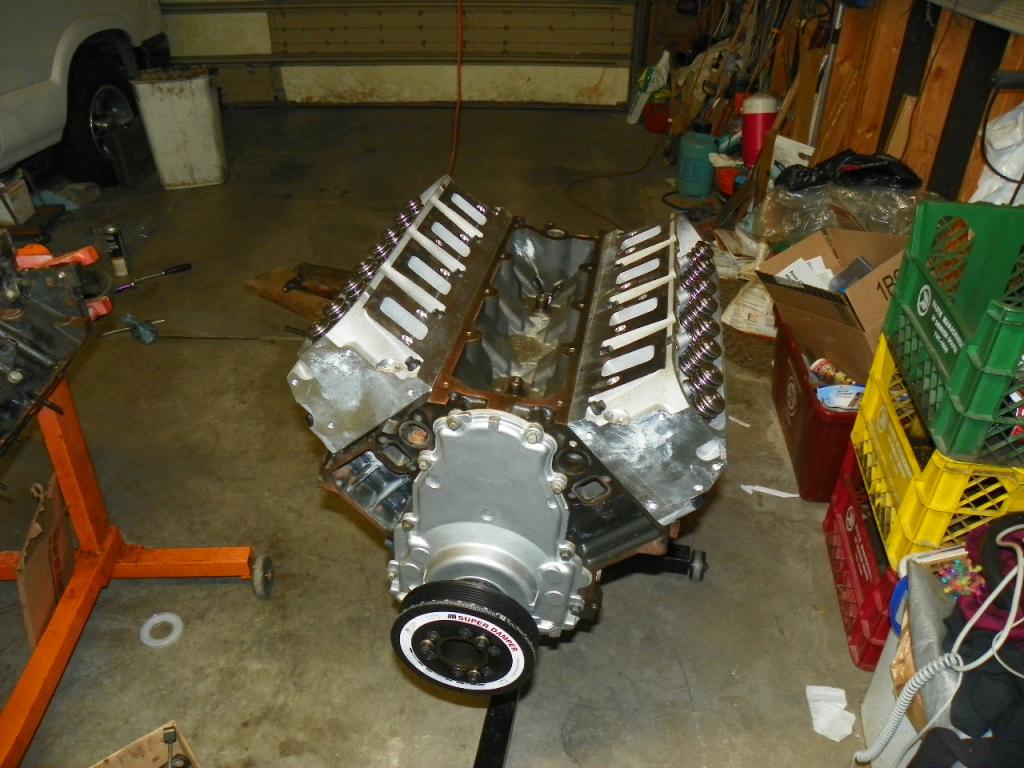
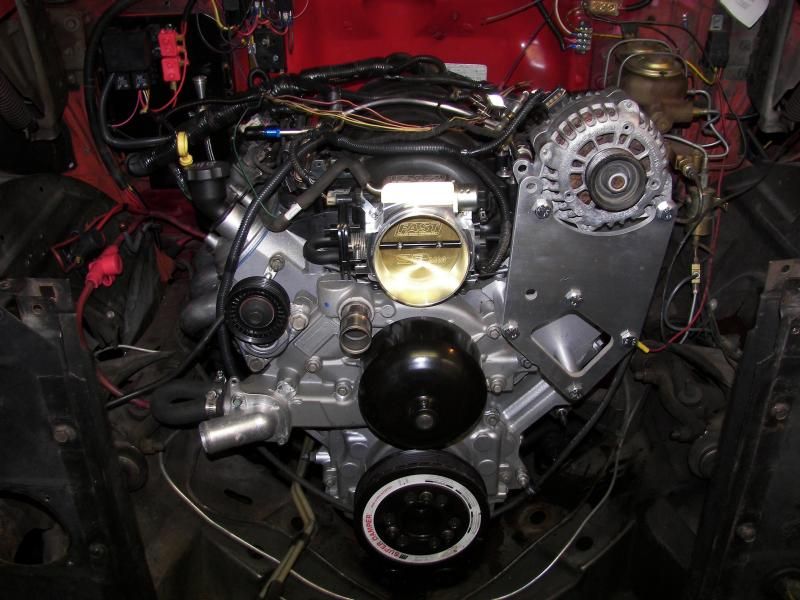
Intake mock-up and damper install:
So, the new pins arrived (my son also needed new ones for his 5.7 assembly). Finally got the heads installed last night.
Intake mock-up and damper install:

Last edited by five7kid; May 2, 2013 at 05:34 PM.
Thread Starter
Joined: Mar 2000
Posts: 43,187
Likes: 46
From: Littleton, CO USA
Car: 82 Berlinetta/57 Bel Air
Engine: L92/LQ4 (both w/4" stroke)
Transmission: 4L80E/4L80E
Axle/Gears: 12B-3.73/9"-3.89
Been awhile since the last update. First, I couldn't find the offset rocker arms or rocker stands in the storage unit when I looked for them shortly after that last update (found the rockers today, of course). So, I ordered a new set. Then, I had to spend a week out of town for work, and seemed to have something else to do every evening until today.
So, using the TSP push rods, and the new offset rockers, finished installing the valve train. The rocker bolt thread is right on 20/inch, which is .050" per turn. With the 7.425" pushrods, it took about 1.25 turns from zero plunger compression to snug, so that translates to about .062" plunger preload. That's within the recommended range, so I'm happy with that.
I installed the driver side valve cover first (with new gaskets & grommets), then moved over to the passenger side and discovered this:
And this:
I don't recall hearing about this issue. After a little internet searching, decided to trim back the baffles and got the needed clearance. Apparently, the LS6 style valley cover will make that modification less of an issue, but we'll see.
The 58 lb injectors fit nicely in the L76 fuel rail and intake. 92mm billet TB arrived a couple of weeks ago as well.
Still lots of little details left to go. As well as some big ones, like getting my son's Blazer back together and out of the garage so there are fewer parts laying around the car. The tranny will get a Transgo shift kit installed, and I hope to order a converter next week. The factory flexplate looks pretty stout, not sure I want to spend another $150 on an aftermarket flexplate (best price I could find for one), but I've probably got a week or so to think about that.
Last edited by five7kid; Mar 27, 2014 at 05:45 PM.
Thread Starter
Joined: Mar 2000
Posts: 43,187
Likes: 46
From: Littleton, CO USA
Car: 82 Berlinetta/57 Bel Air
Engine: L92/LQ4 (both w/4" stroke)
Transmission: 4L80E/4L80E
Axle/Gears: 12B-3.73/9"-3.89
Ordered a torque converter today. Talked to a local shop that builds converters for a lot of local racers, including last year's Div V Super Comp champ, but he had never built a 4L80 converter to stall over 3000 RPMs. Checked out ATI and PTC, again, street type converters only. So, called up Rev Max, who built the converter I have in the LS1/4L60E Camaro (which did quite well at the track last year), they have 4L80 converters up to 5000 stall and many racer customers (said he built/sold 6 last week). A 4000 stall lock-up unit capable of handling 850 HP is on its way.
Curious if anybody has a recommendation for spark plugs. I'm thinking LS3 plugs would do the trick, might need to go up or down a heat range.
Curious if anybody has a recommendation for spark plugs. I'm thinking LS3 plugs would do the trick, might need to go up or down a heat range.
Joined: Jun 2002
Posts: 13,576
Likes: 30
From: Harford County, MD
Car: camaro sportcoupe
Engine: 7.0L
Transmission: G-Force GF5R
Axle/Gears: Moser 9"
Re: Stroked LQ4 Build Thread
234/242 and 11:1, i'd say a good ole tr6 would do the trick.
Thread Starter
Joined: Mar 2000
Posts: 43,187
Likes: 46
From: Littleton, CO USA
Car: 82 Berlinetta/57 Bel Air
Engine: L92/LQ4 (both w/4" stroke)
Transmission: 4L80E/4L80E
Axle/Gears: 12B-3.73/9"-3.89
Well, 11.3, but what's a couple of tenths between friends??? 
LS3's use TR5, TR6 is one step cooler - makes sense.
LS3's use TR5, TR6 is one step cooler - makes sense.
Senior Member
Joined: Jun 2003
Posts: 828
Likes: 3
From: Rockville, MD
Car: 1989 Camaro RS
Engine: Ellis Juan
Transmission: t-56
Thread Starter
Joined: Mar 2000
Posts: 43,187
Likes: 46
From: Littleton, CO USA
Car: 82 Berlinetta/57 Bel Air
Engine: L92/LQ4 (both w/4" stroke)
Transmission: 4L80E/4L80E
Axle/Gears: 12B-3.73/9"-3.89
I'd rather start cold and warm up later.
It'll be spending a good part of its life at WOT...
It'll be spending a good part of its life at WOT...
Joined: Jun 2002
Posts: 13,576
Likes: 30
From: Harford County, MD
Car: camaro sportcoupe
Engine: 7.0L
Transmission: G-Force GF5R
Axle/Gears: Moser 9"
Re: Stroked LQ4 Build Thread
The colder plug allows you to get more aggressive with the tune faster as you get it hammered out. A tr5 or 55 might work fine...
Thread Starter
Joined: Mar 2000
Posts: 43,187
Likes: 46
From: Littleton, CO USA
Car: 82 Berlinetta/57 Bel Air
Engine: L92/LQ4 (both w/4" stroke)
Transmission: 4L80E/4L80E
Axle/Gears: 12B-3.73/9"-3.89
No spray on this one.
No cage, no spray.
With cage, probably still no spray.
No cage, no spray.
With cage, probably still no spray.
Thread Starter
Joined: Mar 2000
Posts: 43,187
Likes: 46
From: Littleton, CO USA
Car: 82 Berlinetta/57 Bel Air
Engine: L92/LQ4 (both w/4" stroke)
Transmission: 4L80E/4L80E
Axle/Gears: 12B-3.73/9"-3.89
Not a lot of work done on the engine lately. We've been concentrating on getting my son's Blazer going again, so that has taken up most of my garage time. We did get his engine bolted in, and he's getting the rest of the stuff put back on. Looking forward to see it running again (it's been down since July last year).
I did decide to spray my engine (paint, that is), and installed the engine mounts. Other than that, I've been ordering more of the parts needed to complete the project like fuel fittings, fuel pump (which meant a new fuel tank - but since that's non-3rd-gen, I can't talk about that ), MAF, electrical connectors (injector, MAF, OBD II), spark plugs & wires. The TB in the pic above had the breather port drilled oversized, so I sent that back to get replaced (new one has similar issue but to a lesser degree).
I was looking over various books and build posts after putting the rear cover on, and I couldn't recall whether the oil galley dumbbell was in there, or what shape it was in, so I got a new one and I'll do that when the engine comes off the stand. Also ordered an SFI flexplate from TCI (4L80 flexplates aren't all that common), and ARP converter bolts. The torque converter also arrived. Still need stuff like throttle cable & bracket, O2 sensors, water pump, belt tensioner, and starter & alternator if the truck stuff doesn't work.
What I need to do now is get the car ready to receive the engine/trans. Since it hasn't been running since June '10, it's collected a lot of "stuff". I spent 3 hours Sunday evening getting stuff out of, off of, out from under, and away from it, only keeping stuff involved with the swap around it. That included hauling 18 gallons of used engine oil, tranny fluid, and gear lube to Advance Auto for recycling. Still have one side of the car next to the garage wall left to clear, mostly tools and other garage stuff I hauled away from my parent's house last year. After that is cleared, I can get the car up in the air and get the old TH400 out, as well as cleaning up other stuff like removing the nitrous system. Then I can put the shift kit in the tranny, mate engine and tranny, and put them in their new home.
After that - wiring, fuel system, rear end change, drive shaft fab, hook up exhaust, PCM tuning...
I did decide to spray my engine (paint, that is), and installed the engine mounts. Other than that, I've been ordering more of the parts needed to complete the project like fuel fittings, fuel pump (which meant a new fuel tank - but since that's non-3rd-gen, I can't talk about that
), MAF, electrical connectors (injector, MAF, OBD II), spark plugs & wires. The TB in the pic above had the breather port drilled oversized, so I sent that back to get replaced (new one has similar issue but to a lesser degree). I was looking over various books and build posts after putting the rear cover on, and I couldn't recall whether the oil galley dumbbell was in there, or what shape it was in, so I got a new one and I'll do that when the engine comes off the stand. Also ordered an SFI flexplate from TCI (4L80 flexplates aren't all that common), and ARP converter bolts. The torque converter also arrived. Still need stuff like throttle cable & bracket, O2 sensors, water pump, belt tensioner, and starter & alternator if the truck stuff doesn't work.
What I need to do now is get the car ready to receive the engine/trans. Since it hasn't been running since June '10, it's collected a lot of "stuff". I spent 3 hours Sunday evening getting stuff out of, off of, out from under, and away from it, only keeping stuff involved with the swap around it. That included hauling 18 gallons of used engine oil, tranny fluid, and gear lube to Advance Auto for recycling. Still have one side of the car next to the garage wall left to clear, mostly tools and other garage stuff I hauled away from my parent's house last year. After that is cleared, I can get the car up in the air and get the old TH400 out, as well as cleaning up other stuff like removing the nitrous system. Then I can put the shift kit in the tranny, mate engine and tranny, and put them in their new home.
After that - wiring, fuel system, rear end change, drive shaft fab, hook up exhaust, PCM tuning...
Thread Starter
Joined: Mar 2000
Posts: 43,187
Likes: 46
From: Littleton, CO USA
Car: 82 Berlinetta/57 Bel Air
Engine: L92/LQ4 (both w/4" stroke)
Transmission: 4L80E/4L80E
Axle/Gears: 12B-3.73/9"-3.89
Okay, a lot of non-3rd gen-related stuff done, but back to some that can be considered 3rd gen-related.
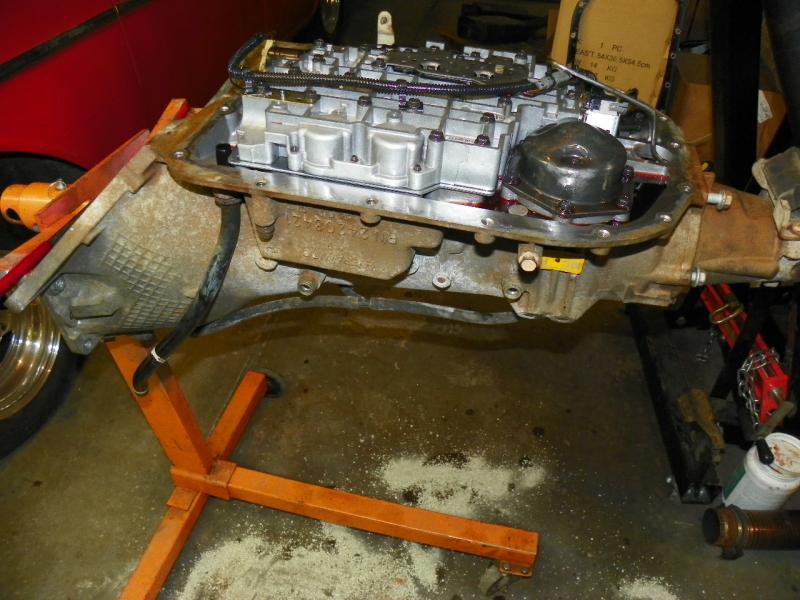
The TH400 and 4L80E swapped places, so the 4L80E got a TransGo shift kit install. I won't go into details because they're covered in the kit instructions, but suffice it to say I still find it a bit intimidating. Took me about 3 hours, with one step in particular (grinding a filter plug to fit) taking more time than it should have.
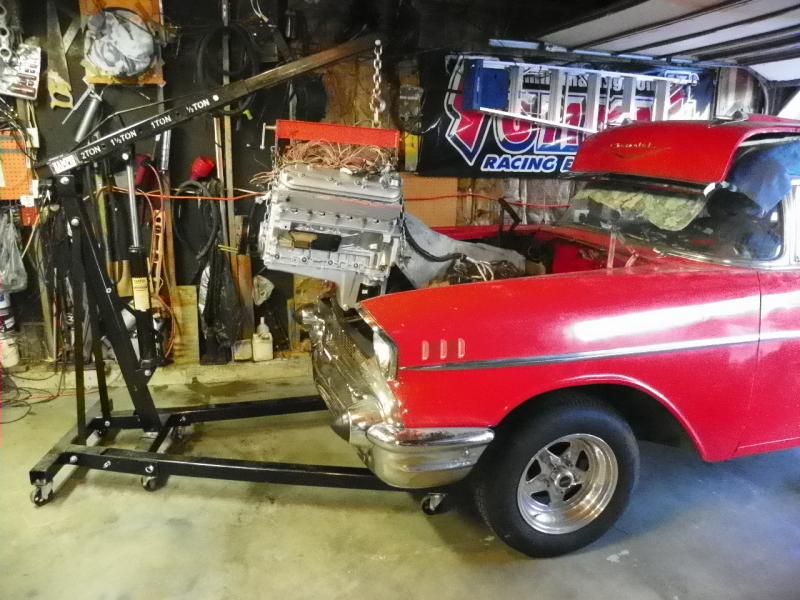
With TCI flexplate and Rev Max torque converter in hand, the engine came off the stand, and the engine & tranny were once again back together.
I debated with myself whether to do this, but finally also decided to get an LS6 valley cover for the improved PCV function. Included new knock sensor seals, gasket, and bolts, which helped the decision a bit.
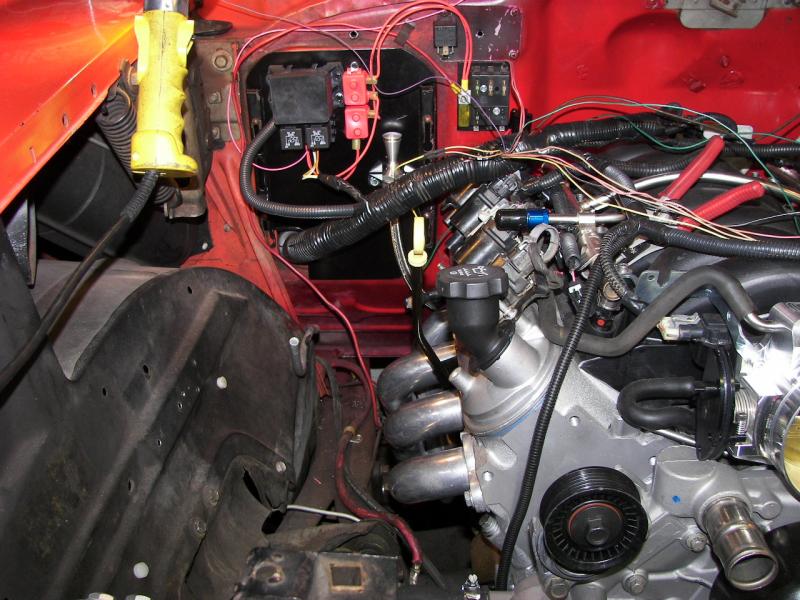
Next was to tackle the wiring harness. This is what it looked like after removal from the engine/trans:
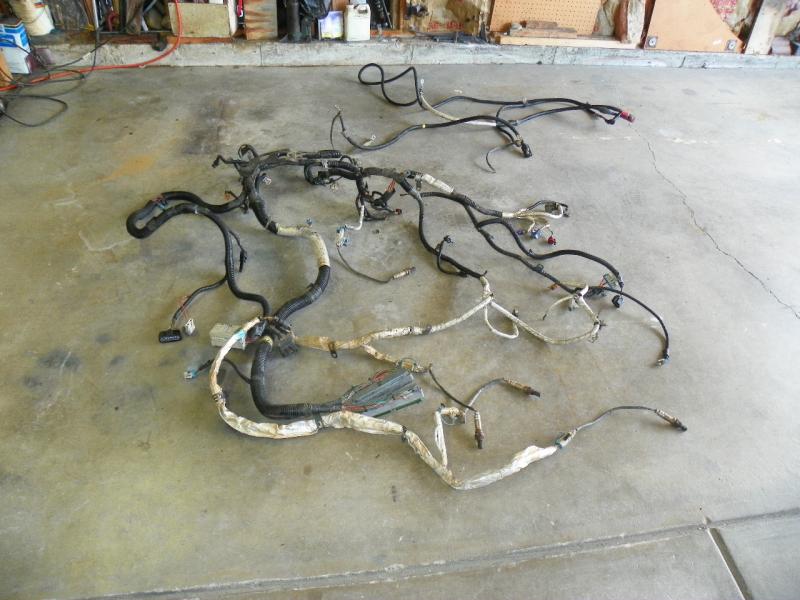
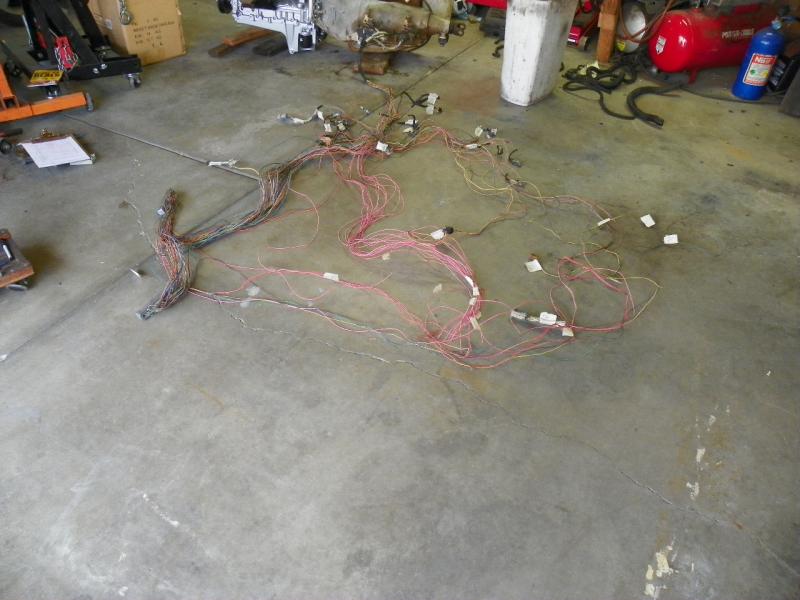
I had pushed the car out onto the driveway to clean up the engine compartment, and spread the harness out to work on it (can't imagine doing this in the house like I've seen some of you guys do - dirt fell out when I unwrapped stuff, tape and plastic conduit fell apart - made a mess). I found a pinout from Mitchell on line and used it to verify whether or not a function was needed. Only made one mistake, which will be easy to rectify. This is what was left (note the many masking tape tags). Note the group of pink wires in the center - all of those get switched 12v.
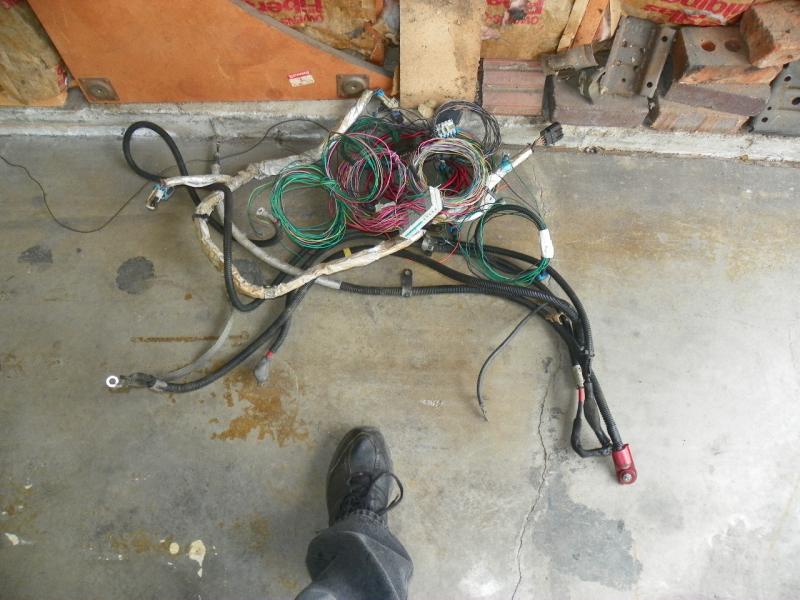
And this is what was removed. The factory included some chassis harnessing in the engine/trans harness, so that added to the bulk that could be removed. Too bad those battery cables are of no use to me, because they were in pretty good shape.
I didn't try to "finish" it at this point, just wanted to only have the needed wiring when the engine/trans went into the car. So, some grouping, coiling, and stowing:

The intake wasn't bolted down, so it came back off before putting the engine/trans in the car, and the harnessing laid on the valley cover. It stayed out of the way.
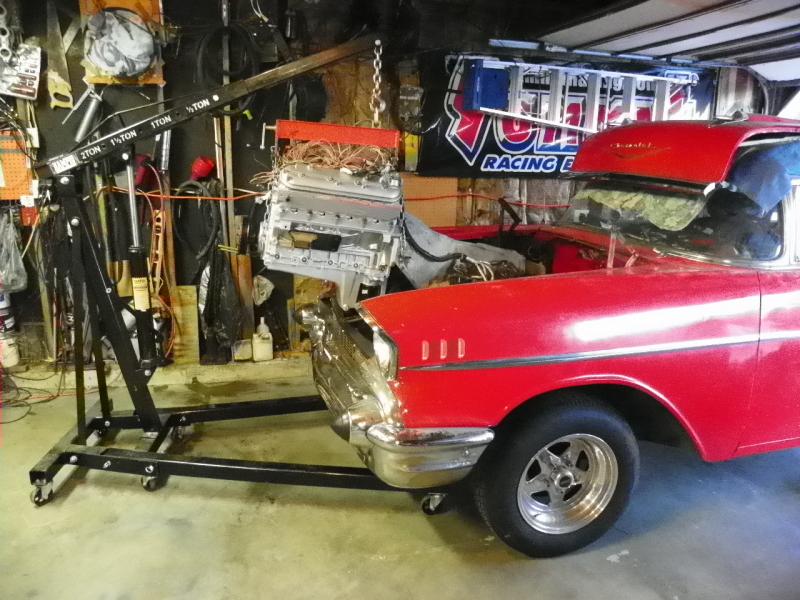
I forgot to grab the camera before putting the engine/trans together to get pics of the flexplate/torque converter, so I took this shot while they were up in the air. It's Rev Max's "Stage 5" converter, 9.5", with billet front cover.

The Express 3500 van has the PCM in the front left corner of the engine compartment. But, that corner is about 3' farther forward in the van than it is in the car, so I could probably put it anywhere in the engine compartment I wanted (and perhaps even inside the car). I'll probably put it in the left front corner of the engine compartment, as that is relatively convenient, so it looks like I'll be shortening and splicing every wire that goes to the PCM. Really looking forward to that...
I'm going to get everything else mounted on the engine - intake, TB, water pump, alternator (have a Kwik Performance kit to mount it above the driver side head to aid in belt routing, since I won't be using PS), and even exhaust so I make sure I don't try to route a wiring harness where something else has to be.
Oh, also discovered the 2003 Express 3500 van harness doesn't have an output from the PCM for a tach. I've tried asking around if simply putting a wire on that pin will allow the tach to function, or if the PCM needs something "turned on" in the programming for it to work. So far it's leaning toward just hooking up a wire to the proper pin.
The TH400 and 4L80E swapped places, so the 4L80E got a TransGo shift kit install. I won't go into details because they're covered in the kit instructions, but suffice it to say I still find it a bit intimidating. Took me about 3 hours, with one step in particular (grinding a filter plug to fit) taking more time than it should have.
With TCI flexplate and Rev Max torque converter in hand, the engine came off the stand, and the engine & tranny were once again back together.
I debated with myself whether to do this, but finally also decided to get an LS6 valley cover for the improved PCV function. Included new knock sensor seals, gasket, and bolts, which helped the decision a bit.
Next was to tackle the wiring harness. This is what it looked like after removal from the engine/trans:
I had pushed the car out onto the driveway to clean up the engine compartment, and spread the harness out to work on it (can't imagine doing this in the house like I've seen some of you guys do - dirt fell out when I unwrapped stuff, tape and plastic conduit fell apart - made a mess). I found a pinout from Mitchell on line and used it to verify whether or not a function was needed. Only made one mistake, which will be easy to rectify. This is what was left (note the many masking tape tags). Note the group of pink wires in the center - all of those get switched 12v.
And this is what was removed. The factory included some chassis harnessing in the engine/trans harness, so that added to the bulk that could be removed. Too bad those battery cables are of no use to me, because they were in pretty good shape.
I didn't try to "finish" it at this point, just wanted to only have the needed wiring when the engine/trans went into the car. So, some grouping, coiling, and stowing:
The intake wasn't bolted down, so it came back off before putting the engine/trans in the car, and the harnessing laid on the valley cover. It stayed out of the way.
I forgot to grab the camera before putting the engine/trans together to get pics of the flexplate/torque converter, so I took this shot while they were up in the air. It's Rev Max's "Stage 5" converter, 9.5", with billet front cover.
The Express 3500 van has the PCM in the front left corner of the engine compartment. But, that corner is about 3' farther forward in the van than it is in the car, so I could probably put it anywhere in the engine compartment I wanted (and perhaps even inside the car). I'll probably put it in the left front corner of the engine compartment, as that is relatively convenient, so it looks like I'll be shortening and splicing every wire that goes to the PCM. Really looking forward to that...
I'm going to get everything else mounted on the engine - intake, TB, water pump, alternator (have a Kwik Performance kit to mount it above the driver side head to aid in belt routing, since I won't be using PS), and even exhaust so I make sure I don't try to route a wiring harness where something else has to be.
Oh, also discovered the 2003 Express 3500 van harness doesn't have an output from the PCM for a tach. I've tried asking around if simply putting a wire on that pin will allow the tach to function, or if the PCM needs something "turned on" in the programming for it to work. So far it's leaning toward just hooking up a wire to the proper pin.
Last edited by five7kid; Apr 2, 2013 at 11:16 AM.
Supreme Member
Joined: Mar 2004
Posts: 2,519
Likes: 4
From: In the Garage
Car: Camaro
Engine: 6.2L
Transmission: T56
Re: Stroked LQ4 Build Thread
Now thats fine right thur just FINE! 
Only thing I can add is on the 6.2 there was no tach out either. It came from a different computer altogether but pin 58 was where I sourced and in HP it was a quick couple of tabs to select and flash. Piece of cake, Im sure yours is similarly easy.
I wonder what thing thing is gonna run? Boost it....
Joined: Jun 2002
Posts: 13,576
Likes: 30
From: Harford County, MD
Car: camaro sportcoupe
Engine: 7.0L
Transmission: G-Force GF5R
Axle/Gears: Moser 9"
Re: Stroked LQ4 Build Thread
looks awesome man! glad to see you using a wix filter too
Thread Starter
Joined: Mar 2000
Posts: 43,187
Likes: 46
From: Littleton, CO USA
Car: 82 Berlinetta/57 Bel Air
Engine: L92/LQ4 (both w/4" stroke)
Transmission: 4L80E/4L80E
Axle/Gears: 12B-3.73/9"-3.89
Now thats fine right thur just FINE!
Only thing I can add is on the 6.2 there was no tach out either. It came from a different computer altogether but pin 58 was where I sourced and in HP it was a quick couple of tabs to select and flash. Piece of cake, Im sure yours is similarly easy.
Only thing I can add is on the 6.2 there was no tach out either. It came from a different computer altogether but pin 58 was where I sourced and in HP it was a quick couple of tabs to select and flash. Piece of cake, Im sure yours is similarly easy.
I'm wondering that, too. I'm fairly confident it will run at least as quick as the 396 did with a hundred shot.
Boost? I don't think so...
Thread Starter
Joined: Mar 2000
Posts: 43,187
Likes: 46
From: Littleton, CO USA
Car: 82 Berlinetta/57 Bel Air
Engine: L92/LQ4 (both w/4" stroke)
Transmission: 4L80E/4L80E
Axle/Gears: 12B-3.73/9"-3.89
Thread Starter
Joined: Mar 2000
Posts: 43,187
Likes: 46
From: Littleton, CO USA
Car: 82 Berlinetta/57 Bel Air
Engine: L92/LQ4 (both w/4" stroke)
Transmission: 4L80E/4L80E
Axle/Gears: 12B-3.73/9"-3.89
I had forgotten about this until I was poking around last night, but one of the coil connectors was cut off of one of the coil packs. O'Reilly has them - for $55 each! For one coil!!!
I don't think I have anything laying around to replace it, so I may have to bit the bullet and buy the connector. Yes, I could go to a pick & pull and try to find one, but most P&P's around here have the engine gone before anybody can get to them.
Might have found one on eBay...
I don't think I have anything laying around to replace it, so I may have to bit the bullet and buy the connector. Yes, I could go to a pick & pull and try to find one, but most P&P's around here have the engine gone before anybody can get to them.
Might have found one on eBay...
Joined: Jun 2002
Posts: 13,576
Likes: 30
From: Harford County, MD
Car: camaro sportcoupe
Engine: 7.0L
Transmission: G-Force GF5R
Axle/Gears: Moser 9"
Re: Stroked LQ4 Build Thread
i have a full set of square truck coils with harnesses and brackets that i'll send ya for $75 shipped, lol
Thread Starter
Joined: Mar 2000
Posts: 43,187
Likes: 46
From: Littleton, CO USA
Car: 82 Berlinetta/57 Bel Air
Engine: L92/LQ4 (both w/4" stroke)
Transmission: 4L80E/4L80E
Axle/Gears: 12B-3.73/9"-3.89
That's tempting. I went ahead and ordered the single connector.
Thread Starter
Joined: Mar 2000
Posts: 43,187
Likes: 46
From: Littleton, CO USA
Car: 82 Berlinetta/57 Bel Air
Engine: L92/LQ4 (both w/4" stroke)
Transmission: 4L80E/4L80E
Axle/Gears: 12B-3.73/9"-3.89
For those running a 4L80E and B&M Mega Shifter, you should know the "regular" cable brackets they include with the shifter won't work with the PRND switch on the selector shaft. You need one that moves the cable outward.
That's my "gobs of room shoebox" installation. I imagine with the tight real estate market of 3rd gens and a 4L80E, you're going to be even closer to something.
That's my "gobs of room shoebox" installation. I imagine with the tight real estate market of 3rd gens and a 4L80E, you're going to be even closer to something.
Thread Starter
Joined: Mar 2000
Posts: 43,187
Likes: 46
From: Littleton, CO USA
Car: 82 Berlinetta/57 Bel Air
Engine: L92/LQ4 (both w/4" stroke)
Transmission: 4L80E/4L80E
Axle/Gears: 12B-3.73/9"-3.89
Most of what I've been doing lately is non-3rd gen (like a Currie 9" kit). But, one thing I was curious about was what the hole in the intake just behind the TB mount with a flat horizontal surface on the passenger side was for. So, in the search process, discovered it is the MAP sensor mount. Now, I just bought an LQ4 MAP sensor, and was going to mount it on the back of the manifold where the large vacuum fitting was broken (I bought the intake as a slightly damaged L76), like the LS and LQ intakes I've seen have done. As part of the investigation, I once again came upon comparisons between the L76 and LS3 intake manifolds. Turns out one of those differences is the MAP sensor mount - the L76 clips on, and the LS3 bolts on (which I had seen before, but at the time assumed they were talking about the back of the manifold). The other difference is the PCV vacuum port below the MAP sensor mount - L76 is just a molded port on the side of the intake, LS3 is a beefier, bonded mount. Well, went out and looked at my intake, and discovered I actually have an LS3 intake. Doesn't make a lick of difference performance-wise, but apparently the seller incorrectly identified the intake when he listed it.
Now, the L76 and the LQ4 use the exact same MAP sensor. The difference with the LS3 sensor goes beyond the way it mounts - it operates on a different calibration. There is some chatter about being able to tune to the LS3 calibration with L76 or other PCM that originally used the LQ4/L76 type sensor, but the results were mixed.
So, I'm going to stick with the LQ4 sensor. I had already "glued" it into the busted port on the back, but I think I'll move it back up to where it belongs and plug the rear port. I'll have to fab up something to hold it down (or "glue" it in...). Shouldn't be a problem with the wiring harness - have plenty of extra wire...
Thread Starter
Joined: Mar 2000
Posts: 43,187
Likes: 46
From: Littleton, CO USA
Car: 82 Berlinetta/57 Bel Air
Engine: L92/LQ4 (both w/4" stroke)
Transmission: 4L80E/4L80E
Axle/Gears: 12B-3.73/9"-3.89
I haven't posted updates for awhile for 2 reasons - 1) Same as above, work done not 3rd gen related; 2) In early July, I abandoned any hope of getting it running during the season and basically didn't work on it until January.
And then February was a complete waste...
So, I've done some more in March, and progress is occurring - still slow, but progress.
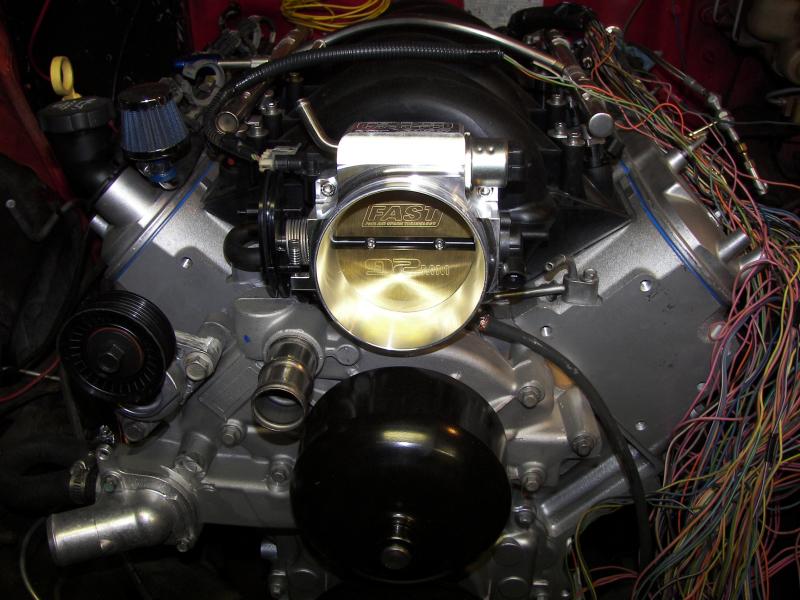
I had issues with the knock-off TB that I got, so I sprang for a Big Mouth 92mm.
If you start out with engine/trans/harness out of a van, you can put the PCM pretty much wherever you want. I decided to mount mine on the passenger side kick panel with a firewall pass-through. About 80 wires had to be "re-lengthed" (read: shortened). If you're starting with a chassis that didn't have EFI, and don't have the fuse/relay box from the donor vehicle, Painless makes a fuse/relay box with 2 relays and 7 circuits (all activated with a single switched signal) that can make life easier. I'm using it for the hot in run & start circuits (switched power for PCM, O2/MAF/IAT sensors, injectors, coils, etc.).
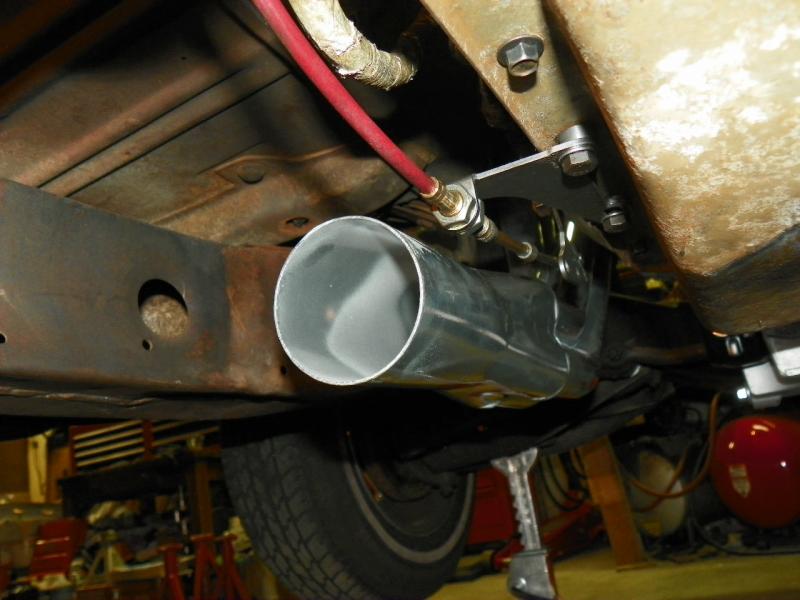
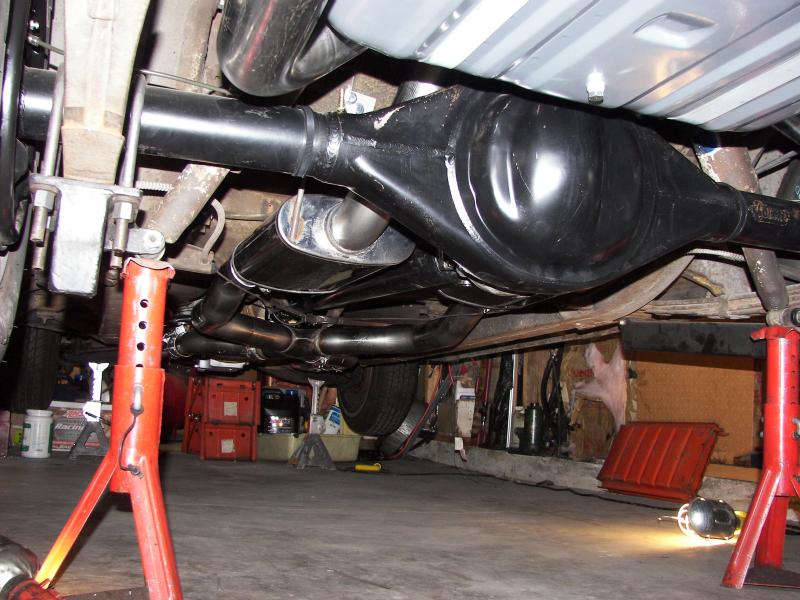
I have an unfair advantage being this is a shoebox, so dual 3" stainless with x-pipe out the back is off-the-shelf from Magnaflow (you can also see the off-the-shelf Currie 9"):
Still a lot of little things left to do - more wiring for fuel pump and starter, bus for battery cable; throttle cable; interior wiring like tach, OBD II connector, speedometer, SES light; install gauges; finish hooking up the fuel system; air inlet/MAF/IAT system; cooling system. Hopefully it'll be at the tuners in a couple of weeks.
The racing season starts April 25th, but I'll be out of town that weekend. More racing the following weekend, so I'm really hoping it'll be ready to go by then. If not, the Camaro will have to fill in (again).
And then February was a complete waste...
So, I've done some more in March, and progress is occurring - still slow, but progress.
I had issues with the knock-off TB that I got, so I sprang for a Big Mouth 92mm.

If you start out with engine/trans/harness out of a van, you can put the PCM pretty much wherever you want. I decided to mount mine on the passenger side kick panel with a firewall pass-through. About 80 wires had to be "re-lengthed" (read: shortened). If you're starting with a chassis that didn't have EFI, and don't have the fuse/relay box from the donor vehicle, Painless makes a fuse/relay box with 2 relays and 7 circuits (all activated with a single switched signal) that can make life easier. I'm using it for the hot in run & start circuits (switched power for PCM, O2/MAF/IAT sensors, injectors, coils, etc.).

I have an unfair advantage being this is a shoebox, so dual 3" stainless with x-pipe out the back is off-the-shelf from Magnaflow (you can also see the off-the-shelf Currie 9"):

Still a lot of little things left to do - more wiring for fuel pump and starter, bus for battery cable; throttle cable; interior wiring like tach, OBD II connector, speedometer, SES light; install gauges; finish hooking up the fuel system; air inlet/MAF/IAT system; cooling system. Hopefully it'll be at the tuners in a couple of weeks.
The racing season starts April 25th, but I'll be out of town that weekend. More racing the following weekend, so I'm really hoping it'll be ready to go by then. If not, the Camaro will have to fill in (again).
Thread Starter
Joined: Mar 2000
Posts: 43,187
Likes: 46
From: Littleton, CO USA
Car: 82 Berlinetta/57 Bel Air
Engine: L92/LQ4 (both w/4" stroke)
Transmission: 4L80E/4L80E
Axle/Gears: 12B-3.73/9"-3.89
Oh, a couple of other things of interest...
I needed injector connectors for the LS3-type injectors, as they are different from the truck connectors. I found some adapters, but later came across an LS3 injector harness, so I picked it up. It had a 3-wire connector on each side I didn't need, so I took the harness apart to remove them, and then splice it all into the LQ4 harness. In the process, I discovered the LQ4 harness used a pink power wire for each injector, while the LS3 harness used a single power wire to each side, ganging the 4 injectors together. That eliminated 6 pink power wires from the bundle - I'm in for that! When you think about it, only one injector will be firing at a time, so why all the extra copper???
I also saw that Holley makes valve covers with baffles compatible with the offset rockers, which would work fine with the LS6 PCV, and also mounted the coils directly to the cover instead of on a separate frame. I thought that was cool (even though I also had to buy LS3 coils), and ordered it all up. When I went to install, I discovered the coil mounts protruded out even more than the frame system did, and hit my firewall. So, had to abandon that (may find another use for the covers & coils...). I ended up T-ing the two sides together into the fresh air supply hose you can see in the pic above.
Holley makes a throttle cable housing mount for LS2/3 cable TBs. Uses an intake mount bolt on the back, and a TB mount bolt on the front. You can kind of see it in the 2nd pic in the post above. In case anyone wants to go cable TB on an LS2 or L92 head/factory intake combination.
Thread Starter
Joined: Mar 2000
Posts: 43,187
Likes: 46
From: Littleton, CO USA
Car: 82 Berlinetta/57 Bel Air
Engine: L92/LQ4 (both w/4" stroke)
Transmission: 4L80E/4L80E
Axle/Gears: 12B-3.73/9"-3.89
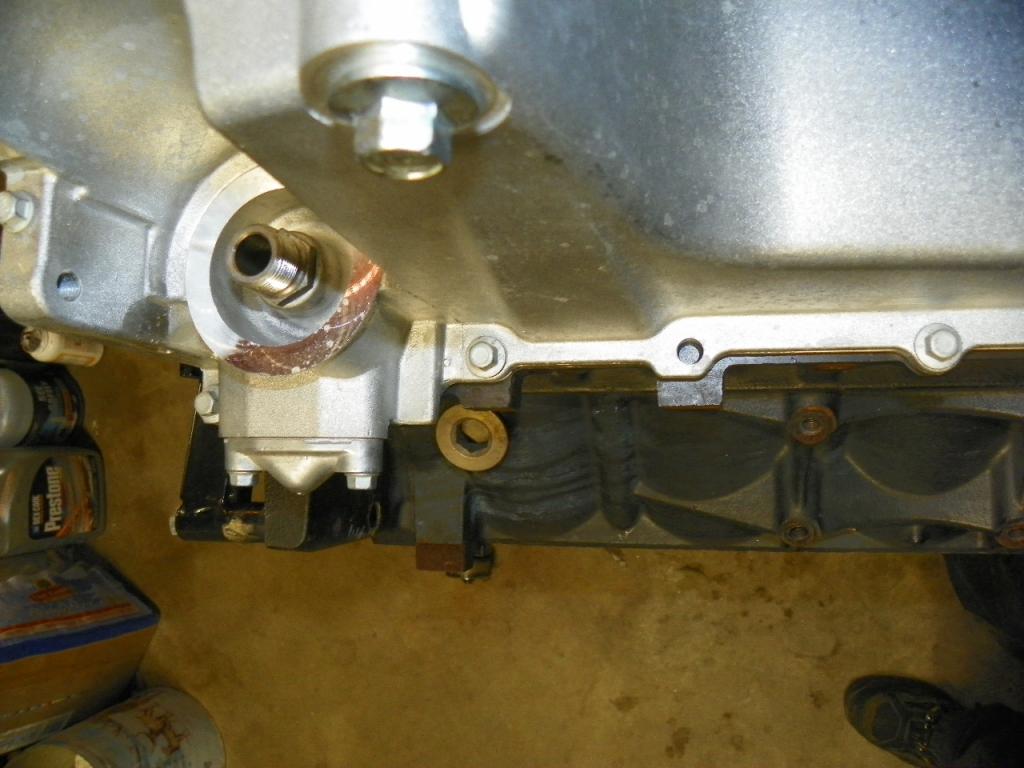
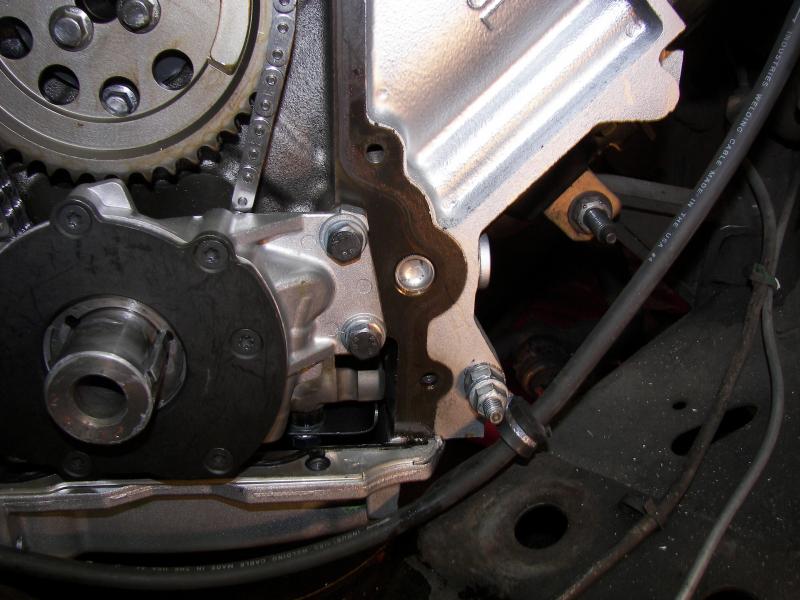
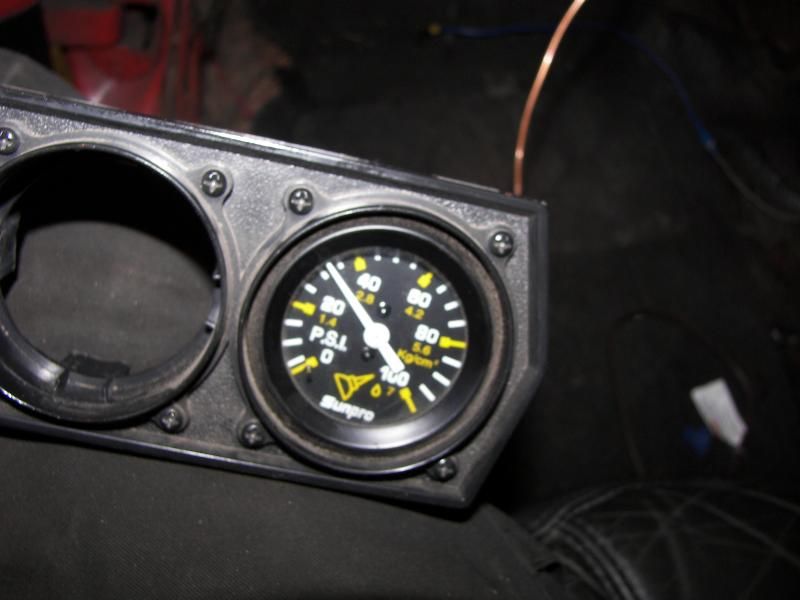
Last night I hooked up a mechanical oil pressure gauge, hooked up the battery (for the first time in almost 4 years), and used the starter to turn over the engine without the spark plugs installed (so it wouldn't load the bearings before it had oil pressure). After much turning over, the oil pressure needle never moved.
I checked the dipstick - yes, there was oil in the pan. I unscrewed the oil filter, which I had partially filled prior to installing, it wasn't full.
I researched on line, looked over pictures I had taken while putting the engine together.
If you really know your LS engine family, you'll see what's wrong with this picture:
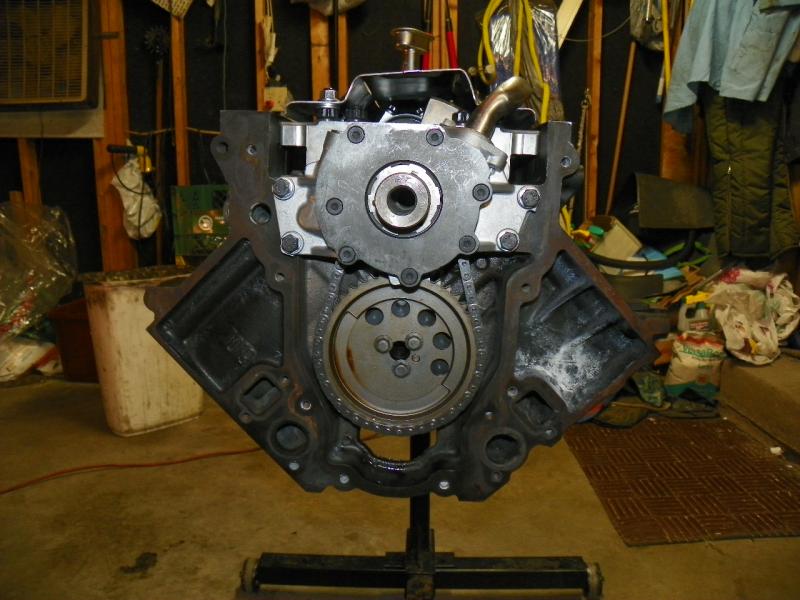
You can even see it more clearly in the 2nd pic I posted way back in post #45.
Joined: Jun 2002
Posts: 13,576
Likes: 30
From: Harford County, MD
Car: camaro sportcoupe
Engine: 7.0L
Transmission: G-Force GF5R
Axle/Gears: Moser 9"
Re: Stroked LQ4 Build Thread
oooh oooh, i know! pick me! pick me!
cool thing is, you can get to that plug (or lack there of in your picture) without pulling the motor, unless you just wanted to.
unless this is some sick sort of april fool's joke
cool thing is, you can get to that plug (or lack there of in your picture) without pulling the motor, unless you just wanted to.
unless this is some sick sort of april fool's joke
Thread Starter
Joined: Mar 2000
Posts: 43,187
Likes: 46
From: Littleton, CO USA
Car: 82 Berlinetta/57 Bel Air
Engine: L92/LQ4 (both w/4" stroke)
Transmission: 4L80E/4L80E
Axle/Gears: 12B-3.73/9"-3.89
I wish.
Discovered last night. Late last night.
Before I could get on the computer and do some searching, I assumed it was the plastic barbell gallery plug in the back, which would mean the engine and tranny would have to come apart. But, the search did come up with an alternative explanation; looking through pics I had taken during the assembly confirmed the barbell was in place, and exposed another area of my LS ignorance.
True, the engine doesn't need to be pulled, but I do need to learn how to pull an ATI Super Damper.
Joined: Jun 2002
Posts: 13,576
Likes: 30
From: Harford County, MD
Car: camaro sportcoupe
Engine: 7.0L
Transmission: G-Force GF5R
Axle/Gears: Moser 9"
Re: Stroked LQ4 Build Thread
oh oh oh! i know that one too!
it's actually as easy as pulling a sbc/bbc as it has 3 bolts in the same pattern as the sbc/bbc stuff, so a regular balancer puller will work. i've found that an old balancer bolt with the outside diameter of the flange ground down enough to pass through the balancer acts as a great place to put the puller push pin against.
it's actually as easy as pulling a sbc/bbc as it has 3 bolts in the same pattern as the sbc/bbc stuff, so a regular balancer puller will work. i've found that an old balancer bolt with the outside diameter of the flange ground down enough to pass through the balancer acts as a great place to put the puller push pin against.
Thread Starter
Joined: Mar 2000
Posts: 43,187
Likes: 46
From: Littleton, CO USA
Car: 82 Berlinetta/57 Bel Air
Engine: L92/LQ4 (both w/4" stroke)
Transmission: 4L80E/4L80E
Axle/Gears: 12B-3.73/9"-3.89
I was hoping it would be something like that. I'll have to look to see if I have an old damper bolt laying around.

Thread Starter
Joined: Mar 2000
Posts: 43,187
Likes: 46
From: Littleton, CO USA
Car: 82 Berlinetta/57 Bel Air
Engine: L92/LQ4 (both w/4" stroke)
Transmission: 4L80E/4L80E
Axle/Gears: 12B-3.73/9"-3.89
Diagnosis confirmed. Front oil galley plug missing.
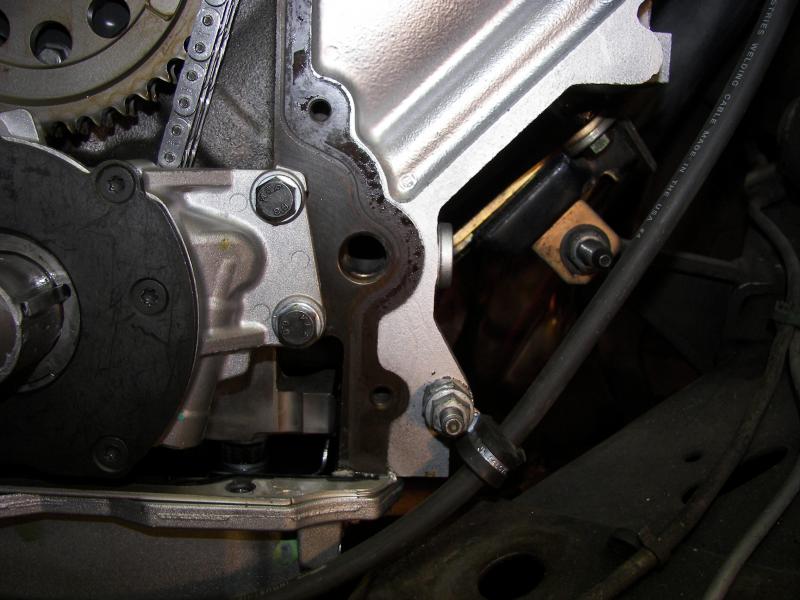
Front oil galley plug missing no more.
All buttoned back up. The damper gave me a little hassle going back on, couldn't see the keyway when sticking it back on the snout. Ended up scratching the location of the keyway on the outside so I could see where it was.
Surgery successful. Cranking oil pressure.

Front oil galley plug missing no more.

All buttoned back up. The damper gave me a little hassle going back on, couldn't see the keyway when sticking it back on the snout. Ended up scratching the location of the keyway on the outside so I could see where it was.

Surgery successful. Cranking oil pressure.

Thread Starter
Joined: Mar 2000
Posts: 43,187
Likes: 46
From: Littleton, CO USA
Car: 82 Berlinetta/57 Bel Air
Engine: L92/LQ4 (both w/4" stroke)
Transmission: 4L80E/4L80E
Axle/Gears: 12B-3.73/9"-3.89
The Summit gauges are pretty cool (I think). With flash:
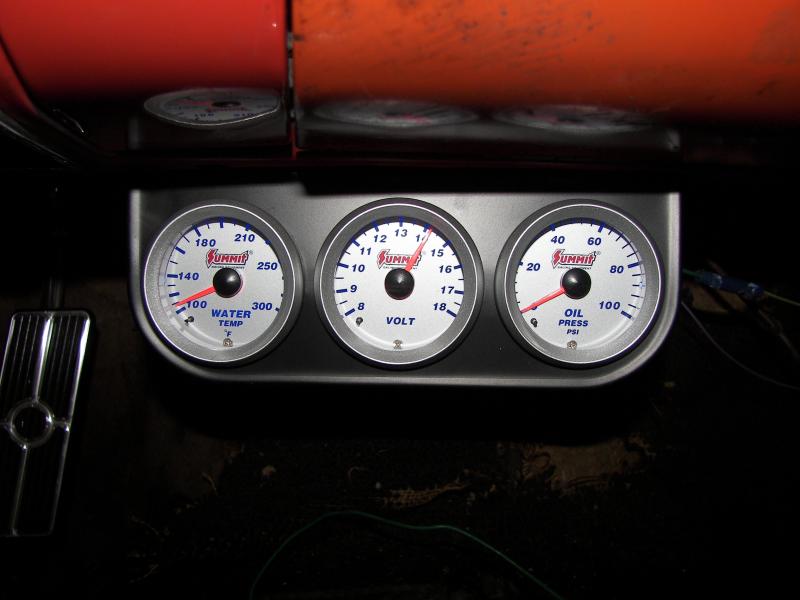
Without flash:
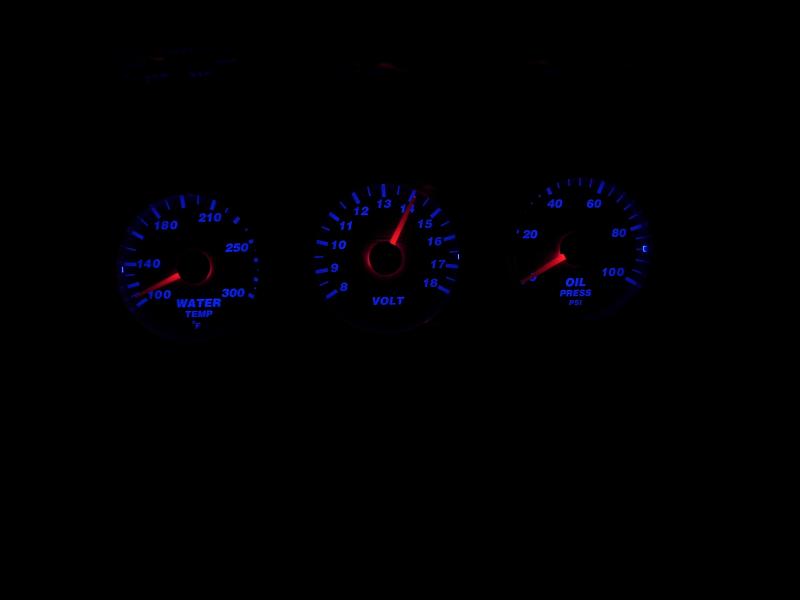
However, they are very sensitive to input voltage, so I need to isolate them from other loads (especially the radiator fan, which is getting its own wire directly to the battery cable bus).
In case any of you decide to use the TCI SFI LS 4L80E flexplate, know that an LS1 type starter is required. I got a new LQ4 starter, and it wouldn't disengage from the flexplate. Dug out the old LS1 starter I had laying around (still don't know where it came from, but the p/n on it checked out as a 4th gen Camaro LS1 starter), it engaged and disengaged fine. It was tired, though, so I picked up a new 2000 Camaro LS1 4L60E application starter. It works fine. And the LS1 starter is actually a little beefier than the LQ4 starter. (I took a pic of the LQ4 starter, an LM7 starter for reference, and the old LS1 starter, but I guess I haven't posted them to Photobucket yet.)
I don't have a 1st time start video because unbeknownst to me, the camera shut itself off before I got back in the car. So, here's the next best thing:
https://www.facebook.com/photo.php?v=10151954343316114
(Need a Facebook account to see it - for some reason, videos I've taken with the "good" camera won't load on Photobucket).
The tach didn't work, so I needed to add a pull-up resistor/power wire. After that, and switching the tach to 4-cylinder mode, it worked.
https://www.facebook.com/photo.php?v=10151953559771114
The 4" air inlet ducting/MAF act like a megaphone and it's really noisy up front. That sounds like something scraping in the bellhousing, but it's really air inlet noise.
https://www.facebook.com/photo.php?v=10151954344521114
Need to button a few things up, then get it to the tuner. Hopefully they can take it next week. And, hopefully, they'll give me dyno curves so I can show you that as well. I'm assuming something around 400 HP at the wheels at our altitude.