
1991 Formula Build. PIC HEAVY!


Thread Starter
Member

Joined: Apr 2009
Posts: 153
Likes: 1
From: Minnesoata/Wisconsin
Car: 1991 Pontiac Firebird Formula
Engine: 5.0 TBI
Transmission: T5
Axle/Gears: 3.08
Re: 1991 Formula Build. PIC HEAVY!
Thanks everyone for the kind words.
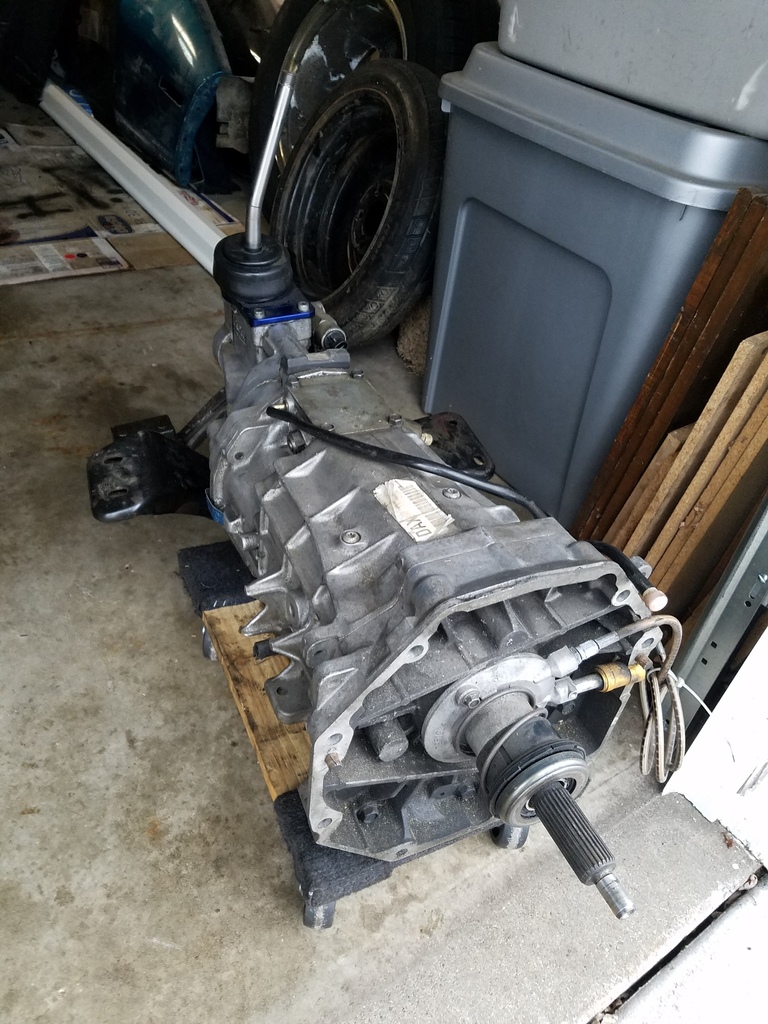
I now have my T56 and fuel tank at my place. It was at my parents� house about 5 hours away. Trip went great and I only have a few swap items left to grab next time I visit them.
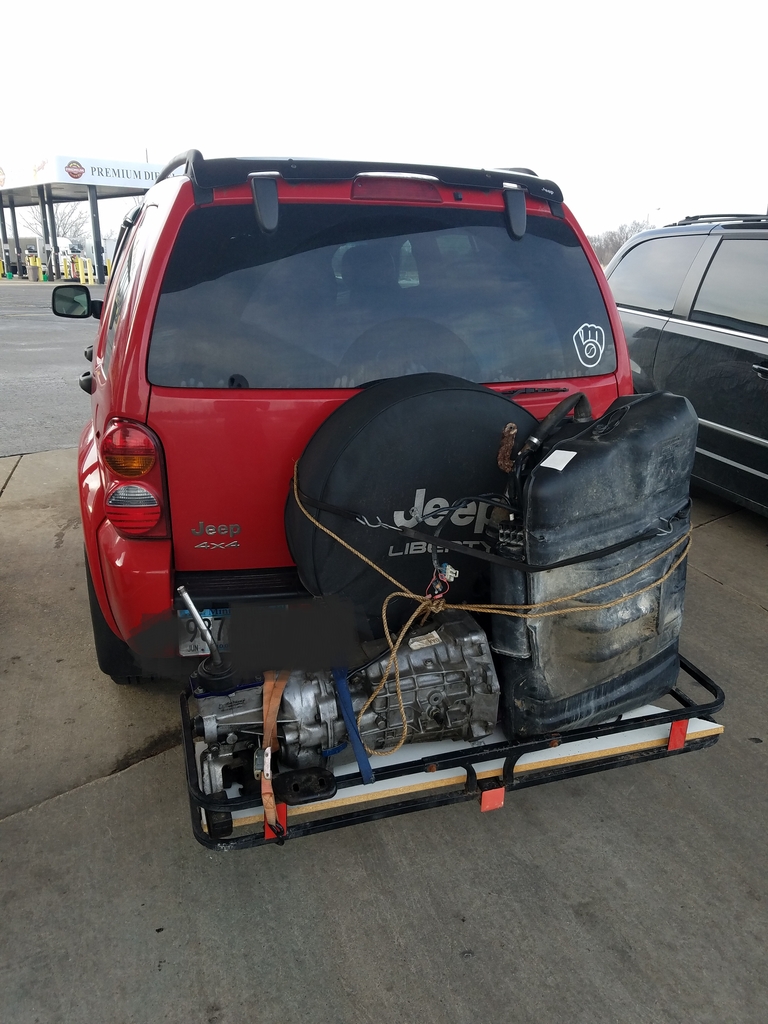
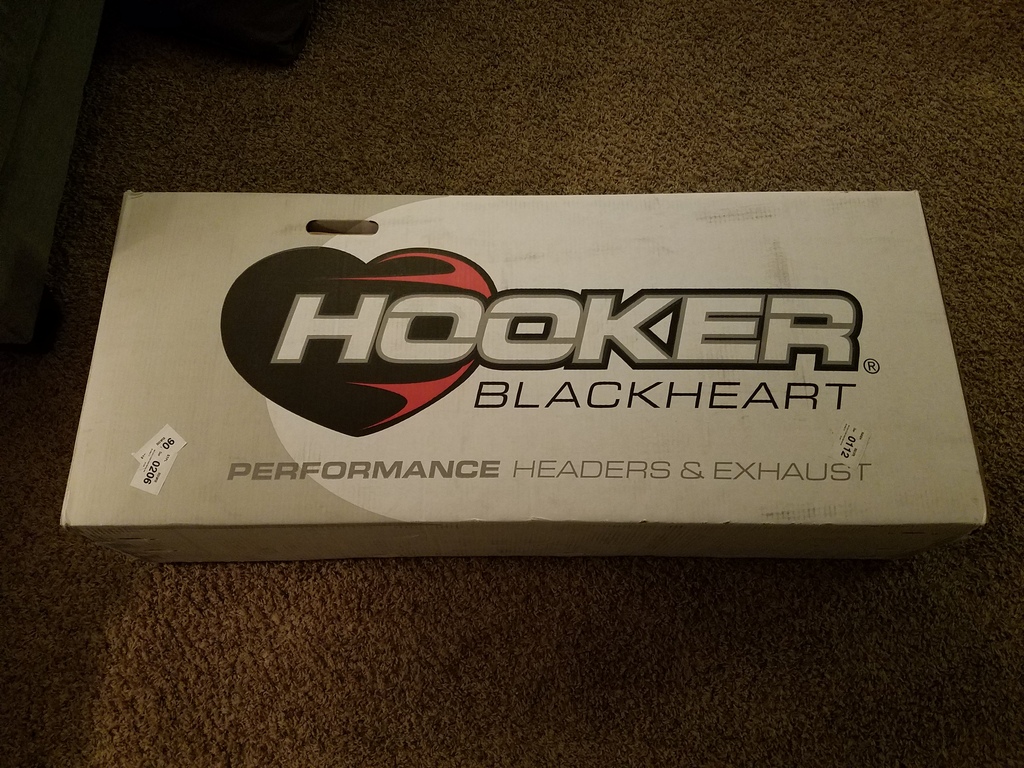
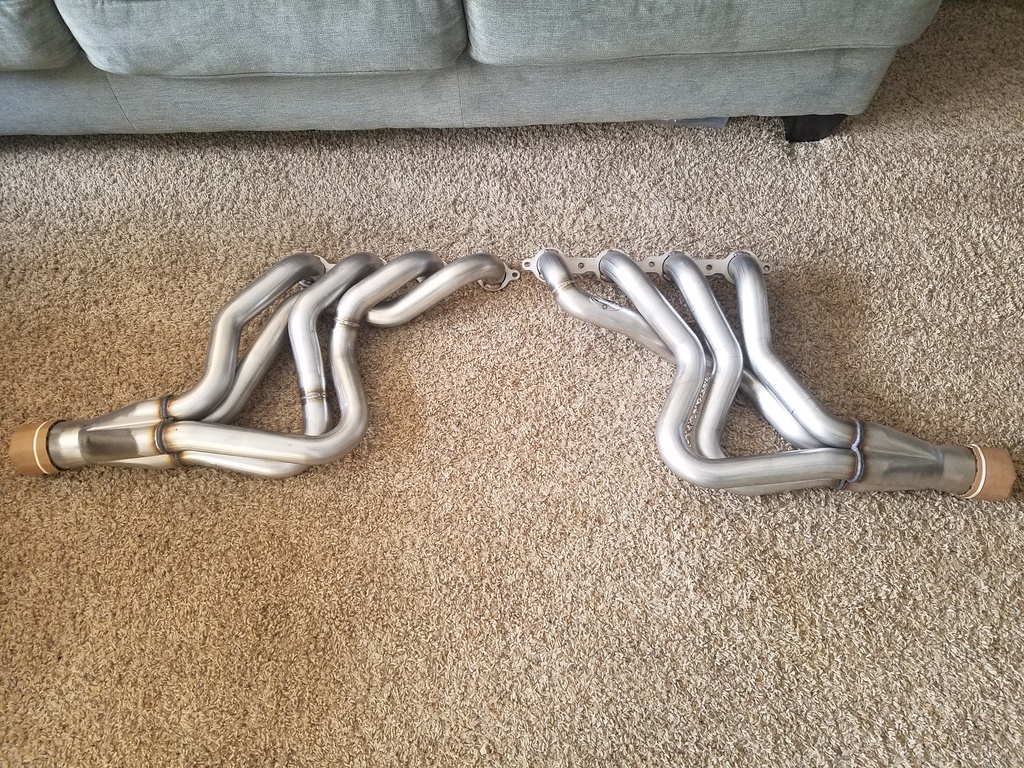
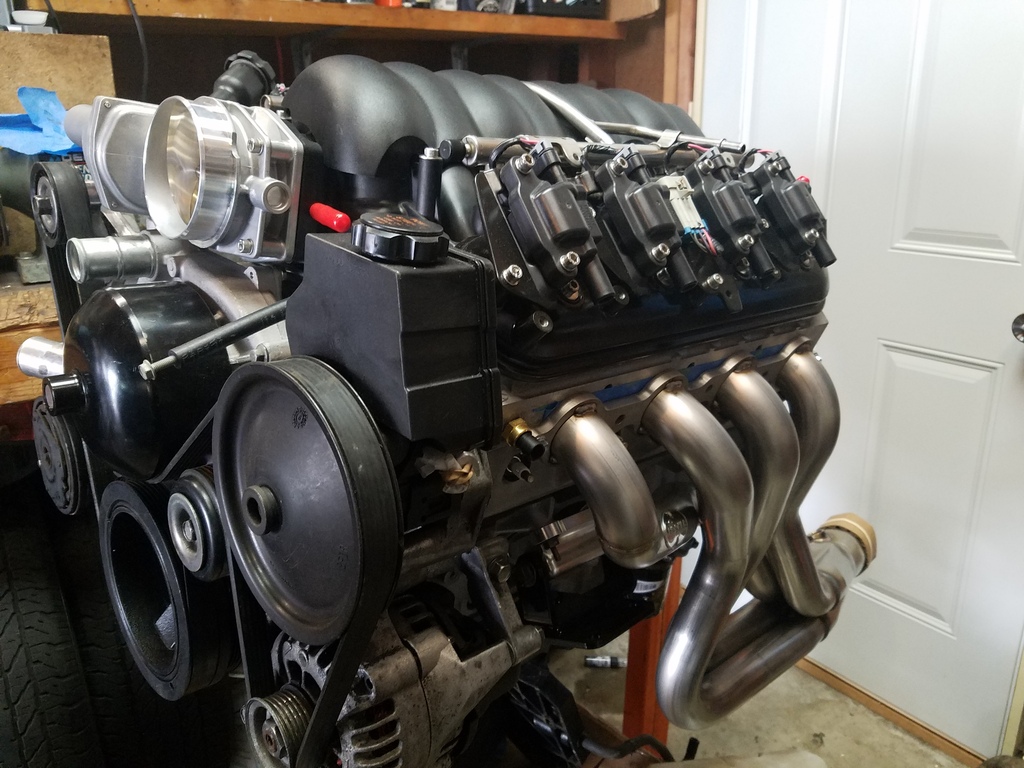
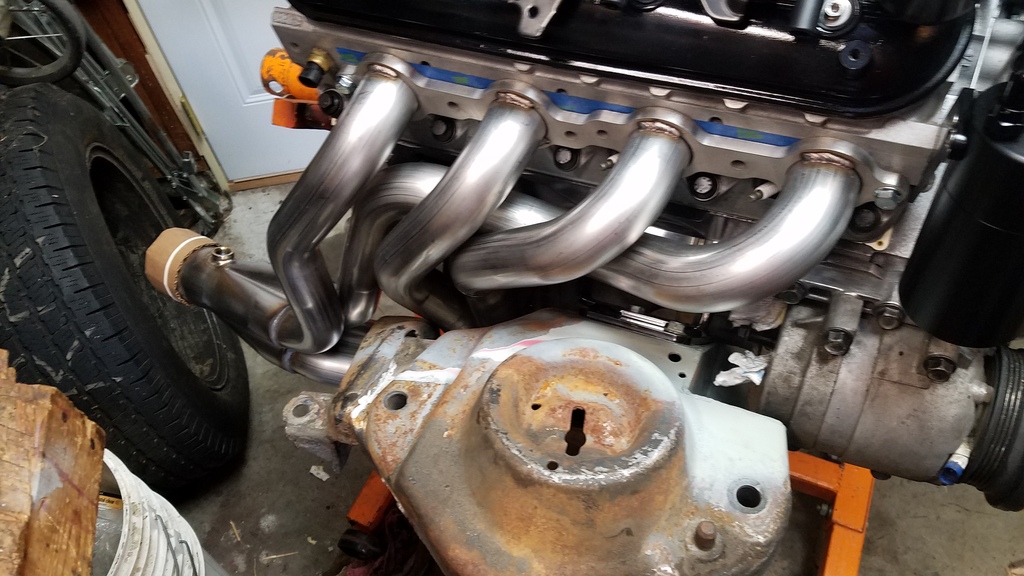
I also have been saving and was able to purchase the headers I will be using in this swap. Hooker Blackheart LS Swap Longtubes. These things look really well built. Can�t wait to throw them on the engine.
I now have my T56 and fuel tank at my place. It was at my parents� house about 5 hours away. Trip went great and I only have a few swap items left to grab next time I visit them.


I also have been saving and was able to purchase the headers I will be using in this swap. Hooker Blackheart LS Swap Longtubes. These things look really well built. Can�t wait to throw them on the engine.


Thread Starter
Member
Joined: Apr 2009
Posts: 153
Likes: 1
From: Minnesoata/Wisconsin
Car: 1991 Pontiac Firebird Formula
Engine: 5.0 TBI
Transmission: T5
Axle/Gears: 3.08
Re: 1991 Formula Build. PIC HEAVY!
Spend some time in the garage today. I was able to test fit the headers on the block. The hooker headers hug the block nice and tight. I can’t wait to see them in the car.
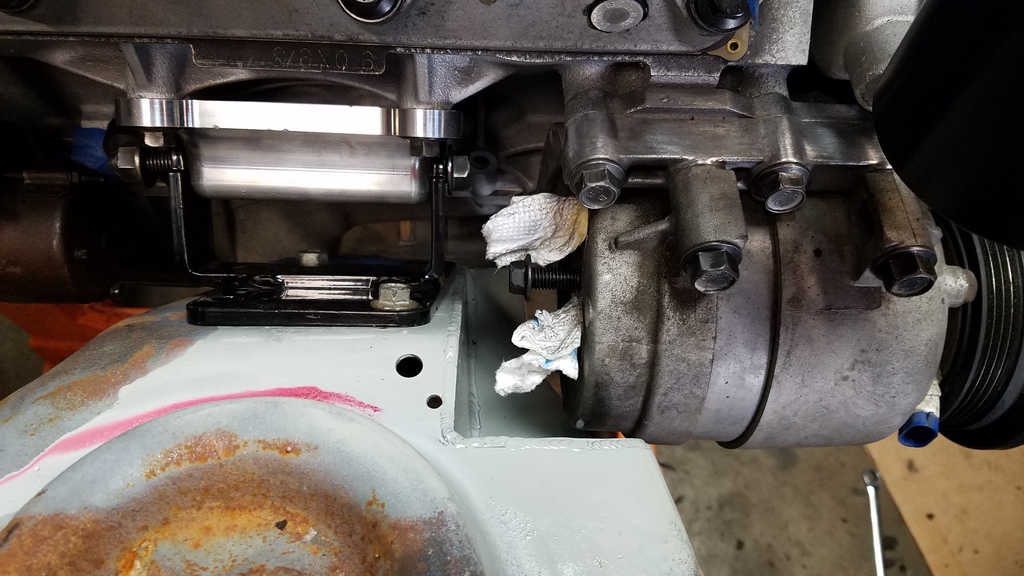
I plan to run my oil pressure sensor for my gauge right above oil filter. Does not look like it will work with how close the headers are. It is not square to the hole and hits the header. I ordered an adapter from LSX Innovations and we will see how that works out in a few days and let you all know.
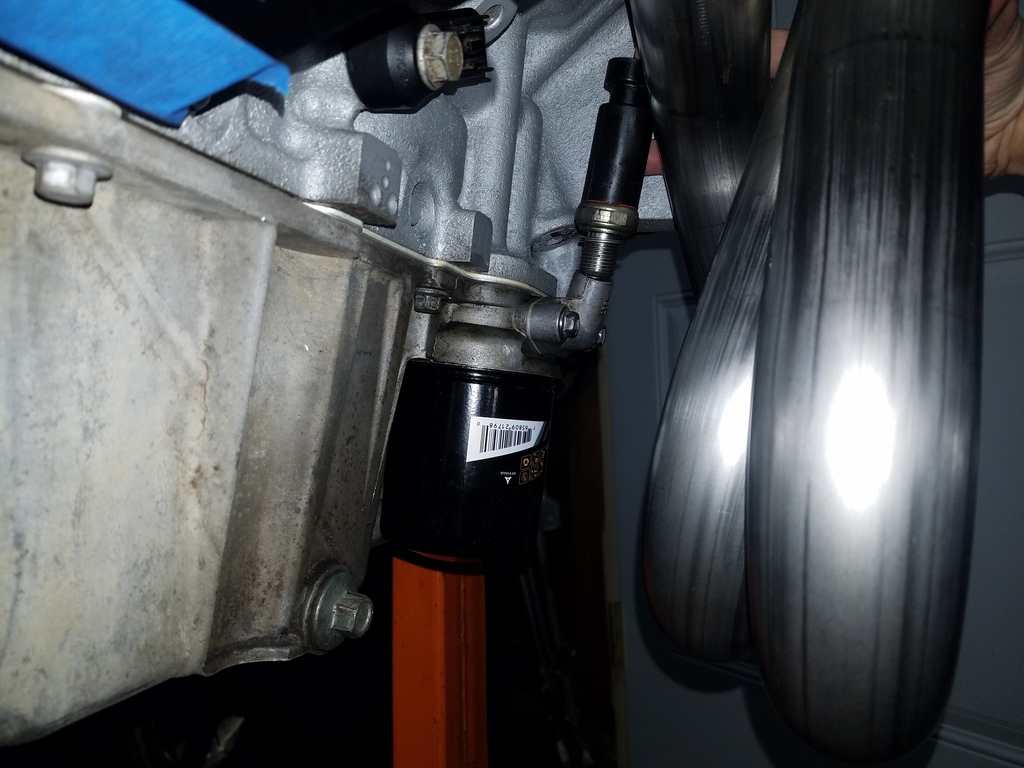

I plan to run my oil pressure sensor for my gauge right above oil filter. Does not look like it will work with how close the headers are. It is not square to the hole and hits the header. I ordered an adapter from LSX Innovations and we will see how that works out in a few days and let you all know.

Last edited by joshy1410; Apr 13, 2017 at 02:53 PM.


Joined: Oct 2001
Posts: 12,228
Likes: 1,156
From: Il
Car: 1989-92 FORMULA350 305 92 Hawkclone
Engine: 4++,350 & 305 CIs
Transmission: 700R4 4800 vig 18th700R4 t56 ZF6 T5
Axle/Gears: 3.70 9"ford alum chunk,dana44,9bolt
Re: 1991 Formula Build. PIC HEAVY!
Looking good!

Joined: Mar 2000
Posts: 43,187
Likes: 45
From: Littleton, CO USA
Car: 82 Berlinetta/57 Bel Air
Engine: L92/LQ4 (both w/4" stroke)
Transmission: 4L80E/4L80E
Axle/Gears: 12B-3.73/9"-3.89
Re: 1991 Formula Build. PIC HEAVY!
Thanks. They make a world of difference in stopping ability and feel. I am really glad I did it. I am not sure what the goal for your car is, but keep in mind the LS1 rears are slightly bigger and can cause fitment issues on 15 inch wheels were the LT1 won't. You will love how the LS1 fronts compare to stockers.
Thread Starter
Member
Joined: Apr 2009
Posts: 153
Likes: 1
From: Minnesoata/Wisconsin
Car: 1991 Pontiac Firebird Formula
Engine: 5.0 TBI
Transmission: T5
Axle/Gears: 3.08
Re: 1991 Formula Build. PIC HEAVY!
Guess we'll see. Last Monday he went to get in his truck to go to work and discovered someone thought breaking the driver's door window on his truck would be a good idea - they didn't break all the way through it, just shattered the outer layer of glass. So, he drove the Camaro to work. One the way home, the traffic on the freeway came to a sudden stop in front of him while he was checking his rear view mirror to move over to the next lane - he couldn't move over because there was a car there, and couldn't stop before going under the rear bumper of the Civic in front of him. So, the hubs & brackets to do the conversion on the fronts are on order. (We'll probably hold off doing the rears for now.)
Thread Starter
Member
Joined: Apr 2009
Posts: 153
Likes: 1
From: Minnesoata/Wisconsin
Car: 1991 Pontiac Firebird Formula
Engine: 5.0 TBI
Transmission: T5
Axle/Gears: 3.08
Re: 1991 Formula Build. PIC HEAVY!
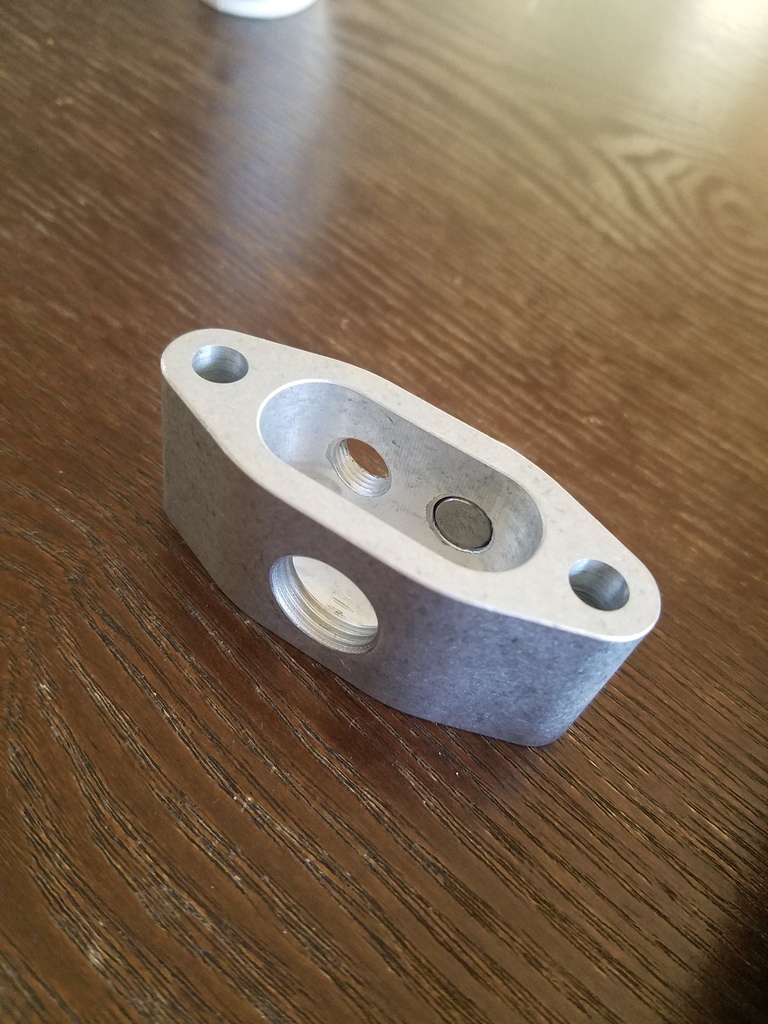
The adapter came it seems to be decent quality. The adapter came with a new stamped steel style gasket, 2 plugs, and bolts. It fit really well with the headers. It has 3 holes in the block. One M16-1.5 for a factory LS oil pressure sensor and two 1/8 npt holes with plugs. One less hurdle solved.
I put one plug in for reference. These can be used for whatever you want. I won�t be using the ports and plugged both.
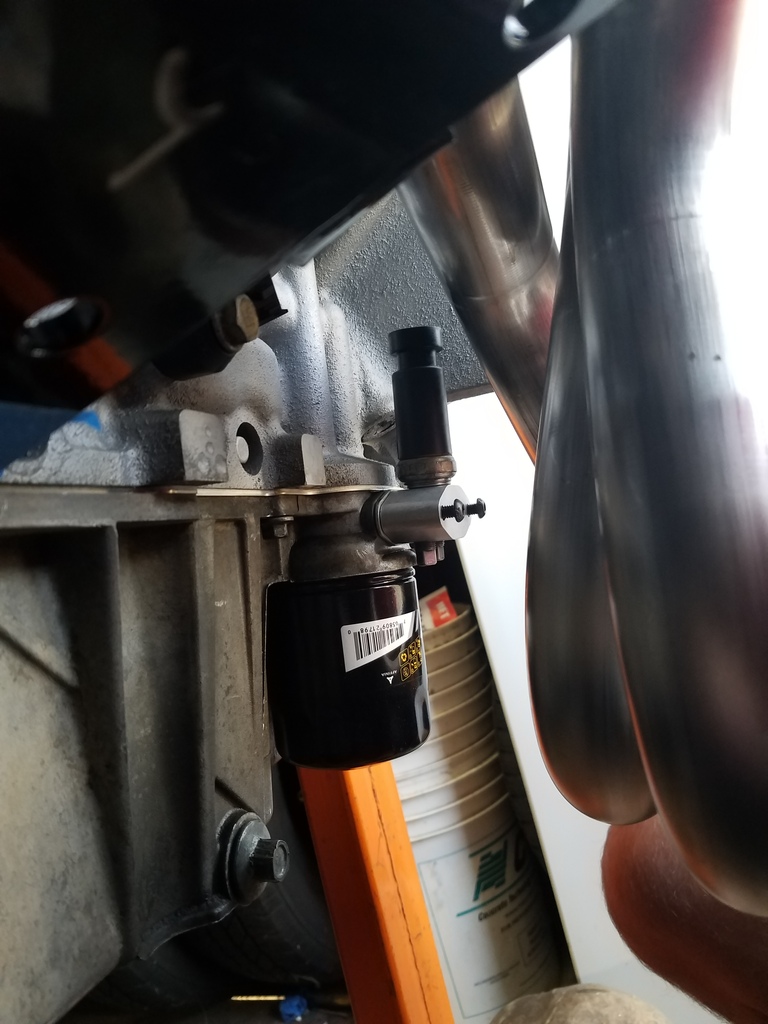
Partially installed. The picture makes the clearance look worse than it appears.
I put one plug in for reference. These can be used for whatever you want. I won�t be using the ports and plugged both.

Partially installed. The picture makes the clearance look worse than it appears.

Thread Starter
Member
Joined: Apr 2009
Posts: 153
Likes: 1
From: Minnesoata/Wisconsin
Car: 1991 Pontiac Firebird Formula
Engine: 5.0 TBI
Transmission: T5
Axle/Gears: 3.08
Thread Starter
Member
Joined: Apr 2009
Posts: 153
Likes: 1
From: Minnesoata/Wisconsin
Car: 1991 Pontiac Firebird Formula
Engine: 5.0 TBI
Transmission: T5
Axle/Gears: 3.08
Re: 1991 Formula Build. PIC HEAVY!
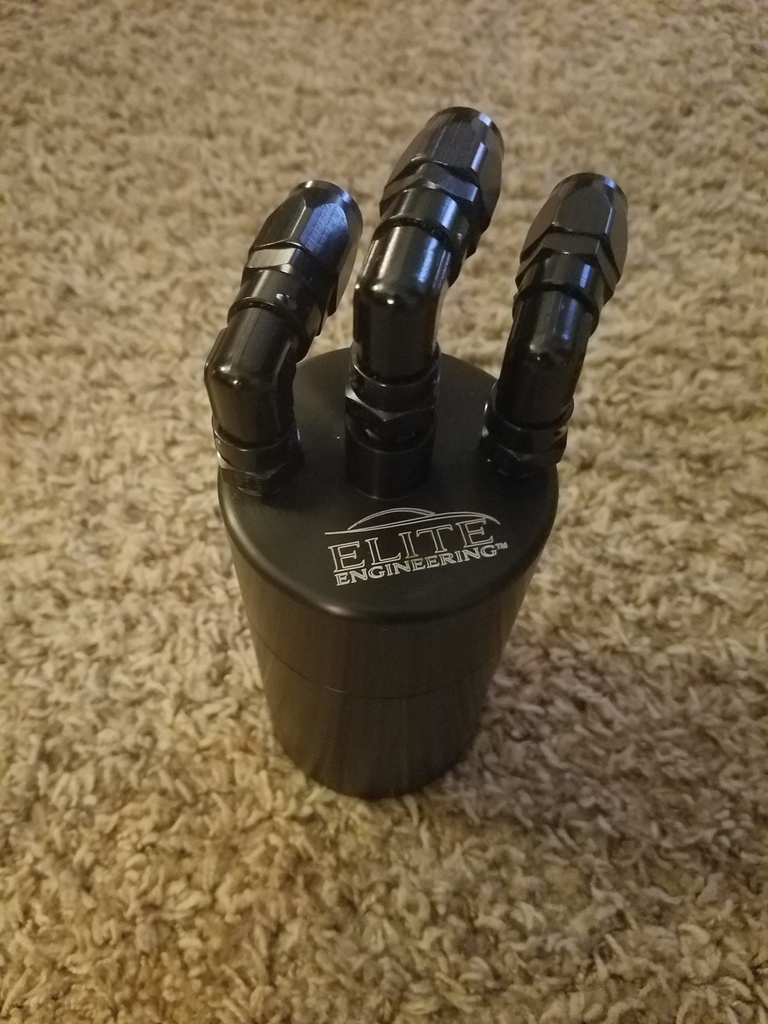
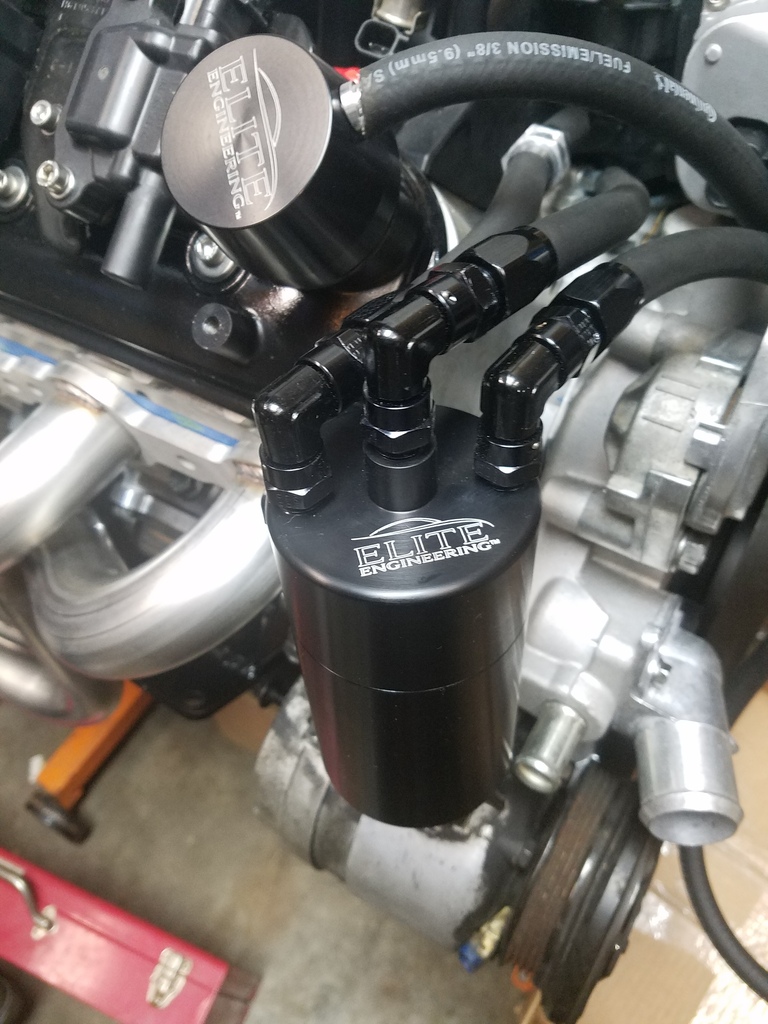
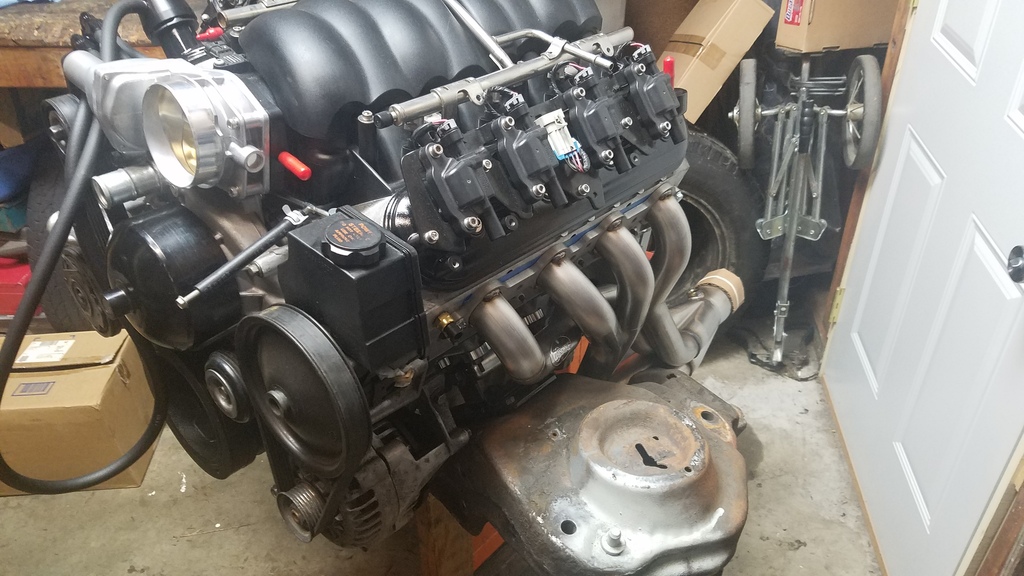
My Elite Engineering catch can and clean side separator came a while ago. I finally have it mocked up on the engine. It is made of 6061-T6 aluminum. I had a problem with my order outside of their control and mine, but they were great to work with and went above and beyond. They took care of everything right away. I am happy with the quality and look forward to using it.


Thread Starter
Member
Joined: Apr 2009
Posts: 153
Likes: 1
From: Minnesoata/Wisconsin
Car: 1991 Pontiac Firebird Formula
Engine: 5.0 TBI
Transmission: T5
Axle/Gears: 3.08
Re: 1991 Formula Build. PIC HEAVY!
Well, I have been able to make a little more progress as of late. My buddy Marc notched out a K-member for me so I can run a 4th gen AC compressor. I sent him a bunch of pictures and he went of those. I think it turned out great. Now I just need to wire wheel or blast it and paint.

Just to make sure everything was going to fit since I am using Spohn K mounts, UMI solid mounts, and Hooker Blackheart headers there, I tested everything out while it was on the stand to eliminate any issues later.
The AC notch was perfect. Plenty of space for the AC lines.
Even thought I was not using the Hooker mounts, the Hooker headers fit really well around the K. I can see how with where the Hooker mounts place the engine these headers would fit even better.
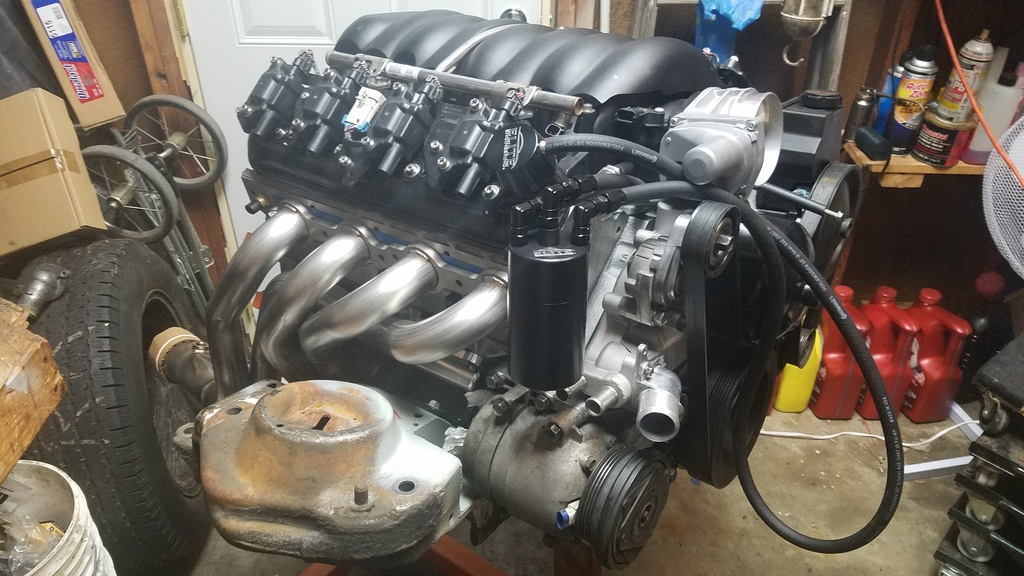
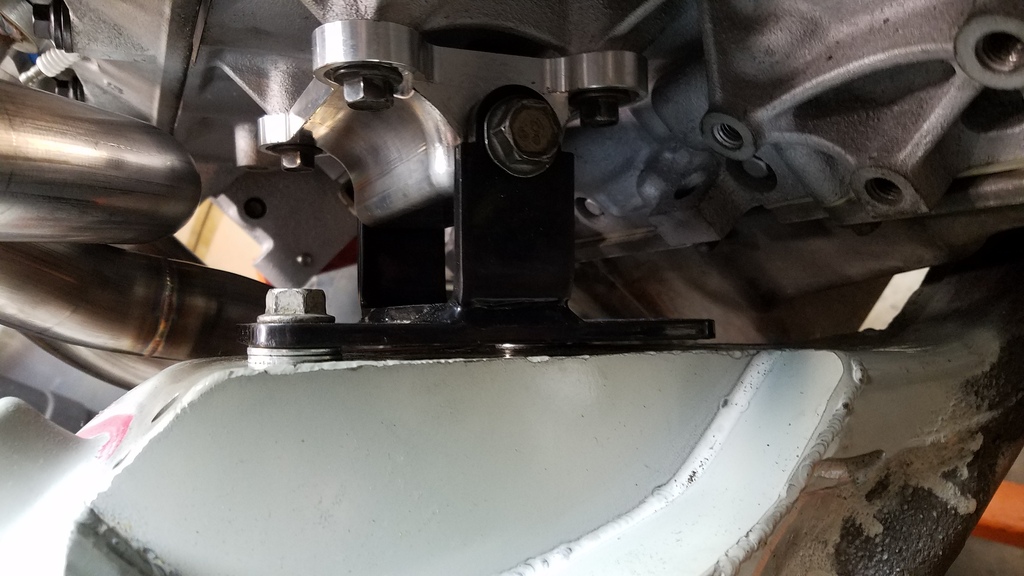
I read the Spohn mounts had a saggy passenger side. This was the case with my mounts. I ended up having to space it out using some washers. I was able to get the engine level. This allowed the headers to fit better as well. Win win in my book.

Just to make sure everything was going to fit since I am using Spohn K mounts, UMI solid mounts, and Hooker Blackheart headers there, I tested everything out while it was on the stand to eliminate any issues later.
The AC notch was perfect. Plenty of space for the AC lines.

Even thought I was not using the Hooker mounts, the Hooker headers fit really well around the K. I can see how with where the Hooker mounts place the engine these headers would fit even better.


I read the Spohn mounts had a saggy passenger side. This was the case with my mounts. I ended up having to space it out using some washers. I was able to get the engine level. This allowed the headers to fit better as well. Win win in my book.


Thread Starter
Member
Joined: Apr 2009
Posts: 153
Likes: 1
From: Minnesoata/Wisconsin
Car: 1991 Pontiac Firebird Formula
Engine: 5.0 TBI
Transmission: T5
Axle/Gears: 3.08
Thread Starter
Member
Joined: Apr 2009
Posts: 153
Likes: 1
From: Minnesoata/Wisconsin
Car: 1991 Pontiac Firebird Formula
Engine: 5.0 TBI
Transmission: T5
Axle/Gears: 3.08
Re: 1991 Formula Build. PIC HEAVY!
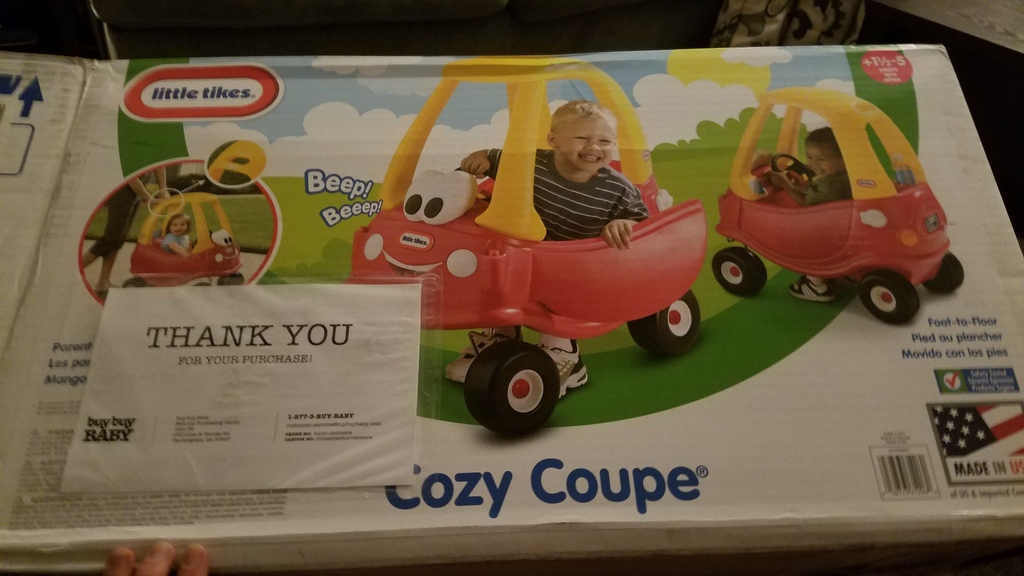
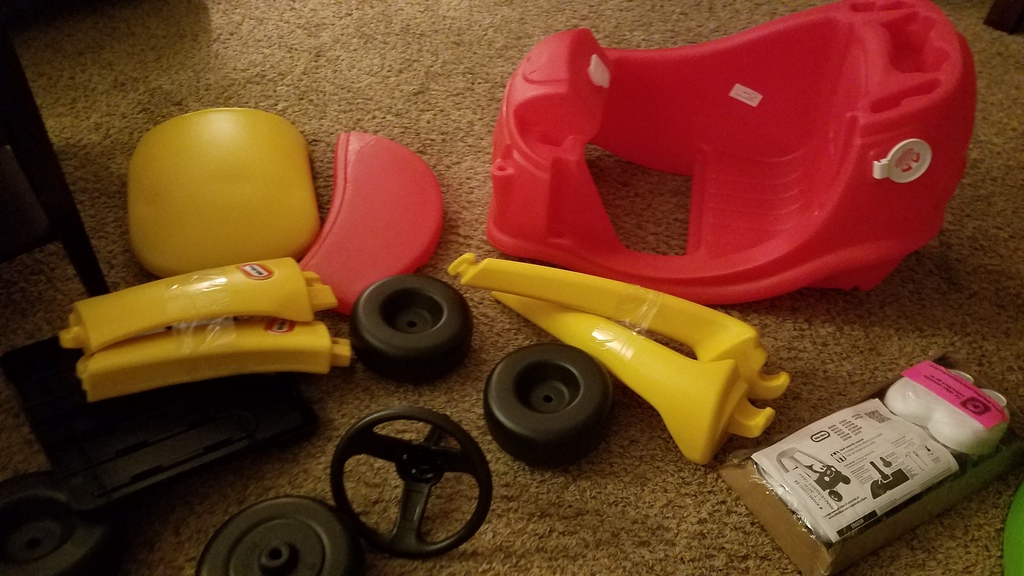
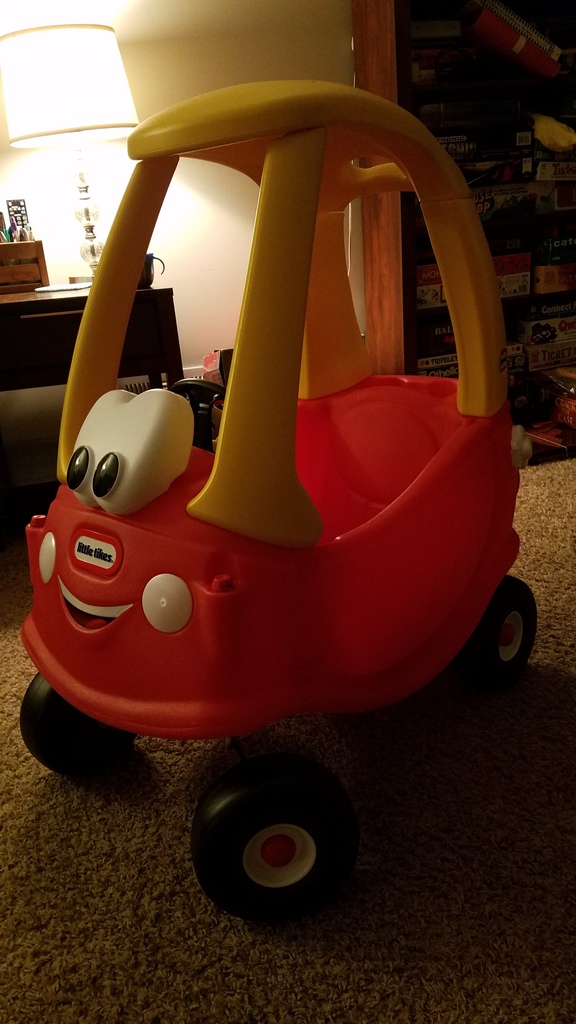
Not much of an update, but I took some time off of building my car and built this fine piece of engineering for my son�s first birthday. He turned one last week. He absolutely loved it. I am hoping to get back in the garage this next week.


Joined: Nov 2006
Posts: 537
Likes: 4
From: Calgary, Alberta, Canada
Car: 89 WS6 TransAm
Engine: LQ408
Transmission: T56 Magnum
Axle/Gears: Strange S60, 4.10s
Re: 1991 Formula Build. PIC HEAVY!
Nice job, that Elite Engineering catch can and separator look like quality pieces. Looks like it should act as your PCV system as well?
Had to laugh about the Cozy Coupe, I built one couple decades ago. A lot of wreck less driving occurred but he kept it off the walls.
Had to laugh about the Cozy Coupe, I built one couple decades ago. A lot of wreck less driving occurred but he kept it off the walls.

Member

Joined: Dec 2011
Posts: 197
Likes: 10
Re: 1991 Formula Build. PIC HEAVY!
not a win...I would take that mount off and trace the pattern on some sheet metal that is as thick as those washers and make a spacer that way. I wouldn't leave those washers in there like that.
Other than that nice job
Thread Starter
Member
Joined: Apr 2009
Posts: 153
Likes: 1
From: Minnesoata/Wisconsin
Car: 1991 Pontiac Firebird Formula
Engine: 5.0 TBI
Transmission: T5
Axle/Gears: 3.08
Re: 1991 Formula Build. PIC HEAVY!
It seemed like it was a good quality piece by what I read about it as well as it doesn't feel cheap when handling it. We will see how it works when the car is running. I will be running a PCV system that is a part of the valley cover. This catch can will work in conjunction with that.
Thread Starter
Member
Joined: Apr 2009
Posts: 153
Likes: 1
From: Minnesoata/Wisconsin
Car: 1991 Pontiac Firebird Formula
Engine: 5.0 TBI
Transmission: T5
Axle/Gears: 3.08
Re: 1991 Formula Build. PIC HEAVY!
Oh no, I agree. That was just temporary to test fit everything while on the engine stand. It was easier to stack washers to get height right. Plus you can see I am only using 2 bolts per mount, there will be 4 when all is said and done.
Thread Starter
Member
Joined: Apr 2009
Posts: 153
Likes: 1
From: Minnesoata/Wisconsin
Car: 1991 Pontiac Firebird Formula
Engine: 5.0 TBI
Transmission: T5
Axle/Gears: 3.08
Re: 1991 Formula Build. PIC HEAVY!
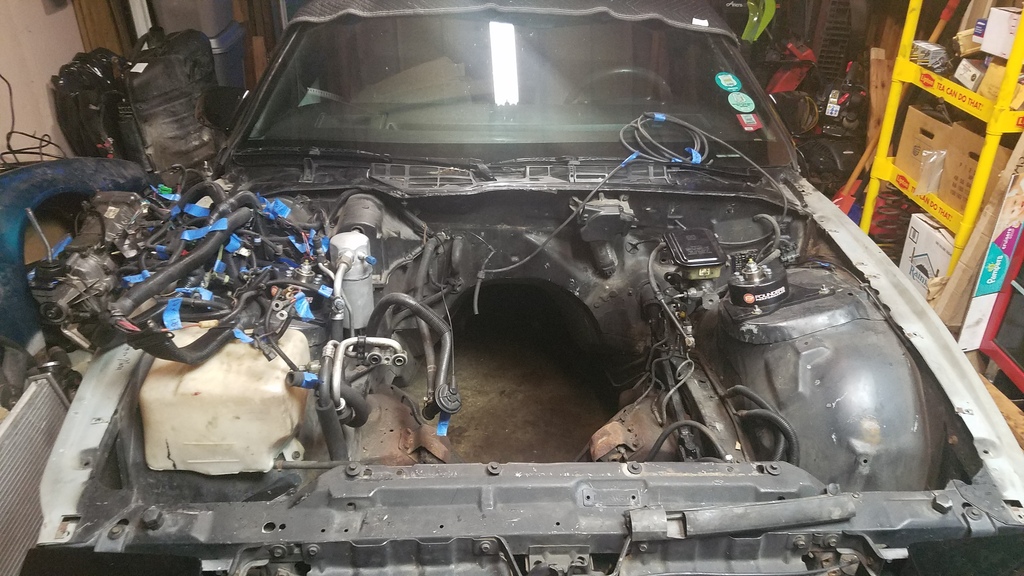
I was able to make more progress on the car. The old engine is out and now it is time to clean off the firewall, prep, and paint. It really feels like I am making progress now.


Senior Member
iTrader: (2)
Joined: Mar 2003
Posts: 859
Likes: 5
From: Birmingham Alabama
Car: 1991 Firebird convertible
Engine: LQ4 ls 6.0
Transmission: 4L60E
Axle/Gears: 342 Limited slip
Re: 1991 Formula Build. PIC HEAVY!
I was able to make more progress on the car. The old engine is out and now it is time to clean off the firewall, prep, and paint. It really feels like I am making progress now.
Attachment 314800
Attachment 314801
Attachment 314802
Attachment 314800
Attachment 314801
Attachment 314802
Joined: Oct 2001
Posts: 12,228
Likes: 1,156
From: Il
Car: 1989-92 FORMULA350 305 92 Hawkclone
Engine: 4++,350 & 305 CIs
Transmission: 700R4 4800 vig 18th700R4 t56 ZF6 T5
Axle/Gears: 3.70 9"ford alum chunk,dana44,9bolt
Re: 1991 Formula Build. PIC HEAVY!
Nice to see you still going at it!
Joined: Feb 2001
Posts: 752
Likes: 19
From: Westminster, MD USA
Car: 91 Firebird 'vert, 91 Formula
Engine: 5.7, 5.0
Transmission: T56, T5
Axle/Gears: Auburn w/ 3.73's, 3.42
Re: 1991 Formula Build. PIC HEAVY!
Great build, love how it's coming along! Any updates?
Thread Starter
Member
Joined: Apr 2009
Posts: 153
Likes: 1
From: Minnesoata/Wisconsin
Car: 1991 Pontiac Firebird Formula
Engine: 5.0 TBI
Transmission: T5
Axle/Gears: 3.08
Thread Starter
Member
Joined: Apr 2009
Posts: 153
Likes: 1
From: Minnesoata/Wisconsin
Car: 1991 Pontiac Firebird Formula
Engine: 5.0 TBI
Transmission: T5
Axle/Gears: 3.08
Re: 1991 Formula Build. PIC HEAVY!
Well, I am still here. Life got in the way, but I am making progress again. We moved last fall and then had some house issues that took priority. I have been accumulating lots of parts in that time so I am hoping things move faster than they have.
Here is the new garage. I went from a 1 car to a 2 car. I am definitely enjoying the extra space.

My last project was to build a set of cribs so I could clean and paint the under body. They turned out great considering it was all scrap wood. Just needed a box of screws. Each layer is glued and screwed. They are 17 inches tall.

Car is very stable.

Here is the new garage. I went from a 1 car to a 2 car. I am definitely enjoying the extra space.
My last project was to build a set of cribs so I could clean and paint the under body. They turned out great considering it was all scrap wood. Just needed a box of screws. Each layer is glued and screwed. They are 17 inches tall.
Car is very stable.
Last edited by joshy1410; Jun 27, 2018 at 11:28 AM.
Thread Starter
Member
Joined: Apr 2009
Posts: 153
Likes: 1
From: Minnesoata/Wisconsin
Car: 1991 Pontiac Firebird Formula
Engine: 5.0 TBI
Transmission: T5
Axle/Gears: 3.08
Re: 1991 Formula Build. PIC HEAVY!
Very productive the last couple weeks. I was able to clean the bottom of the car, prime, and paint it. I think it turned out well for never doing this before. I think it helped the car was really clean underneath. Only a few surface spots where the OE finish had flaked off. Cleaned up to bare metal with a scotch brite.
Before/Dirty

All cleaned up. I used oven cleaner to degrease and a pressure washer to get the dirt off.

Primed – I used VHT Self-etching primer.

Painted – I used VHT Epoxy coating. I have used this on other projects in the past and it seems to hold up well.

Next is to paint the engine bay and a bunch of other small parts. Time to try my hand at painting with a gun and compressor.
Before/Dirty
All cleaned up. I used oven cleaner to degrease and a pressure washer to get the dirt off.
Primed – I used VHT Self-etching primer.
Painted – I used VHT Epoxy coating. I have used this on other projects in the past and it seems to hold up well.
Next is to paint the engine bay and a bunch of other small parts. Time to try my hand at painting with a gun and compressor.
Last edited by joshy1410; Jun 27, 2018 at 11:32 AM.

Thread Starter
Member
Joined: Apr 2009
Posts: 153
Likes: 1
From: Minnesoata/Wisconsin
Car: 1991 Pontiac Firebird Formula
Engine: 5.0 TBI
Transmission: T5
Axle/Gears: 3.08
Re: 1991 Formula Build. PIC HEAVY!
Joined: Oct 2001
Posts: 12,228
Likes: 1,156
From: Il
Car: 1989-92 FORMULA350 305 92 Hawkclone
Engine: 4++,350 & 305 CIs
Transmission: 700R4 4800 vig 18th700R4 t56 ZF6 T5
Axle/Gears: 3.70 9"ford alum chunk,dana44,9bolt
Re: 1991 Formula Build. PIC HEAVY!
Back at it!
Joined: Feb 2007
Posts: 4,770
Likes: 64
From: Trumbull CT
Car: 87 TA clone
Engine: 70/70 Turbo 5.3 LS
Transmission: bullet proof 2004R
Axle/Gears: ford 8.8, 3.55 gears
Re: 1991 Formula Build. PIC HEAVY!
Thread Starter
Member
Joined: Apr 2009
Posts: 153
Likes: 1
From: Minnesoata/Wisconsin
Car: 1991 Pontiac Firebird Formula
Engine: 5.0 TBI
Transmission: T5
Axle/Gears: 3.08
Re: 1991 Formula Build. PIC HEAVY!
Before the engine is to go in, I wanted to refresh the engine bay. I built a makeshift spray booth in the garage and decided to give it the old college try. Here is how my booth turned out.

After all was said and done, it did a really good job at keeping the mess contained.
I had no idea what to expect with painting, but it was a good experience. In the endm I am happy with how it turned out. There are things I would do differently next time, but overall it was a good experience. I used an epoxy primer and an acrylic urethane in satin black.
Before

After

After all was said and done, it did a really good job at keeping the mess contained.
I had no idea what to expect with painting, but it was a good experience. In the endm I am happy with how it turned out. There are things I would do differently next time, but overall it was a good experience. I used an epoxy primer and an acrylic urethane in satin black.
Before
After
Thread Starter
Member
Joined: Apr 2009
Posts: 153
Likes: 1
From: Minnesoata/Wisconsin
Car: 1991 Pontiac Firebird Formula
Engine: 5.0 TBI
Transmission: T5
Axle/Gears: 3.08
Re: 1991 Formula Build. PIC HEAVY!
I was able to the K member ready to go in. A friend notched it for me. There was a really tough tar like substance stuck on it. Degreaser and a pressure washer did nothing to clean it up.

I used a twisted wire wheel in an angle grinder to clean it up and it worked really well.


Coated it with VHT epoxy paint and now it is ready to go in the car.


I used a twisted wire wheel in an angle grinder to clean it up and it worked really well.
Coated it with VHT epoxy paint and now it is ready to go in the car.
Thread Starter
Member
Joined: Apr 2009
Posts: 153
Likes: 1
From: Minnesoata/Wisconsin
Car: 1991 Pontiac Firebird Formula
Engine: 5.0 TBI
Transmission: T5
Axle/Gears: 3.08
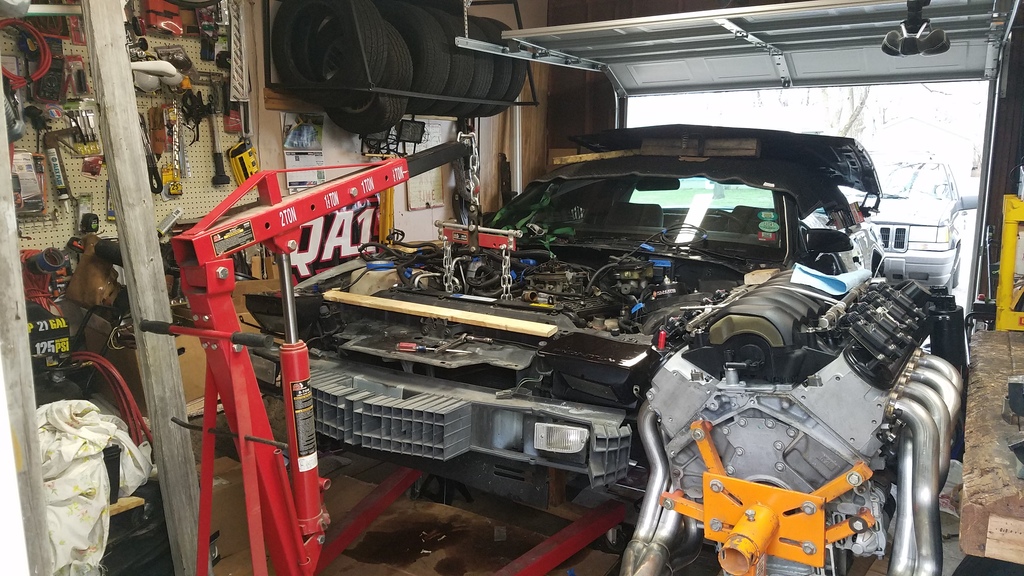
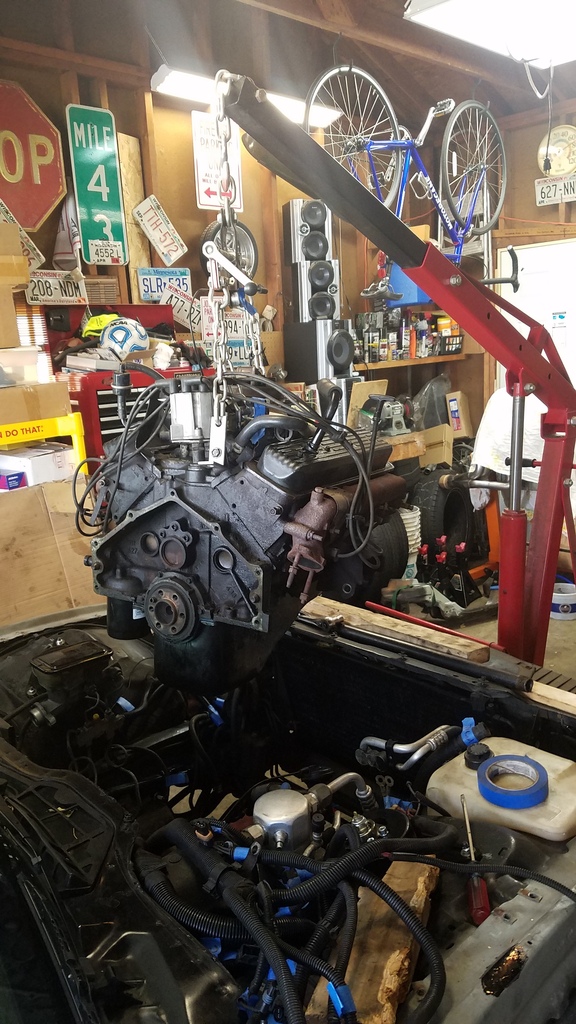
Re: 1991 Formula Build. PIC HEAVY!
After a few long nights and a lot of learning, the engine is finally in. We went in from the bottom without the transmission. I used a 3/16 plate underneath the passenger side k-member mount to level out the engine. My headers came back from getting ceramic coated just in time. I am very happy with how they turned out.

I put the rear of the car two of the cribs. Then I lifted the front of the car by the bumper bar high enough to roll the engine in from the side on some dollies. Once the engine was under, I set the car down on the two other cribs. Once down, I lifted the engine in place.

After what happened to be a clutch alignment issue, I pulled the engine back out and we went in from the bottom with the engine and trans together. With how many times the engine went in and came out, I became very good with it. Hopefully the engine is in to stay for a while.

Special thanks to my Dad and my buddy Mark for lending a set of hands to get the drivetrain back in. Engine, trans, driveshaft, and rear are all back in the car.

For those wondering I used the following. Spohn k-member mounts spaced up 3/16 of an inch on passenger side, UMI solid motor mounts, Hooker Blackheart LS swap headers, Hawks T56 cross member, Energy Suspension polygraphite transmission mount, and stock 3rd gen driveshaft.
I put the rear of the car two of the cribs. Then I lifted the front of the car by the bumper bar high enough to roll the engine in from the side on some dollies. Once the engine was under, I set the car down on the two other cribs. Once down, I lifted the engine in place.
After what happened to be a clutch alignment issue, I pulled the engine back out and we went in from the bottom with the engine and trans together. With how many times the engine went in and came out, I became very good with it. Hopefully the engine is in to stay for a while.
Special thanks to my Dad and my buddy Mark for lending a set of hands to get the drivetrain back in. Engine, trans, driveshaft, and rear are all back in the car.
For those wondering I used the following. Spohn k-member mounts spaced up 3/16 of an inch on passenger side, UMI solid motor mounts, Hooker Blackheart LS swap headers, Hawks T56 cross member, Energy Suspension polygraphite transmission mount, and stock 3rd gen driveshaft.

Joined: Sep 1999
Posts: 4,353
Likes: 308
From: NJ
Car: 92 Firebird
Engine: 4.8 LR4
Transmission: T56
Axle/Gears: 3.45 9 Bolt
Re: 1991 Formula Build. PIC HEAVY!
I too like putting the engine in from underneath. It seems like more work, but at the end of the day it is actually easier than trying to drop it in from the top, with it cantilevered, trying not to bash stuff, or scratch the paint. Pulling the engine up from the bottom is so easy, and you don't have to worry about having to align the engine mounts.
Thread Starter
Member
Joined: Apr 2009
Posts: 153
Likes: 1
From: Minnesoata/Wisconsin
Car: 1991 Pontiac Firebird Formula
Engine: 5.0 TBI
Transmission: T5
Axle/Gears: 3.08
Re: 1991 Formula Build. PIC HEAVY!
I too like putting the engine in from underneath. It seems like more work, but at the end of the day it is actually easier than trying to drop it in from the top, with it cantilevered, trying not to bash stuff, or scratch the paint. Pulling the engine up from the bottom is so easy, and you don't have to worry about having to align the engine mounts.

Thread
Thread Starter
Forum
Replies
Last Post
NWFreerider
Camaros for Sale
3
Jan 19, 2016 02:39 PM
'91CamaroRS
Tech / General Engine
4
Jan 11, 2016 11:23 AM