
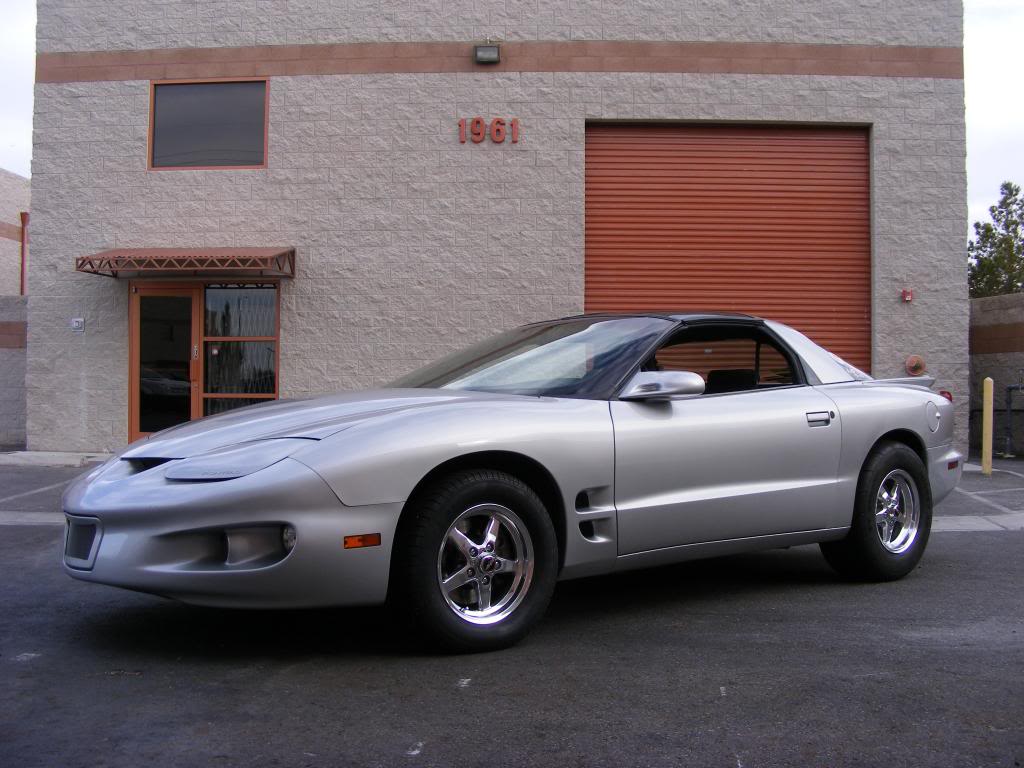
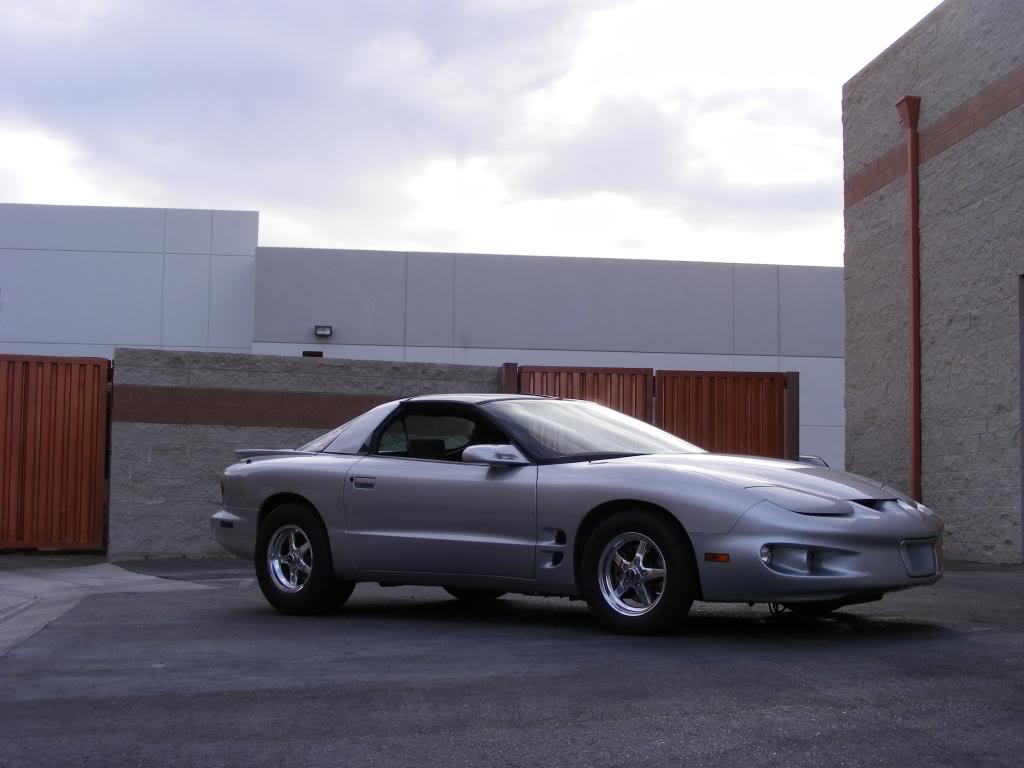
My 1992 Trans Am

Thread Starter
Joined: Nov 2008
Posts: 37
Likes: 27
From: NV
Car: 1992 Trans Am
Engine: 6.0 LQ4
Transmission: T56 Magnum F
Axle/Gears: 3.73
Re: My 1992 Trans Am
So, one year to the day, I'm bringing this thread back from the dead. This weekend I picked up a 95 Z28 with a forged LT1 and a T56. Plan right now is to do the T56 swap behind the stock engine for now and I'm going to use the rear disc breaks. I'm collecting parts for the 24X swap and then the LT1 is going in. I'm still in the process of tearing the Z28 apart but keep and eye out. I have a feeling this is going to turn into another build thread for me!

Re: My 1992 Trans Am
A 24x lt1 harness is basically a ls1 harness with a different firing order. Should make the conversion easier when shopping or building. Also, not much is needed to switch to LSx in the future
Thread Starter
Joined: Nov 2008
Posts: 37
Likes: 27
From: NV
Car: 1992 Trans Am
Engine: 6.0 LQ4
Transmission: T56 Magnum F
Axle/Gears: 3.73
Re: My 1992 Trans Am
I already have the harness and the computer as well as a set of coils. I really just need the 24X timing cover setup now along with some more time and money!
Thread Starter
Joined: Nov 2008
Posts: 37
Likes: 27
From: NV
Car: 1992 Trans Am
Engine: 6.0 LQ4
Transmission: T56 Magnum F
Axle/Gears: 3.73
Re: My 1992 Trans Am
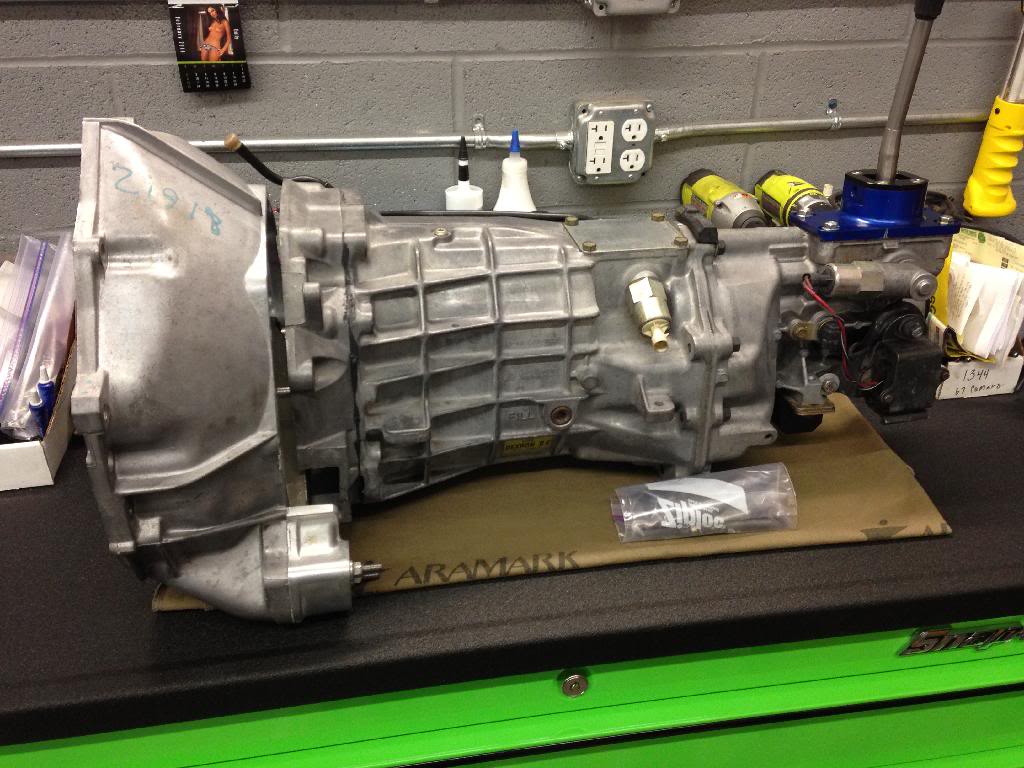
This weekend I was able to tear into the Z28 and get the transmission pulled out. The engine had a nasty oil leak so it was filthy. A little time with some SafetyKleen and a brush followed by a good degreasing and it cleaned up beautifully. The transmission was in really great shape and the fluid that came out was super clean. The only problem I found was that a couple of the bellhousing bolt holes have some messed up threads. I ran a tap through them and they cleaned up, but I think I'm just going to HeliCoil them. The car came with the B&M shifter in the transmission but I think I'd like something different. I've always run the Pro 5.0 in my cars, but I think I'm going to give MGW a shot. The clutch and flywheel in the car were almost new so I'm just going to reuse them for now. This week I'm going to order up the swap crossmember and some new hydraulics. I don't have a dust cover but I found a guy on eBay selling them made out of aluminum. I think I'm going to grab one of those too. That's about it until next weekend.


Thread Starter
Joined: Nov 2008
Posts: 37
Likes: 27
From: NV
Car: 1992 Trans Am
Engine: 6.0 LQ4
Transmission: T56 Magnum F
Axle/Gears: 3.73
Re: My 1992 Trans Am
A little update. Where do I start? I've been looking at swap cross members, but I haven't bought one yet. I like the Hawk's piece for exhaust clearance, but I would much rather a BMR or Spohn unit. Anyone run one? How is the exhaust clearance with those units?
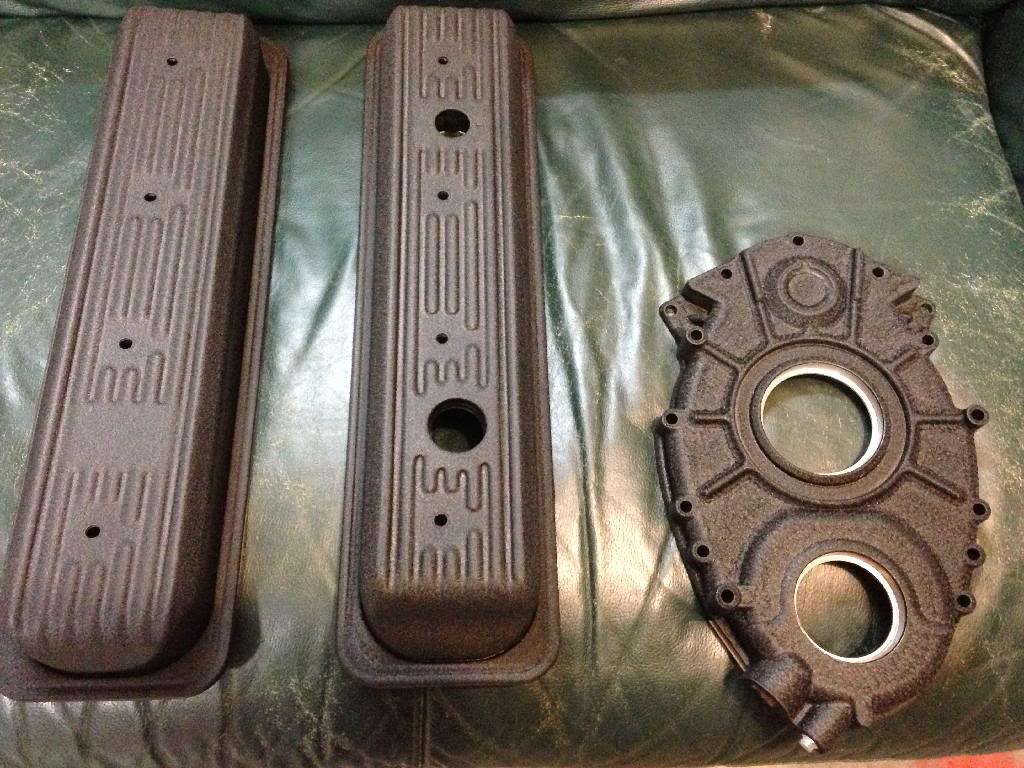
I found a 96 LT1 Firebird at the local pick-a-part so I grabbed the timing cover, balancer hub, and woodruff key to use on my 24X swap. I got it all for $15. I cleaned the cover up, plugged the water pump drive hole, and painted it and the valve covers off the LT1 wrinkle black. I really like how they all turned out. Also, I found a local guy selling all brand new AN fittings to do the coolant crossover complete with the hose, so I picked it all up for $40. Score!
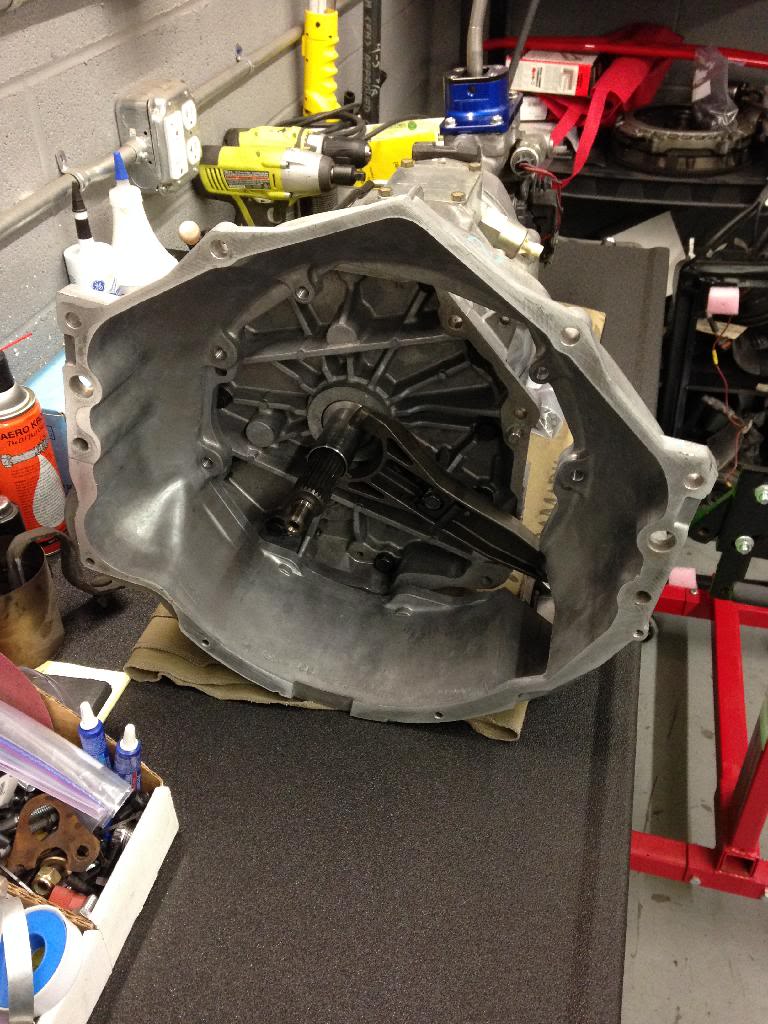
Last weekend I HeliCoiled the bellhousing so it's now ready to go also.
Today, I took some time to figure out the hard starting, and crap running issue with the car. Looks like the fuel system is the problem. I've only got between 28 and 32 pounds of fuel pressure. That's with the vacuum line on and off. There's no change either way. I'm going to do a Racetronix pump and harness, a new fuel pressure regulator, and a new set of injectors. I've read a lot of good reviews about South Bay so I'm going to give them a shot. That's about it. As soon as I have the car running well, I plan to get started on the transmission swap. Stay tuned!
Last edited by Doobie52; Aug 22, 2014 at 11:57 AM. Reason: Added Picture


Re: My 1992 Trans Am
Thanks for the updates, I'm still following 
I used SouthBay for my new Bosch III injectors in my GTA. I'm running a Walbro GSS340M fuel pump with a Holly AFPR even though it's set for the stock pressure (I do my tuning in the ECU). Don't forget to replace your fuel filter. Double check your base timing too with the wire unplugged. I could write a manual on how to tune-up a TPI engine so I'll refrain from any more suggestions, I'm sure you've got it.
I used SouthBay for my new Bosch III injectors in my GTA. I'm running a Walbro GSS340M fuel pump with a Holly AFPR even though it's set for the stock pressure (I do my tuning in the ECU). Don't forget to replace your fuel filter. Double check your base timing too with the wire unplugged. I could write a manual on how to tune-up a TPI engine so I'll refrain from any more suggestions, I'm sure you've got it.
Thread Starter
Joined: Nov 2008
Posts: 37
Likes: 27
From: NV
Car: 1992 Trans Am
Engine: 6.0 LQ4
Transmission: T56 Magnum F
Axle/Gears: 3.73
Re: My 1992 Trans Am
Thanks 92GTA. I actually checked and set the timing when I was checking all the fuel stuff, and one of the first things I ever did after getting the car was change the fuel filter. This past weekend I cleaned and degreased the engine bay, and I also pulled the plenum, runners, rails, and lower intake off. I'm doing a little resealing and painting while I wait for the injectors and regulator. I should have that stuff in the next two weeks or so.
Thread Starter
Joined: Nov 2008
Posts: 37
Likes: 27
From: NV
Car: 1992 Trans Am
Engine: 6.0 LQ4
Transmission: T56 Magnum F
Axle/Gears: 3.73
Re: My 1992 Trans Am
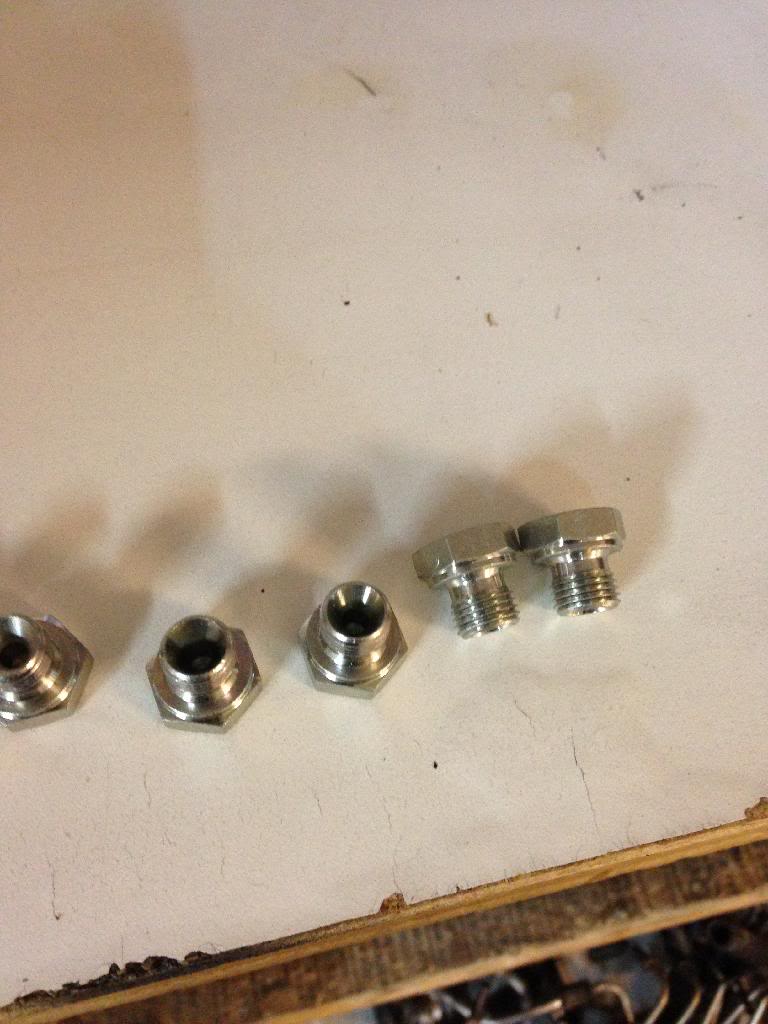
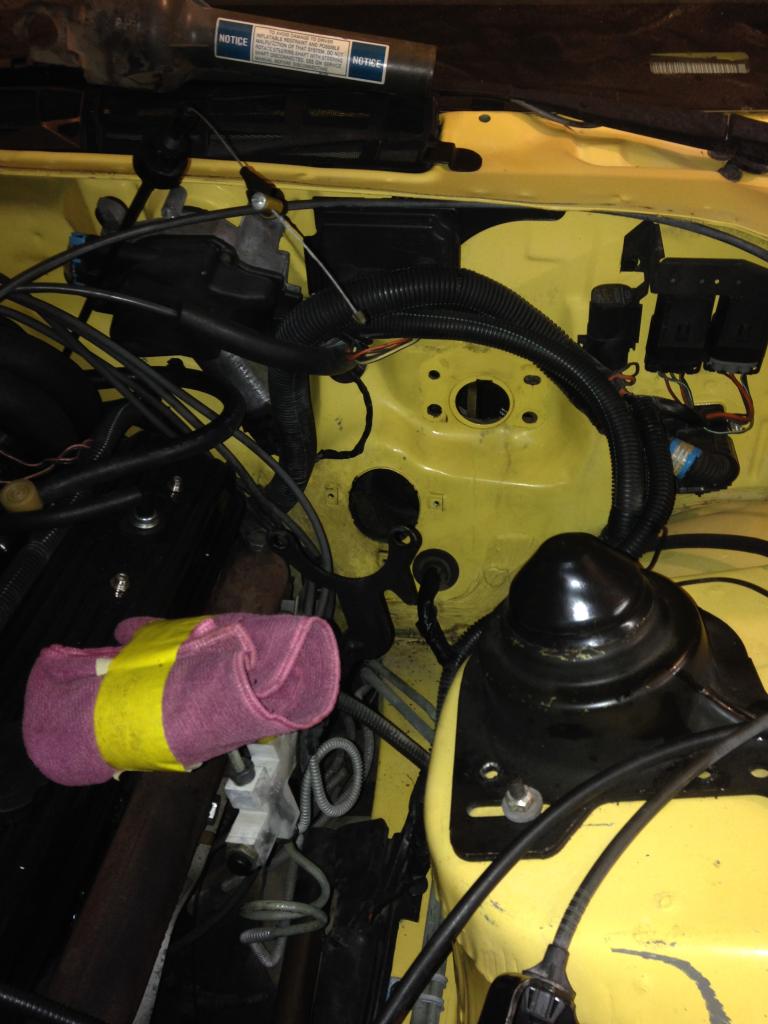
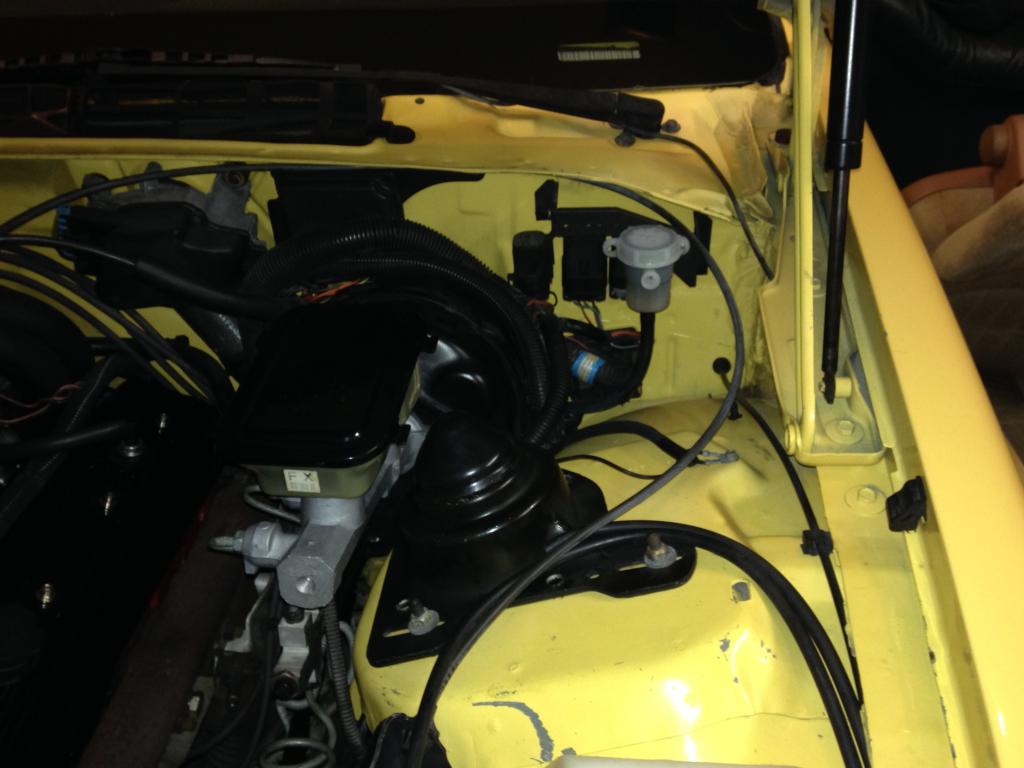
I made a little bit of progress over the past few nights so I figured I'd post up. When I decided it was time to get the car running right and declutter the engine bay, the first thing I wanted gone was all the emissions hardware. I'll be registering the car as a classic later in the year and it doesn't require any smog testing. In the event that I ever wanted to put it all back on (who knows why), I made sure I disassembled and stored all the parts without damaging anything. I've read several threads about plugging the holes in the exhaust manifolds, but none that I found had the exact size of the plugs necessary. So for any of you doing this project, head down to your local Parker Hose store and pick up some 1/4-19 inverted flare plugs. Here's what they look like.
Last week I painted the manifold, runners, and plenum, and last night I decided to loosely assemble it while I wait for the fuel related items I need. I still have a ton of odds and end to acquire before the car is ready to run again but it's getting there.
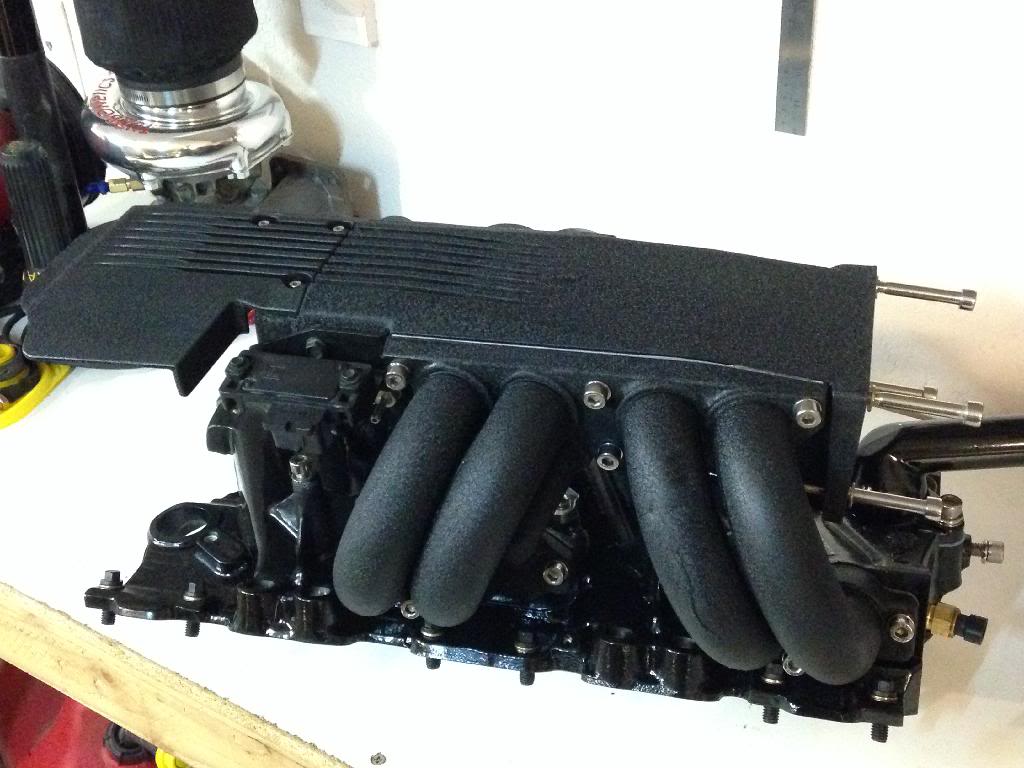

Last week I painted the manifold, runners, and plenum, and last night I decided to loosely assemble it while I wait for the fuel related items I need. I still have a ton of odds and end to acquire before the car is ready to run again but it's getting there.


Last edited by Doobie52; Apr 23, 2014 at 10:54 AM.

Joined: Aug 2013
Posts: 4,795
Likes: 895
From: MICHIGAN
Car: 1988 Trans Am
Engine: L03
Transmission: 700R4
Axle/Gears: 10 Bolt 2.73 Open

Thread Starter
Joined: Nov 2008
Posts: 37
Likes: 27
From: NV
Car: 1992 Trans Am
Engine: 6.0 LQ4
Transmission: T56 Magnum F
Axle/Gears: 3.73
Re: My 1992 Trans Am
Thanks guys!
The black wrinkle finish can be a little temperamental. The coverage dictates how it will wrinkle so if you don't coat all the parts the same, the textures will be different. The temperature outside can also change how it wrinkles. The pictures hide it, but the wrinkle on the plenum and runners are a little different.
The black wrinkle finish can be a little temperamental. The coverage dictates how it will wrinkle so if you don't coat all the parts the same, the textures will be different. The temperature outside can also change how it wrinkles. The pictures hide it, but the wrinkle on the plenum and runners are a little different.
Thread Starter
Joined: Nov 2008
Posts: 37
Likes: 27
From: NV
Car: 1992 Trans Am
Engine: 6.0 LQ4
Transmission: T56 Magnum F
Axle/Gears: 3.73
Re: My 1992 Trans Am
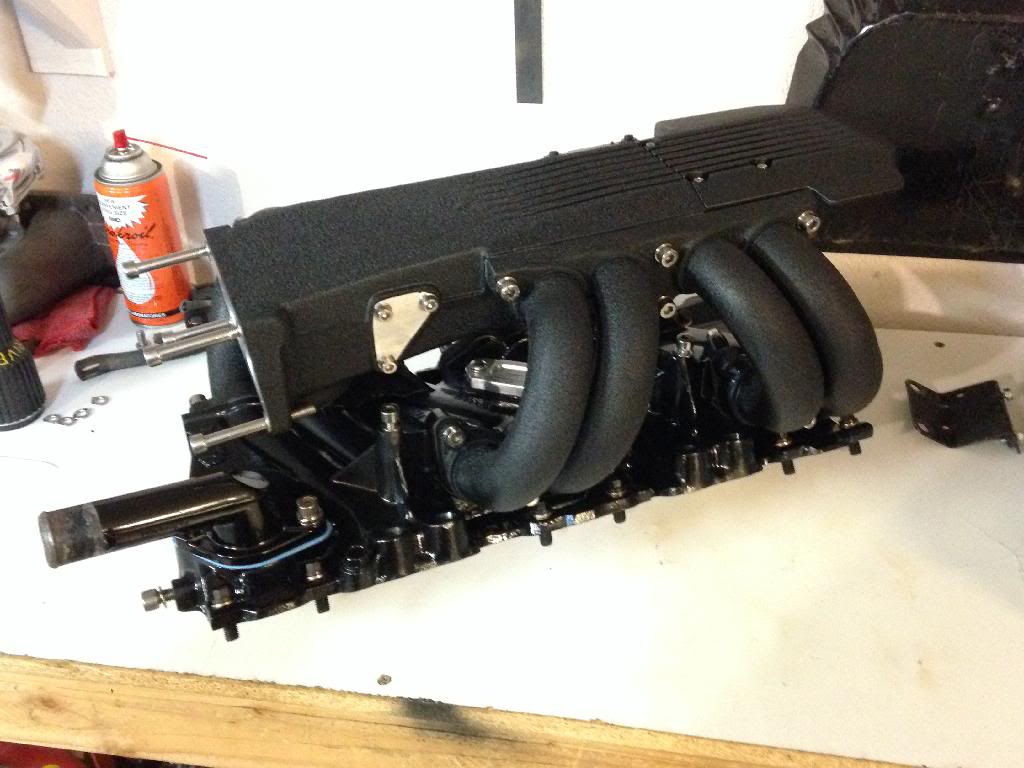
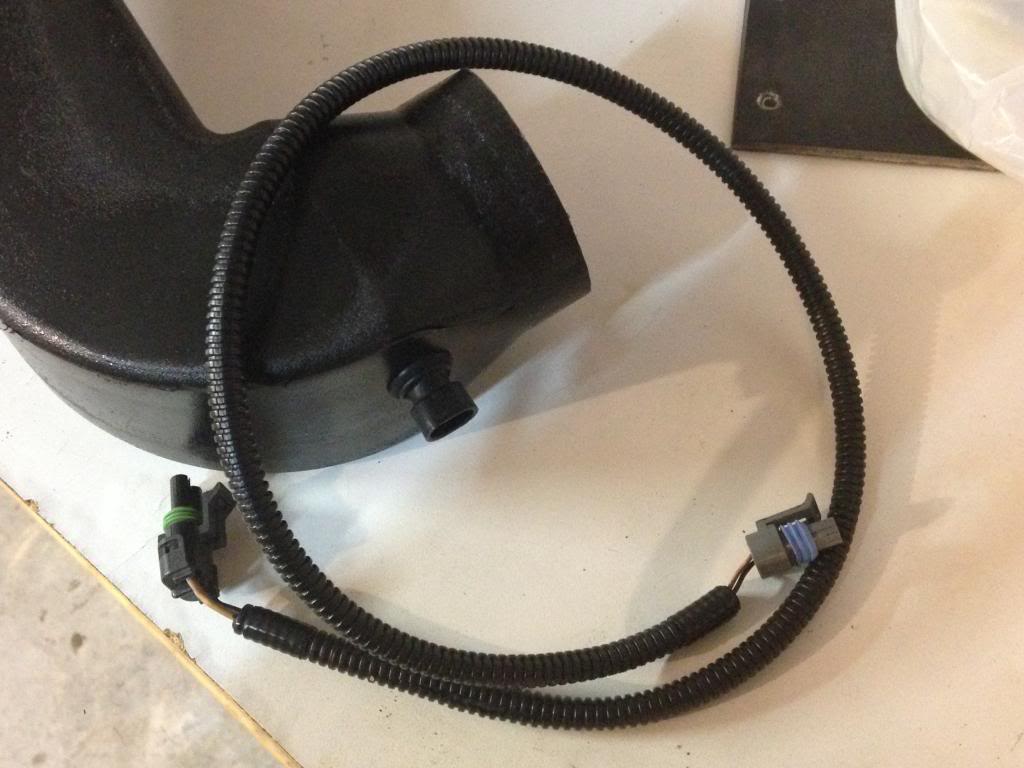
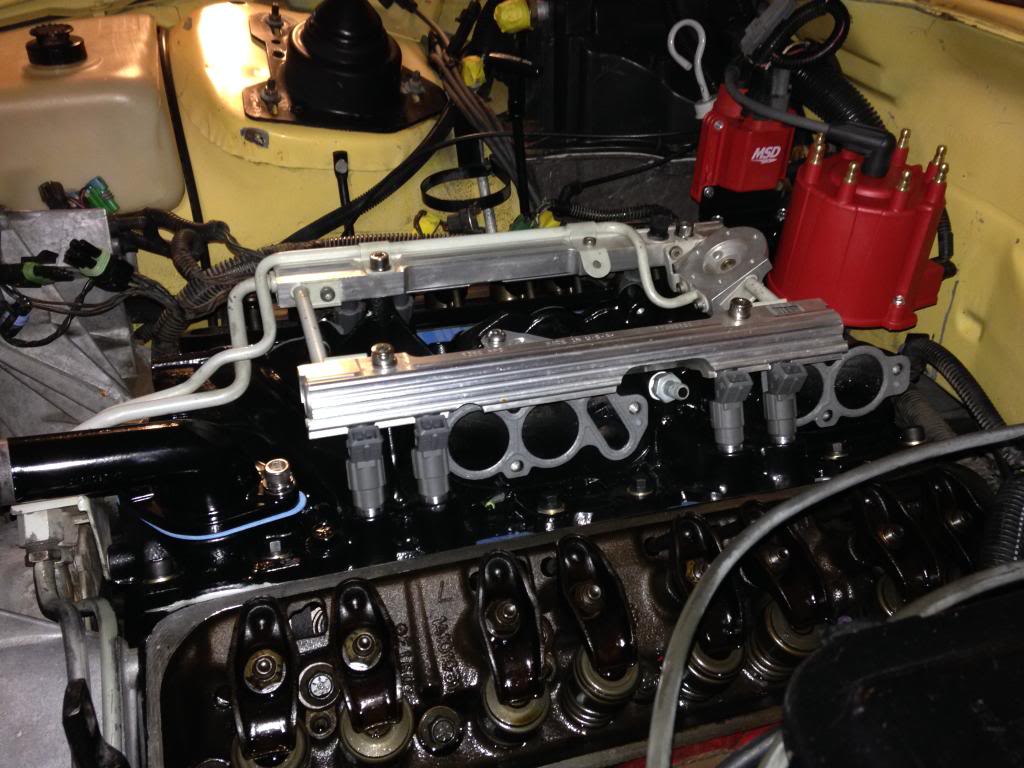
I've made some progress over the past couple of weekends. Last weekend I put the lower intake back on and relocated the IAT sensor. I also made a new extension harness for it. This week, I got my new fuel pressure regulator diaphragm and Bosch 3 injectors from South Bay. I'm waiting for some new screws for the regulator, but I got the injectors and the rails back on last night. I got a lot of other odds and ends taken care of also. Right now I'm thinking I should have everything done and the car ready to fire in about two more weeks. I'm getting really anxious! I'm a teacher and school is over in about 4 more weeks. I also work part time at a restoration shop during the school year, and full time during the summer. As soon as school is out the plan is to put the car on the road and get it over to the shop. My T56 swap is ready to go in, the car is getting all new brakes along with a rear disc conversion, full Founders rear suspension, and a set of 3.73s in the rear. Should be fun to cruise around in this summer.


Thread Starter
Joined: Nov 2008
Posts: 37
Likes: 27
From: NV
Car: 1992 Trans Am
Engine: 6.0 LQ4
Transmission: T56 Magnum F
Axle/Gears: 3.73
Re: My 1992 Trans Am
Thanks for the compliments on the intake. I still have to change the fuel pump but it's so hot right now I just haven't been motivated. I'll bring it to the shop in the next few weeks and get going on it. I want to get everything done by the end of the summer.
Last edited by Doobie52; Aug 24, 2014 at 08:33 PM.
Re: My 1992 Trans Am
Same here, too hot to get motivated.
When I had my ProCharger on I ran some other IAT from another type of car (I have it written down somewhere) and instead of being solid like the F-body one, it had holes, kinda like an 02 sensor, so the sensor could faster react to temperature changes and take less time to heat up or cool down. I preferred it in the intake with that style because it gave me a more accurate reading of the real IAT inside the intake so I could tell how much the temp rose based on how much intake pressure there was from the SC. This helped allot in doing my programming to prevent detonation.
I see you are missing the plastic bracket that attaches to the middle top runner bolt on the drivers side that the secures the TV and throttle cables. Mine just wouldn't stay closed on its self anymore due to a slight warp from 22 years of engine heat. Do you plan on putting on back on?
Also I can't tell, but do you have the black metal support brace bracket thing for the alternator? I just didn't put mine on after swapping my alternator once and I could actually tell when I revved the engine from under the hood and looking, the deflection in the serpentine belt so I put it back on. Seems to do it's job at higher RPMs.
Anyway, it's coming along great!
If you ever do headers, I did a how-to on here like 10 years ago on how to add the heated o2 from a ZR1 vette and wire it seamlessly into the fuel pump relay using correct GM weatherpack connectors and stuff. I included all the P/Ns and stuff. I found that my exhaust cooled down to much at idle and took too long to warm up from cold and the car wouldn't change run mode loops as quickly as it should have. It actually affected my smog test one time and that's why I did it. Plus it made a difference in being able to tune the car with more predictable results and also gave a more precise reading since I went to a Denso from the crappy Bosch.
Last edited by 92GTA; Jun 24, 2014 at 08:39 PM.
Thread Starter
Joined: Nov 2008
Posts: 37
Likes: 27
From: NV
Car: 1992 Trans Am
Engine: 6.0 LQ4
Transmission: T56 Magnum F
Axle/Gears: 3.73
Re: My 1992 Trans Am
Well, I'm back at it again. For the most part the summer was a complete bust. I really didn't work on the car at all. One of my friends had been beating me up to sell him the turbo kit off of my Formula so I finally caved and spent the summer pulling that car apart. About two weeks ago I pulled the final pieces off my Formula to give him and put that car aside. This time around I'm going twins with that car but for now, it's just going to sit and all of my efforts will be directed towards the Trans Am.
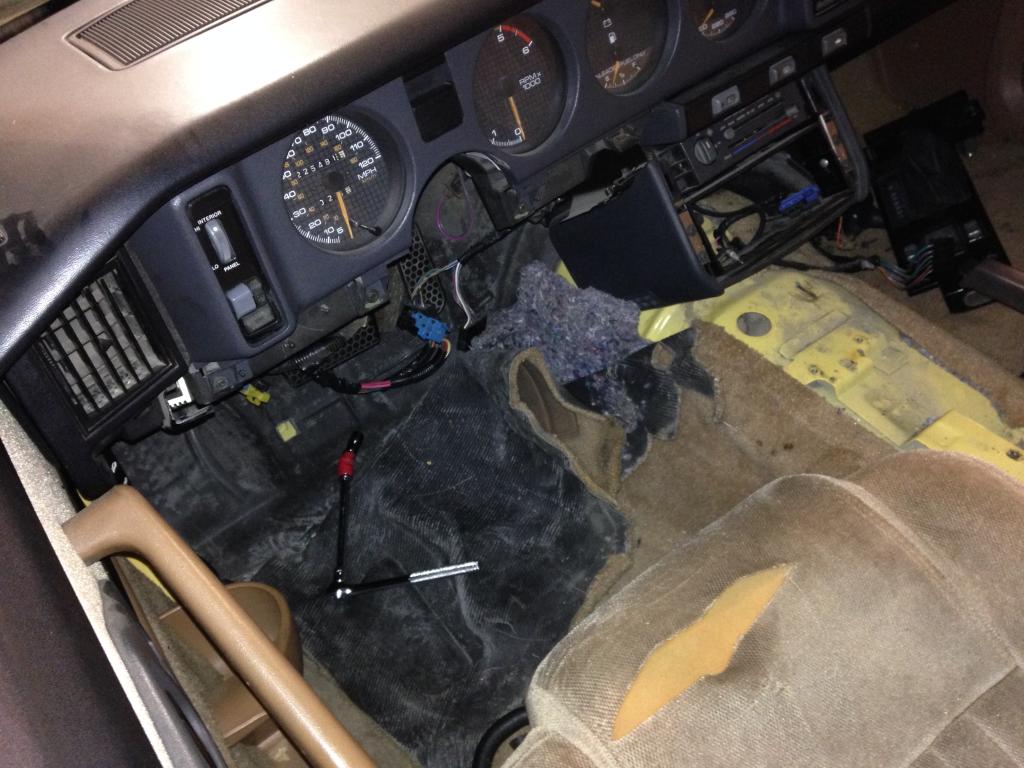
To start, I had some spare time at work recently and I finally pulled the pedals out of the donor Z28. I also found a guy selling a Dakota Digital SGI-5 on LS1Tech so I picked that up along with a few other odds and ends. Those two parts and the beautiful weather we've been having got me motivated to start working on the car again.
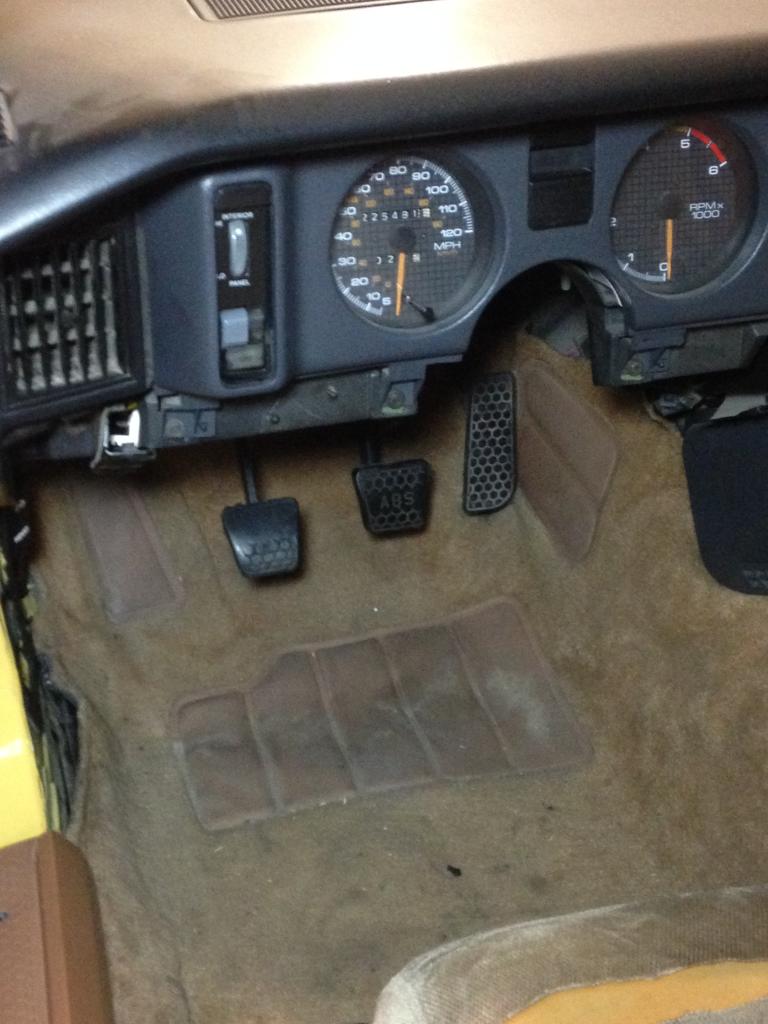
Over the past few nights I pulled the master cylinder, brake booster, column, and the auto brake pedal. Last night I modified the 4th gen pedal assembly and bolted it in. Over the weekend I'm going to drill the holes for the clutch hydraulics and then I'll put it all back together. This Trans Am is my 5th 3rd gen Firebird and it's the first that will be a manual. After I put the pedal assembly in, every time I walked past the car I'd look in it and stare at the three pedals. Awesome! For now, the plan is to just spend a few hours on it each week until it's ready. I'll try and keep the updates a little more frequent.
And then there were three!
To start, I had some spare time at work recently and I finally pulled the pedals out of the donor Z28. I also found a guy selling a Dakota Digital SGI-5 on LS1Tech so I picked that up along with a few other odds and ends. Those two parts and the beautiful weather we've been having got me motivated to start working on the car again.
Over the past few nights I pulled the master cylinder, brake booster, column, and the auto brake pedal. Last night I modified the 4th gen pedal assembly and bolted it in. Over the weekend I'm going to drill the holes for the clutch hydraulics and then I'll put it all back together. This Trans Am is my 5th 3rd gen Firebird and it's the first that will be a manual. After I put the pedal assembly in, every time I walked past the car I'd look in it and stare at the three pedals. Awesome! For now, the plan is to just spend a few hours on it each week until it's ready. I'll try and keep the updates a little more frequent.


And then there were three!

Last edited by Doobie52; Aug 22, 2014 at 10:34 PM. Reason: Added Pictures
Thread Starter
Joined: Nov 2008
Posts: 37
Likes: 27
From: NV
Car: 1992 Trans Am
Engine: 6.0 LQ4
Transmission: T56 Magnum F
Axle/Gears: 3.73
Re: My 1992 Trans Am
It was a big weekend in the garage. After putting my intake all back together in the spring, when I went to reinstall my serpentine belt, I spun the water pump and I didn't like how it sounded. On Friday, I started by pulling the radiator and fan assembly back out, and then I replaced the water pump. Next up on the list was getting the transmission out. I was able to get it drained, pulled the converter bolts, disconnected the sensors, and pull the transmission lines before my friend called asking for help on his car.
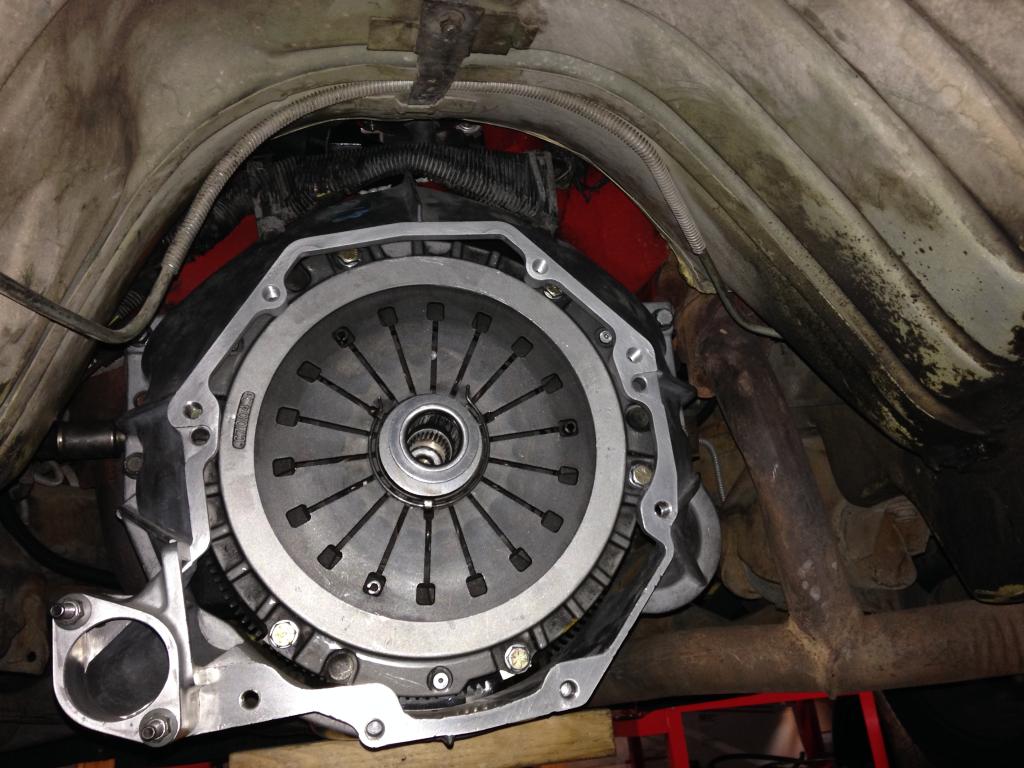
At work on Saturday, I grabbed all the tools I'd need to get the transmission out when I got home. When I got home I was a man on a mission. I had the transmission on the ground within a half hour. After that was out, I pulled the flexplate. I took a break for a little while to hang out with the family and have dinner, but as soon as my kids were in bed I was back at it again. I gave the M6 flywheel a good cleaning and in it went. At that point it was about 8:45 and I didn't have a clutch alignment tool so I was going to call it a night. About 5 minutes into cleaning up, one of my friends called asking if I was out in the garage so he could come by and hang out. I hit him up for a clutch alignment tool and he said he had a few laying around his garage he would bring by. When he got to my house, SCORE! He had the one I needed. We quickly jumped in my car and ran to the parts store to grab a pilot bearing. Ten minutes later we were back at the house and I was installing the pilot bearing. After that, the clutch went on with all new hardware and then came the bellhousing. To finish up I was going to install the starter and call it a night. Unfortunately, when I sold the LT1 I left the starter bolts in with all the hardware for the engine. I didn't think it was going to be such a big deal until I went online to try and find a set. Apparently acquiring the correct size LT1 knurled starter bolts can be a bit of a pain.
My friend who brought me the clutch alignment tool had been telling me about a pick-a-part on the other side of town for weeks. He said there had to be about 30 Firebirds and Camaros. I've had a list of little pieces I couldn't find at the yard by my house so I decided I'd give the one he was telling me about a shot. What a day my Sunday turned into.
When I got to the yard, I couldn't even find a place to park. The place was crazy. After parking, I grabbed my tools, paid the entrance fee, and went on my way looking for the f-body section. He wasn't kidding. There was row upon row of 3rd and 4th gen f-bodies.
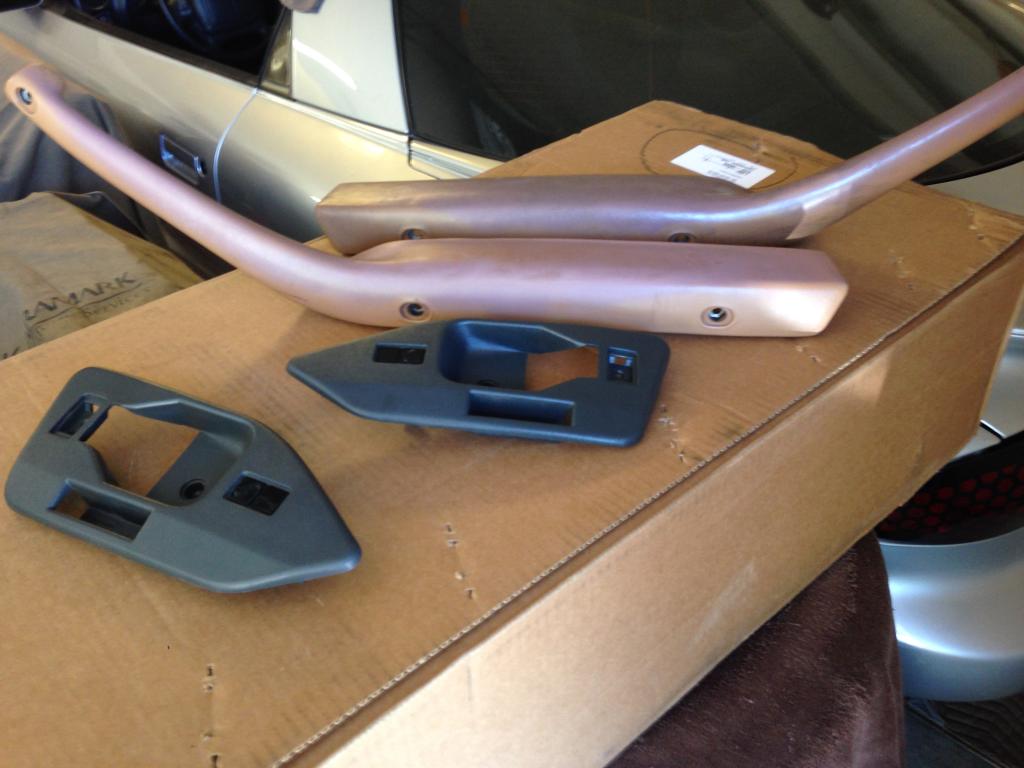
First on my list were the starter bolts. Of course, there were several LT1 cars but none of them had a starter. While I was a little discouraged, my day was about to get a lot better. Sitting there in all its mostly untouched glory was a 1988 Pontiac Trans Am GTA hardtop 350 car. Now, I'm a firm believer in saving these cars, but once it goes to the pick-a-part that's it. They don't sell complete cars off the lot. Upon closer inspection the car had been touched, but whoever got to it first took what they needed and didn't mess anything else up. They had taken the gauges, steering wheel radio controls, radio, auto shift **** and shifter plate, glove box/map pocket, and the console lid. That was it. On the outside someone had also taken the tail lights. I've wanted a nice set of GTA seats and door panels for a while now and these were all in really great shape. Bonus, everything was tan in color just like my interior. I started by quarantining off an area and I got to work. I pulled the seats first, followed by the mint passenger side door sill plate, and then the disc brake rear end proportioning valve. I didn't have what I needed to get the door panels off so I paid for what I had and ran to the shop to get the necessary tools. I unloaded my first haul at the shop and went back. While on my way back I remembered that Caprices and Roadmasters had LT1 engines so hopefully my stater bolt issue would be solved. When I got back I pulled the door panels, found a set of starter bolts, and I took the sun shade. Needless to say I felt awesome about my pull. The best part is that everything I got only cost me $100.
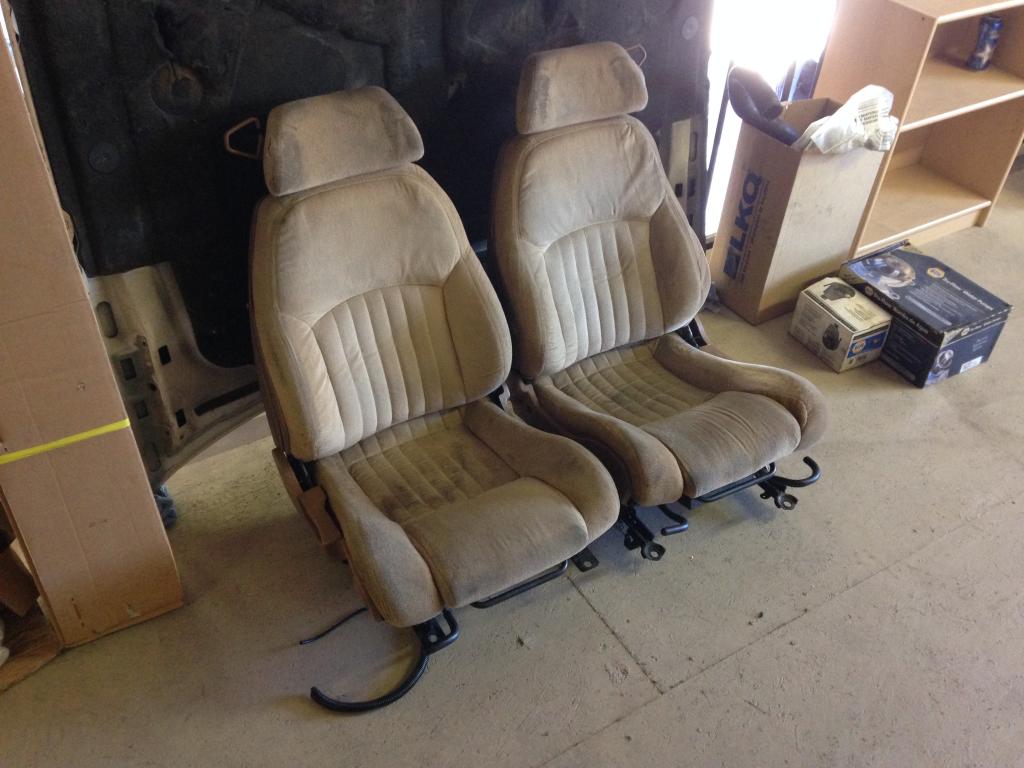

The car had a nice set of GTA wheels on it and of course it had the disc brake rear end. I'm tempted to go back next weekend and grab those parts too. I've though about doing my car as a GTA clone and with all those parts available I just may do it!
After this post I'm going to order the transmission crossmember so that I can bolt the transmission in next weekend. Stay tuned.
At work on Saturday, I grabbed all the tools I'd need to get the transmission out when I got home. When I got home I was a man on a mission. I had the transmission on the ground within a half hour. After that was out, I pulled the flexplate. I took a break for a little while to hang out with the family and have dinner, but as soon as my kids were in bed I was back at it again. I gave the M6 flywheel a good cleaning and in it went. At that point it was about 8:45 and I didn't have a clutch alignment tool so I was going to call it a night. About 5 minutes into cleaning up, one of my friends called asking if I was out in the garage so he could come by and hang out. I hit him up for a clutch alignment tool and he said he had a few laying around his garage he would bring by. When he got to my house, SCORE! He had the one I needed. We quickly jumped in my car and ran to the parts store to grab a pilot bearing. Ten minutes later we were back at the house and I was installing the pilot bearing. After that, the clutch went on with all new hardware and then came the bellhousing. To finish up I was going to install the starter and call it a night. Unfortunately, when I sold the LT1 I left the starter bolts in with all the hardware for the engine. I didn't think it was going to be such a big deal until I went online to try and find a set. Apparently acquiring the correct size LT1 knurled starter bolts can be a bit of a pain.

My friend who brought me the clutch alignment tool had been telling me about a pick-a-part on the other side of town for weeks. He said there had to be about 30 Firebirds and Camaros. I've had a list of little pieces I couldn't find at the yard by my house so I decided I'd give the one he was telling me about a shot. What a day my Sunday turned into.
When I got to the yard, I couldn't even find a place to park. The place was crazy. After parking, I grabbed my tools, paid the entrance fee, and went on my way looking for the f-body section. He wasn't kidding. There was row upon row of 3rd and 4th gen f-bodies.
First on my list were the starter bolts. Of course, there were several LT1 cars but none of them had a starter. While I was a little discouraged, my day was about to get a lot better. Sitting there in all its mostly untouched glory was a 1988 Pontiac Trans Am GTA hardtop 350 car. Now, I'm a firm believer in saving these cars, but once it goes to the pick-a-part that's it. They don't sell complete cars off the lot. Upon closer inspection the car had been touched, but whoever got to it first took what they needed and didn't mess anything else up. They had taken the gauges, steering wheel radio controls, radio, auto shift **** and shifter plate, glove box/map pocket, and the console lid. That was it. On the outside someone had also taken the tail lights. I've wanted a nice set of GTA seats and door panels for a while now and these were all in really great shape. Bonus, everything was tan in color just like my interior. I started by quarantining off an area and I got to work. I pulled the seats first, followed by the mint passenger side door sill plate, and then the disc brake rear end proportioning valve. I didn't have what I needed to get the door panels off so I paid for what I had and ran to the shop to get the necessary tools. I unloaded my first haul at the shop and went back. While on my way back I remembered that Caprices and Roadmasters had LT1 engines so hopefully my stater bolt issue would be solved. When I got back I pulled the door panels, found a set of starter bolts, and I took the sun shade. Needless to say I felt awesome about my pull. The best part is that everything I got only cost me $100.


The car had a nice set of GTA wheels on it and of course it had the disc brake rear end. I'm tempted to go back next weekend and grab those parts too. I've though about doing my car as a GTA clone and with all those parts available I just may do it!
After this post I'm going to order the transmission crossmember so that I can bolt the transmission in next weekend. Stay tuned.
Last edited by Doobie52; Aug 25, 2014 at 01:36 PM. Reason: Added Pictures
Thread Starter
Joined: Nov 2008
Posts: 37
Likes: 27
From: NV
Car: 1992 Trans Am
Engine: 6.0 LQ4
Transmission: T56 Magnum F
Axle/Gears: 3.73
Re: My 1992 Trans Am
I can’t believe it’s been 5 months since my last post. With birthdays, a new baby, holidays, anniversaries, school, and work I guess time just got away from me. Little by little I’ve still been working on the car though. So what have I done in the past 5 months?
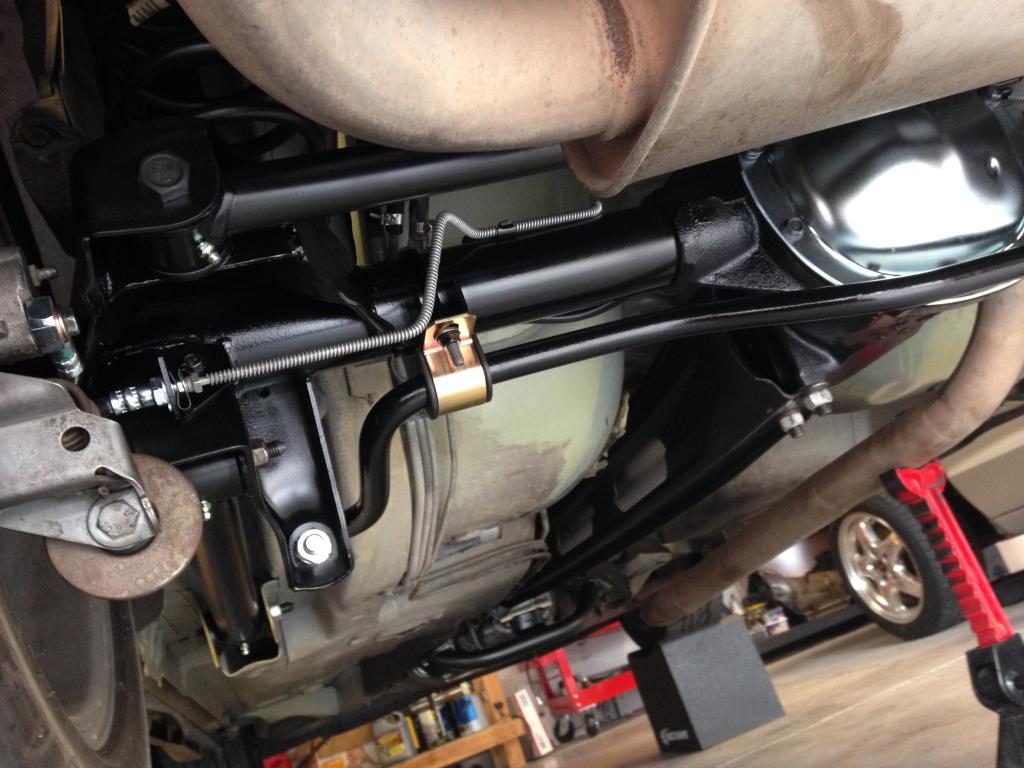
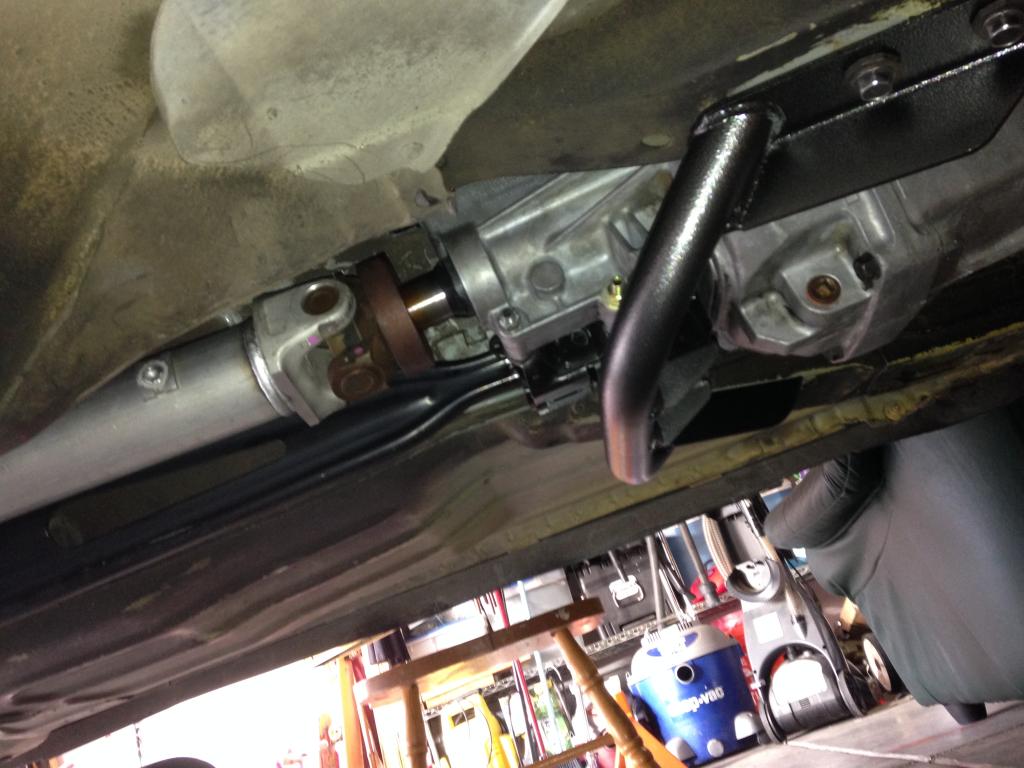
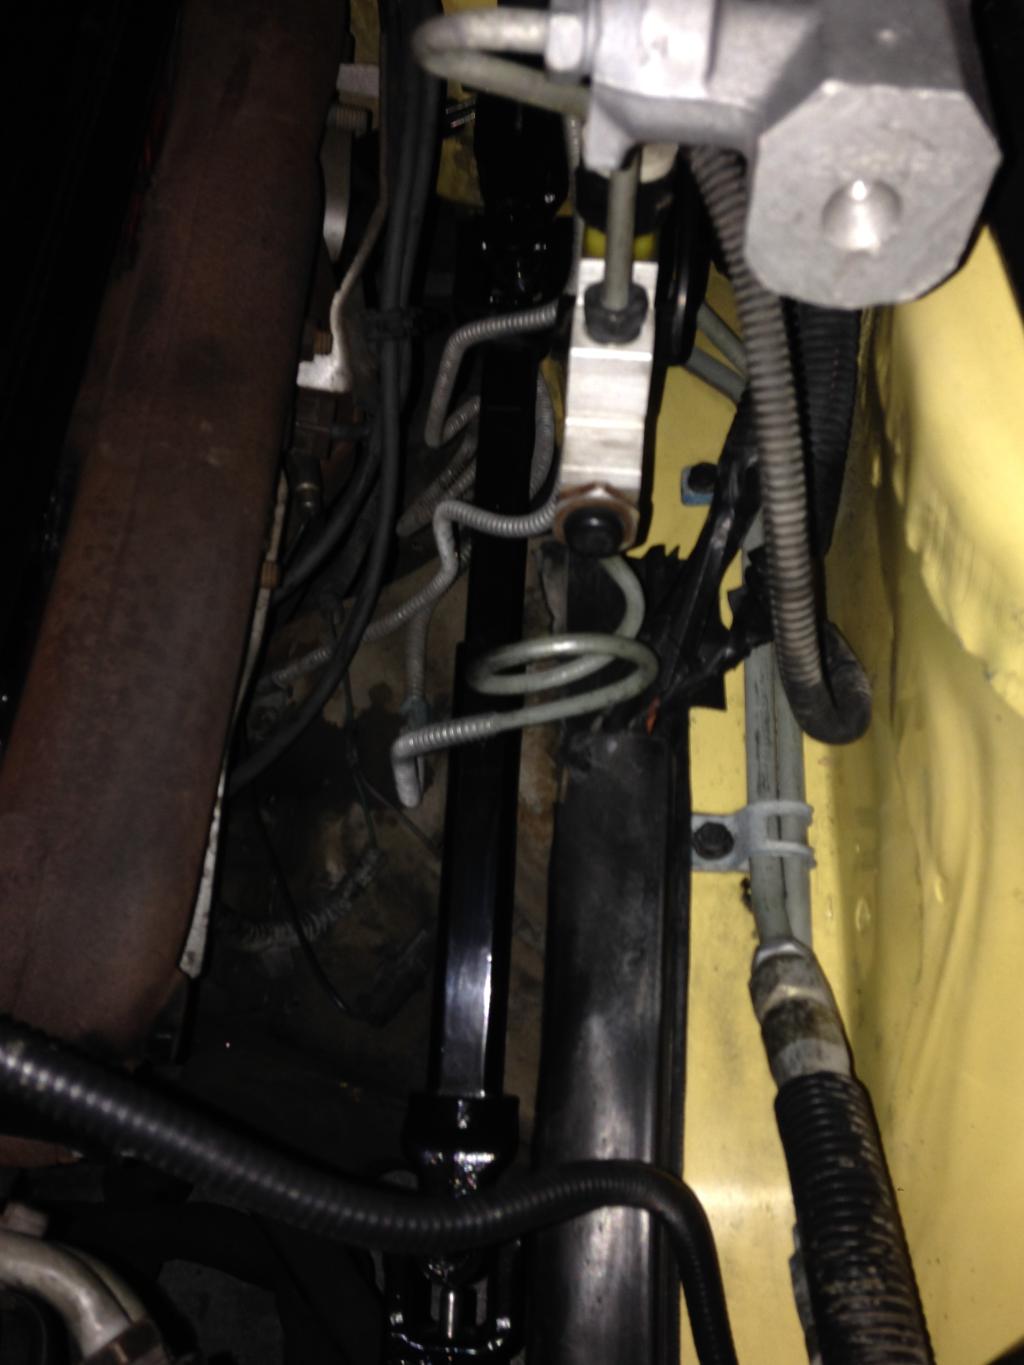
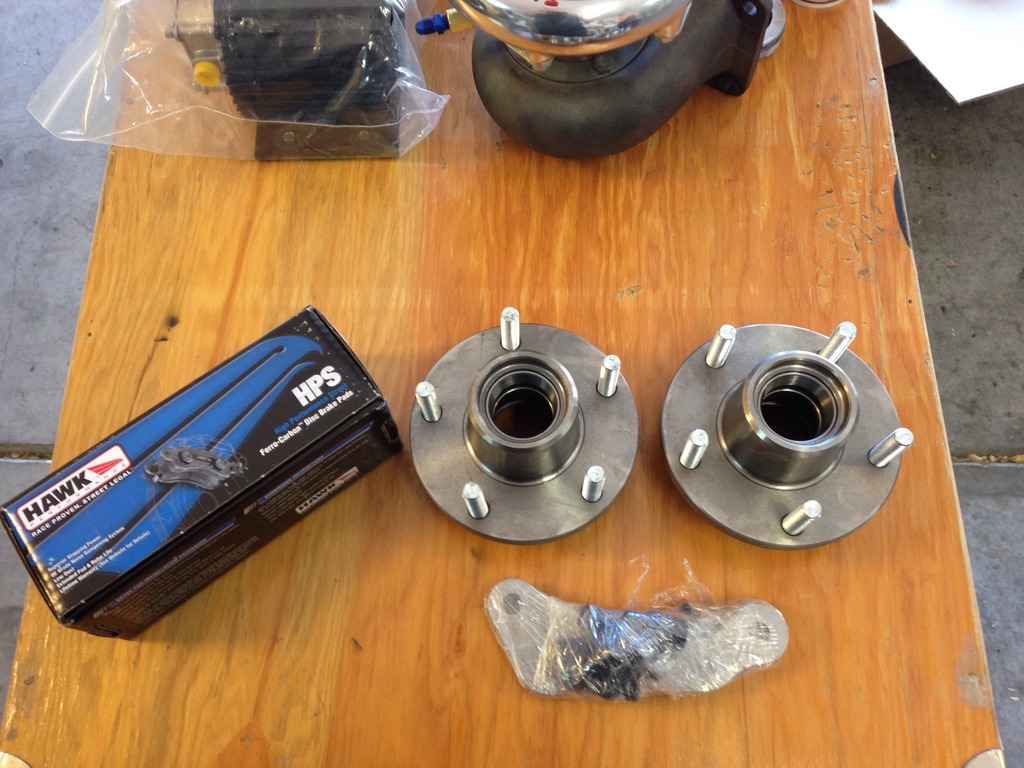
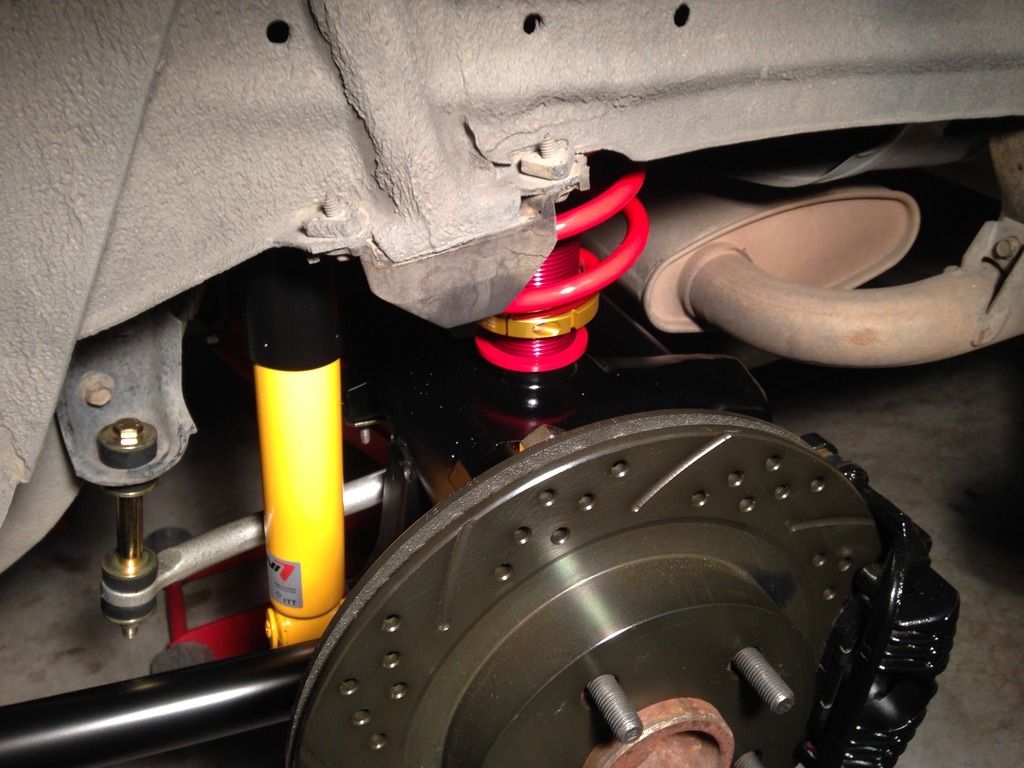
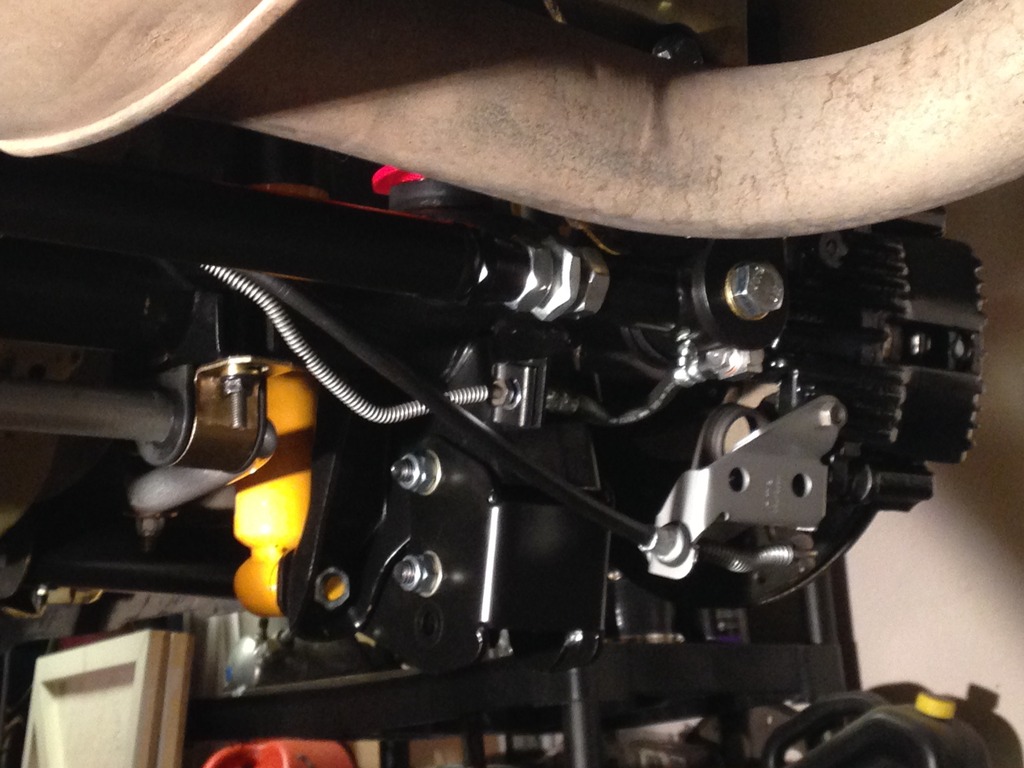
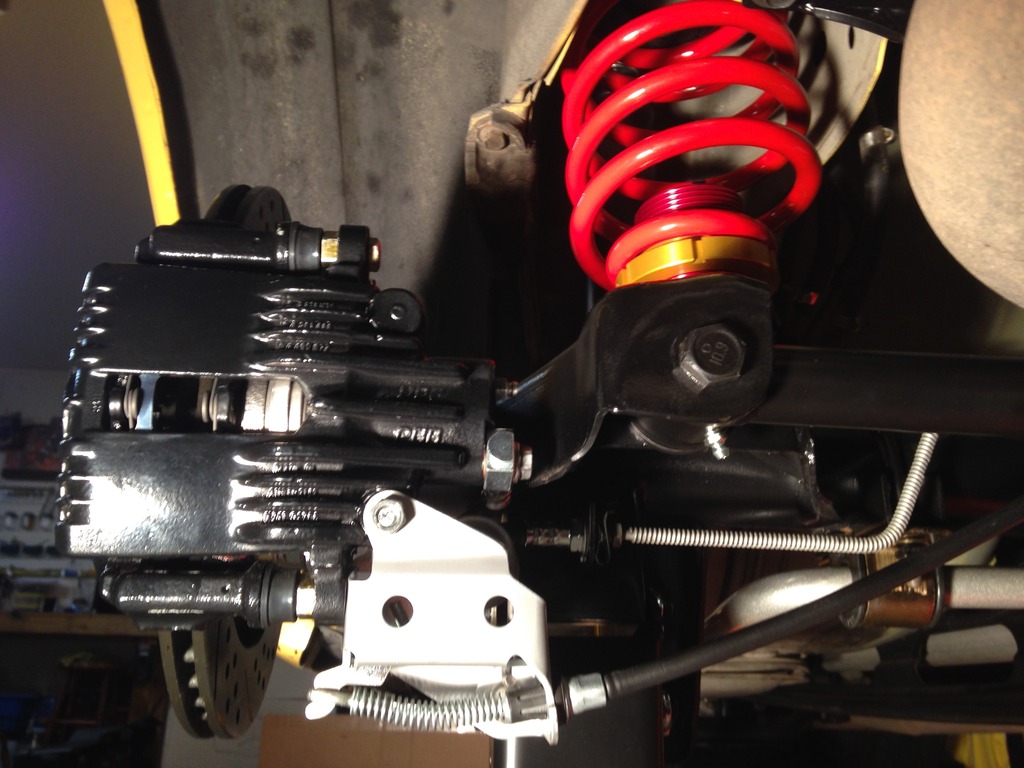
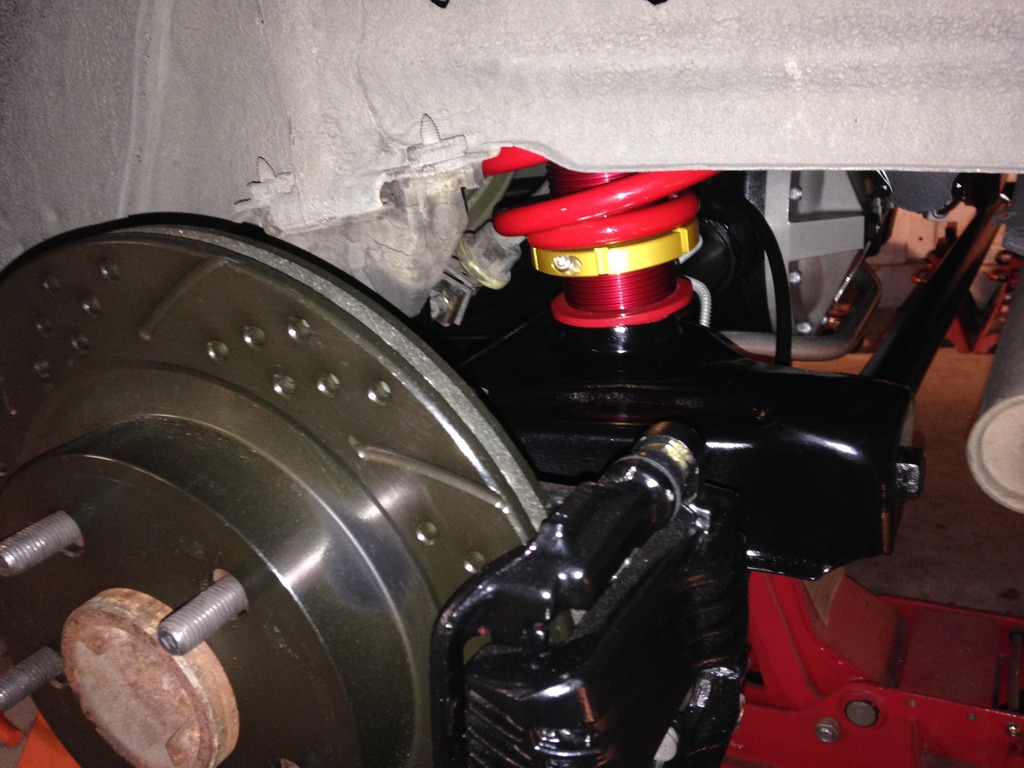
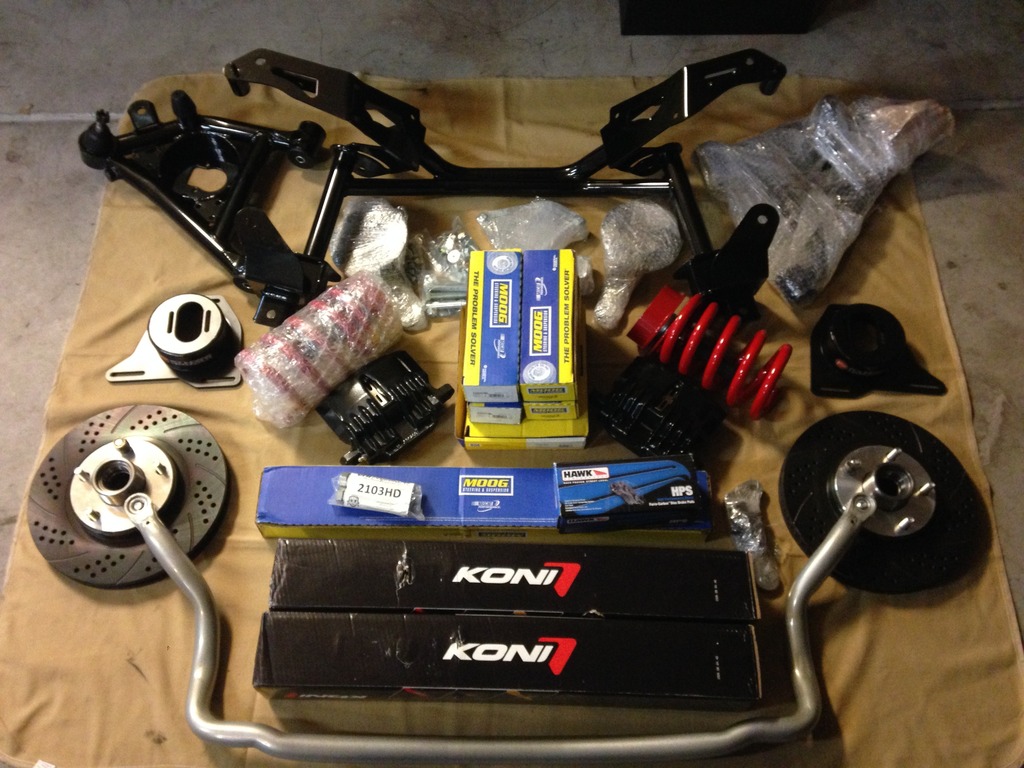
The transmission is in the car. I ended up going with a BMR crossmember. The fit and finish is excellent. I’ve yet to install the clutch hydraulics but they’re on the list. I still have the column out of the car so drilling the holes and bolting the hydraulics in should only take a couple of hours. I recently acquired an Astro Van steering shaft and modded it, so it will replace the stock steering shaft. Right now I’m working on the front end of the car. Last weekend I pulled the sway bar to replace the endlinks, bushings, and install a Wonderbar. I’m going to buy everything from Top Down Solutions. Today I should be getting a delivery of wheel bearing, seals, and brake hoses so that I can put the front brakes back together. The previous owner gave me a brand new set of front calipers so they’ll be installed as well.
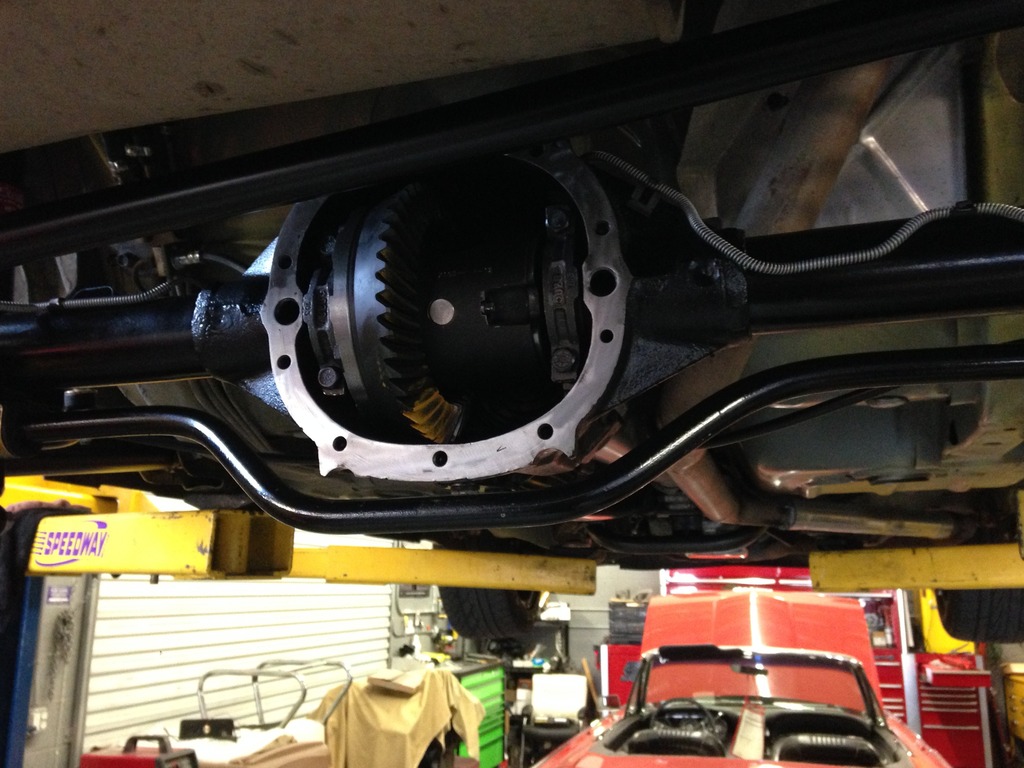
Moving to the back of the car, I dropped the rear end out back in September or October. I don’t remember exactly. I replaced the fuel pump and then went to work on the rear suspension and brakes. The donor Z28 I pulled the transmission from also donated its rear brakes. I ended up going with the Flynbye Performance drum to disc brake adapters. They fit great. All the suspension in the back of the car was basically shot so I replaced almost everything. For my birthday I bought myself a set of Founders Performance lower control arms and a panhard bar. I replaced the sway bar bushings, endlinks, and the torque arm bushing all with Energy Suspension parts. I bought all new brake hoses and some KYB shocks and then the cleaning and reassembly began. Some parts I just cleaned up, and some got painted. I also replaced all the seals on the rear end and capped it off with a new cover. I had a nice aluminum driveshaft from my 98 Formula that got donated to the project as well.
From eBay I bought all the plugs I needed for the transmission connections. This past weekend I wired the reverse lights, reverse lockout, clutch switch, and I wired up the Dakota Digital SGI-5 C speedo signal converter.
I’m sure there’s a ton of stuff I’m forgetting but that’s what happens when you don’t post for 5 months! I’m very busy at the shop right now so I’ve only been working on the car on Sundays. Of course this Sunday I’ll be partying, but I’ll be back on it next weekend. My next update will hopefully come in a few weeks and not months.
These pictures aren’t the greatest but you get the idea of what I’ve been up to.

The transmission is in the car. I ended up going with a BMR crossmember. The fit and finish is excellent. I’ve yet to install the clutch hydraulics but they’re on the list. I still have the column out of the car so drilling the holes and bolting the hydraulics in should only take a couple of hours. I recently acquired an Astro Van steering shaft and modded it, so it will replace the stock steering shaft. Right now I’m working on the front end of the car. Last weekend I pulled the sway bar to replace the endlinks, bushings, and install a Wonderbar. I’m going to buy everything from Top Down Solutions. Today I should be getting a delivery of wheel bearing, seals, and brake hoses so that I can put the front brakes back together. The previous owner gave me a brand new set of front calipers so they’ll be installed as well.
Moving to the back of the car, I dropped the rear end out back in September or October. I don’t remember exactly. I replaced the fuel pump and then went to work on the rear suspension and brakes. The donor Z28 I pulled the transmission from also donated its rear brakes. I ended up going with the Flynbye Performance drum to disc brake adapters. They fit great. All the suspension in the back of the car was basically shot so I replaced almost everything. For my birthday I bought myself a set of Founders Performance lower control arms and a panhard bar. I replaced the sway bar bushings, endlinks, and the torque arm bushing all with Energy Suspension parts. I bought all new brake hoses and some KYB shocks and then the cleaning and reassembly began. Some parts I just cleaned up, and some got painted. I also replaced all the seals on the rear end and capped it off with a new cover. I had a nice aluminum driveshaft from my 98 Formula that got donated to the project as well.
From eBay I bought all the plugs I needed for the transmission connections. This past weekend I wired the reverse lights, reverse lockout, clutch switch, and I wired up the Dakota Digital SGI-5 C speedo signal converter.
I’m sure there’s a ton of stuff I’m forgetting but that’s what happens when you don’t post for 5 months! I’m very busy at the shop right now so I’ve only been working on the car on Sundays. Of course this Sunday I’ll be partying, but I’ll be back on it next weekend. My next update will hopefully come in a few weeks and not months.
These pictures aren’t the greatest but you get the idea of what I’ve been up to.


Last edited by Doobie52; Jan 28, 2015 at 12:57 PM. Reason: Added Pictures
Joined: Aug 2013
Posts: 4,795
Likes: 895
From: MICHIGAN
Car: 1988 Trans Am
Engine: L03
Transmission: 700R4
Axle/Gears: 10 Bolt 2.73 Open


Thread Starter
Joined: Nov 2008
Posts: 37
Likes: 27
From: NV
Car: 1992 Trans Am
Engine: 6.0 LQ4
Transmission: T56 Magnum F
Axle/Gears: 3.73
Re: My 1992 Trans Am

So, as promised I'm updating after only a few weeks and not months. I won some money off the Superbowl and it went right to TDS. I bought the WonderBar, the greasable 36mm sway bar bushings, and some grease fitting covers. From RockAuto I bought sway bar links, brake lines, wheel bearings, and grease seals. I bought the brake pads and caliper paint locally. I had a new set of calipers, and I had the rotors that were on the car cut. I'm now done with the front suspension and the front brakes.
My compressor went out a few months ago and that had been keeping me from mounting the clutch hydraulics. I finally broke down a bought a new compressor last weekend, and this weekend the clutch hydraulics went in. For anyone doing this swap, I found it easiest to bolt the pedal assembly in and then drill the holes for the hydraulics.

The only issue I ran into yesterday was the proportioning valve. My car is a 92 originally with rear drum brakes. A while back I got a proportioning valve from an 88 GTA with rear discs. Unfortunately, the threads for the front brakes on the GTA valve are fine and the brake lines on my 92 are coarse. I'm going to have to find some adapter fittings to make it work, or find a 91-92 rear disc brake proportioning valve.
If anyone knows what size adapters I'd need, please post up. I'll do a search first, and post in the brake section if nothing comes up.
That's about it for now. I have nothing left to order to get the car going so I'm hoping to have it running soon. Hopefully my next update will have some video of the car running and driving.
Last edited by Doobie52; Mar 3, 2015 at 09:17 PM.
Joined: Aug 2013
Posts: 4,795
Likes: 895
From: MICHIGAN
Car: 1988 Trans Am
Engine: L03
Transmission: 700R4
Axle/Gears: 10 Bolt 2.73 Open
Re: My 1992 Trans Am
Thank you for your vote! I was out in the garage this weekend...started it up, ran it through the gears, let it warm up....I sure am anxious for spring to get here.
Sounds like a good deal...for you, and for Lon!
Sounds like a good deal...for you, and for Lon!
Thread Starter
Joined: Nov 2008
Posts: 37
Likes: 27
From: NV
Car: 1992 Trans Am
Engine: 6.0 LQ4
Transmission: T56 Magnum F
Axle/Gears: 3.73
Re: My 1992 Trans Am
As you can see from the video above, I got a lot done this weekend. On Friday, the new clutch hydraulics arrived and I had them installed within 20 minutes of opening the box they came in. After that, I started messing with the brakes. The proportioning valve I pulled from the 88 GTA had different threads than my valve. During the week I tried to find a 90-92 disc/disc valve but I didn't have any luck. What I ended up doing was just opening both valves and swapping the "guts" from the disc/disc valve into mine. This gave me the opportunity to clean the proportioning valve out as well. After the swap, I reinstalled the booster and master cylinder, and then tightened down the new pedal assembly for the last time. Next, I put the column back in so that I could correctly clock the steering shaft. I pulled one from an Astro van back in January, ground down the peens, and cleaned it all up. I was just waiting to get the column back in the car so that I could clock it correctly before I welded it back together. After the steering shaft was clocked and welded, it got a final cleaning and a fresh coat of paint. While the paint on the steering shaft was drying I cleaned up and ended my night in the garage.
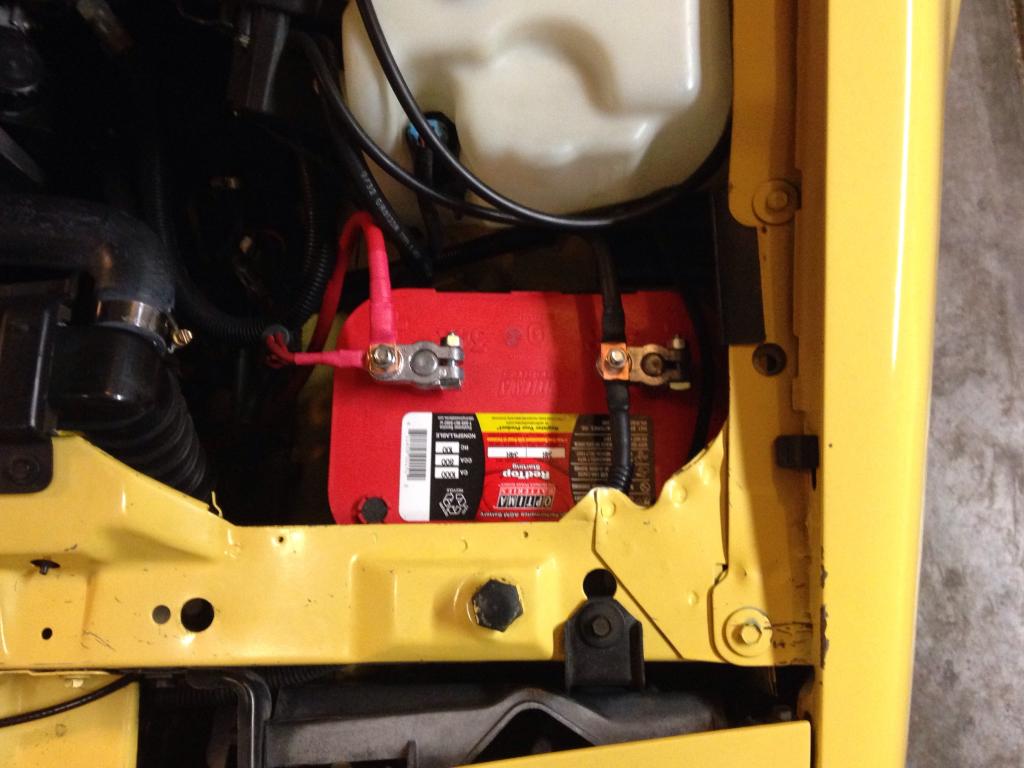
I went back to work on the car late Saturday afternoon. I worked in the morning, and sourced everything I needed to make some new battery cables. I've had that Optima battery on a tender for the last year. It only has top terminals so I just picked up some marine terminals and went to work. On Saturday I bounced around doing a ton of odds and ends. I filled the car with gas and coolant, bled the brakes, and just gave the car a good once over. Around 7:00 pm I fired the car for the first time. I was thrilled when it started on the first bump of the key after priming the lines about 4 times. The car used to be very hard to start because there was a hole in the fuel line between the pump and the sending unit. It would bleed off fuel pressure and it took forever to start. That was the reason I changed the fuel pump in the first place. Anyway, I let the car get up to temperature and then I killed it for the night.
This morning I got up, put air in the tires, bolted them back on, and put the car back on the ground. The video I posted is the first drive. I have another of the car starting and pulling out of the garage too but it's really not that exciting.
Now that the car runs and drives, I have to make a new plan of attack. I'm not going to put it on the road until I get some new wheels and tires for it. I'm waiting for the 17" black crosslace wheels that Hawk's is releasing. Until they come out and I've saved up some money for them, I'm going to start addressing the interior. The car also desperately needs a set of gears so I have to think about that department too. That's about it for now.

I went back to work on the car late Saturday afternoon. I worked in the morning, and sourced everything I needed to make some new battery cables. I've had that Optima battery on a tender for the last year. It only has top terminals so I just picked up some marine terminals and went to work. On Saturday I bounced around doing a ton of odds and ends. I filled the car with gas and coolant, bled the brakes, and just gave the car a good once over. Around 7:00 pm I fired the car for the first time. I was thrilled when it started on the first bump of the key after priming the lines about 4 times. The car used to be very hard to start because there was a hole in the fuel line between the pump and the sending unit. It would bleed off fuel pressure and it took forever to start. That was the reason I changed the fuel pump in the first place. Anyway, I let the car get up to temperature and then I killed it for the night.


This morning I got up, put air in the tires, bolted them back on, and put the car back on the ground. The video I posted is the first drive. I have another of the car starting and pulling out of the garage too but it's really not that exciting.
Now that the car runs and drives, I have to make a new plan of attack. I'm not going to put it on the road until I get some new wheels and tires for it. I'm waiting for the 17" black crosslace wheels that Hawk's is releasing. Until they come out and I've saved up some money for them, I'm going to start addressing the interior. The car also desperately needs a set of gears so I have to think about that department too. That's about it for now.
Thread Starter
Joined: Nov 2008
Posts: 37
Likes: 27
From: NV
Car: 1992 Trans Am
Engine: 6.0 LQ4
Transmission: T56 Magnum F
Axle/Gears: 3.73
Re: My 1992 Trans Am
Again, a significant amount of time has passed since I've made any updates on this car so here it goes. Back in March, shortly after making my last post, I put the car on the road. I registered it as a classic vehicle so I didn't have to worry about passing smog or anything like that. After registering it, I'd only take the car out maybe once or twice every two weeks just to shake it down and make sure everything was working correctly with the rear brake swap, the transmission swap, and the rear suspension. Everything turned out great.
The driver's side door had been sagging since I purchased the car, so much so that the door was starting to scuff the ground effects. I purchased the repair kit from TDS as well as a new roller and spring and fixed that issue. I completed that back in April or May. At that time I also changed the passenger side window motor and installed the GTA door panels and seats I picked up a while back.
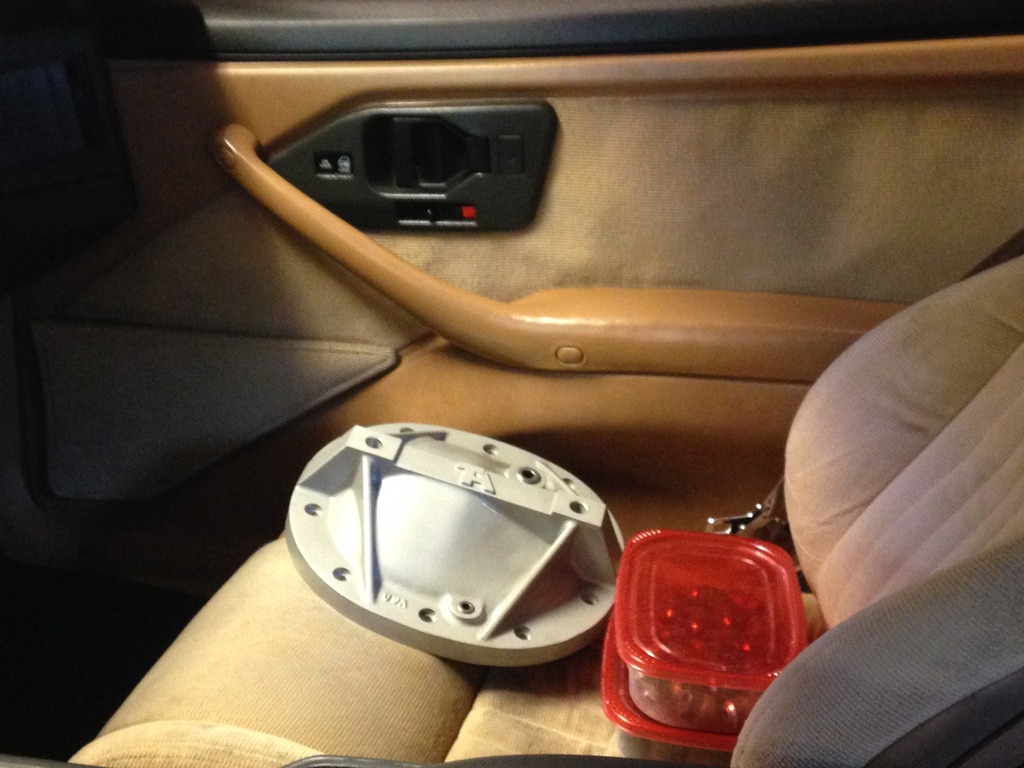
Next up was a gear swap. A T56 was not designed to be behind a set of 2.73 gears. For the first four months the car was on the road part of the reason I didn't drive it that often was the gear situation. Around the neighborhood I didn't have to shift out of first gear, and on the highway I could cruise at 70 in fourth. I maybe once popped it into fifth but never sixth. A few months back I found a member on here selling a lightly used TA cover so I picked that up. I bead blasted it and cleared it and it's currently waiting to be put on the rear end. In July, I completely rebuilt my rear end with all new seals and bearings, had the Auburn posi unit gone through, and installed a fresh set of 3.73s. The difference in the car is night and day. It's so much more enjoyable to drive now. I've just about reached the 500 break in miles for the gears so I'm getting ready to change the fluid and put the rear end cover on. I'll post up some pictures when I get home tonight.
Now on to the reason for the thread bump. Over the course of the next few months I'm going to complete the front suspension, make a couple of changes to the rear suspension, put a set of LS1 front brakes on the car, and get some new wheels and tires. When I work on my car at the shop, I tend not to take any pictures or document anything. Last night I put the car up on jack stands in my garage and I've already started snapping pictures to document what I'm doing. I have a pretty extensive parts list put together, and the first round of parts should be arriving before the weekend. I should have some updated progress in the next few days.
The driver's side door had been sagging since I purchased the car, so much so that the door was starting to scuff the ground effects. I purchased the repair kit from TDS as well as a new roller and spring and fixed that issue. I completed that back in April or May. At that time I also changed the passenger side window motor and installed the GTA door panels and seats I picked up a while back.

Next up was a gear swap. A T56 was not designed to be behind a set of 2.73 gears. For the first four months the car was on the road part of the reason I didn't drive it that often was the gear situation. Around the neighborhood I didn't have to shift out of first gear, and on the highway I could cruise at 70 in fourth. I maybe once popped it into fifth but never sixth. A few months back I found a member on here selling a lightly used TA cover so I picked that up. I bead blasted it and cleared it and it's currently waiting to be put on the rear end. In July, I completely rebuilt my rear end with all new seals and bearings, had the Auburn posi unit gone through, and installed a fresh set of 3.73s. The difference in the car is night and day. It's so much more enjoyable to drive now. I've just about reached the 500 break in miles for the gears so I'm getting ready to change the fluid and put the rear end cover on. I'll post up some pictures when I get home tonight.

Now on to the reason for the thread bump. Over the course of the next few months I'm going to complete the front suspension, make a couple of changes to the rear suspension, put a set of LS1 front brakes on the car, and get some new wheels and tires. When I work on my car at the shop, I tend not to take any pictures or document anything. Last night I put the car up on jack stands in my garage and I've already started snapping pictures to document what I'm doing. I have a pretty extensive parts list put together, and the first round of parts should be arriving before the weekend. I should have some updated progress in the next few days.
Last edited by Doobie52; Oct 16, 2015 at 06:06 PM. Reason: Added Pictures
Thread Starter
Joined: Nov 2008
Posts: 37
Likes: 27
From: NV
Car: 1992 Trans Am
Engine: 6.0 LQ4
Transmission: T56 Magnum F
Axle/Gears: 3.73
Re: My 1992 Trans Am
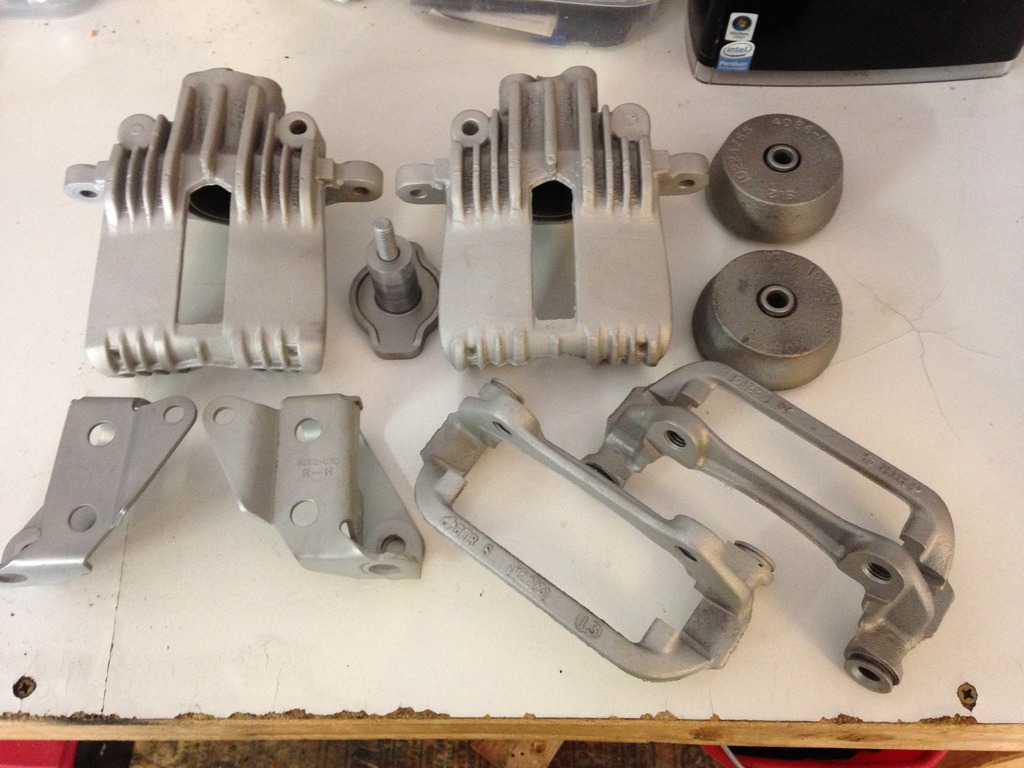
On Wednesday night I stripped the set of LS1 front calipers I picked up last weekend so I could clean them up and rebuild them. They cleaned up pretty well with some degreaser, but I wanted them really clean so that I could paint them. That night, I took them to the shop with me and bead blasted them. They ended up coming out like new. When I got home from work this afternoon my first RockAuto package arrived with the front rebuild and hardware kits. Now, I'm off to mask some calipers and brackets and get some paint on them.


Thread Starter
Joined: Nov 2008
Posts: 37
Likes: 27
From: NV
Car: 1992 Trans Am
Engine: 6.0 LQ4
Transmission: T56 Magnum F
Axle/Gears: 3.73
Re: My 1992 Trans Am
Nice stuff indeed. I have a lot of nice stuff planned over the next couple of months. Stay tuned!
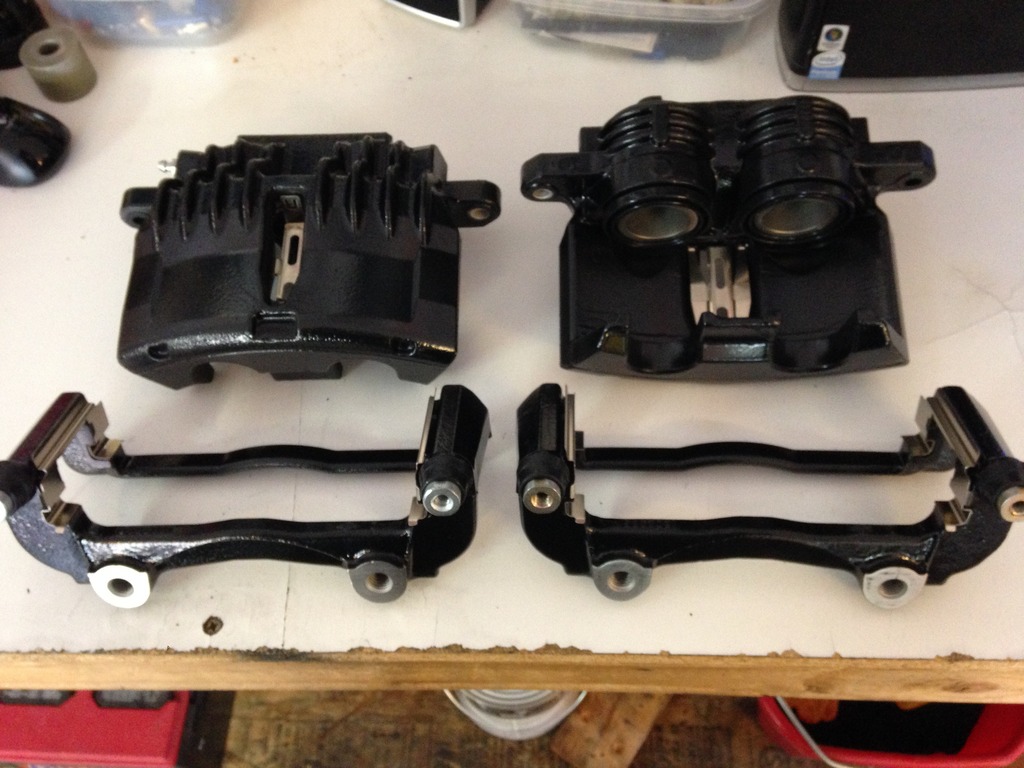
Last night I painted the caliper brackets and this afternoon I painted the calipers themselves. I'm going to give them a couple of days to dry before I handle them for reassembly. They turned out really nice.
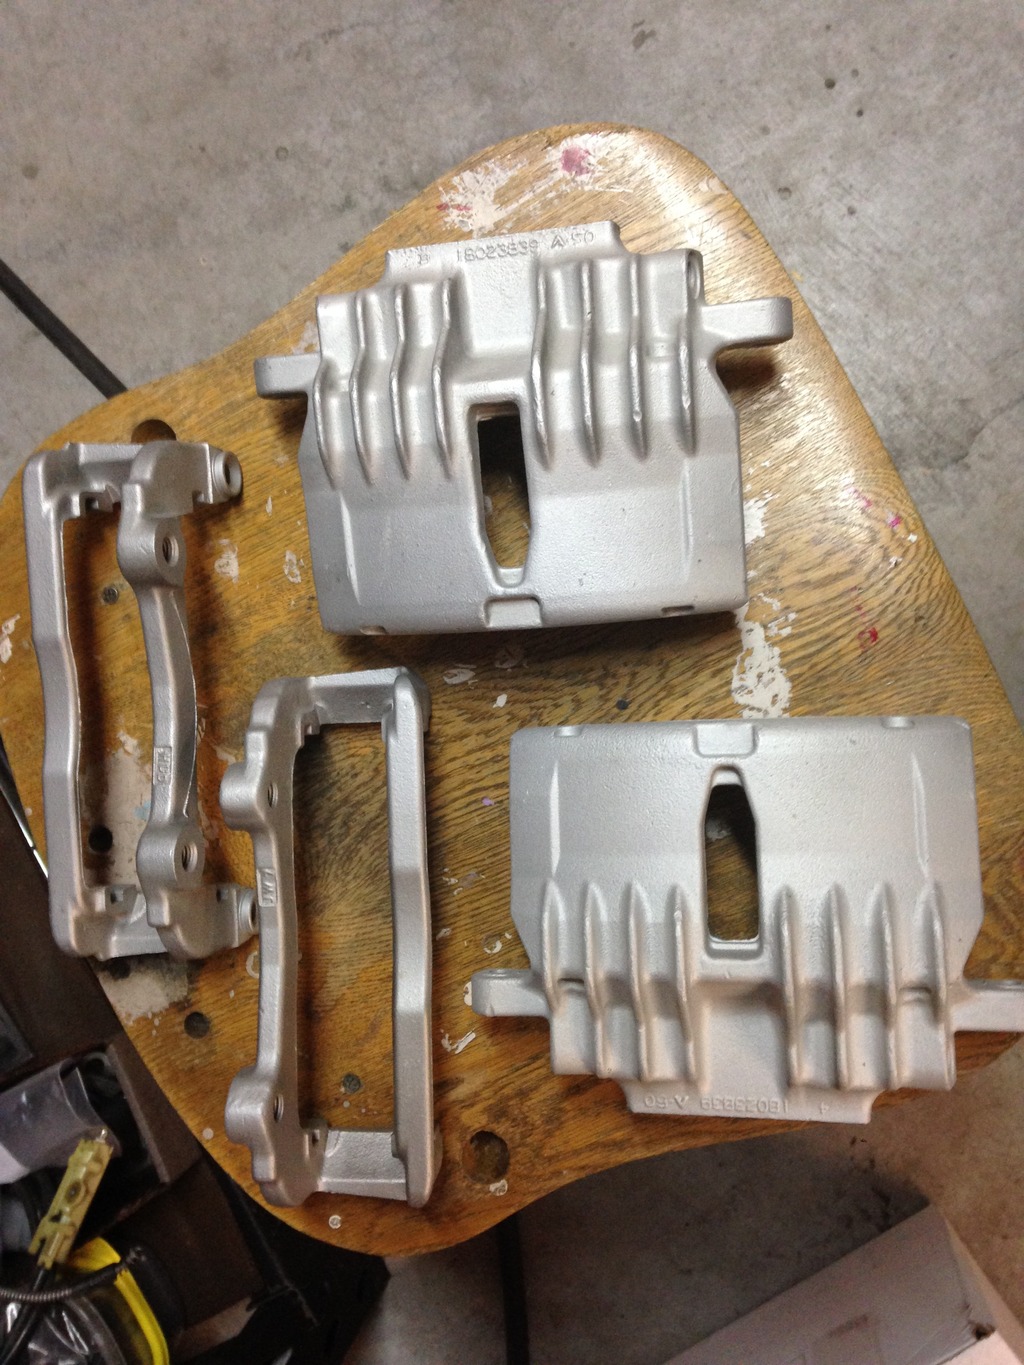
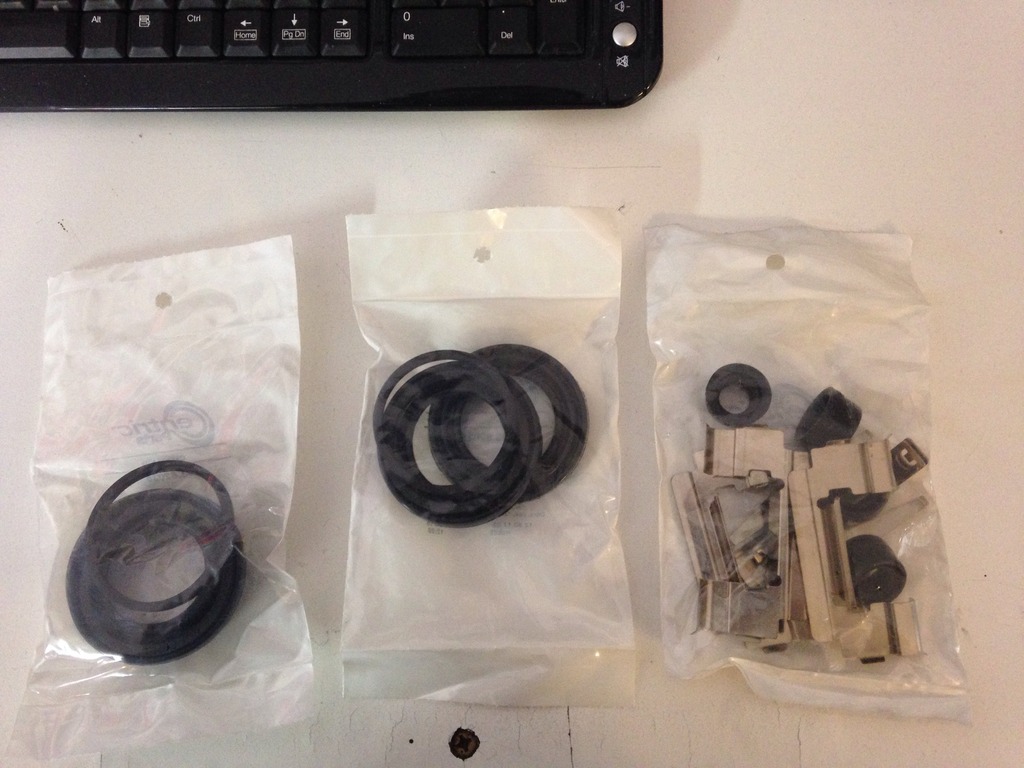
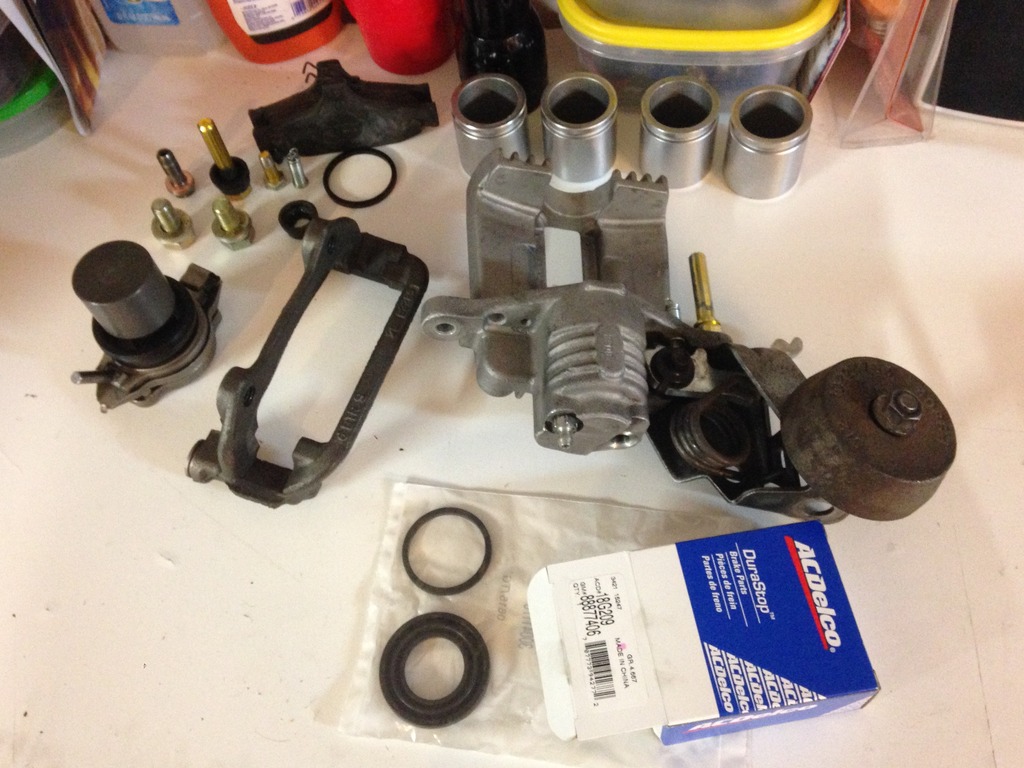
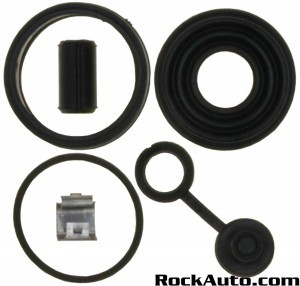
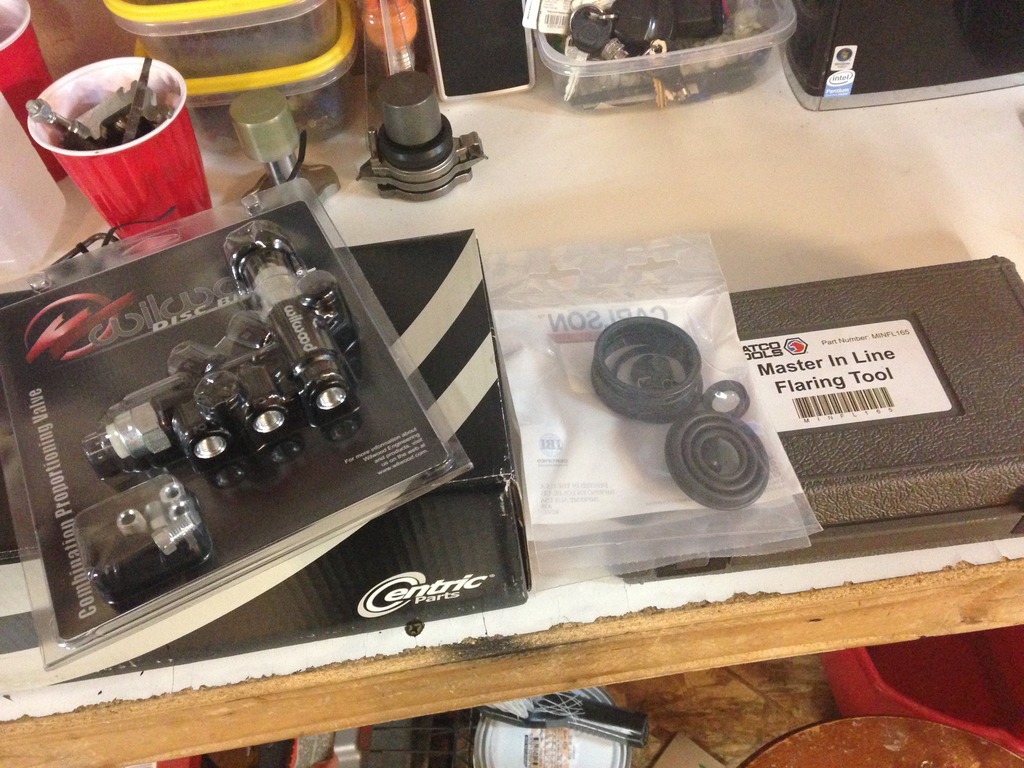
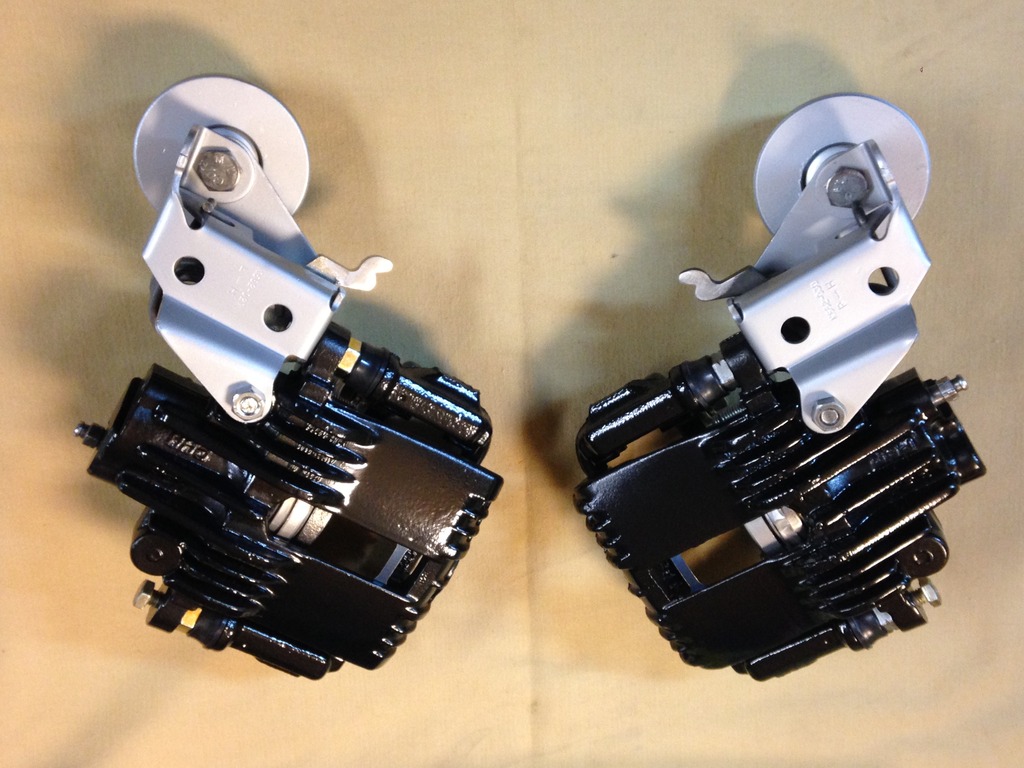
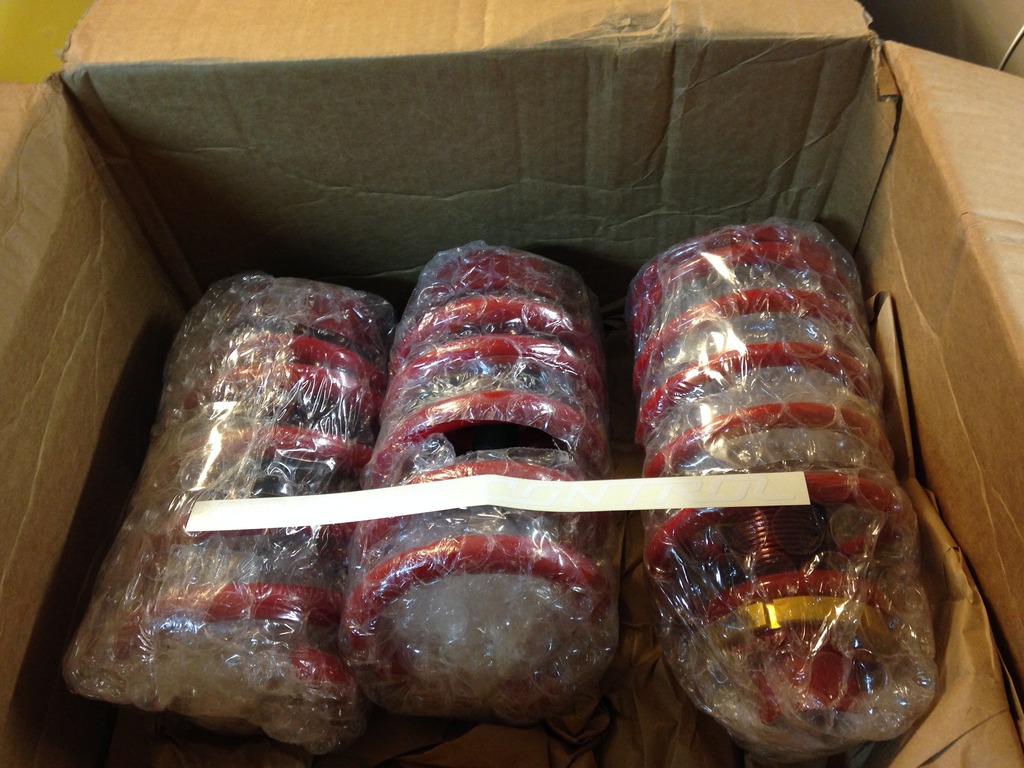
This afternoon I also received the parts I was waiting for from RockAuto to rebuild my rear calipers. At least I though I did anyway. This is just a heads up for anyone out there planning to use the ACDelco 18G209 rebuild kit. The photo you'll find attached to this part number when you search it is not what's included in the kit. You can see what's included in the picture below. I attached the RockAuto photo too, but I don't blame them for the mistake as every picture of this kit I've found online shows the same parts. ACDelco needs to update their photo of this part. Just a minor setback, but aggravating nonetheless. This weekend I don't plan on doing much more than pulling the other rear caliper off the the car and disassembling it. During the week I'll blast and paint them and hopefully have some more progress to report next week.
Last night I painted the caliper brackets and this afternoon I painted the calipers themselves. I'm going to give them a couple of days to dry before I handle them for reassembly. They turned out really nice.

This afternoon I also received the parts I was waiting for from RockAuto to rebuild my rear calipers. At least I though I did anyway. This is just a heads up for anyone out there planning to use the ACDelco 18G209 rebuild kit. The photo you'll find attached to this part number when you search it is not what's included in the kit. You can see what's included in the picture below. I attached the RockAuto photo too, but I don't blame them for the mistake as every picture of this kit I've found online shows the same parts. ACDelco needs to update their photo of this part. Just a minor setback, but aggravating nonetheless. This weekend I don't plan on doing much more than pulling the other rear caliper off the the car and disassembling it. During the week I'll blast and paint them and hopefully have some more progress to report next week.


Joined: Aug 2013
Posts: 4,795
Likes: 895
From: MICHIGAN
Car: 1988 Trans Am
Engine: L03
Transmission: 700R4
Axle/Gears: 10 Bolt 2.73 Open
Re: My 1992 Trans Am
Yeah, you're talking about a bunch of upgrades I'd like to make to my car over time. Keep up the good work.
They certainly take the use a SUBSTANTIAL mass damper seriously on that rear caliper, don't they!
They certainly take the use a SUBSTANTIAL mass damper seriously on that rear caliper, don't they!
Thread Starter
Joined: Nov 2008
Posts: 37
Likes: 27
From: NV
Car: 1992 Trans Am
Engine: 6.0 LQ4
Transmission: T56 Magnum F
Axle/Gears: 3.73
Re: My 1992 Trans Am
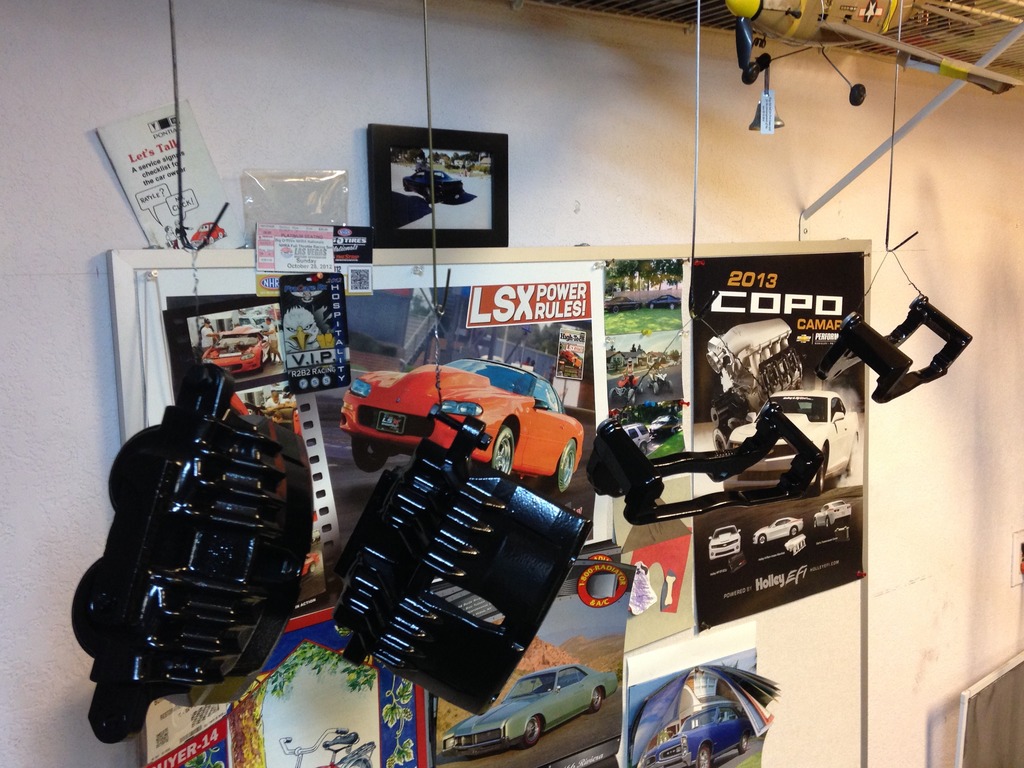
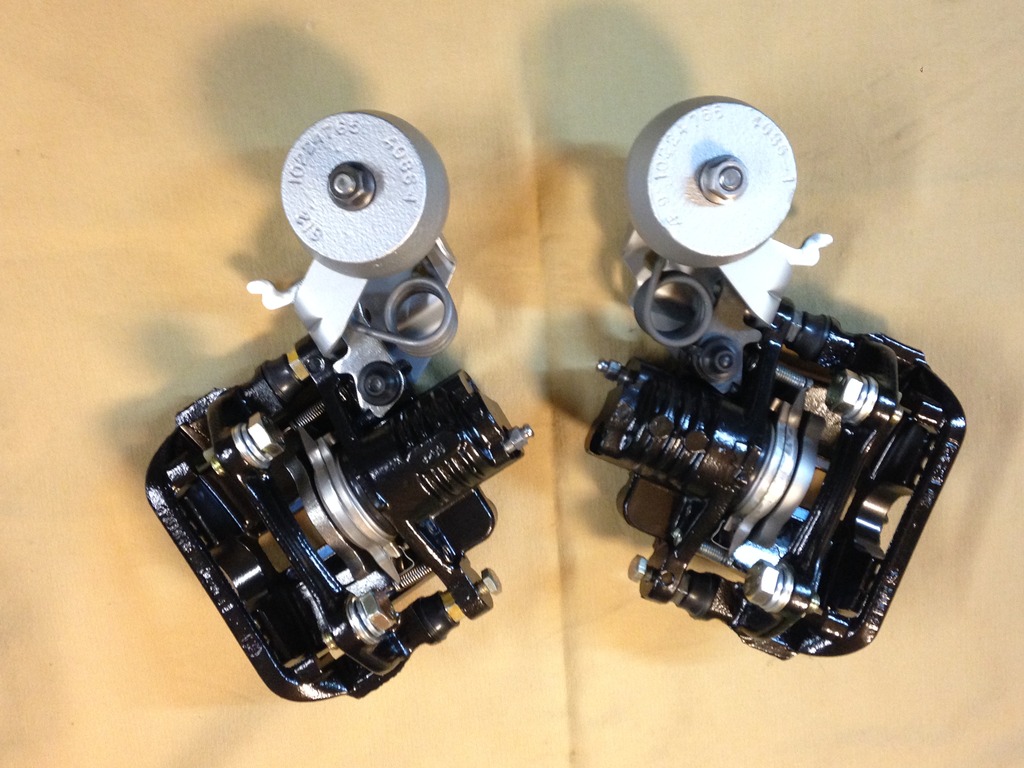
I finished rebuilding my front calipers this week and installed the new hardware. I'm putting them off to the side now to concentrate on finishing the rears, but I think they came out really well.
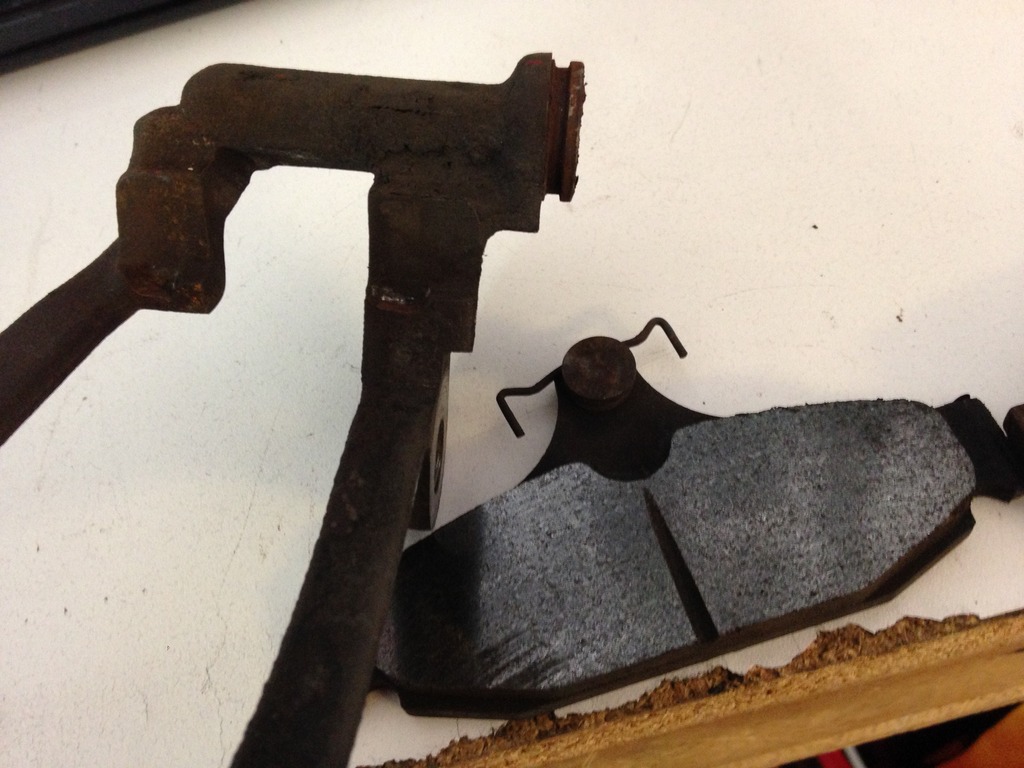
Last weekend turned into a bit of an adventure. After removing the right rear caliper I figured out the noise I've been hearing since I completed the rear disc swap. I first noticed that the brake pads weren't wearing evenly. I thought it was probably a stuck slide. It wasn't. Turned out that the brake pads had dug into the caliper bracket and couldn't slide. Anyway, a trip to the pick-a-part and $24 later, I had a great core all ready for rebuilding.
During the week I was able to get the rears disassembled and blasted. The goal for this morning is to clean them, mask them, and get them painted. I also have to paint the parking brake assembly hardware. I'm doing that all in cast silver.
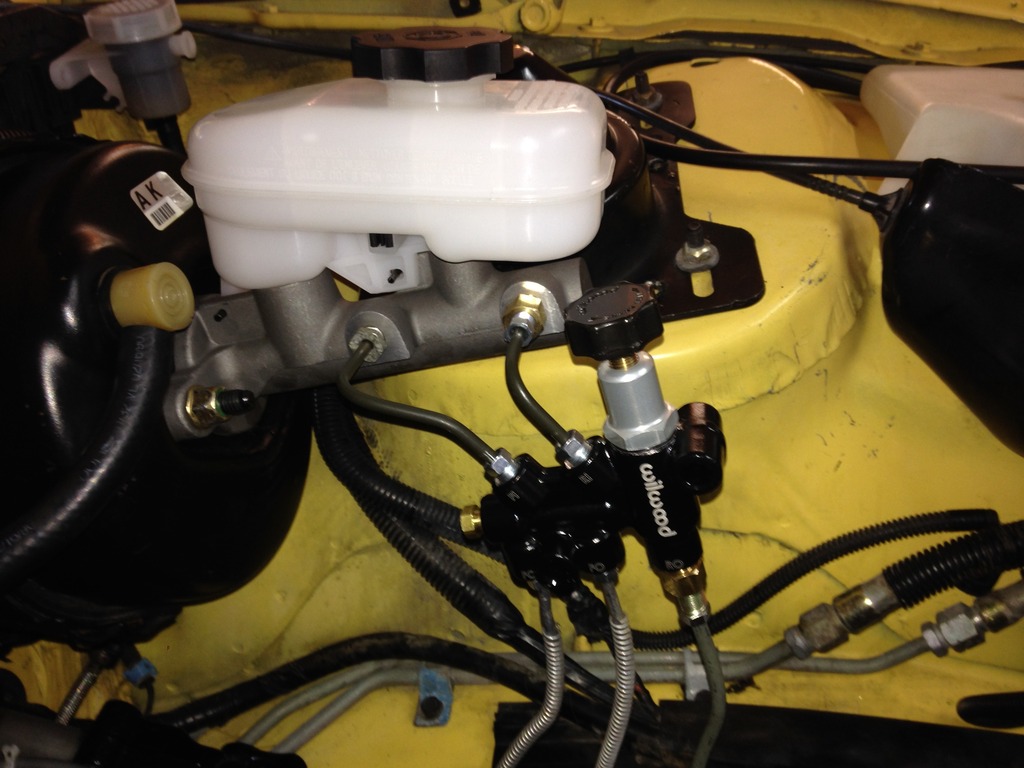
Tomorrow will be a big delivery day. I'm getting the correct rear caliper rebuild kits, a new set of rear rotors, a set of Hawk pads for the rear, a fourth gen master cylinder, and a new Wilwood Combination Proportioning Valve (260-11179) to replace the stock unit in the car. My goal is to have the rear brakes completely assembled and put back together next weekend so that I can tear into the front of the car. If the parts from BigBrakeUpgrade show up this week, I'm going to modify the spindles myself and then drop them off at the powdercoater to be done in gloss black. Once all the brake stuff is out of the way, I'm going to start ordering suspension parts. More to come next weekend.

Last weekend turned into a bit of an adventure. After removing the right rear caliper I figured out the noise I've been hearing since I completed the rear disc swap. I first noticed that the brake pads weren't wearing evenly. I thought it was probably a stuck slide. It wasn't. Turned out that the brake pads had dug into the caliper bracket and couldn't slide. Anyway, a trip to the pick-a-part and $24 later, I had a great core all ready for rebuilding.

During the week I was able to get the rears disassembled and blasted. The goal for this morning is to clean them, mask them, and get them painted. I also have to paint the parking brake assembly hardware. I'm doing that all in cast silver.

Tomorrow will be a big delivery day. I'm getting the correct rear caliper rebuild kits, a new set of rear rotors, a set of Hawk pads for the rear, a fourth gen master cylinder, and a new Wilwood Combination Proportioning Valve (260-11179) to replace the stock unit in the car. My goal is to have the rear brakes completely assembled and put back together next weekend so that I can tear into the front of the car. If the parts from BigBrakeUpgrade show up this week, I'm going to modify the spindles myself and then drop them off at the powdercoater to be done in gloss black. Once all the brake stuff is out of the way, I'm going to start ordering suspension parts. More to come next weekend.
Last edited by Doobie52; Oct 29, 2015 at 02:10 PM.
Thread Starter
Joined: Nov 2008
Posts: 37
Likes: 27
From: NV
Car: 1992 Trans Am
Engine: 6.0 LQ4
Transmission: T56 Magnum F
Axle/Gears: 3.73
Re: My 1992 Trans Am
This post probably could have waited until next weekend but I'm excited and I have some time to kill before dinner so I'll post up. The rear brake parts are all painted, but I'll wait until the end of the week after the kits show up to rebuild them. I have Friday off for Nevada Day and the weather out here is beautiful, so I'll just plan on spending the day out here in the garage. I'll have plenty of parts to keep me busy. Here's the rear brake parts all painted.
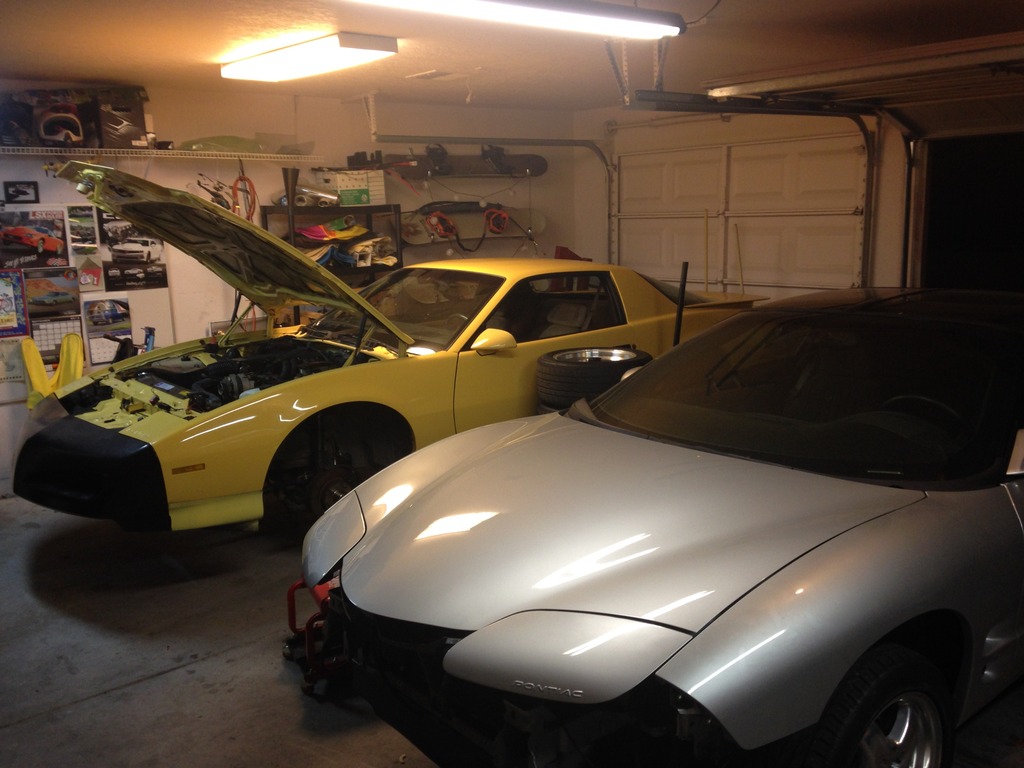
If you've read through this thread, you may have noticed that my 1992 Trans Am shares the garage with my 1998 Formula. They're complete opposites, but they get along really well. Here's a picture of the two of them cohabitating.
While the Trans Am is being build as a handling street car, the Formula was built to go fast in a straight line. Last time I had it out, on 10lbs of boost with a 1.7 60ft. time, the car went 10.8 at 128. This was on the stock shortblock, with a stock cam, and a Turbonetics TC78 making right around 600 rear wheel. This all went through a TH400 that I put a TransGo shift kit in. Needless to say the stock shortblock didn't last too long, and I ended up parking the car in the beginning of 2014. I bought a new engine for if but I also went back and forth about changing the turbo setup. Long story short, one of my friends eventually convinced me that I needed to go bigger and that I should sell my turbo setup to him for his 1999 Z28, so I did. This all went down at the beginning of this summer. Now that fall is here and his monetary situation has changed, he has given the turbo kit back to me to sell for him. The turbo kit went from my car to his closet, so he knows nothing about it. Now, the reason for my excitement and this post, is what he gave me today when he dropped all the turbo kit parts off at my house. He has decided to part out his whole car and as payment for helping him, this is what I got.
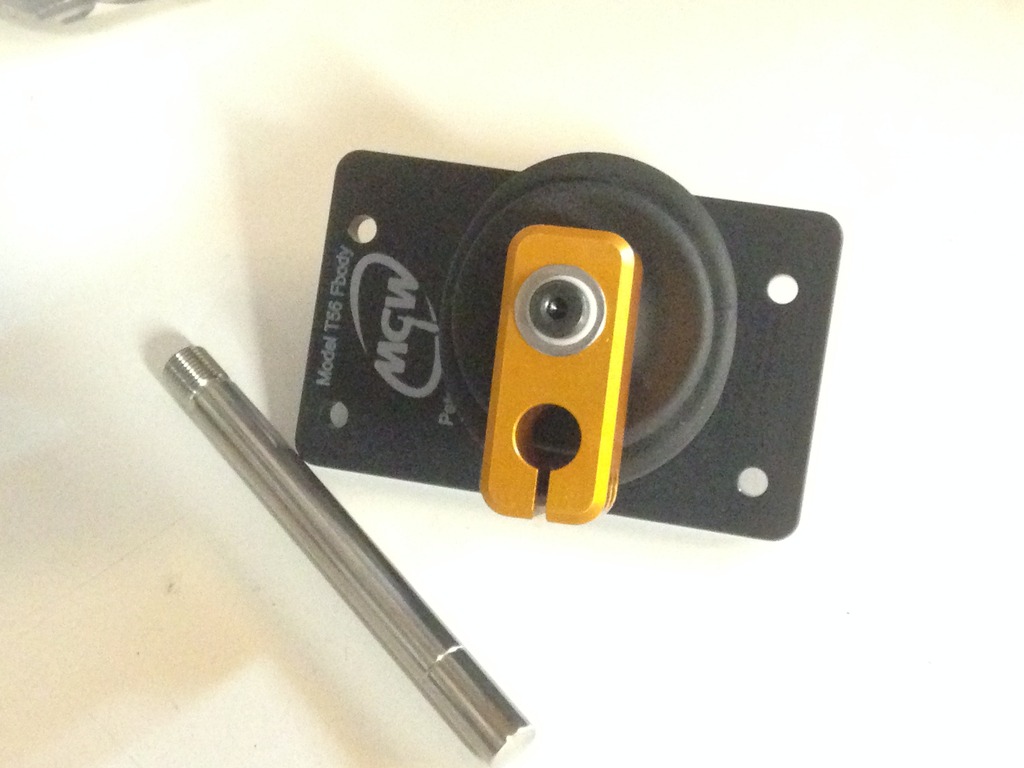
For those of you who may not know, it's an MGW T56 Shifter, and it's brand new. I just took it out of the box for that picture. It'll be replacing the B&M Shifter in the Trans Am now. I also bought some select parts back from the turbo kit, including the hot side, so I'm excited to finish up the brakes and suspension on the Trans Am, and start planning out the 4th incarnation of my Formula. Here's my Formula in her former glory.

If you've read through this thread, you may have noticed that my 1992 Trans Am shares the garage with my 1998 Formula. They're complete opposites, but they get along really well. Here's a picture of the two of them cohabitating.

While the Trans Am is being build as a handling street car, the Formula was built to go fast in a straight line. Last time I had it out, on 10lbs of boost with a 1.7 60ft. time, the car went 10.8 at 128. This was on the stock shortblock, with a stock cam, and a Turbonetics TC78 making right around 600 rear wheel. This all went through a TH400 that I put a TransGo shift kit in. Needless to say the stock shortblock didn't last too long, and I ended up parking the car in the beginning of 2014. I bought a new engine for if but I also went back and forth about changing the turbo setup. Long story short, one of my friends eventually convinced me that I needed to go bigger and that I should sell my turbo setup to him for his 1999 Z28, so I did. This all went down at the beginning of this summer. Now that fall is here and his monetary situation has changed, he has given the turbo kit back to me to sell for him. The turbo kit went from my car to his closet, so he knows nothing about it. Now, the reason for my excitement and this post, is what he gave me today when he dropped all the turbo kit parts off at my house. He has decided to part out his whole car and as payment for helping him, this is what I got.

For those of you who may not know, it's an MGW T56 Shifter, and it's brand new. I just took it out of the box for that picture. It'll be replacing the B&M Shifter in the Trans Am now. I also bought some select parts back from the turbo kit, including the hot side, so I'm excited to finish up the brakes and suspension on the Trans Am, and start planning out the 4th incarnation of my Formula. Here's my Formula in her former glory.


Joined: Aug 2013
Posts: 4,795
Likes: 895
From: MICHIGAN
Car: 1988 Trans Am
Engine: L03
Transmission: 700R4
Axle/Gears: 10 Bolt 2.73 Open
Re: My 1992 Trans Am
Doobie...we think too much alike.
I have those same wire racks up high on the wall of my attached garage, too.
A word of warning...the plastic clips mine came with originally used one screw and the plastic wrapped around the wire frame. I came out one morning to find that the plastic had failed, the rack had come 1/2 off the wall, and dumped all of it's contents on one of my cars. I was NOT pleased. Lots of dents and paint damage.
I rehung the same rack, but this time using a revised 2nd generation plastic clip that used a screw above, and another below the rack, capturing the wire frame with a screw on either side. As before, these were driven into wall studs. These lasted some years, when I noticed that they had yellowed pretty bad. A very close inspection showed that AGAIN the plastic was failing, full of cracks, and bound to come off the wall again.
This time, a 3rd generation of clip was now available, metal, and reused the same two screw system as above. It took them 20 years to get it right, but I finally feel pretty confident they will stay up.
Just thought I'd mention it.
Thread Starter
Joined: Nov 2008
Posts: 37
Likes: 27
From: NV
Car: 1992 Trans Am
Engine: 6.0 LQ4
Transmission: T56 Magnum F
Axle/Gears: 3.73
Re: My 1992 Trans Am
Thanks for the heads up Dave. When I get home from work tonight, my wire racks will be receiving a thorough inspection. It's about time I cleaned some of the crap I never use off of them anyway!
Senior Member

Joined: Nov 2010
Posts: 915
Likes: 4
From: Overland Park Kansas
Car: 91 Firbird Formula
Engine: 5.0 TBI
Transmission: 700R4
Re: My 1992 Trans Am
I've used those same wire racks for 15 years. Best advise for safety, use a ton of those plastic pieces. On shelves I know I will put some weight on, I put those plastic clips every 4 - 6 inches. Lots of braces too. They start to get brittle after 5 - 7 years. If you see one break, replace them all!
Thread Starter
Joined: Nov 2008
Posts: 37
Likes: 27
From: NV
Car: 1992 Trans Am
Engine: 6.0 LQ4
Transmission: T56 Magnum F
Axle/Gears: 3.73
Re: My 1992 Trans Am
I gave my shelves a good once over this week and everything checks out. They've only been up for about three years now so all the hardware is in good shape. Now on to the car.
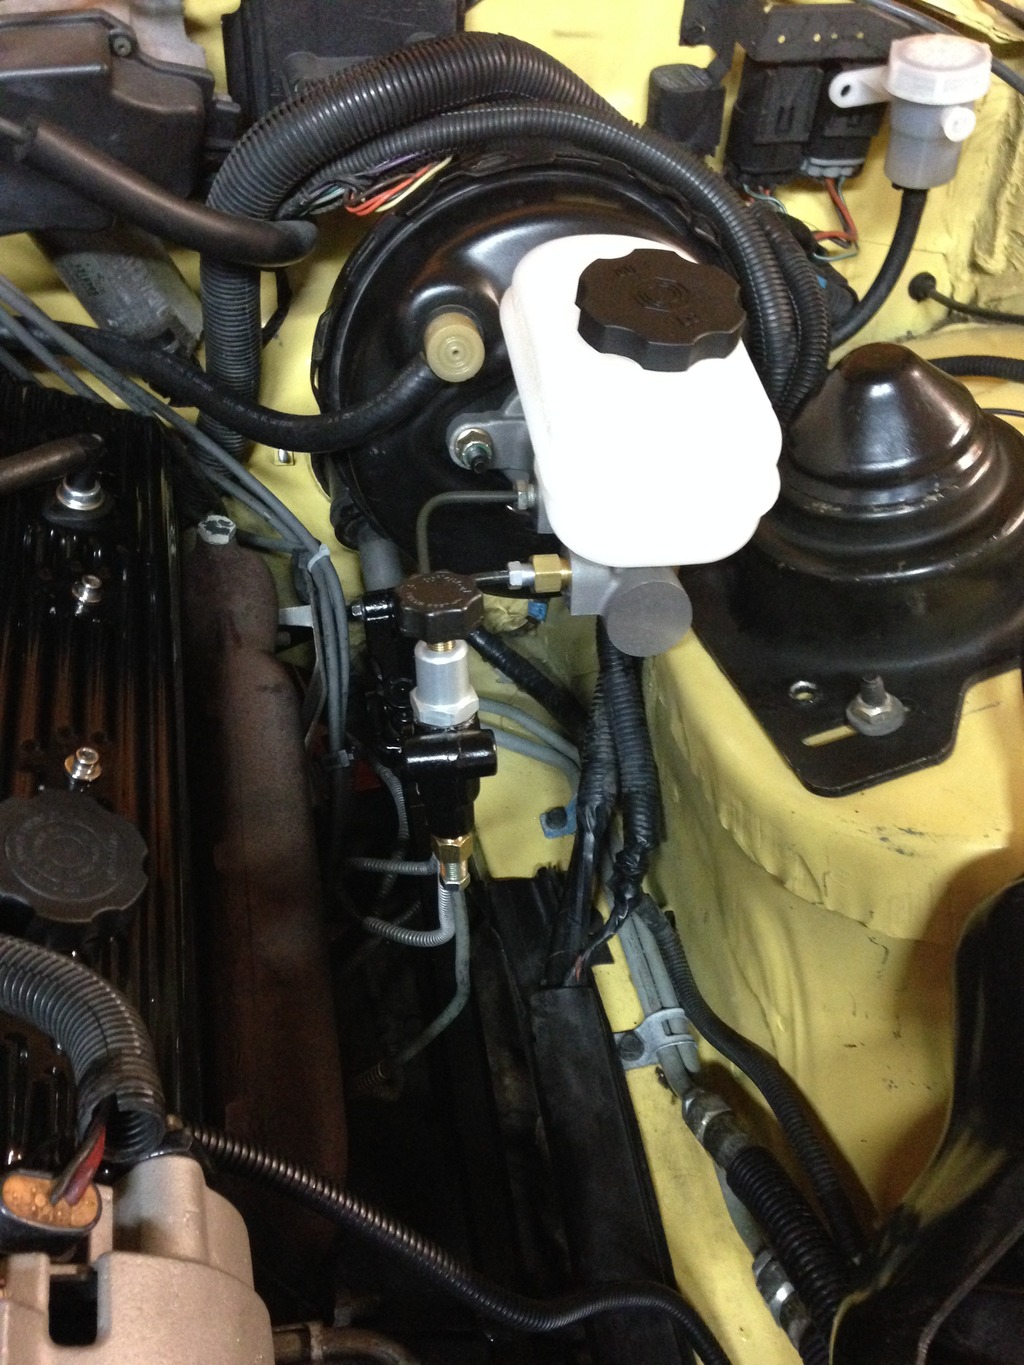
I got a few deliveries this week so I was able to make some progress. I started by pulling the old master cylinder and combination valve. They were replaced with a fourth gen master cylinder and Wilwood adjustable portioning valve. To do the bubble flares and work with the metric lines, I purchased the MATCO inline flare kit in the picture. For anyone considering their inline flare tool, save your money. I ended up using the Mastercool hydraulic flare tool we have at work. I'll keep the MATCO kit because I used it, but if you're in the market for a flare tool, the Mastercool set is where it's at. Anyway, I got everything all mounted up and it came out really nice. I have to pull the master out to bench bleed it, then it's ready for final assembly.
Today I was able to reassemble the rear calipers. They came out great. I like the contrast with the silver so much, I'm going to pull my sway bars and have them powder coated silver to break up all the black. It should go nice in the rear with the differential cover too. To go with the freshly rebuilt calipers, I got some new front and rear rotors. They have a black zinc coating on them that will come off the pad surface during break in. Rears arrived during the week and fronts should be in tomorrow. All of my Hawk brake pads and the Big Brake Upgrade parts should be in tomorrow too.

More to come next weekend.
I got a few deliveries this week so I was able to make some progress. I started by pulling the old master cylinder and combination valve. They were replaced with a fourth gen master cylinder and Wilwood adjustable portioning valve. To do the bubble flares and work with the metric lines, I purchased the MATCO inline flare kit in the picture. For anyone considering their inline flare tool, save your money. I ended up using the Mastercool hydraulic flare tool we have at work. I'll keep the MATCO kit because I used it, but if you're in the market for a flare tool, the Mastercool set is where it's at. Anyway, I got everything all mounted up and it came out really nice. I have to pull the master out to bench bleed it, then it's ready for final assembly.


Today I was able to reassemble the rear calipers. They came out great. I like the contrast with the silver so much, I'm going to pull my sway bars and have them powder coated silver to break up all the black. It should go nice in the rear with the differential cover too. To go with the freshly rebuilt calipers, I got some new front and rear rotors. They have a black zinc coating on them that will come off the pad surface during break in. Rears arrived during the week and fronts should be in tomorrow. All of my Hawk brake pads and the Big Brake Upgrade parts should be in tomorrow too.


More to come next weekend.
Last edited by Doobie52; Dec 7, 2015 at 12:06 AM.
Thread Starter
Joined: Nov 2008
Posts: 37
Likes: 27
From: NV
Car: 1992 Trans Am
Engine: 6.0 LQ4
Transmission: T56 Magnum F
Axle/Gears: 3.73
Re: My 1992 Trans Am
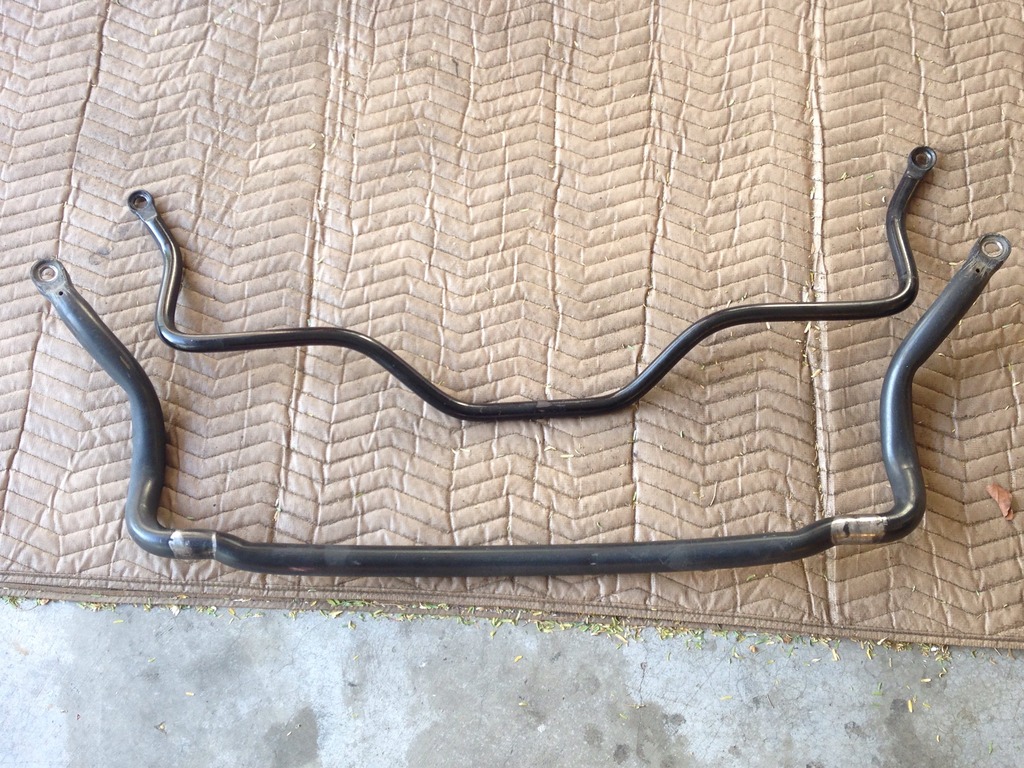
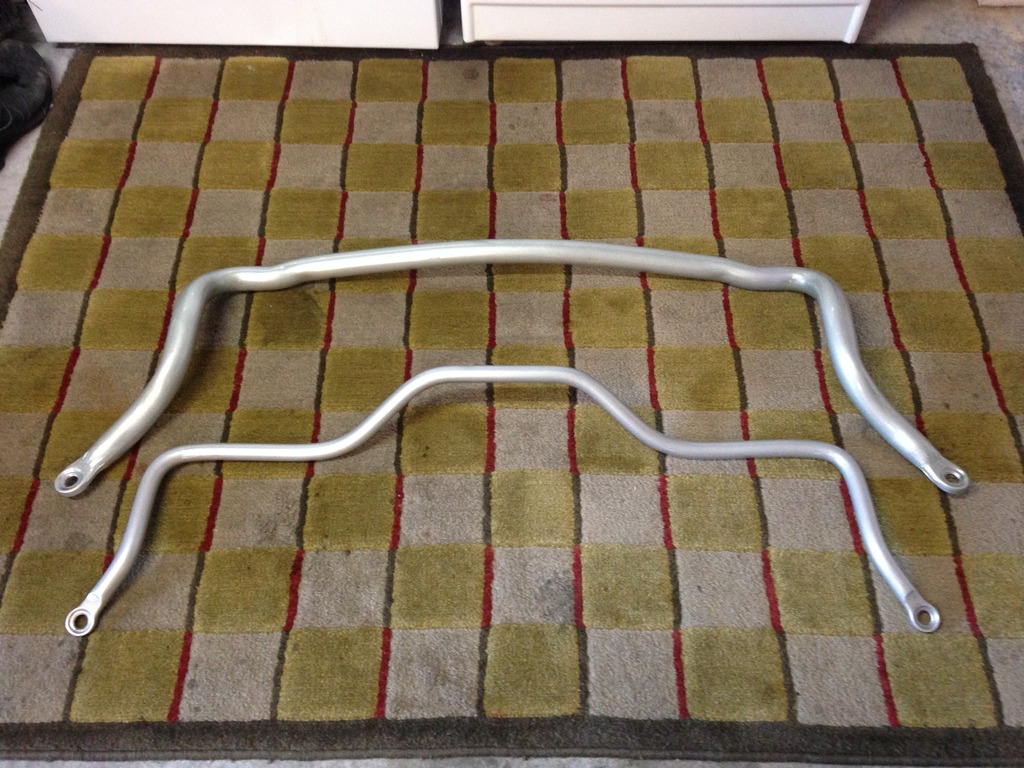
I got some more deliveries today. Hawk rear pads came in along with the hubs and caliper brackets from Big Brake Upgrade. I haven't had a chance to reassemble the rear brakes, but I'll post some pictures as soon as I do. I also pulled my sway bars off, and dropped them off at the powder coater. It was a bit more than I was expecting to spend, but they're getting done in bright silver and then being cleared. Should look good and hold up to some abuse.
For the past couple of months, I've been spending a lot of time on Lateral G and Pro-Touring.com doing research for the suspension for this car. All I'm going to say right now is that I'll be at SEMA this week and I've already been in contact with the guys from RideTech and DSE. Fingers crossed all goes according to plan and budget!


For the past couple of months, I've been spending a lot of time on Lateral G and Pro-Touring.com doing research for the suspension for this car. All I'm going to say right now is that I'll be at SEMA this week and I've already been in contact with the guys from RideTech and DSE. Fingers crossed all goes according to plan and budget!

Joined: Jun 2006
Posts: 2,443
Likes: 74
From: Plant City, FL
Car: 1991 Firebird
Engine: 3.1L V6
Re: My 1992 Trans Am
Keep us updated on what you see and hear while you are at SEMA. I would like to know if anything new is planned for third gens.
Thread Starter
Joined: Nov 2008
Posts: 37
Likes: 27
From: NV
Car: 1992 Trans Am
Engine: 6.0 LQ4
Transmission: T56 Magnum F
Axle/Gears: 3.73
Re: My 1992 Trans Am
For all the fourth gen guys, I did stumble across this new intake manifold from Holley which I haven't really seen being talked about. It's a sheetmetal intake called the Sniper EFI. It slopes down in the back to clear fourth gen cowls. The Holley representative I was talking to said the intake would come with rails, be available in both cathedral and rectangle port configurations, and have a retail price around $500. They'll be available in December. This is something I've been waiting for for a while now as I really wanted a Pro-Flo XT, but didn't want to cut my cowl.


Last edited by Doobie52; Nov 6, 2015 at 02:35 PM.
Thread Starter
Joined: Nov 2008
Posts: 37
Likes: 27
From: NV
Car: 1992 Trans Am
Engine: 6.0 LQ4
Transmission: T56 Magnum F
Axle/Gears: 3.73
Re: My 1992 Trans Am
I don't have time for a good update right now, but I should this weekend. I wanted to get this information out there because I don't know how long the sale will last. Today I came home to this sitting outside my front door.
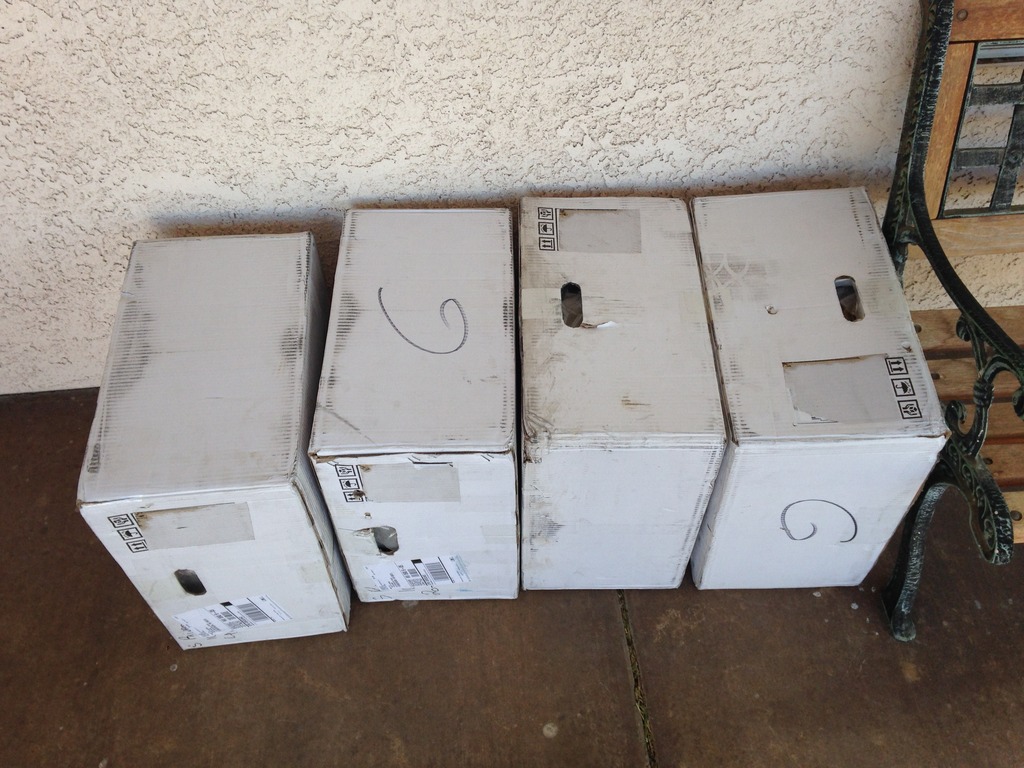
Inside those boxes are these beauties I ordered from Hawk's last week.

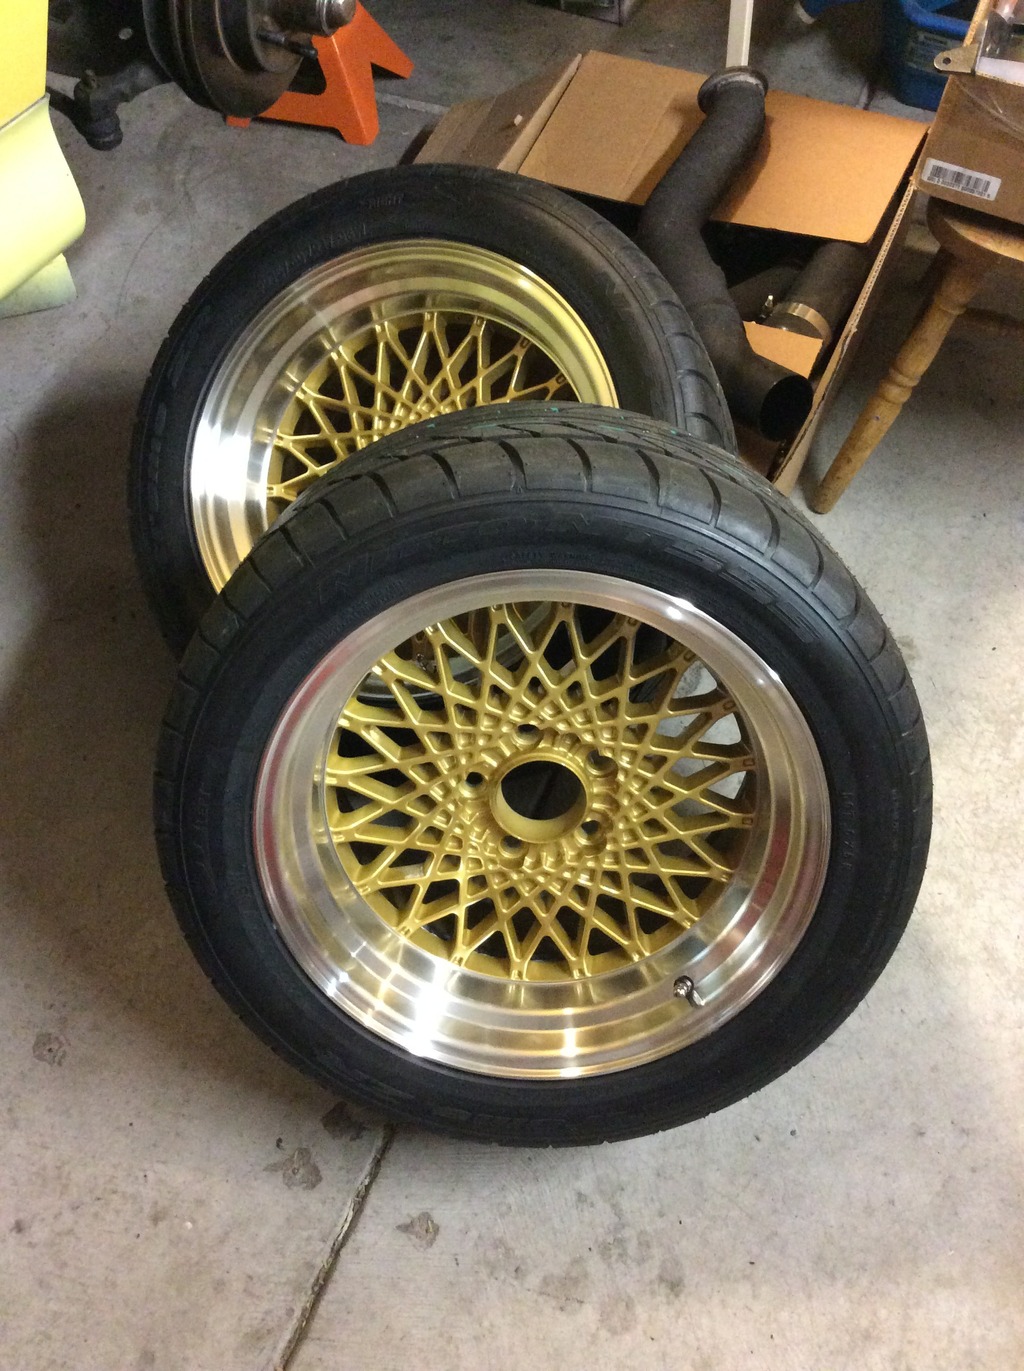
I've had my eyes on these wheels since they came out, and the sale on them right now is a steal. They're usually $1,199 plus another $100 for shipping, and $75 for a new set of center caps. I don't know what sale is currently going on, but I got the wheels, spacers, center caps, and everything shipped for $1,017! I'll post more when time permits, but if you're thinking about a set of these wheels, jump on this sale. Thanks Hawk's!

Inside those boxes are these beauties I ordered from Hawk's last week.

I've had my eyes on these wheels since they came out, and the sale on them right now is a steal. They're usually $1,199 plus another $100 for shipping, and $75 for a new set of center caps. I don't know what sale is currently going on, but I got the wheels, spacers, center caps, and everything shipped for $1,017! I'll post more when time permits, but if you're thinking about a set of these wheels, jump on this sale. Thanks Hawk's!
Last edited by Doobie52; Nov 18, 2015 at 10:03 AM.
Joined: Aug 2013
Posts: 4,795
Likes: 895
From: MICHIGAN
Car: 1988 Trans Am
Engine: L03
Transmission: 700R4
Axle/Gears: 10 Bolt 2.73 Open
Re: My 1992 Trans Am
Excellent! Don't have the $$$ to take advantage of that deal, but thanks for the heads up!
Thread Starter
Joined: Nov 2008
Posts: 37
Likes: 27
From: NV
Car: 1992 Trans Am
Engine: 6.0 LQ4
Transmission: T56 Magnum F
Axle/Gears: 3.73
Thread Starter
Joined: Nov 2008
Posts: 37
Likes: 27
From: NV
Car: 1992 Trans Am
Engine: 6.0 LQ4
Transmission: T56 Magnum F
Axle/Gears: 3.73
Re: My 1992 Trans Am
I really haven't made any progress with the car since the beginning of November, but I did make some decisions on parts (finally) and they've started rolling in. First was the powder coated sway bars I had done in silver to break up all the black in the rear end. They cost a bit more than I was expecting, but the silver really pops in the sunlight, and it's a base and clear powder coat.
Next up was the rear end girdle. I bought it used, so after I received it, I bead blasted it and cleared it so I could just wipe it off to clean it. I couldn't put it on with the old hardware, so after the new stuff came from TA Performance, the cover went on. Looks as good as new. Around the time I did this, I also replaced my old B&M shifter with the new one from MGW. I don't have any pictures, but it's not the look that matters, it's the feel. Tight!

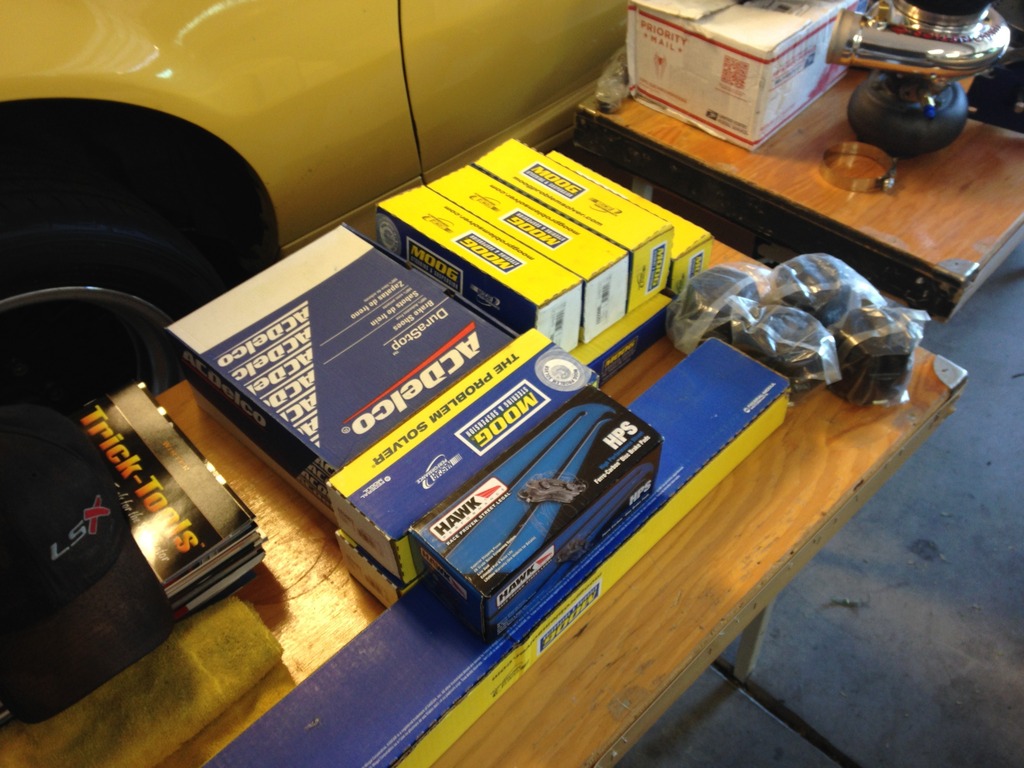
Somewhere in between all this, I received the new front rotors that match the rears, the front brake pads from Hawk, and all new steering parts from MOOG including inner and outer tie-rod ends, idler arm, and a new center link. Tie rod adjusters are coming from UMI as are the new lower control arms for the front. I'd also like to buy a k-member, but that's going to depend on their Black Friday Sale. We'll see. On the table, you'll also notice the complete set of center caps for the new wheels. I'm still super pumped with those. Personally, I think they could pass for a factory wheel, which is the look I prefer over aftermarket wheels.
Now for the suspension. I've had an order in my cart over at Founders Performance for a week now patiently awaiting whether or not they're having a Black Friday Sale. I emailed them about it, but I either didn't receive a response, or if I did, it went into my junk mail folder and I deleted it. Either way, I don't mind waiting another week. I've bought a lot from them and the quality is always excellent. I need a new adjustable panhard bar, a set of strut mounts, some LCA relocation brackets, and I'm going to throw in a panhard relocation kit while I'm back there. I'm going to do exhaust eventually so I might as well give myself all the clearance I can back there.
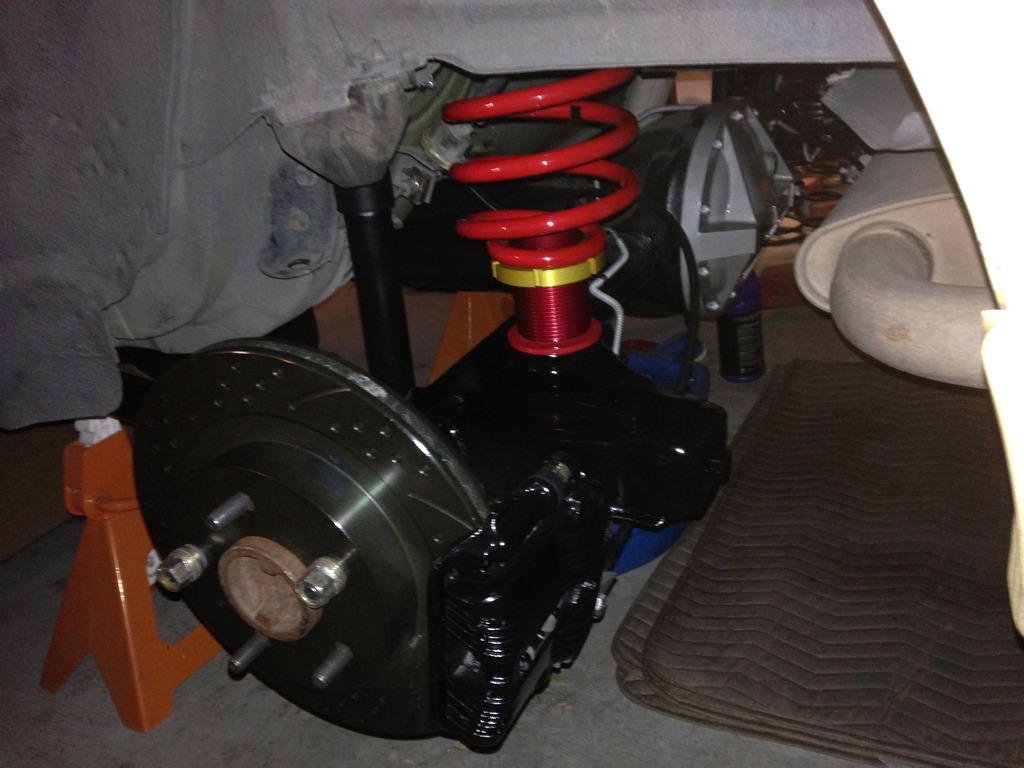
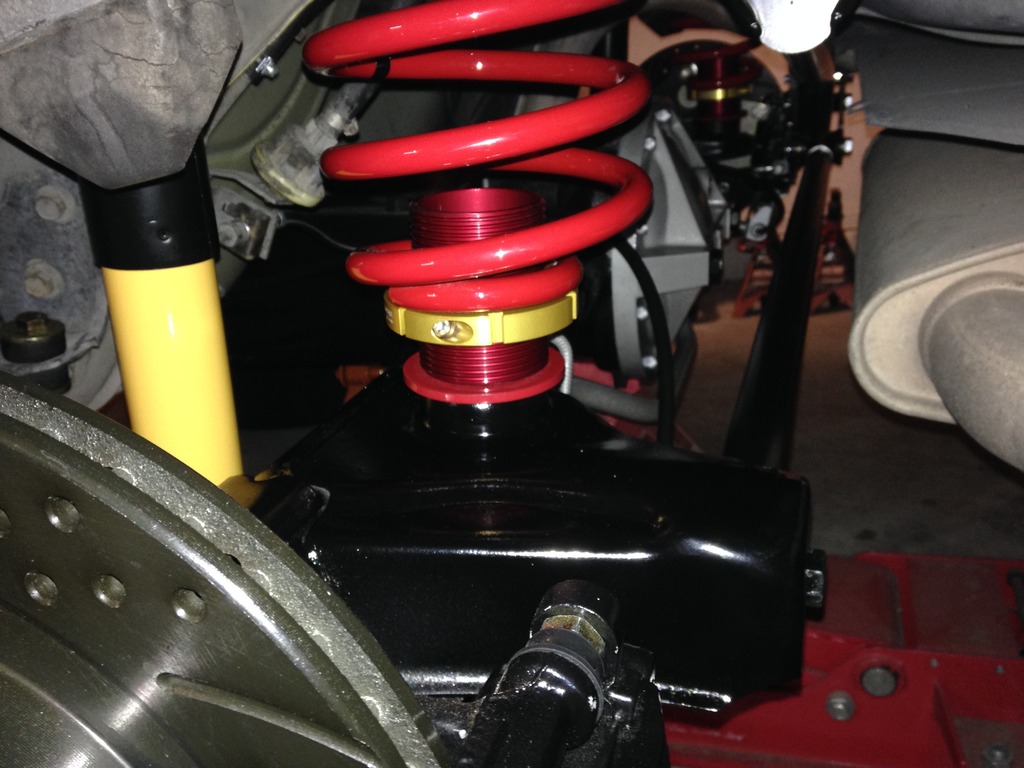
Befor SEMA, I was pretty sold on converting car to front and rear coilovers. A lot of people make setups for the rear, and there's a decent selection of front kits available also. After talking with a bunch of reps at the show, I though I had decided on the UMI kit with Viking Shocks for the rear, and the Spohn kit with QA1 shocks for the front. Just before ordering everything, I stumbled on a thread about weight jacks, and the previously mentioned setup went on hold. I started doing some reading on them and that eventually led to a phone call to Ground Control Suspension. After speaking with a tech named Trevor on Monday, I called him back on Wednesday to place my order. We were on the phone for about 20 minutes while he asked me what I'd be doing with the car, how much power it was making, what type of modifications were done to it, and anything else that helped him determine what springs would be best on the car. I should mention that before I called Trevor again on Wednesday, I ordered a set of KONIs for the car. They'll be here on Monday. Anyway, Trevor took care of everything, even telling me he was going to run his recommendations past some of the more senior techs before filling the order. The springs got here today and I didn't waste any time putting one of the rears in place.
Over the next two weeks I'm just going to enjoy myself, my family, some time off, and let the parts roll in that I need to get it back on the road again. Next update will have the rear completely back together, and then it's on to the front end. Happy Thanksgiving!

Next up was the rear end girdle. I bought it used, so after I received it, I bead blasted it and cleared it so I could just wipe it off to clean it. I couldn't put it on with the old hardware, so after the new stuff came from TA Performance, the cover went on. Looks as good as new. Around the time I did this, I also replaced my old B&M shifter with the new one from MGW. I don't have any pictures, but it's not the look that matters, it's the feel. Tight!

Somewhere in between all this, I received the new front rotors that match the rears, the front brake pads from Hawk, and all new steering parts from MOOG including inner and outer tie-rod ends, idler arm, and a new center link. Tie rod adjusters are coming from UMI as are the new lower control arms for the front. I'd also like to buy a k-member, but that's going to depend on their Black Friday Sale. We'll see. On the table, you'll also notice the complete set of center caps for the new wheels. I'm still super pumped with those. Personally, I think they could pass for a factory wheel, which is the look I prefer over aftermarket wheels.

Now for the suspension. I've had an order in my cart over at Founders Performance for a week now patiently awaiting whether or not they're having a Black Friday Sale. I emailed them about it, but I either didn't receive a response, or if I did, it went into my junk mail folder and I deleted it. Either way, I don't mind waiting another week. I've bought a lot from them and the quality is always excellent. I need a new adjustable panhard bar, a set of strut mounts, some LCA relocation brackets, and I'm going to throw in a panhard relocation kit while I'm back there. I'm going to do exhaust eventually so I might as well give myself all the clearance I can back there.
Befor SEMA, I was pretty sold on converting car to front and rear coilovers. A lot of people make setups for the rear, and there's a decent selection of front kits available also. After talking with a bunch of reps at the show, I though I had decided on the UMI kit with Viking Shocks for the rear, and the Spohn kit with QA1 shocks for the front. Just before ordering everything, I stumbled on a thread about weight jacks, and the previously mentioned setup went on hold. I started doing some reading on them and that eventually led to a phone call to Ground Control Suspension. After speaking with a tech named Trevor on Monday, I called him back on Wednesday to place my order. We were on the phone for about 20 minutes while he asked me what I'd be doing with the car, how much power it was making, what type of modifications were done to it, and anything else that helped him determine what springs would be best on the car. I should mention that before I called Trevor again on Wednesday, I ordered a set of KONIs for the car. They'll be here on Monday. Anyway, Trevor took care of everything, even telling me he was going to run his recommendations past some of the more senior techs before filling the order. The springs got here today and I didn't waste any time putting one of the rears in place.


Over the next two weeks I'm just going to enjoy myself, my family, some time off, and let the parts roll in that I need to get it back on the road again. Next update will have the rear completely back together, and then it's on to the front end. Happy Thanksgiving!
Thread Starter
Joined: Nov 2008
Posts: 37
Likes: 27
From: NV
Car: 1992 Trans Am
Engine: 6.0 LQ4
Transmission: T56 Magnum F
Axle/Gears: 3.73
Re: My 1992 Trans Am
Last Saturday I was able to spend the afternoon in the garage and I got the rear suspension completely together. Everything fit perfectly, and I'm really happy with how it turned out.

Now it's on to the front of the car. I started tearing into it tonight for about an hour, but that's all the time I'll have for it this weekend. After this week, I'm off from work for the next two weeks so I'll have plenty of time to get everything installed. I'm replacing everything.
Last night I got tired of looking at the new rim boxes on the floor so I took the wheels to get some tires mounted. I went with NITTO NT555. I've got the rears mounted on the car, but I have too much crap in my garage right now to get a good picture without moving it all. I'll try and get some updated pictures during the week.


Now it's on to the front of the car. I started tearing into it tonight for about an hour, but that's all the time I'll have for it this weekend. After this week, I'm off from work for the next two weeks so I'll have plenty of time to get everything installed. I'm replacing everything.

Last night I got tired of looking at the new rim boxes on the floor so I took the wheels to get some tires mounted. I went with NITTO NT555. I've got the rears mounted on the car, but I have too much crap in my garage right now to get a good picture without moving it all. I'll try and get some updated pictures during the week.

Thread Starter
Joined: Nov 2008
Posts: 37
Likes: 27
From: NV
Car: 1992 Trans Am
Engine: 6.0 LQ4
Transmission: T56 Magnum F
Axle/Gears: 3.73
Re: My 1992 Trans Am
At work, I spend a lot of time with my students reflecting on the work they do, and today, I did some reflecting myself. I spent some time reading through this thread from the beginning this afternoon. I can't believe I've had this car for three years now. I'm really glad I decided to keep it. When I got it, I was planning an LS swap, then about a year later it turned into an LT swap. Now, I have a Vortec engine sitting on an engine stand in the garage. Talk about indecision! After the suspension and brake overhaul, I'm going to take a break and just enjoy the car for a while before making any major changes again.
After reading through the thread, I though to myself that it wouldn't be a complete overhaul if I didn't change the torque arm and add a set of subframe connectors, so I ordered the parts today from Founders and TDS respectively. I believe they're both in California and everything is marked as shipped so I should see everything at the beginning of next week, just in time for my winter break!
As of right now, the front suspension is completely out of the car and I'm ready to swap the k-member. I also ran into a little issue with the rear. After putting on all the new suspension and the wheels, the car is sitting about 5/8" more over the left wheel than the right. I adjusted the panhard rod as short as it could go, but I'm out of adjustment. To remedy the problem, I was going to cut an inch out of it and weld it back together, but I just went with a UMI panhard rod. It has more adjustment than the Founders piece on the car now. I have one more batch of parts to go to the powder coater and then progress can resume. I'll have some pictures to follow this post during the week.
Happy Holidays to everyone on ThirdGen.org!
Last edited by Doobie52; Jan 9, 2016 at 03:00 PM.
Junior Member
Joined: Jan 2005
Posts: 67
Likes: 0
From: long island n.y.
Car: chevrolet
Engine: lots of em
Re: My 1992 Trans Am
What does your Mom think about that 10second Pontiac you have there kid?
Nice setup you have there and the work you have done looks great.
But whats this stuff of starting a dream job, you left a dream job in NY @ Dr. Daves
and headed out west. Good thing you didnt buy that race fuel guzzling lime green Challenger, I dont think it would have made it to Vegas.
Picking up that Yellow Trans Am sounds like a much better deal, I'm gonna need some wheels next time I get out to The Strip.
Joined: Oct 2001
Posts: 12,211
Likes: 1,135
From: Il
Car: 1989-92 FORMULA350 305 92 Hawkclone
Engine: 4++,350 & 305 CIs
Transmission: 700R4 4800 vig 18th700R4 t56 ZF6 T5
Axle/Gears: 3.70 9"ford alum chunk,dana44,9bolt
Re: My 1992 Trans Am
looking good.
Thread Starter
Joined: Nov 2008
Posts: 37
Likes: 27
From: NV
Car: 1992 Trans Am
Engine: 6.0 LQ4
Transmission: T56 Magnum F
Axle/Gears: 3.73
Re: My 1992 Trans Am
What does your Mom think about that 10second Pontiac you have there kid?
Nice setup you have there and the work you have done looks great.
But whats this stuff of starting a dream job, you left a dream job in NY @ Dr. Daves
and headed out west. Good thing you didnt buy that race fuel guzzling lime green Challenger, I dont think it would have made it to Vegas.
Picking up that Yellow Trans Am sounds like a much better deal, I'm gonna need some wheels next time I get out to The Strip.
Nice setup you have there and the work you have done looks great.
But whats this stuff of starting a dream job, you left a dream job in NY @ Dr. Daves
and headed out west. Good thing you didnt buy that race fuel guzzling lime green Challenger, I dont think it would have made it to Vegas.
Picking up that Yellow Trans Am sounds like a much better deal, I'm gonna need some wheels next time I get out to The Strip.
 Thinking about taking the money and using it to resurrect the silver Formula...again. I actually started making a parts list last week. We'll see. I just had a ton of work done to the house so that should keep my wife at bay for a few months!
 Thanks guys!
Just to keep this thread updated, I accomplished next to nothing over my break. Partly because I was sick for a few days, and partly because my kids planned out my days when they knew I was off from work. Like my dad says, "You don't get that time with them back." I don't regret it one bit. I was able to get the stock k-member out, only to find out that the previous owner installed the Energy Suspension poly mounts wrong and then proceeded to cut the tabs on them and beat the crap out of the block mounts to get everything to fit. Nothing was really salvageable so I've got a set of UMI solid mounts coming. They should be here on Friday along with the new panhard rod. I also got the spindles modified for the LS1 front brakes so all I need to do is bead blast them and then I can drop them off to be powder coated. We're supposed to have some beautiful weather here this weekend so hopefully I'll get in some quality garage time.

Going to get that awesome chrome oil pan nice and shiny before the new k-member goes in.
 Underside looks a lot dirtier in the picture than I remember. Looks like I'll be getting under there with the Simple Green too.
Here you can see the beginning of the tear in the engine mount. Out of the clamshell the split goes from one side to the other. I've never seen a set of poly mounts destroyed like this.
Last edited by Doobie52; Jan 13, 2016 at 09:38 AM. Reason: Added Pictures
Junior Member
Joined: Jan 2005
Posts: 67
Likes: 0
From: long island n.y.
Car: chevrolet
Engine: lots of em
Re: My 1992 Trans Am
Hey Scott you were always a good kid, it was always cool having you around
I'm glad to hear things are good for you and the family out there,
Deb says hello, and Joey cant wait to visit Vegas. Who knows maybe this year.
I would think about putting some headers in there before that k-frame goes back in
Talk to you later, keep up the good work and have fun
I'm glad to hear things are good for you and the family out there,
Deb says hello, and Joey cant wait to visit Vegas. Who knows maybe this year.
I would think about putting some headers in there before that k-frame goes back in
Talk to you later, keep up the good work and have fun