C-Prepared Autox Build
 09-24-2014, 12:27 PM
#51
Member

Thread Starter
iTrader: (3)
Join Date: Nov 2002
Location: Wichita, KS
Posts: 491
Likes: 0
Received 1 Like
on
1 Post
Car: 88 Trans Am GTA
Engine: 5.1L Gen III
Transmission: T56
Axle/Gears: 3.70
Re: C-Prepared Autox Build
I�m way overdue for another update. The 8/10/1 event was one of those days where the car was trying to tell me something but I wasn't listening. For some reason on the drive out the alternator would quit charging and come back, seemingly at random. After stopping and looking for loose terminals and not finding anything I decided to head home. Turned around and it came back and stayed charging 99% of the time. So I turned around again and headed off to the event. Then I get there and the car pitches the serpentine belt for my first 3 runs. I finally short shift it to third and just drive it at a lower RPM. Looks like it�s time to go to a manual/solid adjuster.
Then things got worse.
After my last run, the motor started making a noise. It sounded like valvetrain to me, but somewhat like rod knock. Car still is making 40psi oil pressure at idle. I decided to pull a valvecover and take a quick look. Nothing is loose, all the valves are moving as they should, so I decide to take a friend up on his offer to trailer the car home. Thanks Eric!
Anyway I get home, absolutely beat and dehydrated. I wait for it to cool down outside and drain the oil, just to find bearing material in the oil and filter. At this point I�m disgusted and just let the car sit for 3 weeks.
 09-24-2014, 12:27 PM
#52
Member
Thread Starter
iTrader: (3)
Join Date: Nov 2002
Location: Wichita, KS
Posts: 491
Likes: 0
Received 1 Like
on
1 Post
Car: 88 Trans Am GTA
Engine: 5.1L Gen III
Transmission: T56
Axle/Gears: 3.70
Re: C-Prepared Autox Build
Finally curiosity gets the best of me. I drop the engine one night and disassemble it the next. While pulling it apart I noticed the timing gear bolts are loose on the cam. At that point I�d been going to town with the impact and a 10mm socket to get the oil pump off and covers off. I just figured I�d already loosened them, but not all the way for some reason???
I keep going on the tear down. Front main shows a fair amount of wear as do the cam bearings. Rod bearings look great, so it was never rod knock. I finally go back and take a closer look at the cam gear. There�s fretting marks on the bolt heads as the gear was twisting around the dowel pin as well as marks on the cam retainer plate and rear covers where the cam was sliding around enough to touch. The bearing wear must�ve been from the odd harmonics going on with the timing gear/chain. At least I found the source of the noise, but now I�ve got a tore apart engine with torque to yield bolts.
In retrospect I should�ve just lock tighted the cam bolts back on and reassembled when I found it loose. At the next level, I could�ve had the crank polished, put in ARP bolts, new rings, and just put the motor back together. That�s no fun though.
I went ahead and brought the block/crank rods to the machine shop. All the bores were at .0005-.0015 over, probably fine, except for #8 which for some reason was .0030 out of round. Oh, and the crank should probably be turned.
09-24-2014, 12:29 PM
#53
Member
Thread Starter
iTrader: (3)
Join Date: Nov 2002
Location: Wichita, KS
Posts: 491
Likes: 0
Received 1 Like
on
1 Post
Car: 88 Trans Am GTA
Engine: 5.1L Gen III
Transmission: T56
Axle/Gears: 3.70
Re: C-Prepared Autox Build
At this point I decided it was time to build a legal for my race weight motor. A 4.8L crank in a 5.7 block needs offset ground .010 to get under 5.1L. Something more like .025 destroke should give me room for a .010 overbore/hone, and then deck the block to get the squish back where it needs to be. If I was starting from scratch it would probably be cheaper to buy custom pistons undersize pistons and bore out an aluminum 5.3 block to just under the 5.7 bore size.
I couldn�t find a 4.8L reciprocating assembly. In theory, I could trade my 5.7 crank/rods for 4.8L parts and come out $$$ ahead. In practice nobody has 4.8 parts laying around. I ended up buying an entire �01 80k mile long block for $400 from a local yard. I would�ve loved to have the bushed pin/heavier/stronger rods from an �06+ but those motors were way too much money. Luckily, I was able to sell the 4.8/5.3 long block and LS1 reciprocating assembly for about what I had in the 4.8 a couple weeks later.
My plan for this engine is to make over 400 hp with a smallish cam and some good flowing heads (probably AI) to open up the top end and let it make power well past peak torque. I�m thinking a 7500 rpm rev limit to keep stock rods with ARP bolts intact and to keep hydraulic lifters from floating the valves. Dusting off my 10 year old copy of desktop dyno, the 10% drop of displacement should move the torque band out about 500rpm, so I�m going to stick with the same 224/224 on 112 cam I have now. I don�t have a lot of faith in the program, but that should put my normal shifts around 7,000 or so. To make more power at this displacement I�d have to spin the motor higher. Making a guess of 420 hp at 6750 rpm and assuming the same torque (327ft/lb) at peak power, at 8,000 rpm the motor would make 498hp. There is significant power to be had spinning the motor higher.
But going from a 7,000 rpm motor to an 8000 rpm motor would easily triple the cost. The small bore LS2/LS6 heads wouldn�t really flow any more from the 7,000 rpm motor, but a bigger cam would make more power up top at the cost of low end torque. Lower LSA would help get some of that torque back, leaving a really raucous idle that�s hard to tune. Higher compression would also help with the overlap and get some more torque back, but require race fuel. At that RPM I�d want solid lifters, requiring adjustable valvetrain. To top it off, a wet sump could empty itself in a hurry, requiring changing to a dry sump setup. A FAST intake would help either motor breath better. This may only be 10-15 more HP on the 7,000 motor, but would just about be a necessity on the 8,000 rpm motor for it to make power up high. At that point, I could get a custom destroker crank made and switch to a 4.00� bore block so I can run LS3 style heads�
With the 4.8 crank/rods, I can pretty much use an off the shelf LS1 piston. The compression height is within a thousandth of stock. The only issue is the compression will be lower with the smaller displacement. There�s lots of flat top pistons with valve reliefs out there, but very few dished pistons. These drop the compression a little from stock with a 5.7L, but most people run the smaller chamber, better flowing 243/799 heads to compensate. There�s a few -10cc pistons out there, but they all require bushed (gen 1) .927� pins. Summit�s filtering worked for me here. I was able to find a wiseco piston, PT124A903 that was .005 oversized and had a small -4cc dome. This makes for close to stock 10.4 compression with my current 243 heads. With some milling on the heads, I should be able to get to a pump gas friendly 11:1 easily. Without a lot a large came with a lot of overlap, the gains of higher compression are pretty small.
At this point I've got a plan and I'm waiting on the machine shop.
09-26-2014, 10:26 PM
#54
Member
Re: C-Prepared Autox Build
Torque, torque, torque. How much time do you spend at peak HP/RPM autocrossing? 2% of the time maybe. Build for 7k and save beaucoup bux.
 12-02-2014, 12:35 PM
#56
Member
Thread Starter
iTrader: (3)
Join Date: Nov 2002
Location: Wichita, KS
Posts: 491
Likes: 0
Received 1 Like
on
1 Post
Car: 88 Trans Am GTA
Engine: 5.1L Gen III
Transmission: T56
Axle/Gears: 3.70
Re: C-Prepared Autox Build
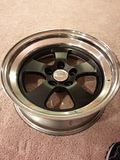
If anybody is working on something similar... I'm selling my second set of wheels.
https://www.thirdgen.org/forums/exte...ml#post5849100
They're Fikse Mags, specs are:
18x12 et19 4.5" lips
18x12 et35 (after 9mm spacer) 3.5" lips
The centers are polished, I was going to plasti dip the centers for contrast, I've done one so you can see what it looks like:
https://www.thirdgen.org/forums/exte...ml#post5849100
They're Fikse Mags, specs are:
18x12 et19 4.5" lips
18x12 et35 (after 9mm spacer) 3.5" lips
The centers are polished, I was going to plasti dip the centers for contrast, I've done one so you can see what it looks like:


 12-27-2014, 09:52 AM
#57
Member

Re: C-Prepared Autox Build
Read the whole thing, nice job so far very well thought out. Nice job on all the weight savings. You find em everywhere!
12-29-2014, 08:00 PM
#58
Junior Member

Re: C-Prepared Autox Build
Your engine bay is so clean...
Drooling...
Drooling...
08-13-2015, 12:15 PM
#59
Member
Thread Starter
iTrader: (3)
Join Date: Nov 2002
Location: Wichita, KS
Posts: 491
Likes: 0
Received 1 Like
on
1 Post
Car: 88 Trans Am GTA
Engine: 5.1L Gen III
Transmission: T56
Axle/Gears: 3.70
Re: C-Prepared Autox Build
Having a kid has taken a lot of my wrenching time away, he's 8 months old now!
Between sleep deprivation, visiting grand parents, and then getting sick from him every other weekend when he got into day care I lost a bit of motivation too. Anyway, he sleeps through the night now and goes to bed early so I've got an hour or so every night I can work. Allot of my plans have been scaled back and it's still taking too long, but there is progress.
Last weekend I got some heat shielding in place. It was DEI, and not really that expensive, $35 for ~2'x2'. I probably should've bought more and done the whole tunnel, but I didn't want to wait for more so I just did by the exhaust. Hopefully no more hot feet. I have some really lightweight stuff to in on the inside at some point if I put down oxcite for carpet.
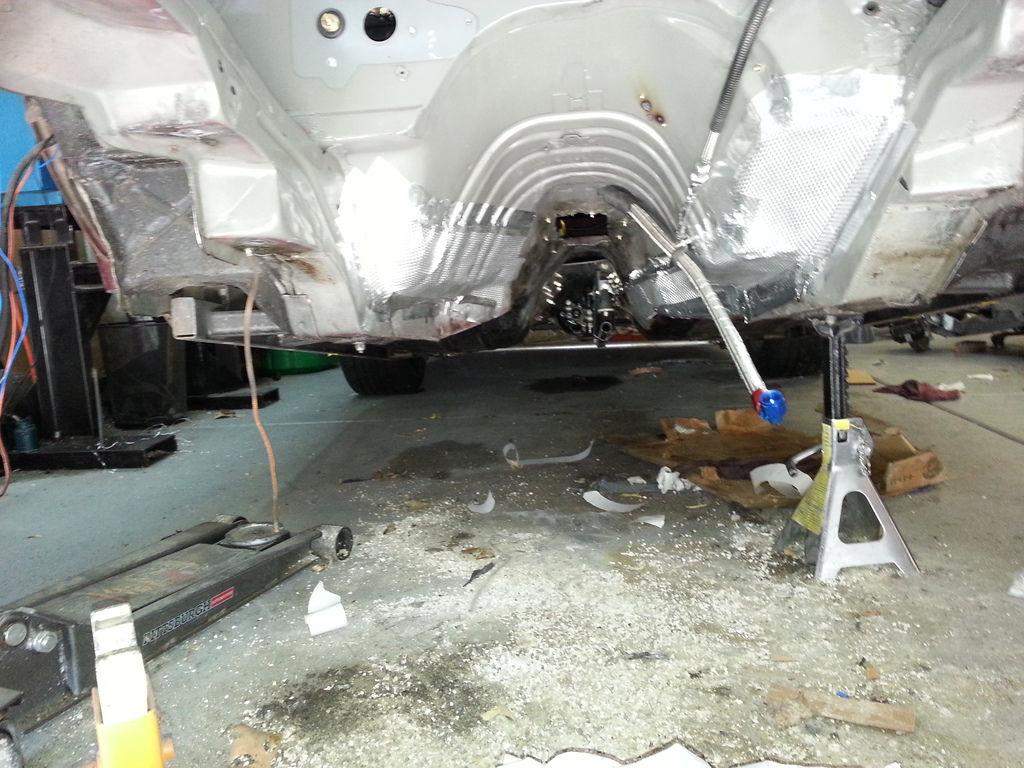
And here she is ready to drop in. In hindsight, boring out a 5.3 block and getting custom pistons would've been easier. Instead it's a .010 over LS1 block (that I already had) with a slightly offset ground 4.8L crank to get it just under 5.1. My machinist couldn't do this in house so it took 10x longer than it should have. Pistons are +4cc Wiseco, which despite being GEN III dimensions were setup for bushed GEN IV rods. Since I wanted to reused the stock 4.8 rods, we ended up honing the small end a little and drilling an oiling hole along with installing the L19 ARP bolts. This should be fine for a race motor, but won't last forever. After all that trouble I wish I would've just bit the bullet on long aftermarket SBC rods even if they're not quite the right offset for an LS1.
Heads are milled 232cc 799 castings from AI and I'll just be using the stock LS6 intake with a ported TB for a while longer. It should be just a hair under 11 to 1 compression. Cam is still the TR224/224 on 112. Will probably go to a 228/228 on 110 at some point or a little bigger. I went ahead and sprung for morel 5315 lifters that hopefully will be able to take the extra rpms.
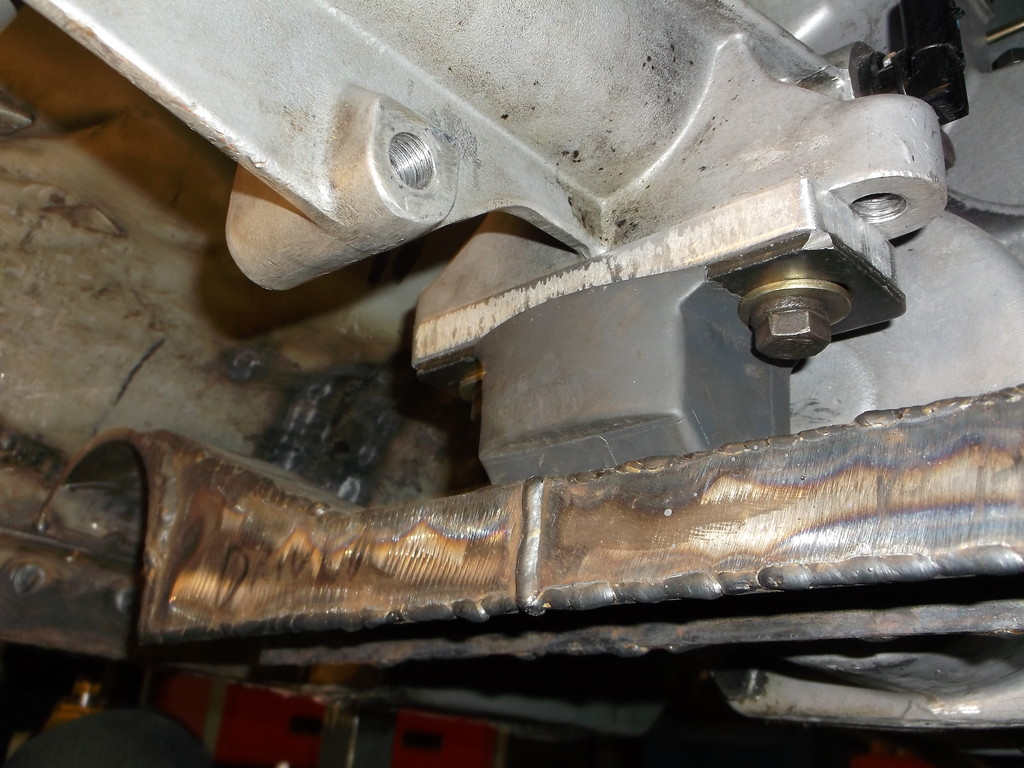
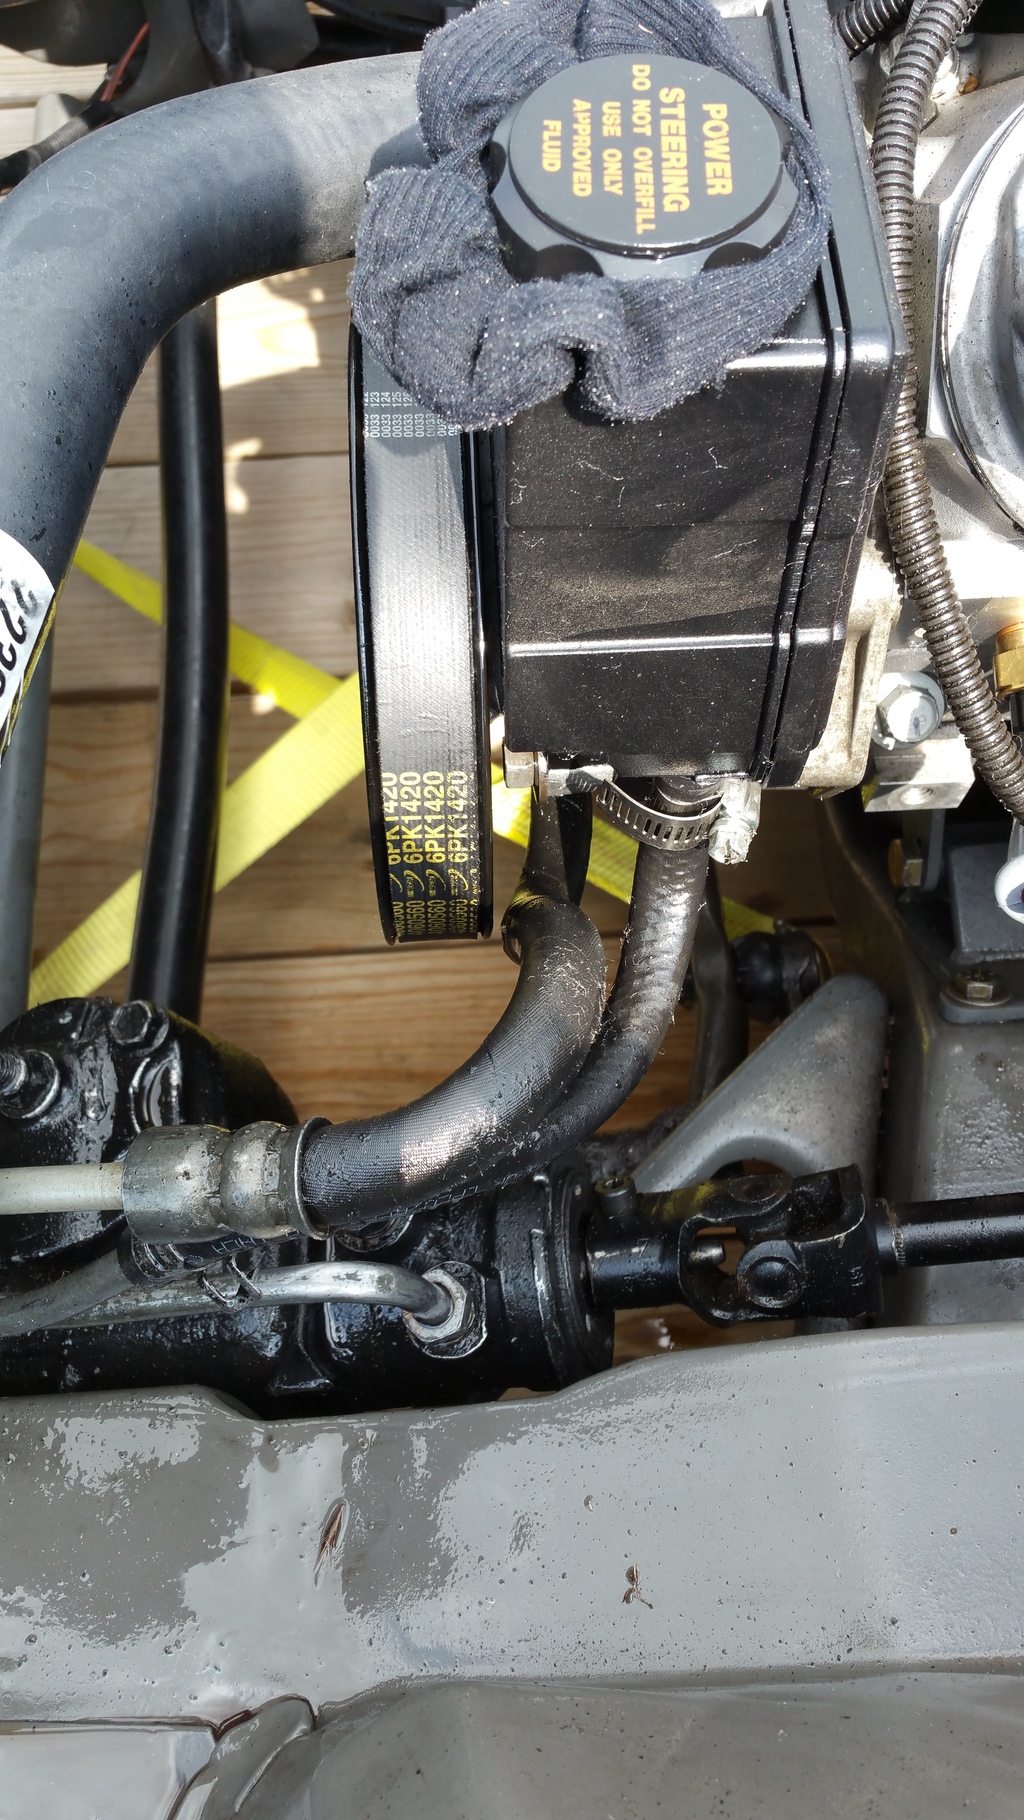
I put in a CS-121 alternator refurb from rock auto (~8lb) and a custom mount to put it on the passenger side. This really didn't work the way I intended and I'm not happy with how the belt touches the crank pulley two times. I think this may push the belt off the power steering pulley. The fix will be to move the idler to the same location as the stock one on the driver side of the motor, but I figured I'd give this a shot first. The plumbing is going to route to a davies craig EWP with their controller. With my huge ballast/battery I should be able to cool the car down completely between runs even if the EWP can't quite keep up during runs.
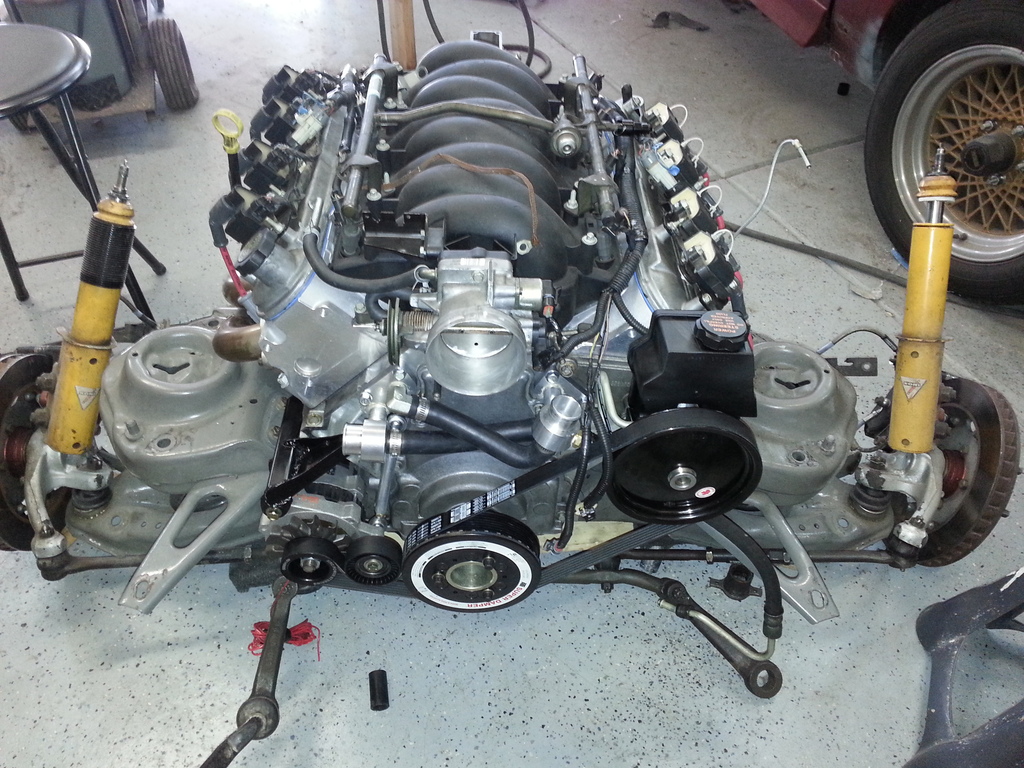
The front accessories should be 20lbs lighter now with the ATI balancer and aluminum power steering pump. Clutch should be 17lbs lighter, with the spec aluminum pressure plate and fidanza flywheel over the ls7/ram clutch/flywheel I had before. The lexan windshield should save another 20. I still want to do coilovers, but that's going to have to wait until this fall. I ran out of time to figure out the rack and pinion so that will have to wait indefinitely, but at least now the alternator is now out of the way.
Right now the engine is sitting in the car, but I have a few things to finish up before firing it.

Between sleep deprivation, visiting grand parents, and then getting sick from him every other weekend when he got into day care I lost a bit of motivation too. Anyway, he sleeps through the night now and goes to bed early so I've got an hour or so every night I can work. Allot of my plans have been scaled back and it's still taking too long, but there is progress.
Last weekend I got some heat shielding in place. It was DEI, and not really that expensive, $35 for ~2'x2'. I probably should've bought more and done the whole tunnel, but I didn't want to wait for more so I just did by the exhaust. Hopefully no more hot feet. I have some really lightweight stuff to in on the inside at some point if I put down oxcite for carpet.

And here she is ready to drop in. In hindsight, boring out a 5.3 block and getting custom pistons would've been easier. Instead it's a .010 over LS1 block (that I already had) with a slightly offset ground 4.8L crank to get it just under 5.1. My machinist couldn't do this in house so it took 10x longer than it should have. Pistons are +4cc Wiseco, which despite being GEN III dimensions were setup for bushed GEN IV rods. Since I wanted to reused the stock 4.8 rods, we ended up honing the small end a little and drilling an oiling hole along with installing the L19 ARP bolts. This should be fine for a race motor, but won't last forever. After all that trouble I wish I would've just bit the bullet on long aftermarket SBC rods even if they're not quite the right offset for an LS1.
Heads are milled 232cc 799 castings from AI and I'll just be using the stock LS6 intake with a ported TB for a while longer. It should be just a hair under 11 to 1 compression. Cam is still the TR224/224 on 112. Will probably go to a 228/228 on 110 at some point or a little bigger. I went ahead and sprung for morel 5315 lifters that hopefully will be able to take the extra rpms.
I put in a CS-121 alternator refurb from rock auto (~8lb) and a custom mount to put it on the passenger side. This really didn't work the way I intended and I'm not happy with how the belt touches the crank pulley two times. I think this may push the belt off the power steering pulley. The fix will be to move the idler to the same location as the stock one on the driver side of the motor, but I figured I'd give this a shot first. The plumbing is going to route to a davies craig EWP with their controller. With my huge ballast/battery I should be able to cool the car down completely between runs even if the EWP can't quite keep up during runs.

The front accessories should be 20lbs lighter now with the ATI balancer and aluminum power steering pump. Clutch should be 17lbs lighter, with the spec aluminum pressure plate and fidanza flywheel over the ls7/ram clutch/flywheel I had before. The lexan windshield should save another 20. I still want to do coilovers, but that's going to have to wait until this fall. I ran out of time to figure out the rack and pinion so that will have to wait indefinitely, but at least now the alternator is now out of the way.
Right now the engine is sitting in the car, but I have a few things to finish up before firing it.
Last edited by Roostmeyer; 06-06-2016 at 08:45 AM.
08-13-2015, 12:18 PM
#60
Member
Thread Starter
iTrader: (3)
Join Date: Nov 2002
Location: Wichita, KS
Posts: 491
Likes: 0
Received 1 Like
on
1 Post
Car: 88 Trans Am GTA
Engine: 5.1L Gen III
Transmission: T56
Axle/Gears: 3.70
Re: C-Prepared Autox Build
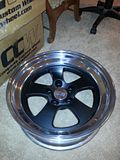
Also, I finally assembled the 18x12 fikses. Since these fikses were (are?) for sale they were much closer to being done than my other set of CCW's I need to re-assemble into 18x12's. I used some of Madarash's old CCW parts. The ID of the centers/barrels were the same, but being ccw 30 5/16" bolt and fikse's being 20 1/4" bolts I had to do some match drilling. I cut a drill bushing that fits in the lightening holes on the CCW centers and used that to put in 10 extra 1/4" holes in the lips and front barrels. Then for the fronts I cut 2x 10 ~.332" OD .254" ID bushings. These went in the 10 5/16" original CCW holes I was using to help keep everything sheared up. I was reusing the fikse barrels in the back so I didn't bother with bushings there.
Bad photo of the backside during assembly showing the bushings:
I'm pretty happy with how they came out.
Bad photo of the backside during assembly showing the bushings:

I'm pretty happy with how they came out.

Last edited by Roostmeyer; 06-06-2016 at 08:45 AM.
08-14-2015, 08:57 AM
#61
Junior Member

Re: C-Prepared Autox Build
Looking good Ryan. The belt arrangement is different, I wonder if that will be fine or not, either way I like the Alt. location, nice and low.
08-20-2015, 05:41 PM
#62
Junior Member
Join Date: Aug 2015
Location: Portland Oregon
Posts: 74
Likes: 0
Received 0 Likes
on
0 Posts
Car: 1991 Chevrolet Camaro Z28
Engine: 421 SBC
Transmission: Powerglide
Axle/Gears: 4.56
Re: C-Prepared Autox Build
Love reading through this build, great stuff.
10-15-2015, 01:13 PM
#63
Member
Join Date: Sep 2014
Location: south central Texas
Posts: 474
Likes: 0
Received 0 Likes
on
0 Posts
Car: BUILDING 1985 HARD TOP T/A
Engine: sbc
Transmission: stick
Axle/Gears: GM
Re: C-Prepared Autox Build
So, if moving the engine /trans back 3" moved the weight distribution from 60/40 to 57/43... would that translate to 51/49 if the engine /trans was moved back 8"?
10-15-2015, 01:16 PM
#64
Member
Join Date: Sep 2014
Location: south central Texas
Posts: 474
Likes: 0
Received 0 Likes
on
0 Posts
Car: BUILDING 1985 HARD TOP T/A
Engine: sbc
Transmission: stick
Axle/Gears: GM
Re: C-Prepared Autox Build
I'm not trying to build my car to meet any particular set of class rules. .. just trying to build the best car I can for all around driving /handling.
12-11-2015, 01:02 AM
#65
Member
Join Date: Sep 2014
Location: south central Texas
Posts: 474
Likes: 0
Received 0 Likes
on
0 Posts
Car: BUILDING 1985 HARD TOP T/A
Engine: sbc
Transmission: stick
Axle/Gears: GM
Re: C-Prepared Autox Build
I guess I'll just have to figure that out myself.
Hope your build goes well.
Hope your build goes well.
12-11-2015, 07:57 PM
#66
Member
Re: C-Prepared Autox Build
Yeah that might be too hard to figure out on a theoretical basis. A team of engineers could do it on a car they knew really well.
12-15-2015, 09:37 AM
#68
Member
Thread Starter
iTrader: (3)
Join Date: Nov 2002
Location: Wichita, KS
Posts: 491
Likes: 0
Received 1 Like
on
1 Post
Car: 88 Trans Am GTA
Engine: 5.1L Gen III
Transmission: T56
Axle/Gears: 3.70
Re: C-Prepared Autox Build
Shifting the wheelbase is where you get a ~1% shift for 1" of shift of both axles or a .5% shift per 1" on a single axle. We have a 101" wheelbase, so the math is pretty easy if you just round that down to 100". If you moved the front wheel base forward 5" and the back axle forward 1" you should get a ~3% shift in CG.
All this is theoretical of course, and impossible with our cars, but I'd say 53-55% rear weight with equal sized front and rear tires would be close to ideal. 50/50 is just marketing BS. Just get as much weight as you can off the front end. The car will hook up better and your differential will have a much easier time avoiding one wheel peel.
As for my build, it's going slowly. I'm currently working on relocating chassis LCA mounts inboard to help clear the 345's in back. I should have an update this weekend. I had the front end off the car for paint, but after talking with several body shop guys I need to really get it back together. If I go back with the factory flame red metallic the pearl/metallic in the paint won't lay consistently painted at different times and/or angles.
Last edited by Roostmeyer; 12-15-2015 at 09:42 AM.
12-15-2015, 11:02 AM
#69
Member
Join Date: Sep 2014
Location: south central Texas
Posts: 474
Likes: 0
Received 0 Likes
on
0 Posts
Car: BUILDING 1985 HARD TOP T/A
Engine: sbc
Transmission: stick
Axle/Gears: GM
Re: C-Prepared Autox Build
Hey, I really appreciate it.
I'm not going to be able to afford the time off, so I'll be sending the car to RaceFab ( Rusk, Tx ), to cut the nose off & build a tubular core support w/rad relocation. Move the engine /Trans back & down ( dry sump ), move the rear frame rails &suspension points inboard 1" ( to clear a 345 tire & 6.5" backspace rim ), & lastly, a fully integrated cage.
I wish that I had the time & facilities to do it myself, but I work out on the road 95% of the year.
Love what you have done with your ride.
12-23-2015, 02:12 PM
#70
Member
Re: C-Prepared Autox Build
Do you know what your driveshaft angles are? I run a t56 as well and have found that its impossible to bring the driveline to correct angles in my lowered car. Did you do mods to the tunnel?
12-25-2015, 09:52 AM
#71

Re: C-Prepared Autox Build
Colt, I have the engine/trans angled down at 2 degrees and plan on setting the pinion angle between 0 and 2 degrees down as well. My rear axle is mounted with all heim joints, so my pinion angle won't ride up as much as it would if mounted with poly or rubber bushings.
I originally set the car up with a 700R4 trans and a 305 all mounted in the stock location with the same angles as above. When I switched over to the TKO 600 The mounting pad on the trans was set much higher than the 700R4 and the trans was angled down more than 5 degrees. If I just raised the trans back up to get the original 2 degree angle it would have put the driveshaft through the top of the tunnel. To get everything back in place I had to lower the engine 1 inch and raise the the trans mount 1/2 inch.
The other necessary mod is to the trans tunnel above the transmission. The T56 and the TKO transmissions do not taper down from the bellhousing like the automatics do, the top surface stays relatively flat all the way to the shifter housing. You can't just cut a hole in the tunnel for the shifter and call it good. You will end up cutting an 8" wide by 12" to 15" long rectangle out of the tunnel starting a couple inches behind the shifter and going forward towards the engine. You will have to fabricate a raised cover plate as the trans will protrude through this opening.
Pics of tunnel mods
I was able to just make a simple 1/2" thick spacer out of aluminum to raise the rear of the trans.
Hope this helps
Dave
I originally set the car up with a 700R4 trans and a 305 all mounted in the stock location with the same angles as above. When I switched over to the TKO 600 The mounting pad on the trans was set much higher than the 700R4 and the trans was angled down more than 5 degrees. If I just raised the trans back up to get the original 2 degree angle it would have put the driveshaft through the top of the tunnel. To get everything back in place I had to lower the engine 1 inch and raise the the trans mount 1/2 inch.
The other necessary mod is to the trans tunnel above the transmission. The T56 and the TKO transmissions do not taper down from the bellhousing like the automatics do, the top surface stays relatively flat all the way to the shifter housing. You can't just cut a hole in the tunnel for the shifter and call it good. You will end up cutting an 8" wide by 12" to 15" long rectangle out of the tunnel starting a couple inches behind the shifter and going forward towards the engine. You will have to fabricate a raised cover plate as the trans will protrude through this opening.
Pics of tunnel mods


I was able to just make a simple 1/2" thick spacer out of aluminum to raise the rear of the trans.

Hope this helps
Dave
01-27-2016, 01:06 PM
#72
Member
Join Date: Nov 2013
Location: Los Angeles
Posts: 186
Likes: 0
Received 1 Like
on
1 Post
Car: 2004 Mazda RX-8
Engine: 1.3l Renesis
Axle/Gears: \
Re: C-Prepared Autox Build
Sorry, for some reason I didn't see this. I'm making a few assumptions, but moving 600lbs back 8" in the car works out to move 48lbs from the front of the car to the rear, or about 1.4% cg shift on a 3400lb car. Removing A/C and the front crash bar should get you a greater shift in CG with a lot less effort.
Shifting the wheelbase is where you get a ~1% shift for 1" of shift of both axles or a .5% shift per 1" on a single axle. We have a 101" wheelbase, so the math is pretty easy if you just round that down to 100". If you moved the front wheel base forward 5" and the back axle forward 1" you should get a ~3% shift in CG.
All this is theoretical of course, and impossible with our cars, but I'd say 53-55% rear weight with equal sized front and rear tires would be close to ideal. 50/50 is just marketing BS. Just get as much weight as you can off the front end. The car will hook up better and your differential will have a much easier time avoiding one wheel peel.
As for my build, it's going slowly. I'm currently working on relocating chassis LCA mounts inboard to help clear the 345's in back. I should have an update this weekend. I had the front end off the car for paint, but after talking with several body shop guys I need to really get it back together. If I go back with the factory flame red metallic the pearl/metallic in the paint won't lay consistently painted at different times and/or angles.
 02-03-2016, 08:32 AM
#75
Member
Thread Starter
iTrader: (3)
Join Date: Nov 2002
Location: Wichita, KS
Posts: 491
Likes: 0
Received 1 Like
on
1 Post
Car: 88 Trans Am GTA
Engine: 5.1L Gen III
Transmission: T56
Axle/Gears: 3.70
Re: C-Prepared Autox Build
Wow, it’s been 6 months since I last updated this… Looks like notifications stopped working on this thread for some reason. I don't think nationals are going to happen this year. The car will make it sooner or later, if only because of proximity. I can tow the car 2 hours to Topeka, hitch it up on the parent's RV and be in Lincoln in another 2 hours and stay all week for nothing but a little gas money.
Dave, Looking at your photos I was thinking huh, that's about where my shifter is... then I realized that's in the mid-trans position, not the tailshaft! Should be a neat build. I probably would've pursued some setback if I could legally. I understand why the rules are there, but getting to the max 51% rear weight is going to cost a lot more money than cutting and welding up the firewall, or redoing the suspension and fenders to move the front wheelbase forward more than the allow 1".
As for my driveshaft angle, I haven't looked at that in years, but I think my pinion flange is lower than the output shaft, I'm thinking there's about a 1-2� angle.
Flipping through my phone I have about 10 photos of the kid for every car photo, so it’s easy to see why progress has been so slow.
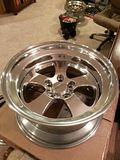
In November I tried to get the car out to the last autocross of the season. The car is disassembled for paint, but nothing that should be unsafe for an autocross. I went out to help with course setup and do a little informal test and tuning. I mainly just wanted to make sure the tires cleared and that the tune would be safe enough to beat on it some. It was all for naught. The clutch started slipping at anything more than 25% throttle. Apparently in my haste to reassemble I forgot to measure the clutch engagement and never removed the shims I had used with the old LS7 clutch. I put it back on the new trailer and went home. It was slipping at too low of a load to even get any useful data logging done for the tune.
At least the new wheels/tires look nice:
I need to get sponsored by Arby’s “We have the meat”

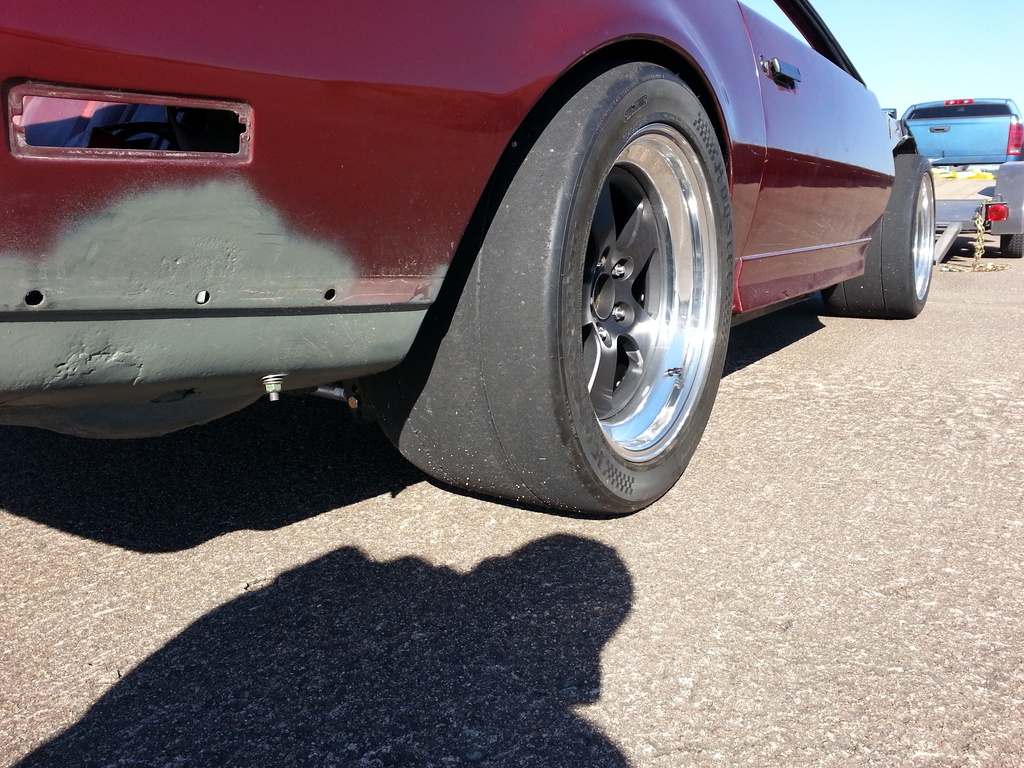
The clutch shims have been removed and I decided to tackle the tires rubbing. The rear tires were rubbing on the inside in two places on the driver side. I mini-tubbed that side first and there’s about �” less clearance at top than on the passenger side. Also the tire was rubbing slightly on the LCA’s on both sides.
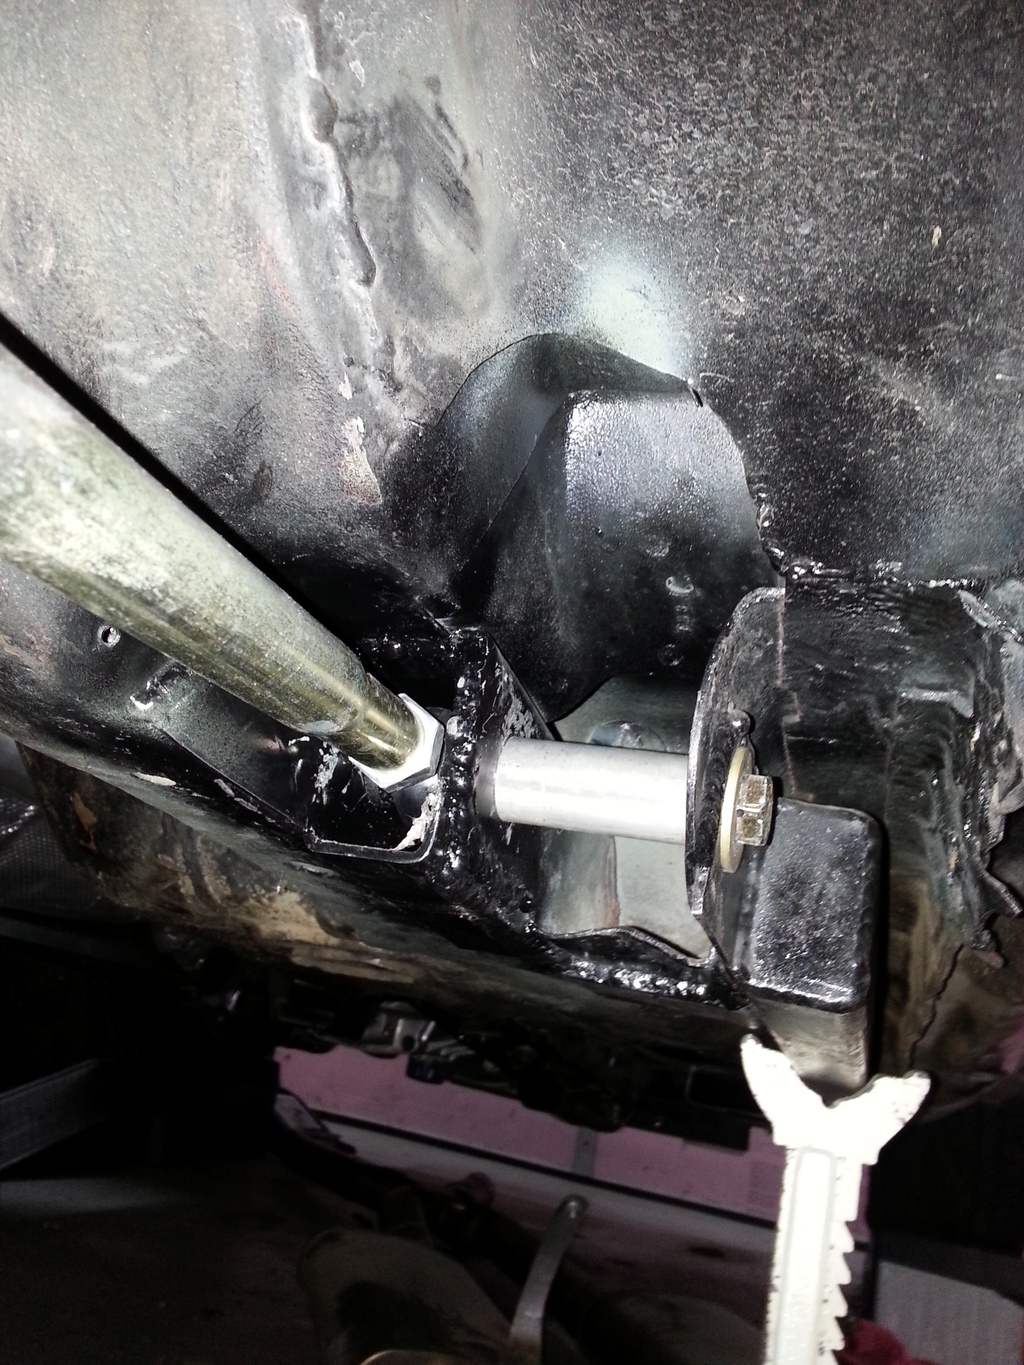
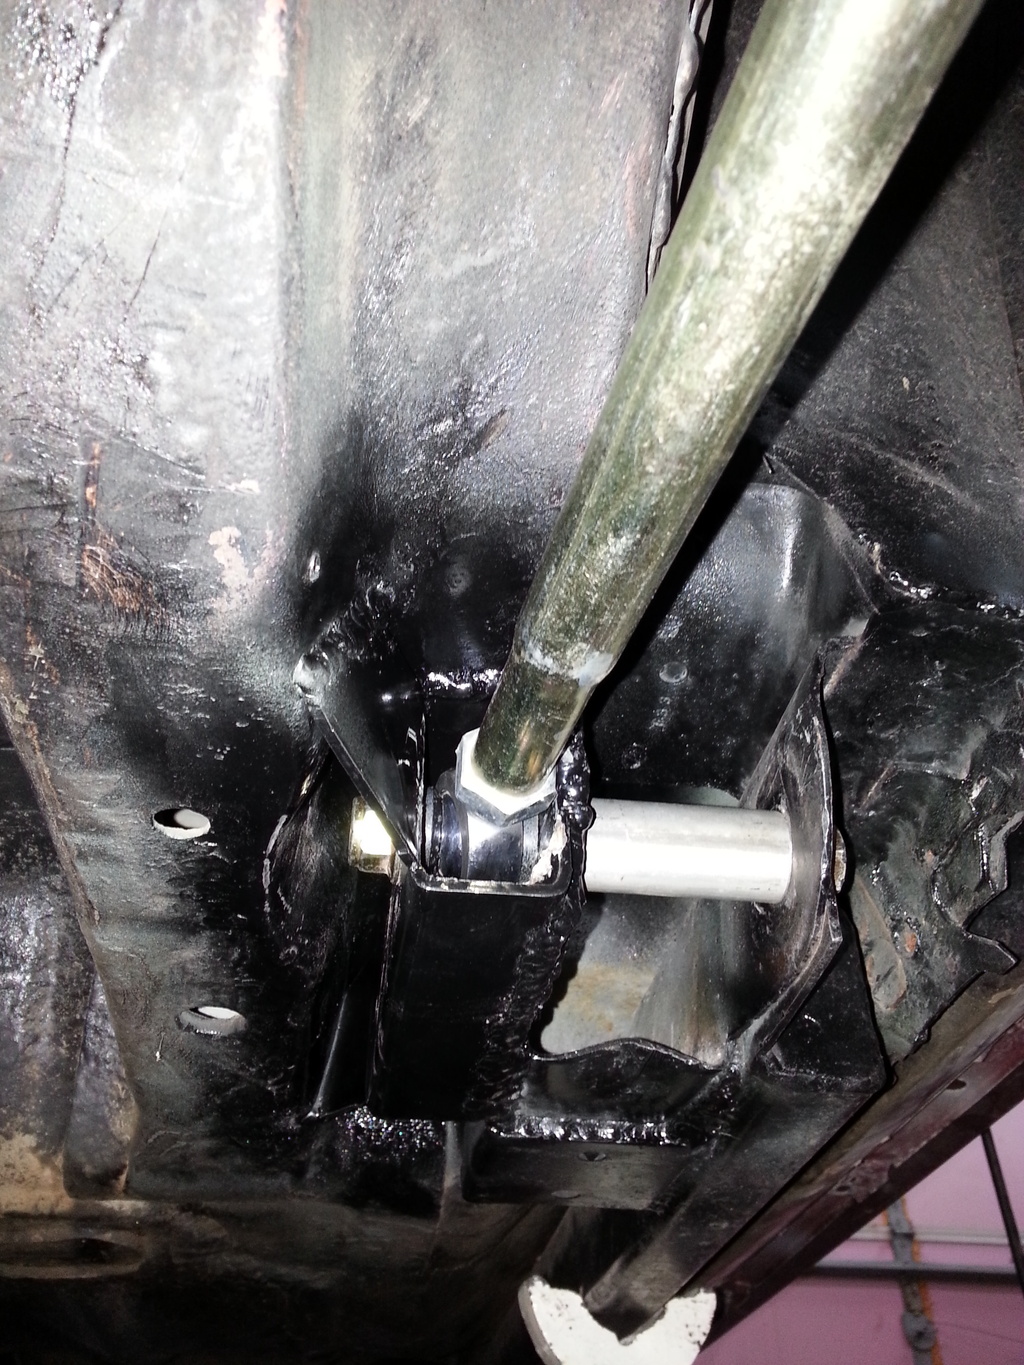
After looking at it a bit, I ordered some 1.5x2.5x.125 rectangular tubing and went about making a new LCA mount moved inboard 1.5” from stock. An aluminum spacer keeps from crushing the original double shear mount and a long 4.5” bolt now goes through both. I call it triple shear mounts. I think skewing the front LCA mount inboard may affect roll steer a little, but shouldn't make too much of a difference. My main concern was making sure they didn't bind through full suspension travel. I also adjusted the panhard over a bit so everything should clear now.
On my plate next, I need to figure out how to do removable lexan side windows and clean up the doors in general. I’m planning on making a window mount frame out of �” square steel tubing and sliding it 3/4” tubing inside the door. Then use a pull pin or something to secure it. I’m planning on going through the front suspension as well. I’m thinking of using dirt track strut type lower control arms with coilovers up front which would convert it all over to rod ends. With a short enough spring I should be able to do this without sacrificing tire clearance. This would also let me adjust the track and wheelbase as I see fit. Then the front sway bars need to be converted to use rod end links.
I also need to reassemble some of the body work and start sanding and filling. After doing more research, it sounds like I really need to spray most if not all of the body panels assembled or the metallic paint (going back with the original flame red metallic) won’t lay down consistently.
Dave, Looking at your photos I was thinking huh, that's about where my shifter is... then I realized that's in the mid-trans position, not the tailshaft! Should be a neat build. I probably would've pursued some setback if I could legally. I understand why the rules are there, but getting to the max 51% rear weight is going to cost a lot more money than cutting and welding up the firewall, or redoing the suspension and fenders to move the front wheelbase forward more than the allow 1".
As for my driveshaft angle, I haven't looked at that in years, but I think my pinion flange is lower than the output shaft, I'm thinking there's about a 1-2� angle.
Flipping through my phone I have about 10 photos of the kid for every car photo, so it’s easy to see why progress has been so slow.
In November I tried to get the car out to the last autocross of the season. The car is disassembled for paint, but nothing that should be unsafe for an autocross. I went out to help with course setup and do a little informal test and tuning. I mainly just wanted to make sure the tires cleared and that the tune would be safe enough to beat on it some. It was all for naught. The clutch started slipping at anything more than 25% throttle. Apparently in my haste to reassemble I forgot to measure the clutch engagement and never removed the shims I had used with the old LS7 clutch. I put it back on the new trailer and went home. It was slipping at too low of a load to even get any useful data logging done for the tune.
At least the new wheels/tires look nice:

I need to get sponsored by Arby’s “We have the meat”

The clutch shims have been removed and I decided to tackle the tires rubbing. The rear tires were rubbing on the inside in two places on the driver side. I mini-tubbed that side first and there’s about �” less clearance at top than on the passenger side. Also the tire was rubbing slightly on the LCA’s on both sides.
After looking at it a bit, I ordered some 1.5x2.5x.125 rectangular tubing and went about making a new LCA mount moved inboard 1.5” from stock. An aluminum spacer keeps from crushing the original double shear mount and a long 4.5” bolt now goes through both. I call it triple shear mounts. I think skewing the front LCA mount inboard may affect roll steer a little, but shouldn't make too much of a difference. My main concern was making sure they didn't bind through full suspension travel. I also adjusted the panhard over a bit so everything should clear now.


On my plate next, I need to figure out how to do removable lexan side windows and clean up the doors in general. I’m planning on making a window mount frame out of �” square steel tubing and sliding it 3/4” tubing inside the door. Then use a pull pin or something to secure it. I’m planning on going through the front suspension as well. I’m thinking of using dirt track strut type lower control arms with coilovers up front which would convert it all over to rod ends. With a short enough spring I should be able to do this without sacrificing tire clearance. This would also let me adjust the track and wheelbase as I see fit. Then the front sway bars need to be converted to use rod end links.
I also need to reassemble some of the body work and start sanding and filling. After doing more research, it sounds like I really need to spray most if not all of the body panels assembled or the metallic paint (going back with the original flame red metallic) won’t lay down consistently.
Last edited by Roostmeyer; 06-06-2016 at 08:44 AM.
02-03-2016, 08:41 AM
#76
Member
Join Date: Sep 2014
Location: south central Texas
Posts: 474
Likes: 0
Received 0 Likes
on
0 Posts
Car: BUILDING 1985 HARD TOP T/A
Engine: sbc
Transmission: stick
Axle/Gears: GM
Re: C-Prepared Autox Build
Still like the car, just really liked the old wheels.
I truly understand performance over appearance though.
Keep up the good work
I truly understand performance over appearance though.
Keep up the good work
02-03-2016, 08:49 AM
#77
Member
Thread Starter
iTrader: (3)
Join Date: Nov 2002
Location: Wichita, KS
Posts: 491
Likes: 0
Received 1 Like
on
1 Post
Car: 88 Trans Am GTA
Engine: 5.1L Gen III
Transmission: T56
Axle/Gears: 3.70
Re: C-Prepared Autox Build
I like the CCW's better as well. I think the Fikse's would look killer on a Camaro, but the gold just pops on this car.
I still have the CCW's and I've got the parts I need to make widen them to 18x12's. In fact, I've already sold the old parts. The lips I bought used are pretty rough and I've got quite a lot of work to do on them before I assembled them. I was trying to sell the Fikse's so they were already more or less done and I was sick and tired of buffing and polishing. At this point I'm planning on mounting 335/30R18 Rival S's on the CCW's for local events and some limited street time, but that may be a year out or more.
I still have the CCW's and I've got the parts I need to make widen them to 18x12's. In fact, I've already sold the old parts. The lips I bought used are pretty rough and I've got quite a lot of work to do on them before I assembled them. I was trying to sell the Fikse's so they were already more or less done and I was sick and tired of buffing and polishing. At this point I'm planning on mounting 335/30R18 Rival S's on the CCW's for local events and some limited street time, but that may be a year out or more.
02-03-2016, 09:05 AM
#78
Member
Join Date: Sep 2014
Location: south central Texas
Posts: 474
Likes: 0
Received 0 Likes
on
0 Posts
Car: BUILDING 1985 HARD TOP T/A
Engine: sbc
Transmission: stick
Axle/Gears: GM
Re: C-Prepared Autox Build
I hear you. ... I do.
I've got a set of rims & tires that don't look bad at all... but would look better on a different car than my TA. But they are the only things I have that will clear my 14" rotors & 6 pot calipers. ... so, I'll run them until I can get what I want
I've got a set of rims & tires that don't look bad at all... but would look better on a different car than my TA. But they are the only things I have that will clear my 14" rotors & 6 pot calipers. ... so, I'll run them until I can get what I want
02-05-2016, 12:35 PM
#79
Re: C-Prepared Autox Build

I have my build thread over in the members camaros section that shows the basics of how I did it and how quick/easy it was.
https://www.thirdgen.org/forums/memb...ml#post5997571
I think I had $10 in material from a steel yard/supplier
05-31-2016, 10:51 AM
#81
Member
Thread Starter
iTrader: (3)
Join Date: Nov 2002
Location: Wichita, KS
Posts: 491
Likes: 0
Received 1 Like
on
1 Post
Car: 88 Trans Am GTA
Engine: 5.1L Gen III
Transmission: T56
Axle/Gears: 3.70
Re: C-Prepared Autox Build
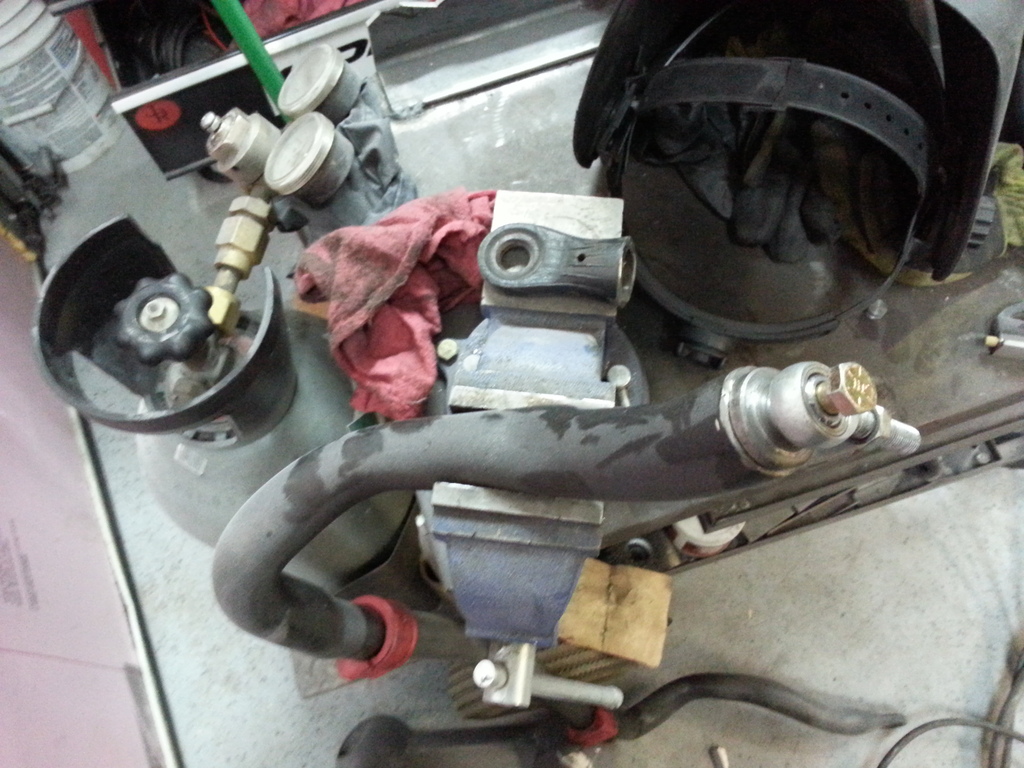
I finally got the car back out. Last weekend I got FTD in EM. I was way underweight and my local competition showed up so I didn't want to run CP. It was pretty uneventful for the first time out on a new motor and a lot of changes. However, on my last run, I got a pinhole leak in the pressure power steering line misting steering fluid everywhere. Apparently the power steering line flexed enough under pressure to move it into the pump pulley.
The shortened steering arms really helped with turn in. Car is still mostly stripped down for paint, and weighed in at 2335! I put in 7 gallons of gas after corner weighting the car to make sure I had over half a tank for the event. Still that's ~330lbs under 2700. In hindsight I should've filled the tank off before corner weighting. The plan is to run full fuel for ballast, but that may change if I ever build the ballast mounts under the axle I've been thinking of. There’s easily 150lbs+ of lexan, hood, front bumper cover, and other parts missing.
Lightweight mode:
And the guilty power steering line:
The shortened steering arms:
I shot for 4.5" long steering arms center to center, about as short as I thought I could get away with. I've heard of people just MIG'ing something on, but I had a local industrial repair place weld on the new mounts with nickel rod for cast iron. It works out to be about a 50% faster steering ratio which is great. It’s still not PS miata fast, but maybe manual miata rack fast. No more hand over hand racing.
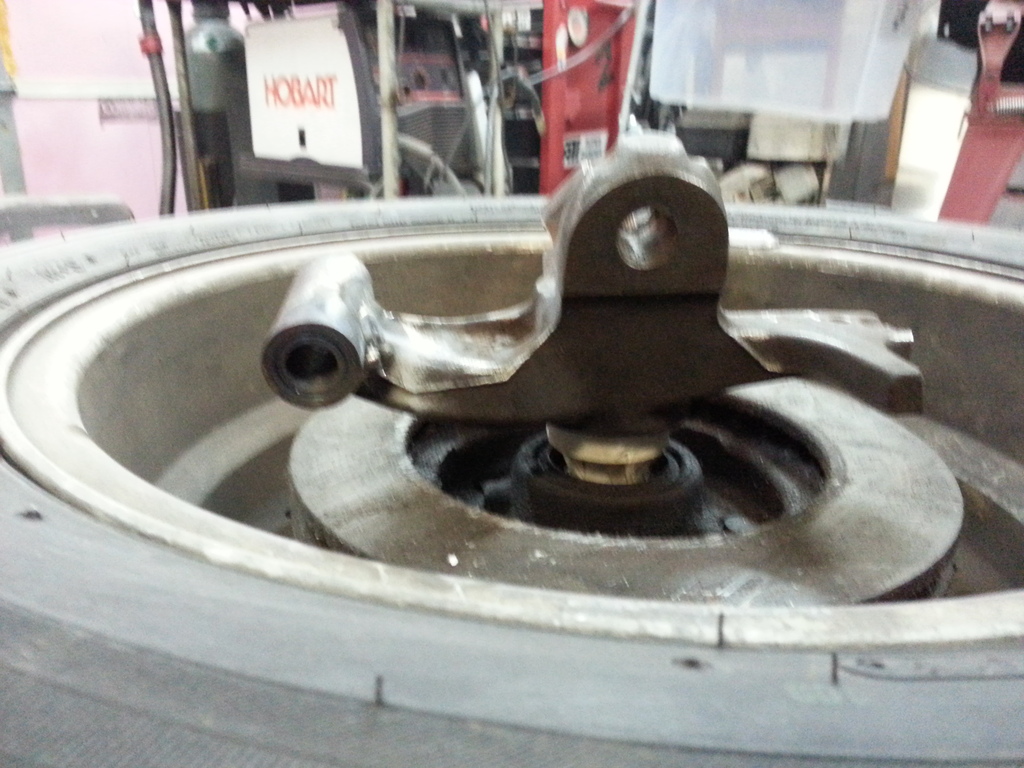
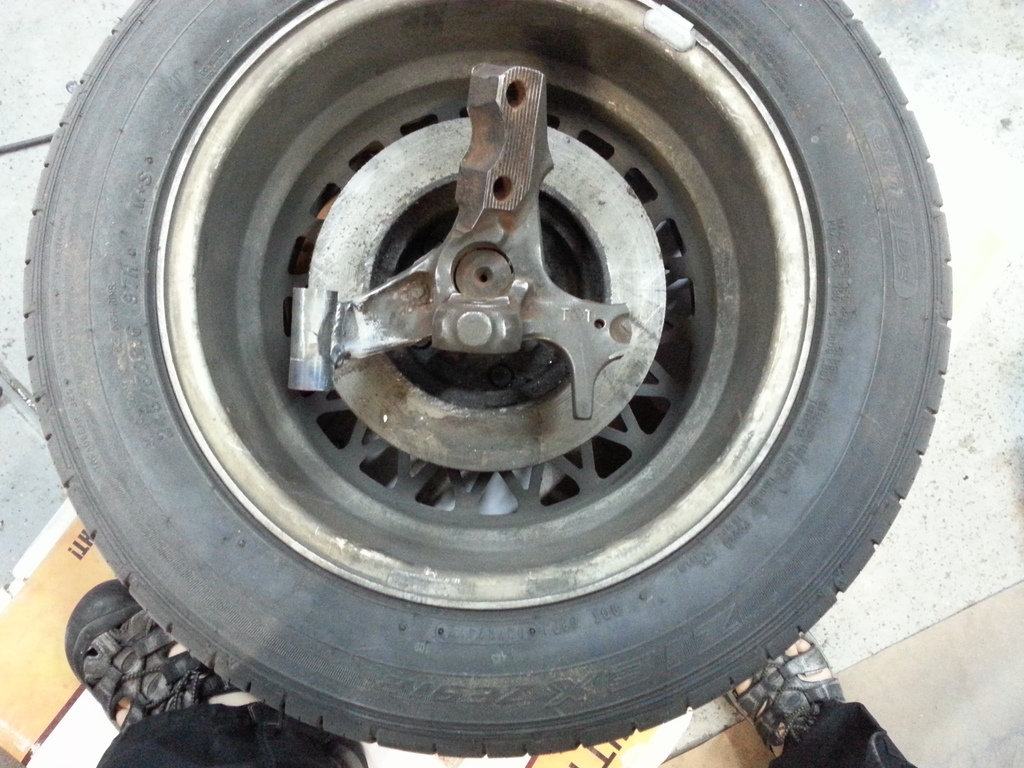
The arms went from being slightly anti-ackerman to considerable pro-ackerman. I was close to zero toe and the car turned in nicely with the added dynamic toe out. Before I’d run close to a �” of toe out to try to compensate. I turned the steering arm tube down myself and shot for it to stick down a 1/2" from the bottom of the stock arm. With +1/2" LBJ's I couldn't measure a difference in bump steer from full droop to ride height, so it seemed to work out all right. Eventually I’ll probably go to +1” balljoints and space the tie rod down even more. Plenty of clearance for wheels means I can run more backspacing on 16” wheels whenever I decide to make the jump R75a’s. I switched to some scalloped rotors that were 4.5lbs lighter. These may turn out to be too light, but they didn’t seem to get all that hot on a breezy 80� day with 3-4 minutes between runs.
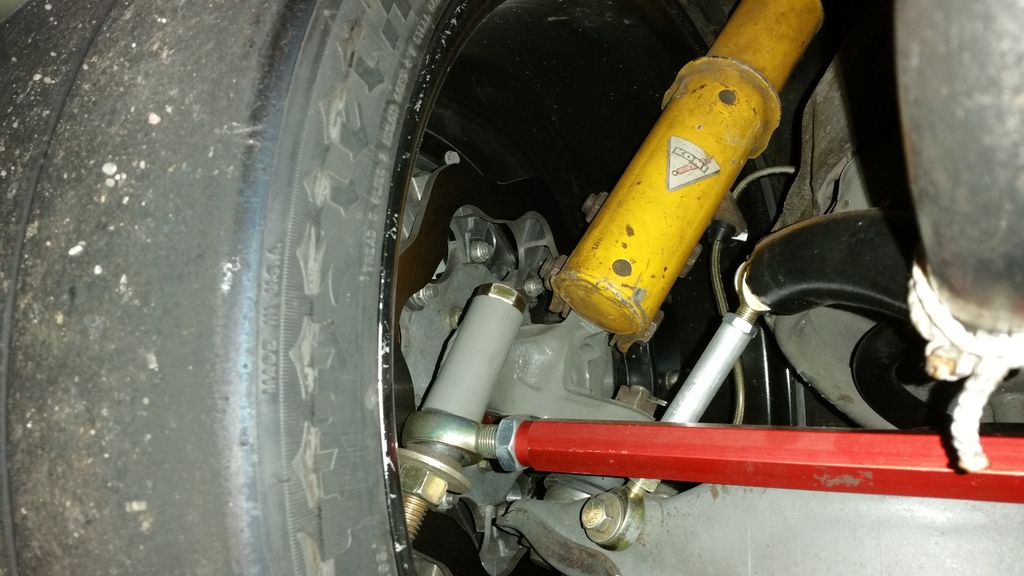
I also converted the front anti-roll bar to use 3/8” rod ends. Right now the tie rods and the lower bolt are very tight at full lock. I don’t think it will be an issue, but it’s something I’m keeping an eye on. Also, I had to add shaft collars to the roll bar as well. I moved the sway bar mounts out as far as possible on the a-arms to increase the motion ratio. Unfortunately this puts a lot of side load on the bar and was pulling it over far enough to hit the frame as it swung through its travel. The rope you see is a temporary solution to keep the springs from unseating at full droop. I’d like to go to a splined bar, but the current bar is 36mm and tubular. I’m afraid anything of comparable stiffness is going to be quite a bit heavier.
The shortened steering arms really helped with turn in. Car is still mostly stripped down for paint, and weighed in at 2335! I put in 7 gallons of gas after corner weighting the car to make sure I had over half a tank for the event. Still that's ~330lbs under 2700. In hindsight I should've filled the tank off before corner weighting. The plan is to run full fuel for ballast, but that may change if I ever build the ballast mounts under the axle I've been thinking of. There’s easily 150lbs+ of lexan, hood, front bumper cover, and other parts missing.
Lightweight mode:

And the guilty power steering line:

The shortened steering arms:

I shot for 4.5" long steering arms center to center, about as short as I thought I could get away with. I've heard of people just MIG'ing something on, but I had a local industrial repair place weld on the new mounts with nickel rod for cast iron. It works out to be about a 50% faster steering ratio which is great. It’s still not PS miata fast, but maybe manual miata rack fast. No more hand over hand racing.

The arms went from being slightly anti-ackerman to considerable pro-ackerman. I was close to zero toe and the car turned in nicely with the added dynamic toe out. Before I’d run close to a �” of toe out to try to compensate. I turned the steering arm tube down myself and shot for it to stick down a 1/2" from the bottom of the stock arm. With +1/2" LBJ's I couldn't measure a difference in bump steer from full droop to ride height, so it seemed to work out all right. Eventually I’ll probably go to +1” balljoints and space the tie rod down even more. Plenty of clearance for wheels means I can run more backspacing on 16” wheels whenever I decide to make the jump R75a’s. I switched to some scalloped rotors that were 4.5lbs lighter. These may turn out to be too light, but they didn’t seem to get all that hot on a breezy 80� day with 3-4 minutes between runs.

I also converted the front anti-roll bar to use 3/8” rod ends. Right now the tie rods and the lower bolt are very tight at full lock. I don’t think it will be an issue, but it’s something I’m keeping an eye on. Also, I had to add shaft collars to the roll bar as well. I moved the sway bar mounts out as far as possible on the a-arms to increase the motion ratio. Unfortunately this puts a lot of side load on the bar and was pulling it over far enough to hit the frame as it swung through its travel. The rope you see is a temporary solution to keep the springs from unseating at full droop. I’d like to go to a splined bar, but the current bar is 36mm and tubular. I’m afraid anything of comparable stiffness is going to be quite a bit heavier.
Last edited by Roostmeyer; 06-06-2016 at 08:44 AM.
06-05-2016, 06:35 PM
#84
Member
Re: C-Prepared Autox Build
here too
06-06-2016, 07:57 AM
#85
Member
Thread Starter
iTrader: (3)
Join Date: Nov 2002
Location: Wichita, KS
Posts: 491
Likes: 0
Received 1 Like
on
1 Post
Car: 88 Trans Am GTA
Engine: 5.1L Gen III
Transmission: T56
Axle/Gears: 3.70
Re: C-Prepared Autox Build
Hmmm, I've had that issue with some message boards not directing to photobucket properly, but this is the first time it's happened on TGO. I'll try to go back and do direct links with full size photos.
03-07-2017, 12:03 AM
#86
Junior Member

Re: C-Prepared Autox Build
So you get to run with Art, Kyle, and Amo.
You need to drag your car up to Lincoln. If nothing else, come up and run the Divisional on August 12-13.
DaveZ.
NRSCCA RE
CP29
You need to drag your car up to Lincoln. If nothing else, come up and run the Divisional on August 12-13.
DaveZ.
NRSCCA RE
CP29

Thread
Thread Starter
Forum
Replies
Last Post