
a discussion about cowl induction


Joined: Aug 2006
Posts: 12,812
Likes: 110
From: Central NJ
Car: 86 Trans Am
Engine: 408 stroker sbc
Transmission: TKO600
Axle/Gears: Moser full floater m9, 3:70 trutrac
Joined: Oct 2007
Posts: 2,606
Likes: 6
From: Kemah, Tx
Car: 1991 z28
Engine: Turbo 310
Transmission: T56
Axle/Gears: D44
Re: a discussion about cowl induction
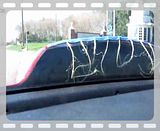
its some hemp twine  i had laying around, i though i'd try it and if it didn't work i'd get something better, but it worked well enough
i had laying around, i though i'd try it and if it didn't work i'd get something better, but it worked well enough Thread Starter
Supreme Member
Joined: Apr 2006
Posts: 4,482
Likes: 10
From: Northern, CA
Car: 1989 Iroc-Z Camaro
Engine: TBI,5.0
Transmission: Automatic 700R4
Axle/Gears: Eaton Posi,3.42,LPW Ultimate Cover
Re: a discussion about cowl induction
Motor Mouth . Heres the photos you wanted.
Last edited by Ron U.S.M.C.; Oct 21, 2011 at 01:53 AM. Reason: add a photo
Senior Member
iTrader: (1)
Joined: Jan 2007
Posts: 688
Likes: 0
From: Palm Coast, Fl.
Car: 1992 Camaro RS, 66 Mustang, 78 t/a
Engine: 5.0 TBI, 289, 400
Transmission: 700R4, C4, th350
Thread Starter
Supreme Member
Joined: Apr 2006
Posts: 4,482
Likes: 10
From: Northern, CA
Car: 1989 Iroc-Z Camaro
Engine: TBI,5.0
Transmission: Automatic 700R4
Axle/Gears: Eaton Posi,3.42,LPW Ultimate Cover
Re: a discussion about cowl induction
I wish. Thats were I took my car to get the Eaton Posi. ,axles, gears,and girdle.The shop is called "The Rear-End Shop" In Santa Rosa CA.


Supreme Member
Joined: Jun 2006
Posts: 2,199
Likes: 1
From: West-Central
Car: 91 Trans am
Engine: built 360 TBI
Transmission: built 700r4
Axle/Gears: 10bolt/3.23
Re: a discussion about cowl induction
Now the same test should be done with the cowl sealed from the engine compartement.
You guy's should plug in EBL and set it up, it has the features you desperately need for CAI.
IAT vs CTS filter to set how much of the IAT readings needs to be considered for fueling, though this is for normal driving. IAT is better wenn stable, EBL has 8 banks, allowing to load a coustom bin for different ambient themperatures, ... To switch form one tune to another takes less then 1 second.
SA - IAT/CTS compensation table to set how much SA needs to be addet or pulled according to the IAT cooler or hotter readings.
Dimented24x7 has posted a nice set up to take advantage of a CAI using a different ECM with MAF, somewere in this forum.
Last edited by thomas1976; Jan 11, 2010 at 06:07 AM. Reason: more details
Supreme Member


Joined: Dec 2005
Posts: 9,926
Likes: 889
From: 53.0907� N, 113.4695� W
Re: a discussion about cowl induction
[QUOTE=thomas1976;4397415]Now the same test should be done with the cowl sealed from the engine compartement.
QUOTE]
I'd like to see that too.
QUOTE]
I'd like to see that too.
Joined: Aug 2006
Posts: 12,812
Likes: 110
From: Central NJ
Car: 86 Trans Am
Engine: 408 stroker sbc
Transmission: TKO600
Axle/Gears: Moser full floater m9, 3:70 trutrac
Re: a discussion about cowl induction
[quote=skinny z;4397431]i can do that once it gets a little nicer out. Mine is almost completely sealed to the hood, the pan is within an 1/8" to the cowl, but has no rubber/foam gasket. May no be until spring unfortunatly, unless we get some rain to get rid of all this damn road salt
Thread Starter
Supreme Member
Joined: Apr 2006
Posts: 4,482
Likes: 10
From: Northern, CA
Car: 1989 Iroc-Z Camaro
Engine: TBI,5.0
Transmission: Automatic 700R4
Axle/Gears: Eaton Posi,3.42,LPW Ultimate Cover
Re: a discussion about cowl induction
Id like to see some photos of the cowl openings from the rear showing the vent / rear screen area. I'm still considering how to open up the rear area of mine. I'm not real good at math so Ill take skinny z's word for it and say there's a total of 2 1/2 in. in diameter worth of 1/4in . holes of space for air to flow through my vent.(way to small) If I drill the holes out to 1/2 in. that should give me plenty of air right? I really want to keep the screen if I can opposed to cutting out large areas.(I remeasured and the holes are 3/8 if that makes any difference.)
Last edited by Ron U.S.M.C.; Sep 29, 2011 at 09:32 PM. Reason: add a photo
Member
Joined: Jan 2010
Posts: 454
Likes: 0
From: Bradenton FL
Car: CAMARO,GMC SUBURBAN DUALLY,RACEBOA
Engine: 305 TBI( soon 383),350Vortec
Transmission: 700 turbo
Re: a discussion about cowl induction
Id like to see some photos of the cowl openings from the rear showing the vent / rear screen area. I'm still considering how to open up the rear area of mine. I'm not real great with math but I multiplied the amount of holes in my screen by 1/4in.(size of holes) and I came up with 6in. in diameter if you combine them in total. If I drill the holes out to 1/2 in. that should give me plenty of air right? I really want to keep the screan if I can opposed to cutting out large areas.


Last edited by DAREDEVIL 1; Jan 11, 2010 at 08:20 PM.
Thread Starter
Supreme Member
Joined: Apr 2006
Posts: 4,482
Likes: 10
From: Northern, CA
Car: 1989 Iroc-Z Camaro
Engine: TBI,5.0
Transmission: Automatic 700R4
Axle/Gears: Eaton Posi,3.42,LPW Ultimate Cover
Re: a discussion about cowl induction
Yes you caught me in the middle of a edit to my message concerning just that.
Last edited by Ron U.S.M.C.; Oct 29, 2017 at 04:15 PM.
Member
Joined: Jan 2010
Posts: 454
Likes: 0
From: Bradenton FL
Car: CAMARO,GMC SUBURBAN DUALLY,RACEBOA
Engine: 305 TBI( soon 383),350Vortec
Transmission: 700 turbo
Supreme Member
Joined: Dec 2005
Posts: 9,926
Likes: 889
From: 53.0907� N, 113.4695� W
Re: a discussion about cowl induction
As you know the area of a circle is 3.14 x radius squared.
3.14 x (.125 x .125)=.049 sq in.
Multiply that times the 100+ holes you have and its around 4.9 sq in.
That's about a 2 1/2 inch pipe.
Even opening up the holes to just 3/8" will get you about 11 sq. in. ( 3 3/4 diameter )
3.14 x (.125 x .125)=.049 sq in.
Multiply that times the 100+ holes you have and its around 4.9 sq in.
That's about a 2 1/2 inch pipe.
Even opening up the holes to just 3/8" will get you about 11 sq. in. ( 3 3/4 diameter )
Joined: Sep 2009
Posts: 3,776
Likes: 101
From: Spokane WA
Car: 92 Lingenfelter Z28 articwhite
Engine: Aluminum 615BBC
Transmission: Th400wbrake/curri entps9" locker
Axle/Gears: 4.11/4.30/4.56
Re: a discussion about cowl induction
Ill have to get a photo all you see looking into mine it the NOS Fogger set up.
and the top half of the Super Ram..
and the top half of the Super Ram..

Supreme Member
iTrader: (25)
Joined: Feb 2006
Posts: 7,260
Likes: 5
From: Manteca,California. Nor Cal.
Car: SOLD IT. Mopar guy only now.
Engine: gone
Transmission: gone
Axle/Gears: gone
Re: a discussion about cowl induction
ok i have teh same hood as the one thats been showed here the most. but i cut out the back panel with all the holes so its a huge wide opening. i have a modded stock housing with a taller filter and a flow thru lid. i noticed a improvement in acceleration and a lot of suck, engine temps dropped slightly. when i drive in the rain the rain will get sucked in deffinately. so IMO it works and doesnt cause any harm
Re: a discussion about cowl induction
Quote: plastic air cleaner spacer.
My spacer(non-GM) cracked at 1/2 throttle a piece size of quarter lodged in the TB bore locking throttle.
Jegs sells aluminum spacer...
My spacer(non-GM) cracked at 1/2 throttle a piece size of quarter lodged in the TB bore locking throttle.
Jegs sells aluminum spacer...
Thread Starter
Supreme Member
Joined: Apr 2006
Posts: 4,482
Likes: 10
From: Northern, CA
Car: 1989 Iroc-Z Camaro
Engine: TBI,5.0
Transmission: Automatic 700R4
Axle/Gears: Eaton Posi,3.42,LPW Ultimate Cover
Re: a discussion about cowl induction
I have looked all over for a "aluminum air cleaner spacer" to replace that plastic one. I called Jegs and Summit Racing and still could not find it. Maybe I could get some help locating one . Maybe a Part # etc. Thanks
Last edited by Ron U.S.M.C.; Jan 21, 2010 at 09:06 PM. Reason: add info.
Banned
iTrader: (12)
Joined: Jul 1999
Posts: 12,212
Likes: 13
From: Bertram (outside Austin), TX
Car: 87 GTA
Engine: L98
Transmission: 700R4
Axle/Gears: Dana M78 3.27 posi
Re: a discussion about cowl induction
14091902
Wheel Spacer
• Originally used on F- body and is 0.030" thick
• Fits wheels/axles with 4.75" bolt pattern
Thread Starter
Supreme Member
Joined: Apr 2006
Posts: 4,482
Likes: 10
From: Northern, CA
Car: 1989 Iroc-Z Camaro
Engine: TBI,5.0
Transmission: Automatic 700R4
Axle/Gears: Eaton Posi,3.42,LPW Ultimate Cover
Re: a discussion about cowl induction
Hi Stephen, Do you know were I can find the aluminum air cleaner spacer ?
Yes and I am happy to say I measured the holes again more closely and came up with 3/8 in. holes.
= ( Even opening up the holes to just 3/8" will get you about 11 sq. in. ( 3 3/4 diameter )" .
I will take it.
Yes and I am happy to say I measured the holes again more closely and came up with 3/8 in. holes.
= ( Even opening up the holes to just 3/8" will get you about 11 sq. in. ( 3 3/4 diameter )" .
I will take it.
Last edited by Ron U.S.M.C.; Oct 29, 2017 at 09:59 PM. Reason: add info.
Banned
iTrader: (12)
Joined: Jul 1999
Posts: 12,212
Likes: 13
From: Bertram (outside Austin), TX
Car: 87 GTA
Engine: L98
Transmission: 700R4
Axle/Gears: Dana M78 3.27 posi
Re: a discussion about cowl induction
I don't recall ever seeing a factory air cleaner spacer. Just air cleaners built to the specific height they needed to be.
Re: a discussion about cowl induction
My orig spacer came from a GM 350cid truck. Plastic. The one I bought from Jegs past summer was 1/2 inch alum with a 0 ring imbedded. I drilled a series of holes in opposite side of o ring and epoxied that surface to each other making 1 inch. now both sides had 0 ring. It was in Jegs catalog maybe in truck or air cleaners area. I will try to get part #.
Re: a discussion about cowl induction
Q:I have looked all over for a "aluminum air cleaner spacer" to replace that plastic one. I called Jegs and Summit Racing and still could not find it. Maybe I could get some help locating one . Maybe a Part # etc. Thanks
__________________
In Jegs catalog with air cleaners is .50 inch 128 72250, 1.50 inch 128 722 60, 2.00 inch 128 72265.
I used 2 .50 inch as 1.50 was too much for clearance to hood.
__________________
In Jegs catalog with air cleaners is .50 inch 128 72250, 1.50 inch 128 722 60, 2.00 inch 128 72265.
I used 2 .50 inch as 1.50 was too much for clearance to hood.
Supreme Member

Joined: Feb 2011
Posts: 1,589
Likes: 89
Re: a discussion about cowl induction
1. Take a look at the cowl area of the cars you walk past. How many use the high-pressure area at the base of the windshield to pressurize the heater/AC fan box? Common as dirt years ago.
2. Removing the seal at the back of the hood doesn't "let the heat out". It lets ambient-temperature air INTO the engine compartment, where it competes with air drawn through the radiator for an escape under the car. In short, it makes the air flow through the radiator less efficient.
3. All the OEM applications of cowl-induction used a sealed system so the carb could draw the ambient-temp air, WITHOUT allowing the air to become part of the under-hood air flow pattern. The engineers were smart enough to recognize that the radiator air flow becomes less efficient when the pressurized air from the cowl gets blown all over the engine.
4. The seals on the hood-to-air cleaner, and hood-to-body also keep engine fumes from being pulled into the HVAC system at idle and low speed.
A cowl-induction hood without the seals 'n' ducts to prevent air leakage into the under-hood airflow is well below optimum. The cowl air is needed in TWO places: The HVAC system and the throttle body, and nowhere else.
Member
Joined: Dec 2005
Posts: 175
Likes: 2
From: Shelby,N.C.
Car: 1986 pontiac bonneville
Engine: LB9 305
Transmission: MK6 T5
Axle/Gears: 3.42
Re: a discussion about cowl induction
1. Take a look at the cowl area of the cars you walk past. How many use the high-pressure area at the base of the windshield to pressurize the heater/AC fan box? Common as dirt years ago.
2. Removing the seal at the back of the hood doesn't "let the heat out". It lets ambient-temperature air INTO the engine compartment, where it competes with air drawn through the radiator for an escape under the car. In short, it makes the air flow through the radiator less efficient.
3. All the OEM applications of cowl-induction used a sealed system so the carb could draw the ambient-temp air, WITHOUT allowing the air to become part of the under-hood air flow pattern. The engineers were smart enough to recognize that the radiator air flow becomes less efficient when the pressurized air from the cowl gets blown all over the engine.
4. The seals on the hood-to-air cleaner, and hood-to-body also keep engine fumes from being pulled into the HVAC system at idle and low speed.
A cowl-induction hood without the seals 'n' ducts to prevent air leakage into the under-hood airflow is well below optimum. The cowl air is needed in TWO places: The HVAC system and the throttle body, and nowhere else.
2. Removing the seal at the back of the hood doesn't "let the heat out". It lets ambient-temperature air INTO the engine compartment, where it competes with air drawn through the radiator for an escape under the car. In short, it makes the air flow through the radiator less efficient.
3. All the OEM applications of cowl-induction used a sealed system so the carb could draw the ambient-temp air, WITHOUT allowing the air to become part of the under-hood air flow pattern. The engineers were smart enough to recognize that the radiator air flow becomes less efficient when the pressurized air from the cowl gets blown all over the engine.
4. The seals on the hood-to-air cleaner, and hood-to-body also keep engine fumes from being pulled into the HVAC system at idle and low speed.
A cowl-induction hood without the seals 'n' ducts to prevent air leakage into the under-hood airflow is well below optimum. The cowl air is needed in TWO places: The HVAC system and the throttle body, and nowhere else.
Just had to say Amen , I am looking to one day take an early carbed V8 sport coupe and make a functional cowl induction setup but using the single plane aftermarket EFI intake systems that use the 4 brl throttle body and make it look almost factory, I hate half assed setups.
Thread Starter
Supreme Member
Joined: Apr 2006
Posts: 4,482
Likes: 10
From: Northern, CA
Car: 1989 Iroc-Z Camaro
Engine: TBI,5.0
Transmission: Automatic 700R4
Axle/Gears: Eaton Posi,3.42,LPW Ultimate Cover
Re: a discussion about cowl induction
Wow,
This started as a $500.00 car and my first build ever.
Here's just a "small" part of what needed to be replace in mine.
I did almost ALL of this myself in including the list of modifications,etc. with many pieces coming from "Pick N Pull" as to salvage what I could from even less fortunate cars.
Needed = tires / fuel pump / water pump / Vats Module / power steering pump / smog pump / alternator / intake manifold gasket / new steering column / all break components / radiator / heater core and hose replacements / front windshield /new front bumper cover / lower valance / side ground effects / new rear hatch and motor /most of the interior including front seats / head liner /door skins / console, etc.,etc.
Here's a few "Modification's","Up-Grade's" and "Replacement" parts I used on the car.
Custom PPG Rally Red Paint / Custom Black Racing Stripes /Crystal Red Pearl in both / Goodmark Steel Cowl Hood /American Racing AR-23 Aluminum Alloy Wheel's and "Mickey Thompson" S/T Sportsman Tires / MOOG 5665 Rear Springs / KYB "Gas A Just" Rear Shocks / New Front Running-Parking Lights / Custom Stainless Steel Hood Pins / Red Bow-Tie Front Grill Insert and "Black" IROC-Z Door Decals with New Weatherstripping.
Open-Air 14 by 3in. Element & Xtra-Flow Filter Top / New Coolant and Washer Tanks / Transmission Cooler / Adjustable Temperature Controlled Duel Fans / Re-Programed E-PROM with VATS and Speed Limiter Removal / New Converter Lock-Up speed of 40 mph./ Corvette servo upgrade.
3in. American Thunder Flowmaster Cat Back / Magnaflow Cat / "Energy Suspension" Poly Motor and Transmission Mounts / 28 spline Eaton Posi. / 28 spline axles & gear ratio changes to 3.42 with L.P.W. Ultimate 10 Bolt cover.
Grant "Challenger" Series Steering Wheel / 4th Gen. Camaro Seats / Fire Extinguisher / "Python" Alarm System / Kenwood Deck with Pioneer 6.5 door speakers added / Pioneer 6x9 speakers in the sail panels and Rear Hatch Privacy Screen.
Most if not all censers, senders including electrical and electronic components have been replaced.
I have my cooling system designed to keep my car in the 180* to 190* range and that keeps my under hood temperatures down.
I have spent countless hard fought hours under the hood of my car to get it where it is today.
Dependable/reliable and starts every time with the first crank and even though it has some miles on the little 5.0 it pulls nice and hard when I want it to.
Although just adding a tray with seal to my air filter assembly would make it a "True Cowl Intake", after many years of driving the car this way as a DD I have decided to keep it as is. I do not like how cheep the trays I have seen look and feel.
I would love to see some of you guys put half the blood, sweat and tears into your cars the way a lot of us have.
Not to mention having to scrape and save for every penny.
There is so much more to it than buying a car that "runs" in "decent" condition or even nicer and adding or changing a few components, especially for us doing it for the first time.
Last edited by Ron U.S.M.C.; Nov 1, 2017 at 05:52 PM.

Thread
Thread Starter
Forum
Replies
Last Post
Bohemian
Aftermarket Product Review
11
Nov 25, 2015 09:38 PM