

V-belt to Serpentine setup

Thread Starter
Member
iTrader: (3)
Joined: Jul 2010
Posts: 164
Likes: 2
From: Athens, Tn
Car: 87 GTA
Engine: 350
Transmission: 700r4
Axle/Gears: 3.42 posi
V-belt to Serpentine setup
I was wondering of this swap is worth doing? My 87 TA is Tpi and obvious running old school v-belt. Can I use my alt and PS pump? I'm running an electric Wp. I was going to order UD pulleys and since their a lot easier to get for the serp set up I was thinking of jus swaping it over. Also what are the pros and cons of doing this? Thanks in advance. I tried searching for this if there is already a thread can someone link me to it.

Joined: Jun 2000
Posts: 5,364
Likes: 51
From: Enschede, Netherlands
Car: 82 TA 87 IZ L98 88 IZ LB9 88 IZ L98
Engine: 5.7TBI 5,7TPI 5.0TPI, 5,7TPI
Transmission: T5, 700R4, T5, 700R4
Axle/Gears: 3.08, 3.27, 3.45, 3.27
Re: V-belt to Serpentine setup
You will have to get a different alternator, yours is the same model but the ear is cast in the wrong position on the front half. You can not reclock it to fit. the P.st. you can reuse but you will have to pull the pulley off and replace it w/ a flat belt pulley.
Easiest is to get a complete front drive system off a later car, incl. the pump and everything..it's a bolt on deal.
Easiest is to get a complete front drive system off a later car, incl. the pump and everything..it's a bolt on deal.
Supreme Member
iTrader: (3)
Joined: May 2004
Posts: 4,345
Likes: 1
From: Brighton, CO
Car: '72 Chevy Nova
Engine: Solid roller 355
Transmission: TH350
Axle/Gears: 8.5" 10-bolt 3.73 Posi
Re: V-belt to Serpentine setup
Honestly I don't really understand why some people insist on this swap. Nothing wrong with V-Belts. Only advantage I could see is cleaning up the front of your engine a bit.
If you want to do it the best bet is a junkyard. Grab the alt/PS/crank pulley and swap them over.
If you want to do it the best bet is a junkyard. Grab the alt/PS/crank pulley and swap them over.


Joined: Apr 2005
Posts: 7,736
Likes: 14
From: Not in Kansas anymore
Car: 82 Z28
Engine: 383 SP EFI/ 4150 TB
Transmission: T400
Axle/Gears: QP 9" 3.73
Re: V-belt to Serpentine setup
Last edited by vetteoz; Oct 31, 2012 at 08:58 PM.
Joined: Jun 2000
Posts: 5,364
Likes: 51
From: Enschede, Netherlands
Car: 82 TA 87 IZ L98 88 IZ LB9 88 IZ L98
Engine: 5.7TBI 5,7TPI 5.0TPI, 5,7TPI
Transmission: T5, 700R4, T5, 700R4
Axle/Gears: 3.08, 3.27, 3.45, 3.27
Re: V-belt to Serpentine setup
Honestly I don't really understand why some people insist on this swap. Nothing wrong with V-Belts. Only advantage I could see is cleaning up the front of your engine a bit.
If you want to do it the best bet is a junkyard. Grab the alt/PS/crank pulley and swap them over.
If you want to do it the best bet is a junkyard. Grab the alt/PS/crank pulley and swap them over.


Joined: Aug 1999
Posts: 19,282
Likes: 103
From: Lawrence, KS
Car: Met. Silver 85 IROC/Sold
Engine: 350 HO Deluxe (350ci/330hp)
Transmission: T-5 (Non-WC)
Axle/Gears: Limited Slip 3.23's
Thread Starter
Member
iTrader: (3)
Joined: Jul 2010
Posts: 164
Likes: 2
From: Athens, Tn
Car: 87 GTA
Engine: 350
Transmission: 700r4
Axle/Gears: 3.42 posi
Re: V-belt to Serpentine setup
Would this affect my electric water pump? Also, i would have to swap to a serp system in order to run a super charger correct?
Trending Topics
Supreme Member
iTrader: (8)
Joined: Jul 2001
Posts: 3,204
Likes: 7
From: New Boston, IL, USA
Car: '90 Formula 350
Engine: 383 SBC
Transmission: ProBuilt S/S 700-R4 & ACT 9" Stall
Axle/Gears: 10 bolt 3.23
Re: V-belt to Serpentine setup
An electric water pump shouldn't matter as long as the belt routing for direction is maintained on the rest of the accessories. I think we have members using March Serpentine Setup with electric water pumps, but I would think the OEM setup would work also.
Most superchargers are serpentine, so yes would be easier to swap if that was the case.
Most superchargers are serpentine, so yes would be easier to swap if that was the case.

Member
Joined: Aug 2008
Posts: 142
Likes: 2
From: Belleville, Ontario
Car: 1986 Chevrolet Camaro
Engine: 355 chevy
Transmission: t-5
Axle/Gears: 3.73 disc brakes
Re: V-belt to Serpentine setup
no dont go serp! i made that mistake and regret it! i brok my alt bracket on my serp and it left me stranded 2 times now... mind you im using a set up from a truck, just get the underdriven v belts and its a 6 dollar fix if you blow the belt vs 40

Supreme Member
Joined: Dec 2000
Posts: 3,813
Likes: 2
From: California
Re: V-belt to Serpentine setup
I did it on my camaro and it was probably the best modification I ever made. Makes changing any accessory easier, runs quieter, looks nicer.
With the electric water pump you'll have to reroute the belt and I'm not sure how that will work but it's probably doable. You'll need all new accessories. Some guy used to sell kits for $3-400 about ten years ago out of florida, not sure if he is still around.
With the electric water pump you'll have to reroute the belt and I'm not sure how that will work but it's probably doable. You'll need all new accessories. Some guy used to sell kits for $3-400 about ten years ago out of florida, not sure if he is still around.
Junior Member

Joined: Mar 2014
Posts: 65
Likes: 0
From: Motor City
Car: 1982 Z28
Engine: 5.0L
Transmission: 700R4
Axle/Gears: Ten Bolt Disc Posi 3.23
Re: V-belt to Serpentine setup
I know this thread is old, but how in the world did you break a bracket? It must have been defective when you installed it, or your cracked it without noticing it. GM puts these brackets on 5.7 trucks, Suburbans, Jimmys, ect
Supreme Member
iTrader: (4)
Joined: Sep 2004
Posts: 2,069
Likes: 5
From: MN
Car: 85 SC, 86 Berlinetta
Engine: V6, V8
Transmission: 700r4, 700r4
Re: V-belt to Serpentine setup
GM added supports later on because the aluminium brackets failed over time. It's often not possible to use the supports with headers though.

Joined: Jun 2006
Posts: 1,700
Likes: 17
From: Southern California
Car: 1987 Camaro LT
Engine: LG4 w/ SLP headers & a 3" catback
Transmission: THM700R4 (Stock)
Axle/Gears: Stock 2.73 gears. No Posi
Re: V-belt to Serpentine setup
I have headers on my car and installed the four support braces with no issue.
Joined: Aug 1999
Posts: 19,282
Likes: 103
From: Lawrence, KS
Car: Met. Silver 85 IROC/Sold
Engine: 350 HO Deluxe (350ci/330hp)
Transmission: T-5 (Non-WC)
Axle/Gears: Limited Slip 3.23's
Re: V-belt to Serpentine setup
The GM serp kit has provision for headers. Pics of the braces/spacers can be seen in posts #16 and 17 below:
https://www.thirdgen.org/forums/afte...rsion-kit.html
JamesC
https://www.thirdgen.org/forums/afte...rsion-kit.html
JamesC
Last edited by JamesC; Apr 5, 2014 at 07:49 AM.
Joined: Jun 2006
Posts: 1,700
Likes: 17
From: Southern California
Car: 1987 Camaro LT
Engine: LG4 w/ SLP headers & a 3" catback
Transmission: THM700R4 (Stock)
Axle/Gears: Stock 2.73 gears. No Posi
Re: V-belt to Serpentine setup
Neither. My car is a factory LG4 carb'd car. I was lucky enough to find that the passenger side head had the three holes for the serpentine bracket. No modifications needed except for minor wiring for the alternator and different hose for the AC.
Last edited by MY87LT; Jun 7, 2016 at 09:53 PM.

Joined: Oct 2001
Posts: 12,232
Likes: 1,166
From: Il
Car: 1989-92 FORMULA350 305 92 Hawkclone
Engine: 4++,350 & 305 CIs
Transmission: 700R4 4800 vig 18th700R4 t56 ZF6 T5
Axle/Gears: 3.70 9"ford alum chunk,dana44,9bolt
Re: V-belt to Serpentine setup
I have heard of the dreaded broken bracket b4, most cases were because the bracket wasn't fully tightened down. (some had bolts that had bottomed out in the heads)
The early aluminum brackets had 3 metal braces per side. Then they went with 4 total later.
I removed all of my brackets years ago and have 240,000 miles on my car with original brackets on it.
Mine gets run up to 200mph and 8,000 rpm quite often. It also has 200,000miles on the SLP serp bet and underdrive I put on it in 1992 or so. (prolly should be changing that..) lol
Supreme Member
iTrader: (4)
Joined: Sep 2004
Posts: 2,069
Likes: 5
From: MN
Car: 85 SC, 86 Berlinetta
Engine: V6, V8
Transmission: 700r4, 700r4
Re: V-belt to Serpentine setup
The GM serp kit has provision for headers. Pics of the braces/spacers can be seen in posts #16 and 17 below:
https://www.thirdgen.org/forums/afte...rsion-kit.html
JamesC
https://www.thirdgen.org/forums/afte...rsion-kit.html
JamesC
I'm guessing that kit is based on the TPI set up?
I have heard of the dreaded broken bracket b4, most cases were because the bracket wasn't fully tightened down. (some had bolts that had bottomed out in the heads)
The early aluminum brackets had 3 metal braces per side. Then they went with 4 total later.
I removed all of my brackets years ago and have 240,000 miles on my car with original brackets on it.
Mine gets run up to 200mph and 8,000 rpm quite often. It also has 200,000miles on the SLP serp bet and underdrive I put on it in 1992 or so. (prolly should be changing that..) lol
The early aluminum brackets had 3 metal braces per side. Then they went with 4 total later.
I removed all of my brackets years ago and have 240,000 miles on my car with original brackets on it.
Mine gets run up to 200mph and 8,000 rpm quite often. It also has 200,000miles on the SLP serp bet and underdrive I put on it in 1992 or so. (prolly should be changing that..) lol
Joined: Jun 2006
Posts: 1,700
Likes: 17
From: Southern California
Car: 1987 Camaro LT
Engine: LG4 w/ SLP headers & a 3" catback
Transmission: THM700R4 (Stock)
Axle/Gears: Stock 2.73 gears. No Posi
Re: V-belt to Serpentine setup
The set up was from a 1990 RS tbi camaro. Got it used from an auction site.
Joined: Oct 2001
Posts: 12,232
Likes: 1,166
From: Il
Car: 1989-92 FORMULA350 305 92 Hawkclone
Engine: 4++,350 & 305 CIs
Transmission: 700R4 4800 vig 18th700R4 t56 ZF6 T5
Axle/Gears: 3.70 9"ford alum chunk,dana44,9bolt
Re: V-belt to Serpentine setup
TBI and TPI use the same brackets.
If you have different ones, they are from a vet or truck.
If you have different ones, they are from a vet or truck.


Member
Joined: Feb 2008
Posts: 230
Likes: 0
Re: V-belt to Serpentine setup
Since moving to Texas, I have been wanting to come up with a better A/C setup to replace the non working stuff on my car. I have never even charged an A/C system from a total start up (but have added charge), so it will be a learning experience. I have been accumulating tools such as a vacuum pump, hose crimper to make my own hoses, fittings, pressure switches, can valves and etc, and have been hanging out at a local shop trying to get learned up about it a little more.
Despite my lack of experience, I want to make some changes. If it doesn't work out I'll have to fall back to professionals, but I'm game to give my ideas, and learning curve, a try.
I've been rounding up some 1990 vintage Camaro/Firebird FOE aluminum brackets, bolts, brace bars and etc. I have seen the high price GM Serpentine Conversion Kit, but yikes! That is pricey! And, several people, pros and otherwise, have told me that the GM Barrel compressor is definately not the hot setup. And that is being kind. There is a company in South Fort Worth called Old Aire, that has a bracket to put a Sanden compressor in where the GM compressor goes in the Passenger Side FOE bracket. This gives you a better compressor with a divorced oil sump, and puts it on the Passenger Side so that you will not have the big A/C hoses crossing over the engine to the Driver's Side like I do now. I'm also going to move my drier/separator to the radiator support to clean up the engine bay and give better access to the right rear side of the engine. I will mock all of this up on an engine on a stand while out of the car. I may try putting water pump spacers in and space the FOE brackets out as well in order to be able to pull the RH valve cover without having to remove the compressor first. And, my old, tired 305 does not have the correct bolt holes in the passenger side head, but there is a new engine and heads in the works (a long way off!).
I've also got a bigger radiator and will probably go to an electric cooling fan set up.
Another thing I want to try is the Ford "white" plastic nozzle. It supposedly makes better cooling at lower speeds.
I will undoubtedly have to do some cutting, moving and fabrication to make this all work. It should be interesting! Now if I can just find the time to get after it, building the new engine and all.
Joined: Dec 2005
Posts: 4,796
Likes: 16
From: St. Cloud, MN
Car: 1984 Trans Am
Engine: LS1383 in work
Transmission: Magnum F - to be installed
Axle/Gears: Zexel Torsen 3.73, 28-spline mosers
Re: V-belt to Serpentine setup
Since moving to Texas, I have been wanting to come up with a better A/C setup to replace the non working stuff on my car. I have never even charged an A/C system from a total start up (but have added charge), so it will be a learning experience. I have been accumulating tools such as a vacuum pump, hose crimper to make my own hoses, fittings, pressure switches, can valves and etc, and have been hanging out at a local shop trying to get learned up about it a little more.
Despite my lack of experience, I want to make some changes. If it doesn't work out I'll have to fall back to professionals, but I'm game to give my ideas, and learning curve, a try.
I've been rounding up some 1990 vintage Camaro/Firebird FOE aluminum brackets, bolts, brace bars and etc. I have seen the high price GM Serpentine Conversion Kit, but yikes! That is pricey! And, several people, pros and otherwise, have told me that the GM Barrel compressor is definately not the hot setup. And that is being kind. There is a company in South Fort Worth called Old Aire, that has a bracket to put a Sanden compressor in where the GM compressor goes in the Passenger Side FOE bracket. This gives you a better compressor with a divorced oil sump, and puts it on the Passenger Side so that you will not have the big A/C hoses crossing over the engine to the Driver's Side like I do now. I'm also going to move my drier/separator to the radiator support to clean up the engine bay and give better access to the right rear side of the engine. I will mock all of this up on an engine on a stand while out of the car. I may try putting water pump spacers in and space the FOE brackets out as well in order to be able to pull the RH valve cover without having to remove the compressor first. And, my old, tired 305 does not have the correct bolt holes in the passenger side head, but there is a new engine and heads in the works (a long way off!).
I've also got a bigger radiator and will probably go to an electric cooling fan set up.
Another thing I want to try is the Ford "white" plastic nozzle. It supposedly makes better cooling at lower speeds.
I will undoubtedly have to do some cutting, moving and fabrication to make this all work. It should be interesting! Now if I can just find the time to get after it, building the new engine and all.
Despite my lack of experience, I want to make some changes. If it doesn't work out I'll have to fall back to professionals, but I'm game to give my ideas, and learning curve, a try.
I've been rounding up some 1990 vintage Camaro/Firebird FOE aluminum brackets, bolts, brace bars and etc. I have seen the high price GM Serpentine Conversion Kit, but yikes! That is pricey! And, several people, pros and otherwise, have told me that the GM Barrel compressor is definately not the hot setup. And that is being kind. There is a company in South Fort Worth called Old Aire, that has a bracket to put a Sanden compressor in where the GM compressor goes in the Passenger Side FOE bracket. This gives you a better compressor with a divorced oil sump, and puts it on the Passenger Side so that you will not have the big A/C hoses crossing over the engine to the Driver's Side like I do now. I'm also going to move my drier/separator to the radiator support to clean up the engine bay and give better access to the right rear side of the engine. I will mock all of this up on an engine on a stand while out of the car. I may try putting water pump spacers in and space the FOE brackets out as well in order to be able to pull the RH valve cover without having to remove the compressor first. And, my old, tired 305 does not have the correct bolt holes in the passenger side head, but there is a new engine and heads in the works (a long way off!).
I've also got a bigger radiator and will probably go to an electric cooling fan set up.
Another thing I want to try is the Ford "white" plastic nozzle. It supposedly makes better cooling at lower speeds.
I will undoubtedly have to do some cutting, moving and fabrication to make this all work. It should be interesting! Now if I can just find the time to get after it, building the new engine and all.
Junior Member
Joined: Mar 2014
Posts: 65
Likes: 0
From: Motor City
Car: 1982 Z28
Engine: 5.0L
Transmission: 700R4
Axle/Gears: Ten Bolt Disc Posi 3.23
Re: V-belt to Serpentine setup
Go with a serp setup, you won't regret it. I did mine and it takes five minutes to pull the WP, Or five to do the ALT. Plus you can upgrade your AC to R134 too. Provides a cleaner look. Get the brackets off a 93-95 truck or Suburban. Or a 90-92 V8 Camaro. Search Car Craft serpentine on the web they have a great article with lots of pictures, advice, and part numbers. Anyone who stays with a V-belt is delusional.
Joined: May 2009
Posts: 4,915
Likes: 41
From: Far West
Car: 1986 Camaro Z28 IROC-Z
Engine: 350 Tuned Port Injection, for now.
Transmission: 700R4
Axle/Gears: Posi - 3.23
Re: V-belt to Serpentine setup
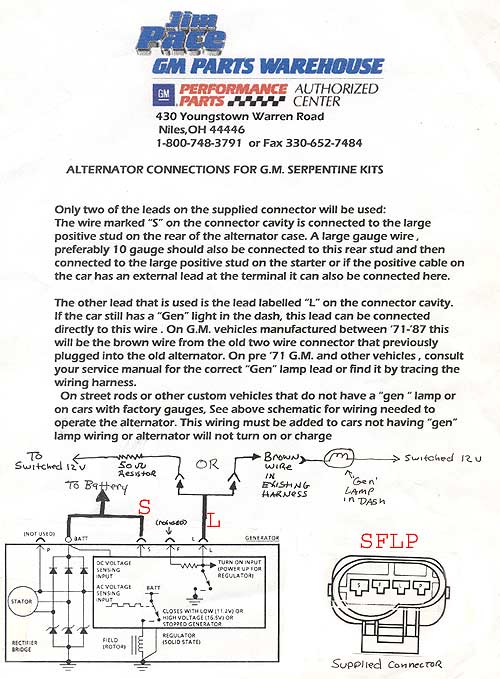
Im trying to look for a correct wiring diagram for my conversion. I have the large Alternator (86 IROC) and Im converting to a serp setup. I got the small alternator but Im confused about doing the 86 style passengerside wiring to the driverside small alt wiring.
Joined: Dec 2005
Posts: 4,796
Likes: 16
From: St. Cloud, MN
Car: 1984 Trans Am
Engine: LS1383 in work
Transmission: Magnum F - to be installed
Axle/Gears: Zexel Torsen 3.73, 28-spline mosers
Re: V-belt to Serpentine setup
There is a diagram for it here on TGO, just need to search firb it. It's what I used
Junior Member
Joined: Mar 2014
Posts: 65
Likes: 0
From: Motor City
Car: 1982 Z28
Engine: 5.0L
Transmission: 700R4
Axle/Gears: Ten Bolt Disc Posi 3.23
Re: V-belt to Serpentine setup
What do you mean correct wiring? The heavy red wire goes to the alternator battery post. You can buy an adapter for the field wiring from Powermaster. You need the two wire adapter if you have the ALT light in the dash. What else is there?
Joined: May 2009
Posts: 4,915
Likes: 41
From: Far West
Car: 1986 Camaro Z28 IROC-Z
Engine: 350 Tuned Port Injection, for now.
Transmission: 700R4
Axle/Gears: Posi - 3.23
Re: V-belt to Serpentine setup
Here is my 86 wiring and the 89 wiring. Im trying to figure out how to wire the small alt to the existing wires of the 86 without burning something up.


Joined: Mar 2017
Posts: 4,255
Likes: 427
From: Portland, OR
Car: 86 Imponte Ruiner 450GT, 91 Formula
Engine: 350 Vortec, FIRST TPI, 325 RWHP
Transmission: 700R4 3000 stall.
Axle/Gears: 9 Bolt Torsen 3.70
Re: V-belt to Serpentine setup
I'll look at my swapped 86 in a bit here. I did this about a year ago and figured it out at that time. Have since forgot....
GD
GD

Senior Member
iTrader: (4)
Joined: Jun 2014
Posts: 667
Likes: 16
From: Brainerd, MN
Car: '84 Trans Am
Engine: 357 SBC
Transmission: 700R4
Axle/Gears: 10 Bolt 3.73, Torsen Diff
Re: V-belt to Serpentine setup
I actually just purchased a set of brackets from Ozz1967, so I'd be interested to know what needs to get rewired also. Is there a difference between having a gauge and a light? I assume you still need a resistor.
Joined: Dec 2005
Posts: 4,796
Likes: 16
From: St. Cloud, MN
Car: 1984 Trans Am
Engine: LS1383 in work
Transmission: Magnum F - to be installed
Axle/Gears: Zexel Torsen 3.73, 28-spline mosers
Joined: May 2009
Posts: 4,915
Likes: 41
From: Far West
Car: 1986 Camaro Z28 IROC-Z
Engine: 350 Tuned Port Injection, for now.
Transmission: 700R4
Axle/Gears: Posi - 3.23
Joined: Mar 2017
Posts: 4,255
Likes: 427
From: Portland, OR
Car: 86 Imponte Ruiner 450GT, 91 Formula
Engine: 350 Vortec, FIRST TPI, 325 RWHP
Transmission: 700R4 3000 stall.
Axle/Gears: 9 Bolt Torsen 3.70
Re: V-belt to Serpentine setup
Red to S pin, brown to L pin.
I bought a universal CS alt pigtail from my local parts store (likely Dorman) and the brown wire connects to the blue wire on my pigtail (field flash/battery lamp), red to red (remote sense), and the black wire on the replacement pigtail was not used.
GD
I bought a universal CS alt pigtail from my local parts store (likely Dorman) and the brown wire connects to the blue wire on my pigtail (field flash/battery lamp), red to red (remote sense), and the black wire on the replacement pigtail was not used.
GD
Joined: May 2009
Posts: 4,915
Likes: 41
From: Far West
Car: 1986 Camaro Z28 IROC-Z
Engine: 350 Tuned Port Injection, for now.
Transmission: 700R4
Axle/Gears: Posi - 3.23
Re: V-belt to Serpentine setup
Red to S pin, brown to L pin.
I bought a universal CS alt pigtail from my local parts store (likely Dorman) and the brown wire connects to the blue wire on my pigtail (field flash/battery lamp), red to red (remote sense), and the black wire on the replacement pigtail was not used.
GD
I bought a universal CS alt pigtail from my local parts store (likely Dorman) and the brown wire connects to the blue wire on my pigtail (field flash/battery lamp), red to red (remote sense), and the black wire on the replacement pigtail was not used.
GD
Joined: Mar 2017
Posts: 4,255
Likes: 427
From: Portland, OR
Car: 86 Imponte Ruiner 450GT, 91 Formula
Engine: 350 Vortec, FIRST TPI, 325 RWHP
Transmission: 700R4 3000 stall.
Axle/Gears: 9 Bolt Torsen 3.70
Joined: Mar 2017
Posts: 4,255
Likes: 427
From: Portland, OR
Car: 86 Imponte Ruiner 450GT, 91 Formula
Engine: 350 Vortec, FIRST TPI, 325 RWHP
Transmission: 700R4 3000 stall.
Axle/Gears: 9 Bolt Torsen 3.70
Re: V-belt to Serpentine setup
Bolt up the bracket, transfer punch the hole, remove the bracket, drill and tap. Use sealant on the bolt.
If you have never done something like this I would suggest seeking professional guidance. Drilling and tapping a horizontal hole into your cylinder head that's backed up by a coolant jacket while the engine is installed in a vehicle is probably not the way to start learning to drill and tap holes.
GD
Joined: Mar 2017
Posts: 4,255
Likes: 427
From: Portland, OR
Car: 86 Imponte Ruiner 450GT, 91 Formula
Engine: 350 Vortec, FIRST TPI, 325 RWHP
Transmission: 700R4 3000 stall.
Axle/Gears: 9 Bolt Torsen 3.70
Re: V-belt to Serpentine setup
I got mine on eBay. You can get adapters though that will allow AN lines to be fabricated if you prefer new parts. I don't think you can get the factory parts anymore.
GD
GD

Joined: Sep 2005
Posts: 654
Likes: 10
From: Windsor, Ontario
Car: 1987 Trans Am
Joined: Sep 2005
Posts: 654
Likes: 10
From: Windsor, Ontario
Car: 1987 Trans Am
Joined: Mar 2017
Posts: 4,255
Likes: 427
From: Portland, OR
Car: 86 Imponte Ruiner 450GT, 91 Formula
Engine: 350 Vortec, FIRST TPI, 325 RWHP
Transmission: 700R4 3000 stall.
Axle/Gears: 9 Bolt Torsen 3.70
Re: V-belt to Serpentine setup
No