

Stock 305 general adjustments


Thread Starter
Junior Member
Joined: Jan 2017
Posts: 92
Likes: 0
Stock 305 general adjustments
Hello,
I have a stock 305 that I just rebuild into my new 84 Camaro. It have the stock Rochester 4 Barrel carb, and 700r4 tranny. It is completely stock except I have a 2.5 double exhaust without cat, and headers (installed by the last owner). I have done a full tune up (all ignition including coil, new mech fuel pump, timing chain, carb rebuild...)
I'm wondering which could be the best adjustments to stay with a stock engine and maximise the fuel economy, on :
-Spark plugs heat
-Ignition timing adjustment
-Carb adjustment
The emissions are not important and it's for a summer daily driver, between april and october, (12k miles/year between these months)
I want to stay on Octane 87 Gas.
-Is it better to go with a hotter spark plug (ex : NGK V-Power UR4/6630 short plugs for headers), or go with colder UR5 to permit me to add more ignition timing and improves mileage?
-About the ignition timing, is it too much with 10degree BTDC at idle on park with warm engine (advance vacuum disconnected and plugged) to maximise fuel efficiency and performance? Or maybe 12 degree?
-For carb adjustments, I have read I need a vacuum gauge (I have it), but do you know sites or pages which explains the entire procedure? Any special tips to improve economy/efficiency? Do you think using a wideband O2 sensor worth it when adjusting it?
-Any other tips on general adjustments?
Moderator


Joined: Jan 2000
Posts: 19,683
Likes: 316
Re: Stock 305 general adjustments
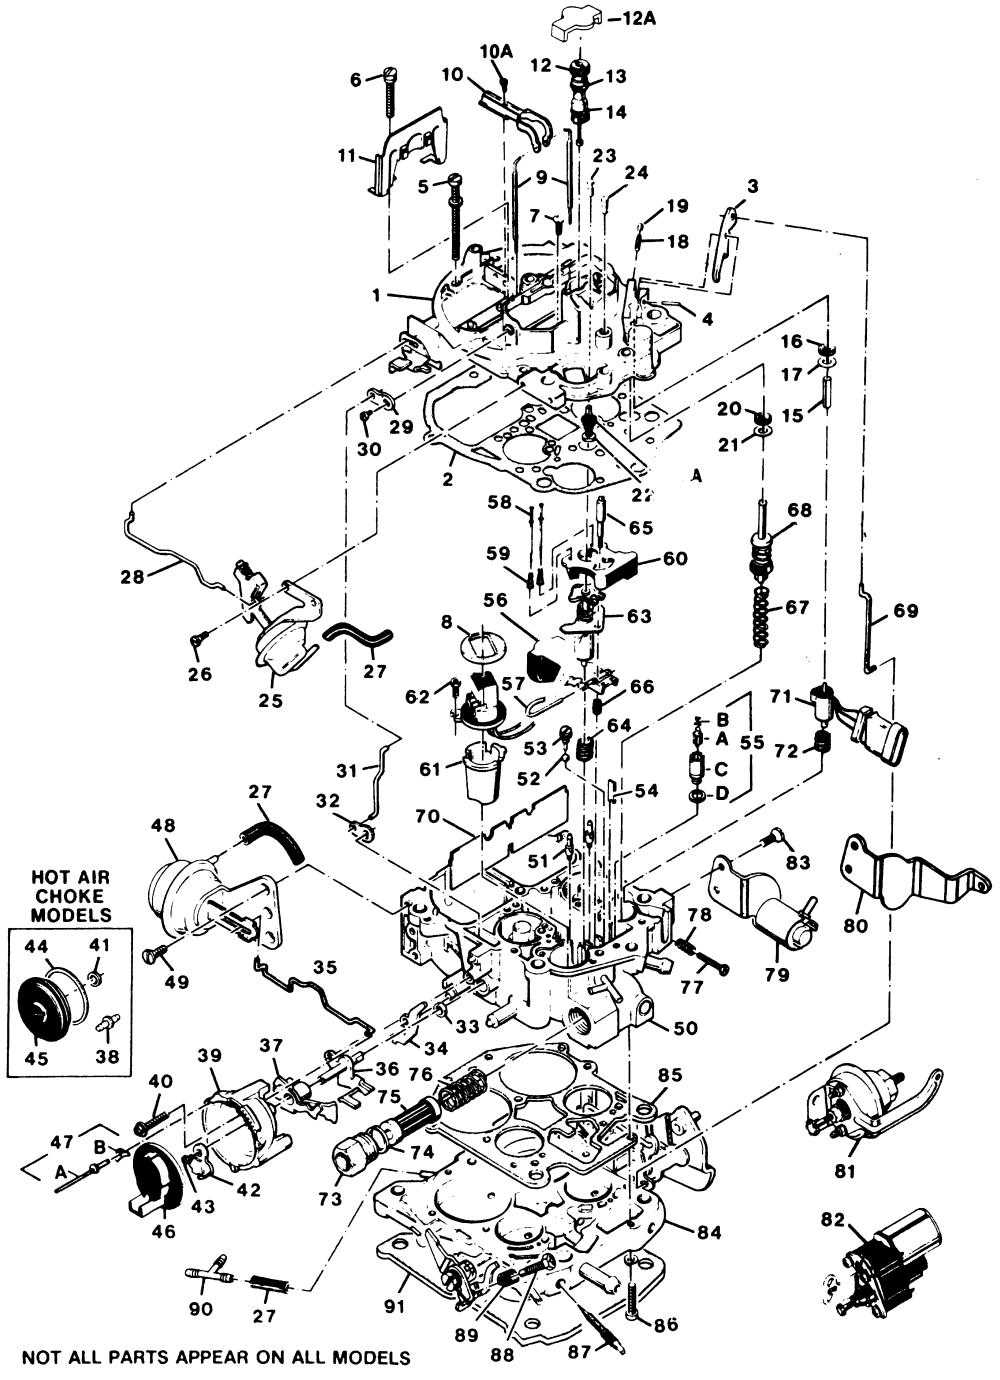
FLOAT CHECK
- Remove the air cleaner and cap any vacuum lines that were disconnected;
- Unplug the Throttle Position Sensor and enrichment solenoid connectors;
- Remove the choke pull-off actuator and linkage rod (25 & 28);
- Remove the secondary metering rod cam follower (10) and metering rods (9);
- Remove the choke lever screw and lever, and the linkage rod (29, 30, & 31);
- Remove the air horn screws (5, 6, & 7) and the two front carburetor to intake bolts;
- Carefully lift the air horn (1) off the carburetor body. As you do, pivot the air horn to allow the accelerator pump linkage rod to be removed from the top lever (3, 69);
- Hold down the float hinge pin (57) and simultaneously hold the front end of the float (56) closed against the inlet needle and seat (55), to raise the float to its maximum position. Verify correct float level by measuring the rear edge of the float to the top of the carburetor body with no gasket in place. Gently bend the float tab to raise or lower this setting to the specification;
- Replace the gasket and reassemble the carburetor, being careful to properly align the metering rods, pickup tubes, and TPS actuator plunger;
- Reconnect the hoses and electrical connectors;
TPS ADJUSTMENT
- Start engine and allow it to reach normal operating temperature;
- Set engine timing at the specified RPM;
- Set base idle speed with the A/C off and idle speed solenoid disconnected;
- Turn off the engine;
- Insert the probes of a digital voltmeter in terminals �B' and �C' on the TPS connector (center and bottom terminals). You may have to insert a paper clip or similar object into the rear of the connector to make contact;
- Turn on the ignition but do not start the engine. Read the voltage of the TPS. Remove the top plug (19) and adjust the TPS screw (18) to obtain a reading of 0.48VDC across the terminals.
NOTE - If your meter probes are reversed, the reading will be -0.48VDC. The important factor is the number. - Replace the hole plug in the adjustment screw hole when the position is set.
MC SOLENOID ADJUSTMENT
- Connect a dwell meter or oscilloscope probe to terminal �B' on the enrichment solenoid connector;
- Start the engine and allow it to reach normal operating temperature. Start the engine and reset the base idle if necessary. The dwell meter reading should vary while this is occurring, or the oscilloscope square wave frequency (pulse length) should vary;
- Set the parking brake, block the drive wheels, and place the transmission in DRIVE for an automatic car, NEUTRAL for a manual car;
- The dwell meter reading should fluctuate between 10� and 50� on the 6 cylinder scale, the oscilloscope should indicate a 15-85% duty cycle. Adjust the idle air bleed valve screw (12) in 1/8th turn increments to obtain a dwell reading between 25�-35�. The optimum setting is 30� (50% duty cycle), so get as close to this as possible. Adjust the screw only a little at a time and allow the system to react between adjustments;
- If the desired reading is not attainable through this method, the idle mixture screws will have to be adjusted (87). This will require removal of the carburetor and cutting the throttle body away around the steel plugs. Then reinstall and adjust the idle mixture screws evenly , then adjusting the idle air bleed screw as described above to obtain the correct readings.
A "dwell" meter is basically a duty cycle meter that is graduated on degrees of distributor rotation for an engine. In Kettering (breaker point) ignition system terms, the duty cycle is the amount of time that the circuit is on (points closed) versus the amount of time the circuit is off (points open). The meter face is graduated in degrees of distributor rotation. A point dwell angle of 30̊ on a V-8 engine is basically a 66% duty cycle, or ON time versus OFF time. One cylinder fires every 45� of distributor rotation (90� of crank rotation), so if the points are closed for 30� of that time, they are open for 15� of that interval. 30� � 45� = 2/3, or 66%.
A six cylinder engine is similar, but one cylinder fires every 60� of distributor rotation (120� of crank rotation). Typical specs for ignition point dwell on a six cylinder are 33�, and on a four cylinder engine 40� is common.
In terms of the mixture control solenoid on your carburetor, it is basically the same thing. The dwell meter is used to determine the amount of time the MC solenoid is ON versus OFF, or duty cycle. Since most automotive technicians have (or had) a dwell meter, the specification is presented in terms of dwell degrees. In reality, the measurement is the duty cycle percentage of the solenoid, but the common dwell meter is not graduated in those terms. Remember that 30� on the "V-8" setting on your dwell meter really means 66% duty cycle, and 45� would equal a 100% duty cycle.
Typical instructions for setting the solenoid are to set the meter on the six cylinder scale and adjust the "dwell" to an optimum of 30̊, or in reality a 50% duty cycle. This means the solenoid is ON an equal amount of time that it is OFF. This is the optimum setting for fullest range of control by the MC solenoid.
If you don�t have a dwell meter, but do have an oscilloscope or better quality DMM with a duty cycle scale, just set the MC solenoid for 50% or as closely as you can get it. The typical instructions indicate that any reading between 10� and 50� and varying is acceptable (15-85% duty cycle), but �acceptable� isn�t good enough for most of us, or we wouldn�t be here.
Once you have it running correctly in stock form, you can begin the power tweaking and tuning.
Moderator
Joined: Jan 2000
Posts: 19,683
Likes: 316
Re: Stock 305 general adjustments
From our friend, Ed Maher:
Tuning for Performance with your Computer-Controlled Quadrajet
Here for your digestion are some easy mods, with brief explanations, that you can make to any computer controlled Quadrajet. They require only simple tools, and most are free. If you have any questions, or need some advice, email me. -Ed Maher
Setting the Air Valve (AV) tension
The AV is the flap that covers the secondaries of your carb. It opens up when airflow through the secondaries demands it. Decreasing tension on it has 2 main benefits. It allows the AV to open faster, giving you full power sooner. It also allows the AV to open more easily with airflow, giving you the possibility to make more total power. It is held shut by 2 things.
First by the choke pull-off diaphragm (which is on the front pass. side of the carb.) When the engine is running , the choke pull off keeps the AV closed by pulling the linkage via the rod that connects them. When you go to/near WOT, the choke pull-off pulls out(due to the loss of manifold vacuum) and allows the AV to open. The pull-off generally releases slowly, slow enough that even with no AV spring tension you shouldn't get a bog. The rate at which it pulls out is not adjustable with the metal can pull offs our carbs came with.
The AV is also held shut by spring tension, and that is adjustable. To adjust it, you will need a small Allen key *and a small flat screwdriver.
(**Note: it is possible that instead of an Allen key you will need a small Torx bit, but they are rarer.)
Now, here you go:
Tuning Notes
Here are the basics of rods and hangers. The thinner the tip of the rod, the richer it is (more fuel can flow around it.) The thin part at the tip is called the power tip. The longer it is, the faster you go under enrichment when you floor it. For drag racing purposes, and in general, a longer power tip will give better response and performance. Rods have identifying letter stamped on their sides. The letters are nearly meaningless though without a book on rod specifications. Instead, compare them by sight. If you do have access to specifications, look for thin tips and long power tips (also found by short tapered sections). A great all around set of rods IMHO are the CKs, which are marginally richer than stock L69 rod, but with a longer power tip.
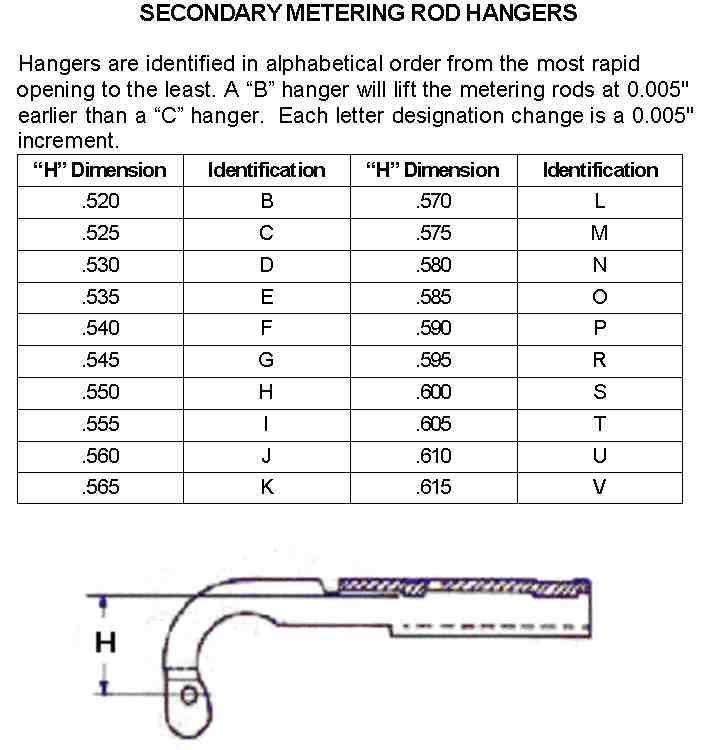
Hangers are identified by the letter stamped into the top of it, the lower the letter, the higher it holds the rods out of the jets, giving you more enrichment sooner. This can be especially helpful in covering a bog going into full throttle, as well as for some extra grunt coming out of the hole.
You can find replacement rods and hangers at a few sources. Edelbrock and GM both stock new units. You could also try poking around in boneyards and swap meets. New, rods should only cost you about $8, hangers about $4. Edelbrock parts can be easily ordered through Jegs (including CK, CC, and CE rods, as well as a good assortment of hangers.)
Increasing Airflow
Stock our carbs are limited to about 600cfm total airflow due to a tab that prevents the AV from opening fully. However, our throttle bores will support 780 cfm, once the AV is allowed to open fully. If you've got a reasonably well-modded car and you think more airflow is in order, here's how to fix that.
After doing this mod, you will need to adjust the secondary metering to suit. After doing this, my old CK rods/G-hanger set-up was woefully lean. Stepping up to CC rods has put me right back in order.
Other Tuning
The stuff mentioned herein is more advanced and requires you to get into your carb. At this point you definitely should have a manual for your carb, and should have a good understanding of how it works.
Primary Enrichment
If you have a part-throttle flat spot, or feel you just need a little more enrichment, look here. This requires you to remove your air horn and take out the plug covering the rich stop screw. By manipulating the travel of the MCS, you can make your car run richer/leaner to suit. As longs as you don't go too far, it will still keep low emissions and fuel economy. But under WOT/enrichment mode you would have the extra fuel. Give it more travel and it gets richer, less travel is leaner. Don't go under 3/32 travel though, that would be too lean and probably mess up overall drivability. Adjust this in 1/4 turn increments. I bought a kit with the proper tool to turn it, and a travel indicator/idle air bleed tool for $4 at Pep Boys (ask for a mixture adjusting kit, listed with the rebuild kits for the carb.)
Idle Air Bleed
This is a worthwhile piece to adjust properly too, especially if you have a lot of mods. I won't go into the whole process here (just read the manual), but i will emphasize a few points. By adjusting the IAB, you don't have to mess with the mixture screws as on previous non-computer carbs (unless they are set way off.) By having the IAB adjusted properly, it allows your computer to continuously adjust the idle mixture, keeping your car running clean. Set it with your car in gear if i is an automatic car (have a friend hold the brake.) Adjust it very slowly (in 1/8 turn increments, waiting a few seconds between to allow the car to settle.)
Some other notes....If your dwell at idle won't vary from 10', then your car is either stuck in enrichment mode (bad or maladjusted TPS) or is compensating for a very lean condition (BIG vacuum leak, loose carb bolts, or a bad TPS) Either way, try to establish the problem before going any further.
Thanks, Ed.
And just a few random bits of information:
SECONDARY METERING RODS
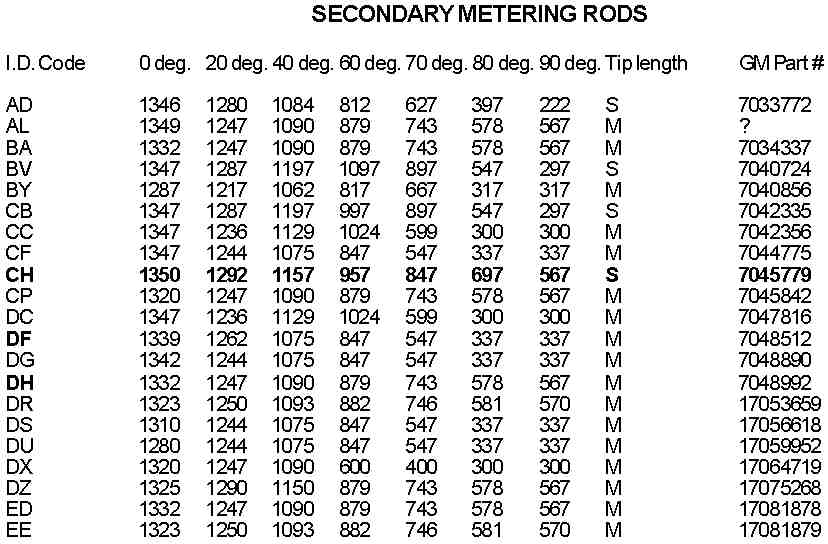
Tip Length Legend:
*
Optimal timing advance is a function of chamber temperature (subject the EGR function), fuel quality, spark plug heat, and general engine condition.
Tuning for Performance with your Computer-Controlled Quadrajet
Here for your digestion are some easy mods, with brief explanations, that you can make to any computer controlled Quadrajet. They require only simple tools, and most are free. If you have any questions, or need some advice, email me. -Ed Maher
Setting the Air Valve (AV) tension
The AV is the flap that covers the secondaries of your carb. It opens up when airflow through the secondaries demands it. Decreasing tension on it has 2 main benefits. It allows the AV to open faster, giving you full power sooner. It also allows the AV to open more easily with airflow, giving you the possibility to make more total power. It is held shut by 2 things.
First by the choke pull-off diaphragm (which is on the front pass. side of the carb.) When the engine is running , the choke pull off keeps the AV closed by pulling the linkage via the rod that connects them. When you go to/near WOT, the choke pull-off pulls out(due to the loss of manifold vacuum) and allows the AV to open. The pull-off generally releases slowly, slow enough that even with no AV spring tension you shouldn't get a bog. The rate at which it pulls out is not adjustable with the metal can pull offs our carbs came with.
The AV is also held shut by spring tension, and that is adjustable. To adjust it, you will need a small Allen key *and a small flat screwdriver.
(**Note: it is possible that instead of an Allen key you will need a small Torx bit, but they are rarer.)
Now, here you go:
- Look at the pass. side of the carb (with the air cleaner off)
- Observe the linkage on the side of the AV. Through the slot you can see a small flat screw. That's the one you need to adjust.
- To adjust it you need to loosen the setscrew, which is on the underside of the lip of the air horn. The setscrew is where the Allen/Torx bit comes into play. Loosen it only enough that you can turn the adjusting screw.
- Turn the adjusting screw counter-clockwise until the AV flops open on its own. Now slowly turn it clockwise until the AV just shuts. That is 0 tension. If you were setting it to factory specs you would then proceed to turn it down the specified turns (usually 1/2-1 turn). Instead, tighten the setscrew and go drive.
Note: You may have to hold the AV rod to the pull-off out of the way while you adjust the tension. You can also remove the pull-off, but that is really excessive. If you exercise some common sense, it isn't hard to figure out how to hold everything.) - With your car fully warmed up, come to a stop and then nail it. Did it bog? If it didn't, consider yourself done. If it did, then there are a few ways to proceed. First ask yourself if you have a fresh tune-up. If not, what are you doing making performance mods when your basics aren't even done. Shame on you. Also, be sure your choke pull-off is working properly. If it is bad, it could cause you problems too. Second, now is a good time to read the next section on changing secondary metering. Finally, if you don't want to change secondary metering (and why not?), you can increase the AV tension until the bog goes away. Go in 1/8 turn increments at a time, and stop when the bog goes away. Do not increase the tension to over 1 turn down or you will permanently distort the spring.
- Look at the top of the carb between the flaps of the AV. Observe the little screw on the hanger.
- Take that screw out. Most likely you will not own a torx bit small enough to remove it. The easiest way to take it out in that case is using pliers to turn it out. It sounds barbaric, but it works. If you didn't have the proper Torx bit, while you have it out, modify the screw for future use. Either hacksaw a slot in its head to accommodate a flat head screwdriver, or file its sides flat so that it is easier to grip with pliers.
- Lift out the hanger and the rods with it. REMEMBER WHICH WAY THE RODS ARE ORIENTED ON THE HANGER.
- Swap the rods or hanger or both with what you want to drop in.
- Drop them back in. They should drop in with no trouble. If there is friction, you probably have the rods on the hanger backwards. Don't start bending the hanger to make it fit until you try reversing the way the rods tips are facing.
Tuning Notes
Here are the basics of rods and hangers. The thinner the tip of the rod, the richer it is (more fuel can flow around it.) The thin part at the tip is called the power tip. The longer it is, the faster you go under enrichment when you floor it. For drag racing purposes, and in general, a longer power tip will give better response and performance. Rods have identifying letter stamped on their sides. The letters are nearly meaningless though without a book on rod specifications. Instead, compare them by sight. If you do have access to specifications, look for thin tips and long power tips (also found by short tapered sections). A great all around set of rods IMHO are the CKs, which are marginally richer than stock L69 rod, but with a longer power tip.
Hangers are identified by the letter stamped into the top of it, the lower the letter, the higher it holds the rods out of the jets, giving you more enrichment sooner. This can be especially helpful in covering a bog going into full throttle, as well as for some extra grunt coming out of the hole.
You can find replacement rods and hangers at a few sources. Edelbrock and GM both stock new units. You could also try poking around in boneyards and swap meets. New, rods should only cost you about $8, hangers about $4. Edelbrock parts can be easily ordered through Jegs (including CK, CC, and CE rods, as well as a good assortment of hangers.)
Increasing Airflow
Stock our carbs are limited to about 600cfm total airflow due to a tab that prevents the AV from opening fully. However, our throttle bores will support 780 cfm, once the AV is allowed to open fully. If you've got a reasonably well-modded car and you think more airflow is in order, here's how to fix that.
- Look at the AV linkage. Rotate the AV open and observe the little tab on the bottom of the linkage that hits the underside of the air horn lip.
- Cut, file or otherwise mutilate that tab off. (*see note*)
- If you want to get really trick, you could drill a hole in the air horn casting where the tab hit and put a setscrew to adjust the total opening of the AV. This could be used as a tuning tool, along with different metering rods to change airflow and fueling to suit current conditions.
- [When removing the tab, be careful how much you remove. If you file it down flat, you will definitely get interference with the AV linkage. When that happens, you have to get creative and tweak the rod and/or cut the slot in the linkage longer to allow it to work. If you want full airflow, this is your only option, and if you're remotely mechanically able it's not hard, but i still had to let you know in advance.)
After doing this mod, you will need to adjust the secondary metering to suit. After doing this, my old CK rods/G-hanger set-up was woefully lean. Stepping up to CC rods has put me right back in order.
Other Tuning
The stuff mentioned herein is more advanced and requires you to get into your carb. At this point you definitely should have a manual for your carb, and should have a good understanding of how it works.
Primary Enrichment
If you have a part-throttle flat spot, or feel you just need a little more enrichment, look here. This requires you to remove your air horn and take out the plug covering the rich stop screw. By manipulating the travel of the MCS, you can make your car run richer/leaner to suit. As longs as you don't go too far, it will still keep low emissions and fuel economy. But under WOT/enrichment mode you would have the extra fuel. Give it more travel and it gets richer, less travel is leaner. Don't go under 3/32 travel though, that would be too lean and probably mess up overall drivability. Adjust this in 1/4 turn increments. I bought a kit with the proper tool to turn it, and a travel indicator/idle air bleed tool for $4 at Pep Boys (ask for a mixture adjusting kit, listed with the rebuild kits for the carb.)
Idle Air Bleed
This is a worthwhile piece to adjust properly too, especially if you have a lot of mods. I won't go into the whole process here (just read the manual), but i will emphasize a few points. By adjusting the IAB, you don't have to mess with the mixture screws as on previous non-computer carbs (unless they are set way off.) By having the IAB adjusted properly, it allows your computer to continuously adjust the idle mixture, keeping your car running clean. Set it with your car in gear if i is an automatic car (have a friend hold the brake.) Adjust it very slowly (in 1/8 turn increments, waiting a few seconds between to allow the car to settle.)
Some other notes....If your dwell at idle won't vary from 10', then your car is either stuck in enrichment mode (bad or maladjusted TPS) or is compensating for a very lean condition (BIG vacuum leak, loose carb bolts, or a bad TPS) Either way, try to establish the problem before going any further.
Thanks, Ed.
And just a few random bits of information:
SECONDARY METERING RODS
Tip Length Legend:
- LL: Extra long power tips supply richest mixture starting at 60� of air valve opening.
Never use in performance applications using greater than 70� air valve opening. - L: Power tip starts at 70� air valve opening.
Tip considered to begin at that part of the rod that is within .003" of rod's minimum diameter - M: Power tip starts at 80� air valve opening.
Tip considered to begin at that part of the rod that is within .003" of rod's minimum diameter - M/S: Power tip starts at 80� air valve opening.
Tip considered to begin at that part of the rod that is within .005" of rod's minimum diameter. - S: Power tip starts at 90� air valve opening.
*
Optimal timing advance is a function of chamber temperature (subject the EGR function), fuel quality, spark plug heat, and general engine condition.

Senior Member
Joined: Apr 2016
Posts: 517
Likes: 4
From: Perth Western Australia
Car: 1987 Z28 Camaro
Engine: 305 LG4 4bbl
Transmission: TH700R4
Re: Stock 305 general adjustments
when i had the computer controlled gear, the best results for me came from 91 octane fuel (not ethanol), accell shorty copper plugs - the iridiums kept clogging, 6 degrees of advance however that will vary from application to application.
for timing take it for a run, advance, run it, advance, when it starts pinging, back it off a bit, run it and repeat til you find the sweet spot.
vac hoses and a rebuild kit help guarantee smooth sailing.
though tbh the best thing i did was go non cc controlled when cc bits started dying. (not that that info helps in this case)
Senior Member
Joined: Apr 2016
Posts: 517
Likes: 4
From: Perth Western Australia
Car: 1987 Z28 Camaro
Engine: 305 LG4 4bbl
Transmission: TH700R4
Re: Stock 305 general adjustments
oh - if you plan on or need to keep your egr because of emissions, verify it works or youll have an crappy vac leak thats pretty much undetectable.
short of that, rip it off and block it off.
short of that, rip it off and block it off.

Joined: Feb 2017
Posts: 4,185
Likes: 576
From: Meriden, CT 06451
Car: 84 TA orig. 305 LG4 "H" E4ME
Engine: 334 SBC - stroked 305 M4ME Q-Jet
Transmission: upgraded 700R4 3200 stall
Axle/Gears: 10bolt 4.10 Posi w Lakewood TA Bars
Re: Stock 305 general adjustments
From our friend, Ed Maher:
Tuning for Performance with your Computer-Controlled Quadrajet
Here for your digestion are some easy mods, with brief explanations, that you can make to any computer controlled Quadrajet. They require only simple tools, and most are free. If you have any questions, or need some advice, email me. -Ed Maher
Setting the Air Valve (AV) tension
The AV is the flap that covers the secondaries of your carb. It opens up when airflow through the secondaries demands it. Decreasing tension on it has 2 main benefits. It allows the AV to open faster, giving you full power sooner. It also allows the AV to open more easily with airflow, giving you the possibility to make more total power. It is held shut by 2 things.
First by the choke pull-off diaphragm (which is on the front pass. side of the carb.) When the engine is running , the choke pull off keeps the AV closed by pulling the linkage via the rod that connects them. When you go to/near WOT, the choke pull-off pulls out(due to the loss of manifold vacuum) and allows the AV to open. The pull-off generally releases slowly, slow enough that even with no AV spring tension you shouldn't get a bog. The rate at which it pulls out is not adjustable with the metal can pull offs our carbs came with.
The AV is also held shut by spring tension, and that is adjustable. To adjust it, you will need a small Allen key *and a small flat screwdriver.
(**Note: it is possible that instead of an Allen key you will need a small Torx bit, but they are rarer.)
Now, here you go:
Tuning Notes
Here are the basics of rods and hangers. The thinner the tip of the rod, the richer it is (more fuel can flow around it.) The thin part at the tip is called the power tip. The longer it is, the faster you go under enrichment when you floor it. For drag racing purposes, and in general, a longer power tip will give better response and performance. Rods have identifying letter stamped on their sides. The letters are nearly meaningless though without a book on rod specifications. Instead, compare them by sight. If you do have access to specifications, look for thin tips and long power tips (also found by short tapered sections). A great all around set of rods IMHO are the CKs, which are marginally richer than stock L69 rod, but with a longer power tip.
Hangers are identified by the letter stamped into the top of it, the lower the letter, the higher it holds the rods out of the jets, giving you more enrichment sooner. This can be especially helpful in covering a bog going into full throttle, as well as for some extra grunt coming out of the hole.
You can find replacement rods and hangers at a few sources. Edelbrock and GM both stock new units. You could also try poking around in boneyards and swap meets. New, rods should only cost you about $8, hangers about $4. Edelbrock parts can be easily ordered through Jegs (including CK, CC, and CE rods, as well as a good assortment of hangers.)
Increasing Airflow
Stock our carbs are limited to about 600cfm total airflow due to a tab that prevents the AV from opening fully. However, our throttle bores will support 780 cfm, once the AV is allowed to open fully. If you've got a reasonably well-modded car and you think more airflow is in order, here's how to fix that.
After doing this mod, you will need to adjust the secondary metering to suit. After doing this, my old CK rods/G-hanger set-up was woefully lean. Stepping up to CC rods has put me right back in order.
Other Tuning
The stuff mentioned herein is more advanced and requires you to get into your carb. At this point you definitely should have a manual for your carb, and should have a good understanding of how it works.
Primary Enrichment
If you have a part-throttle flat spot, or feel you just need a little more enrichment, look here. This requires you to remove your air horn and take out the plug covering the rich stop screw. By manipulating the travel of the MCS, you can make your car run richer/leaner to suit. As longs as you don't go too far, it will still keep low emissions and fuel economy. But under WOT/enrichment mode you would have the extra fuel. Give it more travel and it gets richer, less travel is leaner. Don't go under 3/32 travel though, that would be too lean and probably mess up overall drivability. Adjust this in 1/4 turn increments. I bought a kit with the proper tool to turn it, and a travel indicator/idle air bleed tool for $4 at Pep Boys (ask for a mixture adjusting kit, listed with the rebuild kits for the carb.)
Idle Air Bleed
This is a worthwhile piece to adjust properly too, especially if you have a lot of mods. I won't go into the whole process here (just read the manual), but i will emphasize a few points. By adjusting the IAB, you don't have to mess with the mixture screws as on previous non-computer carbs (unless they are set way off.) By having the IAB adjusted properly, it allows your computer to continuously adjust the idle mixture, keeping your car running clean. Set it with your car in gear if i is an automatic car (have a friend hold the brake.) Adjust it very slowly (in 1/8 turn increments, waiting a few seconds between to allow the car to settle.)
Some other notes....If your dwell at idle won't vary from 10', then your car is either stuck in enrichment mode (bad or maladjusted TPS) or is compensating for a very lean condition (BIG vacuum leak, loose carb bolts, or a bad TPS) Either way, try to establish the problem before going any further.
Thanks, Ed.
And just a few random bits of information:
SECONDARY METERING RODS
Tip Length Legend:
*
Optimal timing advance is a function of chamber temperature (subject the EGR function), fuel quality, spark plug heat, and general engine condition.
Tuning for Performance with your Computer-Controlled Quadrajet
Here for your digestion are some easy mods, with brief explanations, that you can make to any computer controlled Quadrajet. They require only simple tools, and most are free. If you have any questions, or need some advice, email me. -Ed Maher
Setting the Air Valve (AV) tension
The AV is the flap that covers the secondaries of your carb. It opens up when airflow through the secondaries demands it. Decreasing tension on it has 2 main benefits. It allows the AV to open faster, giving you full power sooner. It also allows the AV to open more easily with airflow, giving you the possibility to make more total power. It is held shut by 2 things.
First by the choke pull-off diaphragm (which is on the front pass. side of the carb.) When the engine is running , the choke pull off keeps the AV closed by pulling the linkage via the rod that connects them. When you go to/near WOT, the choke pull-off pulls out(due to the loss of manifold vacuum) and allows the AV to open. The pull-off generally releases slowly, slow enough that even with no AV spring tension you shouldn't get a bog. The rate at which it pulls out is not adjustable with the metal can pull offs our carbs came with.
The AV is also held shut by spring tension, and that is adjustable. To adjust it, you will need a small Allen key *and a small flat screwdriver.
(**Note: it is possible that instead of an Allen key you will need a small Torx bit, but they are rarer.)
Now, here you go:
- Look at the pass. side of the carb (with the air cleaner off)
- Observe the linkage on the side of the AV. Through the slot you can see a small flat screw. That's the one you need to adjust.
- To adjust it you need to loosen the setscrew, which is on the underside of the lip of the air horn. The setscrew is where the Allen/Torx bit comes into play. Loosen it only enough that you can turn the adjusting screw.
- Turn the adjusting screw counter-clockwise until the AV flops open on its own. Now slowly turn it clockwise until the AV just shuts. That is 0 tension. If you were setting it to factory specs you would then proceed to turn it down the specified turns (usually 1/2-1 turn). Instead, tighten the setscrew and go drive.
Note: You may have to hold the AV rod to the pull-off out of the way while you adjust the tension. You can also remove the pull-off, but that is really excessive. If you exercise some common sense, it isn't hard to figure out how to hold everything.) - With your car fully warmed up, come to a stop and then nail it. Did it bog? If it didn't, consider yourself done. If it did, then there are a few ways to proceed. First ask yourself if you have a fresh tune-up. If not, what are you doing making performance mods when your basics aren't even done. Shame on you. Also, be sure your choke pull-off is working properly. If it is bad, it could cause you problems too. Second, now is a good time to read the next section on changing secondary metering. Finally, if you don't want to change secondary metering (and why not?), you can increase the AV tension until the bog goes away. Go in 1/8 turn increments at a time, and stop when the bog goes away. Do not increase the tension to over 1 turn down or you will permanently distort the spring.
- Look at the top of the carb between the flaps of the AV. Observe the little screw on the hanger.
- Take that screw out. Most likely you will not own a torx bit small enough to remove it. The easiest way to take it out in that case is using pliers to turn it out. It sounds barbaric, but it works. If you didn't have the proper Torx bit, while you have it out, modify the screw for future use. Either hacksaw a slot in its head to accommodate a flat head screwdriver, or file its sides flat so that it is easier to grip with pliers.
- Lift out the hanger and the rods with it. REMEMBER WHICH WAY THE RODS ARE ORIENTED ON THE HANGER.
- Swap the rods or hanger or both with what you want to drop in.
- Drop them back in. They should drop in with no trouble. If there is friction, you probably have the rods on the hanger backwards. Don't start bending the hanger to make it fit until you try reversing the way the rods tips are facing.
Tuning Notes
Here are the basics of rods and hangers. The thinner the tip of the rod, the richer it is (more fuel can flow around it.) The thin part at the tip is called the power tip. The longer it is, the faster you go under enrichment when you floor it. For drag racing purposes, and in general, a longer power tip will give better response and performance. Rods have identifying letter stamped on their sides. The letters are nearly meaningless though without a book on rod specifications. Instead, compare them by sight. If you do have access to specifications, look for thin tips and long power tips (also found by short tapered sections). A great all around set of rods IMHO are the CKs, which are marginally richer than stock L69 rod, but with a longer power tip.
Hangers are identified by the letter stamped into the top of it, the lower the letter, the higher it holds the rods out of the jets, giving you more enrichment sooner. This can be especially helpful in covering a bog going into full throttle, as well as for some extra grunt coming out of the hole.
You can find replacement rods and hangers at a few sources. Edelbrock and GM both stock new units. You could also try poking around in boneyards and swap meets. New, rods should only cost you about $8, hangers about $4. Edelbrock parts can be easily ordered through Jegs (including CK, CC, and CE rods, as well as a good assortment of hangers.)
Increasing Airflow
Stock our carbs are limited to about 600cfm total airflow due to a tab that prevents the AV from opening fully. However, our throttle bores will support 780 cfm, once the AV is allowed to open fully. If you've got a reasonably well-modded car and you think more airflow is in order, here's how to fix that.
- Look at the AV linkage. Rotate the AV open and observe the little tab on the bottom of the linkage that hits the underside of the air horn lip.
- Cut, file or otherwise mutilate that tab off. (*see note*)
- If you want to get really trick, you could drill a hole in the air horn casting where the tab hit and put a setscrew to adjust the total opening of the AV. This could be used as a tuning tool, along with different metering rods to change airflow and fueling to suit current conditions.
- [When removing the tab, be careful how much you remove. If you file it down flat, you will definitely get interference with the AV linkage. When that happens, you have to get creative and tweak the rod and/or cut the slot in the linkage longer to allow it to work. If you want full airflow, this is your only option, and if you're remotely mechanically able it's not hard, but i still had to let you know in advance.)
After doing this mod, you will need to adjust the secondary metering to suit. After doing this, my old CK rods/G-hanger set-up was woefully lean. Stepping up to CC rods has put me right back in order.
Other Tuning
The stuff mentioned herein is more advanced and requires you to get into your carb. At this point you definitely should have a manual for your carb, and should have a good understanding of how it works.
Primary Enrichment
If you have a part-throttle flat spot, or feel you just need a little more enrichment, look here. This requires you to remove your air horn and take out the plug covering the rich stop screw. By manipulating the travel of the MCS, you can make your car run richer/leaner to suit. As longs as you don't go too far, it will still keep low emissions and fuel economy. But under WOT/enrichment mode you would have the extra fuel. Give it more travel and it gets richer, less travel is leaner. Don't go under 3/32 travel though, that would be too lean and probably mess up overall drivability. Adjust this in 1/4 turn increments. I bought a kit with the proper tool to turn it, and a travel indicator/idle air bleed tool for $4 at Pep Boys (ask for a mixture adjusting kit, listed with the rebuild kits for the carb.)
Idle Air Bleed
This is a worthwhile piece to adjust properly too, especially if you have a lot of mods. I won't go into the whole process here (just read the manual), but i will emphasize a few points. By adjusting the IAB, you don't have to mess with the mixture screws as on previous non-computer carbs (unless they are set way off.) By having the IAB adjusted properly, it allows your computer to continuously adjust the idle mixture, keeping your car running clean. Set it with your car in gear if i is an automatic car (have a friend hold the brake.) Adjust it very slowly (in 1/8 turn increments, waiting a few seconds between to allow the car to settle.)
Some other notes....If your dwell at idle won't vary from 10', then your car is either stuck in enrichment mode (bad or maladjusted TPS) or is compensating for a very lean condition (BIG vacuum leak, loose carb bolts, or a bad TPS) Either way, try to establish the problem before going any further.
Thanks, Ed.
And just a few random bits of information:
SECONDARY METERING RODS
Tip Length Legend:
- LL: Extra long power tips supply richest mixture starting at 60� of air valve opening.
Never use in performance applications using greater than 70� air valve opening. - L: Power tip starts at 70� air valve opening.
Tip considered to begin at that part of the rod that is within .003" of rod's minimum diameter - M: Power tip starts at 80� air valve opening.
Tip considered to begin at that part of the rod that is within .003" of rod's minimum diameter - M/S: Power tip starts at 80� air valve opening.
Tip considered to begin at that part of the rod that is within .005" of rod's minimum diameter. - S: Power tip starts at 90� air valve opening.
*
Optimal timing advance is a function of chamber temperature (subject the EGR function), fuel quality, spark plug heat, and general engine condition.
Joined: Feb 2017
Posts: 4,185
Likes: 576
From: Meriden, CT 06451
Car: 84 TA orig. 305 LG4 "H" E4ME
Engine: 334 SBC - stroked 305 M4ME Q-Jet
Transmission: upgraded 700R4 3200 stall
Axle/Gears: 10bolt 4.10 Posi w Lakewood TA Bars
Re: Stock 305 general adjustments
You mentioned a vacuum advance distributor. Are you still using the CCC carb? Are you still computer-controlled, or not?
Trending Topics
Thread Starter
Junior Member
Joined: Jan 2017
Posts: 92
Likes: 0
Re: Stock 305 general adjustments
I have a Canadian car and engine, thats why i have a vacuum distributor. Carb is not computer controlled. The egr is cancelled. I plan to use NGK UR4 6630s plugs. For the 91 octane, its a 10-11% diff�rence or price from 87 octane, so i will use only 91 if i have close to 10% benefits of mpg. However, the fuel i use is always fresh (costco), my gas station have 2 full trucks delivered per day. Also, no �thanol.
Last edited by Camaro-3; May 29, 2017 at 07:19 AM.
Senior Member
Joined: Apr 2016
Posts: 517
Likes: 4
From: Perth Western Australia
Car: 1987 Z28 Camaro
Engine: 305 LG4 4bbl
Transmission: TH700R4
Re: Stock 305 general adjustments
excellent - no computer to play with anything.
i was getting some slight pinging on anything lower than 91 octane which was irritating me somewhat. The times i used ethanol fuels it got worse.
also if you dont have a computer you shouldnt have an O2 sensor so put that out of your mind.
there isnt a huge amount to adjust if you are wanting to just maximise economy. If you wanted to tune the carb, theres plenty of vids on the internet to show you how to do it.
a lot of these settings will come down to the car, the age, the miles on it and what condition the motor is in. i wouldnt be playing with the carb too much as with the stock peanut cam etc the performance isnt going to improve much.
the fact that youve got headers - i would got for the shorty plugs but thats just my opinion. its pretty tight under there
Joined: Feb 2017
Posts: 4,185
Likes: 576
From: Meriden, CT 06451
Car: 84 TA orig. 305 LG4 "H" E4ME
Engine: 334 SBC - stroked 305 M4ME Q-Jet
Transmission: upgraded 700R4 3200 stall
Axle/Gears: 10bolt 4.10 Posi w Lakewood TA Bars
Re: Stock 305 general adjustments
Can you provide pictures of your under hood stickers (esp. vacuum routing) and if you happen to have a diagram for the TCC (torque converter control) lockup wiring diagram?
I have an 84 Trans Am and I can now remove all of my emissions crap (now exempt) and I will be making my car just like yours.
I have an 84 Trans Am and I can now remove all of my emissions crap (now exempt) and I will be making my car just like yours.