LOG IN
REGISTER
Forums
Tech Boards
Aftermarket Product Review
Aftermarket Vendor Review
Auto Detailing and Appearance
Body
Interior
Car Audio
Carburetors
Cooling
Convertibles
DIY PROM
DFI and ECM
Electronics
Exhaust
History / Originality
Engine Swap
Fabrication
Tech / General Engine
TPI
TBI
Alternative Port EFI Intakes
Power Adders
Transmissions and Drivetrain
Suspension and Chassis
Brakes
Wheels and Tires
V6
FAQ Board
Racing Boards
Organized Drag Racing and Autocross
Theoretical and Street Racing
Regional Boards
Mid-Atlantic Region
North East Region
South East Region
South West Region
Mid-West Region
Pacific Northwest Region
Northern Great Plains and Rocky Mountains
NW Indiana and South Chicago Suburbs
South Central Region
Northern California
Southern California Area
Canadian Region
Third Gen Association of Ontario
European Region
Pacific Region
Third Gen Expo
Site Boards
Problems / Help / Suggestions / Comments
Signature Pictures and PhotoShop Requests
Memorial Board
Group Purchase Board
Group Purchases
Classified Boards
Sponsored Vendors
Cars for Sale
Cars Wanted
Parts for Sale
Parts Wanted
LSX and LTX Parts
Miscellaneous Third Gen Items!
Classified Ads Feedback Board
News
Marketplace
Vendor Directory
Become a Vendor
New Posts
Tools
Car Payment Calculator
Tire Rim Calculator
Vin Decoder
Recalls
Members List
Live Feed
How-Tos
Gallery
Tech Data
Camaro
1982 Camaro
1983 Camaro
1984 Camaro
1985 Camaro
1986 Camaro
1987 Camaro
1988 Camaro
1989 Camaro
1990 Camaro
1991 Camaro
1992 Camaro
Firebird
1982 Firebird
1983 Firebird
1984 Firebird
1985 Firebird
1986 Firebird
1987 Firebird
1988 Firebird
1989 Firebird
1990 Firebird
1991 Firebird
1992 Firebird
Media
Sales Articles
Magazine Articles
View Dark Mode
Please register or login to enable Dark Mode.
Log In
Register
Threads
Google
Threads
Posts
Advanced
Dark Mode
Please register or login to enable Dark Mode.
Log In
Forgot your Password?
By logging into your account, you agree to our
Terms of Use
and
Privacy Policy
, and to the use of cookies as described therein.
or
Login with Facebook
Recent
Commented
Albums
My Pictures
My Post Pictures
Aviator857
November 8, 2017
187
0
Sort:
Most Recent
Default
Most Recent
0
2022/03/27 12:40:55
Aviator857
0
2021/12/27 15:05:40
Aviator857
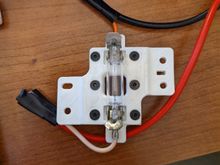
Install lens
0
2021/12/27 09:58:13
Aviator857
Install bulb and test
0
2021/12/27 09:57:44
Aviator857
Install the headliner and housing.
0
2021/12/27 09:57:02
Aviator857
Reinstall it using the original screws with the studs. Don't over tighten it though. Test and let bulb cool and remove it if your headliner needs space some are real tight to the bulb.
0
2021/12/27 09:56:01
Aviator857
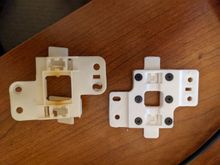
The 6 m3 screws should not extend past the plate. Note only hand tight is required using a Allen wrench, do not use a driver as it will likely strip the threads in the plastic parts. The end screws take the load the middle ones prevent it from warping if too hot of a bulb is used.
0
2021/12/27 09:46:05
Aviator857
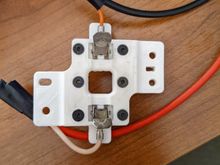
When attaching the top plate make sure the wire is captured in the channel, also note the plate has additional support for the terminals, and the plastic part has a notch where the wire crimp is to allow those supports room to reach the terminal.
0
2021/12/27 09:45:52
Aviator857
Once the clips are in make sure the retaining clips are capturing the terminal against the plastic.
0
2021/12/27 09:45:37
Aviator857
As you press it in you should hear a click when the retainer springs out when it's fully seated capturing it in place.
0
2021/12/27 09:45:20
Aviator857
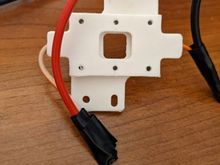
They will be a tight fit so use something hard and flat to push them in. Apply force on the thick area only and not the "wings" that extend out to mount them.
0
2021/12/27 09:44:53
Aviator857
Insert the existing socket terminal into the housing. Do not cut your existing wires if your terminals don't need replaced.
0
2021/12/27 09:44:42
Aviator857
0
2021/12/20 16:21:27
Aviator857
0
2021/12/20 16:21:22
Aviator857
0
2021/12/20 16:21:16
Aviator857
0
2021/12/20 16:17:59
Aviator857
0
2021/12/20 16:17:19
Aviator857
0
2021/12/20 16:16:49
Aviator857
Final product, the spoiler is just sitting there in the picture, I need to grab a picture of the final final with the new center tail light housing and NOS center tail light and after buffing the entire car
0
2021/07/14 11:10:52
Aviator857
The shape of the spoiler is hard to paint right, I may re spray it again later
0
2021/07/14 11:10:19
Aviator857
finished product (well spoiler still needs bolted on here, I didn't take a final final picture)
0
2021/07/14 11:03:42
Aviator857
the final butyl layout
0
2021/07/14 11:03:38
Aviator857
decided to put some butyl at each bolt
0
2021/07/14 11:03:33
Aviator857
butyl rope location
0
2021/07/14 11:03:29
Aviator857
Single person operation, I had an engine hoist hooked to it to open and close it
0
2021/07/14 11:03:24
Aviator857
Alignment tape
0
2021/07/14 11:03:19
Aviator857
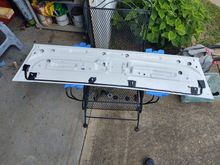
use tie down strips (and tape to protect the paint on the metal surround, a line and tape markers so you can lift and bolt.
0
2021/07/14 11:03:15
Aviator857
sitting in place
0
2021/07/14 11:03:11
Aviator857
Butyl tape under hinge
0
2021/07/14 11:03:07
Aviator857
tapped up for install
0
2021/07/14 11:03:03
Aviator857
New Hinge install, painted metal surround re installed
0
2021/07/14 11:02:58
Aviator857
old hinge
0
2021/07/14 11:02:52
Aviator857
tape it up to protect the paint
0
2021/07/14 11:02:48
Aviator857
man the shape of this spoiler is hard to paint
0
2021/07/14 11:02:45
Aviator857
0
2021/05/29 16:03:12
Aviator857
0
2021/05/29 16:02:52
Aviator857
0
2021/05/29 16:02:37
Aviator857
0
2021/05/29 16:02:25
Aviator857
0
2021/05/25 06:52:25
Aviator857
0
2021/05/13 17:56:22
Aviator857
First
Page
1 of 5
Last
Go To
Page
1
2
3
4
5
1 of 5
Go To
GO
Go to page
of 5
pages
1
2
3
4
5