
Lets see em...Pics of Formulas!


Senior Member
Joined: May 2003
Posts: 800
Likes: 0
From: New Jersey
Car: 87 Black Formula
Engine: Rollercammed Lg4
Transmission: 700R4
Axle/Gears: 3.23 10 Bolt Locker
Originally posted by luxor
eagle_eyes, I modified a stock one and mounted some additional brake lights behind it.
eagle_eyes, I modified a stock one and mounted some additional brake lights behind it.

Thread Starter
Senior Member
Joined: Jul 2002
Posts: 704
Likes: 0
From: Granby, Ma US
Car: 89 WS6 Formula
Engine: 305 TPI w/ some mods done
Transmission: Modified THM700R4
Originally posted by tilstad
How did you modify it to make light shine through?
How did you modify it to make light shine through?


Junior Member
iTrader: (2)
Joined: Jul 2002
Posts: 59
Likes: 0
From: Clarksburg,MA.
Car: 91 Formula
Engine: 357 TPI
Transmission: WC T5
tilstad & TorchRay,
I first bought a few extra center sections of e-bay to practice on. These pieces are made of clear plastic that is painted on the inside. I used sand paper to remove the paint on the inside. Then progressively went up in grit to (if I remember right, this was 3 years ago) to about 1500 maybe 2000 wet sand. Remember to always sand in the same direction. I found a pic of the firebird on the net and saved it as a .jpg and modified it to the size I needed and then printed it. Using this as an outline I traced it onto some adhesive backed vinly (thin) I bought at a local art supply store to create a decal and then cut the bird out. I then peeled of the backing paper and positioned and pressed it into place on the back side of the center section. Then all you have to do is spray paint the back side with a flat black until you achieve a good dense even coat. After it has thoroughly dried I slowly remove the vinly bird decal (may have to cut along its edges) and then sprayed multiple coats of a transparent metallic red like that is used for the lexan bodies for radio controlled cars. I had an extra rear light harness for my car so I removed the two brake light sockets and wired them behind the cover. So the bird lights with the park lights turned on but also function as do the brake lights when the pedal is pressed. It is time consuming to remove the paint from the back side but by taking your time you will ensure the best results.
I first bought a few extra center sections of e-bay to practice on. These pieces are made of clear plastic that is painted on the inside. I used sand paper to remove the paint on the inside. Then progressively went up in grit to (if I remember right, this was 3 years ago) to about 1500 maybe 2000 wet sand. Remember to always sand in the same direction. I found a pic of the firebird on the net and saved it as a .jpg and modified it to the size I needed and then printed it. Using this as an outline I traced it onto some adhesive backed vinly (thin) I bought at a local art supply store to create a decal and then cut the bird out. I then peeled of the backing paper and positioned and pressed it into place on the back side of the center section. Then all you have to do is spray paint the back side with a flat black until you achieve a good dense even coat. After it has thoroughly dried I slowly remove the vinly bird decal (may have to cut along its edges) and then sprayed multiple coats of a transparent metallic red like that is used for the lexan bodies for radio controlled cars. I had an extra rear light harness for my car so I removed the two brake light sockets and wired them behind the cover. So the bird lights with the park lights turned on but also function as do the brake lights when the pedal is pressed. It is time consuming to remove the paint from the back side but by taking your time you will ensure the best results.
Member
iTrader: (2)
Joined: Nov 2004
Posts: 379
Likes: 4
From: New Mexico
Car: 87 Firebird,
Engine: lq4
Transmission: gto t56 (mn12)
Didnt the bird turn out kinda choppy and jagged on the edges. I remember I tried to make some firebird stencils so i didnt have to buy the decal kit and it was hard to get clean lines on the stencil. Plus when you peel the decal or mask off it tends to tear at the paint. Looks like you had pretty good results though. Awesome job!
Junior Member
iTrader: (2)
Joined: Jul 2002
Posts: 59
Likes: 0
From: Clarksburg,MA.
Car: 91 Formula
Engine: 357 TPI
Transmission: WC T5
FirehawkSS , I used a x-acto knife with new blades and changed them often and I had no problem in either cutting out the stencil or scoring along its edges to remove it after painting the flat black. Just need to be patient and go slowly.
Senior Member
iTrader: (3)
Joined: Jan 2005
Posts: 517
Likes: 0
From: San Angelo, TX
Car: 1988 Pontiac firebird
Engine: '93 LT1
Transmission: Built 700R4
Axle/Gears: 3.70 9 bolt
that's awesome. i've always wanted to turn that bird into a light, i just never knew how to approach it. thanks.


Supreme Member
iTrader: (2)
Joined: Jul 2003
Posts: 1,153
Likes: 0
From: allen,tx
Car: 1985 Iroc-Z
Engine: 305
Transmission: t-5
See it blends into the shadows. I think im going to look into getting some trans am ground effects so mine looks lower and hides more.


Member
Joined: Sep 2003
Posts: 152
Likes: 0
From: Michigan
Car: 92 Firebird Formula
Engine: 350 TPI
Transmission: 700 R4, 3.73 rear
Originally posted by f355bird
Hey ator u should paint your exhaust black so no one sees it looks tacky. Respray mine every once in awile to keep black.
Hey ator u should paint your exhaust black so no one sees it looks tacky. Respray mine every once in awile to keep black.
I'll see if I have a newer pic.
Supreme Member
iTrader: (1)
Joined: Apr 2005
Posts: 1,165
Likes: 1
From: Valdosta, GA
Car: 1991 Trans Am GTA
Engine: L98(5.7 L TPI)
Transmission: 700r4(A4)
Axle/Gears: G80 RPO, 3:23s, Auburn Racer's Diff
Luxor, how did you smoke your lights so they're black like the 91-92 GTAs?
Great job with the backlight 'bird by the way
Great job with the backlight 'bird by the way
Supreme Member
iTrader: (1)
Joined: Apr 2005
Posts: 1,165
Likes: 1
From: Valdosta, GA
Car: 1991 Trans Am GTA
Engine: L98(5.7 L TPI)
Transmission: 700r4(A4)
Axle/Gears: G80 RPO, 3:23s, Auburn Racer's Diff
Luxor, how did you get your tail lights to have a smoked look, like the lenses on the 91-92 GTA?
Thanks,
Bill
Thanks,
Bill


Junior Member
Joined: Apr 2003
Posts: 23
Likes: 0
From: Pine Bluff,Arkansas
Car: 1989 Maui Blue Formula350
Engine: 330Hp 350
Transmission: Automatic
1989 Formula 350 TPI
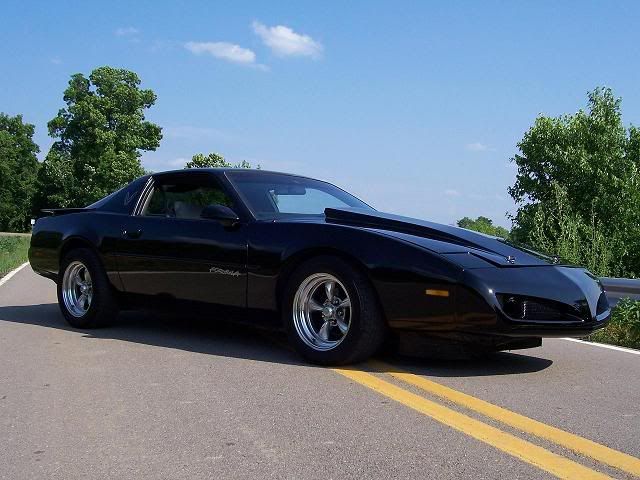
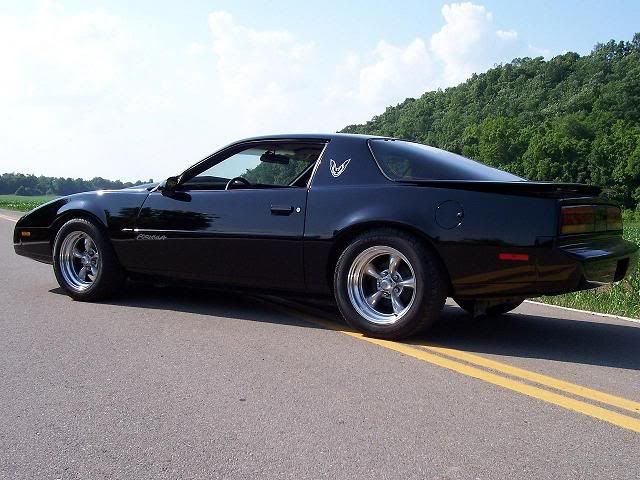
This is my 1989 Formula 350 TPI. Iyt is in excellent condition throughout the entire car. Thanks for looking, Buck
Junior Member
iTrader: (2)
Joined: Jul 2002
Posts: 59
Likes: 0
From: Clarksburg,MA.
Car: 91 Formula
Engine: 357 TPI
Transmission: WC T5
wgripp,
Thanks for the compliment! The taillight assemblies are a two piece assembly(at least on the formula ones). The outer lense cover is attached to the inner bulb box assembly by a type of.... I'am not sure what, maybe silicon or some type of epoxy that remains somewhat flexible. Whatever it is you can slowly work a knife (I used an x-acto No. 11) around the edges to separate the two parts. Be careful when prying up on the lense cover or it will crack. I did this but luckily I had another set of tail lights lying around. So work slowly and do not use excess pressure. After separation all I did was to spray the interior side of the lense cover with transparent black paint (the kind used for spraying the lexan bodies of radio controlled cars) until I achieved the desired amount of shading. Than I just reassembled the lense covers with automotive silicon (black) and I haven't had any leaks or separation in the three years since.
Thanks for the compliment! The taillight assemblies are a two piece assembly(at least on the formula ones). The outer lense cover is attached to the inner bulb box assembly by a type of.... I'am not sure what, maybe silicon or some type of epoxy that remains somewhat flexible. Whatever it is you can slowly work a knife (I used an x-acto No. 11) around the edges to separate the two parts. Be careful when prying up on the lense cover or it will crack. I did this but luckily I had another set of tail lights lying around. So work slowly and do not use excess pressure. After separation all I did was to spray the interior side of the lense cover with transparent black paint (the kind used for spraying the lexan bodies of radio controlled cars) until I achieved the desired amount of shading. Than I just reassembled the lense covers with automotive silicon (black) and I haven't had any leaks or separation in the three years since.
Supreme Member
iTrader: (2)
Joined: Jul 2003
Posts: 3,205
Likes: 0
From: Dallas, TX area
Car: 91 Formula WS6 (Black, T-Tops)
Engine: 383 MiniRam (529 HP, 519 TQ - DD2K)
Transmission: Built '97 T56, Pro 5.0, CF-DF
Axle/Gears: 4.11 posi Ford 9"
Great info, luxor - I may give that a try myself! Like your center bird light, too.
I wonder how Zepher did his?
Both are excellent looking 'Birds by the way!!!!
I wonder how Zepher did his?
Both are excellent looking 'Birds by the way!!!!

Member
Joined: Apr 2005
Posts: 190
Likes: 0
From: Iowa
Car: 1988 formula
Engine: 93' LT1 Swap in progress..
Transmission: 700r4
Axle/Gears: 2.73
heres my formula its kinda in sad shape but its my project car for when im 16 i have done alot of bodywork done since i took this pic. the old formula wing cracked so the last owner put on a reguler firebird wing on but im going to put a formula wing on befor i get it painted so it will have more of a formula look anyway here she is
Last edited by f_body_4_life; Jun 3, 2005 at 01:23 AM.


Thread
Thread Starter
Forum
Replies
Last Post
Linson
Auto Detailing and Appearance
12
Oct 1, 2015 09:50 PM