Alston tunnel mounted torque arm install
 05-09-2015, 12:40 AM
#1
Alston tunnel mounted torque arm install
As mentioned in one of my earlier posts, the upper bolt that held the clam shell mount to my T-56’s tail shaft stripped the other week allowing the stock torque arm to whack the trans tunnel. Instead of attempting to helicoil the bolt hole or installing a new tail shaft, I opted to install an aftermarket torque arm. After much research and deliberation, I decided on the Jegster tunnel mount set up. However, when I went to order it, I discovered that Jegs has indefinitely suspended the Jegster line due to the lead designer retiring a few months ago and they had no more in stock. As a result, I ended up going with the Alston tunnel mount torque arm as it was essentially the same with the exception of the tunnel mount design being different and it actually having a diagonal brace between the tubes of the arm. While I don’t think there is an advantage to one tunnel mount design over the other (Jegster vs. Alston), I’m guessing the Jegster would have been easier to install as it was longer and placed entirely above the seatbelt brackets on the bottom side of trans tunnel (I pirated this pic off the web so if it’s yours, thanks!)
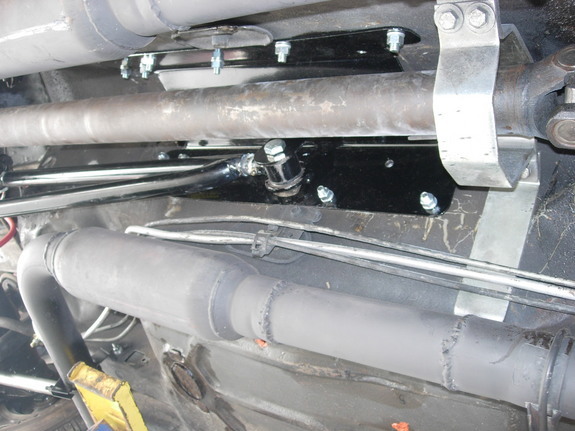
The Alston isn’t as long (front to back) but extends down and fits around the seatbelt brackets which limits the amount of flexibility you have with its placement.
Ideally, mine should probably be about � - �” further towards back of car but I couldn’t due to interference with the seatbelt mounts. Per the Alston installation instructions, approx. �” of the slider should be exposed. I’m closer to 1-1/4+ but that was the best I could get. There’s still plenty of slider in the arm and the grease holes are not exposed so I don’t believe it will be an issue.
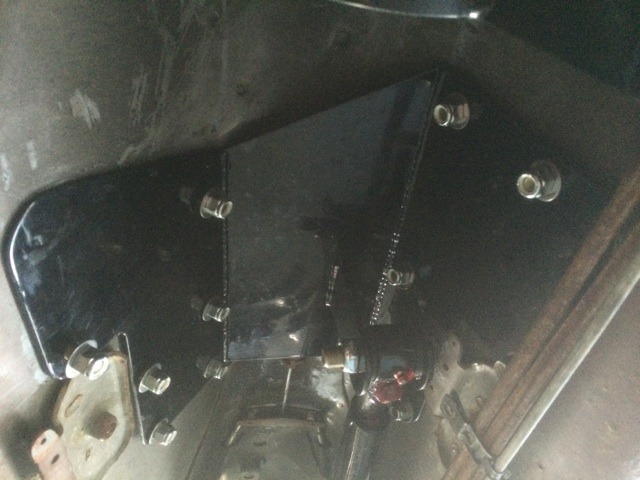
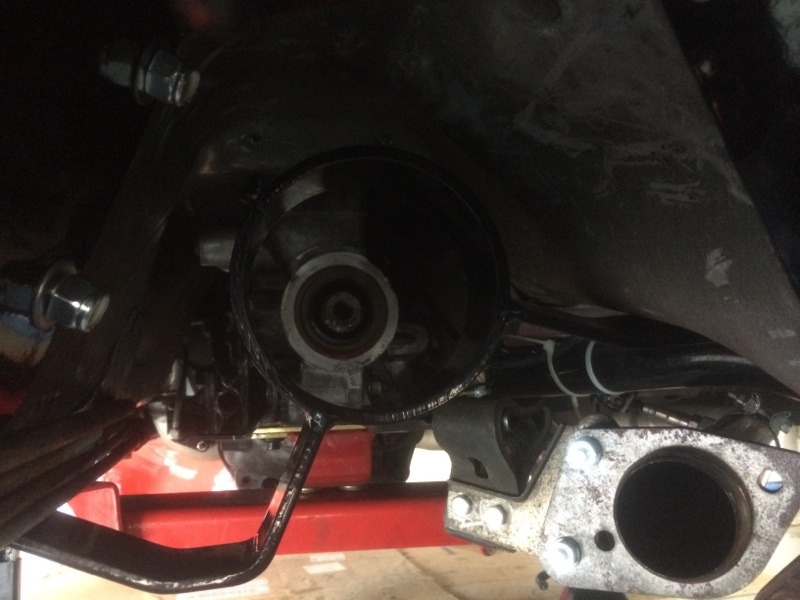
When doing my research, I read numerous comments by people concerned about the tunnel not being strong enough and possibly tearing the bracket bolts through the sheet metal. I will say that is highly unlikely. First, the tunnel is stronger than you’d think and the mount is partially underneath the floor crossmember providing even more strength. Second, the force of the torque arm is primarily upward (during acceleration), not downward, thus eliminating the concern of the mounting bolts being ripped through the tunnel sheet metal. Third, there are 12 bolts (6 per side) which distribute the load over a decent area plus oversized washers on top side for each bolt.
You’ll see that 3 of the bolts even go through the crossmember. The passenger side was very close to the crossmember-I ended up grinding down a smaller washer and using that.
You’ll need a second person (one inside car and one underneath) so grab a buddy (or kickass wife) to lend a hand!
Tighten everything up, put the car back together, set pinion angle and roll!
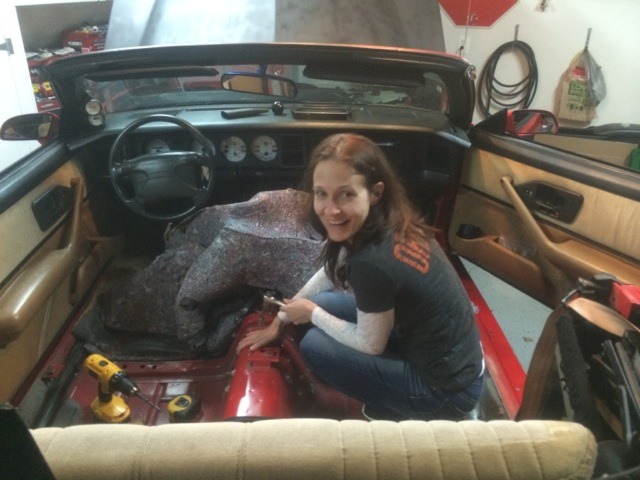
Easier said than done though, so let me back track some. First, you need to pull out your seats and center console, and then pull carpet forward past the floor crossmember. Jack up the car but be sure to have the jack stands under the rear axle so the suspension is loaded. Record your angles (pinion, trans, driveshaft) before disassembly so you have a baseline for when you reassemble (unless starting from scratch or like me, have a busted front mount). Now, remove driveshaft (if car is relatively level you shouldn’t lose any trans fluid to speak off, at least with a T-56) and disconnect exhaust. Now, per Alston’s instructions, install slider onto tunnel mount bracket first (be sure to grease it up good). Slide bolt through so threads are facing opposite side of the mount. This is because the bolt is too long to go through the other way and will interfere with the trans tunnel. Now place the tunnel mount into tunnel. I had to remove a bracket that secured the lines to the driver’s side seat belt mount to clear the head of the slider bolt. Otherwise, it would be impossible to get a wrench to it to tighten during final assembly (and I believe they would have interfered anyway). To ensure mount fits up tight in the tunnel, and to help hold it there while drilling the holes, I used a jack with a block of wood. I then drilled a couple holes on each side and installed the nuts and bolts. (FYI-to keep things moving smoothly, I ran to store and bought new 1/8”, �” and 3/8” bits-final bolt hole is 3/8”. Also, I ran the 3/8” bit through each mounting plate hole before I started to remove the access powdercoating) Remove jack and drill rest of holes. Two issues I ran into here were: (1) there’s a hole right by the front mounting bracket which prevented being able to tighten that nut to a flat surface (its tight and not going anywhere, however…) and

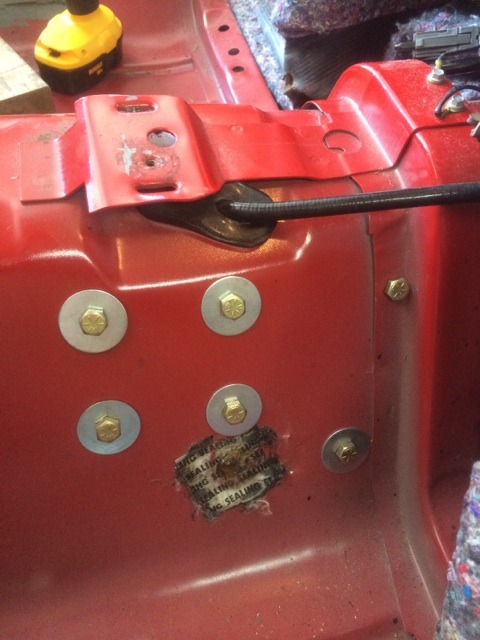
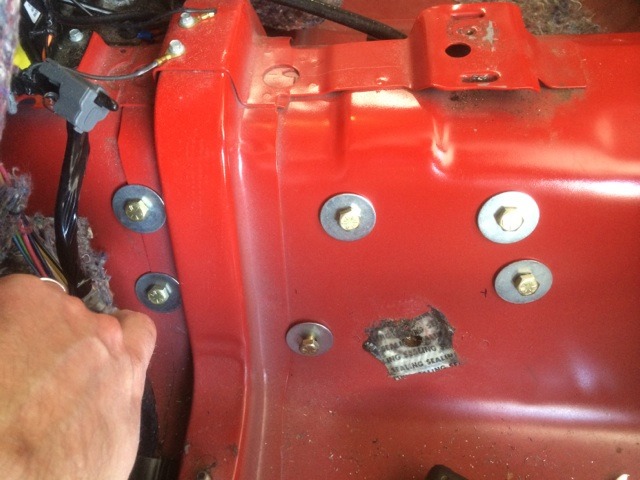
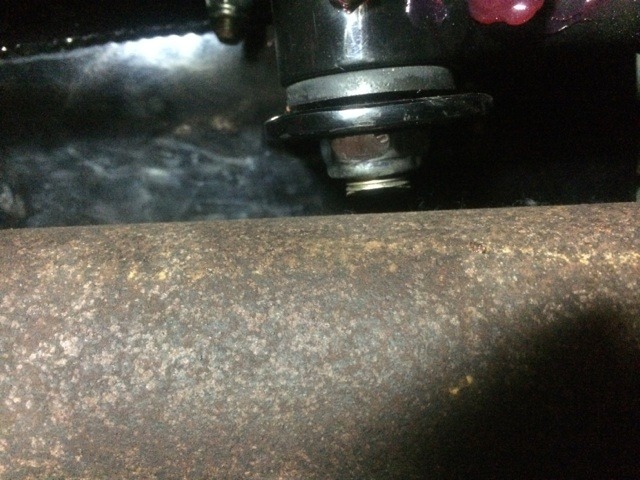
(2) because everything is now assembled and you can’t get the slider bolt back out, you need to drill one hole from inside the car. I simply measured down and over from the top bolt and then used these measurements inside the car. (You can see my mark to left of bottom right bolt in pic below)
I started with a 1/8” bit to make sure I was drilling in the correct spot and then proceeding as usual with the �” & 3/8” bits. Now it’s time to grab that buddy or wife to help tighten up the 12 nuts and bolts. Now tighten the 2 differential bolts and the front slider bolt. Alston doesn’t provide torque specs for the slider bolt so I guessed here. I did send them an email asking but haven’t received a response. Install driveshaft and double check your clearance between the slider bolt and driveshaft. Mine was pretty tight so I took a cutting wheel to the bolt first.
Also, since you have the carpet up anyway, now is also a good time to install a driveshaft safety loop! I installed a Jegster welded loop.
Reinstall your interior (don’t forget to take advantage of having everything out and give it all a good cleaning, I found change under the floor sound deadener!).
Now it’s time to set your pinion angle. I’ve read probably 100 posts on how to do this and each theory is a little different. But, as stated earlier, use our prior angle as a baseline, if able, and then you’ll need to tweak from there. Take for a test driving and if getting any vibrations, jack back up, adjust (with suspension loaded) and test drive again. Repeat as many times as necessary until you get it right.

The Alston isn’t as long (front to back) but extends down and fits around the seatbelt brackets which limits the amount of flexibility you have with its placement.

Ideally, mine should probably be about � - �” further towards back of car but I couldn’t due to interference with the seatbelt mounts. Per the Alston installation instructions, approx. �” of the slider should be exposed. I’m closer to 1-1/4+ but that was the best I could get. There’s still plenty of slider in the arm and the grease holes are not exposed so I don’t believe it will be an issue.
When doing my research, I read numerous comments by people concerned about the tunnel not being strong enough and possibly tearing the bracket bolts through the sheet metal. I will say that is highly unlikely. First, the tunnel is stronger than you’d think and the mount is partially underneath the floor crossmember providing even more strength. Second, the force of the torque arm is primarily upward (during acceleration), not downward, thus eliminating the concern of the mounting bolts being ripped through the tunnel sheet metal. Third, there are 12 bolts (6 per side) which distribute the load over a decent area plus oversized washers on top side for each bolt.


You’ll see that 3 of the bolts even go through the crossmember. The passenger side was very close to the crossmember-I ended up grinding down a smaller washer and using that.
You’ll need a second person (one inside car and one underneath) so grab a buddy (or kickass wife) to lend a hand!

Tighten everything up, put the car back together, set pinion angle and roll!
Easier said than done though, so let me back track some. First, you need to pull out your seats and center console, and then pull carpet forward past the floor crossmember. Jack up the car but be sure to have the jack stands under the rear axle so the suspension is loaded. Record your angles (pinion, trans, driveshaft) before disassembly so you have a baseline for when you reassemble (unless starting from scratch or like me, have a busted front mount). Now, remove driveshaft (if car is relatively level you shouldn’t lose any trans fluid to speak off, at least with a T-56) and disconnect exhaust. Now, per Alston’s instructions, install slider onto tunnel mount bracket first (be sure to grease it up good). Slide bolt through so threads are facing opposite side of the mount. This is because the bolt is too long to go through the other way and will interfere with the trans tunnel. Now place the tunnel mount into tunnel. I had to remove a bracket that secured the lines to the driver’s side seat belt mount to clear the head of the slider bolt. Otherwise, it would be impossible to get a wrench to it to tighten during final assembly (and I believe they would have interfered anyway). To ensure mount fits up tight in the tunnel, and to help hold it there while drilling the holes, I used a jack with a block of wood. I then drilled a couple holes on each side and installed the nuts and bolts. (FYI-to keep things moving smoothly, I ran to store and bought new 1/8”, �” and 3/8” bits-final bolt hole is 3/8”. Also, I ran the 3/8” bit through each mounting plate hole before I started to remove the access powdercoating) Remove jack and drill rest of holes. Two issues I ran into here were: (1) there’s a hole right by the front mounting bracket which prevented being able to tighten that nut to a flat surface (its tight and not going anywhere, however…) and

(2) because everything is now assembled and you can’t get the slider bolt back out, you need to drill one hole from inside the car. I simply measured down and over from the top bolt and then used these measurements inside the car. (You can see my mark to left of bottom right bolt in pic below)
I started with a 1/8” bit to make sure I was drilling in the correct spot and then proceeding as usual with the �” & 3/8” bits. Now it’s time to grab that buddy or wife to help tighten up the 12 nuts and bolts. Now tighten the 2 differential bolts and the front slider bolt. Alston doesn’t provide torque specs for the slider bolt so I guessed here. I did send them an email asking but haven’t received a response. Install driveshaft and double check your clearance between the slider bolt and driveshaft. Mine was pretty tight so I took a cutting wheel to the bolt first.

Also, since you have the carpet up anyway, now is also a good time to install a driveshaft safety loop! I installed a Jegster welded loop.

Reinstall your interior (don’t forget to take advantage of having everything out and give it all a good cleaning, I found change under the floor sound deadener!).
Now it’s time to set your pinion angle. I’ve read probably 100 posts on how to do this and each theory is a little different. But, as stated earlier, use our prior angle as a baseline, if able, and then you’ll need to tweak from there. Take for a test driving and if getting any vibrations, jack back up, adjust (with suspension loaded) and test drive again. Repeat as many times as necessary until you get it right.
Last edited by Ed1LE; 05-09-2015 at 12:52 AM.
 05-09-2015, 04:59 AM
#2
Supreme Member

iTrader: (30)

Join Date: Jul 2000
Location: Fort Myers, FL
Posts: 1,513
Received 17 Likes
on
10 Posts
Car: 91 Firebird
Engine: 6.0
Transmission: T56
Axle/Gears: 3.73
Re: Alston tunnel mounted torque arm install
great write up
I've debated this style of tq arm for awhile...... looks pretty strong
I've debated this style of tq arm for awhile...... looks pretty strong
12-30-2015, 10:36 PM
#3
Member
iTrader: (2)

Join Date: May 2013
Location: Texas
Posts: 235
Likes: 0
Received 1 Like
on
1 Post
Car: 1989 GTA
Engine: LS coming soon
Transmission: 80E coming soon
Axle/Gears: S60/35 Spline/S-Trac/3.73
Re: Alston tunnel mounted torque arm install
Can we get some more feedback since you've put some miles on it?
01-28-2016, 06:22 AM
#4
Re: Alston tunnel mounted torque arm install
I've only put a few hundred miles on it but did do several autocross events. I have mixed feelings on it. It isn't as noisy as some had said, although you do hear it over harsh bumps or if you go into reverse on an incline (for example if I back into my drive way which is a hill with a slightly ramped curb from the street). When the drivetrain shifts it clanks some. Under normal driving and cruising down the street or highway it isn't noticeable. However, my car is so stiff that it already drives like a dump truck so it may not be noticeable to me. As for function, I'm not overly impressed. With the puny LO3, it'll still spin effortlessly into 3rd and a can chirp 4th with the 275's I have currently. That said, they're Sumitomo's and horrible when it comes to traction so we'll see if that changes once I get a stickier compound on there. I've messed with the pinion angle a fair amount and have it to where the ride is the smoothest (I don't recall what it is off the top of my head) and know I could adjust it for better traction but then I'm dealing with driveline vibes. Part of this though is probably the rear I have in the car currently as I picked it up for cheap and swapped with my rear so I could clean up mine and rebuild it out of the car. That was last year and I'm just now getting to it. lol The used rear is a 7.5 out of a 10 sec Z that's been busted up a few times so it's currently howling like crazy (guy was spraying 150 shot of the line on slicks). Once I get mine back in, I'm hoping that cures my vibration blues...
01-28-2016, 09:30 AM
#5

Re: Alston tunnel mounted torque arm install
I've only put a few hundred miles on it but did do several autocross events. I have mixed feelings on it. It isn't as noisy as some had said, although you do hear it over harsh bumps or if you go into reverse on an incline (for example if I back into my drive way which is a hill with a slightly ramped curb from the street). When the drivetrain shifts it clanks some. Under normal driving and cruising down the street or highway it isn't noticeable. However, my car is so stiff that it already drives like a dump truck so it may not be noticeable to me. As for function, I'm not overly impressed. With the puny LO3, it'll still spin effortlessly into 3rd and a can chirp 4th with the 275's I have currently. That said, they're Sumitomo's and horrible when it comes to traction so we'll see if that changes once I get a stickier compound on there. I've messed with the pinion angle a fair amount and have it to where the ride is the smoothest (I don't recall what it is off the top of my head) and know I could adjust it for better traction but then I'm dealing with driveline vibes. Part of this though is probably the rear I have in the car currently as I picked it up for cheap and swapped with my rear so I could clean up mine and rebuild it out of the car. That was last year and I'm just now getting to it. lol The used rear is a 7.5 out of a 10 sec Z that's been busted up a few times so it's currently howling like crazy (guy was spraying 150 shot of the line on slicks). Once I get mine back in, I'm hoping that cures my vibration blues...
01-28-2016, 11:18 AM
#7
Member
iTrader: (2)
Join Date: May 2013
Location: Texas
Posts: 235
Likes: 0
Received 1 Like
on
1 Post
Car: 1989 GTA
Engine: LS coming soon
Transmission: 80E coming soon
Axle/Gears: S60/35 Spline/S-Trac/3.73
Re: Alston tunnel mounted torque arm install
I've only put a few hundred miles on it but did do several autocross events. I have mixed feelings on it. It isn't as noisy as some had said, although you do hear it over harsh bumps or if you go into reverse on an incline (for example if I back into my drive way which is a hill with a slightly ramped curb from the street). When the drivetrain shifts it clanks some. Under normal driving and cruising down the street or highway it isn't noticeable. However, my car is so stiff that it already drives like a dump truck so it may not be noticeable to me. As for function, I'm not overly impressed. With the puny LO3, it'll still spin effortlessly into 3rd and a can chirp 4th with the 275's I have currently. That said, they're Sumitomo's and horrible when it comes to traction so we'll see if that changes once I get a stickier compound on there. I've messed with the pinion angle a fair amount and have it to where the ride is the smoothest (I don't recall what it is off the top of my head) and know I could adjust it for better traction but then I'm dealing with driveline vibes. Part of this though is probably the rear I have in the car currently as I picked it up for cheap and swapped with my rear so I could clean up mine and rebuild it out of the car. That was last year and I'm just now getting to it. lol The used rear is a 7.5 out of a 10 sec Z that's been busted up a few times so it's currently howling like crazy (guy was spraying 150 shot of the line on slicks). Once I get mine back in, I'm hoping that cures my vibration blues...
Trending Topics
01-28-2016, 11:27 AM
#8
Re: Alston tunnel mounted torque arm install
01-28-2016, 03:45 PM
#9
Re: Alston tunnel mounted torque arm install
01-28-2016, 07:49 PM
#10
Member
iTrader: (2)
Join Date: May 2013
Location: Texas
Posts: 235
Likes: 0
Received 1 Like
on
1 Post
Car: 1989 GTA
Engine: LS coming soon
Transmission: 80E coming soon
Axle/Gears: S60/35 Spline/S-Trac/3.73
Re: Alston tunnel mounted torque arm install
I didn't know the slip joint was so loud.
So it's making the noise or transferring it??
I'm expecting an S60 next week. I ordered from Carl at Central Racing Parts.
35spline, STrac, LCARBS, sway bar brackets, powder coated, to my door for $2930. Carl has gone completely above and beyond my expectations!! I recommend calling him when time comes.
01-29-2016, 03:15 PM
#12
Supreme Member

Join Date: Aug 2004
Location: Pasadena, TX
Posts: 1,046
Likes: 0
Received 6 Likes
on
5 Posts
Car: 1991 RS
Engine: 5.0
Transmission: 700r4
Re: Alston tunnel mounted torque arm install
So if you had to do it over again would you choose the same setup? I gotta admit it's not the most visually pleasing setup with the bolt-in look, but if it works who cares.
01-30-2016, 12:15 AM
#13
Supreme Member
iTrader: (13)

Join Date: Dec 2002
Location: Bowdon, GA.
Posts: 2,535
Likes: 0
Received 16 Likes
on
14 Posts
Car: 1988 Camaro
Engine: 355, 10.34:1, 249/252 @.050", IK200
Transmission: TH-400, 3500 stall 9.5" converter
Axle/Gears: Ford 9", detroit locker, 3.89 gears
Re: Alston tunnel mounted torque arm install
I run the jegster adj. torque arm. Almost the same as the Alston.
I installed mine in May 2006., still using it now. IMHO it just plane works. I have upgraded everything on the car but that torque arm since then. 2 rear end, torque converter, re did the engine, changed brake system, etc.
I don't autocross. Street, and drag racing only. The car was a daily driver and in fact my only car between Sept. 2004 and March 2010. Then it became my weekend toy.
Running the jegster torque arm, and Nitto 275/60-15 drag radials I got a best 60' time of 1.62
03-23-2016, 07:22 AM
#14
Re: Alston tunnel mounted torque arm install
I agree, the plate in the tunnel isn't that visually pleasing but it's only really noticeable if the driveshaft is out. One plus is you don't need to remove it to remove the DS, trans, etc. It won't need to be changed if I do any engine swaps and there's no potential clearance issues if I changed exhaust routing and trans mount style since it isn't connected to the trans mount. Also, since I'm running a smaller engine, I read the short arm style would be more effective.
11-08-2016, 07:03 AM
#15
Re: Alston tunnel mounted torque arm install
Just an update, after a dozen or so autoX events this summer and some spirited street driving, I'm pretty pleased with this setup. I haven't noticed any noise to speak of. I think what I heard initially was just my over sensitive ears seeking for there to be an issue. I do lube the slip joint regularly though. I also installed a set of LCA relocation brackets which helped with my traction. The car definitely holds the turns a lot better.
11-08-2016, 02:18 PM
#16
Supreme Member
Join Date: Oct 2001
Location: NWOhioToledoArea
Posts: 8,113
Likes: 0
Received 5 Likes
on
5 Posts
Car: 86-FireBird
Engine: -MPFI
Transmission: T5
Axle/Gears: 3:42
Re: Alston tunnel mounted torque arm install
Old thread but going back to the first post, I had similar with my T5. Once the original threads were toast, I could not keep a bolt in it.
I went a cheaper route to fix it, an exhaust U clamp was just right the clamp around the area and make the bolt stay in the hole tight and no more thumping on the floor.
I went a cheaper route to fix it, an exhaust U clamp was just right the clamp around the area and make the bolt stay in the hole tight and no more thumping on the floor.
11-09-2016, 10:31 AM
#18
Re: Alston tunnel mounted torque arm install
The adjustable version (part #402013) I have I'm not finding on Jeg's now but here is link to manufacturer site: http://ww.alstonracing.com/gm_bolt.html
02-23-2018, 03:28 PM
#19
Member
iTrader: (1)

Join Date: Aug 2003
Location: South Jersey
Posts: 280
Likes: 0
Received 12 Likes
on
12 Posts
Car: '16 Camaro SS, '88 IROC
Engine: 6.2 Gen V
Transmission: 6 spd TR6060
Re: Alston tunnel mounted torque arm install
Does anyone have any new information on this torque arm? I see Jegs has it listed.

Thread
Thread Starter
Forum
Replies
Last Post