$80 Paint Job, step by step!
 12-14-2009, 08:46 PM
#1
Junior Member
Thread Starter

Join Date: May 2009
Posts: 10
Likes: 0
Received 0 Likes
on
0 Posts
$80 Paint Job, step by step!
After having read a thread on Moparts about painting your car for $50 with rustoleum and paint rollers, I decided that since my car's clear coat was peeling everytime I washed it, I would give it a try, albeit a little differently. The cost of the paint, plus sanding paper and rollers rang up to around $50 if I remember right, but after reading through literally hundreds of the thread's pages, I could see that it would present trouble in the long run as 1. complaints of it being to soft after drying, 2.no uv protection. So I bought some slightly more expensive paint with uv protection and gave my friend a call who works at a body shop and he let me know that he would be able to spray it on for me. I've included the pictures of my car as it is now, and hopefully by Saturday will have it all sanded down, and we will paint it on Sunday. I will try to include pictures at each step.

 12-14-2009, 09:27 PM
#2
Supreme Member
Join Date: Jan 2007
Location: Bastrop, TX
Posts: 1,002
Likes: 0
Received 12 Likes
on
11 Posts
Car: 1988 SC Convertible
Engine: LT-1
Transmission: 700R4
Axle/Gears: 3.23 posi w/PBR's
Re: $80 Paint Job, step by step!
I did it too....but in my gravel driveway under an oak tree. Check the link in my sig for lots of pics.
What paint are you using?
What paint are you using?
12-14-2009, 10:47 PM
#4
Junior Member
Thread Starter
Join Date: May 2009
Posts: 10
Likes: 0
Received 0 Likes
on
0 Posts
Re: $80 Paint Job, step by step!
Wow, your car looks impressive. Do you think a gallon was cutting it a little close or did you have some to spare after? I'm using Rustoleum Marine Topside Paint, similar to the Interlux Brightside paint that people have claimed is superior to the simple Rustoleum Enamel. I'm hoping it will be durable against chips and scratches cause it claims "flexibility and durability in extreme weather conditions."
12-15-2009, 09:00 AM
#7
Supreme Member
iTrader: (2)
Join Date: Dec 2006
Location: Hou. TX
Posts: 5,538
Likes: 0
Received 0 Likes
on
0 Posts
Car: 86 TA, 91 B4C
Engine: 5.3, 4.8
Transmission: 4L80 4000, T56
Axle/Gears: 4.30 M12, 23.42 10 bolt
Re: $80 Paint Job, step by step!
BWAHAHHAHAAAHA, i thought i was the only one using the cheap *** tractor supply paint. The damn tractor and implement turned out better than the damn truck and trailer did for me!
Trending Topics
12-15-2009, 04:07 PM
#8
Supreme Member
Join Date: Jan 2007
Location: Bastrop, TX
Posts: 1,002
Likes: 0
Received 12 Likes
on
11 Posts
Car: 1988 SC Convertible
Engine: LT-1
Transmission: 700R4
Axle/Gears: 3.23 posi w/PBR's
Re: $80 Paint Job, step by step!
Wow, your car looks impressive. Do you think a gallon was cutting it a little close or did you have some to spare after? I'm using Rustoleum Marine Topside Paint, similar to the Interlux Brightside paint that people have claimed is superior to the simple Rustoleum Enamel. I'm hoping it will be durable against chips and scratches cause it claims "flexibility and durability in extreme weather conditions."
I used Rustoleum a couple of years ago. It was OK, but it dried soft and the maintenance to keep it shining was a PITA. I had to wax it every week or so to keep it from dulling out.
I also didn't add any hardener to it when I used the Rusto. If you want it it be durable and shine you HAVE to add enamel hardener to it. I used double what the directions suggested with the Tractor paint.
12-15-2009, 04:24 PM
#9
Senior Member
Join Date: Feb 2009
Location: N. Virginia
Posts: 660
Likes: 0
Received 0 Likes
on
0 Posts
Car: 1988 Firebird - 1998 Z28
Engine: 2.8 - LS1
12-18-2009, 02:51 AM
#10
Junior Member

Join Date: Dec 2009
Posts: 12
Likes: 0
Received 0 Likes
on
0 Posts
Re: $80 Paint Job, step by step!
I'm very excited to see this. I've never painted a car to myself. Is this hard to do? I'd like to do it, I have terrible paint. On the hood and top of the car it's worse than Sonny's. I think any paint job would look better. I just want to make sure that with absolutely no experience I could do it. I read that forum on how to do it a while ago too. I also don't have a garage. could I just do it in the summer? I know I would need paint thinner, and my dad could help me. I just want to make sure this isn't TOO hard for an amateur. I'm willing to learn, read, watch. Please, refer me.
12-18-2009, 07:10 AM
#11
Junior Member

Join Date: Nov 2009
Location: Indy
Posts: 34
Likes: 0
Received 0 Likes
on
0 Posts
Car: 1995 RX-7 LS1
Engine: 2000 LS1
Transmission: t56
Axle/Gears: 410 limited slip
Re: $80 Paint Job, step by step!
nice, in for more. My car is going to be getting painted here soon also and I need to keep it cheap!
12-19-2009, 04:53 PM
#12
Junior Member
Thread Starter
Join Date: May 2009
Posts: 10
Likes: 0
Received 0 Likes
on
0 Posts
Re: $80 Paint Job, step by step!
Just an update, started sanding it down today and was wondering if anyone knew if the outside door molding(it's a line running across the both doors) is just glued on? I want to take it off but am wondering if its is screwed or...?
12-19-2009, 08:57 PM
#13
Supreme Member
Join Date: Jan 2007
Location: Bastrop, TX
Posts: 1,002
Likes: 0
Received 12 Likes
on
11 Posts
Car: 1988 SC Convertible
Engine: LT-1
Transmission: 700R4
Axle/Gears: 3.23 posi w/PBR's
Re: $80 Paint Job, step by step!
I'm very excited to see this. I've never painted a car to myself. Is this hard to do? I'd like to do it, I have terrible paint. On the hood and top of the car it's worse than Sonny's. I think any paint job would look better. I just want to make sure that with absolutely no experience I could do it. I read that forum on how to do it a while ago too. I also don't have a garage. could I just do it in the summer? I know I would need paint thinner, and my dad could help me. I just want to make sure this isn't TOO hard for an amateur. I'm willing to learn, read, watch. Please, refer me.
Yes, it will pull right off. The best way to get it off is with fishing line. Start from one end and use the fishing line to "saw" the adhesive behind the strip.
12-19-2009, 11:29 PM
#14
Junior Member
Thread Starter
Join Date: May 2009
Posts: 10
Likes: 0
Received 0 Likes
on
0 Posts
Re: $80 Paint Job, step by step!
Thanks for the info Fyrchkn. My friend ended up being occupied ") and since I've already started, I've decided to go with the original roller method. The pros to the spraying according those who have done it are-far less sanding, but the good thing about rolling it on is that you have a lot more paint left over as less is wasted in the air. The sanding is taking longer than I thought, but I don't want to skimp on this step as bad preparation will show in the finished job. I will post some pics tomorrow and hopefully lay down the first coat.
and since I've already started, I've decided to go with the original roller method. The pros to the spraying according those who have done it are-far less sanding, but the good thing about rolling it on is that you have a lot more paint left over as less is wasted in the air. The sanding is taking longer than I thought, but I don't want to skimp on this step as bad preparation will show in the finished job. I will post some pics tomorrow and hopefully lay down the first coat.
and since I've already started, I've decided to go with the original roller method. The pros to the spraying according those who have done it are-far less sanding, but the good thing about rolling it on is that you have a lot more paint left over as less is wasted in the air. The sanding is taking longer than I thought, but I don't want to skimp on this step as bad preparation will show in the finished job. I will post some pics tomorrow and hopefully lay down the first coat.
12-20-2009, 04:29 AM
#15
Supreme Member
Join Date: Jan 2007
Location: Bastrop, TX
Posts: 1,002
Likes: 0
Received 12 Likes
on
11 Posts
Car: 1988 SC Convertible
Engine: LT-1
Transmission: 700R4
Axle/Gears: 3.23 posi w/PBR's
Re: $80 Paint Job, step by step!
All I can say is have fun with all that sanding. I tried the roller method at first on my car and I can tell you from personal experience that it sucks a large set of *********. I rolled and sanded, rolled and sanded, and rolled and sanded for over a week...and when I was done I ended up stripping it all back off because I was able to see slightly different shades of stripes in the paint from the roller tracks. I also used about 10X as much sand paper with that method then I did spraying it.
I highly recommend spraying instead of rolling. I have done both. Check out my first paint job thread from when I originally painted my car with Rustoleum. You can spray the car even without an air compressor.
Here's the thread:https://www.thirdgen.org/forums/auto...paint-job.html
There is ALOT of useful information in it.
12-21-2009, 05:32 AM
#16
 12-30-2009, 08:55 PM
#17
Junior Member
Thread Starter
Join Date: May 2009
Posts: 10
Likes: 0
Received 0 Likes
on
0 Posts
Re: $80 Paint Job, step by step!
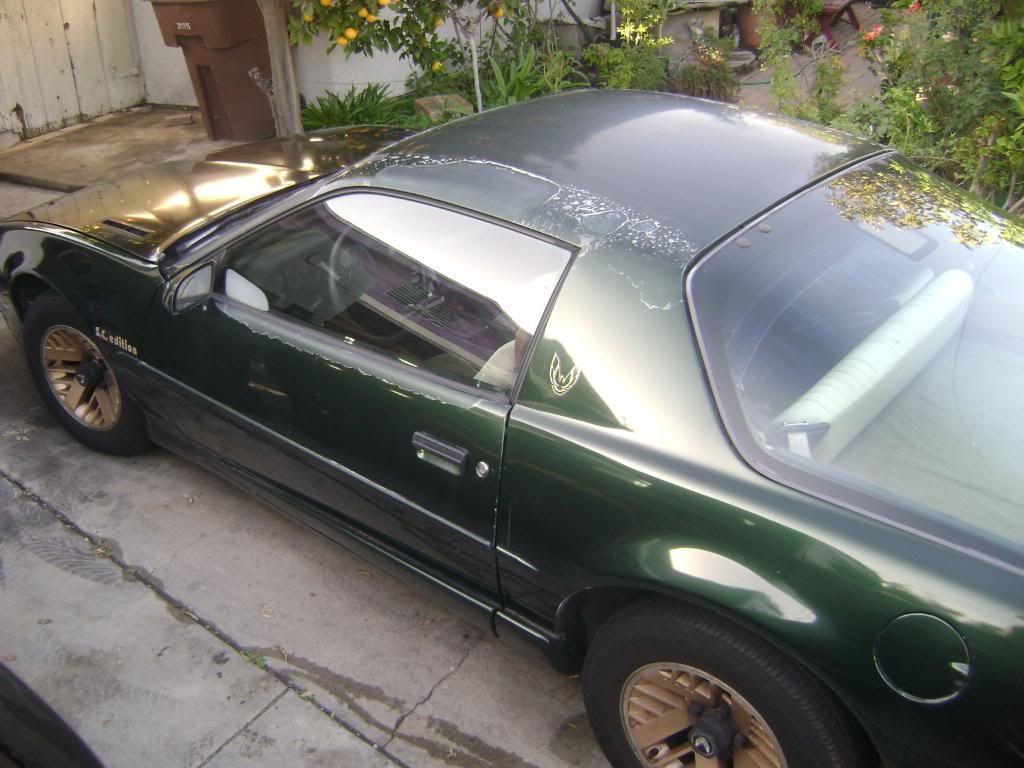
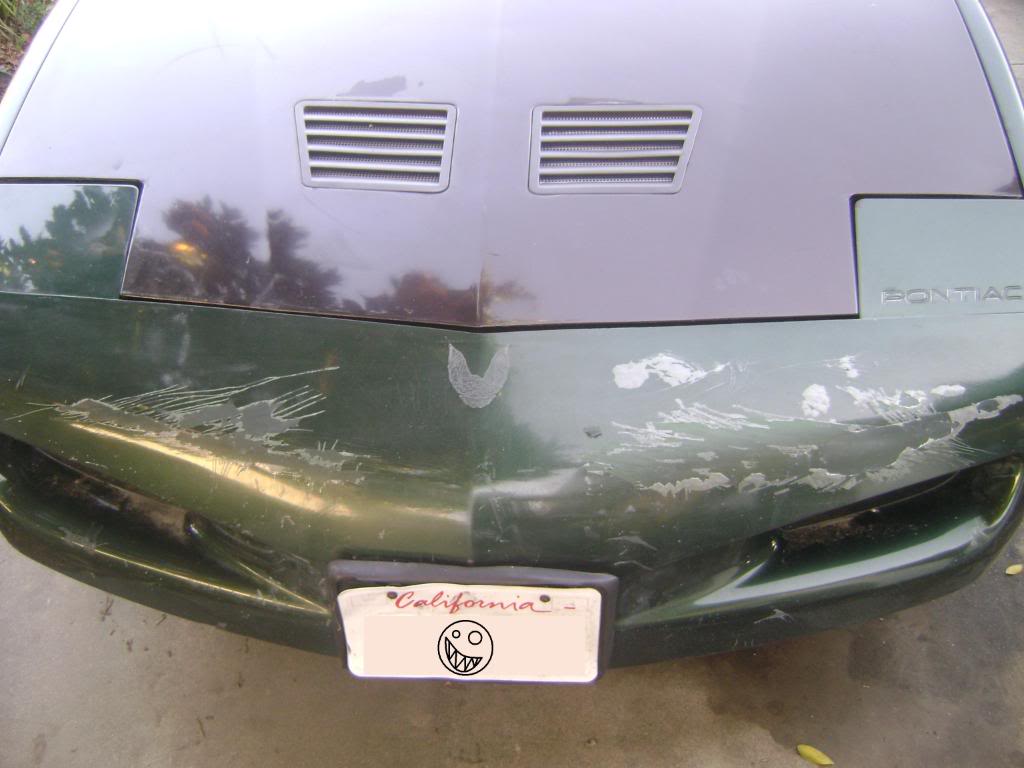
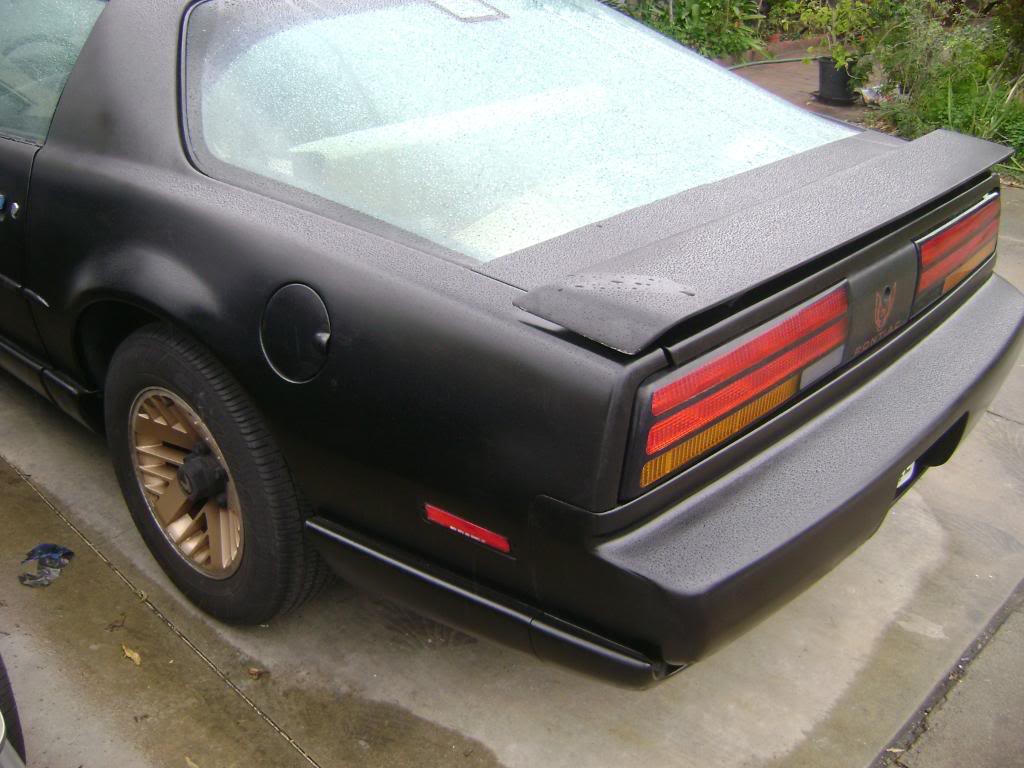
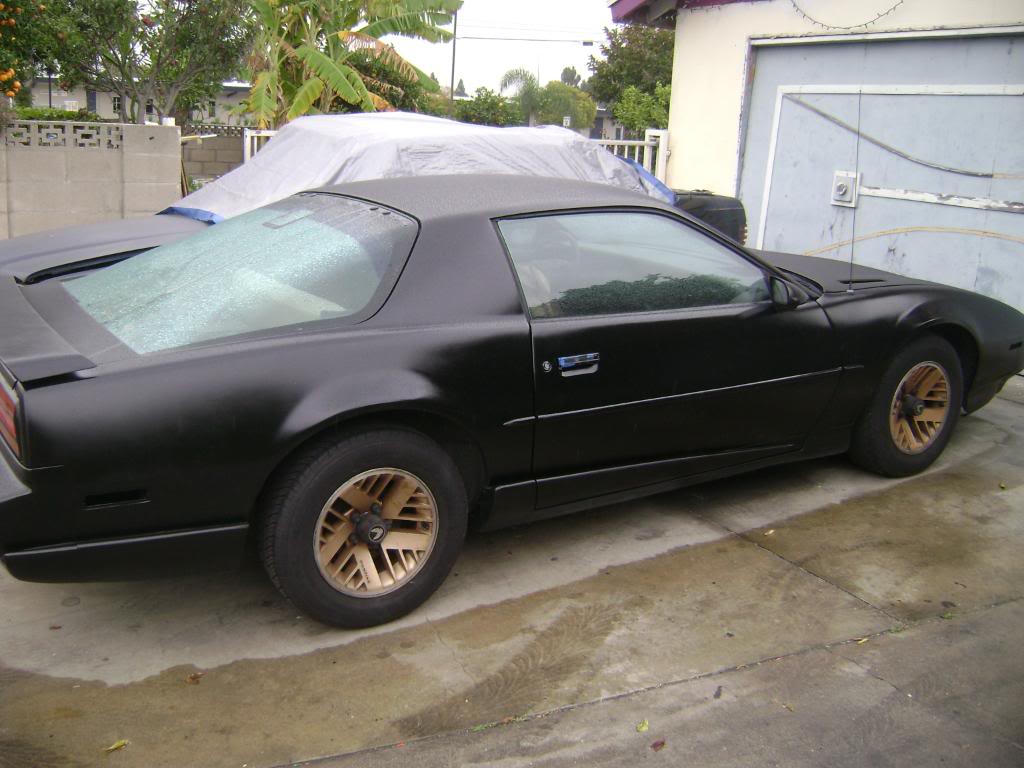
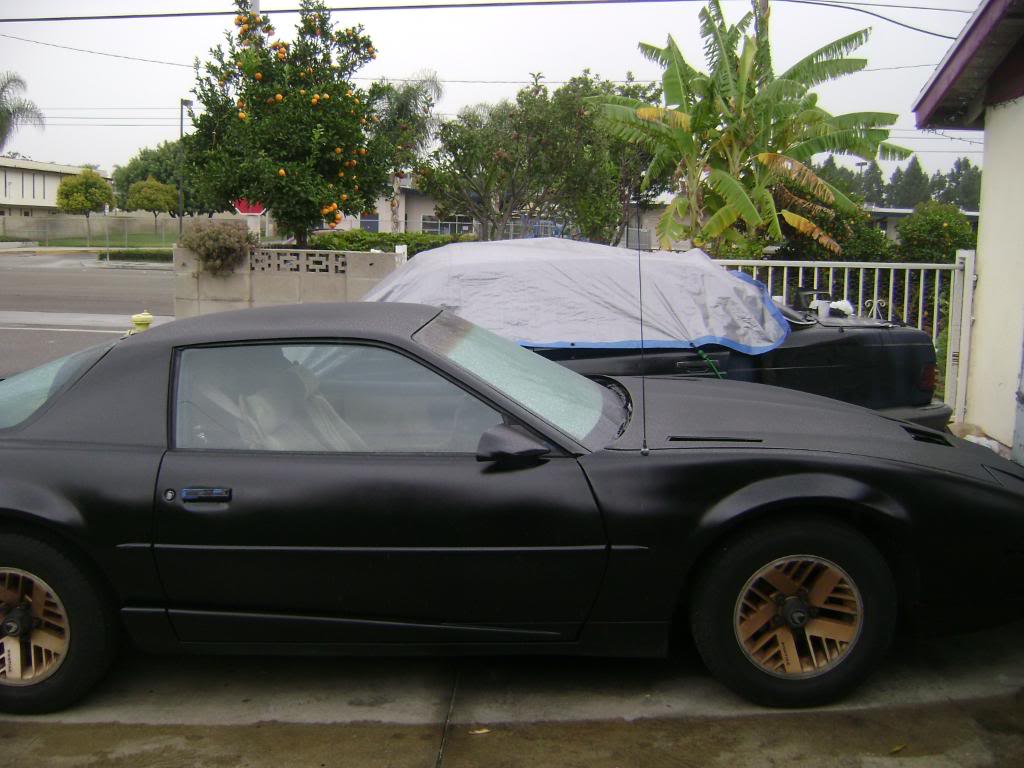
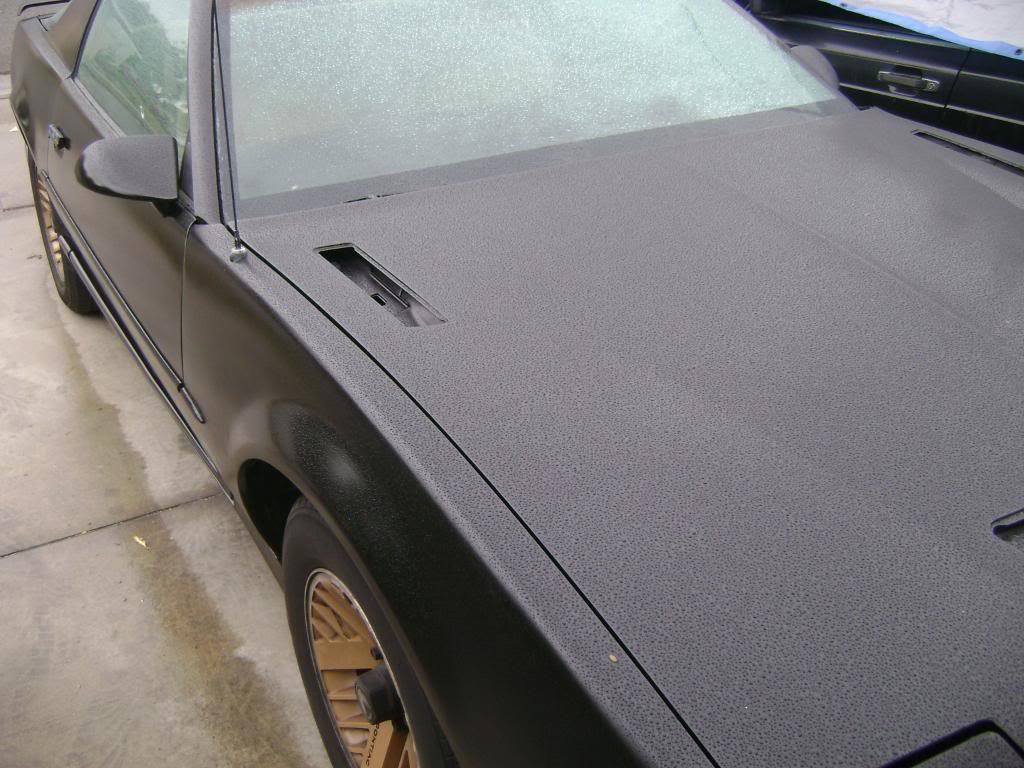
Sorry for the delay, but after sanding it for what seemed forever, Fyrchkn's words came back to me about sand between coats for weeks, and decided to go to Lowe's and get a gun, a Wagner Optimus Power painter and practiced on an bent hood I had. Reading the directions, it led me to believe that I would not need to thin it. Upon spraying, it looked like mucus and phlegm. Adding mineral spirits, it improved. Still, I didn't want to fathom the thought of my car looking like that, so I gave my friend a call. He came later around dusk and after he tested it on the car, he told me that it was just spitting up the paint, so it would never look good. Monday we went to his his brother's work to have it painted when his brother took a close look and felt my car. (Disclaimer: I am only admitting this to help any lazy people like myself, not to be rediculed, although I deserve it) He asked me why the scratches were so deep and my friend Alan said that it was because I had sanded with 400. I said "No, not 400, 40." "40?!" He said. I said yeah, since I figured that sanding with 40 would remove the paint faster than a softer grit. It was already primered and his brother asked me about the paint and I told him that it was for boats and since he never heard of it, we decided to see if it would cover the scratches. One anxious coat later, I couldn't bear to look at it. Long story short, after about an hour and a half of sanding it to factory paint and then another couple of hours to get most of the scratches out, we layed on the first coat and then the second and then the third. I would like some feedback since I don't know about painting
 , it came out looking like this. I would say that the shine is somewhere between matte black and original paint with clear coat. Is this how it is supposed to look without buffing and polishing, because that is it's current state.
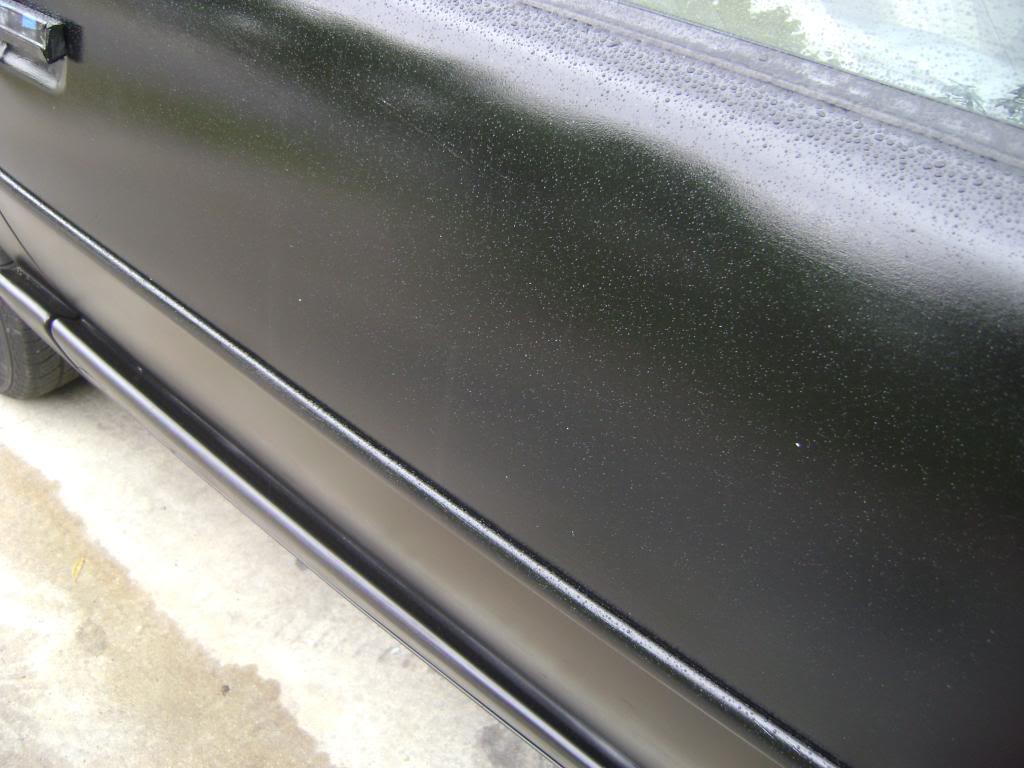
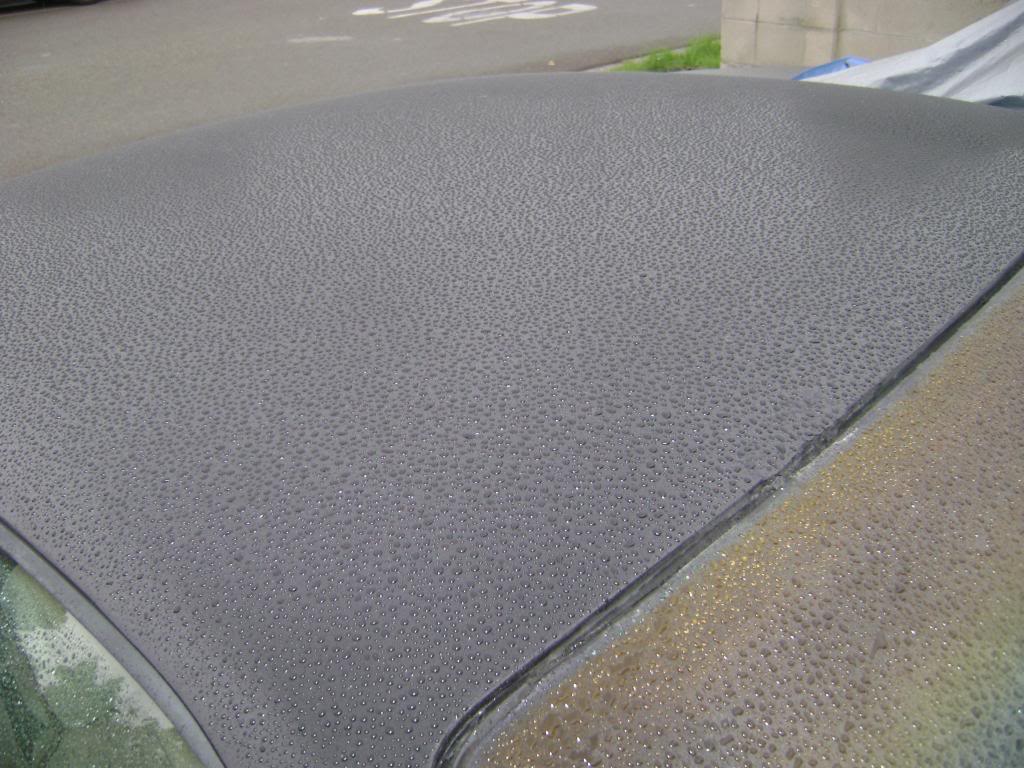
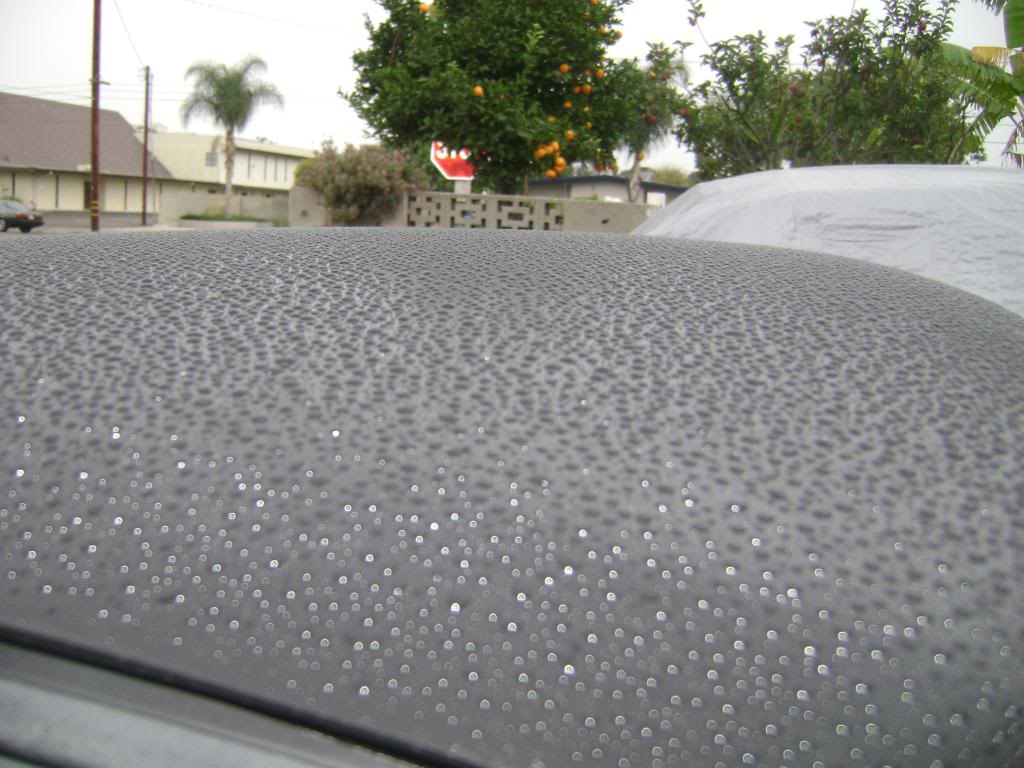

Long story short, after about an hour and a half of sanding it to factory paint and then another couple of hours to get most of the scratches out, we layed on the first coat and then the second and then the third. I would like some feedback since I don't know about painting, it came out looking like this. I would say that the shine is somewhere between matte black and original paint with clear coat. Is this how it is supposed to look without buffing and polishing, because that is it's current state. 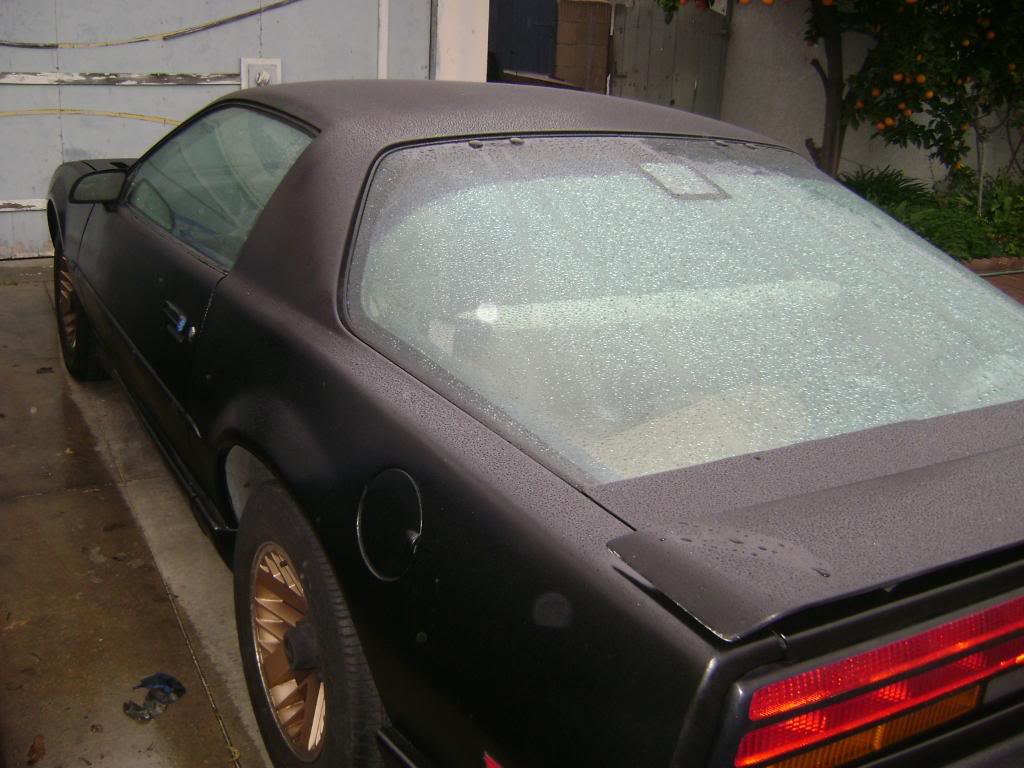


 12-30-2009, 09:01 PM
#19
Junior Member
Thread Starter
Join Date: May 2009
Posts: 10
Likes: 0
Received 0 Likes
on
0 Posts
Re: $80 Paint Job, step by step!
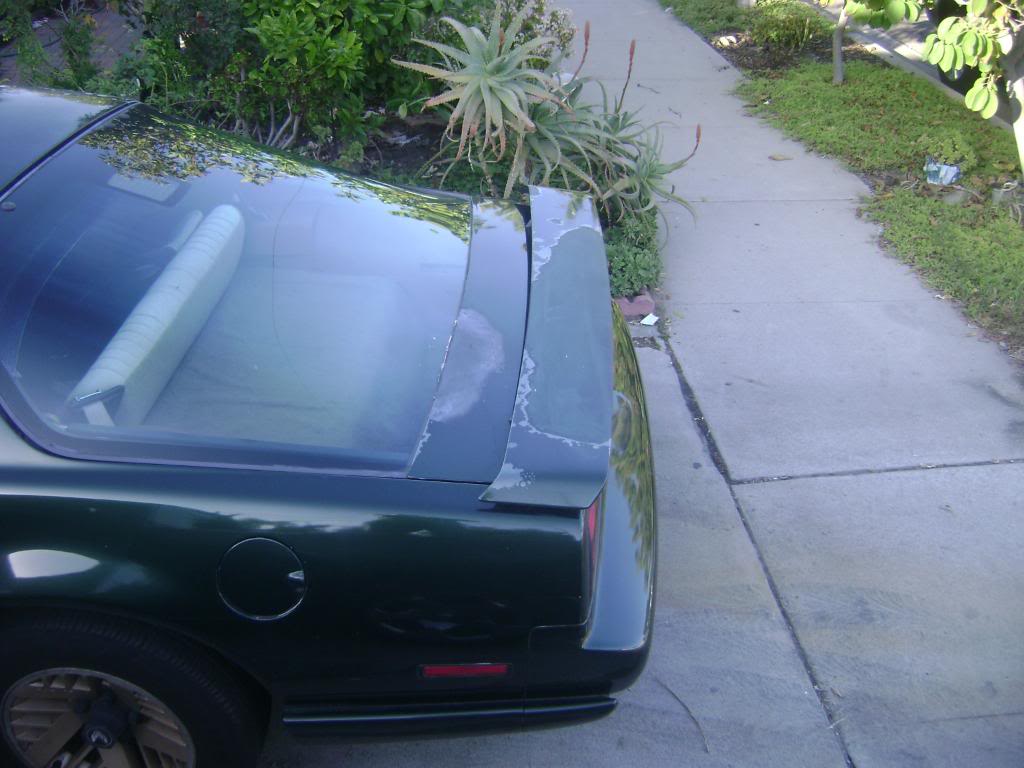
In the close up pictures, you can see some of my scratches , which sucks, but I think it looks better than it did before at least.
P.S.
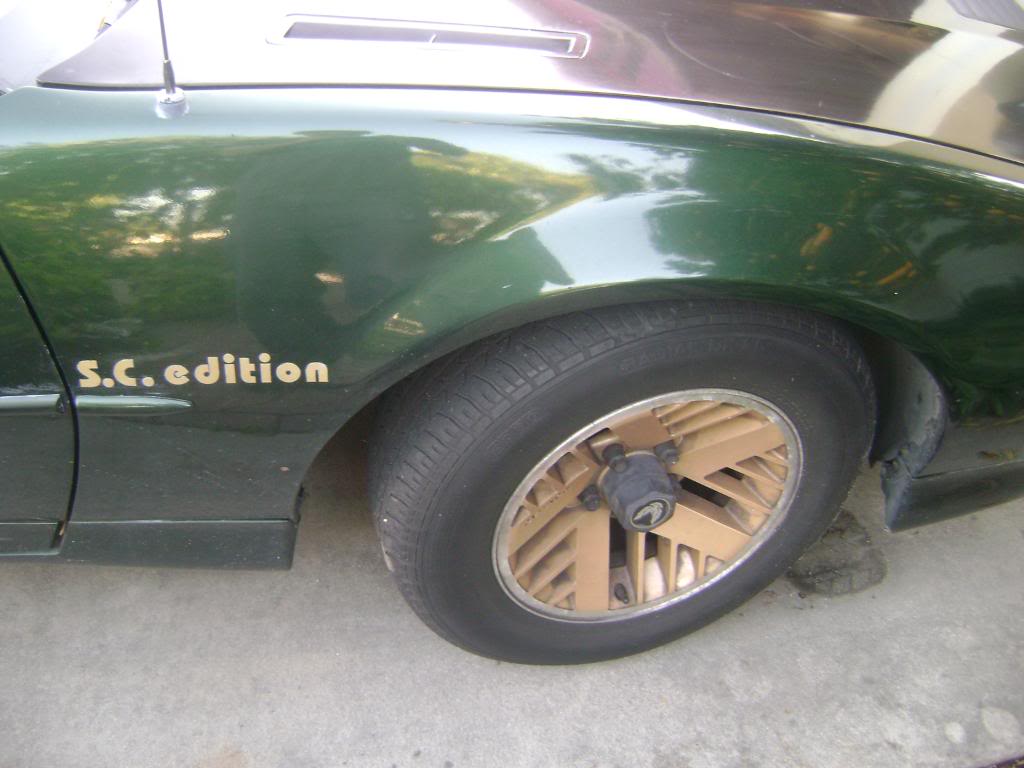
The previous owner told me that S.C. Edition stood for Southern California Edition, if anyone here could back that up or confirm it that would be great .
.
, which sucks, but I think it looks better than it did before at least.P.S.
The previous owner told me that S.C. Edition stood for Southern California Edition, if anyone here could back that up or confirm it that would be great
.
12-30-2009, 09:44 PM
#21
Supreme Member

 01-01-2010, 01:18 PM
#22
Supreme Member
Join Date: Jan 2002
Posts: 1,122
Likes: 0
Received 2 Likes
on
2 Posts
Car: 1984 Trans Am 15th anniversary
Engine: L69
Transmission: 700r
Axle/Gears: 3:73
Re: $80 Paint Job, step by step!
I don't understand why people bother using Rustoleum and other cheapo paints for budget paint jobs real stuff is out there at close to the same price. A gallon of single stage enamel with hardner and reducer is around $120. Get a cheapo HVLP gun and rent a compressor if you don't have one. It can be sprayed outdoors and any flaws can be wet sanded out. Even the worst of jobs after wet sanding can look like a professional paint job. By using that cheapo paint on your car nobody will ever touch it. You can't paint over it with real paint , it would also be a ton of work to strip all that off. It does take some skill. For single stage and even what your trying to use you need to master the technique of keeping the paint wet looking and not getting runs.
 01-06-2010, 08:56 PM
#24
Supreme Member
Join Date: Jan 2007
Location: Bastrop, TX
Posts: 1,002
Likes: 0
Received 12 Likes
on
11 Posts
Car: 1988 SC Convertible
Engine: LT-1
Transmission: 700R4
Axle/Gears: 3.23 posi w/PBR's
Re: $80 Paint Job, step by step!
My $29/gallon tractor paint looks amazing in pics and in person. I have NO regrets at all. It also has amazing UV protection and scratch/chip resistance.
01-07-2010, 02:14 AM
#25
Member
iTrader: (2)
Join Date: Aug 2006
Location: Collegeville PA
Posts: 443
Likes: 0
Received 2 Likes
on
2 Posts
Car: 91 Z-28
Engine: 360TPI
Transmission: PA Racing 700r4
Axle/Gears: 3:73
Re: $80 Paint Job, step by step!
If I would have found it that cheap I would have bought it. My local Sherwin Williams quoted me $325 for the cheapest single stage gallon with hardener and reducer.
My $29/gallon tractor paint looks amazing in pics and in person. I have NO regrets at all. It also has amazing UV protection and scratch/chip resistance.
My $29/gallon tractor paint looks amazing in pics and in person. I have NO regrets at all. It also has amazing UV protection and scratch/chip resistance.
You did a hell of a job and outdoors at that!! I wish my paint was scratch/chip resistant...
 ... So for that reason alone, I must hate you...
 haha...
Just playing of course...
01-08-2010, 02:42 PM
#26
Senior Member
iTrader: (1)
Join Date: Dec 2008
Location: Dallas, Tx
Posts: 600
Likes: 0
Received 0 Likes
on
0 Posts
Car: 1991 camaro rs
Engine: 305 tbi
Transmission: t5
Axle/Gears: stock
Re: $80 Paint Job, step by step!
In the close up pictures, you can see some of my scratches, which sucks, but I think it looks better than it did before at least.
P.S.
The previous owner told me that S.C. Edition stood for Southern California Edition, if anyone here could back that up or confirm it that would be great.
, which sucks, but I think it looks better than it did before at least.P.S.
The previous owner told me that S.C. Edition stood for Southern California Edition, if anyone here could back that up or confirm it that would be great
.
01-08-2010, 03:40 PM
#27

Re: $80 Paint Job, step by step!
All I can say is have fun with all that sanding. I tried the roller method at first on my car and I can tell you from personal experience that it sucks a large set of *********. I rolled and sanded, rolled and sanded, and rolled and sanded for over a week...and when I was done I ended up stripping it all back off because I was able to see slightly different shades of stripes in the paint from the roller tracks. I also used about 10X as much sand paper with that method then I did spraying it.
I highly recommend spraying instead of rolling. I have done both. Check out my first paint job thread from when I originally painted my car with Rustoleum. You can spray the car even without an air compressor.
Here's the thread:https://www.thirdgen.org/forums/auto...paint-job.html
There is ALOT of useful information in it.
I highly recommend spraying instead of rolling. I have done both. Check out my first paint job thread from when I originally painted my car with Rustoleum. You can spray the car even without an air compressor.
Here's the thread:https://www.thirdgen.org/forums/auto...paint-job.html
There is ALOT of useful information in it.
01-08-2010, 03:57 PM
#28
Supreme Member

Re: $80 Paint Job, step by step!
I would do the prep and take it to a shop like Maaco and get the $200.00 special and wait a couple of weeks and compound it.

Thread
Thread Starter
Forum
Replies
Last Post
Hotrodboba400
Firebirds for Sale
3
12-10-2019 07:07 PM