LS1 brakes- my turn
 04-07-2005, 06:54 PM
#1
Member
Thread Starter

Join Date: Jan 2004
Location: Augusta Georgia
Posts: 365
Likes: 0
Received 0 Likes
on
0 Posts
Car: 89 IROC
Engine: 95 350 LT1
Transmission: 4L60E
LS1 brakes- my turn
I just finished the LS1 brake conversion, I think I may try a master cylinder with a larger bore to firm up the pedal but other than that it's sweet! I didn't try to make it look pretty but I wanted it to be safe and reliable. The LS1 brake thread has all the information I used on my conversion and it should be read by anyone who is contemplating a conversion like this. Here's how I did the conversion, I don't know if it's the best way to do it and I take no responsibility for anything I'm sharing here. Read the LS1 brake thread if you need any details on how to do this conversion.
Also, I'd like to point out that some members here worked hard to develop this conversion, especially 89 Iroc Z.
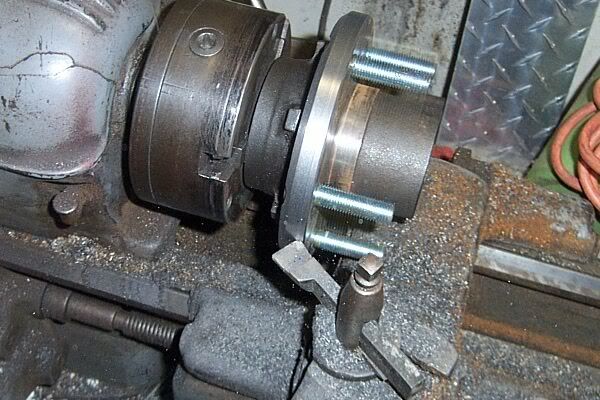
First was the hubs. There was a raised lip on the rotor that looked about right to use as a guide so I broke out the sawzall. Low speed with some lubricant worked best-
After a while they were cut. I hammered the old studs out and hammered the new longer ones in (Advance Auto Parts/Pik-A-Nut 98501). If you twirl the stud around a little you'll find a spot where it lines up with the grooves left by the old stud, I did this after hearing about some guys splitting their hubs while pressing the studs in. It's also good to put the studs in before you turn the outside diameter of the hub down to fit inside the rotor for the same reason. A little grease on the studs makes them go in easier.
I turned the hubs down on my lathe so they would fit inside the new rotors. One person mentioned doing this on a brake lathe, another mentioned putting the hub back on the spindle and spinning/grinding it with a grinder until it was the right size. The spinning/grinding thing sounds crude but if you keep it spinning fast enough it should work fine, just don't let it get too hot.
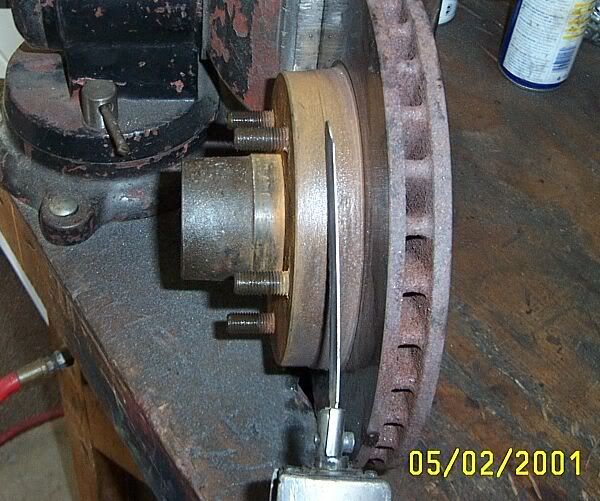
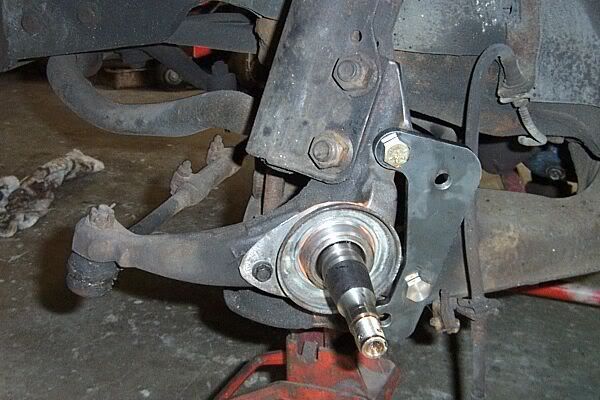
Next was the spindle mods. I cut the upper and lower caliper stops off along with the little finger pointing down for the steering stop, then I drilled and tapped 2 of the dust shield holes out to 1/2" coarse thread. See the LS1 brake thread if you need details on the spindle modifications. Be sure to read the part about keeping the hardware tight! Some people had trouble with the bolts coming loose. A friend laser cut the brackets out of 5/16 GR50 steel using the design posted in the LS1 brake thread. I decided to keep the dust shield for the bearing so I cut it down and used one bolt and some silicone sealer to hold it in place. If you clean things really well silicone holds pretty good. I know this after bending some valve covers and transmission pans trying to get them off after someone glued them on with silicone sealer.
There's some variation in the spindles and you may need to use some thin washers to center the caliper holder on the rotor. One of the bolts may need to have it's head ground down to allow the LS1 caliper mount to seat on the new bracket. If anyone wants a set of these same brackets I can supply them, PM or email me for details serpent99@charter.net
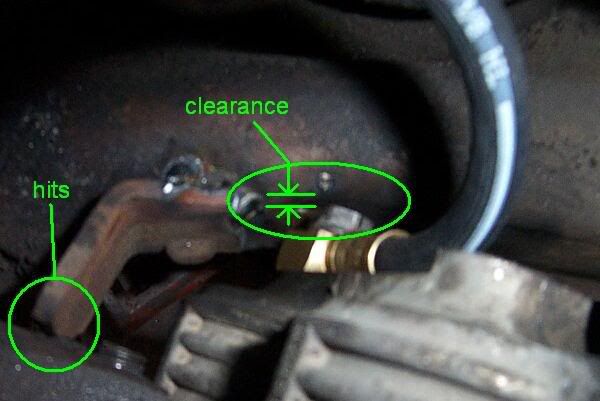
Next was the steering stop. Some have completely removed it, some have extended it, some did nothing to it. I decided to modify it, here's why- The bolt that holds the hose on the caliper will hit the lower control arm when the steering is turned to full lock, and it gets worse as the brake pads wear down. When the pads get thinner the caliper moves away from the wheel and closer to anything behind it. When the bolt for the hose, or any part of the caliper hits anything, it moves it back towards the wheel creating space between the outer brake pad and the rotor. Basically, make a sharp turn, and then you have no brakes until you pump them a few times. How you address this issue is up to you, but here's what I did-
As mentioned before, the little finger that hangs down from the lower caliper stop has to be removed to make room for the new caliper's mounting bolt. The finger doesn't seem to be used anyway, the stop on my car hits way above it on a part of the spindle that we're going to keep... unless the bolt that holds the hose on the LS1 caliper hits first.

To make some clearance, I ground the head of the caliper bolt down and modified the stop on the lower control arm. Be careful if you grind the head of this bolt down, it's drilled out inside, make sure you don't grind into the passage inside. Mine weren't bored deep enough for that to happen but you never know. You may grind just deep enough to leave just a thin piece of metal and when you hit the brakes hard it blows out. No brakes! Oh boy!... Not likely but I'm paranoid about things like that. The bolt actually hit one of the rivets for the steering stop. I drilled out the rivet and cut half the stop out of the way, then put a bead of weld on it to help keep it in place.
Look at this picture. You can see how the steering stop is hitting the back of the spindle casting and there's clearance around the head of the bolt that holds the caliper in place. WARNING- I did not check this clearance at the extremes of the suspension travel, AND, remember, this clearance goes away as the outer brake pad wears down!. I used a half worn pad in this picture. You're responsible for this, not me.
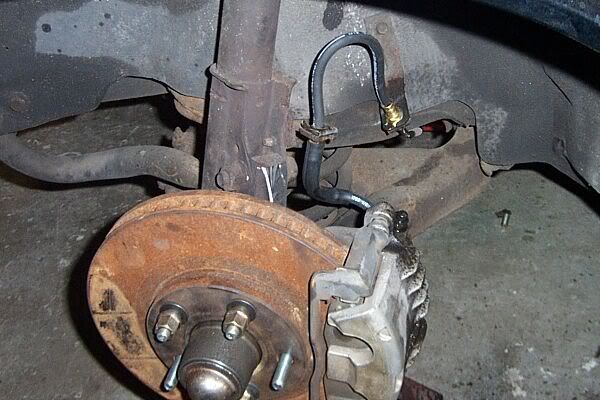
Last was the brake hoses- I used 1LE hoses, about $19 each at AutoZone. There's a rubber sleeve on the caliper end of the hose, I slid this up towards where the hose clips on the strut because it looked more useful there. It looks like the LS1 hose would work if you did away with the steering stops and modified the bracket that anchors the end of the hose to the frame a little. The stock 3rd gen hoses are supposed to work but it was too much of a stretch for me and I needed new ones anyway.
Here it is right before the test ride-
I'm getting a little pedal pulsation but I expected that with all the rust. It's slowly going away, and if it don't, I'll get some new rotors from AutoZone.
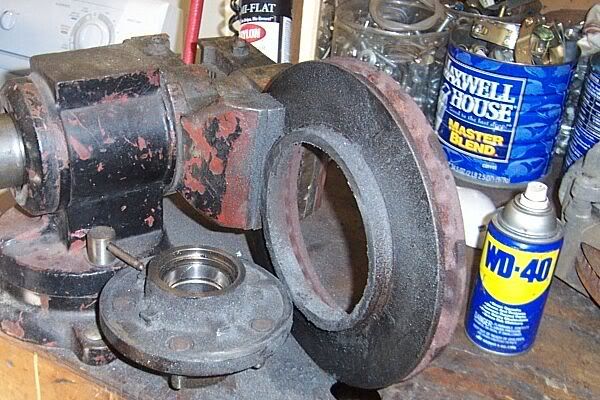
Check out the difference in the size of the caliper and rotor!
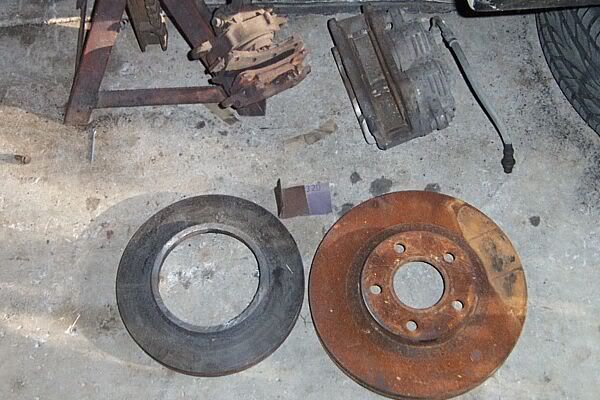
The car I got the LS1 parts from had it's nose smashed in, I figure the brakes on the car were either hardly used or they didn't work too good.

Also, I'd like to point out that some members here worked hard to develop this conversion, especially 89 Iroc Z.
First was the hubs. There was a raised lip on the rotor that looked about right to use as a guide so I broke out the sawzall. Low speed with some lubricant worked best-
After a while they were cut. I hammered the old studs out and hammered the new longer ones in (Advance Auto Parts/Pik-A-Nut 98501). If you twirl the stud around a little you'll find a spot where it lines up with the grooves left by the old stud, I did this after hearing about some guys splitting their hubs while pressing the studs in. It's also good to put the studs in before you turn the outside diameter of the hub down to fit inside the rotor for the same reason. A little grease on the studs makes them go in easier.
I turned the hubs down on my lathe so they would fit inside the new rotors. One person mentioned doing this on a brake lathe, another mentioned putting the hub back on the spindle and spinning/grinding it with a grinder until it was the right size. The spinning/grinding thing sounds crude but if you keep it spinning fast enough it should work fine, just don't let it get too hot.
Next was the spindle mods. I cut the upper and lower caliper stops off along with the little finger pointing down for the steering stop, then I drilled and tapped 2 of the dust shield holes out to 1/2" coarse thread. See the LS1 brake thread if you need details on the spindle modifications. Be sure to read the part about keeping the hardware tight! Some people had trouble with the bolts coming loose. A friend laser cut the brackets out of 5/16 GR50 steel using the design posted in the LS1 brake thread. I decided to keep the dust shield for the bearing so I cut it down and used one bolt and some silicone sealer to hold it in place. If you clean things really well silicone holds pretty good. I know this after bending some valve covers and transmission pans trying to get them off after someone glued them on with silicone sealer.
There's some variation in the spindles and you may need to use some thin washers to center the caliper holder on the rotor. One of the bolts may need to have it's head ground down to allow the LS1 caliper mount to seat on the new bracket. If anyone wants a set of these same brackets I can supply them, PM or email me for details serpent99@charter.net
Next was the steering stop. Some have completely removed it, some have extended it, some did nothing to it. I decided to modify it, here's why- The bolt that holds the hose on the caliper will hit the lower control arm when the steering is turned to full lock, and it gets worse as the brake pads wear down. When the pads get thinner the caliper moves away from the wheel and closer to anything behind it. When the bolt for the hose, or any part of the caliper hits anything, it moves it back towards the wheel creating space between the outer brake pad and the rotor. Basically, make a sharp turn, and then you have no brakes until you pump them a few times. How you address this issue is up to you, but here's what I did-
As mentioned before, the little finger that hangs down from the lower caliper stop has to be removed to make room for the new caliper's mounting bolt. The finger doesn't seem to be used anyway, the stop on my car hits way above it on a part of the spindle that we're going to keep... unless the bolt that holds the hose on the LS1 caliper hits first.
To make some clearance, I ground the head of the caliper bolt down and modified the stop on the lower control arm. Be careful if you grind the head of this bolt down, it's drilled out inside, make sure you don't grind into the passage inside. Mine weren't bored deep enough for that to happen but you never know. You may grind just deep enough to leave just a thin piece of metal and when you hit the brakes hard it blows out. No brakes! Oh boy!... Not likely but I'm paranoid about things like that. The bolt actually hit one of the rivets for the steering stop. I drilled out the rivet and cut half the stop out of the way, then put a bead of weld on it to help keep it in place.
Look at this picture. You can see how the steering stop is hitting the back of the spindle casting and there's clearance around the head of the bolt that holds the caliper in place. WARNING- I did not check this clearance at the extremes of the suspension travel, AND, remember, this clearance goes away as the outer brake pad wears down!. I used a half worn pad in this picture. You're responsible for this, not me.
Last was the brake hoses- I used 1LE hoses, about $19 each at AutoZone. There's a rubber sleeve on the caliper end of the hose, I slid this up towards where the hose clips on the strut because it looked more useful there. It looks like the LS1 hose would work if you did away with the steering stops and modified the bracket that anchors the end of the hose to the frame a little. The stock 3rd gen hoses are supposed to work but it was too much of a stretch for me and I needed new ones anyway.
Here it is right before the test ride-
I'm getting a little pedal pulsation but I expected that with all the rust. It's slowly going away, and if it don't, I'll get some new rotors from AutoZone.
Check out the difference in the size of the caliper and rotor!
The car I got the LS1 parts from had it's nose smashed in, I figure the brakes on the car were either hardly used or they didn't work too good.
Last edited by SERPENT99; 04-07-2005 at 11:42 PM.
 04-07-2005, 08:25 PM
#2
Junior Member


Join Date: Feb 2004
Location: Lake Ozark, MO
Posts: 76
Received 0 Likes
on
0 Posts
Car: 90 camaro
Engine: 305
Transmission: 700R4
Hello, I have a 90 camaro Iroc, with roh zs wheels and 255/40/17 in tire on the front. I wanted to know how much these brakes would move out the wheel scents my car in lowered and i do not want to screw up my fender.
Thanks Cobb
Thanks Cobb
04-07-2005, 10:42 PM
#4
Member
iTrader: (4)

Join Date: Sep 2004
Location: Topeka, Ks
Posts: 157
Likes: 0
Received 0 Likes
on
0 Posts
Car: 1988 Formula
Engine: 355
Transmission: 6 speed
I used a master cylinder off LS1 car. Works fine and looks tons better to. Might one to turn those rusty azz rotors next time too.....
04-07-2005, 10:52 PM
#5
Member
Thread Starter
Join Date: Jan 2004
Location: Augusta Georgia
Posts: 365
Likes: 0
Received 0 Likes
on
0 Posts
Car: 89 IROC
Engine: 95 350 LT1
Transmission: 4L60E
I wonder if there's a way to find out if they're the crappy stock rotors? I hear the stock ones like to warp like a potato chip when they get warm.
04-08-2005, 06:12 AM
#6
Moderator
iTrader: (1)

Join Date: Mar 2002
Location: Chasing Electrons
Posts: 18,405
Likes: 0
Received 216 Likes
on
202 Posts
Car: check
Engine: check
Transmission: check
SERPENT99, nice install. I like the way you cut down and used the former backing shield. After installing C4's I noticed how exposed the inner bearing and seal is. Down the road I'm going to do the same with the cut down shields.
As for the 4 mounting bolts (bracket to spindle, basket to bracket) they should be locktite'd with red 271. Then allowed to sit for 2 hours before using the vehicle. This is straight from the Helm manual on the 1LE brakes. HTH's.
RBob.
As for the 4 mounting bolts (bracket to spindle, basket to bracket) they should be locktite'd with red 271. Then allowed to sit for 2 hours before using the vehicle. This is straight from the Helm manual on the 1LE brakes. HTH's.
RBob.
04-09-2005, 12:40 AM
#7
Supreme Member
iTrader: (5)
Join Date: Apr 2002
Location: Roscoe, IL
Posts: 1,704
Likes: 0
Received 1 Like
on
1 Post
Car: 1991 Trans Am
Engine: LQ4
Transmission: T-56
Axle/Gears: 3.70
what prop valve are you running and what rear brakes? i ran a 1le valve on my stock disc/drum master (j65 maybe?) and the pedal was firm, youre gonna love the stopping power
Trending Topics
04-10-2005, 01:02 AM
#8
Member
Thread Starter
Join Date: Jan 2004
Location: Augusta Georgia
Posts: 365
Likes: 0
Received 0 Likes
on
0 Posts
Car: 89 IROC
Engine: 95 350 LT1
Transmission: 4L60E
I went for a long ride today followed by a trip to the drag strip. The rusty old rotors I used smoothed out really nice. It was a great feeling when I stood on the brakes at the end of the 1/4 mile and it slowed right down. The car ran 14.29. That was with a stock buick roadmaster LT1 and trans and a 2.77 open 9 inch ford rear. The only mods are a 160 degree thermostat and some tweaking on the computer.
It can only get faster from here

I have one set of brackets left if anyone needs them. I'll have more made if there's any demand.
It can only get faster from here
I have one set of brackets left if anyone needs them. I'll have more made if there's any demand.
04-14-2005, 10:28 PM
#10
Supreme Member
iTrader: (7)

Join Date: Mar 2001
Location: Fort Mill, SC, USA
Posts: 6,420
Likes: 0
Received 4 Likes
on
4 Posts
Car: '88 Iroc, '91 RS, and a '70 RS
Engine: 5.7 TPI; 5.0 TBI; ZZ4/T56 on the ag
Transmission: A4, A4, slated to be a T56
I can't believe you didn't at least have the rotors turned...you're gonna groove the heck out of both the pads and rotors.
Ed
Ed
04-14-2005, 10:54 PM
#11
Member
Thread Starter
Join Date: Jan 2004
Location: Augusta Georgia
Posts: 365
Likes: 0
Received 0 Likes
on
0 Posts
Car: 89 IROC
Engine: 95 350 LT1
Transmission: 4L60E
Il have 5 more sets of brackets by the end of the week. $55 a set paypal.
The rotors and pads look fine and there's no pedal pulsation at all. I don't see any groves in anything. I was worried they may be the warp prone oem rotors so I figured I'd replace them anyway but they're working just fine.
The rotors and pads look fine and there's no pedal pulsation at all. I don't see any groves in anything. I was worried they may be the warp prone oem rotors so I figured I'd replace them anyway but they're working just fine.

 06-22-2005, 06:10 PM
#14
Junior Member

Join Date: May 2005
Location: PA
Posts: 12
Likes: 0
Received 0 Likes
on
0 Posts
Car: 1991 Formula
Engine: 5.7L
Transmission: A4
steering stop
I got done with my LS1 upgrade and did not like the way the banjo bolt on the caliper hits. My thanks to Serpent99 for his idea on removing part of the bracket. I had first fixed it by welding an 1/8" strip onto the stop to give the bolt some clearance. But did not like the loss of turning radius. I was considering moving the caliper up as was done in the FAQ thread. I think removing the end of the bracket is the way to go. Thanks again. Sometimes the easiest way out is the best.
I went with stainless steel for my brackets, because I could! and got a set of S.S. speedbleeders. my drivers side bleeder was stuck in and I could only turn it 1/4 turn. That was enough to bleed the brakes and finish the job but I did not like it. Lots of Kroil and I got it out. In aluminum calipers I think SS is the way to go on the bleeders. SB-1010-SS is the PN for anyone interested.
One thing I did not see in the (very long) LS1 brake thread is the fact that you lose the centering hub for your wheel. Only the lug nuts center the wheel now. I may take on machining a new hub to extend that diameter out farther so the wheel can seat on it again. I wonder if aluminum would work for a hub????
That's it I'm tired of typing.
02-14-2006, 09:42 PM
#15
Supreme Member
iTrader: (1)
Join Date: Apr 2002
Location: Fayetteville, NC
Posts: 1,136
Likes: 0
Received 1 Like
on
1 Post
Car: 84 Z28 Convertible 2 Seater
Engine: Dart Little-M SBC 400
Transmission: Pro-built Automatics 700R4
Axle/Gears: Strange Engineering 3:73
Chris
I''m was looking into the C5 Conversion parts. I would like to sent you my spindle, rotor, studs, and buy your C5 brackets. I want everything ready to bolt together when I get them back from you. Do you include the Bolt (abutment to bracket) 39685 X 4 --(Fastenal)
m14-2.0 x 35 mm allen head for clearance.
Can you please give me a total price which include return shipping to zip code 77084.
02-15-2006, 01:33 PM
#16
Supreme Member

Join Date: Jul 2003
Location: Pensacola, FL
Posts: 1,104
Likes: 0
Received 1 Like
on
1 Post
Car: 1999 Saturn SL2
Engine: 4 cylinder
Transmission: 4-speed automatic
Hey, Ed. Just wondering if you got my PM. If you're busy with other stuff, it's cool. Just wanted to make sure you got it.
03-05-2006, 03:09 PM
#17
Member
iTrader: (2)

Join Date: Dec 2000
Location: Central Indiana
Posts: 222
Received 0 Likes
on
0 Posts
Car: 1984 Camaro Z28
Engine: Blueprint 383
Transmission: T-5
Axle/Gears: 3.73
quote by serpent99:
"Last was the brake hoses- I used 1LE hoses, about $19 each at AutoZone. There's a rubber sleeve on the caliper end of the hose, I slid this up towards where the hose clips on the strut because it looked more useful there. It looks like the LS1 hose would work if you did away with the steering stops and modified the bracket that anchors the end of the hose to the frame a little. The stock 3rd gen hoses are supposed to work but it was too much of a stretch for me and I needed new ones anyway."
When Autozone looks up the 1LE part, how do we designate that it is the 1LE hoses we want? Do 1LE's have a specific VIN code?
Thanks,
Craig
07-26-2006, 07:41 PM
#18
Senior Member
iTrader: (1)

Join Date: Nov 2003
Location: San Lorenzo, California
Posts: 574
Likes: 0
Received 1 Like
on
1 Post
Car: 1987 Firebird Trans AM
Engine: 383 TPI...very soon
Transmission: TH700R4
Originally Posted by SERPENT99
There's some variation in the spindles and you may need to use some thin washers to center the caliper holder on the rotor. One of the bolts may need to have it's head ground down to allow the LS1 caliper mount to seat on the new bracket. If anyone wants a set of these same brackets I can supply them, PM or email me for details serpent99@charter.net
Wondering if you had a source for thin washers (maybe .020" thick?) Once I bolted everything up, my carrier sits way closer on one side than the other. Maybe 1/16" clearance on the front side and about 3/16" on the back, I assume I need to even this spacing out a little, but adding a standard washer is just too much, I end up with the exact opposite... any suggestions?
07-26-2006, 09:33 PM
#19
Supreme Member
iTrader: (7)
Join Date: Mar 2001
Location: Fort Mill, SC, USA
Posts: 6,420
Likes: 0
Received 4 Likes
on
4 Posts
Car: '88 Iroc, '91 RS, and a '70 RS
Engine: 5.7 TPI; 5.0 TBI; ZZ4/T56 on the ag
Transmission: A4, A4, slated to be a T56
Lowe's has a pretty good fastener department, look for fender washers which are pretty thin. You may find you can get the right thickness but you may have to drill the hole out a bit but this should work.
Ed
Ed
07-26-2006, 09:50 PM
#20
Senior Member

Join Date: Oct 2003
Location: Aiken, SC
Posts: 544
Likes: 0
Received 2 Likes
on
2 Posts
Car: 91 Z/28, 89 RS Race Car
Engine: 305 stock / ZZ4 AFR 195 9.7:1
Transmission: T5 / t10 / Jerico
Axle/Gears: 10blt w 3.42, 9 in w /3.80 DL
I use valve spring shims to space my calibers. You can get them at napa.
07-27-2006, 07:43 AM
#21
I too am curious about the brake hoses from Autozone... I picked up a new set of stock ones for my 87 TA WS6... But if they are going to be too tight, I want to get some 1LE ones. Got the part number? Or atleast what car you looked it up under?? Thanks.
Justin
Justin
08-04-2006, 03:26 AM
#22
Serpent,
Thanks again for the brackets. Just wanted to pick your brain about your LS1 upgrade. What kind of fasteners did you use to mount the bracket to the spindles and the bracket to the carrier? I have the spindles modded, brackets from you, hubs fabricated, bought the calipers, rotors and carriers from the JY.
Thanks
Lucid

Thread
Thread Starter
Forum
Replies
Last Post