side exit exhaust with ground clearance
 08-03-2009, 10:45 PM
#1

side exit exhaust with ground clearance
I made this exhaust for my sons 84 berlinetta that has xenon gfx and eibach lowering springs. min ground clearance is y-pipe at 4 3/4 in.
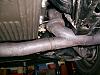
started with hok-2460 headers. fabbed left collector from 3in mandrel pipe facing to rear. slit pipe just past 90* bend and tapered to 2.5 in. added 2.5 in mandrel 90* to fit under torque convertor. this had to angle down slightly. added short length of 2.5 in straight tubing (angled up) which placed pipe under rt side header outlet. fabbed rt side collector fron 3in 90* pointing out to rt side. notched 90* bend and formed straight pipe from left side into rt side 90. continued with 3in 90* bend through factory exhaust channel in frame. a 3in 45* tube was added to turn exhaust under car to oe cat location under passenger floor.
standard 14 inch body muffler (i used turbo style, but chamberd ok to) will fit in place of convertor. another 45* bend puts the exhaust heading down the driveshaft tunnel like factory. a short piece of 3in straight pipe stops just at the end of the rear seat footwell. another 3in 90* turns into the large channel in the floor pan.
i fabbed an exhaust outlet from 18 gauge steel sheet shaped like a trapezoid 6in on the inlet side, 9in on the outlet and about 10in long. it is 1 1/2 in deep. to the inlet side i grafted in a short, tight 90* piece that enters from the top of the box and slips over the final 90* mentioned above. all joints not welded are connected with stainless band clamps.
to support the exhaust i made a simple bracket that bolted to the torque arm bolts and the band clamp at the muffler exit. at the rear i incorporated two mounting ears in the outlet box and installed two threaded inserts, one in the sfc and the other in the frame ahead of the lca front mount. i used some left over swaybar link bushings to isolate the exhaust outlet from the frame.
the exhaust was built before the gfx kit and sat about a half inch under the rocker ahead of the rt rear tire. with the gfx on it is about 4in under the car and can't realy be seen. planning on extending out and can make larger and taller w/ 3 baffles ala nascar.
we have put over 3,000 miles on this without a single ding or clearance issue and the roads in ne ohio are anything but smooth.
 08-07-2009, 04:21 AM
#3
 Pics or fail!
08-11-2009, 09:45 PM
Pics or fail!
08-11-2009, 09:45 PM
#5
Re: side exit exhaust with ground clearance

here is pic of first exhaust system that was built around a set of old hedman shorty headers that i cut the 3 bolt flanges off of. the engine had a stock style pan so the left side of the y-pipe crossed in front of the oil pan sump. the exhaust uses 3" dia. end to end. it is short (under 8ft linear), simple (made from off the shelf walker dynomax parts), and efficient (y-pipe doesn't neck down like edelbrock, pace setter etc).
the boom tube style exit is not in the picture as it was made a few weeks later after the exhaust was hung.
the tone of the system is determined by the muffler used. i used a turbo style muffler for a throaty sound but without a lot of interior droan. with the muffler under the front floor pan interior noise could be a problem with something like a series 40 flow master.
Trending Topics
08-13-2009, 06:34 AM
#8
Supreme Member

iTrader: (1)
Join Date: Jul 2006
Location: Aloha, Oregon
Posts: 1,132
Likes: 0
Received 8 Likes
on
6 Posts
Car: '91 Camaro Z28, '85 Camaro Z28
Engine: LB9, LB9
Transmission: T5, 700r4
Axle/Gears: Eaton 3.73 Posi, 3.23 Posi
Re: side exit exhaust with ground clearance
So....any installed pics?
08-17-2009, 08:40 PM
#9
Re: side exit exhaust with ground clearance
My son took the car to a couple of car shows this past weekend, but its back in the garage now. I'll get it jacked up and take some pics, should have them posted by the weekend. Both the exhaust and the bottom of the car are painted a matte black so i'm not sure what i'll do for clarity.
The whole system can be unbolted and removed in one piece so if I have time i'll drop it down and take pictures of it in the driveway.
The whole system can be unbolted and removed in one piece so if I have time i'll drop it down and take pictures of it in the driveway.
08-18-2009, 10:24 PM
#10
Re: side exit exhaust with ground clearance
ok, now we've got it together, larger type and lots of pics. Ok maybe not all together, the pics are huge. Somebody tell me how to shrink them down.
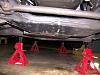
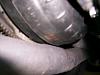
Pic #1, here is a view from just behind rear axle.
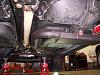
Pic #2, view of exhaust exit. This is completely out of view now with the gfx kit on. You can see the space I have to make a larger, longer, 3 chamber nascar style exit.
Pic #3, view from front. that is an 8 qt stockcar oil pan 8" deep that is level w/ bottom of front crosmember. You can see the crossover pipe is about an inch lower. Oval tubing or a 10" convertor would let me tuck it up more.
Pic #1, here is a view from just behind rear axle.

Pic #2, view of exhaust exit. This is completely out of view now with the gfx kit on. You can see the space I have to make a larger, longer, 3 chamber nascar style exit.

Pic #3, view from front. that is an 8 qt stockcar oil pan 8" deep that is level w/ bottom of front crosmember. You can see the crossover pipe is about an inch lower. Oval tubing or a 10" convertor would let me tuck it up more.
 08-18-2009, 10:52 PM
#11
Re: side exit exhaust with ground clearance
A few more pics.
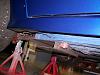
passenger side of y-pipe
driver side of y-pipe, this is a 3" dia. 90* that I sectioned and tapered down to 2 1/2" dia. Added a 2 1/2" 90* to route under the convertor. Clearance at convertor is close, maybe just 3/16 at closest point. 1500 miles and it hasn't bottomed on anything yet. Ground clearance here is about 4 1/2".
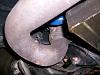
passenger side of y-pipe

driver side of y-pipe, this is a 3" dia. 90* that I sectioned and tapered down to 2 1/2" dia. Added a 2 1/2" 90* to route under the convertor. Clearance at convertor is close, maybe just 3/16 at closest point. 1500 miles and it hasn't bottomed on anything yet. Ground clearance here is about 4 1/2".

 08-18-2009, 11:02 PM
#12


Thread
Thread Starter
Forum
Replies
Last Post
transaero
Engine/Drivetrain/Suspension Parts for Sale
2
08-31-2015 01:14 AM
eightsixseven
Tech / General Engine
1
08-14-2015 03:09 PM