Electrolysis For Dummies (Picture HEAVY)
 12-06-2011, 04:09 PM
#1
Junior Member
Thread Starter
Join Date: Sep 2011
Location: Topeka, KS
Posts: 26
Likes: 0
Received 0 Likes
on
0 Posts
Car: 90 RS
Engine: 5.0 TBI
Transmission: 700R4
Electrolysis For Dummies (Picture HEAVY)
Forgive me, if it seems a bit pretentious of Me, but I didn't find a good thread on the subject (I made sure I searched before I went and foisted my writing on people). This was something I wrote up years ago, and shared on two other forums. Some said it came in handy, and handy is always well.. handy. So I decided to share my drivelings with the 3rd Gen Crowd. So Submitted for your approval (PS: All this was done in my garage with my own 1968 455 Olds engine I scored for less than a pair of shoes).
For those of you who have seen it, read about it, done it, or for any other reason have anything to add, by all means, be my guest....
Alrighty.. I'd read and seen a fair bit about the process, so when I got this engine I decided to give it a try... seeing I had nothing itself invested in the engine and they were rusty enough for me to imagine a machine shop looking at me funny when I showed up with them (At least they look junkyard fresh now).. For those of you unfamiliar with the concept, you basically mix a bunch of things that sound like it can only end in tears, but lo and behold, you somehow come out ahead (Water + Electricity = BAD, Bare Metal + Water = BAD, Bare Metal + Salt =BAD, ETC...).
The advantages to it are
1: it's cheap.
2: it's so easy, a caveman can do it...
3: For those who care, it's environmentally friendly, the end result is a bucket of rusty salt water (VS some sort of pain-to-dispose of acid).
4: if you're easily amused like me, it's kind of fun in a sick sort of way.
5: It STOPS at the good metal. The only victim here is iron OXIDE. Acid dipping will take good metal as well.. this can't.
There are of course a few basic requirements..
1: A nonconductive tub sizable enough to hold your rusty part
2: Washing Soda (Which was the hardest part to find, actually)
3: A 12-20 volt power source that will provide up to 4 constant amps minimum. We are mixing water and electricity here... so high voltage is bad... Amps do the work though, the more amps, the merry/faster it goes.
4: I suppose I should say a well ventilated area or something...
Step 1: Clean the part you want to derust... Dirt, grease/oil/grime repels the water and stops the spot from getting the juice. I heaved the parts in the back of the truck and hit the carwash and blasted them..
Step 2: you get yourself a huge nonconductive (Plastic) bin, bucket, container, tub to do this in...
Step 3: insert part you want to derust...
Step 4: insert piece of clean, ferrous metal object in said container to play Sacrificial Electrode*... Do not let said electrode touch the piece (You ever touch jumper cables together when they're on the battery? Now imagine that under water, fantastic...)
(* = Yes... the electrode will be consumed and rust eleventeenbillion? times faster than you thought possible - nearly as fast as a mitsubishi product, so don't use your wife's favorite axe or something. DO NOT USE STAINLESS STEEL)
Step 5: Fill the tub with water.. you don't want to use distilled water, spring water or anything fancy, just plain old hose water.
Step 6: Add about a half cup of WASHING SODA ('Warshing' soda for those of you in various southern states) for every 5 gallons of water. I eyeballed it. The worst that can happen at this point is A: you under salt the water and won't get the conductivity you desire (Slows the process/takes longer, which is bad, we're an impatient species), or B: you over salt the water (And you waste washing soda, the water is only going to get so conductive, the amps do the work)
This is important... You MUST use WASHING Soda (Shameless Plug, Arm N' Hammer Super Washing Soda). This is Sodium Carbonate... BAKING Soda is Sodium BICarbonate, Borax Laundry Booster is Sodium DICarbonate.
Step 7: The last step: plugging in your power source... This is the IMPORTANT part... POSITIVE goes on the Electrode.. NEGATIVE goes on the PART TO CLEAN. Get those confused and you'll come back to find a super shiny electrode and your part 10 times rustier than when you started. If you have good connection you should see bubbles forming on the piece you are derusting in fairly short order
Step 8: Common Sense: You just plugged an electric device into tub of water.. do I really need to list how this could potentially end badly? Didn't think so.. keep your hands out of the tub, don't let your dog drink out of it, keep the kids out of it.. etc, etc, it's freakin' electrified. Further more.. for those of you who were busy doing something else during middleschool science class... electricity + water = Hindenburg brand hydrogen gas and its equally flammable buddy, Mr Pure Oxygen. I suppose legally, I should tell you to do this in a well ventilated area.. practically... Unless you're railing 100 amps into a 2.5 gallon bucket... you're not going to make enough to worry about. Eitherway, it's not something you do in the kitchen...
Annoying Details, trivias and truths...
Powersource Selection... less than 20 volts, more than 4 amps. They say 2 amps works, but it didn't impress me... the difference between 2 amps and 4 are the difference between night and day... I imagine 8 or more amps would be fantastic. Most commonly used powersources are car battery chargers... It must be a dumb charger... your nifty little auto-shutoff, computer controlled gizmo won't work... me and a more electronically aptituded friend toyed with the thought of putting some sort of resistor in line to trick the charger into seeing a load, but it seemed like more work than it was worth. I picked up a used 4 amp charger from a local fleamarket for the cost of a happymeal. The guy even told me it had a warranty (I didn't tell him I was plugging it into a tub of water though...). I suppose you could use a timer'd one if you wanna run out there ever 2 hours and turn the **** again... Just find your granddaddy's tinbox charger...
Electrode Selection... Regular old steel.. it doesn't matter what it is.. I used a leftover lawnmower blade I had the garage, it doesn't care. The reason for avoiding stainless is because you draw the chromium out of the stainless as its consumed.... for those who don't know.. Chromium is about as toxic as it comes and you'll die a horrible, cancerous death in the jailcell the EPA throws you in after you start producing it. Just freakin' don't - End. If someone says it's fine to use stainless, they are wrong - End. Don't use copper... don't use aluminum.. don't be cute... just plain old steel...
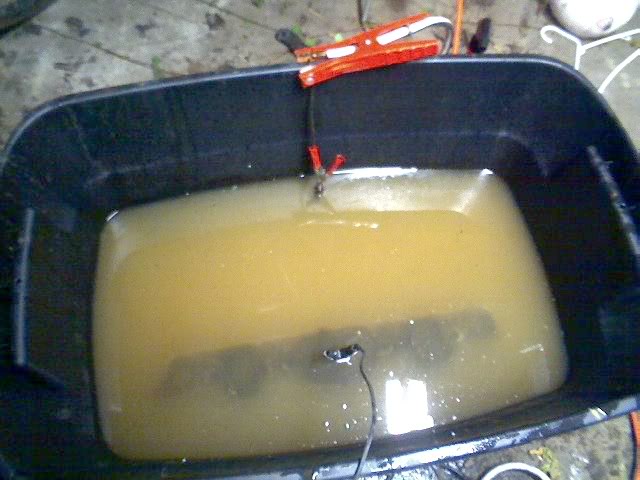
Other interesting notes about the electrode... The more electrode you have in the water, the more connection you have. While experimenting with the set up, I found the 'just stick the end of the electrode in' method was netting me less than half an amp and taking just this side of an epoch. Stick the whole electrode in the water and I'm up over 4 amps and things get to bubbling (Keep the copper coated clamp out of the water.. the negative... not a problem, but not the positive..).
All those cute little websites that say it's fun and easy, throw the part in and walk away are full of CRAP. As the electrode gets coated in rust and consumed, it loses a lot of conductivity. It may have started at 4+ amps, but 5 hours later I'm down to 2 amps.. after 8 hours I'm down to half an amp again. Take the electrode out, clean it (I mean resurface it, grind it back to fresh metal, (alternatively if you're lazy, you could just replace it and keep on bubbling)) and it's back to 4 amps and we continue... This of course, does depend on the part... on how much rust it has, how much surface area, etc, etc. I'd imagine there are some parts that could easily be done in a single sitting, but once you get into heavier, more complicated parts, the longer it's going to take and the more you'll have to renew the electrode. Alternatively, if you have more amperage, it would take less time, but you'd still have to deal with the failing electrode.
Part Selection... The process will work on any piece of rusted metal you throw in there from a door **** to a crankshaft, but here is the potential deal breaker: once you remove the part from the water it'll rust... instantly.. that is not an exaggeration. You can literally sit there and watch the part dry and turn brown in the time it takes to make a Cup o' Soup. It's not going to scale up and crumble, mind you, but it'll have to be dealt with prior to painting or whatever you have in mind for the part. You can reduce this by getting the water the hell off the part ASAP. I say reduce, because there is no practical way to stop it completely... shy of removing the part from the tank of water and submerging it in a 55 gallon drum of WD40... It's going to happen, thems the breaks. Some parts are harder to dry than others. I.E. heads with their many nooks and crannies and passages would be a pain in the ***. a valve cover.. not so much. The good news is it couldn't possibly rust up anywhere near as bad as it was when you started...
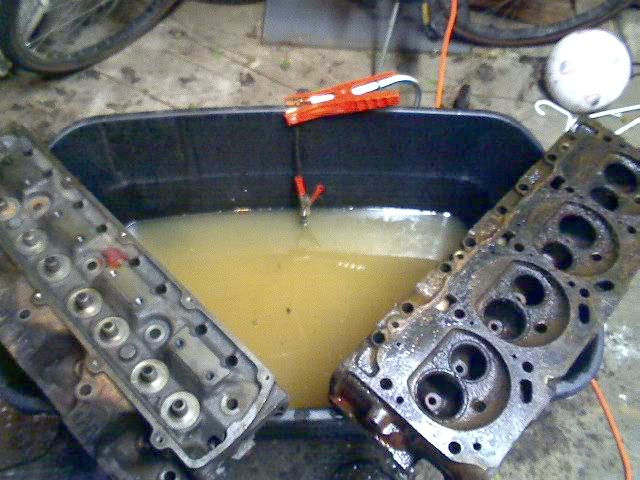
And to prove I'm not just cooking this stuff up... heres a picture of me doing it to 1968 C castings! The one on the left was already done... the one on the right is sort of mid-process.. I didn't think about doing this until it had been in there for about 2 hours.....
The biggest issue with everything I've read about it is that they neglect to mention the electrode issue. They tell you it gets consumed, they just don't tell you it'll slow down and stop if you don't constantly monitor it. Theres a clip on youtube from the TV show Trucks! where they demonstrated it and the host is like 'we left this part in the tub for 48 hours'.. not without checking it every 5-6 hours you didn't...
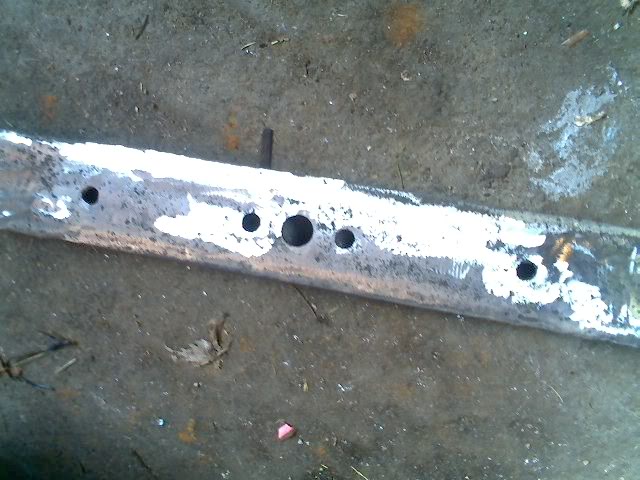
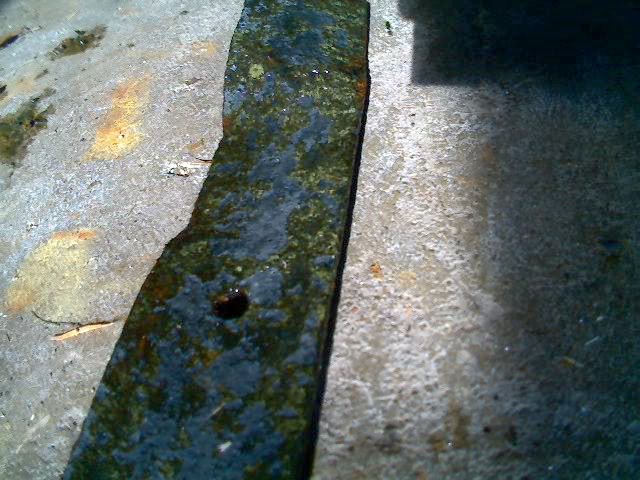
This is what I mean by consumed... This is what the Lawnmower Blade *** Electrode looked like prior to its tour of duty in the tank...
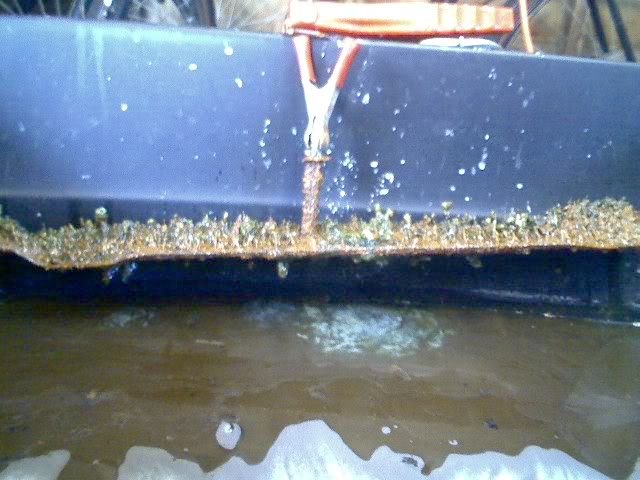
This is after it's overnight stint... that is rust being magnetically drawn out of the cylinder head towards the electrode
And once you scrape off all the magic rust mushrooms, this is what has become of our electrode. You could probably throw it back in the tank like this, but you'll lose some amperage and slow the process down. best bet is either to resurface or replace it..
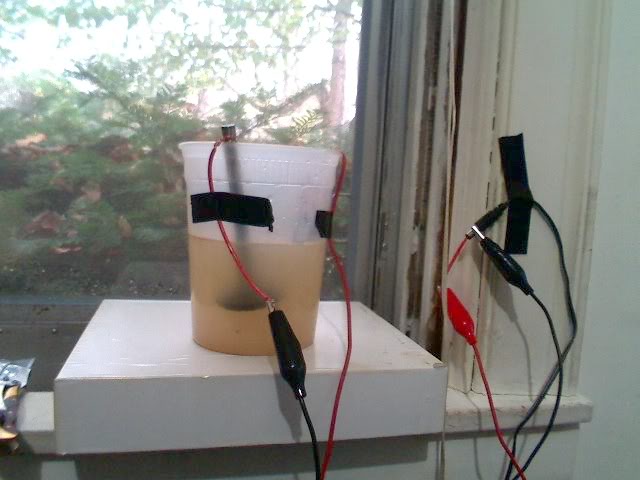
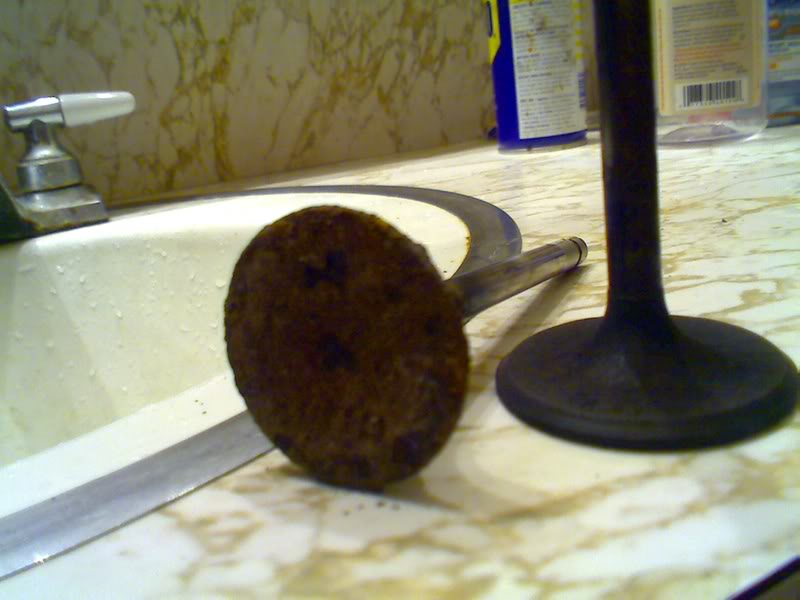
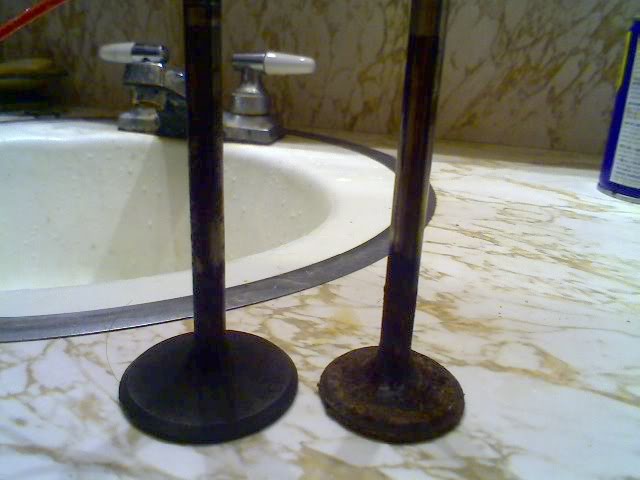
I posted this on the turbo dodge forum I regular and some people were all 'Well, how rusty WERE the parts?!'. Which is a fair question (Figure mopar guys would know all about rust ). So I took two of the valves that were occupying the head and brought them inside, threw one in a cup with a nail and plugged it into a cordless drill charger (18 volts 850MHa).
These be the intake and exhaust valves from the same chamber.. the intake valve did about 90 minutes in the solution..
For those of you who have seen it, read about it, done it, or for any other reason have anything to add, by all means, be my guest....
Alrighty.. I'd read and seen a fair bit about the process, so when I got this engine I decided to give it a try... seeing I had nothing itself invested in the engine and they were rusty enough for me to imagine a machine shop looking at me funny when I showed up with them (At least they look junkyard fresh now).. For those of you unfamiliar with the concept, you basically mix a bunch of things that sound like it can only end in tears, but lo and behold, you somehow come out ahead (Water + Electricity = BAD, Bare Metal + Water = BAD, Bare Metal + Salt =BAD, ETC...).
The advantages to it are
1: it's cheap.
2: it's so easy, a caveman can do it...
3: For those who care, it's environmentally friendly, the end result is a bucket of rusty salt water (VS some sort of pain-to-dispose of acid).
4: if you're easily amused like me, it's kind of fun in a sick sort of way.
5: It STOPS at the good metal. The only victim here is iron OXIDE. Acid dipping will take good metal as well.. this can't.
There are of course a few basic requirements..
1: A nonconductive tub sizable enough to hold your rusty part
2: Washing Soda (Which was the hardest part to find, actually)
3: A 12-20 volt power source that will provide up to 4 constant amps minimum. We are mixing water and electricity here... so high voltage is bad... Amps do the work though, the more amps, the merry/faster it goes.
4: I suppose I should say a well ventilated area or something...
Step 1: Clean the part you want to derust... Dirt, grease/oil/grime repels the water and stops the spot from getting the juice. I heaved the parts in the back of the truck and hit the carwash and blasted them..
Step 2: you get yourself a huge nonconductive (Plastic) bin, bucket, container, tub to do this in...
Step 3: insert part you want to derust...
Step 4: insert piece of clean, ferrous metal object in said container to play Sacrificial Electrode*... Do not let said electrode touch the piece (You ever touch jumper cables together when they're on the battery? Now imagine that under water, fantastic...)
(* = Yes... the electrode will be consumed and rust eleventeenbillion? times faster than you thought possible - nearly as fast as a mitsubishi product, so don't use your wife's favorite axe or something. DO NOT USE STAINLESS STEEL)
Step 5: Fill the tub with water.. you don't want to use distilled water, spring water or anything fancy, just plain old hose water.
Step 6: Add about a half cup of WASHING SODA ('Warshing' soda for those of you in various southern states) for every 5 gallons of water. I eyeballed it. The worst that can happen at this point is A: you under salt the water and won't get the conductivity you desire (Slows the process/takes longer, which is bad, we're an impatient species), or B: you over salt the water (And you waste washing soda, the water is only going to get so conductive, the amps do the work)
This is important... You MUST use WASHING Soda (Shameless Plug, Arm N' Hammer Super Washing Soda). This is Sodium Carbonate... BAKING Soda is Sodium BICarbonate, Borax Laundry Booster is Sodium DICarbonate.
Step 7: The last step: plugging in your power source... This is the IMPORTANT part... POSITIVE goes on the Electrode.. NEGATIVE goes on the PART TO CLEAN. Get those confused and you'll come back to find a super shiny electrode and your part 10 times rustier than when you started. If you have good connection you should see bubbles forming on the piece you are derusting in fairly short order
Step 8: Common Sense: You just plugged an electric device into tub of water.. do I really need to list how this could potentially end badly? Didn't think so.. keep your hands out of the tub, don't let your dog drink out of it, keep the kids out of it.. etc, etc, it's freakin' electrified. Further more.. for those of you who were busy doing something else during middleschool science class... electricity + water = Hindenburg brand hydrogen gas and its equally flammable buddy, Mr Pure Oxygen. I suppose legally, I should tell you to do this in a well ventilated area.. practically... Unless you're railing 100 amps into a 2.5 gallon bucket... you're not going to make enough to worry about. Eitherway, it's not something you do in the kitchen...
Annoying Details, trivias and truths...
Powersource Selection... less than 20 volts, more than 4 amps. They say 2 amps works, but it didn't impress me... the difference between 2 amps and 4 are the difference between night and day... I imagine 8 or more amps would be fantastic. Most commonly used powersources are car battery chargers... It must be a dumb charger... your nifty little auto-shutoff, computer controlled gizmo won't work... me and a more electronically aptituded friend toyed with the thought of putting some sort of resistor in line to trick the charger into seeing a load, but it seemed like more work than it was worth. I picked up a used 4 amp charger from a local fleamarket for the cost of a happymeal. The guy even told me it had a warranty (I didn't tell him I was plugging it into a tub of water though...). I suppose you could use a timer'd one if you wanna run out there ever 2 hours and turn the **** again... Just find your granddaddy's tinbox charger...
Electrode Selection... Regular old steel.. it doesn't matter what it is.. I used a leftover lawnmower blade I had the garage, it doesn't care. The reason for avoiding stainless is because you draw the chromium out of the stainless as its consumed.... for those who don't know.. Chromium is about as toxic as it comes and you'll die a horrible, cancerous death in the jailcell the EPA throws you in after you start producing it. Just freakin' don't - End. If someone says it's fine to use stainless, they are wrong - End. Don't use copper... don't use aluminum.. don't be cute... just plain old steel...
Other interesting notes about the electrode... The more electrode you have in the water, the more connection you have. While experimenting with the set up, I found the 'just stick the end of the electrode in' method was netting me less than half an amp and taking just this side of an epoch. Stick the whole electrode in the water and I'm up over 4 amps and things get to bubbling (Keep the copper coated clamp out of the water.. the negative... not a problem, but not the positive..).
All those cute little websites that say it's fun and easy, throw the part in and walk away are full of CRAP. As the electrode gets coated in rust and consumed, it loses a lot of conductivity. It may have started at 4+ amps, but 5 hours later I'm down to 2 amps.. after 8 hours I'm down to half an amp again. Take the electrode out, clean it (I mean resurface it, grind it back to fresh metal, (alternatively if you're lazy, you could just replace it and keep on bubbling)) and it's back to 4 amps and we continue... This of course, does depend on the part... on how much rust it has, how much surface area, etc, etc. I'd imagine there are some parts that could easily be done in a single sitting, but once you get into heavier, more complicated parts, the longer it's going to take and the more you'll have to renew the electrode. Alternatively, if you have more amperage, it would take less time, but you'd still have to deal with the failing electrode.
Part Selection... The process will work on any piece of rusted metal you throw in there from a door **** to a crankshaft, but here is the potential deal breaker: once you remove the part from the water it'll rust... instantly.. that is not an exaggeration. You can literally sit there and watch the part dry and turn brown in the time it takes to make a Cup o' Soup. It's not going to scale up and crumble, mind you, but it'll have to be dealt with prior to painting or whatever you have in mind for the part. You can reduce this by getting the water the hell off the part ASAP. I say reduce, because there is no practical way to stop it completely... shy of removing the part from the tank of water and submerging it in a 55 gallon drum of WD40... It's going to happen, thems the breaks. Some parts are harder to dry than others. I.E. heads with their many nooks and crannies and passages would be a pain in the ***. a valve cover.. not so much. The good news is it couldn't possibly rust up anywhere near as bad as it was when you started...
And to prove I'm not just cooking this stuff up... heres a picture of me doing it to 1968 C castings! The one on the left was already done... the one on the right is sort of mid-process.. I didn't think about doing this until it had been in there for about 2 hours.....
The biggest issue with everything I've read about it is that they neglect to mention the electrode issue. They tell you it gets consumed, they just don't tell you it'll slow down and stop if you don't constantly monitor it. Theres a clip on youtube from the TV show Trucks! where they demonstrated it and the host is like 'we left this part in the tub for 48 hours'.. not without checking it every 5-6 hours you didn't...
This is what I mean by consumed... This is what the Lawnmower Blade *** Electrode looked like prior to its tour of duty in the tank...
This is after it's overnight stint... that is rust being magnetically drawn out of the cylinder head towards the electrode
And once you scrape off all the magic rust mushrooms, this is what has become of our electrode. You could probably throw it back in the tank like this, but you'll lose some amperage and slow the process down. best bet is either to resurface or replace it..
I posted this on the turbo dodge forum I regular and some people were all 'Well, how rusty WERE the parts?!'. Which is a fair question (Figure mopar guys would know all about rust ). So I took two of the valves that were occupying the head and brought them inside, threw one in a cup with a nail and plugged it into a cordless drill charger (18 volts 850MHa).
These be the intake and exhaust valves from the same chamber.. the intake valve did about 90 minutes in the solution..
Last edited by scottmoyer; 12-06-2011 at 04:57 PM.
 12-06-2011, 04:59 PM
#2
12-06-2011, 05:11 PM
#3
Moderator

Re: Electrolysis For Dummies (Picture HEAVY)
I would believe that it was posted as a way to clean parts without damaging them. This is very useful in the restoration process of metal.
12-06-2011, 05:20 PM
#4
Supreme Member
iTrader: (5)
Join Date: Nov 2010
Location: Mantua NJ
Posts: 5,827
Received 64 Likes
on
57 Posts
Car: 1 Owner 1986 TA with a WS6 package
Engine: 5.0 EFI
Transmission: THM700R4
Axle/Gears: 277 Posi Speedo
Re: Electrolysis For Dummies (Picture HEAVY)
I know electrolysis is bad in the marine engines and any metal exposed while a boat is in the water for a period of time.
Do people really do this in a restoration,that's really cool
Do people really do this in a restoration,that's really cool
Last edited by mantaguy; 12-06-2011 at 05:23 PM.
12-06-2011, 05:37 PM
#5
Junior Member
Thread Starter
Join Date: Sep 2011
Location: Topeka, KS
Posts: 26
Likes: 0
Received 0 Likes
on
0 Posts
Car: 90 RS
Engine: 5.0 TBI
Transmission: 700R4
Re: Electrolysis For Dummies (Picture HEAVY)
Thats because on boats it's a stray electric current between metals.. and you want every part of your boat. It's uncontrolled. This process uses an electrode specifically to be sacrificed to the process and the flow of electricity is unidirectional and controlled. It's the same way fire can cook you a steak or burn your house down...
12-06-2011, 06:21 PM
#6
Senior Member
Join Date: Mar 2009
Location: Bloomfield, IN
Posts: 880
Likes: 0
Received 1 Like
on
1 Post
Car: 87 Camaro
Engine: 305
Transmission: 700R4
Re: Electrolysis For Dummies (Picture HEAVY)
I was actually thinking about making a mid sized tub in my garage for something like this. Thanks for posting some useful and intelligent information! We don't get enough of that around here 
12-06-2011, 06:48 PM
#7
Supreme Member
Join Date: Dec 2000
Location: stallings,n.c.
Posts: 1,271
Likes: 0
Received 1 Like
on
1 Post
Car: 1989 camaro rs convertable
Engine: 305 tbi
Transmission: 700r4
Axle/Gears: 7.5"3.42 gears forth gen 2000 camar
Re: Electrolysis For Dummies (Picture HEAVY)
ive done this before.it works really well.it sometimes takes a couple of days though.
Trending Topics
12-08-2011, 11:37 AM
#8

Re: Electrolysis For Dummies (Picture HEAVY)
A lot of guys clean their rusty gun bores this way.
I remember reading about it and the general concensus was that if you've got a rusted up, garbage gun bore, this is about the only way to save it. But tehy said it's not really a good idea to do it a bunch of times. You do it once to clean it and you use traditional methods of cleaning after that. They seemed to argue that it takes good metal away along with the rust, so it was good if you had somethign that was arguably too far gone, but for something that was clean you wouldnt want to do it.
But then again, with something like a gun bore, tolerances are very, very, very important. Not much on a car that requires that kind of precision (A few things, but not many). Rusty brackets wouldn't be so much of a concern.
Last edited by InfernalVortex; 12-08-2011 at 11:42 AM.
12-08-2011, 06:56 PM
#9
Re: Electrolysis For Dummies (Picture HEAVY)
I use this method and it works well.
couple of things to add:
couple of things to add:
- The washing soda is Sodium Carbonate (not sodium bicarbonate aka baking soda) Its commonly sold in pool or hot tub stores as ph increaser.
- Rebar makes great electrodes
- The sodium carbonate will create an alkaline surface on your parts, which is exactly what paint DOESN'T like to stick to. Use etching primer.
- The parts come out of the tank with a black film on them that you will have to wipe off (or sometimes scrub off with a pot scrubber or something). I usually soak the parts in WD40 right when they come out of the tank, then scrub off the film, and either re coat with WD-40 right away, or wipe with paint thinner, prime, and paint.
- The solution in the tank is caustic. Wear rubber gloves.
12-14-2011, 02:01 AM
#10
Junior Member
Join Date: Sep 2008
Location: Olympia
Posts: 88
Likes: 0
Received 0 Likes
on
0 Posts
Car: '91-Z28/'03 Honda 919
Engine: L98
Transmission: 700R4
Axle/Gears: '99 Zexel 3.42
Re: Electrolysis For Dummies (Picture HEAVY)
Very neat, Ima go find me something rusty just so I can try it!

Thread
Thread Starter
Forum
Replies
Last Post
tonys91rs
Engine/Drivetrain/Suspension Parts for Sale
3
10-10-2015 03:31 PM
Street Lethal
Miscellaneous Third Gen Items!
0
09-07-2015 01:09 PM