
The perfect tail lights?


Thread Starter
Supreme Member
iTrader: (5)
Joined: Aug 2004
Posts: 1,912
Likes: 0
From: Redondo Beach CA
Car: '02 Z06
The perfect tail lights?
Well, at least I like to think so. 
First I shot testors candy apple red through the bulb hole in the back. Also was neccessary to shove a rag in the reverse section because believe it or not overspray can find it's way in there.
The paint comes in a 3 oz. can. I used the whole can.

Many times the grid tail lights on our cars have worn or missing spots of black paint between the grids.

So, I masked off the grids and scuffed the black areas with 600 grit.

Hit with gloss black spray paint.

Here you can see the lights need a good polishing.

Polished by hand with Meguiars Deep Crystal Polish.

Look at finished product.
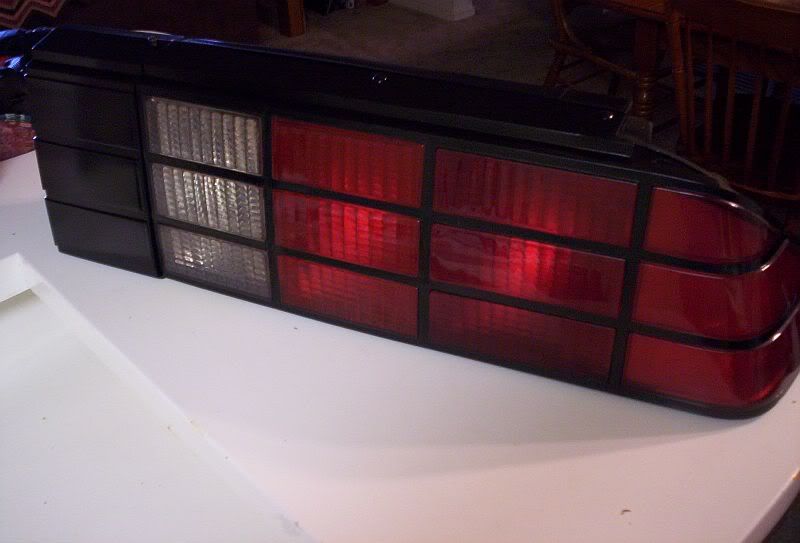
At least in my opinion they look better than a new oem set plus I didn't have to fork out over $400 for them. Ended up costing about $15.
Pics on the car will come when she's done and out of paint.

First I shot testors candy apple red through the bulb hole in the back. Also was neccessary to shove a rag in the reverse section because believe it or not overspray can find it's way in there.
The paint comes in a 3 oz. can. I used the whole can.
Many times the grid tail lights on our cars have worn or missing spots of black paint between the grids.
So, I masked off the grids and scuffed the black areas with 600 grit.
Hit with gloss black spray paint.
Here you can see the lights need a good polishing.
Polished by hand with Meguiars Deep Crystal Polish.
Look at finished product.
At least in my opinion they look better than a new oem set plus I didn't have to fork out over $400 for them. Ended up costing about $15.
Pics on the car will come when she's done and out of paint.
Thread Starter
Supreme Member
iTrader: (5)
Joined: Aug 2004
Posts: 1,912
Likes: 0
From: Redondo Beach CA
Car: '02 Z06
Yes I masked around the hole in the back where the bulb goes in the amber section and just sprayed through there.
I didn't want to spray from the outside as I would loose that ridged texture from the inside of the light.
I didn't want to spray from the outside as I would loose that ridged texture from the inside of the light.
Supreme Member
iTrader: (1)
Joined: Jul 2005
Posts: 2,435
Likes: 1
From: Rockville, Maryland
Car: 1986 Z28 Camaro Gunmetal Gray with
Engine: GM Crate ZZZ HO 350, Edelbrock head
Transmission: Rebuilt 700r4 all TransGo and Beast
Axle/Gears: 10 bolt with 3.73 gears
so you just went right over the amber?

Trending Topics
Supreme Member
iTrader: (1)
Joined: Jul 2005
Posts: 2,435
Likes: 1
From: Rockville, Maryland
Car: 1986 Z28 Camaro Gunmetal Gray with
Engine: GM Crate ZZZ HO 350, Edelbrock head
Transmission: Rebuilt 700r4 all TransGo and Beast
Axle/Gears: 10 bolt with 3.73 gears
how did it cover the amber then? im kinda confused?


Joined: Sep 2003
Posts: 25,895
Likes: 429
From: Pittsburgh PA
Car: 89 Iroc-z
Engine: 555 BBC Turbo
Transmission: TH400
Axle/Gears: MWC 9� 3.00
looks good!
so you just rubbed on that deep crystal stuff on the lenses and they polished up? i gotta do that to mine... since i jsut got done paintin the amber from the outside
so you just rubbed on that deep crystal stuff on the lenses and they polished up? i gotta do that to mine... since i jsut got done paintin the amber from the outside
Supreme Member
Joined: Oct 2001
Posts: 3,155
Likes: 2
From: Louisville, Ky
Car: 1991 Z28
Engine: 383
Transmission: T-5
Axle/Gears: 3.08 10 Bolt
beautiful, if i didnt have black outs id defenitly do the all red conversion and give them a little tlc.
not to take away from yours but i love grabiods too...
not to take away from yours but i love grabiods too...
Last edited by CamarosRUS; Dec 30, 2006 at 12:30 PM.
Supreme Member
Joined: Apr 2004
Posts: 2,139
Likes: 0
From: MN
Car: 1986 Camaro SC (Supercool)
Engine: one composed of various metals
Originally posted by CamarosRUS
beautiful, if i didnt have black outs id defenitly do the all red conversion and give them a little tlc.
not to take away from yours but i love grabiods too...
beautiful, if i didnt have black outs id defenitly do the all red conversion and give them a little tlc.
not to take away from yours but i love grabiods too...
lol graboid gave me such great ideas for my car....tailights, rims....picture angles...too bad he sold the car

Supreme Member
Joined: Oct 2001
Posts: 3,155
Likes: 2
From: Louisville, Ky
Car: 1991 Z28
Engine: 383
Transmission: T-5
Axle/Gears: 3.08 10 Bolt
 i didnt know that...shame. hopefully the new owner takes care of it as well as grabiod did.
i want another set of grids now so i can clean them up and paint them. they might look better than my blackouts

Supreme Member
iTrader: (1)
Joined: Mar 2002
Posts: 2,467
Likes: 1
From: The nation's capital
Car: 91 RS
Engine: 350 TBI
Transmission: 700R4
Wait a minute. . . you didn't even take off the lense? You just stuffed a rag into the clear lense hole, and then shoved the spray can into the light hole and pulled the trigger?
I think that's the first time I've ever heard of anyone taking that kind of short cut. I'm suprised that you don't have one part of the lense a deeper red than the other part.
I think that's the first time I've ever heard of anyone taking that kind of short cut. I'm suprised that you don't have one part of the lense a deeper red than the other part.
Thread Starter
Supreme Member
iTrader: (5)
Joined: Aug 2004
Posts: 1,912
Likes: 0
From: Redondo Beach CA
Car: '02 Z06
Originally posted by Orr89RocZ
looks good!
so you just rubbed on that deep crystal stuff on the lenses and they polished up? i gotta do that to mine... since i jsut got done paintin the amber from the outside
looks good!
so you just rubbed on that deep crystal stuff on the lenses and they polished up? i gotta do that to mine... since i jsut got done paintin the amber from the outside
Thread Starter
Supreme Member
iTrader: (5)
Joined: Aug 2004
Posts: 1,912
Likes: 0
From: Redondo Beach CA
Car: '02 Z06
Originally posted by Gunny Highway
Wait a minute. . . you didn't even take off the lense? You just stuffed a rag into the clear lense hole, and then shoved the spray can into the light hole and pulled the trigger?
I think that's the first time I've ever heard of anyone taking that kind of short cut. I'm suprised that you don't have one part of the lense a deeper red than the other part.

Last edited by Gr89RS; Jan 17, 2006 at 12:35 AM.
Moderator

Joined: Jun 2000
Posts: 2,364
Likes: 4
From: London, Ontario, CANADA
I am amazed you had such good results with that method... I think when I go to do it I will be painting them from the outside... but now I'm thinking about taking the housing apart and going from the inside. Spraying through the little hole is too scary for me.
Thread Starter
Supreme Member
iTrader: (5)
Joined: Aug 2004
Posts: 1,912
Likes: 0
From: Redondo Beach CA
Car: '02 Z06
Originally posted by johnyIROC
I am amazed you had such good results with that method... I think when I go to do it I will be painting them from the outside... but now I'm thinking about taking the housing apart and going from the inside. Spraying through the little hole is too scary for me.
I am amazed you had such good results with that method... I think when I go to do it I will be painting them from the outside... but now I'm thinking about taking the housing apart and going from the inside. Spraying through the little hole is too scary for me.

Senior Member
Joined: Jul 2003
Posts: 773
Likes: 2
From: Raleigh, NC
Car: 1988 Pontiac Firebird Trans Am Vert
Engine: 5.0L TPI
Transmission: 5-Speed
Axle/Gears: 3.08
Can anyone post better pictures of the backside of the grid style taillights?
I don't care if you've done the mod or not, I'm more interested in getting an idea of how much room is actually available to spray through.
This is one of the first things that I am doing in the springtime... I just haven't decided if I'm going to take the lights apart or not. This would make all the difference for me.
Last edited by DigitalMonarch0; Jan 17, 2006 at 01:33 PM.

Member
Joined: Jan 2005
Posts: 391
Likes: 0
From: Grand Rapids, Mi
Car: 1991 Z28
Engine: 357
Transmission: T-56 waiting to go in!
Axle/Gears: 3.73:1
i did this mod also, except i didnt paint through the holes, just pulled them apart and then RTV'd them back together. painting from the inside really does work.
Supreme Member
Joined: Oct 2001
Posts: 3,155
Likes: 2
From: Louisville, Ky
Car: 1991 Z28
Engine: 383
Transmission: T-5
Axle/Gears: 3.08 10 Bolt
id rather paint them on the inside to protect the paint but i wonder if the heat will have any affect on the paint (when on the inside) if you have your lights on for a long time 
Member
Joined: Jan 2005
Posts: 391
Likes: 0
From: Grand Rapids, Mi
Car: 1991 Z28
Engine: 357
Transmission: T-56 waiting to go in!
Axle/Gears: 3.73:1
taking the tails out of the car wasnt bad, it was getting them apart that is a little tricky....not hard, but tricky cause you need to be careful or youll crack the parts that hold it together (we ended up cracking the crap out of mine anyways, no matter how careful we were). its basically 2 big pieces with like little tabs that hold it together, youll see if you take them off the car. I just RTV'd them back together to make sure they stayed together.
Supreme Member
iTrader: (1)
Joined: Jul 2005
Posts: 2,435
Likes: 1
From: Rockville, Maryland
Car: 1986 Z28 Camaro Gunmetal Gray with
Engine: GM Crate ZZZ HO 350, Edelbrock head
Transmission: Rebuilt 700r4 all TransGo and Beast
Axle/Gears: 10 bolt with 3.73 gears
lol. you should have seen my first week at the body shop i work at. tearing those harnesses for the lights up on all the cars. theyre such a pain. but now i work with them everyday and it got much easier. just have a tiny flathead around to pinch the little tab in. even if the paint does get messed up from heat who cares? it only costs like 5 bucks to do it again. and also, if i was going through the trouble of this i would paint all 3 columns (?). to make sure they all matched perfectly and that they were all fresh.
Thread Starter
Supreme Member
iTrader: (5)
Joined: Aug 2004
Posts: 1,912
Likes: 0
From: Redondo Beach CA
Car: '02 Z06
Originally posted by CamarosRUS
id rather paint them on the inside to protect the paint but i wonder if the heat will have any affect on the paint (when on the inside) if you have your lights on for a long time
id rather paint them on the inside to protect the paint but i wonder if the heat will have any affect on the paint (when on the inside) if you have your lights on for a long time
Last edited by Gr89RS; Jan 17, 2006 at 06:12 PM.
Supreme Member
iTrader: (45)
Joined: Dec 2003
Posts: 3,970
Likes: 1
From: Northern, VA
Car: Pair of 92 Z28s
See on my taillights i did it from the outside..and yes they are dull. Now CrazyHawaiian your saying i can wetsand right over that and polish and it wont take that paint right off? I just bought a new pair of grids and im using my current/old ones to test with. (Old grids have a crack in them)
My plan was exactly what you did Gr89RS cept i never would have thought about putting a rag down in the reverse light hole. I just looked at the new pair of grids i got and there is a space in which paint can float over to! Glad you showed me this. Anyway my plan was to paint the inside red...then the whole outside a very light coat of translucent black. This is a good thread because you guys are saying i can sand/polish over the paint and it shouldnt take any off? That was my concern because i didnt want all the black to rub off...
I just recived my grids in the mail today and was gonna take off my old ones tommaro to start messing with. I cant beilive someone just thought of my same exact idea this fast i was just going over with my gf what my plan to do was...lol
Looks great...ill let ya know how mine turn out in a couple of weeks.
current: (You cant see the crack but its there)
Supreme Member
iTrader: (45)
Joined: Dec 2003
Posts: 3,970
Likes: 1
From: Northern, VA
Car: Pair of 92 Z28s
Ya my whole deal was just sick of looking at how dull my tailights are and how they can look like a mirror...just i HATE amber with a passion and crazy for the red/black/clear look of lights
To go by laws in my area i have to have amber...the back still flashes like a redish/orange color looks pretty cool, but so many cars come with red turnsignals nowadays cops dont even know my taillights are modified.
Front of my car in my new parking lights i have these blue bulbs that flash amber (In direct looking the whole housing looks blue really cool i think) and silver coated amber bulbs in my sidemarkers...lol
Supreme Member
iTrader: (45)
Joined: Dec 2003
Posts: 3,970
Likes: 1
From: Northern, VA
Car: Pair of 92 Z28s
Originally posted by TraviZ
What if you painted the inside and outside lightly? any extra benifit to that? for color blending?
What if you painted the inside and outside lightly? any extra benifit to that? for color blending?
Supreme Member
Joined: Apr 2001
Posts: 5,675
Likes: 3
From: Changing Tires
Car: too many ...
You can treat it just like body paint, so depending on what grit and how much you sand or wet/dry, you can either remove what you've already done or clean it up. I did 5 coats of paint on mine, then cleaned them up and buffed them, probably ended up with like 3 coats on there. You can wax them too!! hahaha. I used taillight paint from Japan, got it from some local shop around here (all writing in japanese so I dunno wth the can says but ended up working good)
Taking them apart without cracking them is sort of tricky. I've also had best results with multiple small flathead screwdrivers.
Taking them apart without cracking them is sort of tricky. I've also had best results with multiple small flathead screwdrivers.
Thread Starter
Supreme Member
iTrader: (5)
Joined: Aug 2004
Posts: 1,912
Likes: 0
From: Redondo Beach CA
Car: '02 Z06
Originally posted by CrazyHawaiian
I did 5 coats of paint on mine, then cleaned them up and buffed them, probably ended up with like 3 coats on there.
I did 5 coats of paint on mine, then cleaned them up and buffed them, probably ended up with like 3 coats on there.
Supreme Member
iTrader: (45)
Joined: Dec 2003
Posts: 3,970
Likes: 1
From: Northern, VA
Car: Pair of 92 Z28s
Well i used about 5 coats of the translucent candy apple red paint, same stuff as you used.
Well im just gonna have to experiment on my own this weekend. Cant really f up cause i have new grids here. I was also gonna go 400 wet 600 wet 1000 wet and buff with a buffer...the regular polishing taillights method. Well see how it goes.
Oh ya...and trying to um open them up...screw that...i chipped one edge off and wasnt about to screw them completely up.
Supreme Member
Joined: Oct 2001
Posts: 3,155
Likes: 2
From: Louisville, Ky
Car: 1991 Z28
Engine: 383
Transmission: T-5
Axle/Gears: 3.08 10 Bolt
Originally posted by Gr89RS
Keep in mind, those are turn signals, the things aren't on constantly when the lights are on. Even when you go to turn they are only on for a few seconds intermittently. A sunny So-Cal day will create more heat than that.
Keep in mind, those are turn signals, the things aren't on constantly when the lights are on. Even when you go to turn they are only on for a few seconds intermittently. A sunny So-Cal day will create more heat than that.
 oops wasnt thinking
well as far as taking them apart ive found its best to put them in the oven then use a small flat tool to pry them apart.


Thread
Thread Starter
Forum
Replies
Last Post