
HOW TO: 4th gen Window Sweeps


Junior Member
iTrader: (1)
Joined: Sep 2007
Posts: 7
Likes: 0
From: Mooresville, Nc
Car: 91 camaro "RS"
Engine: 6.6L dart 400 SHP, DArt PRO-1 heads
Transmission: built 700r4
Axle/Gears: 3.73 posi!
Re: HOW TO: 4th gen Window Sweeps
just completed this upgrade on my 91, looks great, and the gap up by the mirror was small and not very noticable. Great upgrade, easy to install.


Thread Starter
Supreme Member
iTrader: (10)
Joined: Oct 2007
Posts: 1,881
Likes: 2
From: Fl.
Car: 83 Trans Am / 96 Jeep XJ
Engine: 355 / 4.0 I6
Transmission: TH350 / Auto
Axle/Gears: 3.23 10-bolt / 4wd
Re: HOW TO: 4th gen Window Sweeps
I am so glad this is helpful to you guys. Mine are still holding up great as well!


Joined: Oct 2001
Posts: 12,223
Likes: 1,148
From: Il
Car: 1989-92 FORMULA350 305 92 Hawkclone
Engine: 4++,350 & 305 CIs
Transmission: 700R4 4800 vig 18th700R4 t56 ZF6 T5
Axle/Gears: 3.70 9"ford alum chunk,dana44,9bolt
Re: HOW TO: 4th gen Window Sweeps
I really like the smooth look of those but they look a tad big to me. If they could be scaled down to the same size of the 3rd gens then Id be all over them!!
Good work tho
Good work tho
Member
iTrader: (1)
Joined: May 2011
Posts: 128
Likes: 7
Car: 90 Iroc
Engine: L98
Transmission: 700r4 Built by- Speed Secrets
Axle/Gears: 3.23
Re: HOW TO: 4th gen Window Sweeps
I got my 4th gen sweeps for $5.00 for both sides.
- If you guys are doing this. all you need is a flatblad screwdriver and a socket/wrench (not sure of nut size I used pliers),
use the flathead and pop off the plastic cover inside the car on the 4th gen side mirrror to access the 3 bolts holding the mirror on and the mirror will be out of the way and you can pop the sweep off with the flathead from outside the car CAREFULLY. I got mine off in about 15 minutes with the windows UP, no need to remove the whole inner door panel.. this was on a 96 camaro.

Joined: Feb 2001
Posts: 8,494
Likes: 412
From: Sophia, NC
Car: 2016 Camaro SS + 1986 Z28
Re: HOW TO: 4th gen Window Sweeps
Bradley, I think this is an amazing write up. Great job!!!!! I have a few things to mention, all in the name of helping others who may find this thread. Certainly in NO WAY intended to try to correct what you've done. No two cars are alike, so I'm just point out what someone else may need! Again, thanks for posting!!!! This was my go to reference for this project!
...first of all, I noticed that the OP, Bradley, certainly has slightly different doors on his 83 than I have on my 89. Especially the triangles! ...no worries though, 99% was correct (for me) and a the difference was no problem.
I cut less off mine. Here's a pic showing all that I cut. Just a little of the visible section, and none of the lower portion where the screws go. From what I can tell, that section that bradley cut off in the first pic of post #6 was needed to run my last screw in!
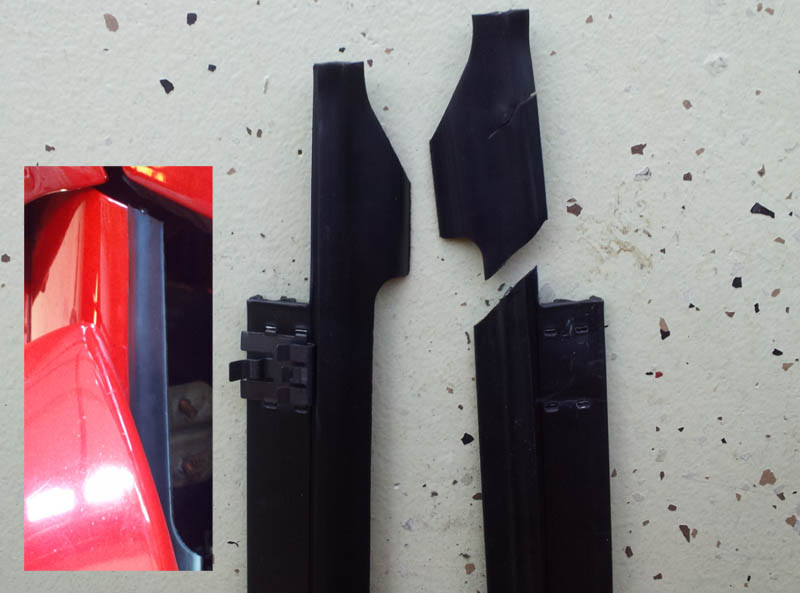
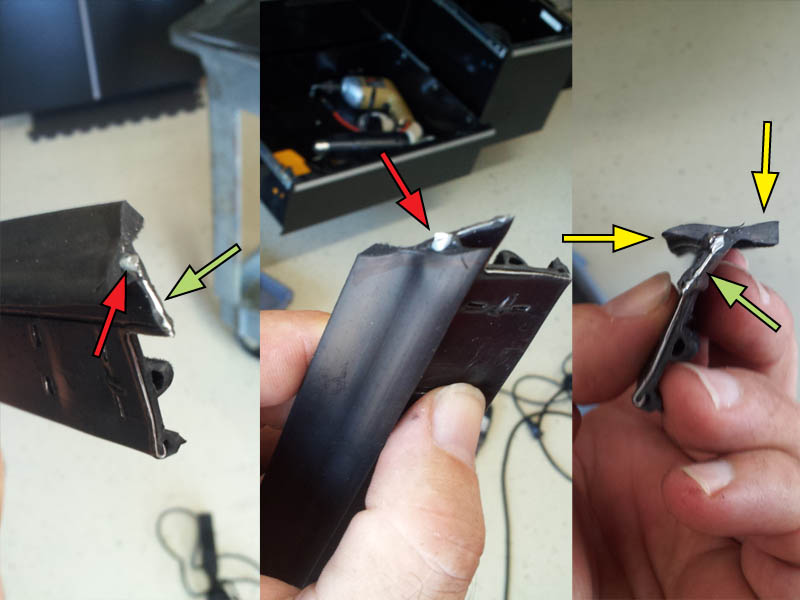
When I cut mine, I found I could make a cleaner cut with an exacto blade on the parts that were just rubber. The lip that actually sweeps the window, (yellow arrows) and the lip that lays over the door are just rubber. I made a nice clean cut with the exacto. The lower metal band, which your screws go through, (green arrows) and doesn't show, I used tin snips. Then for the final hanger wire like metal going through the middle (red arrow) I just bent back and forth until it broke, and then hit it with a dremel sanding wheel real quick. You could just snip the whole thing, but I wanted to be sure it was REAL clean. I think I nailed it.

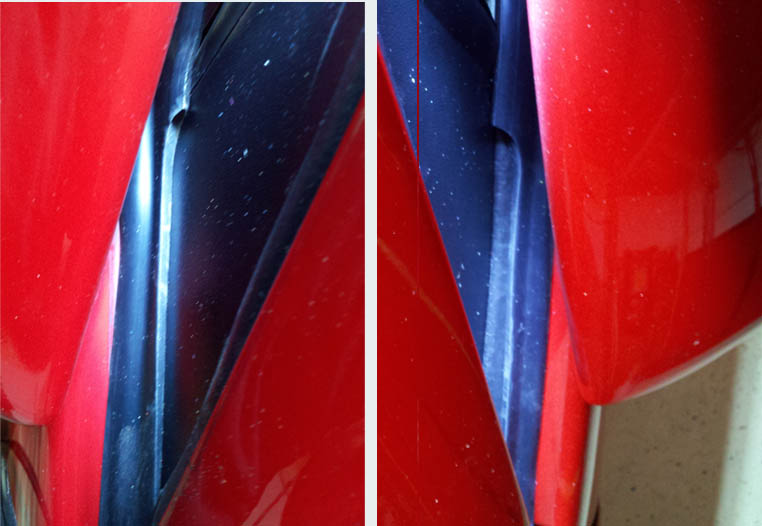
Another thing. Valicswarrior mentions in post 25 about the gap. No one else in this thread had a gap. My friend did this on his Iroc, and no gap. I did my passenger side with no gap, BUT.....low and behold, I had an unacceptable gap in my driver side, due to a slightly differently adjusted triangle, which has to be aligned to the window, NOT the sweep, otherwise I woulda just realigned the triangle. You can see in the left/PS half how flush the fitment is. no gap. ...but on the driver side, you can see where I put weather stripping in there. I had almost a 1/4" gap!!! ...right down into the door! HAD to be fixed. That being said, you can hardly tell since it's behind the mirror. ya gotta be looking for it. Not an issue for me at all, but I wanted to confirm what he said, since I think everyone else thought he was crazy!!!! LOL!!!!
....and last but not least, one problem I had on the first/PS was that the rubber lip side that overlaps the door skin kept wanting to curl up underneath itself, it didn't want to sit flush. Once I got it, no problems, but it was a pain. On the driver side, before i started, I ran some straight car wash gel across the leading edge of the door skin. No problems at all!!!! ...the rubber slid right into place perfectly!
Thanks again for the right up!!!!!!!
...first of all, I noticed that the OP, Bradley, certainly has slightly different doors on his 83 than I have on my 89. Especially the triangles! ...no worries though, 99% was correct (for me) and a the difference was no problem.
I cut less off mine. Here's a pic showing all that I cut. Just a little of the visible section, and none of the lower portion where the screws go. From what I can tell, that section that bradley cut off in the first pic of post #6 was needed to run my last screw in!
When I cut mine, I found I could make a cleaner cut with an exacto blade on the parts that were just rubber. The lip that actually sweeps the window, (yellow arrows) and the lip that lays over the door are just rubber. I made a nice clean cut with the exacto. The lower metal band, which your screws go through, (green arrows) and doesn't show, I used tin snips. Then for the final hanger wire like metal going through the middle (red arrow) I just bent back and forth until it broke, and then hit it with a dremel sanding wheel real quick. You could just snip the whole thing, but I wanted to be sure it was REAL clean. I think I nailed it.
Another thing. Valicswarrior mentions in post 25 about the gap. No one else in this thread had a gap. My friend did this on his Iroc, and no gap. I did my passenger side with no gap, BUT.....low and behold, I had an unacceptable gap in my driver side, due to a slightly differently adjusted triangle, which has to be aligned to the window, NOT the sweep, otherwise I woulda just realigned the triangle. You can see in the left/PS half how flush the fitment is. no gap. ...but on the driver side, you can see where I put weather stripping in there. I had almost a 1/4" gap!!! ...right down into the door! HAD to be fixed. That being said, you can hardly tell since it's behind the mirror. ya gotta be looking for it. Not an issue for me at all, but I wanted to confirm what he said, since I think everyone else thought he was crazy!!!! LOL!!!!
....and last but not least, one problem I had on the first/PS was that the rubber lip side that overlaps the door skin kept wanting to curl up underneath itself, it didn't want to sit flush. Once I got it, no problems, but it was a pain. On the driver side, before i started, I ran some straight car wash gel across the leading edge of the door skin. No problems at all!!!! ...the rubber slid right into place perfectly!
Thanks again for the right up!!!!!!!
Last edited by Abubaca; Apr 7, 2013 at 10:00 AM.

Thread Starter
Supreme Member
iTrader: (10)
Joined: Oct 2007
Posts: 1,881
Likes: 2
From: Fl.
Car: 83 Trans Am / 96 Jeep XJ
Engine: 355 / 4.0 I6
Transmission: TH350 / Auto
Axle/Gears: 3.23 10-bolt / 4wd
Re: HOW TO: 4th gen Window Sweeps
I enjoyed doing the write-up, so no problem guys!
Abubaca; Its true that no 2 cars are the same, and there are more than one way to do something. I really appreciate the added information on doing this mod, because it's something that I didn't 100% cover on my initial posting. I'm just glad that this has helped so many people put new sweeps on their car, adn save a bit of money in the process!
Abubaca; Its true that no 2 cars are the same, and there are more than one way to do something. I really appreciate the added information on doing this mod, because it's something that I didn't 100% cover on my initial posting. I'm just glad that this has helped so many people put new sweeps on their car, adn save a bit of money in the process!

Senior Member
iTrader: (5)
Joined: Aug 2010
Posts: 916
Likes: 9
From: Wichita Falls, TX
Car: 91 Firebird,00 c2500,75 Vette
Engine: 3.1 but 350 soon, 350, 350
Transmission: T56 soon
Axle/Gears: stock 3.42 Posi to come
Re: HOW TO: 4th gen Window Sweeps
Great writeup and a thanks to Abubaca for a little more info. I am a long way from there yet but assume mine need replacing.

Supreme Member
Joined: Apr 2011
Posts: 1,051
Likes: 0
From: Huntsville, AL
Car: 89 Black IROC-Z convertible
Engine: 305 TBI
Transmission: Auto
Re: HOW TO: 4th gen Window Sweeps
Saving this for future reference. My Camaro sweeps are fine but I have an '82 ElCamino in the garage that may benefit from this as soon as I get home to take some measurements.
Thanks for the write-up
Thanks for the write-up

Member
Joined: Jun 2006
Posts: 367
Likes: 0
From: Louisiana
Car: 88 Camaro
Engine: 350
Transmission: Th350
Axle/Gears: 3.73's
Re: HOW TO: 4th gen Window Sweeps
We need some type of "best of" thread for all these useful write ups. Great thread. I never even thought of this.

Joined: Nov 2000
Posts: 1,420
Likes: 5
From: Byhalia MS, just south of memphis
Car: 89 Firebird
Engine: 6.0 LS
Transmission: T-56
Axle/Gears: 3.70
Re: HOW TO: 4th gen Window Sweeps
Abubaca, could you put your photos back up? plan on doing this in a month or so and your addition is what i may need to see.
Joined: Nov 2000
Posts: 1,420
Likes: 5
From: Byhalia MS, just south of memphis
Car: 89 Firebird
Engine: 6.0 LS
Transmission: T-56
Axle/Gears: 3.70
Re: HOW TO: 4th gen Window Sweeps
Abubaca i dunno where your gap was exactly because the pics are down but my gap was where the glass to trangle seal is. i worked at mine by pushing it to the triangle and it seals but not tight. from what it looks like my pass side may turn out better.
i'll tackle that one later this week. this time i'll go in reverse, i'll do up by the triangle first and work towards the back of the door.
i'll tackle that one later this week. this time i'll go in reverse, i'll do up by the triangle first and work towards the back of the door.
Joined: Feb 2001
Posts: 8,494
Likes: 412
From: Sophia, NC
Car: 2016 Camaro SS + 1986 Z28
Re: HOW TO: 4th gen Window Sweeps
Sorry about the photos guys, I move the pics around sometimes and forget that some are linked into threads. They're fixed. 
Joined: Nov 2000
Posts: 1,420
Likes: 5
From: Byhalia MS, just south of memphis
Car: 89 Firebird
Engine: 6.0 LS
Transmission: T-56
Axle/Gears: 3.70
Re: HOW TO: 4th gen Window Sweeps
something to help any gap issues, I found that the further down you pull the part of the sweep that you screw to the door the better it seals against the glass.
you sort of rolling the seal inward towards the glass. roll too far and the lip tha sits on the outer body of the door will roll off and slip behind the door.
you sort of rolling the seal inward towards the glass. roll too far and the lip tha sits on the outer body of the door will roll off and slip behind the door.
Senior Member
iTrader: (2)
Joined: Jun 2008
Posts: 728
Likes: 0
From: Traverse City, MI
Car: 91' Firebird
Engine: 3.1 LH0 V6
Transmission: Auto 700R4
Axle/Gears: 3.23 limited slip
Re: HOW TO: 4th gen Window Sweeps
I did this last year but didn't take the triangles off so they're not adjusted close enough to the sweep... Wish I would have seen this guide FIRST! Oh well I'm thinking new paint will require me to take them off again anyways..

Re: HOW TO: 4th gen Window Sweeps
Did you try mounting the curved up end first? That curve is visible on the pass. side pic. May make it easier to get it tight, then work the rest down as you go using the leverage of the extra length. Just a thought.
The right sweeps are not all that pricey if you get them from rock auto. Never tried them, but certainly must fit better than trying to convert those.
edit: whoops, just saw quick chicken had the same idea
The right sweeps are not all that pricey if you get them from rock auto. Never tried them, but certainly must fit better than trying to convert those.
edit: whoops, just saw quick chicken had the same idea
Last edited by Joe Tag; Apr 10, 2013 at 12:51 PM.

Junior Member
Joined: Jun 2010
Posts: 57
Likes: 0
From: Cleveland, Ohio
Car: 1992 Camaro RS
Engine: 3.1L
Transmission: 700R4
Axle/Gears: 3.23
Re: HOW TO: 4th gen Window Sweeps
just got me a pair of sweeps off of a 97 camaro today for a total of $6 bucks. $2.00 to get in pullapart (need to get that vip card). and $2.00 a side. my buddy paid for the gas this trip so i could pull him a finder, pop up head light, and shifter for his 94 firebird. the sweeps were even laying in the back seat of the 4th gen someone before me took the interior apart for me so its just cleaning them up and installing. will post pics when the job is done.

Re: HOW TO: 4th gen Window Sweeps
So i did this to my driver side door atm (plan to do the passengers too) but i noticed that when i tried to screw it in theres a part where its almost impossible to screw in.
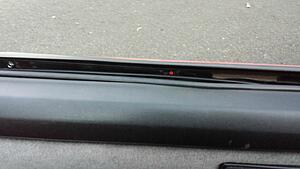
So right where the red indicates i need to get a screw in, Granted ill have the door taken apart again when i do it, but anyone got any suggestions?

So right where the red indicates i need to get a screw in, Granted ill have the door taken apart again when i do it, but anyone got any suggestions?
Joined: Feb 2001
Posts: 8,494
Likes: 412
From: Sophia, NC
Car: 2016 Camaro SS + 1986 Z28
Re: HOW TO: 4th gen Window Sweeps
There were a few times I needed to predrill a pilot hole VERY CAREFULLY, since if ya go TOO far, it go into the backside of the door skin. I put the bit as far into the drill as possible so it wasn't too long.
Senior Member
iTrader: (1)
Joined: Dec 2012
Posts: 512
Likes: 0
From: Mattoon Il.
Car: 1989 IROC-Z / T-Top -1987 GTA
Engine: 305 (LO3) _350 (L98)
Transmission: 700R4 _ 700R4
Axle/Gears: 2.73 L.S. - ???
Re: HOW TO: 4th gen Window Sweeps
uumm ... you are at a salvage yard, walk around and look for a battery ... lol
Supreme Member
iTrader: (3)
Joined: Jan 2009
Posts: 4,009
Likes: 7
From: Mesquite, Texas
Car: 89 rs, 86 Trans Am
Engine: RS-V6... Trans Am-LG4
Transmission: RS-T5... Trans Am 700r4
Re: HOW TO: 4th gen Window Sweeps
Around here, it's standard procedure to remove batteries before putting a car on the lot. If the battery is good, they sell them from a different part of the lot. If not, they junk them.
That, and puncturing gas tanks, is SOP. I would say the best way to get a used window sweep is to find a private individual parting out a car on Craigslist
That, and puncturing gas tanks, is SOP. I would say the best way to get a used window sweep is to find a private individual parting out a car on Craigslist
Junior Member
iTrader: (7)
Joined: Nov 2010
Posts: 40
Likes: 0
From: POTTSTOWN, PA 19464
Car: 84 z clone tear down starting soon
Engine: 383 Stroker
Transmission: T-5 till it explodes
Axle/Gears: 3.42 10 bolt disc till it explodes
Supreme Member
iTrader: (5)
Joined: Mar 2011
Posts: 2,893
Likes: 4
From: Central Texas
Car: GTA
Engine: 350 TPI
Transmission: 700R4
Axle/Gears: Aussie 9-bolt/3.27 posi
Re: HOW TO: 4th gen Window Sweeps
I'm so glad to hear that my question from 2 1/2 years ago amused you so much. And like 58mark posted.....Salvage yards remove batteries as well as drain gas tanks. So walking around a salvage yardv will NOT get you a battery to use.
Senior Member
iTrader: (1)
Joined: Dec 2012
Posts: 512
Likes: 0
From: Mattoon Il.
Car: 1989 IROC-Z / T-Top -1987 GTA
Engine: 305 (LO3) _350 (L98)
Transmission: 700R4 _ 700R4
Axle/Gears: 2.73 L.S. - ???
Re: HOW TO: 4th gen Window Sweeps
wow, around st. louis (where i used to get all my parts) they had 4 or 5 batteries in stacks on dollies all hooked together and you could just take one out to any car (i am guessing the stack was to help the worn out starters) and see if it would crank, or if the part you needed worked
Supreme Member
iTrader: (28)
Joined: Jul 2006
Posts: 1,564
Likes: 2
From: ocklawaha FL.
Car: 81z-28,89gta,91z-28 03 1500
Engine: 355,L98vette tpi,327
Transmission: TH350/700R4/700r4/4l80E
Axle/Gears: 3;73/3;27/2;73/3;73
Re: HOW TO: 4th gen Window Sweeps
I have never seen this before..thanks for the write up Bradley!
Member
Joined: Jun 2012
Posts: 145
Likes: 1
From: Cambridge, MD
Car: 88 Firebird, 87 Formula
Engine: 2.8, 5.0
Transmission: both 700R4
Axle/Gears: 3.42,3.45
Re: HOW TO: 4th gen Window Sweeps
I just use a shop rag between the handle and the plastic bushing. Pull gently both ways... and if successful, the clip also stays in the rag.
And also, thanks for the great post!
And also, thanks for the great post!
Last edited by a62belair; Dec 14, 2013 at 11:24 AM. Reason: add info
Re: HOW TO: 4th gen Window Sweeps


Joined: Jul 2003
Posts: 582
Likes: 205
From: DFW
Car: 90 Formula 350
Engine: 350
Transmission: 700r4
Axle/Gears: Dana 44 3.54
Re: HOW TO: 4th gen Window Sweeps
Senior Member
Joined: Jan 2008
Posts: 631
Likes: 7
From: Massachusetts
Car: 86' IROC
Engine: Supercharged 350
Transmission: T56
Axle/Gears: 3.45
Re: HOW TO: 4th gen Window Sweeps
What do these look like with the window down? I usually cruise with my left arm on the door, do they stick up at all?
Joined: Feb 2001
Posts: 8,494
Likes: 412
From: Sophia, NC
Car: 2016 Camaro SS + 1986 Z28
Re: HOW TO: 4th gen Window Sweeps
No, they do NOT stick up. In fact they lay over the window channel, making it MUCH more comfortable to have your arm there!!!!!!

Thread
Thread Starter
Forum
Replies
Last Post
IROCZDAVE (88-L98)
Interior Parts for Sale
4
Oct 6, 2016 09:08 AM
ambainb
Camaros for Sale
11
Apr 25, 2016 09:21 PM
IROCZDAVE (88-L98)
Interior Parts for Sale
0
Aug 6, 2015 03:51 PM