
'86 IROC fixer upper


Thread Starter
Junior Member
Joined: Apr 2008
Posts: 46
Likes: 5
From: WV
Car: 1986 IROC-Z
Engine: 350
Transmission: 5 Speed
'86 IROC fixer upper
i'm fixing up my '86 IROC for my son who turns 16 next May. i bought the car in '93/'94, sold it in '96 for college funds, and bought it back in '08 less an engine. actually saw it setting in a yard one day and pull in and, after determining it was definitely my old IROC, made the owner an offer of $1K and picked it up the next day. had a 350 built and i did the install, just wanted to get it running at that point and never really did anything to it until lately, other than starting it a couple times a year and running it up the road once or twice a year since.
my son asks me a month or 2 ago if he can drive it when he turns 16. my initial reaction was "HECK NO!" but, after giving it some thought, figured minus OVERHAULING calling me to do a restore on it, it was probably going to sit and rot, so decided to fix it up for him, retard the timing and do whatever else I can do to calm it down somewhat (current engine isn't a screamer), and let him drive it with understanding that he: 1) keeps his grades high (currently is pretty much a straight A student), 2) stays out of any kind of trouble (school, tickets, etc.), and 3) takes care of the car and doesn't tear it up. the understanding is that if he falters on any of these three conditions, i'll sell the car.
if he keeps his end of the bargain, i've committed to painting the car summer 2019 (car has been painted once. when i owned the car the first time around, the clear had dulled, so i had it sprayed. clear has once again dulled, even worse than the first time), will install new carpet (front carpet has faded really bad, back carpet is in really good condition), install new door panels (current ones aren't in bad condition, black trim at top is broken and that may be all it needs, although the backing on the panels appears to have gotten wet and expanded, but the color is still in really good condition), and install air ride suspension (we live 1/2 a mile on a gravel road and it'd be nice to have the ability to raise the car up a bit to keep from dragging), and do a good clean restore of everything else underneath that i'm not replacing at this time.
as for now to get the car ready to drive, it needs/needed (some items i've already completed) the following:
- headliner was ripped to shreds and the backing was coming apart. i have a new one in the garage ready to install after i get all the wiring issues taken care of.
- have installed a complete new stereo system.
- installed new hatch pull down motor. old one was barely pulling.
- repaired fog lights that wasn't working. found faulty ground as well fog lamp relay missing, so installed new one.
- replaced heater core. after installing engine, the heater core was leaking, so tied the supply/return hoses together under the hood bypassing the heater core. in addition, heater control (hot/cold) wouldn't move. when removing old heater core, found a huge rat/mouse/squirrel next inside heater core box.
- replaced blower motor. blower motor wouldn't run, pulled old one out, found another rat/mouse/squirrel next in it. got the motor to run.
- repaired hvac vacuum lines and valve. vacuum line was melted/broken where it went through firewall on engine compartment side. once that was repaired, could hear a vacuum leak around valve at controls. found fix on this site after ordering a new valve which i hadn't received, so tried the fix of soaking rubber part of valve in brake fluid and replacing clip that holds the valve together with a 8-32x1/2" bolt/locknut. thanks to the forum for that!
- fixed inoperative 3rd brake light. was a grounding issue.
have yet to do (areas I need assistance/information with in bold:
- repair backup lights. climbed under car and the wire that plugs into the backup light switch is totally missing - switch is there, but no wires. no clue what happened to it. i know it's a switched power blue wire in and a light green wire out to lights. where does this wire come from? is it up through the console, then to the wire harness and split off to the respective switched power/lights locations?
- repair horn and signals. horn inoperative (missing parts inside of steering wheel) and left side signal lights work fine and right side signals work as long as the lever is just pushed up and not totally flipped until it clicks open. need to pull it apart to see what parts are missing and get those ordered.
- replace both window motors. i greased the tracks and it helped some, but they're still pretty slow. i ordered/received new motors, so what the heck, going to install those.
- replace all 4 rotors, pads, calipers, brake hoses. master cylinder should be okay, but may end up replacing that.
- replace front struts and rear schocks.
- going to install a dual electric radiator fan. car would easily overheat when i had it before after upgrading engine to a 350 after blowing the bottom out of the 305 which was after upgrading top end with 202 heads, cam, intake, carb, and ignition. after installing the current 350 upon getting the car back in '08, have had the same issue. cools fine when out on road, but when running through town at 25 mph, it tends to run hot.
- purchased a bushing kit for what appears to be every bushing underneath the car, so will replace all those.
- check over steering components, make sure everything in good operative condition.
- fuel tank sending unit i'm thinking needs replaced. gas gauge fluctuates and doesn't read properly.
- where's best place to get new trim screws at a decent price? i've seen the 129 piece trim screw package on ebay and Hawk's website for $50 +/-, but i'd rather just purchase a handful of various length phillips head black screws and another handful of the black hex head screws with washer.
- have all new door/t-top/hatch seals to install
some of the things above may or may not have needed replaced. however, i'm putting my 16 year old kid in the car and want to make certain EVERYTHING about the car SAFELY works and is dependable.
TL;DR crowd: really not worth reading.
Last edited by QuentsIROC; Nov 29, 2017 at 09:20 AM.

Joined: May 2012
Posts: 300
Likes: 18
From: Laurel, MT
Car: 1984 Z28 HO
Engine: 305
Transmission: 700R4
Axle/Gears: 3.73
Re: '86 IROC fixer upper
Can't wait to see the pictures and progress.
Make sure he helps you as much as he can. I cherish the time my daughter and I spent on her car. She is in college 4 hours away so we don't get to do much on it lately. She took exceptional care of her car in high school and we never had any problems.
Make sure he helps you as much as he can. I cherish the time my daughter and I spent on her car. She is in college 4 hours away so we don't get to do much on it lately. She took exceptional care of her car in high school and we never had any problems.
Thread Starter
Junior Member
Joined: Apr 2008
Posts: 46
Likes: 5
From: WV
Car: 1986 IROC-Z
Engine: 350
Transmission: 5 Speed
Re: '86 IROC fixer upper
Yep! That was one of the other conditions I didn't mention, he has to help me on it. He does, but not all the time. My day job is in accounting but playing mechanic and carpenter is where my heart is, love doing this type of stuff, so I'm usually working on it until midnight or later and can't expect him to be out in the garage with me on school nights.
I'll post pics at some point. right now it's just a standard run of the mill 1986 black IROC with bad paint. I am pretty happy that I've found no rust on the car!
I'll post pics at some point. right now it's just a standard run of the mill 1986 black IROC with bad paint. I am pretty happy that I've found no rust on the car!
Joined: Jun 2003
Posts: 5,028
Likes: 78
From: Desert
Car: 1991 Z28 Vert
Engine: 383 single plane efi
Transmission: T-56
Axle/Gears: 8.8 with 3.73s
Re: '86 IROC fixer upper
- repair backup lights. climbed under car and the wire that plugs into the backup light switch is totally missing - switch is there, but no wires. no clue what happened to it. i know it's a switched power blue wire in and a light green wire out to lights. where does this wire come from? is it up through the console, then to the wire harness and split off to the respective switched power/lights locations?
Don't go crazy with these items. A mid-level monroe or gabriel of today's standards will be the same as the stock pieces were. Spend the money elsewhere like paint where you only get one chance to get it right.
- going to install a dual electric radiator fan. car would easily overheat when i had it before after upgrading engine to a 350 after blowing the bottom out of the 305 which was after upgrading top end with 202 heads, cam, intake, carb, and ignition. after installing the current 350 upon getting the car back in '08, have had the same issue. cools fine when out on road, but when running through town at 25 mph, it tends to run hot.
- where's best place to get new trim screws at a decent price? i've seen the 129 piece trim screw package on ebay and Hawk's website for $50 +/-, but i'd rather just purchase a handful of various length phillips head black screws and another handful of the black hex head screws with washer.
Lastly, check out my thread, Rob's thread or Dennis' thread for some good ideas and pictures!
Thread Starter
Junior Member
Joined: Apr 2008
Posts: 46
Likes: 5
From: WV
Car: 1986 IROC-Z
Engine: 350
Transmission: 5 Speed
Re: '86 IROC fixer upper
Tibo, thanks for your post all the great information! I will definitely check out the threads you indicated. A couple questions/points:
- So, the feed wire to the backup light switch comes out to the engine compartment through the firewall then down to the switch on the the tranny (this one's a 5 speed). Where does the green wire come back into the cabin? I guess I can simply follow the wire from the backup lights back but if you can tell me where, it'd make it a bit easier.
- I THINK the GM service manual or Haynes manual one indicated the rivets were 1/8" rivets. Have a friend that has a rivet gun and was going to borrow his, don't have it yet. At any rate, go with whatever the manual suggests? That was my plan, anyhow. Was planning to refrain from the bolts.
- YES to the beer breaks! Ha!
- Yeah, didn't go crazy on shocks/struts. Did get a bit outlandish on the brakes, went with the drilled rotors and red powdercoated calipers, primarily aesthetics.
- For the fan . . . when I installed the engine, i wired the current fan direct to a switched power source and it runs all the time. Just need to get the connectors for the dual fan as there's no wires on it to splice. I THINK, if memory serves me correctly, I ordered a dual fan for a 4th gen camaro because they were 1/4 the price of a dual fan setup for a 3rd gen and I remember reading somewhere, maybe this forum, they could be made to work. Hope so.
- Fuel pump . . . geesh, i should remember this, but all the sudden can't and not at home to look. I'm almost certain we converted to a manual pump, perhaps it was manual in the beginning since it was a factory 4 BBL car. I can't remember for certain, though. Will have to look. How huge of a deal is it to drop the tank? Haven't looked into that job yet.
- Great idea on the junk yard for screws!
Thanks again for your post and great information!
Thread Starter
Junior Member
Joined: Apr 2008
Posts: 46
Likes: 5
From: WV
Car: 1986 IROC-Z
Engine: 350
Transmission: 5 Speed
Re: '86 IROC fixer upper
BTW, just went to check out your thread on the convertible, read through it yesterday. Darn you for posting that! HA! After reading through that, seeing before/after pics, etc., wanted so bad to go home and just start tearing parts off the car and start a full ground up resto.
Joined: Jun 2003
Posts: 5,028
Likes: 78
From: Desert
Car: 1991 Z28 Vert
Engine: 383 single plane efi
Transmission: T-56
Axle/Gears: 8.8 with 3.73s
Re: '86 IROC fixer upper
- So, the feed wire to the backup light switch comes out to the engine compartment through the firewall then down to the switch on the the tranny (this one's a 5 speed). Where does the green wire come back into the cabin? I guess I can simply follow the wire from the backup lights back but if you can tell me where, it'd make it a bit easier.
- I THINK the GM service manual or Haynes manual one indicated the rivets were 1/8" rivets. Have a friend that has a rivet gun and was going to borrow his, don't have it yet. At any rate, go with whatever the manual suggests? That was my plan, anyhow. Was planning to refrain from the bolts.
-
Depends how rusty the suspension parts are back there. You have to jack the rear of the car up as high as you can and then totally drop and remove the rear exhaust and suspension. If there is rust present on the bolts and nuts they might be seized to the metal sleeves of the control arms and panhard rod. Make an effort to thoroughly de-rust all the bolts or use new ones when putting it back together and use anti-seize. If the bolts are not rusted and can slide in and out easily it is just a full afternoon job.
Trending Topics
Thread Starter
Junior Member
Joined: Apr 2008
Posts: 46
Likes: 5
From: WV
Car: 1986 IROC-Z
Engine: 350
Transmission: 5 Speed
Re: '86 IROC fixer upper
Ouch, sounds like we may have to deal with the gas gauge fluctuation until summer 2019 when we plan to put air ride under it. Ha.
Thanks for the wiring info, that should help me run it down. I just can't for the life of me figure why someone would rip that out.
Thanks for the wiring info, that should help me run it down. I just can't for the life of me figure why someone would rip that out.
Thread Starter
Junior Member
Joined: Apr 2008
Posts: 46
Likes: 5
From: WV
Car: 1986 IROC-Z
Engine: 350
Transmission: 5 Speed
Thread Starter
Junior Member
Joined: Apr 2008
Posts: 46
Likes: 5
From: WV
Car: 1986 IROC-Z
Engine: 350
Transmission: 5 Speed
Re: '86 IROC fixer upper
https://imgur.com/a/pFopx
i think the links are working, if not, let me know and i'll attempt to fix. i'm more perplexed posting photos to this site from imgur on my galaxy than trying to get the top bolt off the strut on the camaro. ha.
pics in this dump basically show the car with the interior tore apart. finally got everything working, including the back up lights, which as of my last post, i had a switch with no wires. found the wires to the switch in a balled up mess of wires in the engine compartment close to the battery, lol. everything now works on the car. following are the things that didn't work when i bought it back in 2008: wipers, signals, fog lights, 3rd brake light, reverse lights, hatch release switch, hatch motor was super iffy, blower motor, heater controls, radio.
replaced the drivers side rotor/caliper/pads/brake hose yesterday, along with the strut and front control arm bushings/bolts. had a hell of a time getting the nut off the top of the strut. PB Blaster and heat, and still nothing. removed strut through top, put it on floor, added a pipe for leverage to the wrench and finally got it. wasn't so lucky for the passenger side, so taking it to my cousins shop today for him to get it off. i couldn't do it. going to replace ball joints and tie rods, also.
as pics show, if you can see them, got the new headliner most of the way in yesterday, also. need to add some glue to get it to hold up better in a couple locations. otherwise, very happy with it.
should get the passenger side brakes put back together over weekend, maybe ball joints and tie rods replaced, too, and hopefully get started on the rear rotors/pads.
Last edited by QuentsIROC; Dec 1, 2017 at 12:26 PM.
Re: '86 IROC fixer upper
Image embedding 101 :
For example, say you have a picture uploaded and you want to embed it, you'd copy the direct link to the .jpg, paste it in the message where you want it to appear, and add the img tag at the beginning, and /img at the end.

Hope that helps.
Code:
[img]value[/img]

Hope that helps.
Thread Starter
Junior Member
Joined: Apr 2008
Posts: 46
Likes: 5
From: WV
Car: 1986 IROC-Z
Engine: 350
Transmission: 5 Speed
Re: '86 IROC fixer upper
thanks g_e. yeah, it's been great so far. problem is, things are going too fast! ha! i'm down to rear brakes (can't get rotors off, rusted fast. i've beat them and beat them. have a mechanic friend who suggested using a product called "in/out" and have been spraying both with it every day or two for the past week. probably try them again over weekend), sway bar bushings, outer tie rods, ball joints, and putting interior back together. going to do all that ourselves. also need to replace rear differential gears, going to have someone who knows how to set that up do that.
so far, we've fixed/replaced everything that didn't work (wiper switch & wiring harness, blower motor, hvac vacuum tubing and valve, horn, signals, fog lights, 3rd brake lights, backup lights, hood & hatch shocks, new stereo & speakers, new headliner, sun visors, and interior quarter panel inserts, new front pads/rotors/calipers, inner/outer bearings, struts, rear shocks, sway bar links front and rear, and i'm sure other things i'm missing). haven't fixed windshield washer, which i missed and haven't worked on yet.
still have 6 months til he turns 16, but will be able to drive it prior and get him accustomed to it since he can drive with me.
lots of fun!
Senior Member

Joined: Apr 2000
Posts: 682
Likes: 24
From: MidWest
Car: 91 RS/ 99 T/A/ 72 Vette/ 02 Z28
Engine: LSx/ Dart400
Transmission: M6/ M6/ TH400/ 4L60E
Axle/Gears: 4.10's / 3.08/ 2.73
Re: '86 IROC fixer upper
Sounds like a fantastic project and looks like excellent progress is being made.
I suggest : If the brake booster hasn't been replaced, I would replace it too while hitting the other stuff. The 25 year old brake boost failed without warning in my 91 RS when I hit the brakes one day. This was a car I bought new and drove every day in excellent mechanical condition. The resulting vacuum leak killed the running engine when the brakes were pressed. Nothing an experienced driver couldn't work around but it would have been a hand full for an inexperienced driver to deal with on the road when it happen.
With that said the brake booster in my 72 vette lasted 36 years before it failed.
Thread Starter
Junior Member
Joined: Apr 2008
Posts: 46
Likes: 5
From: WV
Car: 1986 IROC-Z
Engine: 350
Transmission: 5 Speed
Re: '86 IROC fixer upper
UPDATE: My kid has been driving the car for about a year now and, as promised to him if he kept up his end of the deal (grades, out of trouble, take care of car), it's in the body as I type. Not sure who's more excited to get it back. Been a while since I posted, so to address everything that needed done from above . . .
- replaced headliner
- installed a complete new stereo system.
- installed new hatch pull down motor
- repaired fog lights that wasn't working, new fog lights to be installed by body shop
- replaced heater core and cleaned out mouse/rat/squirrel nest
- replaced blower motor. blower motor wouldn't run, pulled old one out, found another rat/mouse/squirrel next in it. got the motor to run.
- repaired hvac vacuum lines and valve.
- fixed inoperative 3rd brake light. was a grounding issue.
- repaired backup lights. wire wasn't hooked up.
- repaired horn and signals, basically rebuilt steering column.
- replaced both window motors.
- replaced all 4 rotors, pads, calipers, brake hoses
- replaced front struts and rear schocks.
- installed a dual electric radiator fan
- replaced bushings underneath the car
- replaced tie rod and tie rod ends
- replaced all door/t-top/hatch seals
- replaced some other misc interior parts
- new skins, old ones were "new" . . . in 2008 and had under 1,000 miles on them and dry rotted
body shop going to:
- replace doors (mine were rusted through along bottom, found a FREE donor car with good doors)
- replace back glass (i screwed up defrosters in mine removing tint - donor car)
- also got a set of t-tops and tail lights from donor car. it has good fenders, too, in the event they're ever needed
- paint car back to orginal black and replace all stickers and emblems (i'm not putting gray stripe back on, IROC stickers only, plus new Z28 emblems and new emblem on front below hood)
- replace door handles both interior and exterior
- replace carpet
- replace door panels with new like-factory aftermarkets
- replace front seat belts
I'll post before/after pictures later.


Thread Starter
Junior Member
Joined: Apr 2008
Posts: 46
Likes: 5
From: WV
Car: 1986 IROC-Z
Engine: 350
Transmission: 5 Speed
Re: '86 IROC fixer upper
Here's some pics from last year as well as a few from the body shop where's it's being dismantled:


Last edited by QuentsIROC; Jun 17, 2019 at 12:40 PM.


Thread Starter
Junior Member
Joined: Apr 2008
Posts: 46
Likes: 5
From: WV
Car: 1986 IROC-Z
Engine: 350
Transmission: 5 Speed
Re: '86 IROC fixer upper
Thanks, and thanks for your help in prior posts. I'm pretty tickled with it, my son even more so. Had to come into office this morning and told him I was taking it . . . negative, he's taking it to meet some friends later.
I drove car back from paint yesterday and was one of probably 3 times I've driven it over the past year. Car drives great after doing everything to it as indicated previously in this thread. Really couldn't believe how nice it drove in comparison to how it previously did. I had driven it a couple times after we replaced all suspension, brakes, and steering components and it drove better but still not that great. I guess it took some time for everything to break in because she now drives darn near like a new one. And now, she looks as good as she drives. I told my kid I was thinking about keeping the car for myself and buying him something else to drive. Haha. It has a little over 100K miles, so no point in making anything more than a daily driver for my son out of it.
Thanks again!
Joined: Jun 2003
Posts: 5,028
Likes: 78
From: Desert
Car: 1991 Z28 Vert
Engine: 383 single plane efi
Transmission: T-56
Axle/Gears: 8.8 with 3.73s
Re: '86 IROC fixer upper
Before you relinquish it to a daily driver status I think you should have it professionally appraised and check out the insurance situation. With rebuilt braking and suspension systems and new paint, you've increased the value a bit. Even a stock engine over 100K if it starts every time and runs well and a decent condition interior (easy to refurbish to like new status) you could have a car that's worth 8K. Normal insurance may not insure it for anything more than half that unless you get an appraisal and have the amount raised. You really don't want to find yourself in a situation where the insurance company wants to declare it a total loss because of a minor collision.
If you haven't you could start to do some minor stuff that's relatively inexpensive like weatherstripping, wheel refinishing, engine bay restoration (Eastwood has great products for that) and upgrading to a plug and play LED headlight system makes a huge difference for night driving.
If you haven't you could start to do some minor stuff that's relatively inexpensive like weatherstripping, wheel refinishing, engine bay restoration (Eastwood has great products for that) and upgrading to a plug and play LED headlight system makes a huge difference for night driving.
Thread Starter
Junior Member
Joined: Apr 2008
Posts: 46
Likes: 5
From: WV
Car: 1986 IROC-Z
Engine: 350
Transmission: 5 Speed
Re: '86 IROC fixer upper
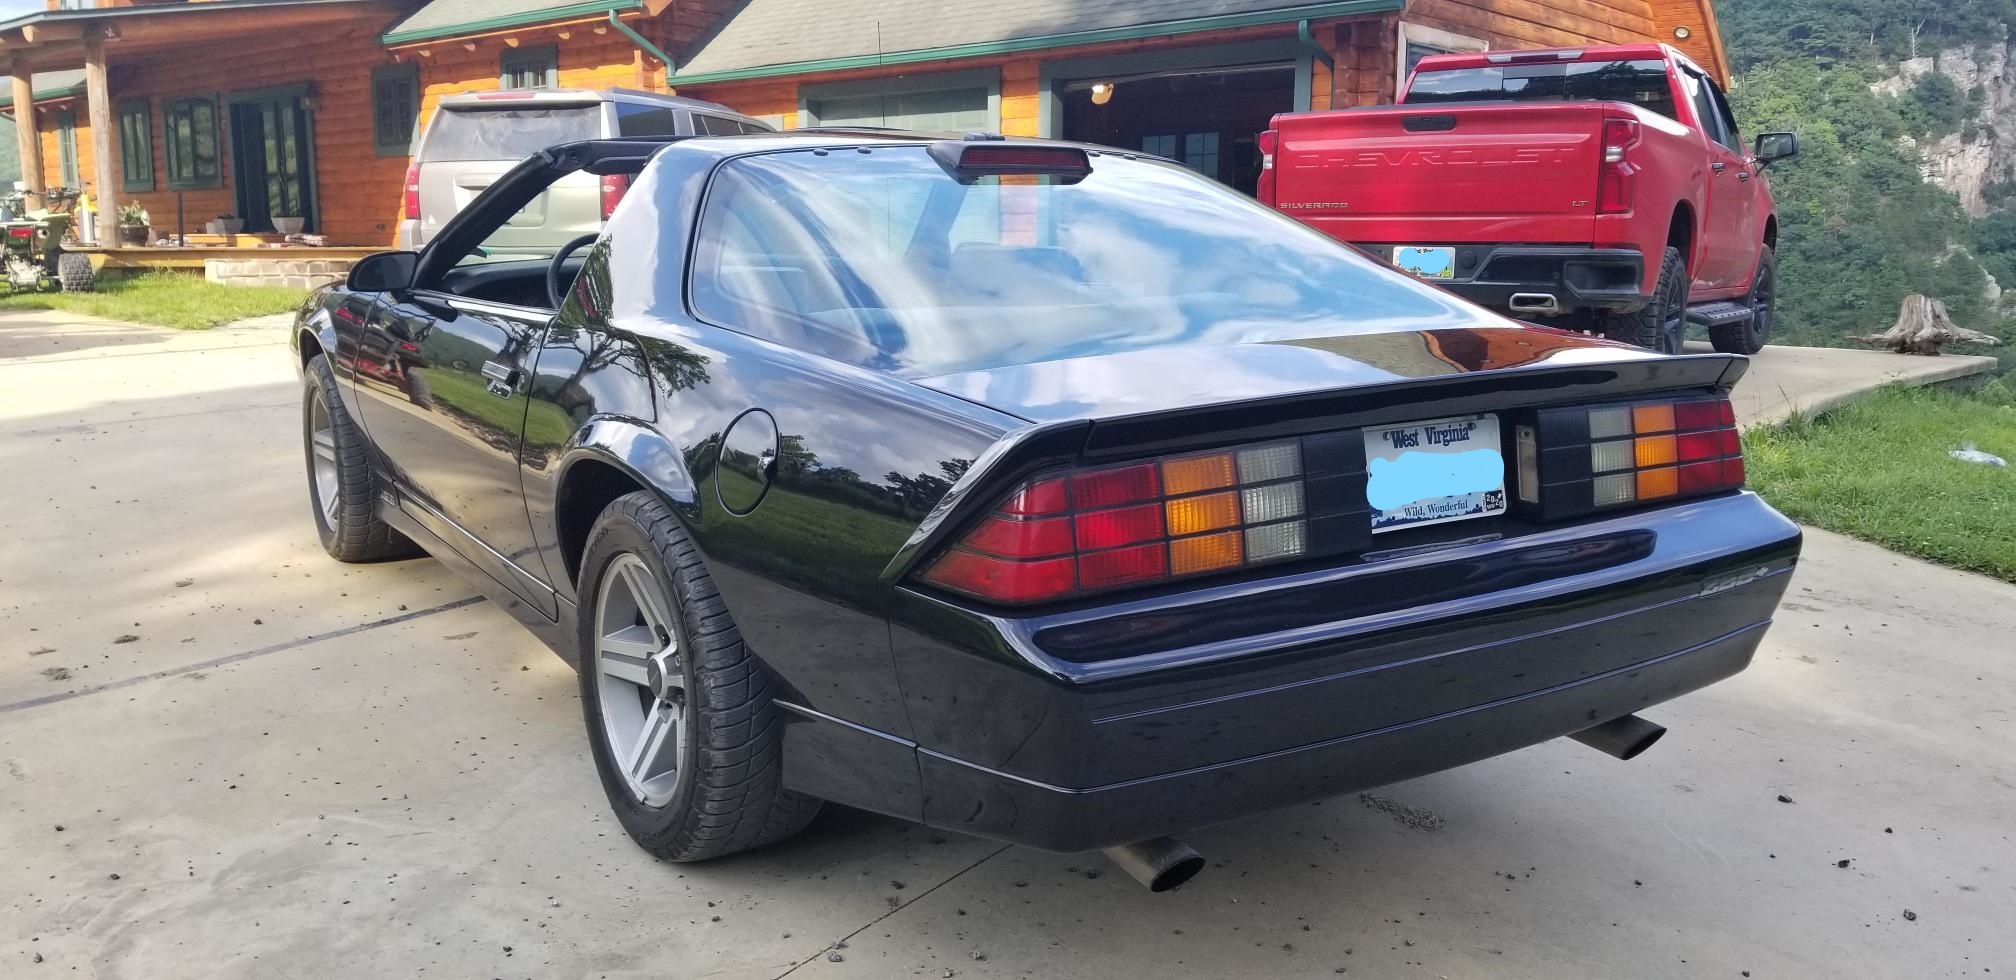
here's the car now, 2 years later. just installed 396 horse 350 a couple weeks ago. a couple of small issues . . .
- what's the best fix for the !@#$8& vacuum leak that won't allow it to switch between defroster, heater, floor, vent? i've replaced the rubber diaphragm on the back of the hvac control two or three times over past 2 years. when it's hot out and the rubber is more pliable, i guess, it seems to work. cold weather . . . not happening. being stuck on defrost isn't the end of the world in cold weather, at least it's on the windshield, but would be nice if it worked properly and i didn't have to hear the ssssssssssssssssssssssssssssssss noise.
- park brake light is on about all the time. if i lift the e-brake handle a bit, it'll go off, but when i let go, it comes back on. sometimes i can hit down on the handle and it'll temporarily go off for a bit but comes back on with the next bump in the road. could this be parking brake adjustment or switch needs replaced? i'm thinking former as the kid says the park brake won't hold when he parks on a hill. it seems tight, though. brakes all new, under 10K miles. rear disc brakes.
- shift light will not go off, doesn't work. this is a 5 speed car, factory tranny, but everything under the hood has been replaced out, all smog stuff done away with, computer done away with, etc. it's a basic sbc with an msd distributor. i have the gm service manual for the car and couldn't find anything about the shift light, what powers it, where the power from the light comes from, etc. it'd be great if it actually worked properly, but would rather have it off than on all the time. short of pulling the light out to make it go away, where's the power source? maybe i've a wire unhooked from engine replacement . . .
Joined: Nov 2002
Posts: 6,642
Likes: 403
From: Oyth
Car: 89RS vert
Engine: Erod
Transmission: 4L65e
Axle/Gears: BW, 3.27
Re: '86 IROC fixer upper
There's a write up posted on the forum for the Hvac leak.Basically, someone put a nut/bolt in place of the pin on the rotary valve.
Parking brake light is probably the switch and those delco mariane calipers are to blame for the e-brake not holding properly.
Parking brake light is probably the switch and those delco mariane calipers are to blame for the e-brake not holding properly.