
HOW TO: Installing an mp3 jack in your factory radio


Thread Starter
Junior Member
Joined: Mar 2007
Posts: 16
Likes: 0
From: Northern Cal
Car: 89 Firebird / 64 Catalina
Engine: 2.8 / 389 Tri-Power
Transmission: t-5 / m-21
Axle/Gears: 3.73 / 3.43 posi
HOW TO: Installing an mp3 jack in your factory radio
Hello everyone! Tired of the crappy sound from those cassette adapters? Don't wanna shell out the money for one of those antenna FM transmitters? Well here's the solution for you. Its fairly simple requires about $10 in parts and gives you a line in jack that has FM quality sound for your factory deck. Its great if you're like me and like the look of the stock deck, or happen to be one of those people who always gets their radio stolen. So get out those soldering irons and lets get started.
First the disclaimer: I am not responsible for anyone attempting this frying their radio so do so at your own risk.
That being said i've done 3 of these so far and it worked perfect each time. My roomate also did the conversion on his stock toyota radio.
What you need:
To begin if you are not doing a delco radio with the equalizer don't know which wires are the audio wires you'll need to build what i dubbed my high tech audio probe.
Its actually a game boy audio jack rigged into a probe since it is all i had.
That's the bottom where the probes connect. Grounds are the bare wires. First go through the suspected wires with a probe light to find the wires with current. (you want to avoid those). After you know where the power in is then check the remaining wires with the audio probe. To use it just hold the ground wires on the case of the radio and stick the probe end into the wire harness going from the FM board into the internal amplifier untill you get sound from two wires. On the Delco equalizer board it is this harness:
IMG_20110207_175556.jpg?t=1297183444
The reason you want the FM wires coming out of the radio board is so that whatever goes from the mp3 player is fully controlled by the radio and all its buttons. Also the input will be at or close to the same volume as the radio.
I would recommend for the first attempt going out to the local wrecking yard and picking up an extra radio to try this with just so you know you can do it.
First the disclaimer: I am not responsible for anyone attempting this frying their radio so do so at your own risk.
That being said i've done 3 of these so far and it worked perfect each time. My roomate also did the conversion on his stock toyota radio.
What you need:
- A soldering iron
- A roll of 22 gauge wire
- Heatshrink tubing
- 1 1/8'' (3.5mm) stereo jack with internal double pole double throw switch
- A drill with a bit slightly larger than the tip of the jack
- 1 radio
- 1 double male 3.5mm jack cable
- Wire cutter with stripper
- Rosin core electric solder
- Tools to remove radio screws
- To make the audio probe (necessary if not doing an eq radio)
- Electrical tape (optional)
- 1 set of headphones
- 1 regular 3.5mm jack w/o switch
To begin if you are not doing a delco radio with the equalizer don't know which wires are the audio wires you'll need to build what i dubbed my high tech audio probe.
Basically take the non switched jack and solder on a ground wire and one wire on either the left or right audio tab. Here's mine:
IMG_20110206_011439.jpg?t=1297182545
IMG_20110206_011439.jpg?t=1297182545
Its actually a game boy audio jack rigged into a probe since it is all i had.
That's the bottom where the probes connect. Grounds are the bare wires. First go through the suspected wires with a probe light to find the wires with current. (you want to avoid those). After you know where the power in is then check the remaining wires with the audio probe. To use it just hold the ground wires on the case of the radio and stick the probe end into the wire harness going from the FM board into the internal amplifier untill you get sound from two wires. On the Delco equalizer board it is this harness:
IMG_20110207_175556.jpg?t=1297183444
The reason you want the FM wires coming out of the radio board is so that whatever goes from the mp3 player is fully controlled by the radio and all its buttons. Also the input will be at or close to the same volume as the radio.
I would recommend for the first attempt going out to the local wrecking yard and picking up an extra radio to try this with just so you know you can do it.
IMG_20110207_165214.jpg?t=1297183645
that one is from an 86 cadillac. First step is to remove the top and bottom casings by removing the associated screws.
IMG_20110207_165248-1.jpg?t=1297184031
IMG_20110207_165242-1.jpg?t=1297184100
and finally
IMG_20110207_165235-1.jpg?t=1297184145
and finally
IMG_20110207_165235-1.jpg?t=1297184145
Once those screws are removed you can pull the two covers by lifting from the back of the unit and pulling it up. They have prongs that go into the faceplate so careful not to crack it.
Now you should see this:
Now you should see this:
IMG_20110207_165514.jpg?t=1297184244
that is the bottom of the circuit board that has the radio. Remove the screws holding it down and gently move it out of the way. Also note there is one screw holding it on where the antenna goes in.
Thread Starter
Junior Member
Joined: Mar 2007
Posts: 16
Likes: 0
From: Northern Cal
Car: 89 Firebird / 64 Catalina
Engine: 2.8 / 389 Tri-Power
Transmission: t-5 / m-21
Axle/Gears: 3.73 / 3.43 posi
Re: HOW TO: Installing an mp3 jack in your factory radio
Under it you will see this plug:
IMG_20110207_175556.jpg?t=1297184338
that has the line out from the board. Gently pull it out of the socket (it should come out with some wiggling) We will be splicing here. The audio wires are the 3rd and 4th wires from the side of the plug closest to the faceplate.
Now that the plug is off we can move the radio board kinda out of the way and begin cutting and splicing. Start with the closest wire and cut it about halfway between the two boards. Take a length of 22 gauge wire and cut it so the wire will reach where you want the jack to be. Next solder it on to the radio wire.
IMG_20110207_185418.jpg?t=1297185039
and that is with a piece of heat shrink covering the connection so it won't short or do anything weird. Now do the same for the other half of the wire.
Next step is to begin to connect to the audio jack for the mp3 player. Mine was setup like this:
Untitled.png?t=1297185426
Basically when you insert the 3.5mm plug it disconnects radio from the line out and then connects the line out to the aux in. Also you will have to solder a wire going from the audio terminals to the aux in terminals so sound actually goes through. To find out how the switch is set up just get a battery some wire and a probe light. Hook the probe to the negative terminal and then attach the wire to the positive and one of the center terminals. Probe the terminals to see where the current is. note it and then push in the jack and see where it switches to. To figure out which terminal is what side of stereo input take a jack not connected to anything and put it in the socket. Take the hot wire and connect it to a terminal until you can get light off the tip of the plug when probing it. The tip is the left channel contact.
Solder your wires from the radio wires to the appropriate sockets on the plug and repeat the previous step for the second audio channel.
IMG_20110207_192326.jpg?t=1297185938
IMG_20110207_190440.jpg?t=1297185982
Next is to repeat the previous step for the other audio channel. Once the jack is all hooked up take your new bundle of wires and wrap them with electrical tape or cover them with some heat shrink to keep it all neat and tidy. Remember to cover all solder connections so that they cannot contact anything by accident. Now figure out where you want the jack to be and drill the corresponding hole being careful not to drill any board components. ( i did that on my first successful radio so i had no FM lol). If the jack mount doesn't touch the radio body you may need to solder a grounding wire to the side ( there should be a tab) and run it to a ground on the body of the radio.
Once the jack is mounted you can re attach the plug to the radio board and re mount the board. Be sure to check it seats securely and that the jack isn't in the way of anything. Button the radio back up re-attaching all the sides.
That is about all. Go hook it up. It should switch from FM to aux automatically when you plug into the jack just like the ones on ebay do.
You should notice a fair difference between that and those awful cassette adapters and best of all the radio still functions like a factory one. For those of you who are pretty good with a soldering iron if you want i can also post how to take your equalizer deck and turn that search button next to eject and turn it into a switch to go between radio and aux in.
Thread Starter
Junior Member
Joined: Mar 2007
Posts: 16
Likes: 0
From: Northern Cal
Car: 89 Firebird / 64 Catalina
Engine: 2.8 / 389 Tri-Power
Transmission: t-5 / m-21
Axle/Gears: 3.73 / 3.43 posi
Re: HOW TO: Installing an mp3 jack in your factory radio
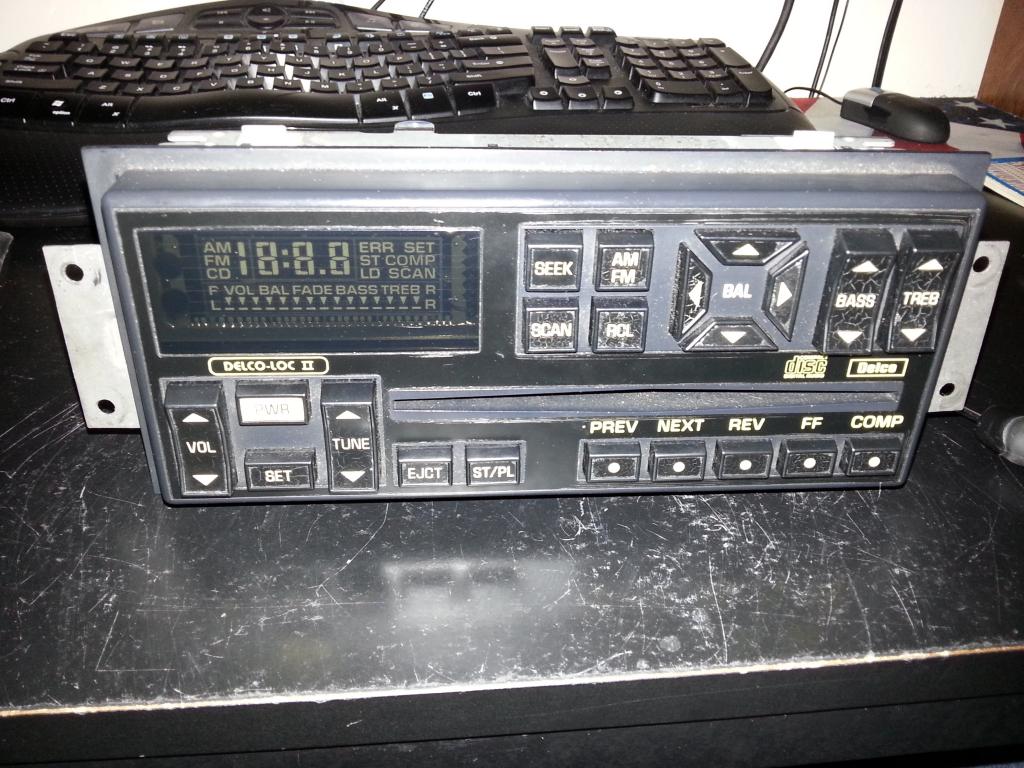
This is the finished radio
IMG_20110207_195941.jpg?t=1297187102
I used a 1/4'' jack since its all the electronic parts store had and put it in the side since this one will be my shop radio. Just have to build a power converter for it so i can plug it into the wall 
Also instead of mounting it in the deck you can run the wires for the jack out the back and make a plug. Make another plug on the wires from the jack itself and mount it where you want.
Also instead of mounting it in the deck you can run the wires for the jack out the back and make a plug. Make another plug on the wires from the jack itself and mount it where you want.
Last edited by Melosh; Feb 8, 2011 at 11:50 AM.
Senior Member
Joined: Sep 2008
Posts: 588
Likes: 2
From: France
Car: 1984 Pontiac Firebird Trans Am
Engine: V8 5.0L HO (L69)
Transmission: B&W T5
Axle/Gears: 3.73 limited slip
Re: HOW TO: Installing an mp3 jack in your factory radio
I've done he same thing, except that I used the signal from the cassette deck (I wanted to keep the radio), with an switch to go between aux mode an cassette mode. Since the sound for the input does not go into the cassette deck electronics, there's no loss or noise correction.
I've tested the unit for one hour with my computer and later my mp3 player as an output, works like a charm and sounds great.
Here's a schematic :
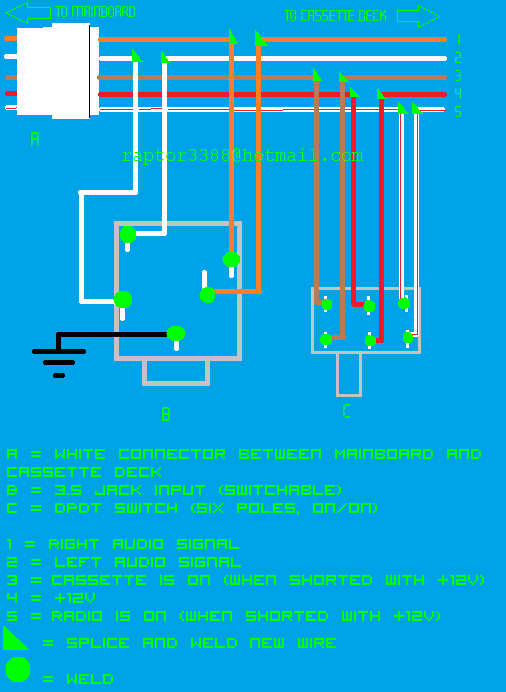
I've tested the unit for one hour with my computer and later my mp3 player as an output, works like a charm and sounds great.
Here's a schematic :


Joined: Jul 2011
Posts: 695
Likes: 73
From: New York
Car: 86 Sport Coupe
Engine: 5.3 LM7
Transmission: T56
Axle/Gears: 4th gen 3.42 posi
Re: HOW TO: Installing an mp3 jack in your factory radio
Hey i know this ia an old thread, but where do you get the double pole double throw headphone jack? I checked radio shack and they dont have. Couldnt find it at any auto parts store either. I have everything but that jack.

Member
Joined: Mar 2012
Posts: 169
Likes: 0
From: Hudson, NH
Car: 1982 Firebird Base
Engine: 2.8L V6
Transmission: Auto
Axle/Gears: Stock
Re: HOW TO: Installing an mp3 jack in your factory radio
Here's a link to the part you're looking for:
http://www.mouser.com/ProductDetail/...Qlfv%252bVE%3d
Trending Topics

Joined: Nov 2010
Posts: 5,892
Likes: 84
From: Mantua NJ
Car: 1 Owner 1986 TA with a WS6 package
Engine: 5.0 EFI
Transmission: THM700R4
Axle/Gears: 277 Posi Speedo
Re: HOW TO: Installing an mp3 jack in your factory radio
I sent mine out to a member on here,84TA,very inexpensive to have it done if you have no knowledge of electronics.It makes your sound system so much better.I had the jack installed in the face plate.

Member
Joined: Aug 2007
Posts: 386
Likes: 1
From: Panhandle of Florida
Car: 85 IROC / 92 Z28 Vert / 57 210
Engine: L69 / LB9 / LQ4
Transmission: T5 / T56 / 4L65E
Axle/Gears: 3:73 / 3.73 / ?.??
Re: HOW TO: Installing an mp3 jack in your factory radio
any one know off hand how this installs to a factory CD unit with digital EQ?

Junior Member
Joined: Feb 2013
Posts: 7
Likes: 0
From: Kerrville TX
Transmission: 5 speed manual
Re: HOW TO: Installing an mp3 jack in your factory radio
Ik this is an old thread, but how can I wire it directly to the pre amp, I accidentally ripped a cable out and I can't find where it goes, so doing it through cassette won't work, and I did it to the 3rd and 4th also but when plugged in It just sounds all crappy and staticky

Member
iTrader: (14)
Joined: Jan 2008
Posts: 210
Likes: 2
From: Kettering, ohio
Car: Restored 88 GTA
Engine: 5.0
Transmission: Auto
Axle/Gears: Posi
Re: HOW TO: Installing an mp3 jack in your factory radio
This thread is old enough to start drawing Social Security if the Gov't hasn't spent it all. Besides there is an easier way of doing the same thing. Another member posted for some of us a while back. Anyway hopefully the pics will help you find the connector you are looking for. The CD models can be done in a similar method. It just depends on which CDM module you have. I have done several Ford radios as well.
Last edited by red88tagta; Mar 14, 2013 at 08:24 AM.
Member
Joined: Aug 2007
Posts: 386
Likes: 1
From: Panhandle of Florida
Car: 85 IROC / 92 Z28 Vert / 57 210
Engine: L69 / LB9 / LQ4
Transmission: T5 / T56 / 4L65E
Axle/Gears: 3:73 / 3.73 / ?.??
Re: HOW TO: Installing an mp3 jack in your factory radio
This thread is old enough to start drawing Social Security if the Gov't hasn't spent it all. Besides there is an easier way of doing the same thing. Another member posted for some of us a while back. Anyway hopefully the pics will help you find the connector you are looking for. The CD models can be done in a similar method. It just depends on which CDM module you have. I have done several Ford radios as well.
i figured this had dried up and died, but thanks for the answer.
one question though. Was that supposed to be CD Model not CDM Module?
Member
iTrader: (14)
Joined: Jan 2008
Posts: 210
Likes: 2
From: Kettering, ohio
Car: Restored 88 GTA
Engine: 5.0
Transmission: Auto
Axle/Gears: Posi
Re: HOW TO: Installing an mp3 jack in your factory radio
If you post a pic of your CDM module with the top removed, I can probably point you in the right direction.
Junior Member
Joined: Oct 2012
Posts: 51
Likes: 0
From: Cooperstown, NY
Car: 1992 Z28 Convertible
Engine: 5.0 TPI
Transmission: Auto
Axle/Gears: 2:73 L/S
Re: HOW TO: Installing an mp3 jack in your factory radio
How can I do this on an 89 GTA with cassette and SWC's? The radio boards look totally different.
Member
Joined: Aug 2007
Posts: 386
Likes: 1
From: Panhandle of Florida
Car: 85 IROC / 92 Z28 Vert / 57 210
Engine: L69 / LB9 / LQ4
Transmission: T5 / T56 / 4L65E
Axle/Gears: 3:73 / 3.73 / ?.??
Re: HOW TO: Installing an mp3 jack in your factory radio
Ok - this is more or less for anyone else that might be trying to figure this out on a factory CD player for these cars as I was....
if your CD player looks like this:
Then this should work for you.
First after removing the unit from the vehicle remove the amplifier subcomponent from the top (the component with the heat sinks attached). the picture below shows all three main components of the CD player. The main chassis housing and CD player (left), the faceplate and face plate circuits (middle), and Amplifier board or as some refer to it the CDM (right)

As a Side Note / Warning. Because I was uncertain what wires went to what I needed to create an audio probe (used radioshack P/N 274-0249 to make it). I would not recommend having these components separated when plugging in and testing. I had everything spread apart but connected to each other trying to access to the wires I need to test, and in doing so the faceplate fell over and hit the chassis causing the magic white smoke to be released. I was lucky in that my CD player still works and all the buttons still function. The display, however, was a casualty and I'm now trying to figure out what fragged and get the screen working again. the block of wires you are going to be concerned with are shown below.
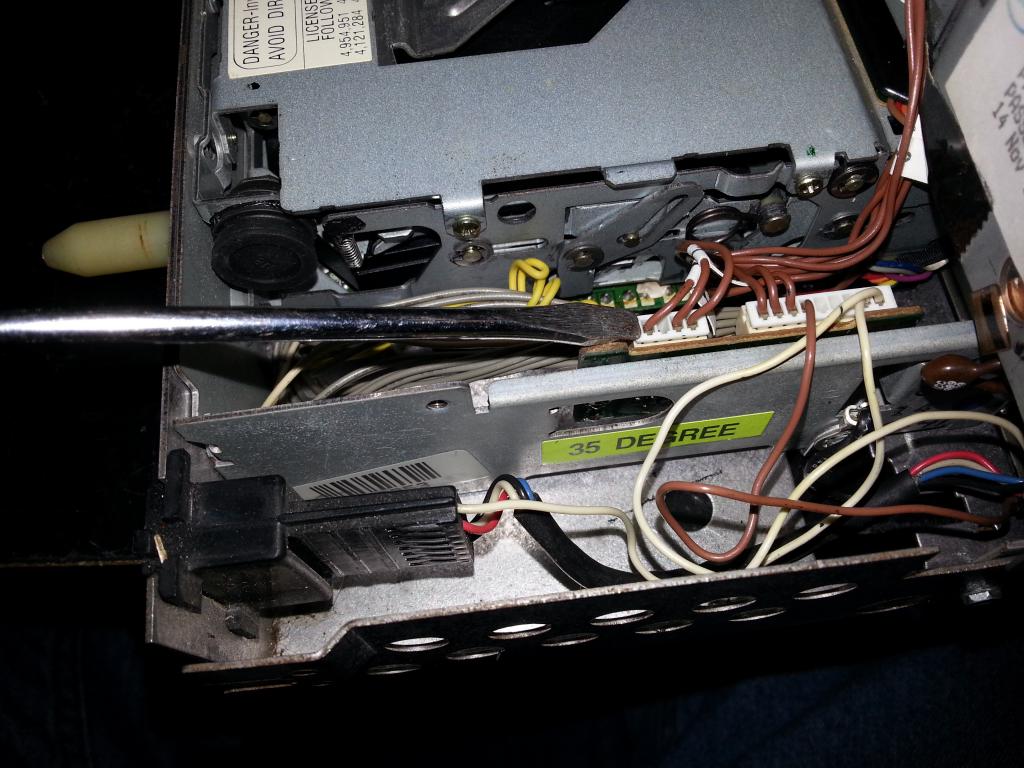
This is located on the main chassis/cd player section with the amplifier board removed. I have labeled the wires that were the left and right channels. As another note, you probably don't need an audio probe to verify these. when I was voltage testing these wires I had a CD in the drive and playing. With my ground on the CD player chassis, I used the positive probe on the wires to find the ones with voltage so I didn't hook my audio probe up to 12v. When I would contact the wires with left and right channels, those channels would cut out of the song playing. Hooking the audio probe up to those wires again verified they were indeed the audio outputs from the cd player. Left channel is shown by the #1, the right channel is shown by #2.
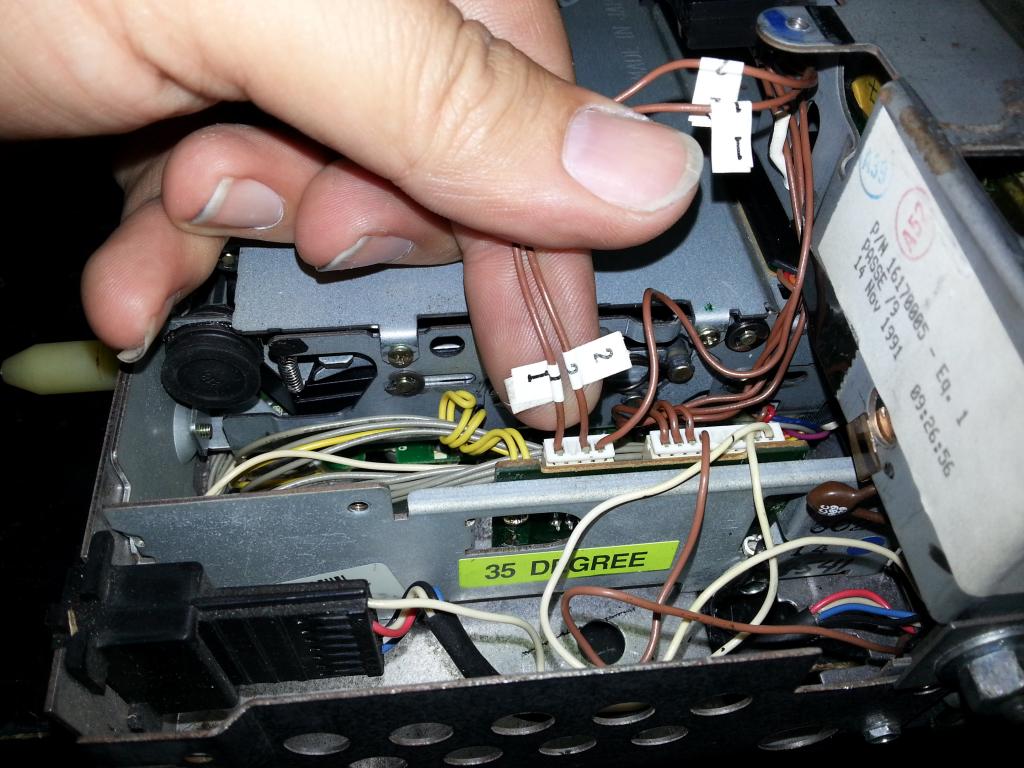
Basically about where my thumb is at I cut the wires and spliced in my audio jack using the diagram from SolarGoldRaptor above only I left out part C in their diagram. I used RadioShack P/N 274-0246 for the DPDT 1/8" Phono jack, a 2' piece of Cat 6 cable, soldered everything, and then liquid taped it. In hind sight I probably should have used Cat5 as it's not a solid core, but I'll redo my cable later if it poses a problem. My cable is shown below.

Only things left to do is make a CD with about 6 tracks of nothing but silence and figure out where I want to mount the input jack. You don't really NEED the silence CD to do this, but in order for this to work their has to be a CD in the player running. While it's running it plays audio, until you plug the phono in, at which point the phono takes over..... sort of. What I mean by sort of is if there is audio coming from your mp3 player and through the phono input it completely takes over and you don't hear any ghosts from the cd player, however, if the phono input is not producing sound, but is still plugged in the audio from the cd player will bleed through and create a ghost effect. Easiest solution is to make a cd with nothing but silence.
if your CD player looks like this:
Then this should work for you.
First after removing the unit from the vehicle remove the amplifier subcomponent from the top (the component with the heat sinks attached). the picture below shows all three main components of the CD player. The main chassis housing and CD player (left), the faceplate and face plate circuits (middle), and Amplifier board or as some refer to it the CDM (right)
As a Side Note / Warning. Because I was uncertain what wires went to what I needed to create an audio probe (used radioshack P/N 274-0249 to make it). I would not recommend having these components separated when plugging in and testing. I had everything spread apart but connected to each other trying to access to the wires I need to test, and in doing so the faceplate fell over and hit the chassis causing the magic white smoke to be released. I was lucky in that my CD player still works and all the buttons still function. The display, however, was a casualty and I'm now trying to figure out what fragged and get the screen working again. the block of wires you are going to be concerned with are shown below.
This is located on the main chassis/cd player section with the amplifier board removed. I have labeled the wires that were the left and right channels. As another note, you probably don't need an audio probe to verify these. when I was voltage testing these wires I had a CD in the drive and playing. With my ground on the CD player chassis, I used the positive probe on the wires to find the ones with voltage so I didn't hook my audio probe up to 12v. When I would contact the wires with left and right channels, those channels would cut out of the song playing. Hooking the audio probe up to those wires again verified they were indeed the audio outputs from the cd player. Left channel is shown by the #1, the right channel is shown by #2.
Basically about where my thumb is at I cut the wires and spliced in my audio jack using the diagram from SolarGoldRaptor above only I left out part C in their diagram. I used RadioShack P/N 274-0246 for the DPDT 1/8" Phono jack, a 2' piece of Cat 6 cable, soldered everything, and then liquid taped it. In hind sight I probably should have used Cat5 as it's not a solid core, but I'll redo my cable later if it poses a problem. My cable is shown below.
Only things left to do is make a CD with about 6 tracks of nothing but silence and figure out where I want to mount the input jack. You don't really NEED the silence CD to do this, but in order for this to work their has to be a CD in the player running. While it's running it plays audio, until you plug the phono in, at which point the phono takes over..... sort of. What I mean by sort of is if there is audio coming from your mp3 player and through the phono input it completely takes over and you don't hear any ghosts from the cd player, however, if the phono input is not producing sound, but is still plugged in the audio from the cd player will bleed through and create a ghost effect. Easiest solution is to make a cd with nothing but silence.

Junior Member
Joined: Aug 2017
Posts: 1
Likes: 0
Re: HOW TO: Installing an mp3 jack in your factory radio
Hello this is my first time using this web site I have a GM Delco with EQ and casset player can you send me pics and instructions on how install the Aux plug onto it please thank you
Junior Member
Joined: Oct 2012
Posts: 51
Likes: 0
From: Cooperstown, NY
Car: 1992 Z28 Convertible
Engine: 5.0 TPI
Transmission: Auto
Axle/Gears: 2:73 L/S
Re: HOW TO: Installing an mp3 jack in your factory radio
PM me an email address. I will look for the photo instructions I used on my 1989 Trans Am GTA convert. It my take a day or two. I have them in a folder I will have to search through.
Joe
Joe
Junior Member
Joined: Sep 2009
Posts: 18
Likes: 4
From: Pacific Northwest
Car: 88 IROC
Engine: 350 TPI
Transmission: 700R4
Re: HOW TO: Installing an mp3 jack in your factory radio
I know this thread is super old, but does anyone have a link to the photos from the original 2011 post? It looks like photobucket isn't a website anymore...
Senior Member
Joined: Jul 2008
Posts: 623
Likes: 13
From: Alaska
Car: 1992 RS
Transmission: Automatic
Re: HOW TO: Installing an mp3 jack in your factory radio


Junior Member
Joined: Jul 2022
Posts: 15
Likes: 6
From: The Emerald City
Car: '92 Camaro Z28 Convertible
Engine: 5.0 TPI
Transmission: Automatic
Axle/Gears: 2.73 Posi
Re: HOW TO: Installing an mp3 jack in your factory radio
Ok - this is more or less for anyone else that might be trying to figure this out on a factory CD player for these cars as I was....
if your CD player looks like this:
Attachment 344833
Then this should work for you.
First after removing the unit from the vehicle remove the amplifier subcomponent from the top (the component with the heat sinks attached). the picture below shows all three main components of the CD player. The main chassis housing and CD player (left), the faceplate and face plate circuits (middle), and Amplifier board or as some refer to it the CDM (right)
Attachment 344834
As a Side Note / Warning. Because I was uncertain what wires went to what I needed to create an audio probe (used radioshack P/N 274-0249 to make it). I would not recommend having these components separated when plugging in and testing. I had everything spread apart but connected to each other trying to access to the wires I need to test, and in doing so the faceplate fell over and hit the chassis causing the magic white smoke to be released. I was lucky in that my CD player still works and all the buttons still function. The display, however, was a casualty and I'm now trying to figure out what fragged and get the screen working again. the block of wires you are going to be concerned with are shown below.
Attachment 344835
This is located on the main chassis/cd player section with the amplifier board removed. I have labeled the wires that were the left and right channels. As another note, you probably don't need an audio probe to verify these. when I was voltage testing these wires I had a CD in the drive and playing. With my ground on the CD player chassis, I used the positive probe on the wires to find the ones with voltage so I didn't hook my audio probe up to 12v. When I would contact the wires with left and right channels, those channels would cut out of the song playing. Hooking the audio probe up to those wires again verified they were indeed the audio outputs from the cd player. Left channel is shown by the #1, the right channel is shown by #2.
Attachment 344836
Basically about where my thumb is at I cut the wires and spliced in my audio jack using the diagram from SolarGoldRaptor above only I left out part C in their diagram. I used RadioShack P/N 274-0246 for the DPDT 1/8" Phono jack, a 2' piece of Cat 6 cable, soldered everything, and then liquid taped it. In hind sight I probably should have used Cat5 as it's not a solid core, but I'll redo my cable later if it poses a problem. My cable is shown below.

Only things left to do is make a CD with about 6 tracks of nothing but silence and figure out where I want to mount the input jack. You don't really NEED the silence CD to do this, but in order for this to work their has to be a CD in the player running. While it's running it plays audio, until you plug the phono in, at which point the phono takes over..... sort of. What I mean by sort of is if there is audio coming from your mp3 player and through the phono input it completely takes over and you don't hear any ghosts from the cd player, however, if the phono input is not producing sound, but is still plugged in the audio from the cd player will bleed through and create a ghost effect. Easiest solution is to make a cd with nothing but silence.
if your CD player looks like this:
Attachment 344833
Then this should work for you.
First after removing the unit from the vehicle remove the amplifier subcomponent from the top (the component with the heat sinks attached). the picture below shows all three main components of the CD player. The main chassis housing and CD player (left), the faceplate and face plate circuits (middle), and Amplifier board or as some refer to it the CDM (right)
Attachment 344834
As a Side Note / Warning. Because I was uncertain what wires went to what I needed to create an audio probe (used radioshack P/N 274-0249 to make it). I would not recommend having these components separated when plugging in and testing. I had everything spread apart but connected to each other trying to access to the wires I need to test, and in doing so the faceplate fell over and hit the chassis causing the magic white smoke to be released. I was lucky in that my CD player still works and all the buttons still function. The display, however, was a casualty and I'm now trying to figure out what fragged and get the screen working again. the block of wires you are going to be concerned with are shown below.
Attachment 344835
This is located on the main chassis/cd player section with the amplifier board removed. I have labeled the wires that were the left and right channels. As another note, you probably don't need an audio probe to verify these. when I was voltage testing these wires I had a CD in the drive and playing. With my ground on the CD player chassis, I used the positive probe on the wires to find the ones with voltage so I didn't hook my audio probe up to 12v. When I would contact the wires with left and right channels, those channels would cut out of the song playing. Hooking the audio probe up to those wires again verified they were indeed the audio outputs from the cd player. Left channel is shown by the #1, the right channel is shown by #2.
Attachment 344836
Basically about where my thumb is at I cut the wires and spliced in my audio jack using the diagram from SolarGoldRaptor above only I left out part C in their diagram. I used RadioShack P/N 274-0246 for the DPDT 1/8" Phono jack, a 2' piece of Cat 6 cable, soldered everything, and then liquid taped it. In hind sight I probably should have used Cat5 as it's not a solid core, but I'll redo my cable later if it poses a problem. My cable is shown below.
Only things left to do is make a CD with about 6 tracks of nothing but silence and figure out where I want to mount the input jack. You don't really NEED the silence CD to do this, but in order for this to work their has to be a CD in the player running. While it's running it plays audio, until you plug the phono in, at which point the phono takes over..... sort of. What I mean by sort of is if there is audio coming from your mp3 player and through the phono input it completely takes over and you don't hear any ghosts from the cd player, however, if the phono input is not producing sound, but is still plugged in the audio from the cd player will bleed through and create a ghost effect. Easiest solution is to make a cd with nothing but silence.
I've managed to get the connector off of the board rather than cutting the wires and was wondering if anyone knew what kind of connectors these were so that I could build an intermediary harness to the BT unit. I just purchased a cheap 5.0 BT module that has an input and an output so it should switch between sources depending on what is detected.
Connectors:

This wasn't fun to separate. The connectors are more securely fastened to each other than they are the PCB.
Here's the module I purchased. There are a dozen listings for the same unit from different sellers.


Thread
Thread Starter
Forum
Replies
Last Post
colton_carlson
Firebirds for Sale
7
Mar 8, 2019 12:21 PM