replacing heater core


Thread Starter
Senior Member


Joined: Apr 2016
Posts: 733
Likes: 47
Car: 1991 base firebird
Engine: tbi 305
Transmission: 700r4
replacing heater core
 removed my heater core today. I have never done this before. I did what any modern person would do. I watched youtube and searched this forum. the biggest argument seems to be if you have to remove the dash or not. all parties seem to agree that this is a simple straight forward job except for ONE bolt. I agree that besides the ONE bolt its not too bad.
 1) i didn't need to drain my coolant because my heater core had been bypassed.
2) removed passenger seat for room. you will be lying on your back. the seat studs WILL dig into your back at the worst times. just deal with it.
3) removed passenger side lower dash panel
4) laid on my back and started removing the 3 bolts on the air box cover
5) forgot there was a terrible bolt on the top
6) couldn't reach it so i removed the dash pad. still couldn't see it. put the dash pad back on.
7) finally saw that i could remove the ECU bracket and let the computer sit in the floor .there is a little black computer box right by the ecu. it can also be removed with two screws. this gives you a lot more room. this gave me enough room to reach up and around the top of the air box.
8) once i located the bolt it took about 25 minutes to remove it due to the angle and position. there is no room for you to use two fingers. you wont be able to turn it with your fingers at all. you can touch it to locate it but that's it.
the tool I used with success was a 3/8 ratchet with a wiggle and 9/32 socket. I broke the screw loose with the wrench but due to room only got a few turns before I ran out of room. I then removed the ratchet and turned the wiggle and socket by hand until it came out. it was a pain in the *** and I had to stop several times to rest my arm but its just a bolt. take your time and it will come out. you can now pull the airbox cover off and see the heater core.
9) removed the 4 bolts holding the heater core. they are easy to reach with a small extension.
10) removed the two hoses on the fire wall. be careful with these. they are heat sealed after all the years. remove the clamps and then use a small flat blade screw driver under the edge to help release them. gently twist and pull them off. try not to shake or wiggle them. that will easily break your heater core tubes.
11) finagled the heater core out. its a tight fit but will come out. remove it from its bracket. you will need to put the bracket on the replacement heater core.
NOTE-{ I thought my heater core wasn't leaking but after I cleaned it out and looked it over I did find a water stain where it had been leaking. }
12) I slipped the new heater core into place without the bracket into the air box to make sure it fit. i was able to set the bracket on to verify that with the heater core in place the bracket holes lined up.
13) attach bracket to heater core.
14) install heater core with bracket back into airbox/firewall. when i connected the heater core to the bracket the holes were way off. turned out that the heater core tubes weren't going through the firewall enough. i pulled the heater core back out and put some lubricant on the tubes and on the rubber grommets in the fire wall. my lovely assistant pushed and wiggled from the cab side while i pulled on the tubes from the motor side and it slipped right in. the holes lined up perfect. try not to damage the tubes when you pull on them. slow steady pressure. be careful not to cause a new leak.
15) install the hoses on the fire wall. this should be easy.
16) with the dash and airbox still apart i tested everything. i looked for leaks, made sure all of my blend doors were working as they should. lubricated the blend doors. although the air wasn't going through the vents without the airbox cover being installed the system would still blow under the dash. i was able to get cold and hot air blowing. so i knew there ware no leaks and i had heat. technically this was when i declared victory. as soon as i felt heat i felt like a winner.
17) time to put it all back together.
reinstall the airbox cover. this is the most time consuming part because we are back to THE BOLT. i installed 2 of the 4 airbox bolts loosely to make sure everything was lined up before i went for the terrible 4th bolt on top of the airbox. the trick for me was having the 3/8 ratchet with a wiggle and a magnetic socket. there is very little room to start the bolt. i could easily locate the hole and i was able to poke the screw into the hole but when i tried to put the socket on the bolt would fall out of the hole. with the magnet i could get the bolt started and was able to tighten it up far quicker than i thought. maybe 10 minutes.
18) at this point i tested the system again. the airbox is a big part and i wanted to make sure that with the heat a/c system back together everything was working correctly before i put the rest of the dash back on. it was
19) reinstall the black box and ecu.
20) reinstall kick panel and seat.
21) add coolant
22) hi five yourself and everyone you see. you have completed a big job.
this felt like a big job because its tedious. being under the dash is a pain in the...well everything if your tall. however it really wasn't that bad. the one BOLT is difficult but not the worst thing ive ever dealt with. using the right tool will make your life a lot better. i had a little trouble getting a good fitting replacement heater core. i guess there are several different cores that have the same part number. make sure to take your old core with you to the part store to make sure its right. if the tubes are off by just a few degrees the heater core wont fit. you CAN do this. don't be afraid. shops are charging $800 for this. i think my total cost was about $40.
Last edited by Evilokc; Aug 7, 2017 at 09:59 AM.

Re: replacing heater core
I'd give it a very carefull visual inspection for evidence of past leaks. Often you can see where they've been leaking. Might be worth looking in your local phone book for a radiator shop. They're kind of a thing of the past, but if you find one still in business, it wouldn't hurt to have them boil it out and give it a proper pressure test. Might find evidence of antifreeze in the heater box too...
If you do find where it has been leaking, you might be able to just solder up the leak. Hardest part is finding decent solder. A 60/40 rosin core electronics solder would be vastly easier to deal with than the lead-free, feed-it-to-a-bald-eagle-safe garbage at the hardware store.
If you do find where it has been leaking, you might be able to just solder up the leak. Hardest part is finding decent solder. A 60/40 rosin core electronics solder would be vastly easier to deal with than the lead-free, feed-it-to-a-bald-eagle-safe garbage at the hardware store.
Joined: Feb 2017
Posts: 4,185
Likes: 576
From: Meriden, CT 06451
Car: 84 TA orig. 305 LG4 "H" E4ME
Engine: 334 SBC - stroked 305 M4ME Q-Jet
Transmission: upgraded 700R4 3200 stall
Axle/Gears: 10bolt 4.10 Posi w Lakewood TA Bars
Re: replacing heater core
Thanks for posting this. Simple and straight to the point. The other thread on this I was reading yesterday was somewhat confusing.
Thread Starter
Senior Member
Joined: Apr 2016
Posts: 733
Likes: 47
Car: 1991 base firebird
Engine: tbi 305
Transmission: 700r4
Re: replacing heater core
I decided to use the reproduction heater core instead of trying to use the original. I would be so pissed if I put it back and it started leaking. it will be here at noon today and I will get it back in and let you guys know how it went. I was happy to see my blend doors were working so well. I'm going to lubricate them while I have it all apart. if you guys have any specific questions ask away while its fresh in my mind.
Thread Starter
Senior Member
Joined: Apr 2016
Posts: 733
Likes: 47
Car: 1991 base firebird
Engine: tbi 305
Transmission: 700r4
Re: replacing heater core
well here we go. got the reproduction and it doesn't fit. the heater core itself is a tiny bit smaller. however the tubes don't sit at the exact same angle. you have to bend them. I put it in and took it out about 10 or 12 times trying to bend it to the right angle until it broke. so now I have an original that probably doesn't work and a brand new one that definitely leaks. I'm at a very annoying cross roads here. I took the broken new heater core and told them it wasn't a direct fit as advertised. they said it had been " re stickered" meaning there is a good chance it wasn't the brand it said it was. so they gave me my money back and ordered me a new one for tomorrow. worth a try I guess. there is a radiator shop on my way to work. I may see what they think about my original.
Last edited by Evilokc; Jul 30, 2017 at 07:20 PM.
Joined: Jan 2016
Posts: 201
Likes: 23
From: Midland, Michigan
Car: 1989 IROC
Engine: 350
Transmission: 700R4
Axle/Gears: 3:42
Re: replacing heater core
That sucks to have that happen. I have heard tweaking the replacement one isn't uncommon. Thanks for the pointers. Mine is fine but someday it won't be.
Joined: Jan 2016
Posts: 201
Likes: 23
From: Midland, Michigan
Car: 1989 IROC
Engine: 350
Transmission: 700R4
Axle/Gears: 3:42
Re: replacing heater core
Seems this one gets good reviews. http://www.rockauto.com/en/parts/spe...ater+core,6864
Trending Topics
Joined: Feb 2017
Posts: 4,185
Likes: 576
From: Meriden, CT 06451
Car: 84 TA orig. 305 LG4 "H" E4ME
Engine: 334 SBC - stroked 305 M4ME Q-Jet
Transmission: upgraded 700R4 3200 stall
Axle/Gears: 10bolt 4.10 Posi w Lakewood TA Bars
Re: replacing heater core
well here we go. got the reproduction and it doesn't fit. the heater core itself is a tiny bit smaller. however the tubes don't sit at the exact same angle. you have to bend them. well I put it in and took it out about 10 or 12 times trying to bend it to the right angle until it broke. so now I have an original that probably doesn't work and a brand new one that definitely leaks. I'm at a very annoying cross roads here. either way I'm out the cost of the new one. I'm not sure what it is I'm going to do yet. I'm putting my car back together minus the air box for now and will get whatever plan together for next weekend. so pissed. direct replacement my ***.
Thread Starter
Senior Member
Joined: Apr 2016
Posts: 733
Likes: 47
Car: 1991 base firebird
Engine: tbi 305
Transmission: 700r4
Re: replacing heater core
wasn't able to complete it today but I don't consider this a failure. its a to be continued. I'm far too stubborn to fail.
Joined: Feb 2017
Posts: 4,185
Likes: 576
From: Meriden, CT 06451
Car: 84 TA orig. 305 LG4 "H" E4ME
Engine: 334 SBC - stroked 305 M4ME Q-Jet
Transmission: upgraded 700R4 3200 stall
Axle/Gears: 10bolt 4.10 Posi w Lakewood TA Bars
Re: replacing heater core
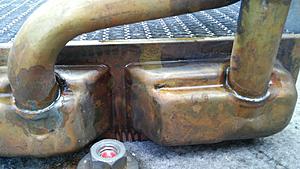
You have made up my mind for me. When I change to a non A/C heater box I will clean out my original HC and then get the propane torch out and put a nice bead of solder where both tubes are connected.
Member

Joined: Oct 2009
Posts: 369
Likes: 0
From: Washington-state
Car: '96 Camaro-Vsux -- SOLD, '84 Z/28
Engine: 3.8L, 305 SBC
Transmission: 4L60E, T-5
Axle/Gears: 3.08s, 3.23s
Re: replacing heater core
well here we go. got the reproduction and it doesn't fit. the heater core itself is a tiny bit smaller. however the tubes don't sit at the exact same angle. you have to bend them. I put it in and took it out about 10 or 12 times trying to bend it to the right angle until it broke. so now I have an original that probably doesn't work and a brand new one that definitely leaks. I'm at a very annoying cross roads here. I took the broken new heater core and told them it wasn't a direct fit as advertised. they said it had been " re stickered" meaning there is a good chance it wasn't the brand it said it was. so they gave me my money back and ordered me a new one for tomorrow. worth a try I guess. there is a radiator shop on my way to work. I may see what they think about my original.
When I had to replace my heater core, I went to a wrecking yard for a good used one. Fit exactly and made sure it had no leaks. I would recommend you do this instead of buying some crappy part that doesn't even fit right.
Thread Starter
Senior Member
Joined: Apr 2016
Posts: 733
Likes: 47
Car: 1991 base firebird
Engine: tbi 305
Transmission: 700r4
Re: replacing heater core
I'm gong to give the spectra one more shot. I hear they are a good fit. the one I got before wasn't a spectra. if it doesn't fir I'm going to take mine to a radiator to be serviced and then put it back in.
Member
Joined: Oct 2009
Posts: 369
Likes: 0
From: Washington-state
Car: '96 Camaro-Vsux -- SOLD, '84 Z/28
Engine: 3.8L, 305 SBC
Transmission: 4L60E, T-5
Axle/Gears: 3.08s, 3.23s
Re: replacing heater core
That spectra does look similar to the original, but I wouldn't be surprised if it still doesn't fit perfect.
The only thing that broke on my heater core originally was the outlet tube. I think I ended up tightening the worm clamp too tight causing the tube to collapse. Another reason why I like the spring clamps better FYI.
Joined: Aug 2009
Posts: 1,972
Likes: 127
From: Los Angeles
Car: 1989 IROC Convertible
Engine: 350 TPI L98
Transmission: WC T5
Axle/Gears: 3.42
Re: replacing heater core
+1 one on the radiator shop. Not only will you have an exact, original, fit and OEM quality, you can see first hand when they clean and pressure test it. I'll be doing mine soon and that's my plan. I am afraid of these replacements and the mountain of new garbage out there.
And thanks for the write up. Simple and to the point.
How do you reach the hose clamps?
And thanks for the write up. Simple and to the point.
How do you reach the hose clamps?
Member
Joined: Oct 2009
Posts: 369
Likes: 0
From: Washington-state
Car: '96 Camaro-Vsux -- SOLD, '84 Z/28
Engine: 3.8L, 305 SBC
Transmission: 4L60E, T-5
Axle/Gears: 3.08s, 3.23s
Re: replacing heater core
+1 one on the radiator shop. Not only will you have an exact, original, fit and OEM quality, you can see first hand when they clean and pressure test it. I'll be doing mine soon and that's my plan. I am afraid of these replacements and the mountain of new garbage out there.
And thanks for the write up. Simple and to the point.
How do you reach the hose clamps?
And thanks for the write up. Simple and to the point.
How do you reach the hose clamps?
Joined: Feb 2017
Posts: 4,185
Likes: 576
From: Meriden, CT 06451
Car: 84 TA orig. 305 LG4 "H" E4ME
Engine: 334 SBC - stroked 305 M4ME Q-Jet
Transmission: upgraded 700R4 3200 stall
Axle/Gears: 10bolt 4.10 Posi w Lakewood TA Bars
Re: replacing heater core
You can almost guarantee a broken heater core by tugging and twisting the hoses on heater core when trying to remove them. I remove the hose clamp and slide a very small flat blade screwdriver between the tube and the hose. Then insert the straw on a can of WD-40 or silicone in the gap and give it a shot. That usually releases the hose. If it's really welded on, then cut the hose along the tube and carefully pry it open.
Thread Starter
Senior Member
Joined: Apr 2016
Posts: 733
Likes: 47
Car: 1991 base firebird
Engine: tbi 305
Transmission: 700r4
Re: replacing heater core
I didn't have any issue getting the hoses off. I went at them with a flat blade screwdriver right off and they popped right away. the more I look at the pics comparing the repop heater core to the original the more annoyed I get. look at the angle of the tubes. they aren't even close! what did they use as a templet when they designed this repop? the parts store says my new one is in but I'm too busy with work until tomorrow to go get it.
Thread Starter
Senior Member
Joined: Apr 2016
Posts: 733
Likes: 47
Car: 1991 base firebird
Engine: tbi 305
Transmission: 700r4
Re: replacing heater core
I got the new heater core. its a lot closer to the original. I asked the orileys to order 4 for me so I could compare them and pick the one that was closest. 3 showed up. one was worse than the first one I got, the second was the same as the first one that I got and broke, the third was beautiful. it was the same color, had the same shape and size , and the tubes were very similar. so that was a relief. when I went to install it I was still having issues. the heater core seemed to fit fine without being attached to the bracket. I was even able to set the heater core in place and the bracket in place and everything lined up perfect. however once I attached the heater core to the bracket my holes were off by 1/8 inch. took me a few minutes to figure that out. as it sits the heater core is back in place. I'm under the hood routing hoses now. I lost my light so I will finish tomorrow. my plan is to get the last hose hooked up and test the heat before I put the air box cover back on. I will be able to feel the heat to know its working and see the heater core to check for leaks. once I verify everything's working I will reassemble. this hasn't been a hard job. it was annoying that I couldn't get a direct fit heater core but other than that not too bad.
when I finish the job tomorrow I will edit the original post wit a few extra tips I have picked up. hope it will help in the future.
when I finish the job tomorrow I will edit the original post wit a few extra tips I have picked up. hope it will help in the future.
Last edited by Evilokc; Aug 5, 2017 at 10:39 PM.
Joined: Feb 2017
Posts: 4,185
Likes: 576
From: Meriden, CT 06451
Car: 84 TA orig. 305 LG4 "H" E4ME
Engine: 334 SBC - stroked 305 M4ME Q-Jet
Transmission: upgraded 700R4 3200 stall
Axle/Gears: 10bolt 4.10 Posi w Lakewood TA Bars
Re: replacing heater core
WOW. 3 different cores, same part numbers, 3 different configurations. WOW again.
Re: replacing heater core
Sounds like you got an older brass/lead heater core that managed to hide on a shelf somewhere. When parts stores change house branding, it's not unusual to rebox the existing inventory into the new brand's boxes. This is part of the reason every time I buy a pair of brake calipers, I get one in tasteful cast iron gray, and the other will be fit to hang from Mr T's neck in brite Gold. In fact, my last brake job the local Advance Auto gave me two different rotors, one gray and one gold caliper, and even a mismatched set of bearing seals.
Thread Starter
Senior Member
Joined: Apr 2016
Posts: 733
Likes: 47
Car: 1991 base firebird
Engine: tbi 305
Transmission: 700r4
Thread Starter
Senior Member
Joined: Apr 2016
Posts: 733
Likes: 47
Car: 1991 base firebird
Engine: tbi 305
Transmission: 700r4
Re: replacing heater core
Sounds like you got an older brass/lead heater core that managed to hide on a shelf somewhere. When parts stores change house branding, it's not unusual to rebox the existing inventory into the new brand's boxes. This is part of the reason every time I buy a pair of brake calipers, I get one in tasteful cast iron gray, and the other will be fit to hang from Mr T's neck in brite Gold. In fact, my last brake job the local Advance Auto gave me two different rotors, one gray and one gold caliper, and even a mismatched set of bearing seals.
Joined: Aug 2013
Posts: 4,845
Likes: 928
From: MICHIGAN
Car: 1988 Trans Am
Engine: L03
Transmission: 700R4
Axle/Gears: 10 Bolt 2.73 Open
Re: replacing heater core
the heater core seemed to fit fine without being attached to the bracket. I was even able to set the heater core in place and the bracket in place and everything lined up perfect. however once I attached the heater core to the bracket my holes were off by 1/8 inch. took me a few minutes to figure that out.
Thread Starter
Senior Member
Joined: Apr 2016
Posts: 733
Likes: 47
Car: 1991 base firebird
Engine: tbi 305
Transmission: 700r4
Re: replacing heater core
no. it wasnt a distortion issue. the new heater core tubes weren't sliding through the firewall far enough. no matter how I pushed I couldn't get it to seat. I finally pulled it back out and put some lubrication on the tubes and on the rubber grommets that go through the fire wall. I then had my lovely assistant wiggle and push from the cab while I grabbed the tubes from the engine side and pulled. it popped right in.
Last edited by Evilokc; Aug 6, 2017 at 10:34 PM.
Thread Starter
Senior Member
Joined: Apr 2016
Posts: 733
Likes: 47
Car: 1991 base firebird
Engine: tbi 305
Transmission: 700r4
Re: replacing heater core
finished my heater core today. once I figured out how the p.o had run the hoses to bypass the heater core I was able to run them correctly. I didn't even need new hoses. they had used the original hoses in the bypass. so that's good. now last week when I ordered the heater core I thought about ordering a new heater control valve. I figured mine was probably dry rotted after all this time without working. I didn't though. today when I got everything hooked up I started the car and the heater control valve was spewing fluid all over. went to the parts store and was shocked they had one in stock. hooked it up and let the car idle for a few minutes while I watched for leaks under the hood and under the dash (before I put the air box cover back on). no leaks. hit the heat and I HAD HEAT! I took it for a ride to let it get up to temp and tested the system. I had heat up in the defroster, dash vents, and in the floor. the floor did get heat but it didn't seem to have as much pressure as the dash and defrost. I used my meat thermometer to check the temp for heat and a/c. I read that new a/c should blow about 38 degrees and I didn't find what the optimum heat out put is bbut I'm pretty happy with 130.5 degrees for heat and 40.6 for the a/c. now on to the next thing.
Last edited by Evilokc; Aug 6, 2017 at 11:59 PM.
Joined: Feb 2017
Posts: 4,185
Likes: 576
From: Meriden, CT 06451
Car: 84 TA orig. 305 LG4 "H" E4ME
Engine: 334 SBC - stroked 305 M4ME Q-Jet
Transmission: upgraded 700R4 3200 stall
Axle/Gears: 10bolt 4.10 Posi w Lakewood TA Bars
Re: replacing heater core
Sounds great. Good job.
Member
Joined: Oct 2009
Posts: 369
Likes: 0
From: Washington-state
Car: '96 Camaro-Vsux -- SOLD, '84 Z/28
Engine: 3.8L, 305 SBC
Transmission: 4L60E, T-5
Axle/Gears: 3.08s, 3.23s
Re: replacing heater core
I got the new heater core. its a lot closer to the original. I asked the orileys to order 4 for me so I could compare them and pick the one that was closest. 3 showed up. one was worse than the first one I got, the second was the same as the first one that I got and broke, the third was beautiful. it was the same color, had the same shape and size , and the tubes were very similar. so that was a relief. when I went to install it I was still having issues. the heater core seemed to fit fine without being attached to the bracket. I was even able to set the heater core in place and the bracket in place and everything lined up perfect. however once I attached the heater core to the bracket my holes were off by 1/8 inch. took me a few minutes to figure that out. as it sits the heater core is back in place. I'm under the hood routing hoses now. I lost my light so I will finish tomorrow. my plan is to get the last hose hooked up and test the heat before I put the air box cover back on. I will be able to feel the heat to know its working and see the heater core to check for leaks. once I verify everything's working I will reassemble. this hasn't been a hard job. it was annoying that I couldn't get a direct fit heater core but other than that not too bad.
when I finish the job tomorrow I will edit the original post wit a few extra tips I have picked up. hope it will help in the future.
when I finish the job tomorrow I will edit the original post wit a few extra tips I have picked up. hope it will help in the future.
Member


Joined: Apr 2007
Posts: 342
Likes: 27
From: Cincinnati
Car: 1985 IROC-Z
Engine: L69
Transmission: T-5
Axle/Gears: 373 Limited Slip
Re: replacing heater core
I took the advise of one of the forum members here and am having my local radiator shope rebuild my original. Im not modifying my car to fit the so called "exact fit" aluminum ones out on the market. I ordered from Ecklers, and its on its way back to them.
Thread Starter
Senior Member
Joined: Apr 2016
Posts: 733
Likes: 47
Car: 1991 base firebird
Engine: tbi 305
Transmission: 700r4
Re: replacing heater core
I hear ya man. I was about there myself. I just lucked out with the heater core I got. I kept my original heater core just in case.

Member

Joined: Apr 2005
Posts: 249
Likes: 0
From: Ann Arbor MI
Car: '88 Trans Am
Engine: 305 TBI
Transmission: 700R4
Re: replacing heater core
I did this job over the weekend, and this write-up was extremely helpful! I have a few things to add...
--I got a heater core out of a Camaro at a junkyard. I didn't trust it enough to put it in my car, so instead I took it to a radiator shop and had them rebuild it. That way the old core could remain in the car until I had a new part to replace it w/. Cost about $140. When I got the new core, I heard something rattling, so I shook it until a couple pieces of solder came out and there were no more rattles. Definitely don't need that plugging up the new core!
--As far as the seat studs digging into your back, I put down 3 layers of cardboard on the floor. That's thick enough to keep u above the studs.
--There is 1 bolt on the bottom of the heater box, 2 on the side, and 1 on top. But there is also a bolt just to the left (towards the driver's side) of the bottom of the box. Removing it will give u a little extra room to maneuver the heater box cover in and out.
--I not only pulled the ECU down, I actually unplugged it and removed it. That provides more room and also keeps it away from the antifreeze that might leak when u pull the core out.
--Yes the bolt on top of the box sucks. I took a pic to try to simulate the position of your hand when u reach up to get it. U can see why u can only reach it w/ 2 fingers. I used the ratchet/extension in the pic and I was able to get a decent turn. It's all about finding the right length extension so that the ratchet can turn in the narrow space between the heater box and the firewall.
--I used Harbor Freight's finest hook tool (see pic) to help pull the heater hoses off the core. I was able to work it all the way around the hoses to break the heat seal.
--Lined up the old core w/ the replacement. It was damn close, but not quite perfect. Gave 1 of the tubes a very gentle and very minor tweak. The way everything lines up, there is virtually no room for any variation in the angles of the tubes.
--As I put the new core in the car, the larger tube kept catching on the grommet on the firewall. So I found about an 8" section of copper pipe for household plumbing. I had my no-so-lovely assistant (my dad) work under the hood so that he could put the copper pipe in the large tube. He was able to guide the tube thru the firewall while worked in the car.
--I had a little trouble w/ the heater core bracket catching on the rod for the blend door. U might want to trim the bracket in that spot to give yourself a little clearance.
--Getting the box back together also sucked. I used a 1/4" air ratchet -- that helped becuz I only had to worry about getting everything lined up and didn't have to worry about finding room to swing a ratchet. Unfortunately, I couldn't get the air ratchet in for the top bolt becuz the air hose connection made the ratchet too long. I taped the bolt to the socket and used the same setup as in the pic.
Member
Joined: Aug 2009
Posts: 384
Likes: 2
From: Escondido, Ca
Car: 1985 Trans Am
Engine: LG4
Transmission: 700R4
Axle/Gears: 3.08
Re: replacing heater core
Those of you who have been lucky enough to get your original heater cores rebuilt, count yourselves lucky. I took my original core to a couple of local radiator shops and they wouldn't even give a price quote. They said it wasn't worth the effort to rebuild. There is a shop that advertises online but they wanted close to $200 to rebuild. That's a lot of Spectra aluminum cores if you consider that price ($25). So, I went with the aluminum and the first one leaked. I took it back and got a replacement and that one is working fine for over a year now. Lesson learned on this job: the more times you have to change that heater core, the better you get and the faster it goes.
Thread Starter
Senior Member
Joined: Apr 2016
Posts: 733
Likes: 47
Car: 1991 base firebird
Engine: tbi 305
Transmission: 700r4
Re: replacing heater core
good work man. my heater core had been bypassed so I wasn't worried about any fluid in there. the job really isn't as bad as I felt it had been made out to be. its cold now and I'm glad I did it!
Member
Joined: Apr 2005
Posts: 249
Likes: 0
From: Ann Arbor MI
Car: '88 Trans Am
Engine: 305 TBI
Transmission: 700R4
Re: replacing heater core
It's certainly not a fun job, but in my experience, it was a lot easier than most cars when it comes to heater core swaps!
Supreme Member
iTrader: (2)
Joined: Sep 2006
Posts: 2,118
Likes: 15
From: Houston, TX
Car: 1989 GTA
Engine: SuperRam 350
Transmission: Pro Built S/S TH700R4
Axle/Gears: 3.27
Re: replacing heater core
I did this a few years ago. I know all about how troubling that top left bolt is. Even with those finger socket tools, it's a tight squeeze. I don't know why anybody would bother to put it back in. The heater core sees no movement and isn't going to fall out.
In my case, after wrestling with that one bolt for an eternity, I simply grabbed the cover and yanked on it and popped the corner where the bolt is off. So there is a tiny tear in the cover. But you'd never know it. Putting the 3 bolts instead of 4 back on was much faster.
I can't remember the brand I bought. Something from RockAuto. But I do remember the tubes could swivel. Trying to line up the tubes for the holes in the firewall by yourself is pretty much impossible. I had a friend stick a long screwdriver through the firewall holes and into the tubes. He would pry the tubes toward the holes while I finessed the heater core from the bottom.
Re: replacing heater core
On the 85-up Firebirds, just pop off the trim on the bottom of the dash, and look straight back and BAM! there's the top bolt. Long extension. Done in seconds. Camaros are still screwed, but Pontiacs have it made.
Joined: Oct 2005
Posts: 854
Likes: 107
From: KY
Car: 2 T-Tops
Engine: 327/305
Transmission: TH350/700R4
Axle/Gears: 3:42/2:73
Re: replacing heater core
Of course, I broke 3 aftermarket heater cores which looked absolutely nothing like the factory one and took every one of them back. Had a radiator shop fix mine, but didn't last long. Finally, came to my senses and found a guy on here parting out a low mile Formula and bought his. Been fine ever since and wouldn't you know it, fit like a glove!


Joined: Nov 2000
Posts: 1,420
Likes: 5
From: Byhalia MS, just south of memphis
Car: 89 Firebird
Engine: 6.0 LS
Transmission: T-56
Axle/Gears: 3.70
Re: replacing heater core
For me it isnt the top screw thats an issue, its ither getting the tongue in the groove on that box or the blend door arm that my heater core bracket gets hung on going back in. i never hear anyone mention that. i take a long screwdriver or pry bar (which ever is closest ATM) and slightly push it over.
When going in with the core i use a socket extension to guide the pipes into place and it slip right into place.
When going in with the core i use a socket extension to guide the pipes into place and it slip right into place.

Joined: Mar 2017
Posts: 4,255
Likes: 427
From: Portland, OR
Car: 86 Imponte Ruiner 450GT, 91 Formula
Engine: 350 Vortec, FIRST TPI, 325 RWHP
Transmission: 700R4 3000 stall.
Axle/Gears: 9 Bolt Torsen 3.70
Re: replacing heater core
Those of you who have been lucky enough to get your original heater cores rebuilt, count yourselves lucky. I took my original core to a couple of local radiator shops and they wouldn't even give a price quote. They said it wasn't worth the effort to rebuild. There is a shop that advertises online but they wanted close to $200 to rebuild.

Get used to it - the price of quality has gone way, WAY up. Because labor in America has skyrocketed.
Rick
Member
Joined: Apr 2005
Posts: 249
Likes: 0
From: Ann Arbor MI
Car: '88 Trans Am
Engine: 305 TBI
Transmission: 700R4
Re: replacing heater core
As I mentioned earlier in this post, I replaced my heater core in December 2017. As I also mentioned before, the new heater core had pieces of solder in it, so I wasn't so sure about the build quality. I drove the car this past summer, and started using the heat in late September when the weather got chilly. Didn't take long before the windows fogged up Thinking I hadn't cleaned the heater box well enough before I installed the new core, I pulled it and inspected the box for antifreeze. There was very little, and it appeared to have leaked out of the various foam pieces in the box. But while I had the core out, I figured I should get it tested anyway. Testing showed no leaks.
By this time it was winter so I was no longer driving the car, I was busy w/ the holidays, etc. So it sat in the garage for a couple of months. Then yesterday, I had some time to work on it. I looked in the heater box, and there was a little puddle of antifreeze! There wasn't a lot, but it was enough that it soaked a 1/2 piece of paper towel.
Any thoughts on where this antifreeze came from? The obvious answer is that it spilled when I pulled the core out, but I can't believe I wouldn't have noticed then and cleaned it up. I also considered that maybe it was soaked into the foam and has slowly dripped out. The foam does seem to have bit of a residue on it when I run my fingers over it. And if it is in the foam, how do I clean it out before I put the core back in?
Thinking I hadn't cleaned the heater box well enough before I installed the new core, I pulled it and inspected the box for antifreeze. There was very little, and it appeared to have leaked out of the various foam pieces in the box. But while I had the core out, I figured I should get it tested anyway. Testing showed no leaks.By this time it was winter so I was no longer driving the car, I was busy w/ the holidays, etc. So it sat in the garage for a couple of months. Then yesterday, I had some time to work on it. I looked in the heater box, and there was a little puddle of antifreeze! There wasn't a lot, but it was enough that it soaked a 1/2 piece of paper towel.
Any thoughts on where this antifreeze came from? The obvious answer is that it spilled when I pulled the core out, but I can't believe I wouldn't have noticed then and cleaned it up. I also considered that maybe it was soaked into the foam and has slowly dripped out. The foam does seem to have bit of a residue on it when I run my fingers over it. And if it is in the foam, how do I clean it out before I put the core back in?

Joined: Aug 2009
Posts: 1,972
Likes: 127
From: Los Angeles
Car: 1989 IROC Convertible
Engine: 350 TPI L98
Transmission: WC T5
Axle/Gears: 3.42
Re: replacing heater core
I just left that tough bolt out. Works fine.
If I had to do it again, I�d drill an access hole in the front dash and go in straight. Then use a black pop-cover. Ghetto but waaaay easier probably.
I made dang sure my hose connections were good. I had a similar experience. Previous owner had tried to replace core and it was leaking in the box. I took it out and had it tested, all good. I figured it was the hose connections. One of them was kinda loose. It�s been fine ever since. All the same parts.
Last edited by Tootie Pang; Jan 24, 2019 at 04:24 PM.
Joined: Oct 2001
Posts: 12,234
Likes: 1,166
From: Il
Car: 1989-92 FORMULA350 305 92 Hawkclone
Engine: 4++,350 & 305 CIs
Transmission: 700R4 4800 vig 18th700R4 t56 ZF6 T5
Axle/Gears: 3.70 9"ford alum chunk,dana44,9bolt
Re: replacing heater core
As I mentioned earlier in this post, I replaced my heater core in December 2017. As I also mentioned before, the new heater core had pieces of solder in it, so I wasn't so sure about the build quality. I drove the car this past summer, and started using the heat in late September when the weather got chilly. Didn't take long before the windows fogged up Thinking I hadn't cleaned the heater box well enough before I installed the new core, I pulled it and inspected the box for antifreeze. There was very little, and it appeared to have leaked out of the various foam pieces in the box. But while I had the core out, I figured I should get it tested anyway. Testing showed no leaks.
By this time it was winter so I was no longer driving the car, I was busy w/ the holidays, etc. So it sat in the garage for a couple of months. Then yesterday, I had some time to work on it. I looked in the heater box, and there was a little puddle of antifreeze! There wasn't a lot, but it was enough that it soaked a 1/2 piece of paper towel.
Any thoughts on where this antifreeze came from? The obvious answer is that it spilled when I pulled the core out, but I can't believe I wouldn't have noticed then and cleaned it up. I also considered that maybe it was soaked into the foam and has slowly dripped out. The foam does seem to have bit of a residue on it when I run my fingers over it. And if it is in the foam, how do I clean it out before I put the core back in?
Thinking I hadn't cleaned the heater box well enough before I installed the new core, I pulled it and inspected the box for antifreeze. There was very little, and it appeared to have leaked out of the various foam pieces in the box. But while I had the core out, I figured I should get it tested anyway. Testing showed no leaks.By this time it was winter so I was no longer driving the car, I was busy w/ the holidays, etc. So it sat in the garage for a couple of months. Then yesterday, I had some time to work on it. I looked in the heater box, and there was a little puddle of antifreeze! There wasn't a lot, but it was enough that it soaked a 1/2 piece of paper towel.
Any thoughts on where this antifreeze came from? The obvious answer is that it spilled when I pulled the core out, but I can't believe I wouldn't have noticed then and cleaned it up. I also considered that maybe it was soaked into the foam and has slowly dripped out. The foam does seem to have bit of a residue on it when I run my fingers over it. And if it is in the foam, how do I clean it out before I put the core back in?
Supreme Member

Joined: Jun 2012
Posts: 1,371
Likes: 196
From: Canada
Car: '18 Chev Camaro SS 1LE
Engine: LT1 6.2L
Transmission: T56
Axle/Gears: 3.91
Re: replacing heater core
well here we go. got the reproduction and it doesn't fit. the heater core itself is a tiny bit smaller. however the tubes don't sit at the exact same angle. you have to bend them. I put it in and took it out about 10 or 12 times trying to bend it to the right angle until it broke. so now I have an original that probably doesn't work and a brand new one that definitely leaks. I'm at a very annoying cross roads here. I took the broken new heater core and told them it wasn't a direct fit as advertised. they said it had been " re stickered" meaning there is a good chance it wasn't the brand it said it was. so they gave me my money back and ordered me a new one for tomorrow. worth a try I guess. there is a radiator shop on my way to work. I may see what they think about my original.
I inserted 2 rubber hoses inside the tubes and secured them with electrical tape. I used the rubber hose to guide the tubes into the firewall holes. By twisting my body in a crazy yoga fashion with a flashlight I was able to see where the holes were in relation to the tubes. A bit of bending on one of the tubes and the heater core went in. Since it was thinner than the original, securing it with OEM brackets would not leave enough tube length sticking out in the engine compartment. Furthermore, it would not fit properly on the plastic retainer. I ditched the OEM clips and used 1/2in self adhesive foam tape around the heater core. Once the heater core was in place sitting against the firewall, I install the plastic retainer (4 screws) which pushed against the self adhesive foam tape. The seal was perfect with just enough pressure. The fins were not obstructed. The heater core is not moving at all.I have also put some pieces of rubber hose between the bent tube and the core making sure it was not pressing against the fins. This is to prevent the tube from bending backward when installing the coolant hose. The whole installation seems to be way stronger than the OEM. The tubes are barely moving when pulled and jiggled with in the engine bay.
I did not struggle more than any other challenging jobs. Again thanks to the forums. I went straight with a 3/8 ratchet a lots of extensions for the famous top bolt. I did remove the dash pad and T-Top for better view and work space.
Only time will tell if this fix is sustainable. I kept the old heater core with the metal brackets just in case. Warranty is void as soon as a tube is bent.


Last edited by SbFormula; Jan 8, 2020 at 12:09 PM. Reason: Added pictures

Joined: Jan 2005
Posts: 1,409
Likes: 200
From: S. UTAH
Car: 1989 IROC-Z 305 LB9 AT Convertible
Engine: LB9 305
Transmission: AT
Re: replacing heater core
The automobile assembly process begins with a worker placing a heater core on the assembly line. Then the car is built around it.
Joined: Sep 2009
Posts: 3,776
Likes: 101
From: Spokane WA
Car: 92 Lingenfelter Z28 articwhite
Engine: Aluminum 615BBC
Transmission: Th400wbrake/curri entps9" locker
Axle/Gears: 4.11/4.30/4.56
Re: replacing heater core
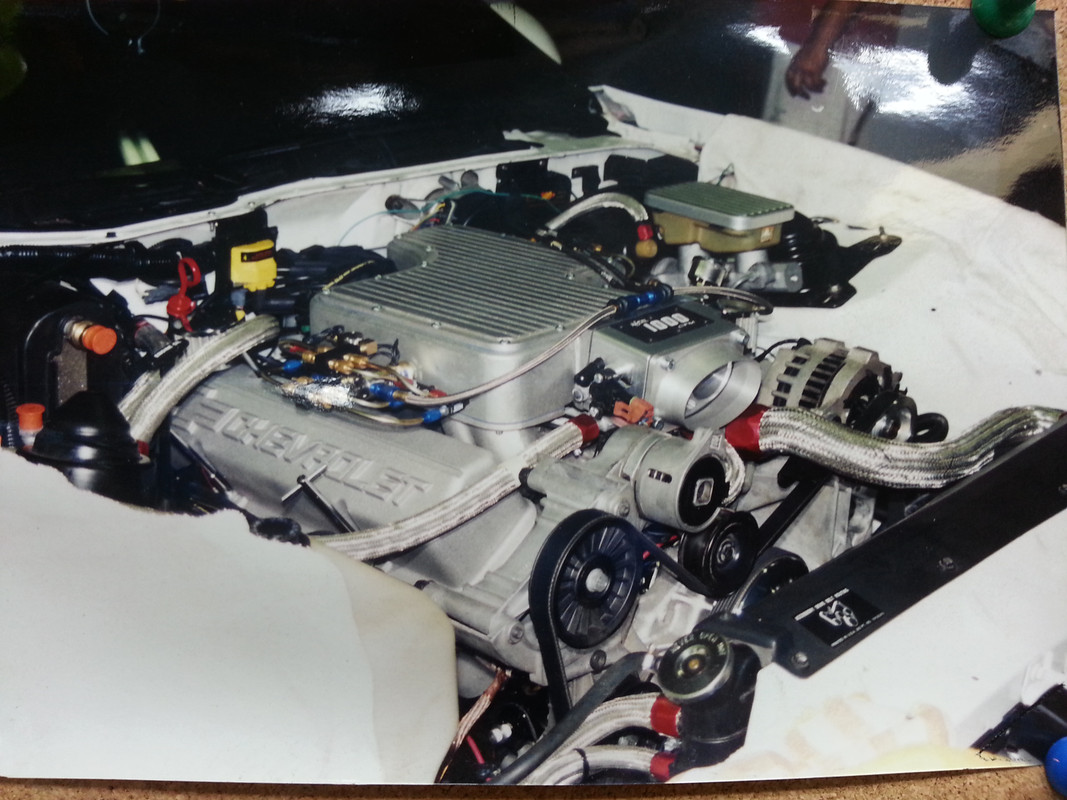
who has taken the Aluminum heater core and had AN fittings tigged to it..Im going to do this to a new unit. to use AN fittings. nothing wrong with my old unit (low miles) but wanted to not have to fight with the valve covers and heater hose using 90 deg AN fitting to keep them clear of the Valve covers..
will have the core tubes cut back. to just give the 90 deg fitting to clear and turn away/run down the fire wall.. (big block) doing this as I want to keep heat..
will have the core tubes cut back. to just give the 90 deg fitting to clear and turn away/run down the fire wall.. (big block) doing this as I want to keep heat..
On Probation
Joined: Apr 2007
Posts: 1,592
Likes: 18
From: Syracuse NY
Car: 84 Z-28
Engine: 305 HO
Transmission: r-700
Axle/Gears: 3:73
Re: replacing heater core
Why do that? Its makes it a even more a PIA than messing with the hoses.
Wanna challenge?
Try and chang or hook up the heater hoses to a 93 cadillac deville.
The camaro is a breeze compared to the caddy!
Wanna challenge?
Try and chang or hook up the heater hoses to a 93 cadillac deville.
The camaro is a breeze compared to the caddy!
Joined: Mar 2014
Posts: 4,557
Likes: 817
From: South Ms
Car: 89 Firebird
Engine: 355 TBI
Transmission: 700R4
Axle/Gears: 10 Bolt.Posi-3.73s
Re: replacing heater core
My heater core just took a dump and I bypassed it for now. Looks tough and 99% of my driving is in fair weather. I can deal with no heat but A/C is a must in Mississippi, sometimes even in the winter!
Joined: Sep 2009
Posts: 3,776
Likes: 101
From: Spokane WA
Car: 92 Lingenfelter Z28 articwhite
Engine: Aluminum 615BBC
Transmission: Th400wbrake/curri entps9" locker
Axle/Gears: 4.11/4.30/4.56
Re: replacing heater core
example
my car from the 90's notice the heater core hose laying over the Valve covers