
MAF problem/Question


Thread Starter
Member
iTrader: (1)
Joined: Oct 2003
Posts: 288
Likes: 0
From: South Carolina
Car: 1989 IROCZ
Engine: Rebuilt 350 TPI
Transmission: 700r4
Adjusted the TPS down to .48, but I adjusted it by lowering the idle control screw. Still getting the code 33 but the idle is nice and steady, fluctuates just a bit, but I was told it would because of the stock PROM with the new cam.
Moderator


Joined: Jan 2000
Posts: 19,679
Likes: 316
I mislead you earlier. The "33" is usually from a TPS voltage that is too LOW for a given MAF input/measurement. The ECM reads the MAF flow, and calculates that the flow is too great for the reported throttle opening at the measured engine RPM. At a lower TPS, the ECM will expect less (and tolerate less) intake air - A lower MAF reading. Conversely, at a higher TPS, the the ECM will expect more intake air (higher MAF reading). Raising the TPS and/or lowering the actual air intake flow should solve it. (I hadn't had my first pot of coffee just yet, sorry.)
Now, go back and set the Minimum Air Position of the throttle plates (the screw you just adjusted) to achieve as close to 500RPM in DRIVE with the IAC and EST bypassed (and IAC fully closed).
THEN you can reset the TPS to 0.54-0.58VDC. This will lower the actual intake air flow (MAF measurement) and still report to the ECM that the throttle is open the correct amount.
Moderator
Joined: Jan 2000
Posts: 19,679
Likes: 316
Since I've already made you do more work than necessary, this should make the process a little easier:
Throttle Minimum Air Position
Tools needed:
1. Torx driver # T-20
2. Paper Clip
3. Small Punch
4. Tachometer
GENERAL NOTE: The engine should be at normal operating temperature before performing any adjustments. Never rely on the dash mounted instruments for diagnostics and adjustments. The oil pressure and temperature gauges and the voltmeter and tachometer just aren't calibrated accurately enough for diagnosis, but are a relative indication for monitoring the vehicle while driving.
For this adjustment, the transmission will be in DRIVE while you're under the hood. You will need to securely set the parking brake and block the drive wheels. It would also be a good idea to have an assistant hold the service brake while you perform the adjustments.
In order to successfully complete the adjustment, the IAC air passages and pintle need to be clean. The throttle plates and bores need to be clean as well. If this is not the case, you'll need to remove the air cleaner from TBI engines or the intake air bellows from TPI engines to gain access to the area to be cleaned. A spray-type carburetor cleaner works well for this. Cleaning the IAC passages on a TPI/MAF engine will set a DTC, but we'll be clearing that later. With the engine idling, direct the spray cleaner in to the IAC air passages and around the throttle plates. Shut off the engine and continue cleaning the throttle plates by opening the throttle manually. Once everything is satisfactorily cleaned, replace the air bellows on TPI engines. Many times, this alone can solve IAC/idle speed problems.
If this doesn't solve the problem, you may need to remove and clean the IAC stepper motor. If the IAC appears to be clean and functioning properly, continue with the adjustment procedure.
- - - - - - - - - - - - - - - - - - - - - - - - - - - - - - - - - - - - - - - -
Idle Air Control Cleaning
You can remove the IAC and service it. Remove the electrical connector from the IAC. Unscrew the IAC unit from the throttle body.
You can gently rock the pintle back and forth and allow the spring to extend it until it comes apart in your hands. Clean everything with lint-free cloths and a mild solvent. Harsh solvents can affect the insulation of the stepper motor coils. It's generally the dirt and buildup on this worm shaft that causes sluggish IAC operation.
When the worm gear on the pintle shaft is clean and dry, apply one drop of clean light oil to the shaft and work the pintle back into the rack gears of the motor by the same rocking motion. It takes a while to get the pintle back into the worm gears, but you'll get it. It is important to get the pintle fully retracted into the housing so that the pintle is not forced against the gears when reinstalling the IAC unit in the throttle body.
While the IAC is out, clean the air passages in the throttle body. The orifice in the TB where the IAC resides is the seat that the IAC valve closes against, and it can accumulate a lot of carbon, dirt, and debris. The easy way to do this is with carburetor cleaner and a small stiff brush.
When everything is clean and dry, replace the gasket if it is damaged, apply a little anti-seize to the threads, and torque the IAC to the proper specs. (13 ft/lb for '85-'89 , 30 in/lb for 1990-on.) Proceed with setting the TPS and minimum air position.
- - - - - - - - - - - - - - - - - - - - - - - - - - - - - - - - - - - - - - - -
Locate the ALDL connector under the dash panel, in the driver's foot well area. Remove the plastic trim cover (if it is still there).
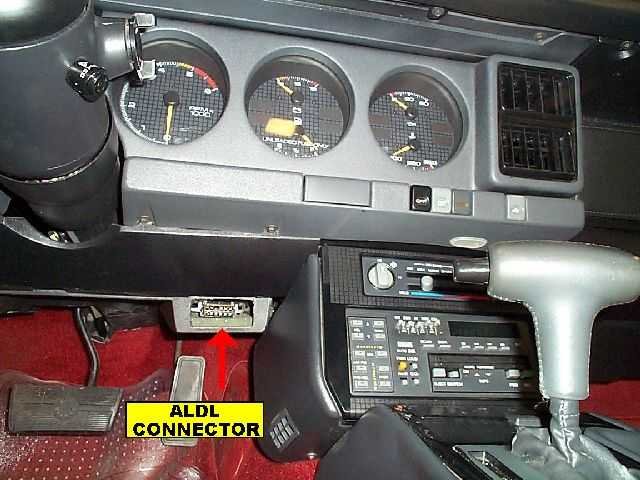
Cut and form a paper clip into a "U" shape. Insert the clip ends into the ALDL in the 'A' and 'B' sockets.
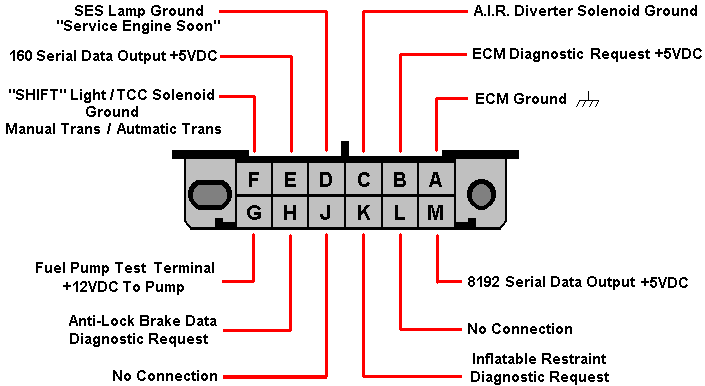
Turn on the ignition, but don't start the engine. This will force the ECM into its diagnostic mode. Wait 30 seconds to allow the IAC pintle to fully extend. Under the hood, remove the electrical connector from the IAC, then turn off the ignition and remove the paper clip jumper from the ALDL. With the IAC pintle fully extended (closed) all idle air will be controlled by the position of the throttle plates. Some manuals indicate that the EST bypass connector should be disconnected for this procedure, while some make no mention of it. While timing is a factor in idle speed, the EST should only operate as a function of engine RPM, temperature, and detonation sensor inputs. To remove all doubt, disconnect the EST bypass connector if your car is so equipped. Some TBI and V-6 engines do not have this bypass connector, and therefore must be set with no regard to the EST system. The EST can be bypassed on some cars by grounding the diagnostic terminal at the ALDL and continuing with the procedure, but the fuel mixture will be skewed to the rich side, affecting idle speed as well. In any event, the minimum air position idle speed range is wide enough to allow for some variations. As always, it is best to consult your service manual for the exact procedure for your system.
Locate the Torx screw on the left side of the throttle body. It may be equipped with a protective metal cap from the factory. This was intended to discourage adjustment. If the cap is present, use a small punch to knock it out. Once the screw is accessible, start the engine and place the transmission in DRIVE. Adjust the throttle stop to obtain 400 RPM with the transmission in "DRIVE" on an automatic transmission car, 450 in neutral on a manual transmission car, rotating the Torx screw clockwise to raise speed and counter-clockwise to lower speed. Once the idle RPM is set, place the transmission in PARK and turn off the engine.
Re-connect the electrical connector onto the IAC. Start engine. Idle speed should be governed by the ECM at approximately 600-650 rpm in "DRIVE" (for unmodified cars). Idle speed in NEUTRAL or PARK is less significant, and will be higher.
Throttle Position Sensor (TPS)
Tools needed:
1. Digital Volt-Ohm-Meter (VOM)
2. Breakout jumper wires or probes (make your own)
3. AutoXray, Diacom, or similar scanner will replace the VOM and jumper wires.
Turn on ignition, but don't start the engine.
With a diagnostic scanner: plug in the scanner and read the TPS voltage. It should be 0.54Volts +/- 0.07 VDC.
Connect the VOM to the TPS electrical connector terminals ‘A' and ‘B'.
With a breakout jumper: Disconnect the electrical connector from the TPS. Install the breakout in-line, between the TPS and wiring harness connector. Connect the meter probes to terminals 'A' and 'B' on the connector. (‘B' is the positive connection, ‘A' the signal ground, or negative.)
With probes: If you have very slender probes on your VOM, you can back-probe the TPS connector while it is attached to the TPS. If you have made probes of large dressmakers pins or a similar item, you can back-probe the connector as well. Connect the meter probes to terminals 'A' and 'B' on the connector.
Turn on the ignition to read the TPS output voltage at the idle position. The reading should be 0.54VDC +/- 0.07VDC. The ideal is the center of the range, 0.54VDC for a stock engine. To adjust the output voltage, loosen the two Torx screws holding the TPS to the throttle body, and slightly rotate the TPS up or down, reading the voltage until it comes into specification. Tighten screws. Using the throttle lever, rotate the throttle to WOT (wide open throttle). The TPS voltage should be over 4.0 volts. Close the throttle again, and then slowly open it to WOT, observing the voltage reading. It should increase progressively and in a linear fashion. If it sticks or jumps or falls off at all while doing this check, the TPS sensor may be failing and could be a cause of stumbling and driveability problems.
After achieving the desired setting, turn off the ignition switch. Remove all jumpers or the scanner and reconnect the TPS connector as required.
Reinitializing the ECM
If you set a DTC during the procedure, the SES light should be illuminated on the dash. This ECM retains DTC data for the previous 50 engine starts, so the codes will eventually be cleared. If you want more immediate results, after shutting down the engine disconnect the negative battery terminal for five minutes. This will clear the ECM of all diagnostic trouble codes. Clearing the ECM also clears any data learned about your engine, and clears the radio presets. If you have a Delco-Loc or Theft Loc II radio, make sure you follow the procedure to unlock the radio protection before disconnecting the battery. This five minutes is also just about long enough to clean both battery cables. Reconnect the battery. When you first start the engine after clearing the ECM, the engine will operate with base parameters programmed into the ECM PROM. These parameters may not be optimum for your engine, but the ECM will enter a Block Learn Mode soon after the engine is warm and enters Closed Loop Mode. The ECM will write new data tables specific to your engine and will eventually rely on those tables instead of the base tables of the factory program. You can expedite this process by driving the car for 20 minutes under varying conditions to allow the ECM to initialize. Or you can wait and drive the car normally at your convenience. The BLM tables are constantly being updated as sensor input ranges change, but the greatest change will occur within the first twenty minutes of Closed Loop operation.
Throttle Minimum Air Position
Tools needed:
1. Torx driver # T-20
2. Paper Clip
3. Small Punch
4. Tachometer
GENERAL NOTE: The engine should be at normal operating temperature before performing any adjustments. Never rely on the dash mounted instruments for diagnostics and adjustments. The oil pressure and temperature gauges and the voltmeter and tachometer just aren't calibrated accurately enough for diagnosis, but are a relative indication for monitoring the vehicle while driving.
For this adjustment, the transmission will be in DRIVE while you're under the hood. You will need to securely set the parking brake and block the drive wheels. It would also be a good idea to have an assistant hold the service brake while you perform the adjustments.
In order to successfully complete the adjustment, the IAC air passages and pintle need to be clean. The throttle plates and bores need to be clean as well. If this is not the case, you'll need to remove the air cleaner from TBI engines or the intake air bellows from TPI engines to gain access to the area to be cleaned. A spray-type carburetor cleaner works well for this. Cleaning the IAC passages on a TPI/MAF engine will set a DTC, but we'll be clearing that later. With the engine idling, direct the spray cleaner in to the IAC air passages and around the throttle plates. Shut off the engine and continue cleaning the throttle plates by opening the throttle manually. Once everything is satisfactorily cleaned, replace the air bellows on TPI engines. Many times, this alone can solve IAC/idle speed problems.
If this doesn't solve the problem, you may need to remove and clean the IAC stepper motor. If the IAC appears to be clean and functioning properly, continue with the adjustment procedure.
- - - - - - - - - - - - - - - - - - - - - - - - - - - - - - - - - - - - - - - -
Idle Air Control Cleaning
You can remove the IAC and service it. Remove the electrical connector from the IAC. Unscrew the IAC unit from the throttle body.
You can gently rock the pintle back and forth and allow the spring to extend it until it comes apart in your hands. Clean everything with lint-free cloths and a mild solvent. Harsh solvents can affect the insulation of the stepper motor coils. It's generally the dirt and buildup on this worm shaft that causes sluggish IAC operation.
When the worm gear on the pintle shaft is clean and dry, apply one drop of clean light oil to the shaft and work the pintle back into the rack gears of the motor by the same rocking motion. It takes a while to get the pintle back into the worm gears, but you'll get it. It is important to get the pintle fully retracted into the housing so that the pintle is not forced against the gears when reinstalling the IAC unit in the throttle body.
While the IAC is out, clean the air passages in the throttle body. The orifice in the TB where the IAC resides is the seat that the IAC valve closes against, and it can accumulate a lot of carbon, dirt, and debris. The easy way to do this is with carburetor cleaner and a small stiff brush.
When everything is clean and dry, replace the gasket if it is damaged, apply a little anti-seize to the threads, and torque the IAC to the proper specs. (13 ft/lb for '85-'89 , 30 in/lb for 1990-on.) Proceed with setting the TPS and minimum air position.
- - - - - - - - - - - - - - - - - - - - - - - - - - - - - - - - - - - - - - - -
Locate the ALDL connector under the dash panel, in the driver's foot well area. Remove the plastic trim cover (if it is still there).
Cut and form a paper clip into a "U" shape. Insert the clip ends into the ALDL in the 'A' and 'B' sockets.
Turn on the ignition, but don't start the engine. This will force the ECM into its diagnostic mode. Wait 30 seconds to allow the IAC pintle to fully extend. Under the hood, remove the electrical connector from the IAC, then turn off the ignition and remove the paper clip jumper from the ALDL. With the IAC pintle fully extended (closed) all idle air will be controlled by the position of the throttle plates. Some manuals indicate that the EST bypass connector should be disconnected for this procedure, while some make no mention of it. While timing is a factor in idle speed, the EST should only operate as a function of engine RPM, temperature, and detonation sensor inputs. To remove all doubt, disconnect the EST bypass connector if your car is so equipped. Some TBI and V-6 engines do not have this bypass connector, and therefore must be set with no regard to the EST system. The EST can be bypassed on some cars by grounding the diagnostic terminal at the ALDL and continuing with the procedure, but the fuel mixture will be skewed to the rich side, affecting idle speed as well. In any event, the minimum air position idle speed range is wide enough to allow for some variations. As always, it is best to consult your service manual for the exact procedure for your system.
Locate the Torx screw on the left side of the throttle body. It may be equipped with a protective metal cap from the factory. This was intended to discourage adjustment. If the cap is present, use a small punch to knock it out. Once the screw is accessible, start the engine and place the transmission in DRIVE. Adjust the throttle stop to obtain 400 RPM with the transmission in "DRIVE" on an automatic transmission car, 450 in neutral on a manual transmission car, rotating the Torx screw clockwise to raise speed and counter-clockwise to lower speed. Once the idle RPM is set, place the transmission in PARK and turn off the engine.
Re-connect the electrical connector onto the IAC. Start engine. Idle speed should be governed by the ECM at approximately 600-650 rpm in "DRIVE" (for unmodified cars). Idle speed in NEUTRAL or PARK is less significant, and will be higher.
Throttle Position Sensor (TPS)
Tools needed:
1. Digital Volt-Ohm-Meter (VOM)
2. Breakout jumper wires or probes (make your own)
3. AutoXray, Diacom, or similar scanner will replace the VOM and jumper wires.
Turn on ignition, but don't start the engine.
With a diagnostic scanner: plug in the scanner and read the TPS voltage. It should be 0.54Volts +/- 0.07 VDC.
Connect the VOM to the TPS electrical connector terminals ‘A' and ‘B'.
With a breakout jumper: Disconnect the electrical connector from the TPS. Install the breakout in-line, between the TPS and wiring harness connector. Connect the meter probes to terminals 'A' and 'B' on the connector. (‘B' is the positive connection, ‘A' the signal ground, or negative.)
With probes: If you have very slender probes on your VOM, you can back-probe the TPS connector while it is attached to the TPS. If you have made probes of large dressmakers pins or a similar item, you can back-probe the connector as well. Connect the meter probes to terminals 'A' and 'B' on the connector.
Turn on the ignition to read the TPS output voltage at the idle position. The reading should be 0.54VDC +/- 0.07VDC. The ideal is the center of the range, 0.54VDC for a stock engine. To adjust the output voltage, loosen the two Torx screws holding the TPS to the throttle body, and slightly rotate the TPS up or down, reading the voltage until it comes into specification. Tighten screws. Using the throttle lever, rotate the throttle to WOT (wide open throttle). The TPS voltage should be over 4.0 volts. Close the throttle again, and then slowly open it to WOT, observing the voltage reading. It should increase progressively and in a linear fashion. If it sticks or jumps or falls off at all while doing this check, the TPS sensor may be failing and could be a cause of stumbling and driveability problems.
After achieving the desired setting, turn off the ignition switch. Remove all jumpers or the scanner and reconnect the TPS connector as required.
Reinitializing the ECM
If you set a DTC during the procedure, the SES light should be illuminated on the dash. This ECM retains DTC data for the previous 50 engine starts, so the codes will eventually be cleared. If you want more immediate results, after shutting down the engine disconnect the negative battery terminal for five minutes. This will clear the ECM of all diagnostic trouble codes. Clearing the ECM also clears any data learned about your engine, and clears the radio presets. If you have a Delco-Loc or Theft Loc II radio, make sure you follow the procedure to unlock the radio protection before disconnecting the battery. This five minutes is also just about long enough to clean both battery cables. Reconnect the battery. When you first start the engine after clearing the ECM, the engine will operate with base parameters programmed into the ECM PROM. These parameters may not be optimum for your engine, but the ECM will enter a Block Learn Mode soon after the engine is warm and enters Closed Loop Mode. The ECM will write new data tables specific to your engine and will eventually rely on those tables instead of the base tables of the factory program. You can expedite this process by driving the car for 20 minutes under varying conditions to allow the ECM to initialize. Or you can wait and drive the car normally at your convenience. The BLM tables are constantly being updated as sensor input ranges change, but the greatest change will occur within the first twenty minutes of Closed Loop operation.
Last edited by Vader; Mar 31, 2018 at 11:31 AM. Reason: Updated links
Thread Starter
Member
iTrader: (1)
Joined: Oct 2003
Posts: 288
Likes: 0
From: South Carolina
Car: 1989 IROCZ
Engine: Rebuilt 350 TPI
Transmission: 700r4
Ok, took out the IAC, it was clean(still new), re-seated it and followed the procedures, was very hard to get the car to idle at 400 RPM, with or without the EST bypass disconnected. So when it was barely idling around 400, I left the minimum air at that. Set the TPS to .54 (jumped up a full .1 during the min air setting). Idles around 700-ish in drive, 1200-ish in park, still poppin a code 33  (reset all codes after setting min air and TPS)
(reset all codes after setting min air and TPS) Thread Starter
Member
iTrader: (1)
Joined: Oct 2003
Posts: 288
Likes: 0
From: South Carolina
Car: 1989 IROCZ
Engine: Rebuilt 350 TPI
Transmission: 700r4
Extra question: How safe is it to drive with a code 33 hanging around? I really need to get my Y pipe made for the exhaust and would like to take it to the shop tomorrow to get it done. Dont want to endanger my car anymore than I have too though. THanks!
Thread Starter
Member
iTrader: (1)
Joined: Oct 2003
Posts: 288
Likes: 0
From: South Carolina
Car: 1989 IROCZ
Engine: Rebuilt 350 TPI
Transmission: 700r4
I actually wont take it tomorrow, I drove it down the road a few miles to get some air in a tire that was low, it drove fine, good brakes, etc. When I was going to leave, it had a real high idle, 2000 or maybe a smidge higher. I went ahead and drove it home, what was weird, when I would start to slow down, if I hit the brake, the idle would go back down a bit, and more as I hit the brakes more (which was essentially letting the vacuum out of the resevoir). So im assuming I should start trying to find out why im losing/holding too much vaccuum? Could an intake manifold leak cause this? Can I just put freakin RTV all over the edges? lol! Sure seems like a leak, it got dark on me, im going to spray around the intake with carb cleaner in the morning ( I get real hesitant around flammables for some reason, kinda quirky about spraying it on my engine and whatnot).
Thread Starter
Member
iTrader: (1)
Joined: Oct 2003
Posts: 288
Likes: 0
From: South Carolina
Car: 1989 IROCZ
Engine: Rebuilt 350 TPI
Transmission: 700r4
Ok, put the brake hose back on the stock way, idles around 1100, bit choppy, but I expect that is the Camshaft, STILL getting the code 33. Sprayed the carb cleaner around the manifold, no change in idle, so no leaks. Im stuck otherwise, my test light isnt working, going to get a new bulb today and follow the code 33 flowchart thats around here somewhere. I just dont know how to jump the fuel pump relay to 12V, dont really know what that does anyway, so Ill just skip that step and go from there. Oi.

Supreme Member
Joined: Feb 2005
Posts: 1,034
Likes: 0
From: Fort Lauderdale, FL
Car: 91 Camaro RS
Engine: 305 TBI
Transmission: 700R4
Axle/Gears: 2.73 Posi w/Disc
To hotwire the fuel pump relay:
Look at the first post Vader gave up at the top (I think it's the third post down). The wire going from the fuel pump relay to the ALDL terminal G is a fuel pump prime circuit. If you apply +12VDC to this line with the key on or not, the fuel pump in the tank should come on. Note that on my 305 TBI engine, there is no terminal G on the ALDL connector. I had to go to the relay directly and find the wire. It was either orange or red -- I don't remember which one, but if you pull the relay and look at it's base, the terminal IDs will be printed into the plastic relay carrier. Each terminal (A, B, C, D & E) should be marked. Just find D and run a jumper from there to the battery + (after the relay is replaced into it's socket, of course.)
Applying +12VDC to this line will cause the fuel pump to operate.
Last edited by PhLaXuS; Jul 6, 2005 at 07:19 PM.
Thread Starter
Member
iTrader: (1)
Joined: Oct 2003
Posts: 288
Likes: 0
From: South Carolina
Car: 1989 IROCZ
Engine: Rebuilt 350 TPI
Transmission: 700r4
thats what I was thinking, is the only purpose of jumping to pin "G" to turn the fuel pump on? So if I turn the key on and the fuel pump turns on, that would be good?
Moderator
Joined: Jan 2000
Posts: 19,679
Likes: 316
Applying a +12VDC source to the 'G' terminal on the ALDL will only power the fuel pump through the normally closed contacts of the FP power relay. Because of this, the relay must be installed, the relay contacts must be good, and the relay must be turned off. Therefore, it can only be used to test run the pump with the ignition off. Turning the ignition on will power the FP relay and break the N.C. contacts. The 'G' terminal is only present for diagnostic use.

Thread Starter
Member
iTrader: (1)
Joined: Oct 2003
Posts: 288
Likes: 0
From: South Carolina
Car: 1989 IROCZ
Engine: Rebuilt 350 TPI
Transmission: 700r4
Ok, I got a vacuum testing kit from AA yesterday, the one with the hand pump. Started checking lines today, basically plug it in, pump it up, see if it holds vacuum. Least thats my basic thinking on how it works. The L connector coming off the vac line at the TB is leaking, holds no vacuum( but the line held when I took the connector off and put my finger over it). The other checked out, except for the one part going into the back end of the plenum, I want to say you or someone said it was a check valve? But it holds no vacuum at all, could this be my problem? Ill include a picture of the part, thanks for the help!

Moderator
Joined: Jan 2000
Posts: 19,679
Likes: 316
I got a vacuum testing kit from AA yesterday
Nonetheless, that is a vacuum check, although not the one that concerned me. I was more curious about the large check valve at the brake booster and vacuum reservoir.
Thread Starter
Member
iTrader: (1)
Joined: Oct 2003
Posts: 288
Likes: 0
From: South Carolina
Car: 1989 IROCZ
Engine: Rebuilt 350 TPI
Transmission: 700r4
Hehe, well some of the guys at advance auto do look like they should be in AA. I can do a check on the brake booster, I unhooked the vacuum canister/resevoir after that last deal I had with it.
Thread Starter
Member
iTrader: (1)
Joined: Oct 2003
Posts: 288
Likes: 0
From: South Carolina
Car: 1989 IROCZ
Engine: Rebuilt 350 TPI
Transmission: 700r4
Ok, Checked the valve going into the brake booster from the hose itself. Held good vacuum, about 17 or so, in?
Checked the check valve going into the vacuum canister, it also held, had to pump awhile to get enough vaccum in the canister to register, but it held good. Other than that im lost, the parts store didnt have the L connector, they said I could use an old spark plug boot, but I dont have any laying around. Now if Im checking a hose going INTO the plenum, or manifold, will I read any vacuum? I checked the PCV and the hose going from the brake booster and had no vacuum.
Im tryin to figure this out lol, thanks for the help! what next though?
Thread Starter
Member
iTrader: (1)
Joined: Oct 2003
Posts: 288
Likes: 0
From: South Carolina
Car: 1989 IROCZ
Engine: Rebuilt 350 TPI
Transmission: 700r4
well I used an old spark plug boot for an L connector at the TB, no change. It still idles up and then settles down around 1000 RPMs for idle. Would an electrical problem cause this at all, or should I keep trying to find a vacuum problem?
Thread Starter
Member
iTrader: (1)
Joined: Oct 2003
Posts: 288
Likes: 0
From: South Carolina
Car: 1989 IROCZ
Engine: Rebuilt 350 TPI
Transmission: 700r4
That would throw me off pretty bad lol! All I know is its a code 33, when the car first starts up, it revs up, idles back down, revs up, idles back down (prolly 3-5 times) and then settles in around 1100 and the code pops. I would assume that means a vacuum leak, but not sure how to check the lines going into the plenum, and could any vac line problems inside the car possible affect this? Just trying to find the next point to check, really wanna get it on the road. Thanks for all the help and ideas!
Thread Starter
Member
iTrader: (1)
Joined: Oct 2003
Posts: 288
Likes: 0
From: South Carolina
Car: 1989 IROCZ
Engine: Rebuilt 350 TPI
Transmission: 700r4
Well ive decided to concede defeat and limp it to the exhaust shop and from there to a mechanic that comes highly recommended. Hopefully he can fix it and I can be back on the road. Ill post back what the problem turns out to be.
Thread Starter
Member
iTrader: (1)
Joined: Oct 2003
Posts: 288
Likes: 0
From: South Carolina
Car: 1989 IROCZ
Engine: Rebuilt 350 TPI
Transmission: 700r4
One last question(s) before I take it in next week, please answer! (anyone).
Does the EGR have a gasket?
If it does, then I dont have one on, which brings me to the next question.
Would lack of a gasket on the EGR cause a vac leak and would it/could it pop a code 33?
THanks!
Does the EGR have a gasket?
If it does, then I dont have one on, which brings me to the next question.
Would lack of a gasket on the EGR cause a vac leak and would it/could it pop a code 33?
THanks!
Supreme Member
Joined: Feb 2005
Posts: 1,034
Likes: 0
From: Fort Lauderdale, FL
Car: 91 Camaro RS
Engine: 305 TBI
Transmission: 700R4
Axle/Gears: 2.73 Posi w/Disc
Indeed! The EGR should have a metallic gasket. This should come with the replacement valve or it can be purchased by itself for only a few dollars at most auto stores. Hmmm...not really certain off the top of my head if it could cause the code 33. Worth a shot since the gasket should be less than $5.
Thread Starter
Member
iTrader: (1)
Joined: Oct 2003
Posts: 288
Likes: 0
From: South Carolina
Car: 1989 IROCZ
Engine: Rebuilt 350 TPI
Transmission: 700r4
Ok, replaced the EGR gasket, the car started and I didnt get a fault for at least 2 min before I shut the car off. So I went to teach it how to idle and got a code, code 33 still. I checked the TPS and it was a bit off, so I readjusted it, cleared the code and restarted. It idled at 2000RPMs and after about 30 seconds dropped down to 1500, then after about another 30 seconds it went back up to 2000 and climbed to about 2700 before I shut it off. What could make the car do this? I can't take it to get it looked at unless I have the exhaust on, I can't get it to the exhaust shop if its idling real high like this, basically undriveable. Please help!
Supreme Member
Joined: Feb 2005
Posts: 1,034
Likes: 0
From: Fort Lauderdale, FL
Car: 91 Camaro RS
Engine: 305 TBI
Transmission: 700R4
Axle/Gears: 2.73 Posi w/Disc
I don't know if this is true because my TBI engine doesn't learn idle, but I've heard that you're supposed to idle the engine for ~20 minutes to allow the ECM to fully learn.
Thread Starter
Member
iTrader: (1)
Joined: Oct 2003
Posts: 288
Likes: 0
From: South Carolina
Car: 1989 IROCZ
Engine: Rebuilt 350 TPI
Transmission: 700r4
well, I talked to a friend about a year ago that use to be a GM mechanic and he gave me that tip. What it is, you put the car in nuetral and start it, once its started you put it in drive and let it sit for roughly 5 minutes and the computer would teach itself to idle. Basically the same as driving, he told me you would still have to drive around for the computer to learn everything else though.
Thread Starter
Member
iTrader: (1)
Joined: Oct 2003
Posts: 288
Likes: 0
From: South Carolina
Car: 1989 IROCZ
Engine: Rebuilt 350 TPI
Transmission: 700r4
Update: I replaced the runner gaskets today and Im getting no faults at all, even took it for a drive, WOW! Really drives awesome now, still tends to Idle a tad high and my brakes are still very hard, not soft and spongy and its hard to stop the car. Dunno what that deal is honestly, but I got no faults, so thats good, Im going to hook the vacuum canister back up and see how that goes.
Thread Starter
Member
iTrader: (1)
Joined: Oct 2003
Posts: 288
Likes: 0
From: South Carolina
Car: 1989 IROCZ
Engine: Rebuilt 350 TPI
Transmission: 700r4
Additional, I freakin forgot to hook up the brake booster to the back of the plenum, I hook it up and get the code 33 automatically. Does this mean my brake booster could be bad? Would it cause the code? Im going to replace the hose real quick and see if it changes, I did it before with no change, but ill give it another shot. Thoughts?
Moderator
Joined: Jan 2000
Posts: 19,679
Likes: 316
Possibly a failed brake booster. Does it retain vacuum after the engine is shut off? You can usually idle the engine to build vacuum, shut it off, then slowly remove the brake vacuum check valve from the booster reservoir and listen for air rushing in. If there is vacuum in the reservoir, you should hear air movement.
Thread Starter
Member
iTrader: (1)
Joined: Oct 2003
Posts: 288
Likes: 0
From: South Carolina
Car: 1989 IROCZ
Engine: Rebuilt 350 TPI
Transmission: 700r4
Ok, I decided to check the check valve at the booster, when I pulled it out, there was air rushing out. I put the check valve from the Vacuum canister in, started it up, ran fine, no faults. However when I went to drive it, about 500 or so feet I would have real good power brakes, then it would fault and I would have no brakes, or no power assist rather. Put the old check valve back in and got the same problem, faults out after about 500 or so feet, but good brake vacuum until then. Now im getting a code 34 again, no code 33, but it did this before, gave me the 34 for a long time then switched to the 33. Any thoughts? thanks for the help!
EDIT: When I pulled each check valve from the booster, there was air coming out, but not alot, don't know if that helps any.
EDIT: When I pulled each check valve from the booster, there was air coming out, but not alot, don't know if that helps any.
Thread Starter
Member
iTrader: (1)
Joined: Oct 2003
Posts: 288
Likes: 0
From: South Carolina
Car: 1989 IROCZ
Engine: Rebuilt 350 TPI
Transmission: 700r4
Sorry been so long, fried my computer last week. So I replaced the power brake booster and it ran great, gave me no faults for 20 min then the code 33 popped back up. It comes on every time still, only its not instant, usually takes about 30 seconds to pop up. I did get the exhaust put on, it runs fine, brakes good, you can feel a slight surge when your barely hitting the gas. I took a hose and poked around the engine since I can finally hear in there, other than an exhaust leak (!!oi!!) I could hear some hissing at the MAF connector (front side) So, could this be the problem? or since I replaced the power brake booster and it worked for a good 20 min, do you think it could possibly be the connection between the master cylinder and the brake booster? Thanks!

Thread Starter
Member
iTrader: (1)
Joined: Oct 2003
Posts: 288
Likes: 0
From: South Carolina
Car: 1989 IROCZ
Engine: Rebuilt 350 TPI
Transmission: 700r4
Intake Runner gaskets, the runners are the small curved pieces that go between the plenum and the intake. I did drive my car for a good bit today, not out of choice, my wife drives a ford!!(CRAP!) and I broke a bolt off in the thermostat housing. So it drives great, but I get just a little surge when my foot is barely on the gas, other than that its fine, any ideas?! Thanks!
Thread Starter
Member
iTrader: (1)
Joined: Oct 2003
Posts: 288
Likes: 0
From: South Carolina
Car: 1989 IROCZ
Engine: Rebuilt 350 TPI
Transmission: 700r4
This is weird, fault went away last night, drove it today with no fault, checked the plug at the MAF and it was a tad crooked, plugged it back in fully and it faulted out, so Im assuming my connection isnt great at the plug. I pick up a new one tomorrow from the dealership, we'll see how that goes, just an update, think im close to fixing it! 
Thread Starter
Member
iTrader: (1)
Joined: Oct 2003
Posts: 288
Likes: 0
From: South Carolina
Car: 1989 IROCZ
Engine: Rebuilt 350 TPI
Transmission: 700r4
Think I have figured it out, the MAF plug keeps vibrating out and losing the connection, which is because the clip is broken. It runs fine, great when its plugged in, the SES light goes out. After awhile it comes back when the plug gets loose and the car runs like crap. So im getting a new plug which should be the final end of my problem! Just wanna give a big thanks to Vader for tolerating my numerous posts and hopefully I can take what ive learned and help other thirdgenners. Thanks again!
Supreme Member
Joined: Feb 2005
Posts: 1,034
Likes: 0
From: Fort Lauderdale, FL
Car: 91 Camaro RS
Engine: 305 TBI
Transmission: 700R4
Axle/Gears: 2.73 Posi w/Disc
Intermittent problems are always the hardest to find. It's been months & I still haven't had the time to find out where my false knock is coming from. I replaced the sensor and ran a second ground to the ESC module. I think instead of wasting more time running temporary jumpers all over the place, I'm gonna start by replacing the ESC.
Here's to swearing at your car!
Here's to swearing at your car!
Thread Starter
Member
iTrader: (1)
Joined: Oct 2003
Posts: 288
Likes: 0
From: South Carolina
Car: 1989 IROCZ
Engine: Rebuilt 350 TPI
Transmission: 700r4
Actually it seems to not be fixed. Yesterday the SES light came on and no matter how I adjusted the plug it wouldnt go out, on the way to taking my wife to work the car started jumping and surging on me real bad and when I hit the gas, I got no response, I had to floor it to get it to do anything. When I got it home, it threw a code 33, 34 and 36, so I replaced the burn off relay. Still doing the jumpy problem, I had taped the plug to the MAF(quick fix idea) and once I undid the tape and plugged it ran fine, but went to pull it out and it started jumping and surging again. So I started it up again and it was runing smooth and I tapped the MAF and it started jumping and surging then it would quit. Then I tapped it again and got nothing, but every few taps it would jump and surge on me, so would this point to a bad MAF?
Thread Starter
Member
iTrader: (1)
Joined: Oct 2003
Posts: 288
Likes: 0
From: South Carolina
Car: 1989 IROCZ
Engine: Rebuilt 350 TPI
Transmission: 700r4
Ok, it ended up being both relays and the MAF, the new one was D.O.A. Been drivin it for a few days now, drives wonderful, no problems at all, now I can move onto other parts of the car, thanks again for the help!
Thread Starter
Member
iTrader: (1)
Joined: Oct 2003
Posts: 288
Likes: 0
From: South Carolina
Car: 1989 IROCZ
Engine: Rebuilt 350 TPI
Transmission: 700r4
Ok, I was wrong, this morning it started surging real bad on me and I parked it and went to class, when I came back out it drove fine for about 20 min and then started surging really bad again. It pulls a code 33, I think the MAF is bad again. Both relays are good, they are new anyways. My plug going into the MAF is loose, is there any way the plug being loose could short the MAF out? or anything else that could make the MAF go bad? I just hate to think that I got another bad MAF. Please help! Thanks!

Junior Member
Joined: Jul 2004
Posts: 7
Likes: 0
Car: 88 GTA, 83 Trans Am
Engine: 350 TPI, 305 Carb
Transmission: 700R4, TH350
Is this a NEW maf or a salvage yard part? Not trying to be snide or anything, just making sure 
My idea of NEW sometimes includes new-to-me...LOL
My idea of NEW sometimes includes new-to-me...LOL

Junior Member
Joined: Mar 2010
Posts: 20
Likes: 1
From: Scenic, Idaho
Car: 1985 CAMARO IROC-Z
Engine: 305 TPI
Transmission: 700R4
Re: MAF problem/Question
WOW I just read this entire thread...
For anybody that really likes 3rd Gen F-bodies--- this should be "a briefing" required to be read before you buy one of these cars--- DAMN!
Did this guy ever get his camaro fixed? What a pain in the yeah!
I mean, I love my IROC and all, its a fun car to drive, when it runs right--- but as soon as one little problem happens--- GOOD NIGHT!!! What a frickin nightmare. I'm seriously considering taking a month and gutting the entire car of all its stock wiring, gut the engine bay completely, and put a a carbed v8 in there, with the same 4 pin wire harness that I used on my hot rod (which btw I've never had any problems with since I built it 10 years ago) --------------- I mean TPI 350's are OVER RATED! Fuel injection is nice and all, but when it comes to reliability--- seriously, what can you do with a car that is 25 years old, and in general its just worn out. and My IROC only has 108,000 miles on it--- black/gold limited edition in great shape.
Currently I'm having the code 34 issue, I put a new computer in and swapped a few relays--- and if I change out that MAF sensor and the problem doesn't go away, I am considering some serious alternatives.
----

Thread
Thread Starter
Forum
Replies
Last Post
BumpaD82
Tech / General Engine
37
Feb 26, 2016 02:57 PM
[For Sale] 4" Spectre MAF Housing/LS7 MAF/Coupler
Ikes 91Z
LSX and LTX Parts
0
Sep 13, 2015 09:03 AM