When you click on links to various merchants on this site and make a purchase, this can result in this site earning a commission. Affiliate programs and affiliations include, but are not limited to, the eBay Partner Network.
Ok, before you judge, and say that there have been a thousand threads on this, i have a bit of new information.
i decided to get a 4th gen coolant overflow tank for my car, and instead of properly planning, i kinda rushed into it and started cutting.
well, after lots of frustration using the wrong tools to cut and not measuring properly, i decided to start over.
since my battery tray was already rusty, i figured that the easiest way to remedy the situation, while erasing all evidence of my previous attempt, was to cut out the old battery tray, put in a new one, and cut a hole in that one BEFORE i welded it in.
i took some measurements of the tank, and realized that it is almost exactly symmetrical along its center line... it isnt exactly, but its close enough.
i then transfered those measurements to AutoCAD (i am a part time draftsman/autocad man) and made myself a cutting template.
i then printed the template out on a 1:1 scale and tested it over the tank...
BINGO
it fit perfectly
now it is a simple matter of laying the template over the metal, cutting it out, welding in the new battery tray, and calling it done!
i am still in the process of getting the new battery tray, but i will attach a picture of the template.
you will see a box with a shape inside.
if you scale the box so that it is 8.5" x 11" (standard paper size) the inside shape should be exactly what you need to cut out
i can also try and attach the .dwg file for the template if anyone might find that more helpful.
Last edited by RED_DRAGON_85; May 6, 2010 at 02:29 PM.
Reason: attachments DUR
interesting, post pictures of the steps you've taken or are planning on taking... I think there is one or two other threads, but I think they were more along the lines of hack jobs... ...
well as you can see, the template fits over the reservoir perfectly...
i'd rather not show my hack job... its pretty bad lol. but ill show the steps of the "correct" way to do it
Not sure of what I'm seeing there. I suppose it might make sense if I had a 4th gen tank to compare it to, but I don't. And prefer to see what I'm working on, before I go buying stuff & start cutting.
i could not open your file . would like to see your template . i have done 4th gen coolant tank before . its always been cut a little , try fit , cut some more , try fit . job would be easy with a template to follow . it does clean up engine bay great . good luck .
Not sure of what I'm seeing there. I suppose it might make sense if I had a 4th gen tank to compare it to, but I don't. And prefer to see what I'm working on, before I go buying stuff & start cutting.
I think that's the template to the reservoir's neck/cap... that's the way it's molded...
if you have ever seen a fourth gen tank, it would make sense.
basically, the fourth gen tank is 2 pieces in one.
its a battery tray AND a coolant reservoir.
the battery sits on the battery tray part, which sits on the battery tray, just how our battery tray is.
the coolant tank goes through a hole in the battery tray. which is why you need a hole.
i made a template for the hole.
nobody else has seemed to take the initiative to do it, so it was mostly a guess and cut method.
now, you print out the template, lay it over, and cut it out... couldnt be easier
I've seen the battery tray ones & that template still doesn't make sense to me.
What else I have seen, are long narrow ones that can be put down in front of the radiator. And since Firebirds have the metal plate around the hood latch, only a small hole is cut for the neck & the rest is hidden. Nothing to do with the battery in any way.
in the first pic of the op is the bottom side {the part that will stick through the third gen battery tray}you can see the paper he cut out the hole and stuck it around the overflow resivor. i did this a little while back and made a templet out of cardboard and kept it so when i get anothe camaro i could do the same. i followed bluezee28 thred when he did his but he didnt have a templet like this so i just cut it out of paper first then cardboard. always use paper before cutting metal.
in the first pic of the op is the bottom side {the part that will stick through the third gen battery tray}you can see the paper he cut out the hole and stuck it around the overflow resivor. i did this a little while back and made a templet out of cardboard and kept it so when i get anothe camaro i could do the same. i followed bluezee28 thred when he did his but he didnt have a templet like this so i just cut it out of paper first then cardboard. always use paper before cutting metal.
Thanks! It makes perfect sense now. I didn't realize the bottom of them was like a Ford Fairlane Thunderbolt hood.
This is for future reference to anyone else who uses this...
If you copy and paste the image to a word document, instead of spending half an hour trying to figure how to rotate the image 90 degrees so it takes up a whole 8.5" X 11" piece of paper, and feeling like a complete dumba** because you can't figure out how to do that, change the orientation of the page from portrait to landscape Thanks for the help RED_DRAGON_85. I owe you for that one lol
Also don't forget to trim the margins, so the image fills the whole page
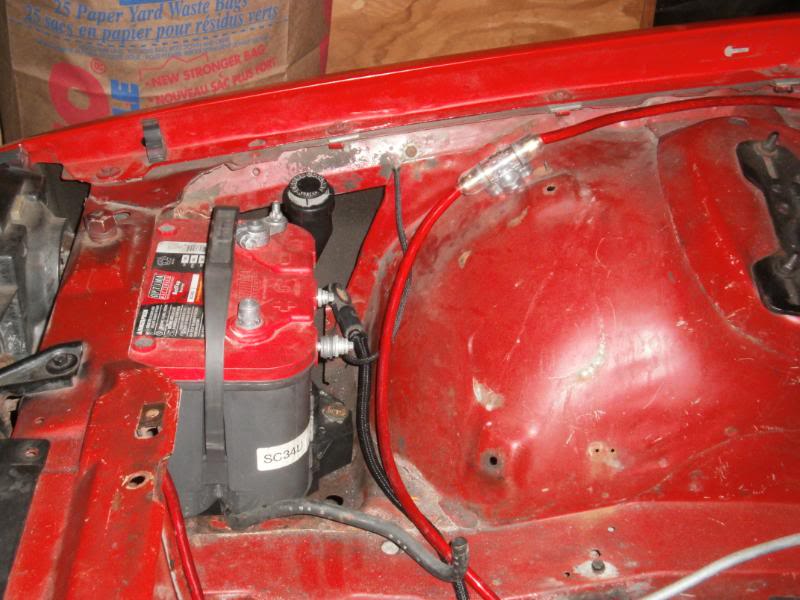
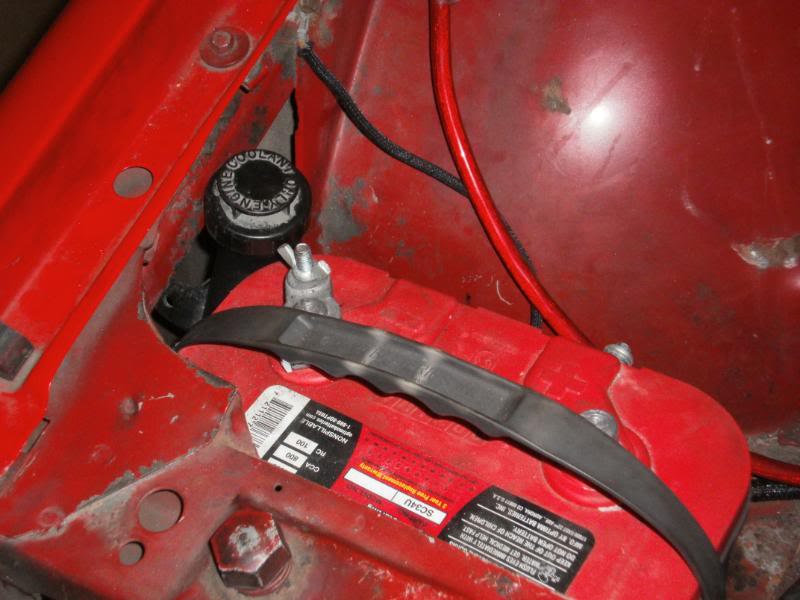
Dont have any without the battery in place, but here you can see the cap (between fender/batt).
Underside. 4th gen tray needs to be trimmed a bit, but no trimming on the 3rd gen tray
Hangs just above the bottom of the GFX.
i tried it under the tray but i couldnt figure out what to do with the hose.
i probably should get another tank too because i trimmed off all the battery hold down walls ect.
anyway, my tank fits like a charm, i still need to take and post pics...
There are holes already on the stock batt tray.I used a big one right by the frame rail side.Just peaks out the edge of the batt.Pass the rubber line thru it & up to the rad.I ground off the edges on the 4th gen tray so its flat against the bottom of the 3rd gens tray.I also removed some material in the center.Cause there is a round indentation in the center of the stock tray(this might of not been necessary though).
To hold the 4th gen tray up.I used the battery hold down bolt.Its long enough & more than reaches past both trays.You can see it in the top of the thrid pic.Drill a hole directly under the bolt & use a threaded clip on the 4th gen tray.
Opposite the batt bolt.I drilled a hole in the 4th gen tray.Directly under a threaded bung on the 3rd gen tray.With a 10mm bolt thru the bottom, up into the threaded bung to hold up that side of the tray/bottle.
Thats the way it been since 05.It's never fallen/broken off or hang to low & scrape.
I have a question on this swap. Does the battery hold down bolt for the 4th gen tank line up with the factory thirdgen bolt hole? So this would be the reference point on where it installs relative to the battery tray? I should be performing this swap this weekend.
Thanks for the templates... printed out and ready to use! I always make templates when cutting something and you just saved me some time!
What did you guys use to seal the drain hose to the hole it passes through into the top of the tank? Is there a grommet I can get or use RTV? I have a 3/8" SS hardline bent that runs to 1/2" from the bottom of the tank and then makes the bend over under the battery and comes out the side.
I am going to be doing this swap in the next few days as well and any info that could save time would be well appreciated as well. I was wondering the same thing about the battery bolt and if it lines up. Mines already a little rusty and would like to get it right on the first shot. Anyone have any other pics of it already done without it being mounted under the battery tray???
I am going to be doing this swap in the next few days as well and any info that could save time would be well appreciated as well. I was wondering the same thing about the battery bolt and if it lines up. Mines already a little rusty and would like to get it right on the first shot. Anyone have any other pics of it already done without it being mounted under the battery tray???
I used this template and lined it up to the battery bolt. Lined up nicely on the bottom of the tray, the side panel needed some more trimming. Cutting it all out was not much fun but I managed with a jigsaw and some HD cut off wheels on the trusty Dremel. I saw the pics of it mounted under the tray and from what I saw it hung lower than I liked myself. So I cut the tray and went that route. It hit my fender brace once in place so I removed that for now and plan to cut out where it hits and add some plate steel (less than 1/8" thick) as a bottom shelf it will sit on as extra support. I still need to clean up the cutout area and paint it all nice. Picking up a longer bolt to hold the battery down as well as the second bolt to be able to bolt it down. Then I need to wait on my tubing bender to come in I ordered so I can bend up the hard line as I want it to come out, run along the frame rail and then turn up and run along the radiator. If it goes as planned I should only have a small section of rubber hose right at the radiator nipple that will connect to the two. Even with it just sitting in there I am happy with this change as getting rid of the thirdgen tank really cleaned up the engine bay!
I used this template and lined it up to the battery bolt. Lined up nicely on the bottom of the tray, the side panel needed some more trimming. Cutting it all out was not much fun but I managed with a jigsaw and some HD cut off wheels on the trusty Dremel. I saw the pics of it mounted under the tray and from what I saw it hung lower than I liked myself. So I cut the tray and went that route. It hit my fender brace once in place so I removed that for now and plan to cut out where it hits and add some plate steel (less than 1/8" thick) as a bottom shelf it will sit on as extra support. I still need to clean up the cutout area and paint it all nice. Picking up a longer bolt to hold the battery down as well as the second bolt to be able to bolt it down. Then I need to wait on my tubing bender to come in I ordered so I can bend up the hard line as I want it to come out, run along the frame rail and then turn up and run along the radiator. If it goes as planned I should only have a small section of rubber hose right at the radiator nipple that will connect to the two. Even with it just sitting in there I am happy with this change as getting rid of the thirdgen tank really cleaned up the engine bay!
Yeah im on the same page of not mounting it under the battery tray as I really dont want it that low at all. Too many things cant hit it when its that low. Im gonna line it up the best I can with the bolt and go from there. I got a air body saw so it shouldnt take too long to cut the hol at all. I did notice the hard line situation and was wondering what people did and I might just get a longer rubber hose and tuck it close to the frame rail as best i can. I jst did the 4th gen washer fluid jug and man did that clean up my engine bay so much on the driver side.
On another note, what is everyone using for the battery hold down bolt?? My stock one is nowhere near long enough to go through the hold down block, 4th gen tank and into the factory threaded hole? I know I need it to be 3.25 - 3.5 inches long.
I read this post awhile back and decided to try this for my 85 camaro but I used the existing coolant and windshield jugs that it came with , installed them in front of the radiator and made a hinged plate to hide them and to check the fluids , here's some pics of what I came up with .
Finally got around to doin the swap. Only thing is after I cut the hole the neck with the cap on it hits the side of my car and doesnt let the bottom sit flush on the tray. Do I have to heat it up and bend it I guess or am i missisng something here. I noticed there seems to be a difference in bottles between everyone. Is there certain years only that works as mines out of a 95. Any help would be appreciated. Thanks
Do I have to heat it up and bend it I guess or am i missisng something here.
I used a replacement bottle generic for 93-02's off ebay. And yes, I had to use a heat gun and bend the neck over to get it away from the fender apron. I centered it between that and the battery. Looks like it was meant to go there.
who cut the plate for that. and what is it made out of. do you still have all the ducting for the radiator below the bottles. how did you mount the bottles.
I used a replacement bottle generic for 93-02's off ebay. And yes, I had to use a heat gun and bend the neck over to get it away from the fender apron. I centered it between that and the battery. Looks like it was meant to go there.
Thanks man Ill try that I just hope i get it right as bending it will be new to me. I guess its the same priciple as bending a hockey stick after taking the blade out of th oven
I got mine finished last night as I havnt been able to work on my car for a few months now. Its done and looks pretty good I must say and now theres tons of room under the hood
Sorry I haven't been on in a while but I cut the plate myself with a 4 1/2 inch angle grinder not easy but it can be done with patience , the plate is galvonized steel so it's a little heavy but wont rust , as afr the mounting I just made some angle brackets and bolts , they are very solid , you can grab them pull up and down and shake the whole car without them moving , there is no ducting in front of the radiator so it makes mounting them easy , I have had these on for some time now and they cause any overheating or restrictive air flow so the temp stays right on the money , if you would like more pics I could post some more .
I wasn't too happy with how the jug part of the overflow just hangs there as well as I had to remove the fender brace to make room for it. I ended up making a brace panel using half of the original fender brace. Now my fender no longer shakes and I feel comfortable knowing the jug cannot break off and fall out!
Last edited by onebad82z; Oct 17, 2012 at 03:16 PM.
regarding 84 1LE's method, I'd like to get a little more info about it since it apparently doesn't require any cutting. What is the part number on the 4th gen reservoir as well? I might pick one up and check it out. thanks!
Christ man, i must be clairvoyant or something, hehe.Im not even subscribed to this thread anymore, but for some reason i decided to open it as i was browsing the fab section.hmmmmmmmmmm!
Anyway,The neck(snout) runs up the side of the batt tray.As with other installs, still requires bending a bit w/a heat gun.I stuffed an old t-shirt to keep the neck from collapsing.
Can someone please post a pic of their dirty hole? I just would like to visualize what the cutting looks like in that location. Thank you so much in advance and :undead: thread


 ...
...  Not sure of what I'm seeing there. I suppose it might make sense if I had a 4th gen tank to compare it to, but I don't. And prefer to see what I'm working on, before I go buying stuff & start cutting.


 Thanks for the help RED_DRAGON_85. I owe you for that one lol