BlackTopKing's "Concrete Angel" Build
 11-28-2013, 10:24 AM
#451
Supreme Member
Thread Starter
iTrader: (1)
Join Date: Oct 2008
Location: Charleston SC
Posts: 1,107
Likes: 0
Received 0 Likes
on
0 Posts
Car: 1987 Trans Am GTA
Engine: 350 TPI
Transmission: T56
Axle/Gears: Posi 3:42
Re: BlackTopKing's "Concrete Angel" Build
I'm about 415hrs total (spoiler included).
As for the LS1.
I'll explain this way:
Like most builds there was a budget set, Exterior +/Interior and +/DriveTrain to complete each (Stage I) at which point if the car excelled and you wanted to continue, you could set upgrading budgets. But vim a time who likes to do things once and complete...pain to keep jumping back and forth.
The car did have the T56 installed and was my biggest +/ to buying it, but its (I guess I would say) LT1 style.
So...for a LS1 swap.
Budger goes out the roof, I have seen some guys on here really build some nice set ups on a pretty good price, but SC must be that LS black hole because most want 2000$ for motors that'll be rebuilt and haft of it useless in the swap. So 4-5$ motor swap for 350hp just doesn't excite me. Plus the intimidation of the swap...to be honest. A lot to do your self.
My TA, wiring has gremlins and have been slowly chasing and fixing...so my LS swap would littlery be from scratch...
And although I didn't intend to strip car down at once and fully redo...its the direction this is starting to head...lol...suckered in by aTA Dreams...
 11-28-2013, 10:27 AM
#452
Supreme Member
Thread Starter
iTrader: (1)
Join Date: Oct 2008
Location: Charleston SC
Posts: 1,107
Likes: 0
Received 0 Likes
on
0 Posts
Car: 1987 Trans Am GTA
Engine: 350 TPI
Transmission: T56
Axle/Gears: Posi 3:42
Re: BlackTopKing's "Concrete Angel" Build
Oh yeah, looking forward to this.
Dash, console, doors and rear hatch wrap around will all be redone.
I really was thinking of doing the Tablet swap cause I thought it would look super cool, but if I go carb...it'll change the dash layout a lot verse staying digital.
I been sketching up ideals and will post some to show some of the ideals.
11-28-2013, 10:47 AM
#453
Supreme Member
Thread Starter
iTrader: (1)
Join Date: Oct 2008
Location: Charleston SC
Posts: 1,107
Likes: 0
Received 0 Likes
on
0 Posts
Car: 1987 Trans Am GTA
Engine: 350 TPI
Transmission: T56
Axle/Gears: Posi 3:42
Re: BlackTopKing's "Concrete Angel" Build
Lol
Got a think with the idea of getting in and having to hit like 19 switches to start and go...def fighter jetish.
Lmao
12-06-2013, 03:17 PM
#454
Member
Join Date: Sep 2012
Location: Worth, IL
Posts: 111
Likes: 0
Received 0 Likes
on
0 Posts
Car: 1991 Camaro RS
Engine: 3.1 V6 Auto
Transmission: 700r4
Axle/Gears: 3.27?
Re: BlackTopKing's "Concrete Angel" Build
I've been following this the whole time you've been working on it and I gotta say your car is sweet..... how long until you get some paint on it?
12-06-2013, 08:46 PM
#455
Supreme Member
Thread Starter
iTrader: (1)
Join Date: Oct 2008
Location: Charleston SC
Posts: 1,107
Likes: 0
Received 0 Likes
on
0 Posts
Car: 1987 Trans Am GTA
Engine: 350 TPI
Transmission: T56
Axle/Gears: Posi 3:42
Re: BlackTopKing's "Concrete Angel" Build
Well my friends.
Time has come.
I got the sealer in today, borrowed a jack from jimmy (thanks) and now am ready!
So game plan is, pull car, clean like I got a first date, pull back in and lift.
I'll pull the hoods, front clip and spoiler to spray the back sides and inner jams. The clip on the car for the out side shot and actual paint. I only have so much room so...if all is well, I'll have a sealed car by tomorrow night.
At which point I'll prep to prime Sunday.
Goal is to start (base up) fresh on Monday and set a few hours each night aside to do each part of the actual paint job.
My main focus will be background, which was show earlier in post of the sketch. Once I get that laid out I'll have (hope fully) good ideal of how to do the rest. But will spray a mid coat to seal the background from the forground. Mid coats are great for art layers and for kandys , keeps colors from bleeding but also gives you a protective layer and saving point in the game.
I should have background done by Thursday night, since it'll be a 5layer spray out, do one a night basically (2 on night one)
Friday I fly to jersey so I'll won't get back on car until Monday which will be prepping for art....when the cool part starts.
I still gotta figure a camcorder in, on all of this. I wanted to do a video each week and put up on YouTube ( worth a million words) and I thought some of you guys get a kick out of actually seeing it!
Also in the meantime of all of this...I still gotta do a few side TA notes.
I'm not too worried about interior as it'll all come out and be painted later (when I get to that stage) although I'll be doing all jams now (so some time pieces and stripping come off, most worn or busted any way) but engine bay....at first I was gonna do 1/2 now and 1/2 later (inner and firewall later) when I pulled motor just easier, but I think it'll bother me not doing it....
Undercarriage is still getting done and I will do 1/2 now and the suspention parts later (pull motor, front and rear to paint) but am kinda bothered by that too....
Don't like the 1/2 staging but kinda don't have a choice...Si I'll think on this.
I am gonna keep Pro Am style hood, and not use as a base for the C7style hood...because I still want the hoods to have an inverted paint scheme. The ProAm being a little less and down toned I'll probly do a bird.
So if anyone see a TA or firebird hood...let me know for the C7.
And that's it....
The C7, mirror mod, spiltter/lip and valance will all be done after paint.
12-06-2013, 08:48 PM
#456
Supreme Member
Thread Starter
iTrader: (1)
Join Date: Oct 2008
Location: Charleston SC
Posts: 1,107
Likes: 0
Received 0 Likes
on
0 Posts
Car: 1987 Trans Am GTA
Engine: 350 TPI
Transmission: T56
Axle/Gears: Posi 3:42
Re: BlackTopKing's "Concrete Angel" Build
Paint is on the scheduled this week so def stay tuned now. I'll try to post more then ever.

 12-06-2013, 09:08 PM
#459
Member


Join Date: Aug 2007
Posts: 363
Likes: 0
Received 4 Likes
on
4 Posts
Car: 85 Firebird C&C T-Top
Engine: 347ci LS1
Transmission: 4L60E LS1
Axle/Gears: BW 9 Bolt Posi,3.27,C5+VE Brakes
Re: BlackTopKing's "Concrete Angel" Build
exciting times, can't wait for more , more more..... :-)
12-08-2013, 05:06 PM
#460
Supreme Member
Thread Starter
iTrader: (1)
Join Date: Oct 2008
Location: Charleston SC
Posts: 1,107
Likes: 0
Received 0 Likes
on
0 Posts
Car: 1987 Trans Am GTA
Engine: 350 TPI
Transmission: T56
Axle/Gears: Posi 3:42
Re: BlackTopKing's "Concrete Angel" Build

 URL=http://s1223.photobucket.com/user/BLackTopInk/media/Snapbucket/30EA5733-orig_zps9ce4fe70.jpg.html]
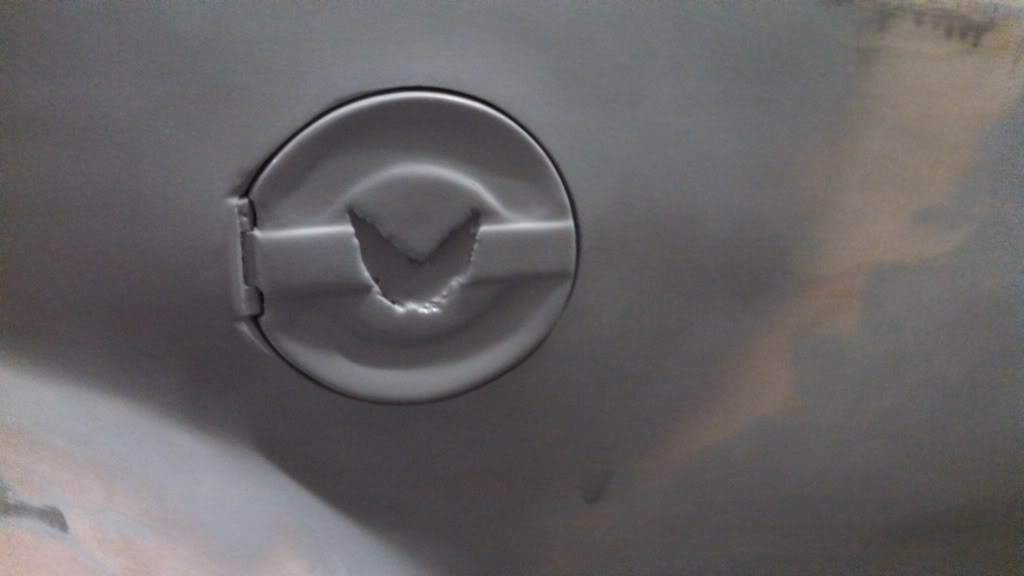 [/URL]
12-08-2013, 05:08 PM
[/URL]
12-08-2013, 05:08 PM
#461
Supreme Member
Thread Starter
iTrader: (1)
Join Date: Oct 2008
Location: Charleston SC
Posts: 1,107
Likes: 0
Received 0 Likes
on
0 Posts
Car: 1987 Trans Am GTA
Engine: 350 TPI
Transmission: T56
Axle/Gears: Posi 3:42
Re: BlackTopKing's "Concrete Angel" Build
Installed the door and primed it see how I like it..and I do, think it'll fit well.
Used magnetic push pop to open door.
As for today, cleaned and cleaned and cleaned...started taping off to spray tomorrow, already a day behind...lol
Used magnetic push pop to open door.
As for today, cleaned and cleaned and cleaned...started taping off to spray tomorrow, already a day behind...lol
12-10-2013, 07:27 AM
#462
Supreme Member
Thread Starter
iTrader: (1)
Join Date: Oct 2008
Location: Charleston SC
Posts: 1,107
Likes: 0
Received 0 Likes
on
0 Posts
Car: 1987 Trans Am GTA
Engine: 350 TPI
Transmission: T56
Axle/Gears: Posi 3:42
Re: BlackTopKing's "Concrete Angel" Build
Well as everything slowly moves into place to base, I've been thinking long and hard on some small details that I think are important.
I'm def a thinker at heart and artistically like things to make sence. For example: biomechanics, love the look but hate dead end hoses and just pointless nothings...
So with that being said, my next thoughts are kinda of important to get right.
Tail Numbers, its supposed to be two letters = base, three numbers = serial number (vin) and last two lil numbers are year? Idk if anyone has any better information on this but that (if correct) will equal for me
TA 048 87
Next thought is the insignia...this is a big thing in history and I think it'll be best to make one for the car.
So that it relates both ways (trans an&fighter/bomber)
At the moment my best thought is (pin up style for vintage look)
A cartoonish fighting bird with a gun in hand and bomb strapped to his back (I know TA is a Phoenix) but thought of...a chicken (joke) or eagle (patriotic)...
"WarBird" would be the name or handle.
The other side of the car, I will need an insignia (symbol) for the badging (both images location and size will be the same, just one will trace towards a bomber and fighter)
The insignia will habe :
3rd F-Bomber (top) Squadron (below)
Now I could just combined the two to insignia into one and just have it on both sides, or have the cartoon pin up on one side and symbol on other....
The question is:
Feedback...lol...just looking for creative construction on the ideal.
Using the GTA Bird/TABird would work, just seemed too easy....so let me hear some ideals as well, ex specially anyone with or from military interest or background.
Markings also, stupid to go that far, but import to me.
Not A Step or Don't Step is one.
Intake
Tow ect...
But are there more? Figured there would be and I Google stuff but kinda only get the same four or five things....
Maybe there aren't but I figure I ask before I make stuff up....lol
Anyway....thoughts of the day!
12-10-2013, 09:28 AM
#463
Member
Join Date: Sep 2012
Location: Worth, IL
Posts: 111
Likes: 0
Received 0 Likes
on
0 Posts
Car: 1991 Camaro RS
Engine: 3.1 V6 Auto
Transmission: 700r4
Axle/Gears: 3.27?
Re: BlackTopKing's "Concrete Angel" Build
everything about this car is custom this far..... so i wouldnt go with the plain name I like the sound of warbird...... with that being said I think it would be best to combine the two ideas you said and put the same logo on each side. Just my opinion I think if you had two different logos it wouldn't look right. just my 
12-10-2013, 02:08 PM
#464
Supreme Member
Thread Starter
iTrader: (1)
Join Date: Oct 2008
Location: Charleston SC
Posts: 1,107
Likes: 0
Received 0 Likes
on
0 Posts
Car: 1987 Trans Am GTA
Engine: 350 TPI
Transmission: T56
Axle/Gears: Posi 3:42
Re: BlackTopKing's "Concrete Angel" Build
Good point, lol
I do like the fighting bird with bomb, I'll have to doodle up a ruff outline to show and I thought the play on words was creative for the
3rd F-Bomber Squadron=3rd Gen F Body...lol
I do like the fighting bird with bomb, I'll have to doodle up a ruff outline to show and I thought the play on words was creative for the
3rd F-Bomber Squadron=3rd Gen F Body...lol
12-10-2013, 02:35 PM
#465
Member
iTrader: (1)

Join Date: Jul 2013
Location: Pensacola FL
Posts: 123
Likes: 0
Received 0 Likes
on
0 Posts
Car: 1986 Camaro Sport Coupe (Part Out)
Engine: 2.8 MPFI V6
Transmission: 700R4 Automatic 4 speed
Axle/Gears: 3.42 Open With Drum Brakes
Re: BlackTopKing's "Concrete Angel" Build
I'd keep it the same on both sides. It would be more appealing as a show car.
12-10-2013, 07:10 PM
#466
Supreme Member
Thread Starter
iTrader: (1)
Join Date: Oct 2008
Location: Charleston SC
Posts: 1,107
Likes: 0
Received 0 Likes
on
0 Posts
Car: 1987 Trans Am GTA
Engine: 350 TPI
Transmission: T56
Axle/Gears: Posi 3:42
Re: BlackTopKing's "Concrete Angel" Build

I'm excited to say, roll the tape!
We have begun.
Back side to nose, fenders done
Next jams, undersides of hoods and hatch, I'll then just hang the pieces and spray the car fully at once.
More pic to come and I'm working on this video thing....I feel so stupid doing it... lol...I swear I'm my worst critic.
But don't wanna get to far with out starting.
12-10-2013, 07:16 PM
#467
Member
iTrader: (1)
Join Date: Jul 2013
Location: Pensacola FL
Posts: 123
Likes: 0
Received 0 Likes
on
0 Posts
Car: 1986 Camaro Sport Coupe (Part Out)
Engine: 2.8 MPFI V6
Transmission: 700R4 Automatic 4 speed
Axle/Gears: 3.42 Open With Drum Brakes
Re: BlackTopKing's "Concrete Angel" Build
I'm excited to say, roll the tape!
We have begun.
Back side to nose, fenders done
Next jams, undersides of hoods and hatch, I'll then just hang the pieces and spray the car fully at once.
More pic to come and I'm working on this video thing....I feel so stupid doing it... lol...I swear I'm my worst critic.
But don't wanna get to far with out starting.
12-10-2013, 08:12 PM
#468
Supreme Member
Thread Starter
iTrader: (1)
Join Date: Oct 2008
Location: Charleston SC
Posts: 1,107
Likes: 0
Received 0 Likes
on
0 Posts
Car: 1987 Trans Am GTA
Engine: 350 TPI
Transmission: T56
Axle/Gears: Posi 3:42
Re: BlackTopKing's "Concrete Angel" Build
Lol. Thanks
And I promise that I won't be shy on the pics of paint.
I'm a post a ton.
Lol
And I promise that I won't be shy on the pics of paint.
I'm a post a ton.
Lol
12-11-2013, 04:13 PM
#469
Junior Member
iTrader: (1)
Join Date: May 2012
Location: Milwaukee, WI ; San Bernardino, CA
Posts: 63
Likes: 0
Received 0 Likes
on
0 Posts
Car: 1991 Camaro RS
Engine: 305 will be LSX eventually
Transmission: T56
Axle/Gears: Borg Warner
Re: BlackTopKing's "Concrete Angel" Build
Tail Numbers are slightly different than what you have. At least here in the States. Other countries have different requirements. I'm sure there are always exceptions to the rules, but here they are called "N" numbers. The most common form I've seen is the letter N followed be 3 numbers, and then two letters. Example N123TA.
That being said there are a bunch of different combinations out there. Below is a copy and past from Wikipedia which isn't an "official" source, but just so you get an idea.
The following are the combinations that could be used:
N1 to N9 — Federal Aviation Administration (FAA) internal use only[2]
N1A to N9Z
N1AA to N9ZZ
N10 to N99 — Federal Aviation Administration (FAA) internal use only[2]
N10A to N99Z
N10AA to N99ZZ
N100 to N999
N100A to N999Z
N100AA to N999ZZ
N1000 to N9999
N1000A to N9999Z
N10000 to N99999
Hope that helps
12-11-2013, 06:44 PM
#470
Supreme Member
Thread Starter
iTrader: (1)
Join Date: Oct 2008
Location: Charleston SC
Posts: 1,107
Likes: 0
Received 0 Likes
on
0 Posts
Car: 1987 Trans Am GTA
Engine: 350 TPI
Transmission: T56
Axle/Gears: Posi 3:42
Re: BlackTopKing's "Concrete Angel" Build
Huh....I didnt know that at all but def helps. I would of hated to use....the wrong layout... lol...my luck it mean something conflicting.
Lmao
Lmao
12-12-2013, 07:16 AM
#471
Supreme Member
Thread Starter
iTrader: (1)
Join Date: Oct 2008
Location: Charleston SC
Posts: 1,107
Likes: 0
Received 0 Likes
on
0 Posts
Car: 1987 Trans Am GTA
Engine: 350 TPI
Transmission: T56
Axle/Gears: Posi 3:42
Re: BlackTopKing's "Concrete Angel" Build
Question:
So I'm thinking Kandy Red lips on GTA rims to match stripping.
Centers either:
Gunmetal/silvers to match body
Or
Black centers to match 2ndairy color
Rrrr...hard...I love bulk centers but keep thinking that it'll really look cool to body match, FXs and all....
Coin flip!
So I'm thinking Kandy Red lips on GTA rims to match stripping.
Centers either:
Gunmetal/silvers to match body
Or
Black centers to match 2ndairy color
Rrrr...hard...I love bulk centers but keep thinking that it'll really look cool to body match, FXs and all....
Coin flip!
12-12-2013, 08:42 PM
#472
Supreme Member
Thread Starter
iTrader: (1)
Join Date: Oct 2008
Location: Charleston SC
Posts: 1,107
Likes: 0
Received 0 Likes
on
0 Posts
Car: 1987 Trans Am GTA
Engine: 350 TPI
Transmission: T56
Axle/Gears: Posi 3:42
Re: BlackTopKing's "Concrete Angel" Build
Now I'm not a cartoon style artists ( just not my thing) hut I had a few mins on lunch to sketch out the basic idea that was mentioned above.
The WarBirds custom Insignia.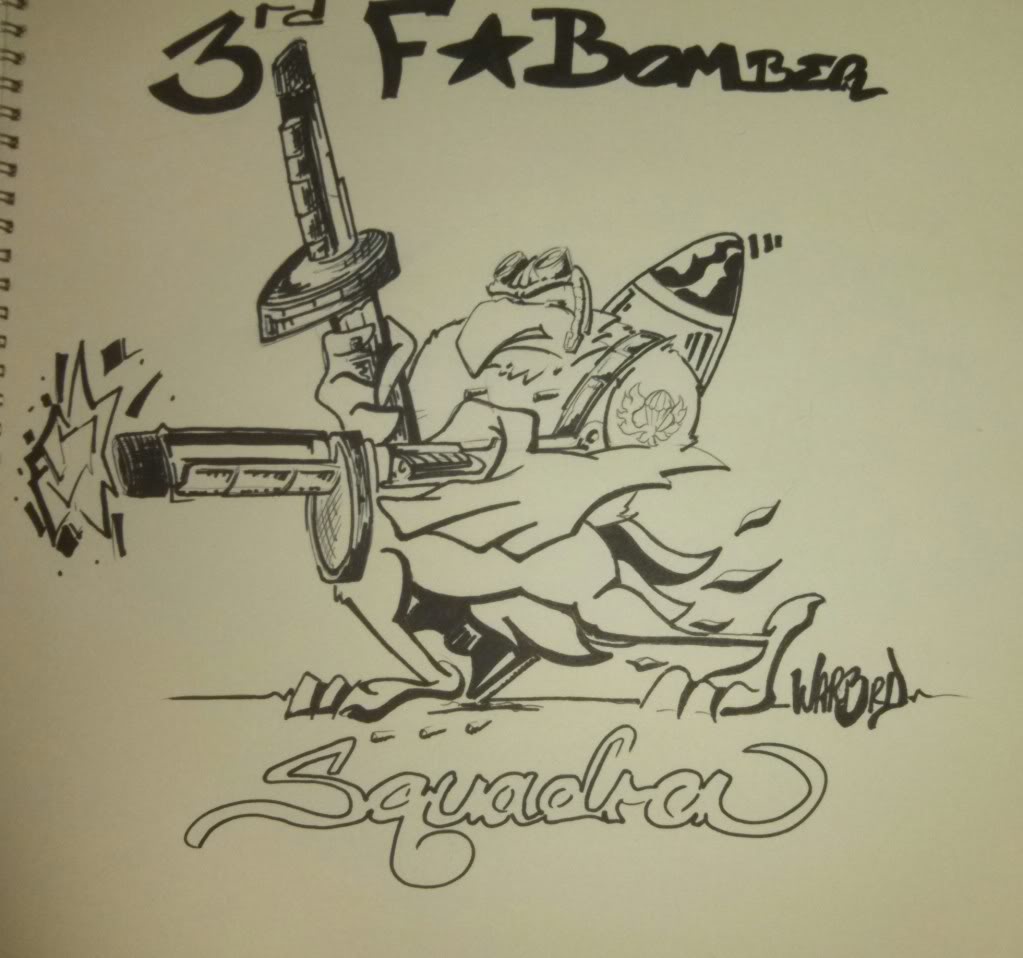
Now it'll only be about 10-12" big on the front fenders right after the door. But it'll def add a neat touch
The WarBirds custom Insignia.

Now it'll only be about 10-12" big on the front fenders right after the door. But it'll def add a neat touch
12-13-2013, 08:07 AM
#473
Member
Join Date: Sep 2012
Location: Worth, IL
Posts: 111
Likes: 0
Received 0 Likes
on
0 Posts
Car: 1991 Camaro RS
Engine: 3.1 V6 Auto
Transmission: 700r4
Axle/Gears: 3.27?
Re: BlackTopKing's "Concrete Angel" Build
I like the idea..... it would obviously be better with some finishing touches but its a sweet concept
12-13-2013, 08:10 AM
#474
Member

Join Date: Dec 2011
Location: West Haven, Utah
Posts: 420
Likes: 0
Received 0 Likes
on
0 Posts
Car: 1985 trans am
Engine: 350 TPI
Transmission: T5
Axle/Gears: 3.27
Re: BlackTopKing's "Concrete Angel" Build
Now I'm not a cartoon style artists ( just not my thing) hut I had a few mins on lunch to sketch out the basic idea that was mentioned above.
The WarBirds custom Insignia.
Now it'll only be about 10-12" big on the front fenders right after the door. But it'll def add a neat touch
The WarBirds custom Insignia.
Now it'll only be about 10-12" big on the front fenders right after the door. But it'll def add a neat touch
12-13-2013, 09:30 AM
#475
Supreme Member
Thread Starter
iTrader: (1)
Join Date: Oct 2008
Location: Charleston SC
Posts: 1,107
Likes: 0
Received 0 Likes
on
0 Posts
Car: 1987 Trans Am GTA
Engine: 350 TPI
Transmission: T56
Axle/Gears: Posi 3:42
Re: BlackTopKing's "Concrete Angel" Build
oh yeah I definitely agree like I said it's kind of just a starting spot for me on the ideal its self. Didn't really finish yesterday but at least got the ideal out ta my head.
I know IMA change out the guns, kinda thought of a more fitting ideal afterwards.
I know IMA change out the guns, kinda thought of a more fitting ideal afterwards.
12-24-2013, 02:28 PM
#478
Supreme Member
Thread Starter
iTrader: (1)
Join Date: Oct 2008
Location: Charleston SC
Posts: 1,107
Likes: 0
Received 0 Likes
on
0 Posts
Car: 1987 Trans Am GTA
Engine: 350 TPI
Transmission: T56
Axle/Gears: Posi 3:42
Re: BlackTopKing's "Concrete Angel" Build
Hey guys.
Wanted to say Marry XMass and hope everyone holiday is great one.
Things been crazy this past two weeks.
As mentioned before I flew to NJ on a Friday to help my friend Carmen drive down to his new house in Conway.
Well that turned into a nations lampoons trip to say the least and last week things got even crazier when he called to ask if I could drive to NJ to grab his last load....
Of course I said yes. He is an old friend and one of the few you meet in life who become truly great friends. Plus he is older now and I really didnt see how he could possibly do it himself.
Especially since this load was the garage and a few house hold left overs.
So Friday after work I set sail to Conway 2hrs, grabbed him the truck and trailer and 12hr to NJ...loaded nonstop for about 8hrs to get in and head back...13hrs (last hour was forever and eye bleeding on those dark roads)
Now everyone home safe and sound but out of all the trips I've made (usually 10-12 from Charleston in car) this was the worst and I walked away feeling nasty and sick for a day or two.
In the mist of all this, I managed to get two last minute xmass jobs in n out and hit the TA with 2coats of sealer.
Well...Of course I found a thing here and there, and although not enough to cry over enough to annoy me.
Not to mention how freaking jammed up I feel...
I really hate to back burner this, but do think I'm just being a butt head and over anxious.
Carmen, my friend who moved from NJ had three of those portable garages and was pretty awesome to offer me one.
This is cool, 17x20 and one of the nicer styles as well, so I'm hoping to make time Sat to pull car, set this thing up install some flooring of some kind and make some big time room. Clean out garage and get ready to actually spray something more then sealer and primer on this Car. In meantime....might as well attend to the boo boos and figure out how and where to start these videos.
Must of made like 10 already and deleted each...lmao...always feel stupid in them.
But anyway...had a min and realised I been a little MIA...Dec didn't work out as open of a month to start painting as I though... lol...but we will get there and once going....won't stop!
12-24-2013, 05:53 PM
#480
Supreme Member
Thread Starter
iTrader: (1)
Join Date: Oct 2008
Location: Charleston SC
Posts: 1,107
Likes: 0
Received 0 Likes
on
0 Posts
Car: 1987 Trans Am GTA
Engine: 350 TPI
Transmission: T56
Axle/Gears: Posi 3:42
Re: BlackTopKing's "Concrete Angel" Build
Lol
I'm very much a great not only is anupdate needed but a entertaining update at that.
but you're right we will get there we are right there waiting to get there.
I just got to get some of the stuff out of my way...lol
 12-24-2013, 08:02 PM
#481
Re: BlackTopKing's "Concrete Angel" Build
ouchthat is the president joke that is personally hurt me....because I personally feel the same way.
Lol
I'm very much a great not only is anupdate needed but a entertaining update at that.
but you're right we will get there we are right there waiting to get there.
I just got to get some of the stuff out of my way...lol
Lol
I'm very much a great not only is anupdate needed but a entertaining update at that.
but you're right we will get there we are right there waiting to get there.
I just got to get some of the stuff out of my way...lol
12-24-2013, 09:13 PM
#482
Supreme Member
Thread Starter
iTrader: (1)
Join Date: Oct 2008
Location: Charleston SC
Posts: 1,107
Likes: 0
Received 0 Likes
on
0 Posts
Car: 1987 Trans Am GTA
Engine: 350 TPI
Transmission: T56
Axle/Gears: Posi 3:42
Re: BlackTopKing's "Concrete Angel" Build
I know man, just messing with you. Only pressure I have is me, lol.
But if all works out well this weekend, I'll at least have something to show.
But if all works out well this weekend, I'll at least have something to show.
01-01-2014, 06:14 PM
#483
Supreme Member
Thread Starter
iTrader: (1)
Join Date: Oct 2008
Location: Charleston SC
Posts: 1,107
Likes: 0
Received 0 Likes
on
0 Posts
Car: 1987 Trans Am GTA
Engine: 350 TPI
Transmission: T56
Axle/Gears: Posi 3:42
Re: BlackTopKing's "Concrete Angel" Build
Hey guys
Happy New Year
I'm officially a month behind my projection...lol...but still hard at work. Hope everyone had a good, fun and safe holiday.
Positive news is.. I've done great setting up and moving the main garage with in the portable garage. Amazing how much stuff I have and have found that I totally forgot about...lol....but anyway, I've created alotbof space and am very much more organized... in fact car seems smaller, lmao.
On side note....here is the C7 style hood (side project for the TA)
https://www.thirdgen.org/forums/fabr...ml#post5690570
Will update soon.
01-04-2014, 10:39 PM
#484
Supreme Member
Thread Starter
iTrader: (1)
Join Date: Oct 2008
Location: Charleston SC
Posts: 1,107
Likes: 0
Received 0 Likes
on
0 Posts
Car: 1987 Trans Am GTA
Engine: 350 TPI
Transmission: T56
Axle/Gears: Posi 3:42
Re: BlackTopKing's "Concrete Angel" Build
 URL=http://s1223.photobucket.com/user/BLackTopInk/media/Snapbucket/A865B335-orig_zps5519e167.jpg.html]
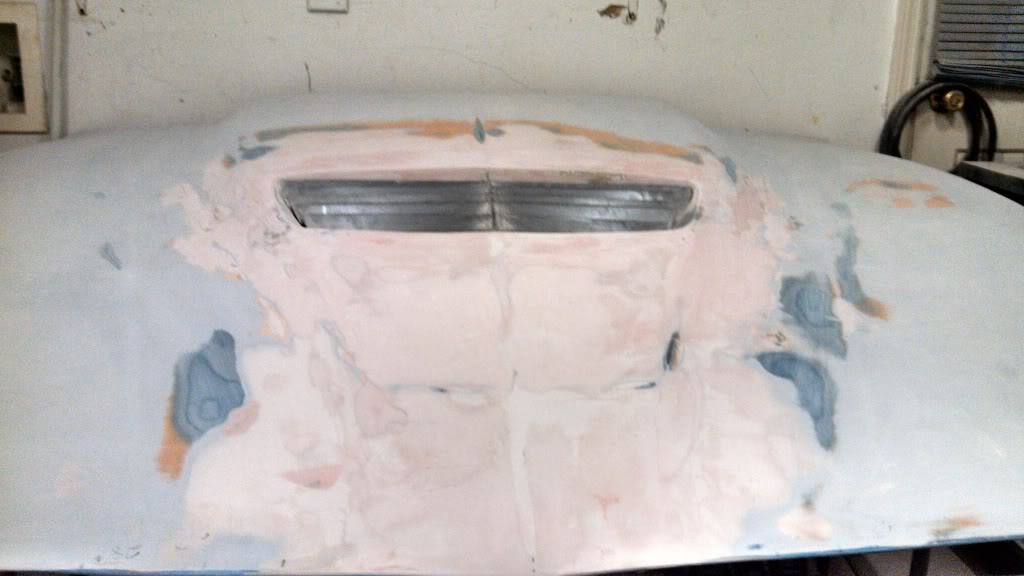 [/URL]
I don't know....think it might be better and cooler then the vision hood....lol...
01-13-2014, 07:25 AM
#485
Supreme Member
Thread Starter
iTrader: (1)
Join Date: Oct 2008
Location: Charleston SC
Posts: 1,107
Likes: 0
Received 0 Likes
on
0 Posts
Car: 1987 Trans Am GTA
Engine: 350 TPI
Transmission: T56
Axle/Gears: Posi 3:42
Re: BlackTopKing's "Concrete Angel" Build

Well I been hard at work with little free time these past two weeks but with the time I have had, I've gotten a lot done.
Made adapter plates for the spoiler to mount to lid easier and clean.
Finish the C7 hood, finished the underside, although I wanted to try a gel coating for first time and it came out really nice except it was raining so much and so cold it didn't want to dry....needed up getting runs and I hate RUNS with a passion....so off they went....which made a mess cause this stuff don't come off easy.
I ended up getting fusterated with this because it lost its uniformed look ( really all I want) so....
I had to sadly strip off so I can do it again, which I started yesterday and should have done later today.
But on a positive note, rest of car got its final wash and taped off again, just too much dust and junk got involved from the C7 hood. Which I normally would do body work next to a car prep to paint, but its been wicked cold and me and the TA have been cuddling the heater....lol....
Long story short...so close yet still so far. And really only the underside of the hood is holding me up
Which, I had thought of using this liner+/coating instead, I've used it on floors or inside of fenders/wheel wells- stuff like that...and thought of doing the engine bay with it . .but not sure....
I'll hit cha guys up later
01-13-2014, 07:08 PM
#487
Supreme Member
Thread Starter
iTrader: (1)
Join Date: Oct 2008
Location: Charleston SC
Posts: 1,107
Likes: 0
Received 0 Likes
on
0 Posts
Car: 1987 Trans Am GTA
Engine: 350 TPI
Transmission: T56
Axle/Gears: Posi 3:42
Re: BlackTopKing's "Concrete Angel" Build
Well....
My life, somet7mes I domcool stuff and never anyone around to tell....lol...life of an3rd gen geek...lol
Anyway, grinded hood back to zero, and spend about an hour messing with mix to air pressure...mistake is I attempted the spray line like gel coat or clear, to heavy slow and low on pressure which was like pouring it on and making it too smooth to have texture but too much texture to be smooth....
Second attempt and destruction of clean garage....perfect!!!!!
Will post pics.
Def see more uses of this stuff.

 01-19-2014, 10:09 AM
#490
Supreme Member
Thread Starter
iTrader: (1)
Join Date: Oct 2008
Location: Charleston SC
Posts: 1,107
Likes: 0
Received 0 Likes
on
0 Posts
Car: 1987 Trans Am GTA
Engine: 350 TPI
Transmission: T56
Axle/Gears: Posi 3:42
Re: BlackTopKing's "Concrete Angel" Build

Last edited by BlackTopKing; 01-19-2014 at 10:13 AM. Reason: double post

 01-19-2014, 11:11 AM
#494
Supreme Member
Thread Starter
iTrader: (1)
Join Date: Oct 2008
Location: Charleston SC
Posts: 1,107
Likes: 0
Received 0 Likes
on
0 Posts
Car: 1987 Trans Am GTA
Engine: 350 TPI
Transmission: T56
Axle/Gears: Posi 3:42
Re: BlackTopKing's "Concrete Angel" Build
Well I decided to line the engine bay with the spray liner as I did the hood.
Was def hard even with just about everything thing off because gun is either too close or too far.
but for the most part I did get to 90% of it... just the steering tunnel area and directly under booster.
And of course....as of last night 3coats of primer hit the car! Hurray, but been Here already...lol
Next I put the actual base one. Maybe today if I get lil time but most likely tomorrow night.
01-22-2014, 08:31 PM
#496
Member
iTrader: (1)
Join Date: Jul 2013
Location: Pensacola FL
Posts: 123
Likes: 0
Received 0 Likes
on
0 Posts
Car: 1986 Camaro Sport Coupe (Part Out)
Engine: 2.8 MPFI V6
Transmission: 700R4 Automatic 4 speed
Axle/Gears: 3.42 Open With Drum Brakes
Re: BlackTopKing's "Concrete Angel" Build
Looks like everything has been going smoothly. Looking forward for when it is dressed in color!
01-23-2014, 09:21 AM
#497
Supreme Member
Thread Starter
iTrader: (1)
Join Date: Oct 2008
Location: Charleston SC
Posts: 1,107
Likes: 0
Received 0 Likes
on
0 Posts
Car: 1987 Trans Am GTA
Engine: 350 TPI
Transmission: T56
Axle/Gears: Posi 3:42
Re: BlackTopKing's "Concrete Angel" Build

Last edited by BlackTopKing; 01-23-2014 at 09:22 AM. Reason: pic fail
01-23-2014, 09:36 AM
#498
Supreme Member
Thread Starter
iTrader: (1)
Join Date: Oct 2008
Location: Charleston SC
Posts: 1,107
Likes: 0
Received 0 Likes
on
0 Posts
Car: 1987 Trans Am GTA
Engine: 350 TPI
Transmission: T56
Axle/Gears: Posi 3:42
Re: BlackTopKing's "Concrete Angel" Build
OK guys....
So, I an working on this my friends.
I will admit I been pretty scattered mentally.
Find myself just trying to do to much at once but I feel as if I have finally caught up to myself.
As of today, car up and ready for first base which will be a pearl silver (spraying tonight) along with a white pearl silver mix. That ill apply in all highlight areas.
Tomorrow I'll tape out the flag (background as in pic) and all the logo ( making a paint roll call). Then spray a phantom pearl (dark silver pearls mix in silver) to apply in all the low light areas.
Point of this as I'll mention in video (which I'll try to make tonight) is to create a tone look and dimensional shade effect to the body. Plus creating the actual background coloring for the metal look....
Saturday I was hoping to get rims stripped and ready as well as finish replacing some of the front parts (end link and such) If I have the side splitters done I'll put them on the bottom of the side skirts.
But we will see....sat is gonna be a funky day....
But hopefully I with this being done, I'll be ready to actually airbrush all the metal fx on the hole car.
Leaving the next step to be black, air force logo and top body stripping (hood roof and hatch).
And then
....that's the background.... mid coat and done....
Next will be all the art and murals
But we will see
Wish me luck...think IMA need it


 01-23-2014, 09:56 PM
#500
Supreme Member
Thread Starter
iTrader: (1)
Join Date: Oct 2008
Location: Charleston SC
Posts: 1,107
Likes: 0
Received 0 Likes
on
0 Posts
Car: 1987 Trans Am GTA
Engine: 350 TPI
Transmission: T56
Axle/Gears: Posi 3:42
Re: BlackTopKing's "Concrete Angel" Build
OK, 1st actual color the TA has seen in 14months.
Is on...pic with phone so sorry if not best, but I got video for you guys too...better to see.
Base #1 is an Aluminum Base Fine with Fine Silver Pearl mix, 2:1:2 this is in top of a single shot of just Aluminum Base. It makes it very reflective with light...meaning in sun areas or bright areas it'll whiten/silver and dark/ silver in shade my attempt to show this in pic is simply angles or opening door to block 2 of the 5 lights I have up top.
Crude but effective.
I have to say this is a royal pain...got to open everything spray on gaps, jams and corners wells and under edges....so I'm crawimg up and under everything it feels like. Then I have to close it all up (in strap doors) and spray out side of car....set up hood, lift hood...spray...set back down...lift spoiler spray set on table ( have to put on stands but have to take down due to room)...
Omg...its like 2.5hrs tonight to just spray plus set up and clean up before and after...so 3-3.5hrs
Honestly... kinda on the long side, but def gives Me a better estimatmation on how long it'll actually take....almost a step a night...
Anyway...I'll post video tomorrow once near computer, hope ya like....
Let the fun begin