GTA digital dash swap - doing it the hard way - pic heavy
 05-14-2018, 09:24 AM
#151
Junior Member

Join Date: May 2008
Posts: 2
Likes: 0
Received 0 Likes
on
0 Posts
Re: GTA digital dash swap - doing it the hard way - pic heavy
Hello, I am assembling a digital dash to the car from 1990, unfortunately my odometer he burst, he crumbled, he crashed.
I am looking for a good odometer,
I am asking for help in searching.
I am looking for a good odometer,
I am asking for help in searching.
 05-14-2018, 01:56 PM
#152
Re: GTA digital dash swap - doing it the hard way - pic heavy

It's difficult to find just the odometer section alone. Your best bet is to get a complete dash, like this one:
https://www.ebay.com/itm/87-89-Fireb...AAAOSweoBa7z50
Or maybe you can find it in the classified section here.
If you really are putting a digital dash into a 1990 Firebird you should make a thread on this forum!
05-14-2018, 10:51 PM
#153
Senior Member

iTrader: (2)
Join Date: May 2002
Location: Hollywood, FL
Posts: 504
Likes: 0
Received 0 Likes
on
0 Posts
Car: '88 Black GTA, T-tops, digital dash
Engine: 5.7 TPI w/custom chip
Transmission: 700R4
Axle/Gears: 9 bolt 327 posi
Re: GTA digital dash swap - doing it the hard way - pic heavy
Wow, great work. I just went over the entire thread. I'm definitely subscribing.
05-15-2018, 09:18 AM
#154

Re: GTA digital dash swap - doing it the hard way - pic heavy
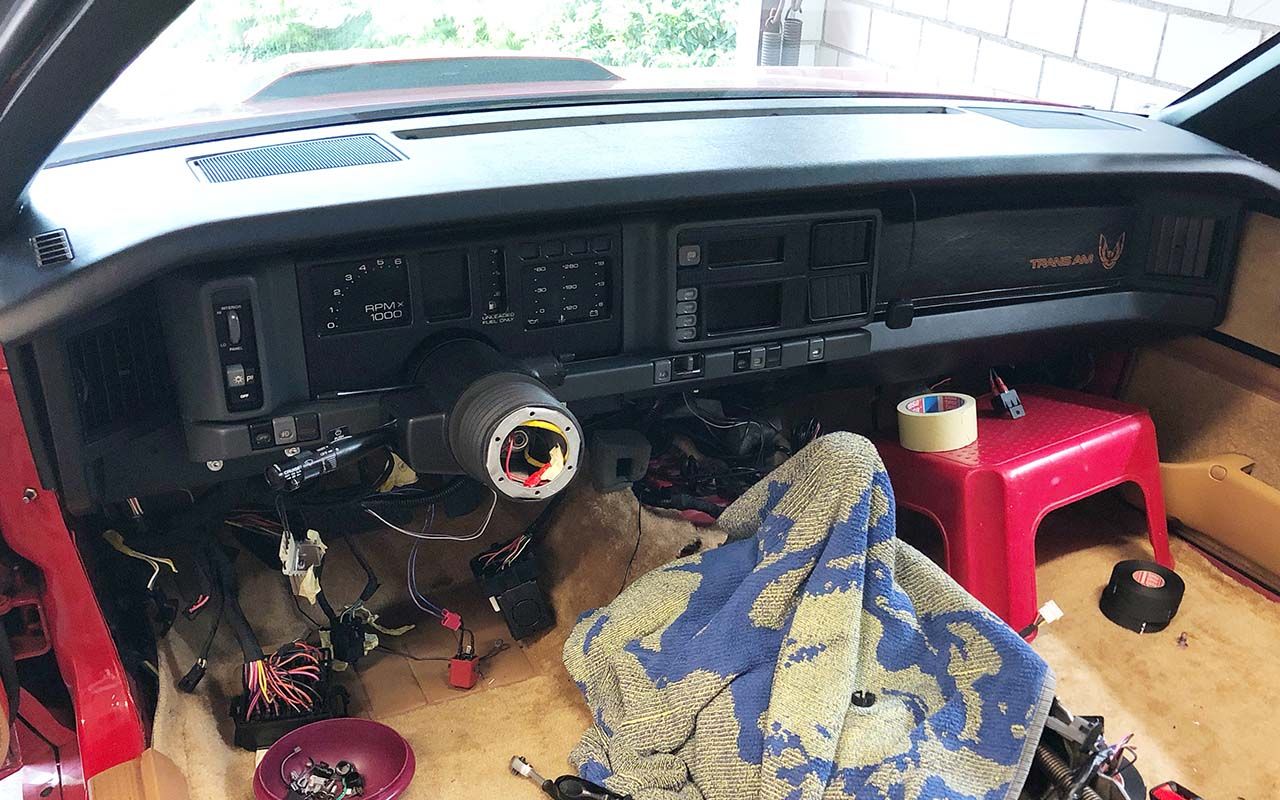
As suggested by RunawayRadio I ordered some of that Tesa harness tape. I can really recommend that stuff, it worked out nicely for me. I got the dash harness loomed and I think it looks quite nice. All clean and still flexible.
Yesterday I took a first drive in months - cluster hanging down and all the wires floating around lol. Everything working as it should. I'm very happy so far. The next thing will be to get the dash carrier back on. And then of course the radio pod and that should more or less be it then...
Yesterday I took a first drive in months - cluster hanging down and all the wires floating around lol. Everything working as it should. I'm very happy so far. The next thing will be to get the dash carrier back on. And then of course the radio pod and that should more or less be it then...
Lookout on that wiring knot for the stereo in the centre. I found with the tape on the wire there isn't much room under the radio pod there. It might not fit properly until you 'massage' those wires flat.
 05-15-2018, 03:53 PM
#157
Re: GTA digital dash swap - doing it the hard way - pic heavy
Another day off and some spare time to work on the dash while the kids are at school 
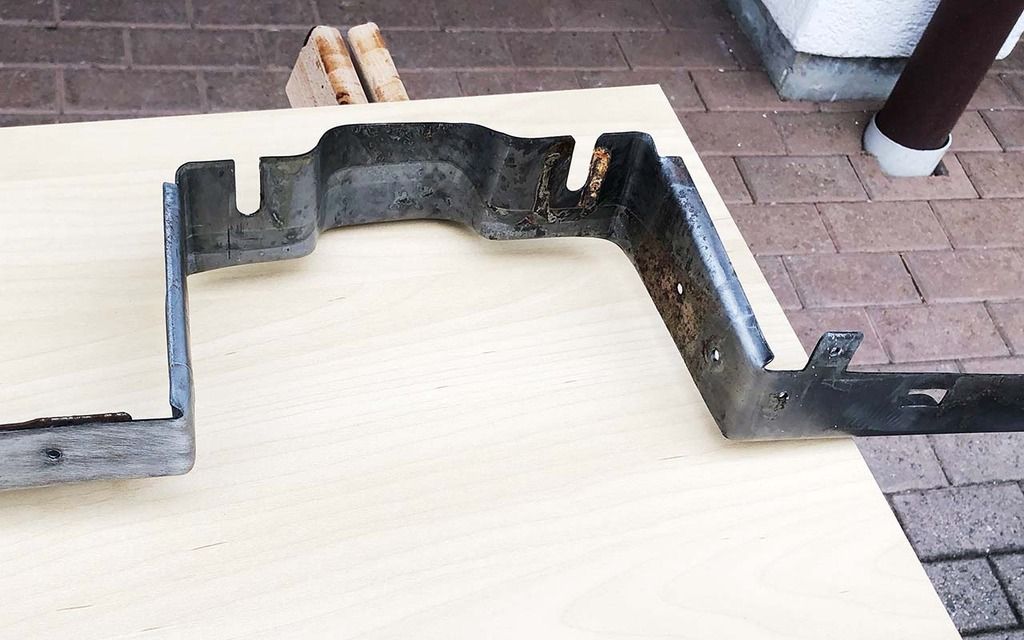
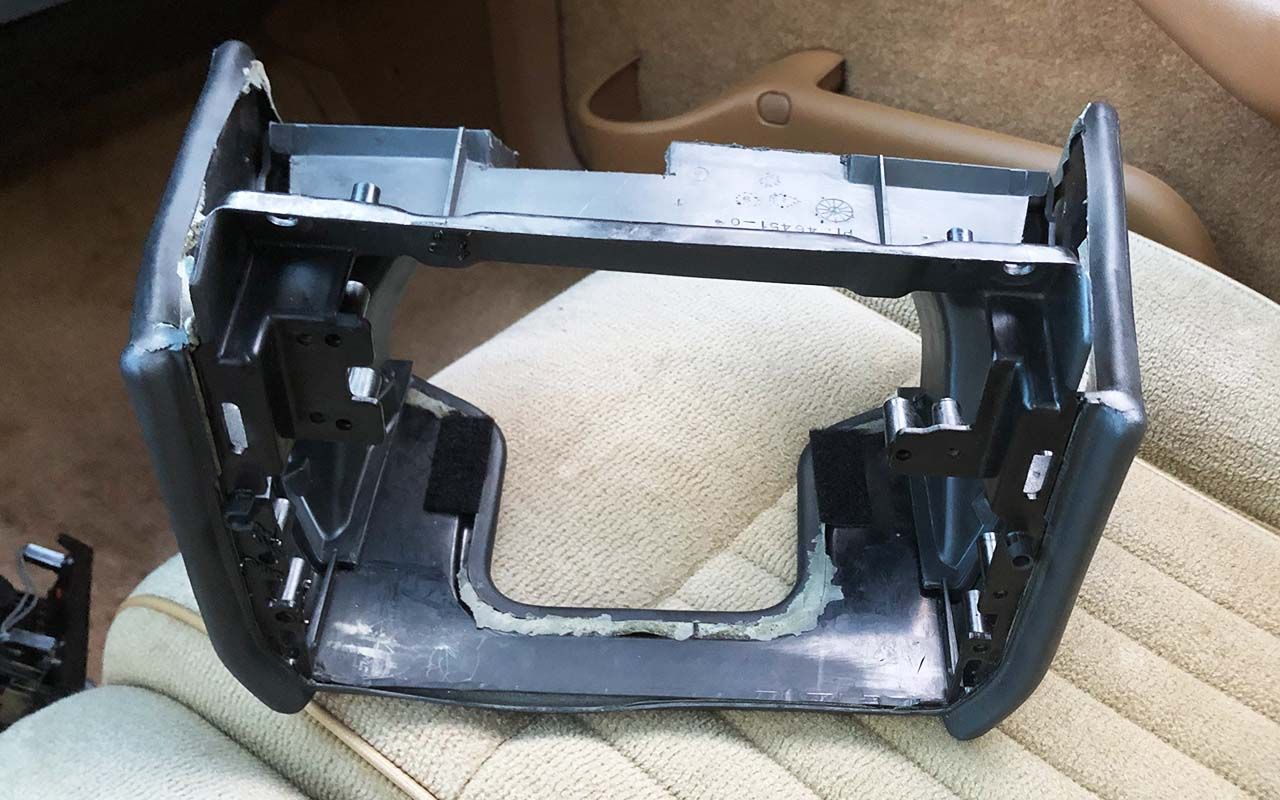
Today I tackled that steel bracket behind the dash carrier. I had to decide whether to use the old rusty one from the 88 digital dash or the one from the 91 analog dash. Unfortunately the steering wheel section is quite different. With the 91 version I hoped to have it easier to mount the fuse box, the convenience center and the under dash panel. But in the end I settled for the 88 bracket, as that one just fits nicely.
So after a lot of cleaning, priming and two coats of black I mounted it back to the dash carrier and fixed it with some M5 nuts and bolts where I had previously removed the rivets.


 05-15-2018, 03:57 PM
#158
Re: GTA digital dash swap - doing it the hard way - pic heavy
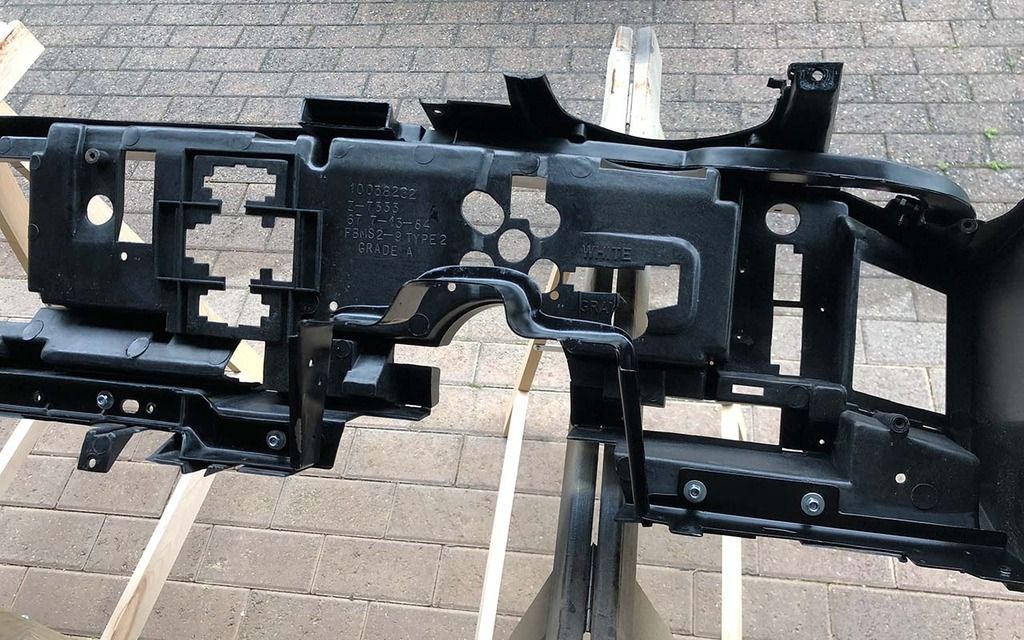
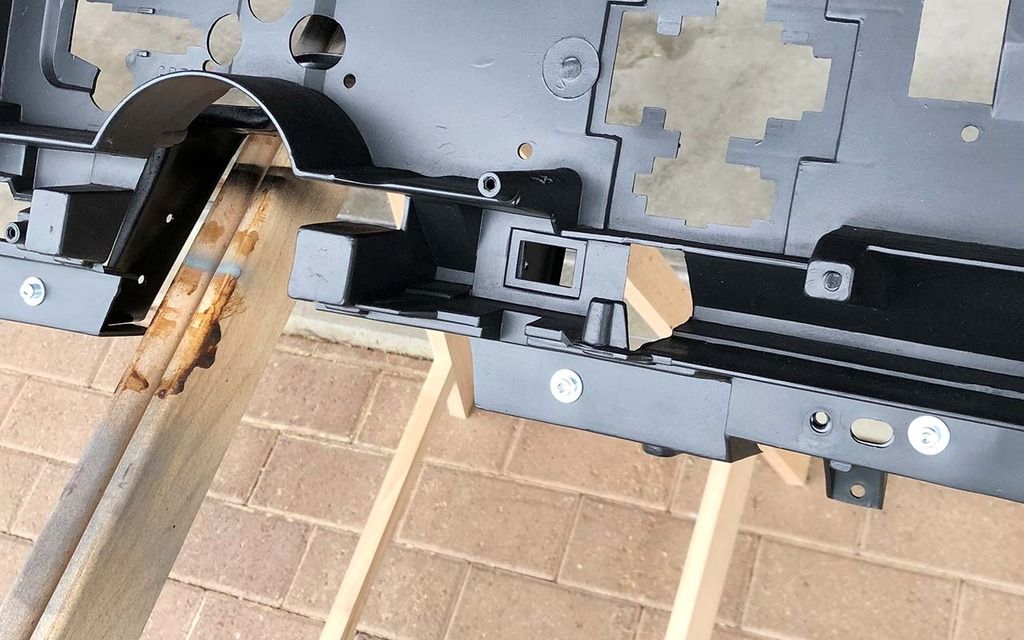
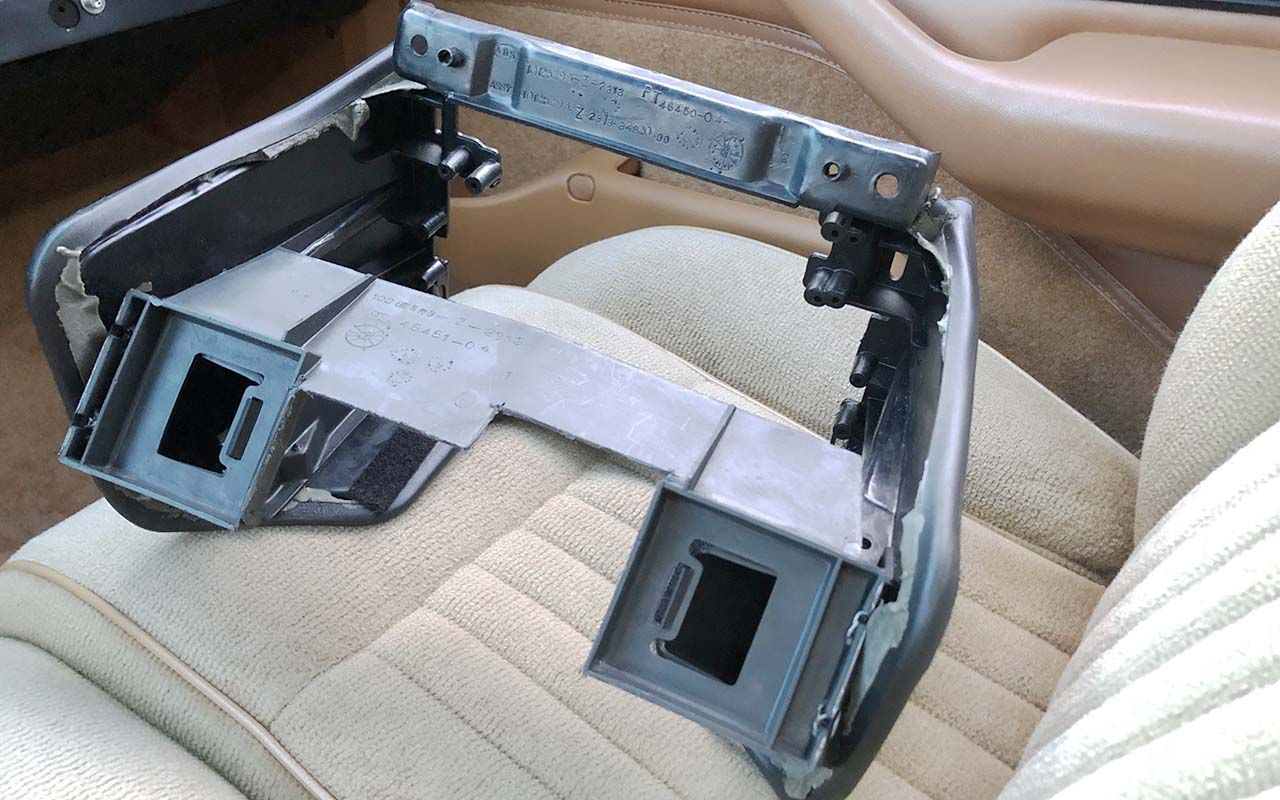
Well on to the next step. I did a quick fit test which looked promising. So I thought I could as well go ahead and mount that thing.
There is a vertical steel bar of which I forgot to take a picture. This one secures the dash harness to the front part. The rest of the harness is sandwiched in between the air ducts and the dash carrier. Surprisingly all went in without too many problems.
There is a vertical steel bar of which I forgot to take a picture. This one secures the dash harness to the front part. The rest of the harness is sandwiched in between the air ducts and the dash carrier. Surprisingly all went in without too many problems.
 05-15-2018, 03:58 PM
#159
Re: GTA digital dash swap - doing it the hard way - pic heavy
And with
all Edit: most of the beauty plates and the dash pad mounted. Looks promising.
Of course that one big question remains: is it working?
Of course that one big question remains: is it working?

Last edited by Cehbra; 05-29-2018 at 10:24 AM.

 05-15-2018, 04:06 PM
#161
Re: GTA digital dash swap - doing it the hard way - pic heavy
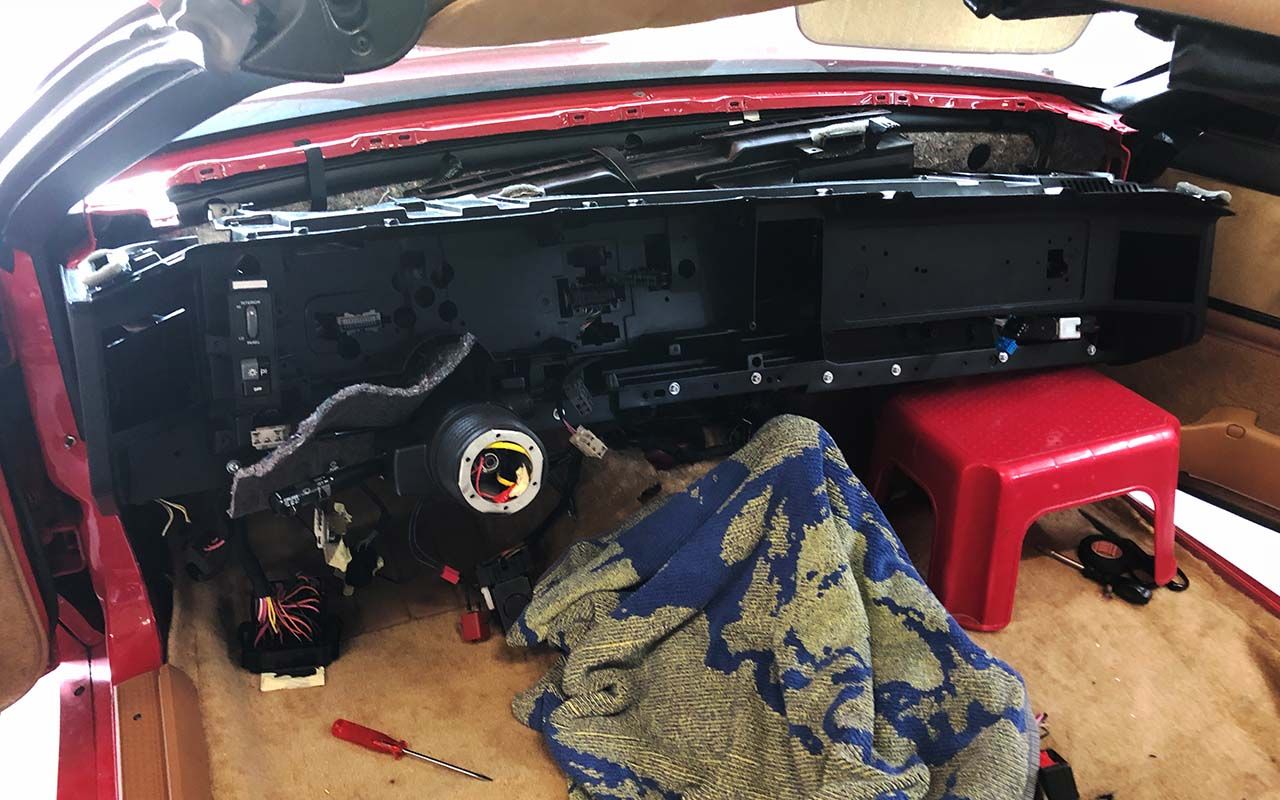
It's really nice to see the digital dash finally in the car after so many months of collecting parts, studying diagrams, preparing and cleaning, soldering, trials and errors.
There are some quirks, especially on the lower left and right side I'll need a thick washer to fix the dash carrier to the support brackets as there is a gap of about 5 mm. And then of course all the wires hanging from the top will need to be mounted nicely.
But finally there is some light at the end of the tunnel...
05-15-2018, 04:08 PM
#162
Senior Member

Re: GTA digital dash swap - doing it the hard way - pic heavy
Some digital light from the 80s
All I can say is a big well done mate!!
All I can say is a big well done mate!!
 05-15-2018, 10:08 PM
#164
Senior Member
iTrader: (2)
Join Date: May 2002
Location: Hollywood, FL
Posts: 504
Likes: 0
Received 0 Likes
on
0 Posts
Car: '88 Black GTA, T-tops, digital dash
Engine: 5.7 TPI w/custom chip
Transmission: 700R4
Axle/Gears: 9 bolt 327 posi
Re: GTA digital dash swap - doing it the hard way - pic heavy
Looks great!
05-15-2018, 11:33 PM
#165
Supreme Member
iTrader: (34)
Join Date: Jul 2002
Location: Stamford, New York
Posts: 1,983
Likes: 0
Received 6 Likes
on
3 Posts
Car: 80 SE/TTA;88 T/A GTA;86 T/A
Engine: 4.9L Turbo; LT1; empty
Transmission: TH350; T56; empty
Axle/Gears: 3:23 disk; 4:10 disk ; 3.42 disk
Re: GTA digital dash swap - doing it the hard way - pic heavy
Way to go, happy to see you making so much progress! once I get my body blasted I'll be starting my restoration thread, but soon I'll be testing my dash wiring for my digital swap outside the car to make sure everything looks good before I start to tap in for my customizations. with that said, you happen to have any luck with lower odometers? Keep up the good work, look forward to seeing a video of the dash in full function!
05-17-2018, 03:41 PM
#167
Re: GTA digital dash swap - doing it the hard way - pic heavy
Way to go, happy to see you making so much progress! once I get my body blasted I'll be starting my restoration thread, but soon I'll be testing my dash wiring for my digital swap outside the car to make sure everything looks good before I start to tap in for my customizations. with that said, you happen to have any luck with lower odometers? Keep up the good work, look forward to seeing a video of the dash in full function!
https://www.thirdgen.org/forums/elec...ml#post6222818
Happy?
05-17-2018, 04:01 PM
#168
Supreme Member

Re: GTA digital dash swap - doing it the hard way - pic heavy
05-18-2018, 12:36 AM
#169
Re: GTA digital dash swap - doing it the hard way - pic heavy

To me nothing beats the look of the OEM digital dash. It's definitely a lot more time consuming and more expensive than putting the aftermarket gages in. But to me it's a heartfelt thing and I think it was worthwhile to go through the trouble.
05-18-2018, 07:08 AM
#170
Supreme Member
iTrader: (11)

Join Date: Sep 1999
Location: NJ
Posts: 4,345
Received 298 Likes
on
234 Posts
Car: 92 Firebird
Engine: 4.8 LR4
Transmission: T56
Axle/Gears: 3.45 9 Bolt
Re: GTA digital dash swap - doing it the hard way - pic heavy
Those Intellitronix look like *** to me, I don't know why anyone would want those in their car. It looks like something I could put together on my own. The factory gauges definitely don't look like something I could build, they look a lot cooler and more modern than those simple 7-11 (or whatever) segment displays.
05-18-2018, 10:54 PM
#171
Supreme Member
iTrader: (34)
Join Date: Jul 2002
Location: Stamford, New York
Posts: 1,983
Likes: 0
Received 6 Likes
on
3 Posts
Car: 80 SE/TTA;88 T/A GTA;86 T/A
Engine: 4.9L Turbo; LT1; empty
Transmission: TH350; T56; empty
Axle/Gears: 3:23 disk; 4:10 disk ; 3.42 disk
Re: GTA digital dash swap - doing it the hard way - pic heavy
Kudos and hate off! Amazing that you had that figured out in 4 hours, Haha absolutely impressed. I'll take one, and with that said, wanted to say thank you for the 3d model of the radio plate. I never put two and two together with the threads and your user name until today, and after the health scare you had on that thread I feared the worst since there was no more posting afterwards. Anyways, a buddy took your file and made one for me to test fit, and we will be going back in with a nicer material second time around. With that said do you still have access to the foil print to make the panels look factory? May be interested if I can't find a print service locally, and potentially combine shipping if that's possible. I'd need to check on that first, but, anyways, enough of my hijack of your digi dash thread with other topics, but again thank you for all your diligent work for the third gen community!
05-23-2018, 06:18 AM
#172
Re: GTA digital dash swap - doing it the hard way - pic heavy
Those Intellitronix look like *** to me, I don't know why anyone would want those in their car. It looks like something I could put together on my own. The factory gauges definitely don't look like something I could build, they look a lot cooler and more modern than those simple 7-11 (or whatever) segment displays.
 05-23-2018, 06:20 AM
#173
Re: GTA digital dash swap - doing it the hard way - pic heavy
Kudos and hate off! Amazing that you had that figured out in 4 hours, Haha absolutely impressed. I'll take one, and with that said, wanted to say thank you for the 3d model of the radio plate. I never put two and two together with the threads and your user name until today, and after the health scare you had on that thread I feared the worst since there was no more posting afterwards. Anyways, a buddy took your file and made one for me to test fit, and we will be going back in with a nicer material second time around. With that said do you still have access to the foil print to make the panels look factory? May be interested if I can't find a print service locally, and potentially combine shipping if that's possible. I'd need to check on that first, but, anyways, enough of my hijack of your digi dash thread with other topics, but again thank you for all your diligent work for the third gen community!

As we moved away from Basel last year I currently don't have access to a foil print service anymore. I'll have to find another one sooner or later though.
05-23-2018, 11:44 AM
#174
Re: GTA digital dash swap - doing it the hard way - pic heavy
A little update:
One thing I noticed just today is that when I press the "E/m" button next to the odometer the mileage value will switch from miles to kilometers - right as intended. However, the speedometer didn't.
Of course I can't drive around with a miles to km conversion table attached to the windshield so I had to resolve that problem.
I did some switching in and out of boards and changing EEPROMs to find the problem. In the end it was the odometer board. I have three of them - two from the USA and one from Germany. The german board worked correctly, the other two didn't.
The one that works is on the left side:
 05-23-2018, 11:48 AM
#175
Re: GTA digital dash swap - doing it the hard way - pic heavy
There is no visible difference in the boards, they also share the same part number. It can't be a coincidence that the US board doesn't' work that way though. Probably it is intended not to switch from miles to km.
There are some export versions that also have a different temperature range display (both of mine are the same however). There are some secrets yet to be resolved...
There are some export versions that also have a different temperature range display (both of mine are the same however). There are some secrets yet to be resolved...
05-23-2018, 11:53 AM
#176
Re: GTA digital dash swap - doing it the hard way - pic heavy
I would be glad if some of you guys with a digital dash could post your experience with that!
When you press the E/m button what happens? Does the odometer value switch from miles to km alone - or also the speedometer?
Input very much appreciated!
When you press the E/m button what happens? Does the odometer value switch from miles to km alone - or also the speedometer?
Input very much appreciated!
05-23-2018, 11:56 AM
#177
Senior Member
Re: GTA digital dash swap - doing it the hard way - pic heavy
Mine changes both speed and odometer. Will post pic of the board later
05-27-2018, 11:35 AM
#181
Re: GTA digital dash swap - doing it the hard way - pic heavy
Back in the late 90s, I had a 'GTA with the digital dash. And yes, the "e/m" button would change both the odometer and speedometer to KM. I would always fool passengers in my car by making them think I was going faster than I actually was, lol. I currently have another '88 GTA with the digital dash but that's been sitting since right before I got married 5 years ago so there's no way I can easily check that one(62k original miles). My other '88 GTA currently is analog so that's no help(Factory Notchback car though).
05-28-2018, 02:05 PM
#182
Re: GTA digital dash swap - doing it the hard way - pic heavy
Back in the late 90s, I had a 'GTA with the digital dash. And yes, the "e/m" button would change both the odometer and speedometer to KM. I would always fool passengers in my car by making them think I was going faster than I actually was, lol. I currently have another '88 GTA with the digital dash but that's been sitting since right before I got married 5 years ago so there's no way I can easily check that one(62k original miles). My other '88 GTA currently is analog so that's no help(Factory Notchback car though).
Thanks for the input. Looks like I'll have to check those boards then.
05-29-2018, 10:14 AM
#183
Re: GTA digital dash swap - doing it the hard way - pic heavy
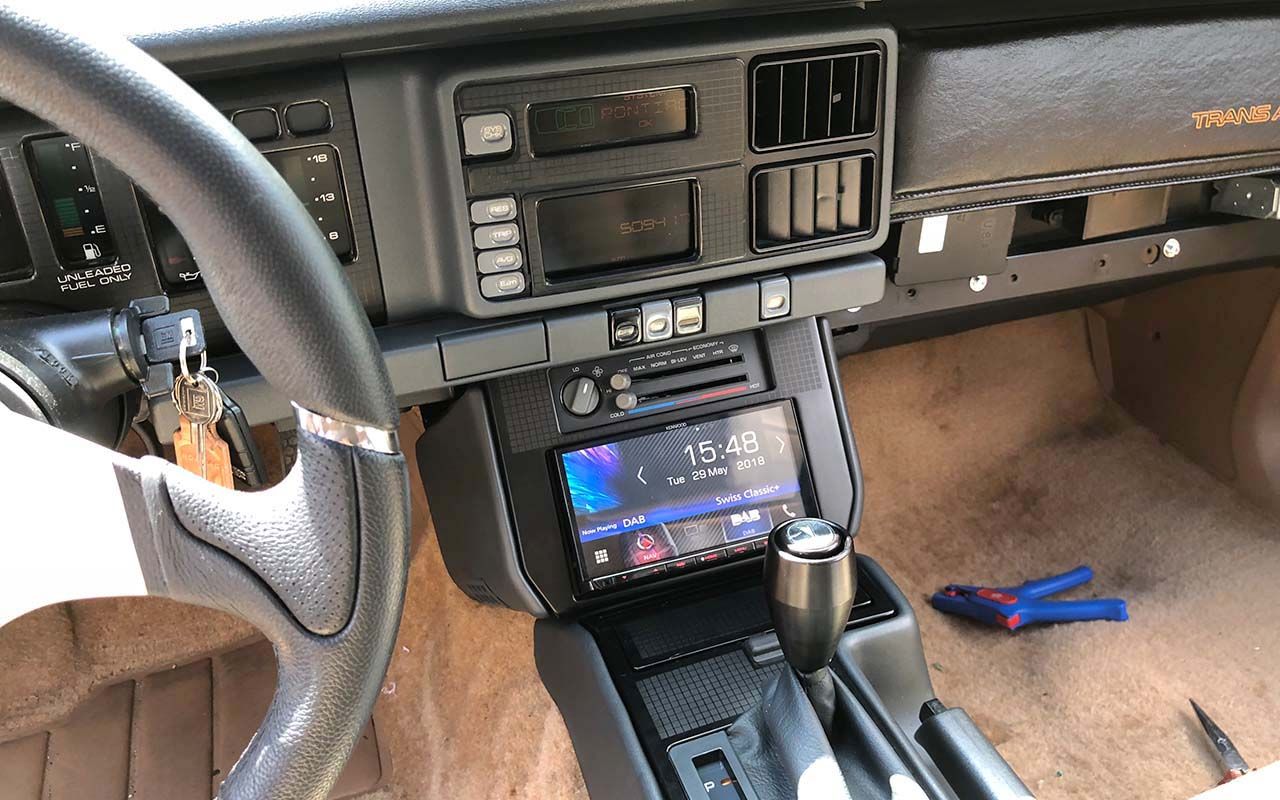
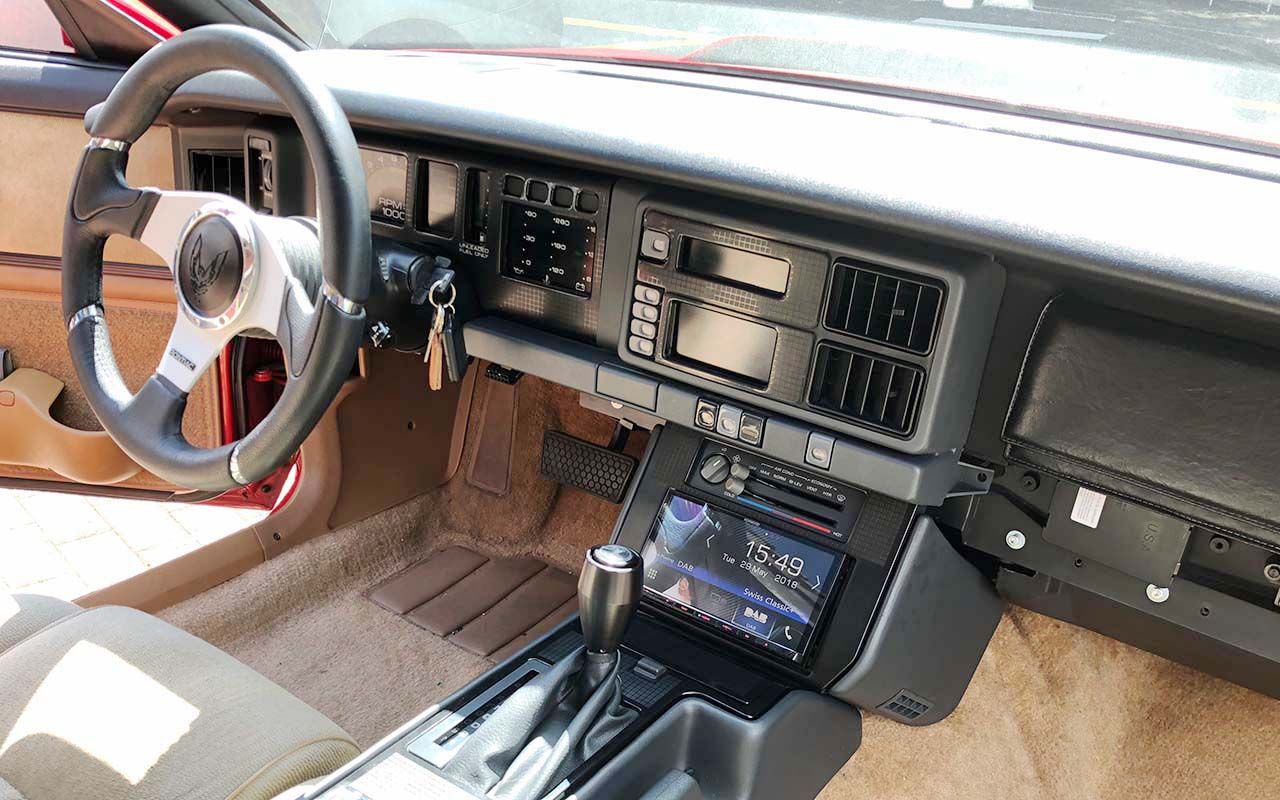
Mounting that double din radio was a total pain in the whatever. Well I was warned by RunawayRadio that there isn't much room to work with inside the radio pod. As it turns out he was totally right.
First I had to shave that plastic frame inside the pod and I also had to cut off a few millimeters of the bulge at the end of the center console. That way my double din radio - a Kenwood DNX8170DABS - would just fit ever so tightly sideways. However that knot on the radio harness came in the way all the time and there just wasn't enough clearance for the radio to fit in lengthwise
In the end I had to split the harness into 2 separate strands for some 10 inches to finally get it to fit. The radio actually still isn't flush and sticks out about 1/3 of an inch, not much but it bugs me a bit. As there absolutely isn't any more room underneath I guess I'll have to live with that.
Shaved off quite a bit of plastic, now it's a little flimsy but when mounted it sits well:


Last edited by Cehbra; 05-29-2018 at 10:26 AM.
05-29-2018, 10:18 AM
#184
Re: GTA digital dash swap - doing it the hard way - pic heavy
Here are some test pics, I need to get it all cleaned up and fine tuned yet. And two of the dash beauty plates are still missing, I'm waiting for them to arrive. And yes, I kept the analog HVAC controls for the moment. The digital HVAC will be a future project.
Better pictures are coming soon.
Better pictures are coming soon.


 05-30-2018, 09:51 AM
#186
Re: GTA digital dash swap - doing it the hard way - pic heavy
Mounting that double din radio was a total pain in the whatever. Well I was warned by RunawayRadio that there isn't much room to work with inside the radio pod. As it turns out he was totally right.
First I had to shave that plastic frame inside the pod and I also had to cut off a few millimeters of the bulge at the end of the center console. That way my double din radio - a Kenwood DNX8170DABS - would just fit ever so tightly sideways. However that knot on the radio harness came in the way all the time and there just wasn't enough clearance for the radio to fit in lengthwise
In the end I had to split the harness into 2 separate strands for some 10 inches to finally get it to fit. The radio actually still isn't flush and sticks out about 1/3 of an inch, not much but it bugs me a bit. As there absolutely isn't any more room underneath I guess I'll have to live with that.
Overall, looks really good. It's the first time i've ever seen anyone finish the swap correctly and not just scrap the car halfway though, lol. Nice work.
05-31-2018, 03:11 PM
#187
Re: GTA digital dash swap - doing it the hard way - pic heavy
It's tricky to work with the dimensions of that pod. I got around it by mounting a low depth double din media receiver. The parrot asteroid smart is only 3-3.5" deep but even then it was pretty tight. Sits flush though.
Overall, looks really good. It's the first time i've ever seen anyone finish the swap correctly and not just scrap the car halfway though, lol. Nice work.
Overall, looks really good. It's the first time i've ever seen anyone finish the swap correctly and not just scrap the car halfway though, lol. Nice work.
Thanks for your acknowledgement. I know about some people who swapped from analog to digital within the 1986 to 1989 model years, but I didn't know there were attempts to do it to later years as well.
Last edited by Cehbra; 06-12-2018 at 07:11 AM.
05-31-2018, 03:26 PM
#188
Re: GTA digital dash swap - doing it the hard way - pic heavy
As promised, here are some better pictures. I got the car all cleaned up and tested out.
That left door ajar sensor quit the service today, so I'll have to reopen the driver side door, sigh") But apart from that there's nothing to complain about. Everything working flawlessly.
But apart from that there's nothing to complain about. Everything working flawlessly.
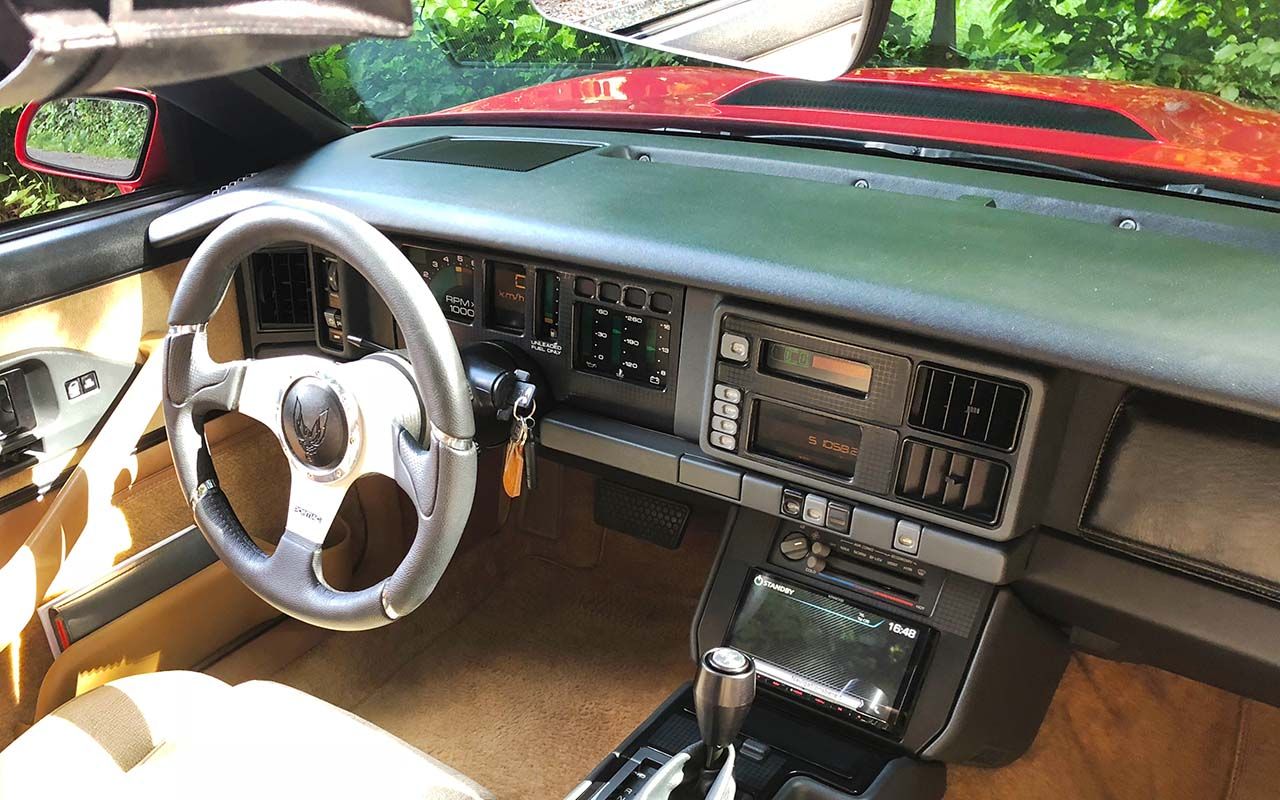
That left door ajar sensor quit the service today, so I'll have to reopen the driver side door, sigh
But apart from that there's nothing to complain about. Everything working flawlessly.

The following users liked this post:
Ascension (07-21-2019)
05-31-2018, 03:51 PM
#190
Senior Member
Re: GTA digital dash swap - doing it the hard way - pic heavy
Hey. You sure the oil pressure gauge is working? I would make sure it’s working as it is a vital metric to monitor.
Mine goes to max especially when in normal temperature.
Mine goes to max especially when in normal temperature.
05-31-2018, 04:14 PM
#192
Senior Member
Re: GTA digital dash swap - doing it the hard way - pic heavy
Yes I saw it but to me 30 is a bit too low. Maybe you can get other views from members.
As I said mine is normally in the 60 regions and I replaced the sender very recently just to be sure. You can measure resistance at the sensor. You should be able to find a table with resistance vs pressure somewhere on here.
As I said mine is normally in the 60 regions and I replaced the sender very recently just to be sure. You can measure resistance at the sensor. You should be able to find a table with resistance vs pressure somewhere on here.
06-01-2018, 12:36 AM
#193
Re: GTA digital dash swap - doing it the hard way - pic heavy
Ok thanks for that input aseychell. If I remember correctly my old analog setup showed an oil pressure in the same range, so that hasn't changed with the digital dash. As far as I checked on the 1988 manual the 1988 and the 1991 sending units have about the same resistance range as well so it should read correctly.
I've heard that 10 psi per 1000 rpm should be enough oil pressure, is that wrong?
I've heard that 10 psi per 1000 rpm should be enough oil pressure, is that wrong?
06-01-2018, 01:08 AM
#194
Senior Member
Re: GTA digital dash swap - doing it the hard way - pic heavy
For sure I am not going to dare taking the lead of an authoritative source but what I can say is that mine WHEN COLD, it is at full max, at times the range goes even beyond the 60 momentarily and returns down. It will eventually decrease to 3/4 of the display at idle when hot.
06-01-2018, 06:48 AM
#195
06-01-2018, 05:31 PM
#197
Re: GTA digital dash swap - doing it the hard way - pic heavy
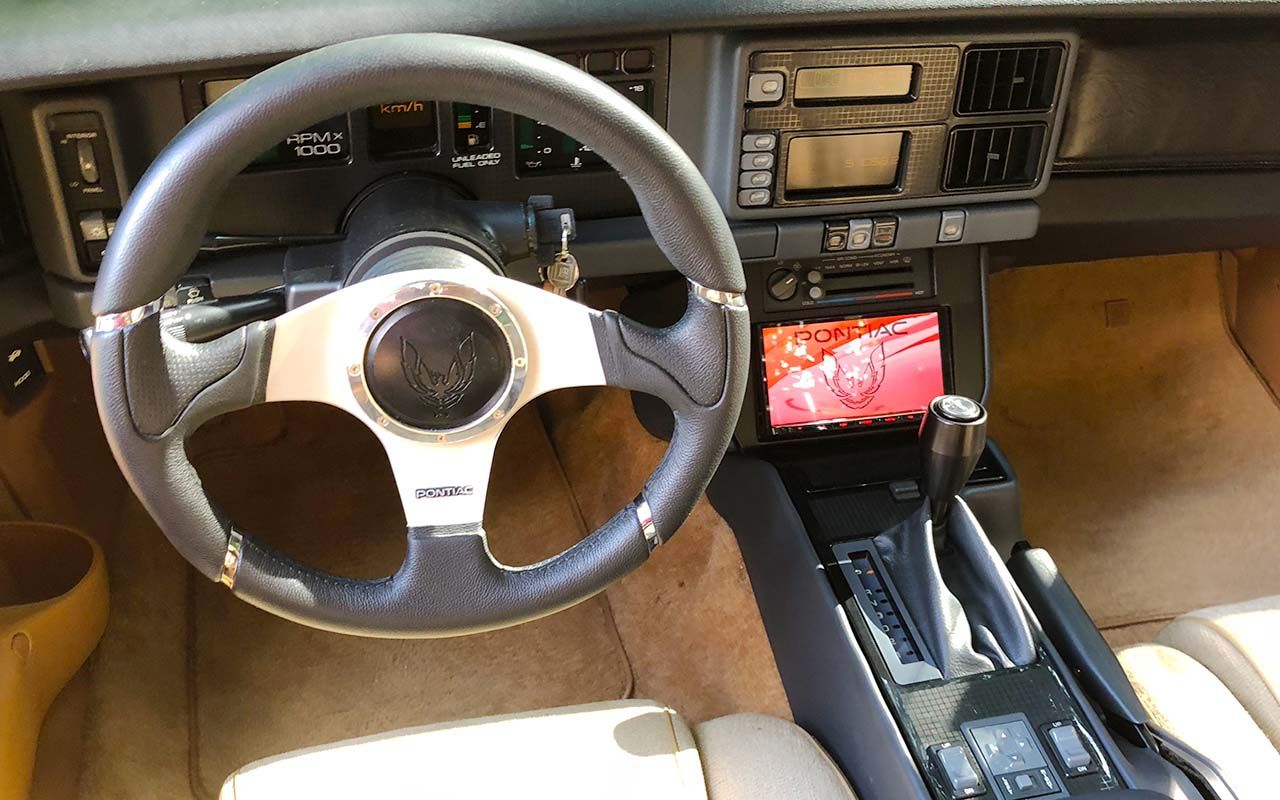
I thought I'd share some of my experiences with the digital dash.
I've been driving the car to work a few times now. What really surprises me is how readable the speedo is even in direct sunlight. I never had any problem reading those digits. That I can't say about the odometer as this display can be hard to read at times. And the DIC is in a whole different league. I think that piece was designed by a different team and it's as good as unreadable under normal daylight conditions. Doesn't really matter though. The DIC contents are hardly relevant while driving.
The dash is very responsive and there's nothing to complain about the overall day to day usability.
Now that the dash is in the car I got used to it quickly. In the end the part that was the most fun was the process of doing it. Now that I'm finished after all those weeks and months it doesn't look or feel that special. Which is kinda nice too, because what really matters is whether it gets it's job done - and it does.
I don't know if I'd do it again. But as I said, I had a lot of fun doing it!
06-01-2018, 05:41 PM
#198
Re: GTA digital dash swap - doing it the hard way - pic heavy
So if anybody wants to do the same I recommend a good heap of insanity and lots of time. Preparation work is crucial. A complete Firebird service manual 1988 is needed as well as the service manual of the year of the receiving car. All the special infos I gathered are in this thread, and links to the odometer thread as well.
And of course doing that swap will require a working digital dash with the carrier and a harness to work with - the harness doesn't need to be complete. The three dash plugs should do, except if you want to swap from analog to digital in the same generation (1986-1989), then you'll need a matching dash harness, but also the front and rear lights harness.
I will gladly answer questions as far as I can.
Thank you all for your support! Couldn't have done it without you!
06-02-2018, 08:39 PM
#199
Senior Member
iTrader: (2)
Join Date: May 2002
Location: Hollywood, FL
Posts: 504
Likes: 0
Received 0 Likes
on
0 Posts
Car: '88 Black GTA, T-tops, digital dash
Engine: 5.7 TPI w/custom chip
Transmission: 700R4
Axle/Gears: 9 bolt 327 posi
Re: GTA digital dash swap - doing it the hard way - pic heavy
Wow Cehbra, awesome work. Your video looks great! Congratulations! My original digital dash switched to KM or Miles on the odometer as well. I replaced it with a Canadian dash and it works the exact same way.
06-08-2018, 11:35 AM
#200
Senior Member
Re: GTA digital dash swap - doing it the hard way - pic heavy
Cehbra
I am currently re assembling my dash and tidying up a bit the looms. I forgot to take a photo before I removed the loom from the dash and now I have doubt on which side the attached connector should go. Is this way the right orientation? Maybe you have some high res photos while you were doing yours as the ones online are not clear enough to zoom in. As you can see currently the part with an open end of the connector is at the passenger side.
Also on a related note, I can’t get the special neon like light on top of the dimmer switch to work. Not sure yet if the dash lights work as all is in boxes however the courtesy lights facing the floor work fine even the dome light. There is no power to the wires for this neon light. Tried parking lights on, ignition on... nothing.
I am reading about that transistor near the radio pod. Do you think it is related? It is all wired but I didn’t test it in isolation.