GTA digital dash swap - doing it the hard way - pic heavy
 06-24-2016, 06:00 PM
#1
GTA digital dash swap - doing it the hard way - pic heavy
This is going to be another - rather long - build thread. I’m reworking the interior of my 1991 Firebird over the next few weeks. Actually I once thought that I was finished with the car

As it seems, our cars never really are finished…
I’m actually planning on doing the following:
Hmm, now that I see the list: this seems to be a major undertaking. However I got most of the parts ready, so it should be doable.
As it seems, our cars never really are finished…
I’m actually planning on doing the following:
- swap in the 86-88 TA/GTA digital dash
- swap in digital HVAC
- add keyless entry (ABO0104 from 4th gen)
- Edit:
add one touch turn signal module - replace stereo with new double DIN system (Kenwood DNX8170DABS)
- Edit:
add UQ7 stereo - remove power antenna and replace it with an electronic system
- Edit: add dash cam and back-up cam
- Edit: add auto-dimming rearview mirror with homelink
Hmm, now that I see the list: this seems to be a major undertaking. However I got most of the parts ready, so it should be doable.
Last edited by Cehbra; 05-08-2018 at 12:58 AM.
 06-24-2016, 06:02 PM
#2
Re: GTA digital dash swap - doing it the hard way - pic heavy
The largest part of this thread will be about the digital dash, especially the DIC (driver information center) which requires a lot of wiring for the sensors. As I have not been able to get hold of a TBI digital dash harness I decided to wire it up myself. I got the diagrams ready and will also be posting what I have, in case anyone is interested.
Propelled by the fact that swapping a cluster from a different car will likely result in a non-matching mileage I hacked the digital dash odometer. Those findings have been posted in a different thread:
https://www.thirdgen.org/forums/elec...o-86-88-a.html
Propelled by the fact that swapping a cluster from a different car will likely result in a non-matching mileage I hacked the digital dash odometer. Those findings have been posted in a different thread:
https://www.thirdgen.org/forums/elec...o-86-88-a.html
Last edited by Cehbra; 06-19-2018 at 03:17 PM.
06-24-2016, 06:03 PM
#3
Re: GTA digital dash swap - doing it the hard way - pic heavy
Even though it's believed to be a fact - we do *not* need a complete harness for a digital dash swap into any third generation model year Firebird (at least that is what I believe). It is sufficient to get the connectors (3 for the dash, plus as many sensors we can get).
There are three parts to the digital dash, which are totally independent from each other:
1. digital cluster
2. driver information center (DIC)
3. digital HVAC controls
There are three parts to the digital dash, which are totally independent from each other:
1. digital cluster
2. driver information center (DIC)
3. digital HVAC controls
Last edited by Cehbra; 06-12-2018 at 06:34 AM.
06-24-2016, 06:08 PM
#4
Re: GTA digital dash swap - doing it the hard way - pic heavy
The digital cluster itself is just a digital version of the usual analog cluster. Except newer analog clusters have an "infl rest" light, which was not needed as there was no airbag in the earlier model years. The major difference really is just the connector, which has to be rewired.
However: there are a bunch of sensors that are not present in the analog cluster, namely:
All these sensors mount to the so called driver information center (DIC). The DIC is a little car computer which displays the sensor information. This device is independent from the digital cluster (well not totally as there is an input to synchronize the dimming with the main cluster). But essentially all the additional goodies in the digital dash are in that separate module called DIC.
I believe that two different design teams created the DIC and the instrument panel back in the 80's. There are several differences in the display, the overall encasing and in the way this thing is connected that makes me assume that. But whatever...
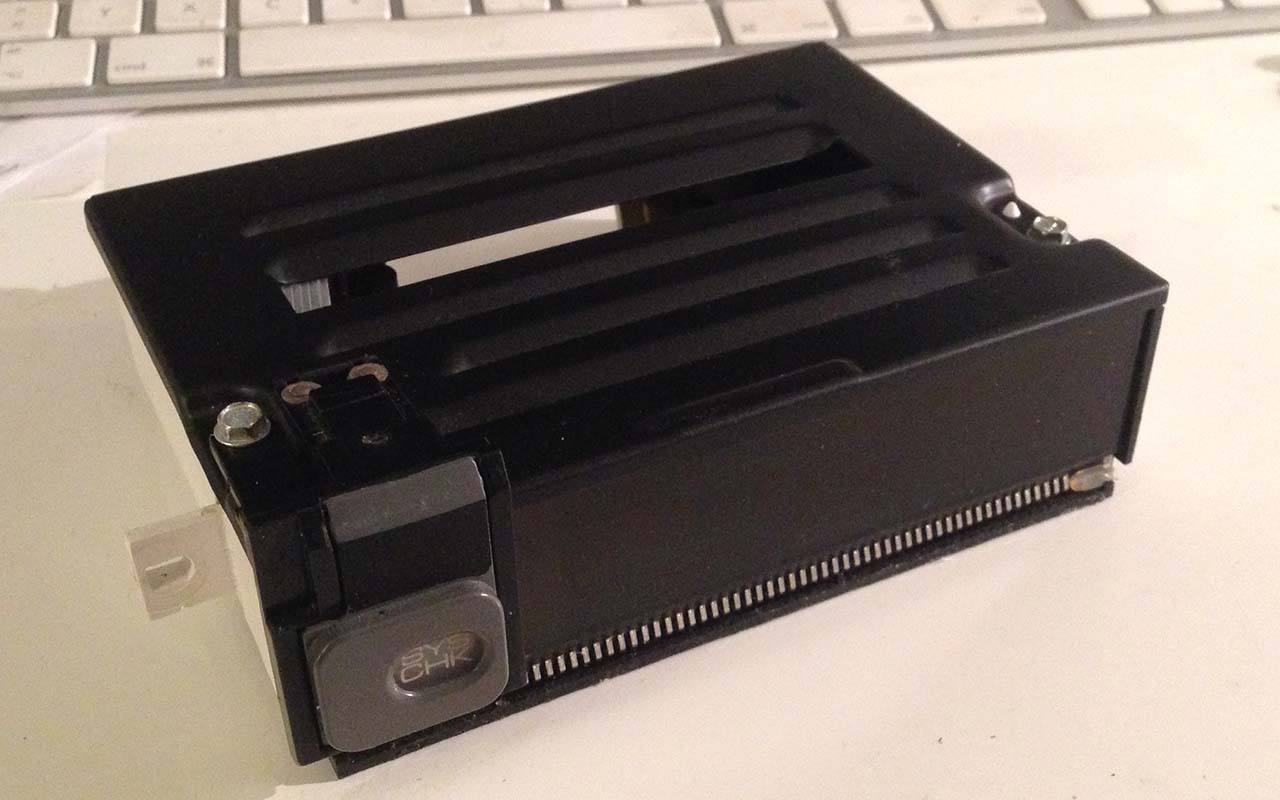
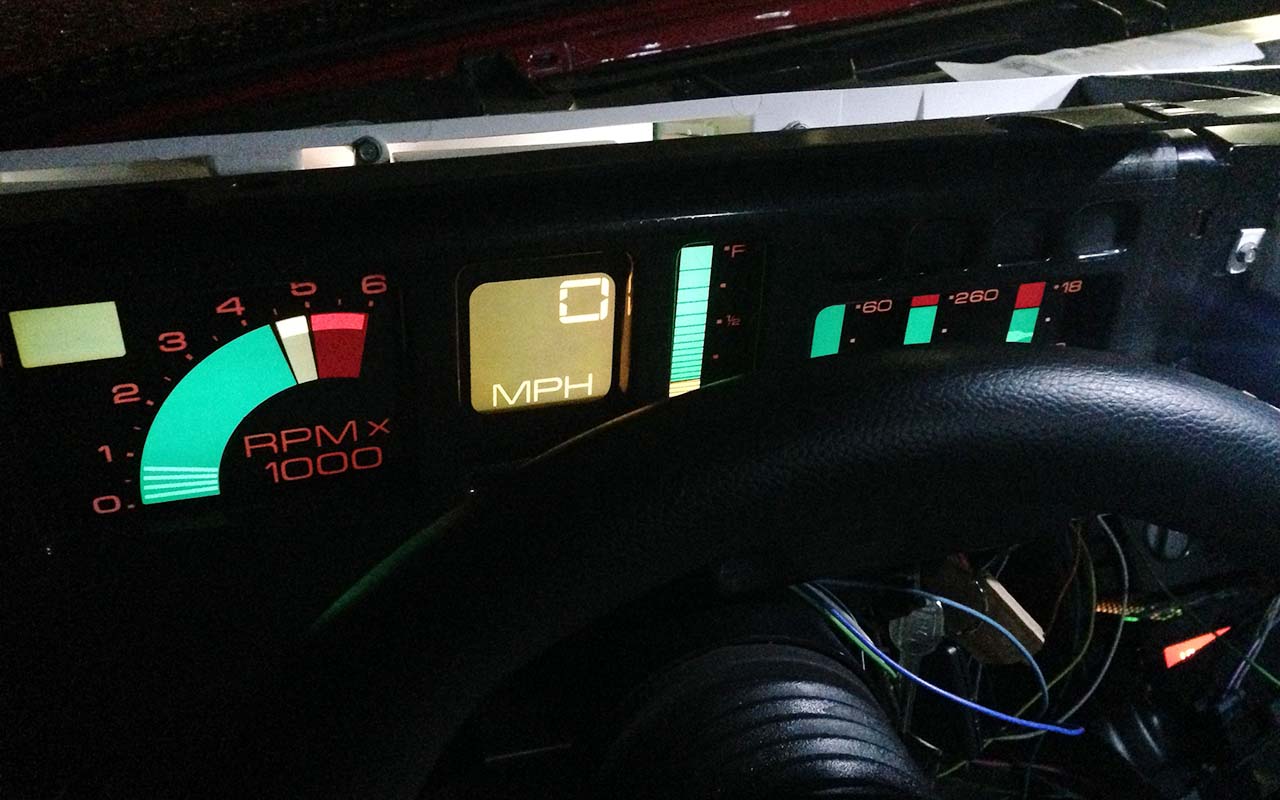
This is my refurbished DIC, and next to me only my wife is allowed to touch it
However: there are a bunch of sensors that are not present in the analog cluster, namely:
- L + R door ajar
- hatch ajar
- coolant fluid level
- washer fluid level
- lights monitoring
All these sensors mount to the so called driver information center (DIC). The DIC is a little car computer which displays the sensor information. This device is independent from the digital cluster (well not totally as there is an input to synchronize the dimming with the main cluster). But essentially all the additional goodies in the digital dash are in that separate module called DIC.
I believe that two different design teams created the DIC and the instrument panel back in the 80's. There are several differences in the display, the overall encasing and in the way this thing is connected that makes me assume that. But whatever...

This is my refurbished DIC, and next to me only my wife is allowed to touch it
Last edited by Cehbra; 06-12-2018 at 06:42 AM.
The following users liked this post:
watchfulspark (10-11-2021)
06-24-2016, 06:09 PM
#5
Re: GTA digital dash swap - doing it the hard way - pic heavy
Additionally the digital HVAC has nothing to do with the digital dash. Back in 86-88 the digital dash and HVAC were paired on the order sheet, so if you ordered the digital dash you always got the digital HVAC as well. But essentially you can swap in the digital HVAC controls and keep the analog dash or vice versa.
Edit: I ended up leaving the analog HVAC in the car, so I can confirm what I said above.
Edit: I ended up leaving the analog HVAC in the car, so I can confirm what I said above.
Last edited by Cehbra; 06-12-2018 at 06:43 AM.
06-24-2016, 06:14 PM
#6
Re: GTA digital dash swap - doing it the hard way - pic heavy
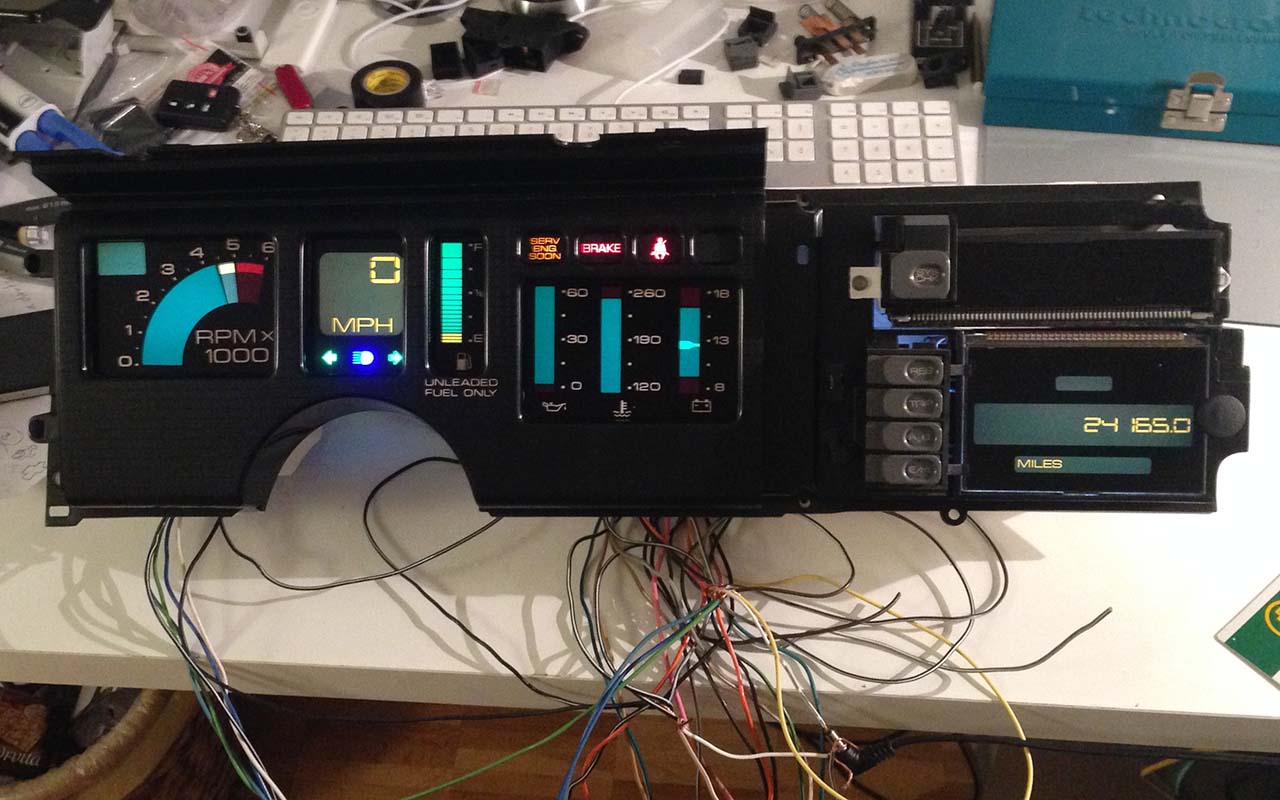
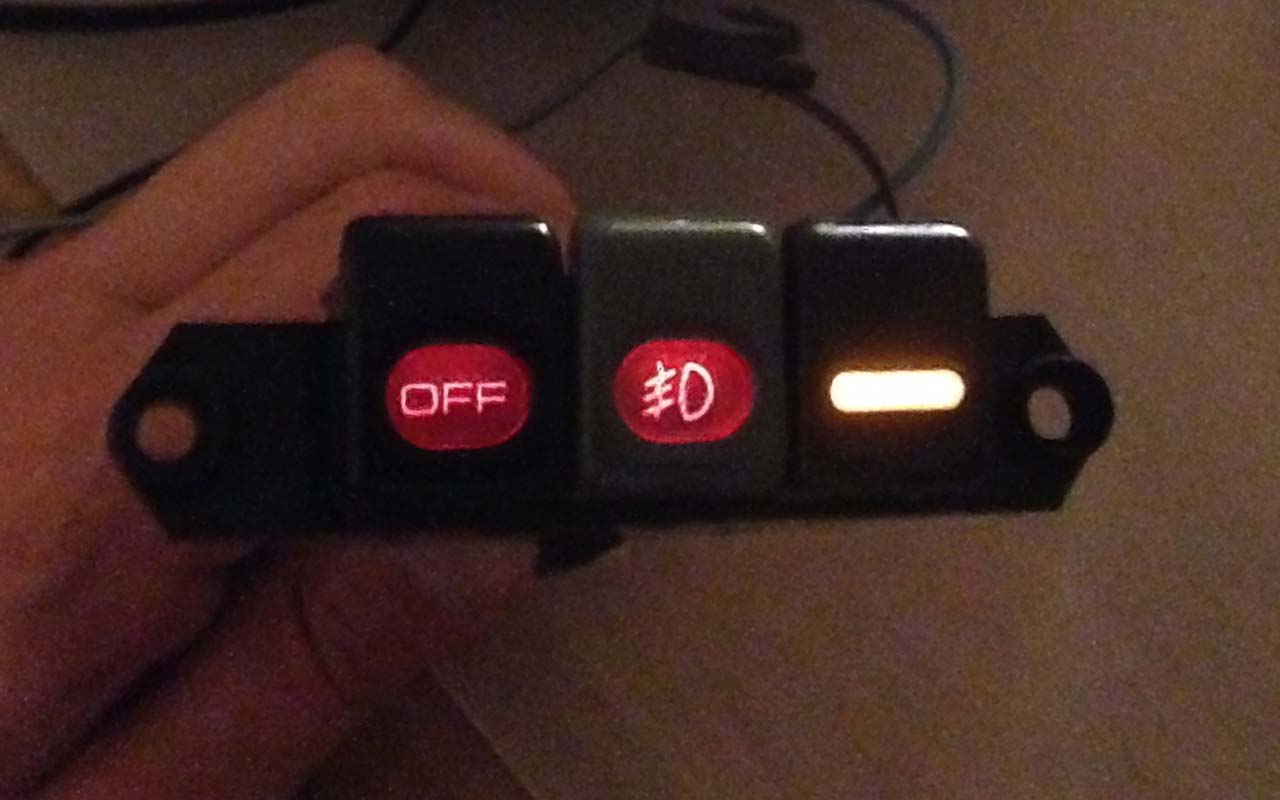
So here’s basically the state at which I am right now: digital dash core cleaned and equipped with some high power neutral white LEDs and colored LEDs for the turn signal, high beam and tell-tale indicators. The white LEDs seem to do their work nicely, I get nice and strong colors. By adding colored LEDs behind the turn signal and high beam indicators I get even nicer colors there, I hope they’re not too intense.
That fourth light next to the fasten seat belt should light up with a "Security" caption. Unfortunately the plug is not connected on the main connector. I hope I can wire that one up somehow.
Quite a wire mess. I hope I can keep track of the wires when I put it in the car...
That fourth light next to the fasten seat belt should light up with a "Security" caption. Unfortunately the plug is not connected on the main connector. I hope I can wire that one up somehow.
Quite a wire mess. I hope I can keep track of the wires when I put it in the car...

Last edited by Cehbra; 06-19-2018 at 03:21 PM.
The following users liked this post:
JadedBirdsFlame (08-02-2020)
06-24-2016, 06:20 PM
#7
Re: GTA digital dash swap - doing it the hard way - pic heavy
Not sure yet if I'm going to wire up all the sensors to the DIC in the end. Door ajar is a must, maybe hatch ajar. Low washer fluid for sure. Not sure about low coolant sensor, as this could be a pain in the a$$ to wire. And I definitely will be skipping the lights monitoring as that special harness is prone to failure.
Trending Topics
06-24-2016, 11:09 PM
#8
Supreme Member

iTrader: (5)
Join Date: Aug 2011
Location: Jackson NJ
Posts: 1,173
Received 155 Likes
on
99 Posts
Car: 1984 T/A
Engine: LQ4
Transmission: T56
Axle/Gears: Ford 8.8 4.10 gears
Re: GTA digital dash swap - doing it the hard way - pic heavy
Do you have the donor dash harness from the car it came from. When i pulled a digitial dash from a junkyard car I removed EVERYTHING associated with the dash. all the wiring and sensors
06-25-2016, 01:36 AM
#9
Re: GTA digital dash swap - doing it the hard way - pic heavy
Yes, I got the complete harness, but it's from a TPI car while mine is TBI. So I de-loomed it (took ages) and cut away all the connectors. So basically I'm left with a bunch of plugs and two large bags of colored wires lol.
06-25-2016, 06:18 AM
#10
Re: GTA digital dash swap - doing it the hard way - pic heavy
Thinking about that shift indicator in the upper left corner of the rpm section. It could be cool to light that one at WOT, so I can see when the cowl induction system is active. Any other ideas?
 06-28-2016, 12:22 PM
#12
Member
Join Date: Sep 2000
Location: Crestline,OH
Posts: 464
Likes: 0
Received 0 Likes
on
0 Posts
Car: 1987 Formula 350
Engine: 6.0 boost and smak
Transmission: 4l80e
Axle/Gears: 9bolt 3.27
Re: GTA digital dash swap - doing it the hard way - pic heavy
subscribed.... I have always loved that dash. 
06-29-2016, 04:11 PM
#13
Re: GTA digital dash swap - doing it the hard way - pic heavy
Thanks guys!

Not much done today, but I compiled my findings on the connectors into a list, so I could see them side by side.
This is only the digital cluster part though, not talking about the DIC right now. That one needs a third connector to connect all the additional sensors. I will be dealing with the DIC later.
Edit: this list is outdated. See post #138 for an updated version. https://www.thirdgen.org/forums/inte...ml#post6217498
Last edited by Cehbra; 06-19-2018 at 03:22 PM. Reason: added info
06-29-2016, 04:13 PM
#14
Re: GTA digital dash swap - doing it the hard way - pic heavy
I hope that list is going to help me with the final wiring.
I’m actually planning on wiring the digital dash in parallel to the existing analog connectors. That way I could swap back to analog easily.
Oh and here's the excerpt from the 88 service manual:
Edit: I made a diagram of the DIC connector and added this one as well, as this is not in the service manual
Last edited by Cehbra; 04-25-2018 at 07:44 AM. Reason: new info
06-29-2016, 04:14 PM
#15
Re: GTA digital dash swap - doing it the hard way - pic heavy
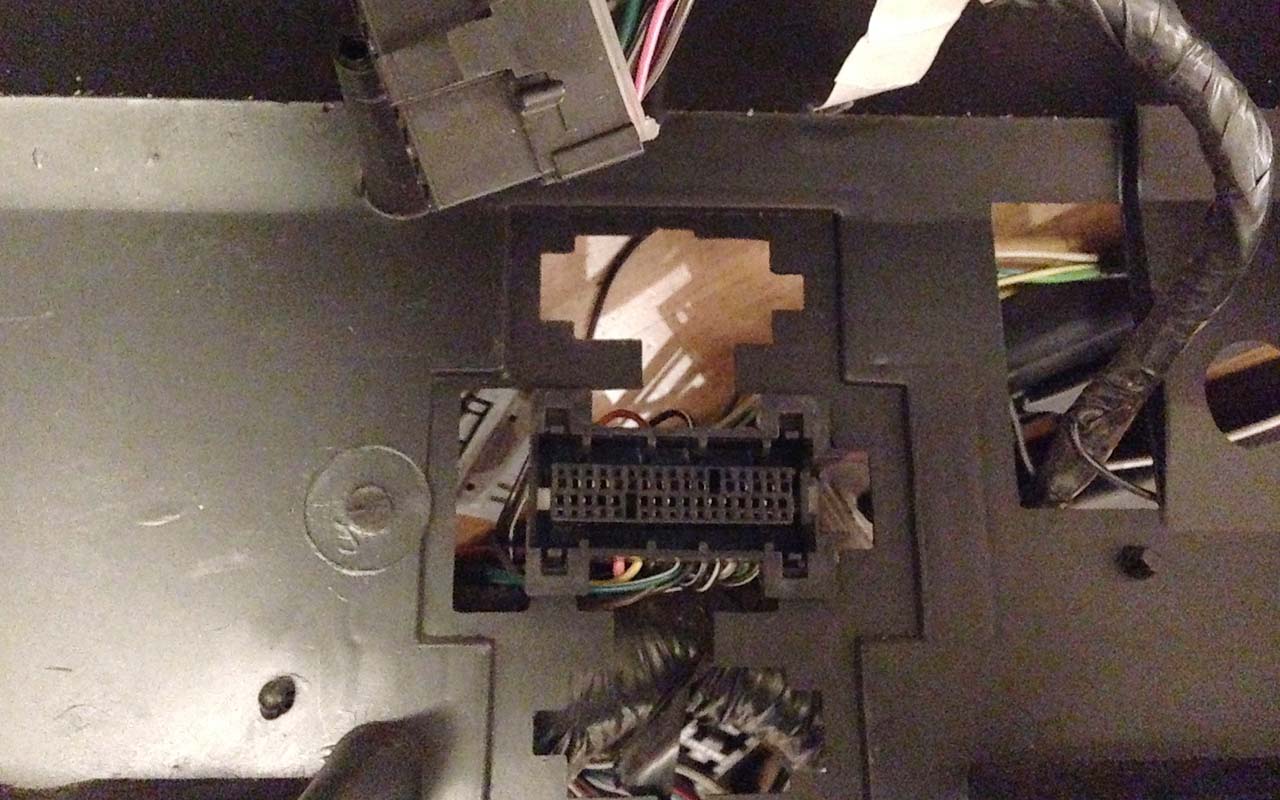
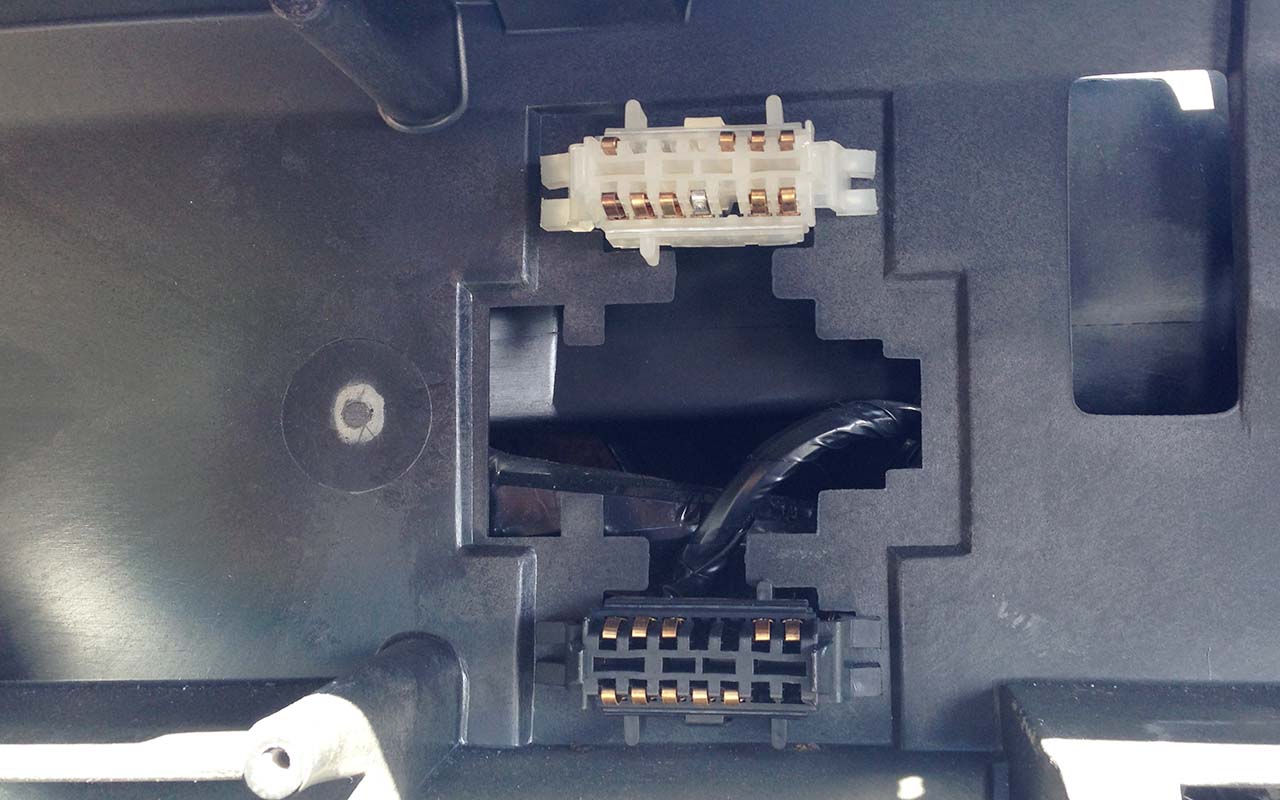
These are the plugs I’m talking about. Luckily, the dash carrier is the same for digital and analog. That big one in the middle is the digital cluster connector C2. Above and below that connector are the cutholes for the analog connectors. Floating around on the top would be the DIC connector.
That other connector is called C1/C3. It really is just one plug, with a white and a grey section.
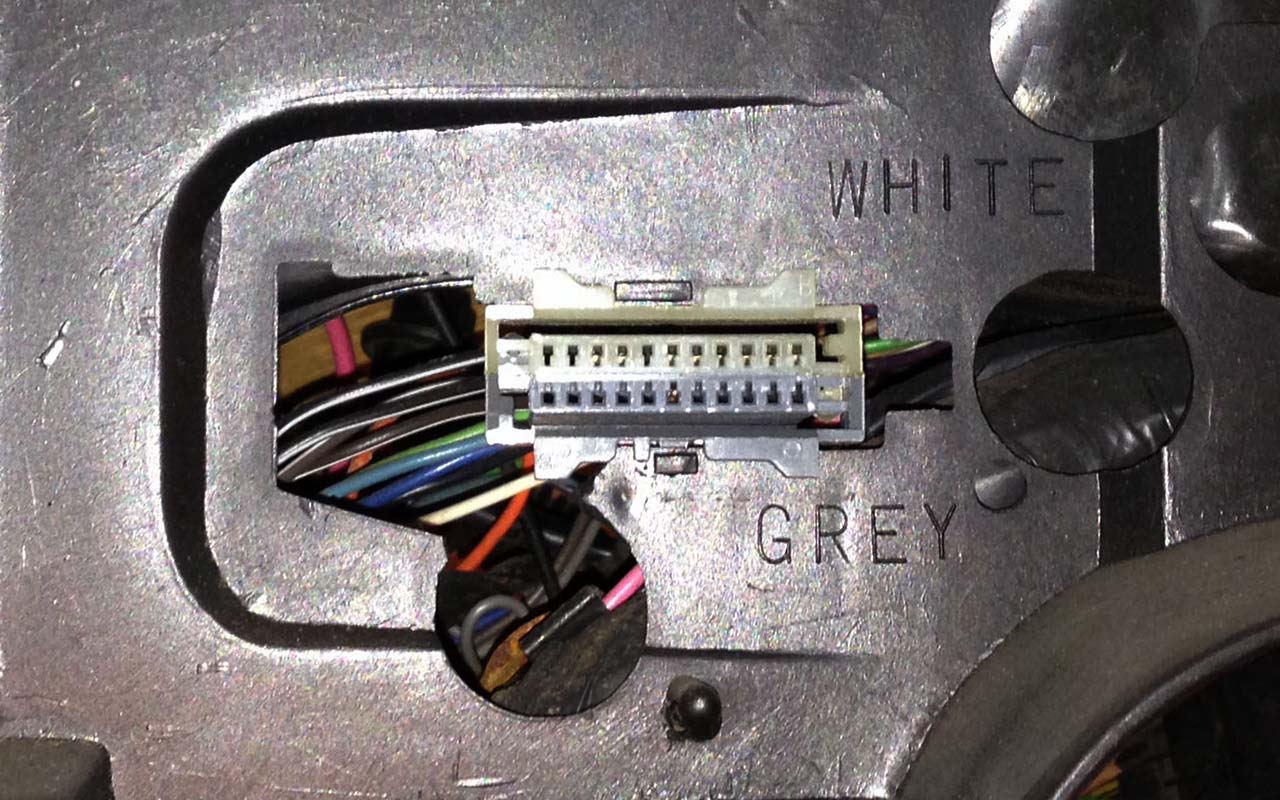

That other connector is called C1/C3. It really is just one plug, with a white and a grey section.
 07-04-2016, 02:24 PM
#16

Re: GTA digital dash swap - doing it the hard way - pic heavy
Not sure yet if I'm going to wire up all the sensors to the DIC in the end. Door ajar is a must, maybe hatch ajar. Low washer fluid for sure. Not sure about low coolant sensor, as this could be a pain in the a$$ to wire. And I definitely will be skipping the lights monitoring as that special harness is prone to failure.

I'm really looking forward to seeing you progress through this project. In the last 10 years of this board, I think you're singlehandedly the furthest along in understanding how that dash all comes together as well as how the logic behind it works. I have one myself and see the maintenance void we've got since no one either a) understands how they work or b) can source parts for them anymore. Keep it up!
07-05-2016, 04:44 AM
#17
Re: GTA digital dash swap - doing it the hard way - pic heavy
The low coolant sensor should be straightforward to wire. IIRC, all it checks for is voltage across the sensor. As long as the sensor is immersed in coolant, it will be grounded through the frame. When that ground is lost, it throws the "low coolant" alarm. I think it's worth it to know when the lower coolant line comes off the radiator.
I'm really looking forward to seeing you progress through this project. In the last 10 years of this board, I think you're singlehandedly the furthest along in understanding how that dash all comes together as well as how the logic behind it works. I have one myself and see the maintenance void we've got since no one either a) understands how they work or b) can source parts for them anymore. Keep it up!
I'm really looking forward to seeing you progress through this project. In the last 10 years of this board, I think you're singlehandedly the furthest along in understanding how that dash all comes together as well as how the logic behind it works. I have one myself and see the maintenance void we've got since no one either a) understands how they work or b) can source parts for them anymore. Keep it up!
You've definitely got some high expectations in my abilities! I'll do my best to live up to them.
07-05-2016, 06:40 AM
#18
Re: GTA digital dash swap - doing it the hard way - pic heavy
Still getting the parts ready... So not much to say today.
Those buttons - while not specific to the digital dash as they are used on all the mid-thirdgen dashes as well - need some time and care before I can put them in the car. Most of the buttons have yellowed and don't look nice. What's even worse is the white lettering is liquifying and many of the buttons I have are hardly readable anymore.
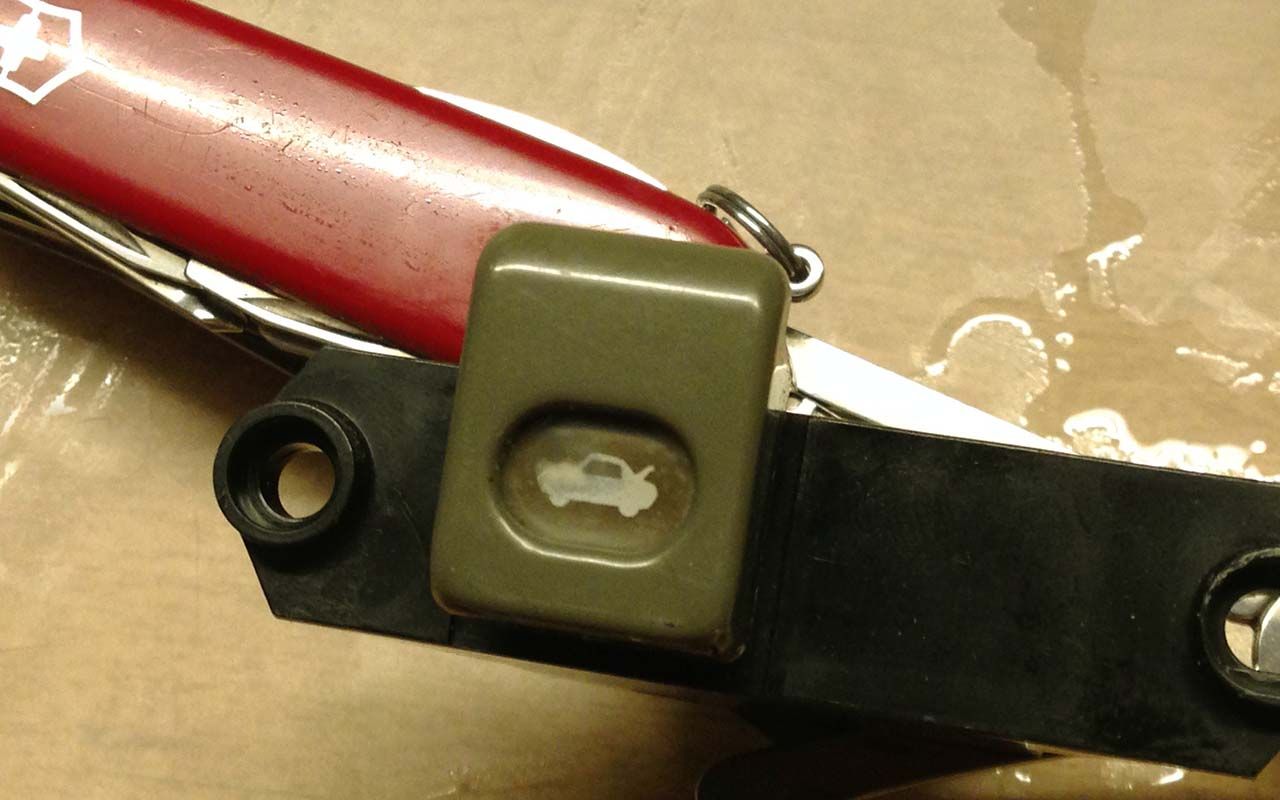
One of the problems could be the heat from the bulbs inside the buttons. So let's begin with replacing them with LEDs! The button faces pop off easily with a flat screwdriver under the lower side. The black button case is a little harder to get apart as there are 6 small edges to separate at the same time. There are 3 bulbs inside, one for each button and one for the status light.
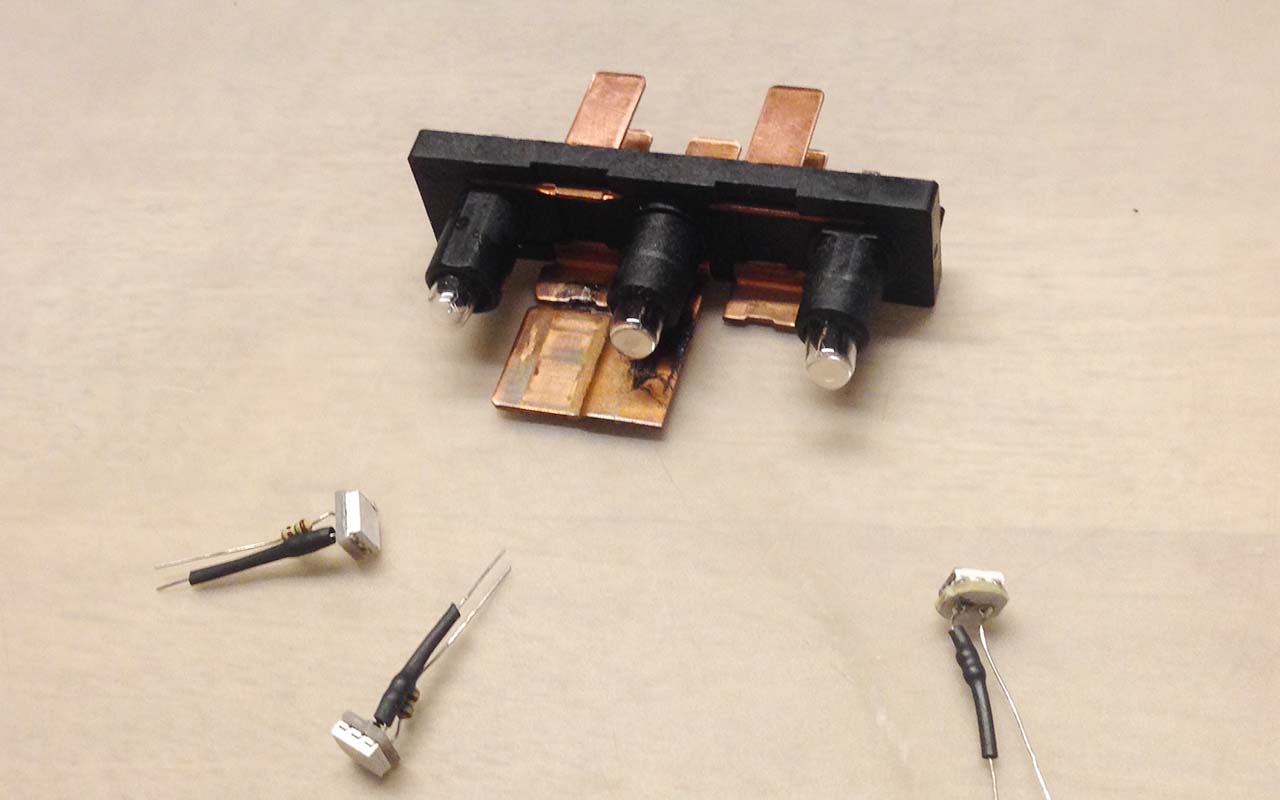
I decided to replace the two button bulbs with red LEDs and the status bulb with a yellow one. The cathodes (negative pole) are all connected to GND, so soldering them in the right directions wasn't really difficult.
The buttons were wet sanded with 600 grit, then 1000 and then 2000 grit to get the yellowing off and finally coated with clear coat.
I still haven't figured out how to address that lettering problem. There are little sliders inside the buttons that should come out easily when the button is popped off. The white color is printed inside on the outer clear plastic and very easily rubbed off. With those two clear plastic sliders the light from inside is guided around the opaque middle part and the light breaks inside the white print to show nicely at night. Some of the letterings are still ok, others have faded completely. Don't know yet how to fix that...
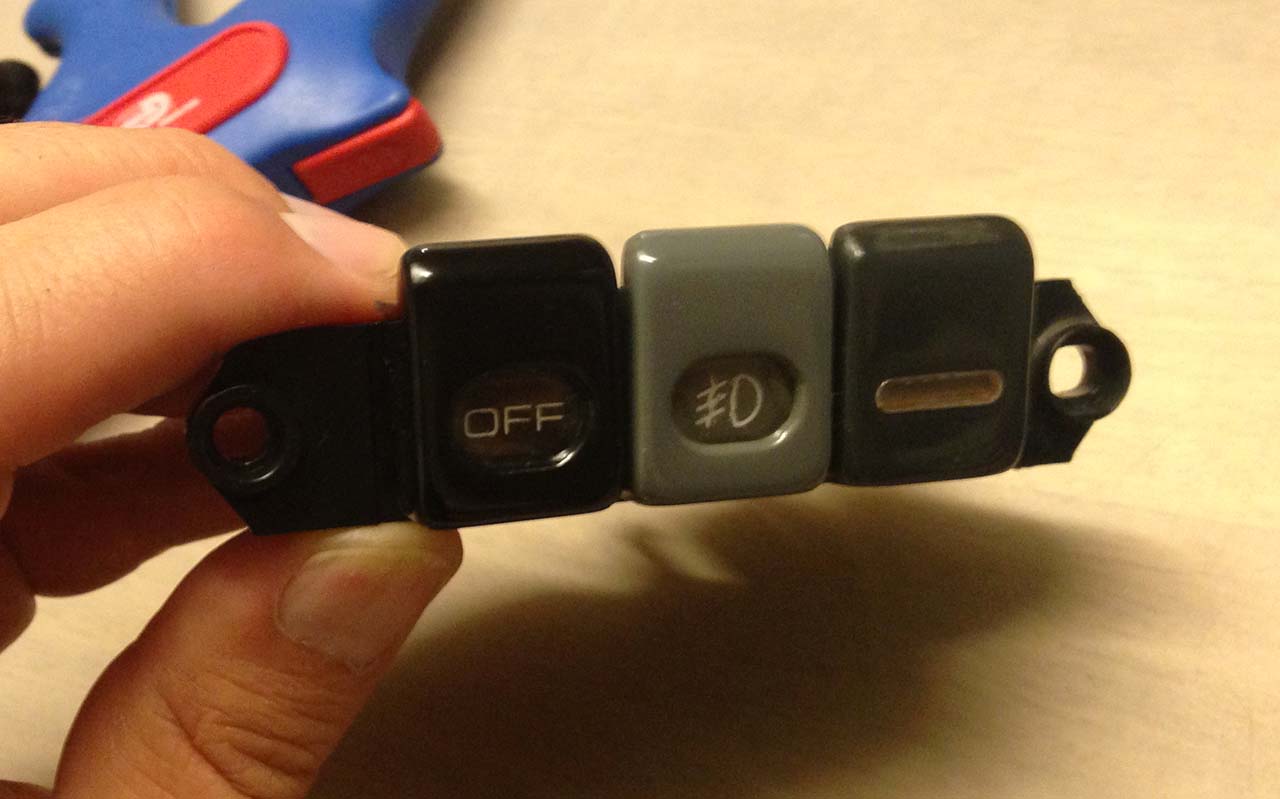
Here is the night view:
More to follow...
Those buttons - while not specific to the digital dash as they are used on all the mid-thirdgen dashes as well - need some time and care before I can put them in the car. Most of the buttons have yellowed and don't look nice. What's even worse is the white lettering is liquifying and many of the buttons I have are hardly readable anymore.

One of the problems could be the heat from the bulbs inside the buttons. So let's begin with replacing them with LEDs! The button faces pop off easily with a flat screwdriver under the lower side. The black button case is a little harder to get apart as there are 6 small edges to separate at the same time. There are 3 bulbs inside, one for each button and one for the status light.

I decided to replace the two button bulbs with red LEDs and the status bulb with a yellow one. The cathodes (negative pole) are all connected to GND, so soldering them in the right directions wasn't really difficult.

The buttons were wet sanded with 600 grit, then 1000 and then 2000 grit to get the yellowing off and finally coated with clear coat.
I still haven't figured out how to address that lettering problem. There are little sliders inside the buttons that should come out easily when the button is popped off. The white color is printed inside on the outer clear plastic and very easily rubbed off. With those two clear plastic sliders the light from inside is guided around the opaque middle part and the light breaks inside the white print to show nicely at night. Some of the letterings are still ok, others have faded completely. Don't know yet how to fix that...

Here is the night view:

More to follow...
The following users liked this post:
Moonlight137 (01-20-2020)
07-29-2016, 02:03 AM
#19
Senior Member
iTrader: (1)
Join Date: Dec 2011
Location: Vancouver
Posts: 552
Likes: 0
Received 0 Likes
on
0 Posts
Car: 1989 Trans am GTA
Engine: 305 TPI
Transmission: t56 6 speed
Axle/Gears: 3.45
Re: GTA digital dash swap - doing it the hard way - pic heavy
Great work! I finished a digital dash swap a few years ago, if you have any questions or need to refer to anything check out the thread I made or feel free to ask any questions!
08-01-2016, 07:15 AM
#20
Re: GTA digital dash swap - doing it the hard way - pic heavy
As it looks, I will need a lot of help soon...
Last edited by Cehbra; 06-12-2018 at 06:45 AM.
08-01-2016, 07:41 AM
#21
Re: GTA digital dash swap - doing it the hard way - pic heavy
Not much progress lately as I have been extremely busy at work.
What bugs me a lot is there's an annoying setback about the dash carrier. I removed the dash and the beauty plates of the analog cluster. Nice and clean underneath
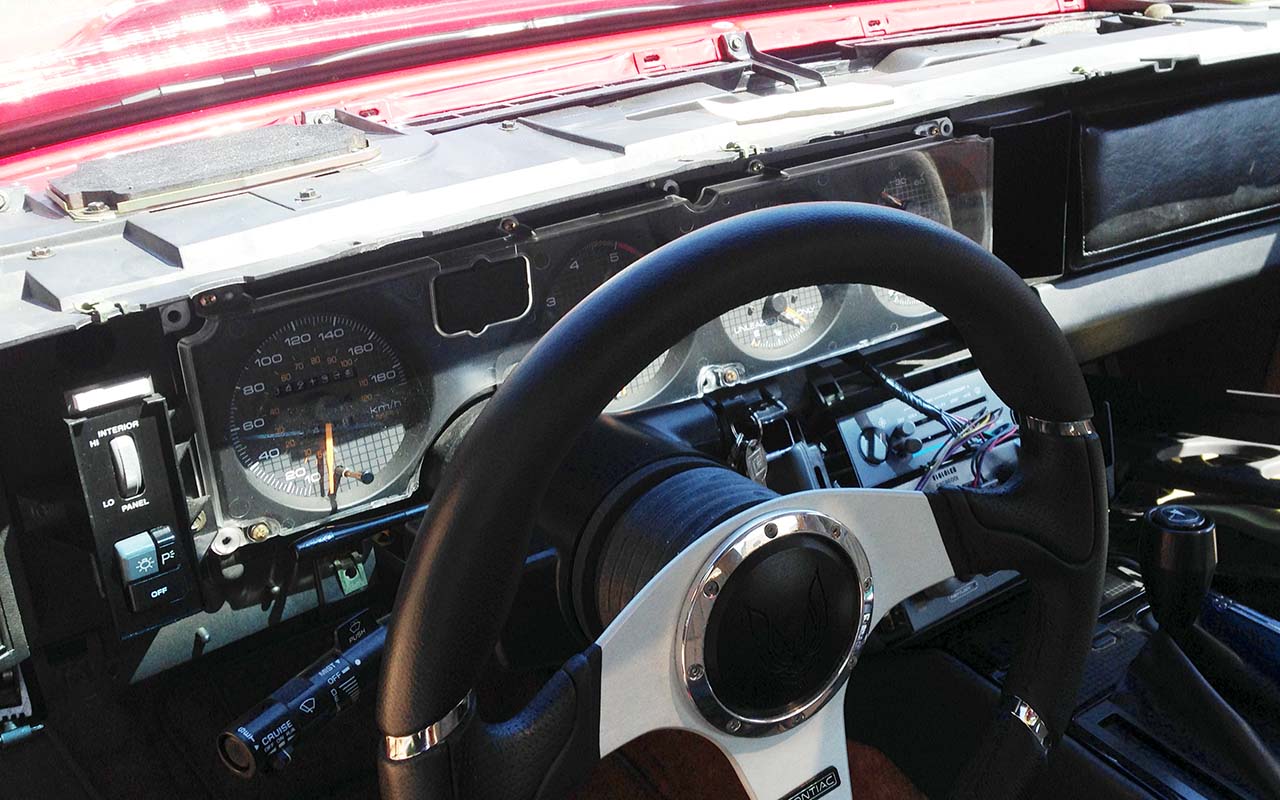
BUT: while the connector holes for C2 are more or less the same as in 1988 there is no hole for the white/grey C1/C3 (see post 15). Damn it!
So the dash carrier for 1988 is NOT the same as 1991 - even the face plates don't fit at all. I was wrong assuming I could just swap the connectors. So. What to do?
I have been able to get hold of a complete 88 digital dash (another one) for a real bargain. So I guess I' will have to swap the WHOLE thing and that means doing much more work than I had hoped for... And now soldering the analog connectors in parallel won't make any sense. This will be a one-way road.

Last edited by Cehbra; 08-01-2016 at 08:15 AM.
08-01-2016, 07:50 AM
#22
Re: GTA digital dash swap - doing it the hard way - pic heavy
Things get even more complicated.
The car is parked in an underground garage where I'm not allowed to work on the car. So if I do something with the car in front of the house I will have to move it in the evening as I'm not allowed to leave it on the street during the night - yes that's a ridiculous law... I am quite sure I will not be able to finish in one day
Oh man. But actually I don't care. There's always a solution.
08-01-2016, 08:31 AM
#23
Member
Join Date: Nov 2008
Location: Germany / Romania
Posts: 321
Received 0 Likes
on
0 Posts
Car: Firebird
Engine: 5737cc
Transmission: 700R4
Re: GTA digital dash swap - doing it the hard way - pic heavy
Things get even more complicated.
The car is parked in an underground garage where I'm not allowed to work on the car. So if I do something with the car in front of the house I will have to move it in the evening as I'm not allowed to leave it on the street during the night - yes that's a ridiculous law... I am quite sure I will not be able to finish in one day
Oh man. But actually I don't care. There's always a solution.
The car is parked in an underground garage where I'm not allowed to work on the car. So if I do something with the car in front of the house I will have to move it in the evening as I'm not allowed to leave it on the street during the night - yes that's a ridiculous law... I am quite sure I will not be able to finish in one day
Oh man. But actually I don't care. There's always a solution.

Look on the bright side...these cars work without a dash
 08-04-2016, 03:48 PM
#25
Re: GTA digital dash swap - doing it the hard way - pic heavy
At least some good news today! I got the dash hooked up by sticking each wire from the digital dash into its corresponding pin on the analog counterpart in the car. It's an ugly wire mess but almost everything seems to be working nicely. I was afraid about the speedo but that one read correctly, too when I drove around the block. I said "almost" because when I switch from miles to km only the odometer switches, the speedo still showing miles... Hope I can resolve that issue some time.
So as a proof of concept a 1991 Firebird should technically be ok to be fitted with a 1988 digital dash.
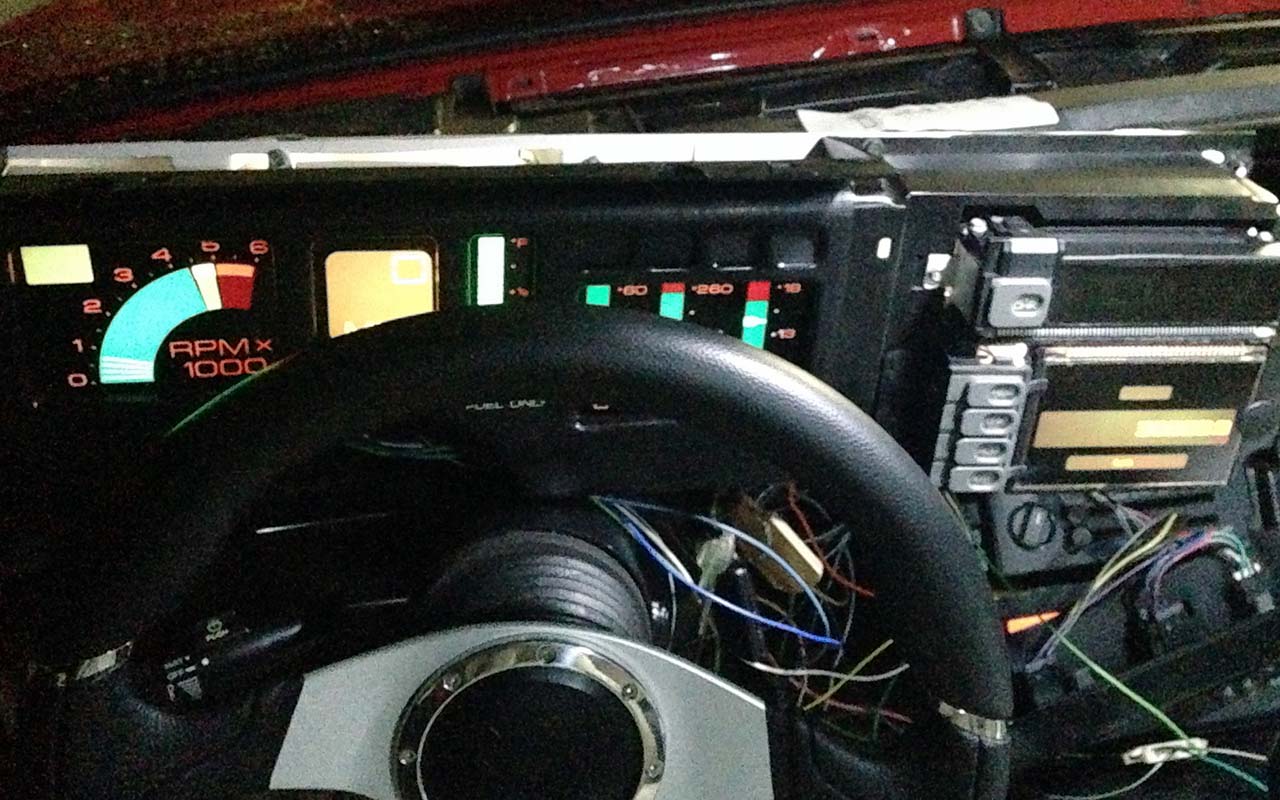
So as a proof of concept a 1991 Firebird should technically be ok to be fitted with a 1988 digital dash.

 08-04-2016, 03:52 PM
#26
Re: GTA digital dash swap - doing it the hard way - pic heavy
One question:
When I remove the analog dash there is this annoying constant beeeeeeep. Apparently there's a circuit that must be shortened to get that sound off. Does anyone know how to do that?
Edit: It turned out to be the SIR system in the end
When I remove the analog dash there is this annoying constant beeeeeeep. Apparently there's a circuit that must be shortened to get that sound off. Does anyone know how to do that?
Edit: It turned out to be the SIR system in the end
Last edited by Cehbra; 06-12-2018 at 06:46 AM.
08-05-2016, 07:41 PM
#27
Supreme Member
iTrader: (11)

Join Date: Sep 1999
Location: NJ
Posts: 4,345
Received 298 Likes
on
234 Posts
Car: 92 Firebird
Engine: 4.8 LR4
Transmission: T56
Axle/Gears: 3.45 9 Bolt
Re: GTA digital dash swap - doing it the hard way - pic heavy
Where in CH do you live? I was there for around 10 months in the Geneva area. While I was there I remember seeing a 91-92 Firebird for sale in one of the used car lots, I always wanted to buy it.
08-07-2016, 08:57 AM
#28
Member
Re: GTA digital dash swap - doing it the hard way - pic heavy
Not sure yet if I'm going to wire up all the sensors to the DIC in the end. Door ajar is a must, maybe hatch ajar. Low washer fluid for sure. Not sure about low coolant sensor, as this could be a pain in the a$$ to wire. And I definitely will be skipping the lights monitoring as that special harness is prone to failure.
08-08-2016, 05:04 PM
#29
Re: GTA digital dash swap - doing it the hard way - pic heavy
Is your key in the ignition when you hear the beep? If so that may be it. There is a box under the dash on the RH side, kind of rectangular, it also is the reminder for the headlights. I pull that box out because the noise is annoying.
Where in CH do you live? I was there for around 10 months in the Geneva area. While I was there I remember seeing a 91-92 Firebird for sale in one of the used car lots, I always wanted to buy it.
Where in CH do you live? I was there for around 10 months in the Geneva area. While I was there I remember seeing a 91-92 Firebird for sale in one of the used car lots, I always wanted to buy it.
I'm in the north area close to Basel. Nice to see other thirdgen lovers from around the planet find their way to Switzerland!
 08-08-2016, 05:07 PM
#30
Re: GTA digital dash swap - doing it the hard way - pic heavy
Could you re-engineer the light section to work? The 94-98 Jeep Grand Cherokee have a "lamp outage" module in the rear by the spare tire. When it blows out because of a trailer wiring short you just unplug the 2 connectors and hook them to each other for working lights. This tells me the lamp power runs throuth the module and it "sees" current draw. When something is amiss it simply sends power to light a portion of the display. Maybe just use that module and plugs to tap into your current lighting system and have that module light the proper portion of the Firebid display??? I realize this would still require quite a bit of effort but you wouldn't need a special harness that's known to fail.
03-07-2018, 06:05 AM
#31
Re: GTA digital dash swap - doing it the hard way - pic heavy
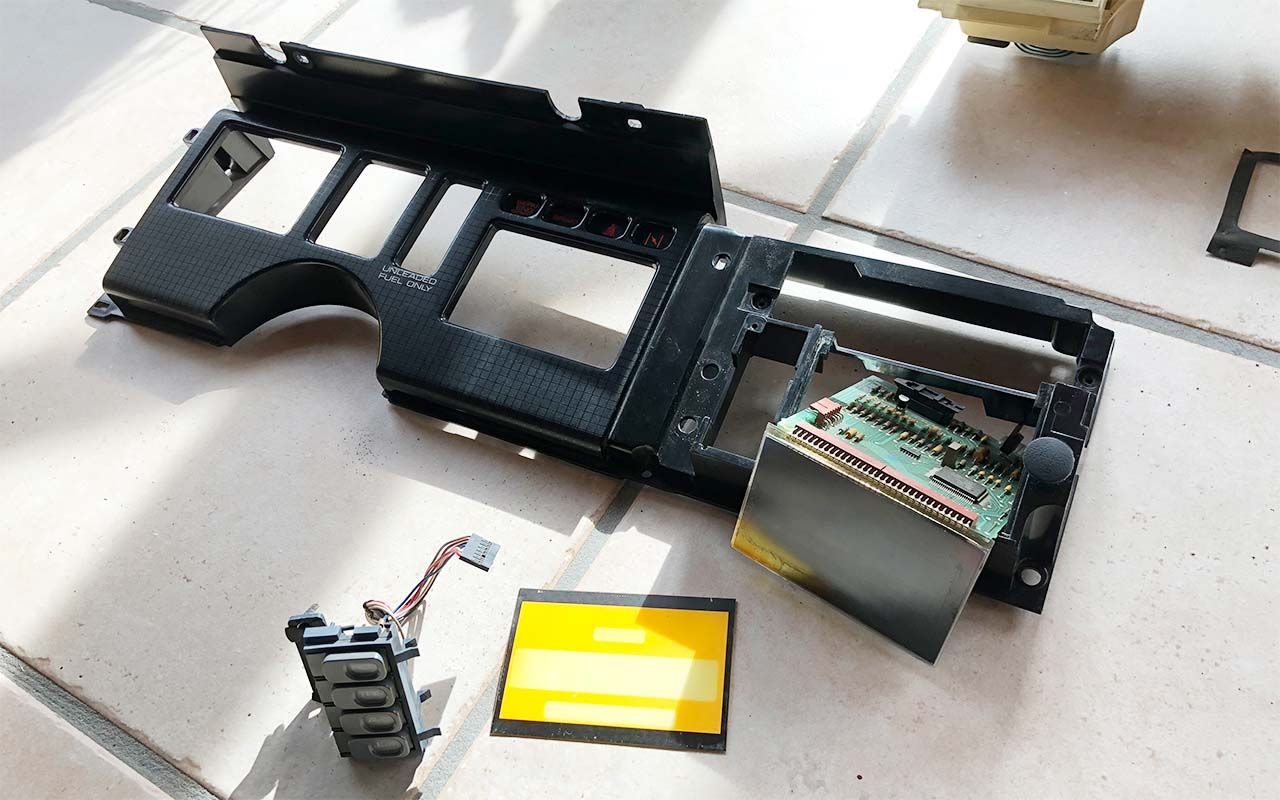
Interestingly, recently I got quite a few PM's from TGO members asking how to disassemble the digital dash. Well as spring is returning and I finally get a little more spare time I am able to provide my findings. Here's a step-by-step guide on how to disassemble the GTA/Trans Am digital dash.
That's a digital dash, as it was removed from a Trans Am. First we will need to remove the driver's information center (the DIC). It is held in place by two 9/32 screws, see red arrows.
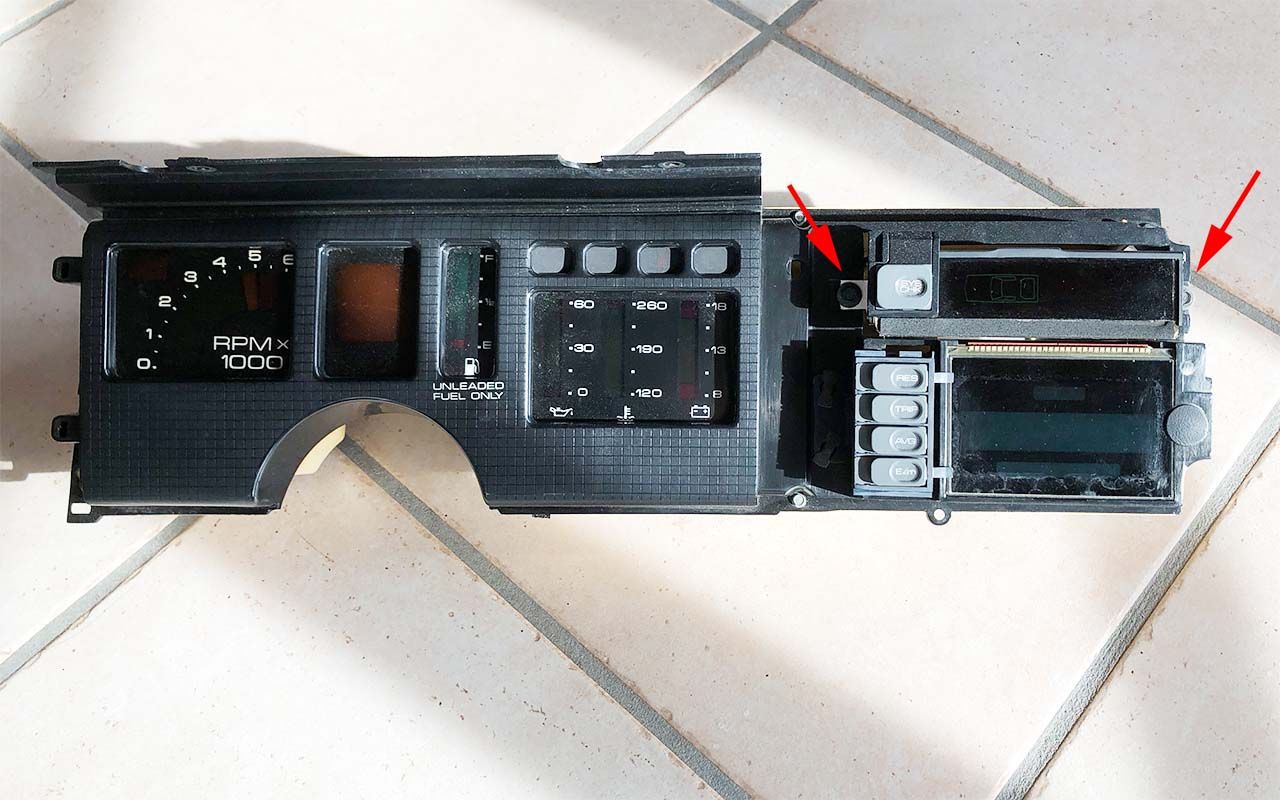
That's a digital dash, as it was removed from a Trans Am. First we will need to remove the driver's information center (the DIC). It is held in place by two 9/32 screws, see red arrows.

Last edited by Cehbra; 03-07-2018 at 06:23 AM.


 03-07-2018, 06:08 AM
#34
Re: GTA digital dash swap - doing it the hard way - pic heavy
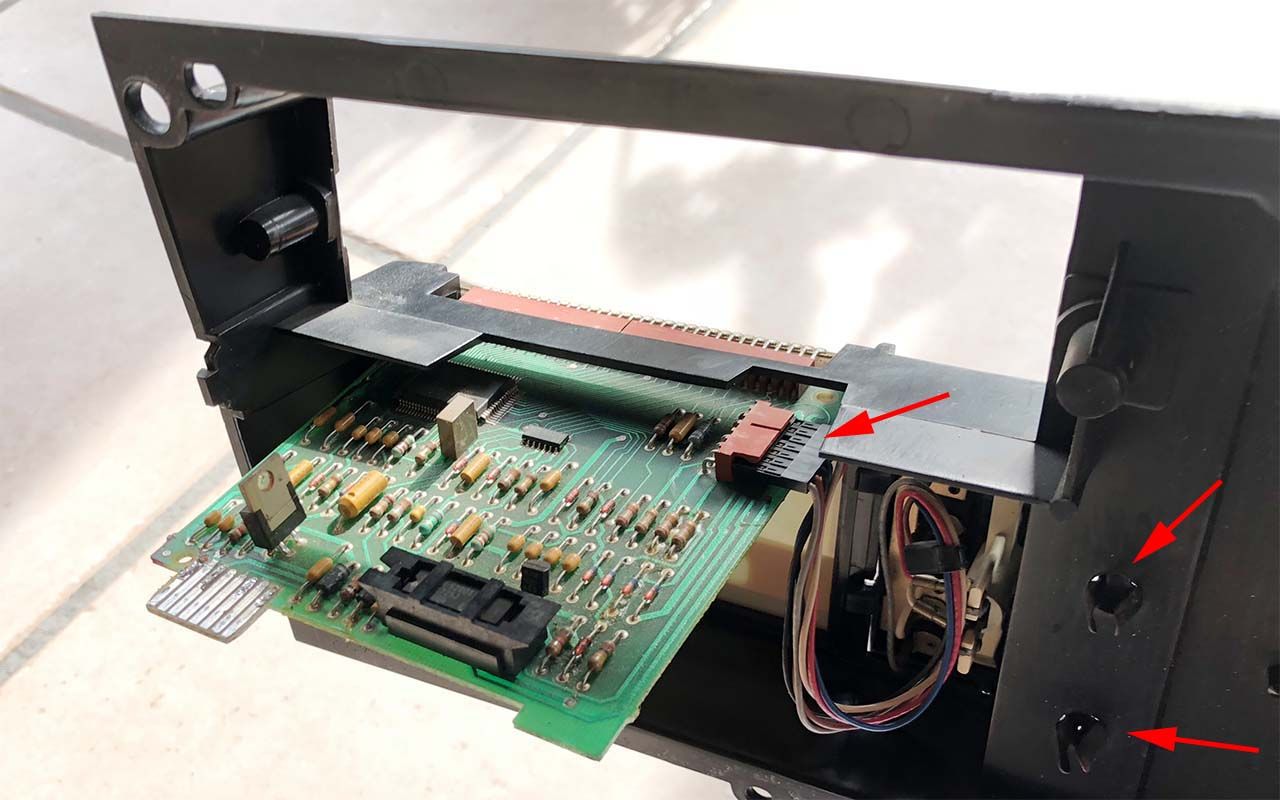
In case we need to remove the odometer there are two tabs at the back of the keypad, that can be pinched and then the keypad will slide out. Don't forget to remove the connector to fully remove the keypad.
 03-07-2018, 06:10 AM
#35
Re: GTA digital dash swap - doing it the hard way - pic heavy
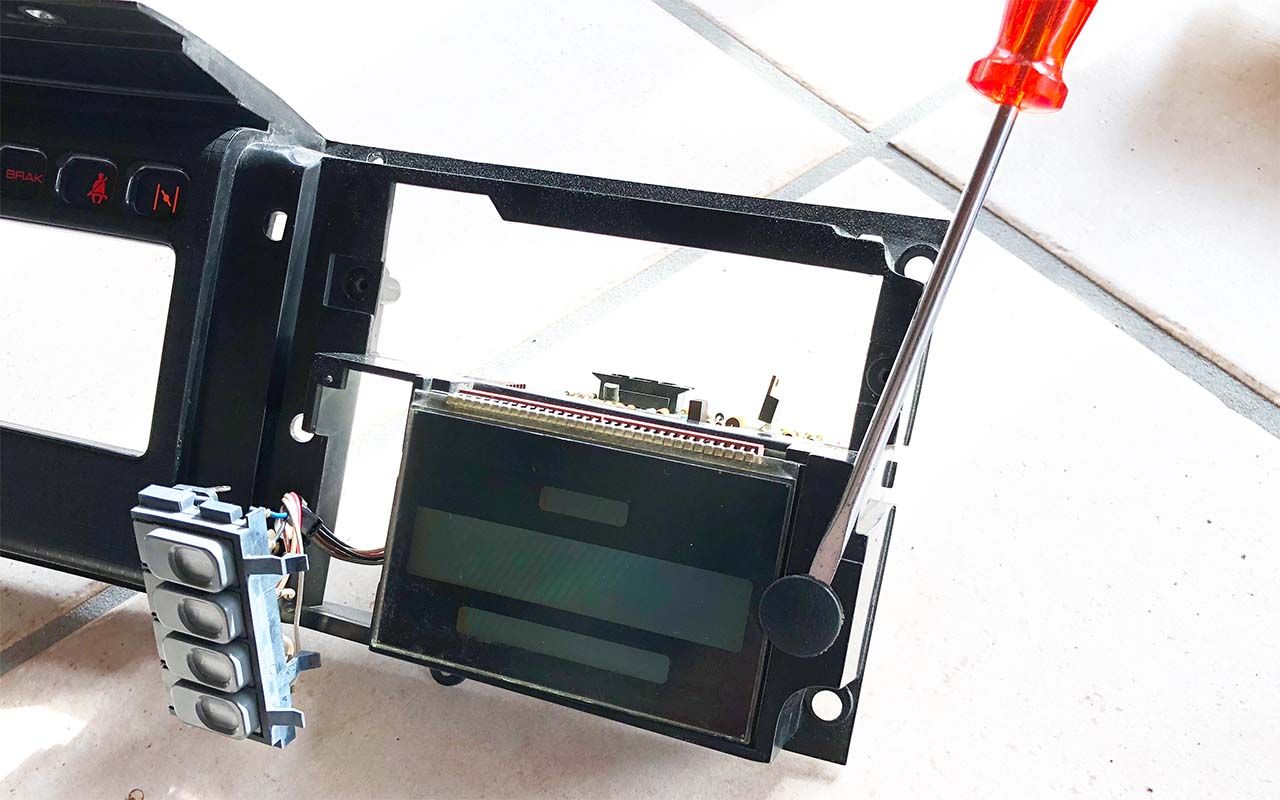
Now to remove the odometer we need to carefully pry up that round tab. Make sure to not harm the display glass. I used a screwdriver to lift the tab a few millimeters. No need to completely remove it as the odometer will come off anyway.
There are two ways to remove the odometer:
There is an orange diffusor plate behind the display to give the digits the corresponding color.
The round tab can stay where it is.
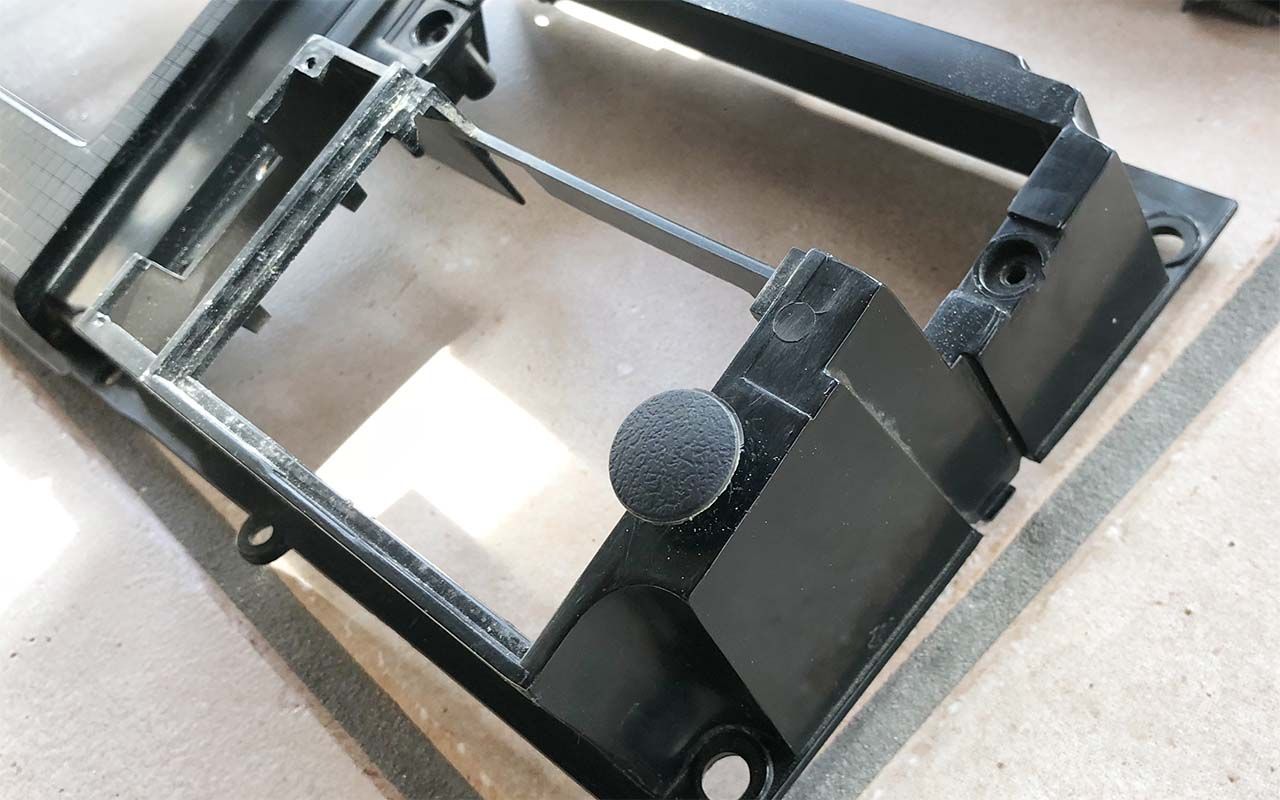
There are two ways to remove the odometer:
- either we separate the display from the PCB (don't worry, those many pins will go back easily), or
- we can carefully wiggle the board and tilt it 45 degrees to slide it out to the front all in one.
There is an orange diffusor plate behind the display to give the digits the corresponding color.


The round tab can stay where it is.
 03-07-2018, 06:11 AM
#36
Re: GTA digital dash swap - doing it the hard way - pic heavy
In case we need to tamper with the odometer settings, the EEPROM that holds the mileage is under that cage depicted with the red arrow.
See my thread here: https://www.thirdgen.org/forums/elec...o-86-88-a.html
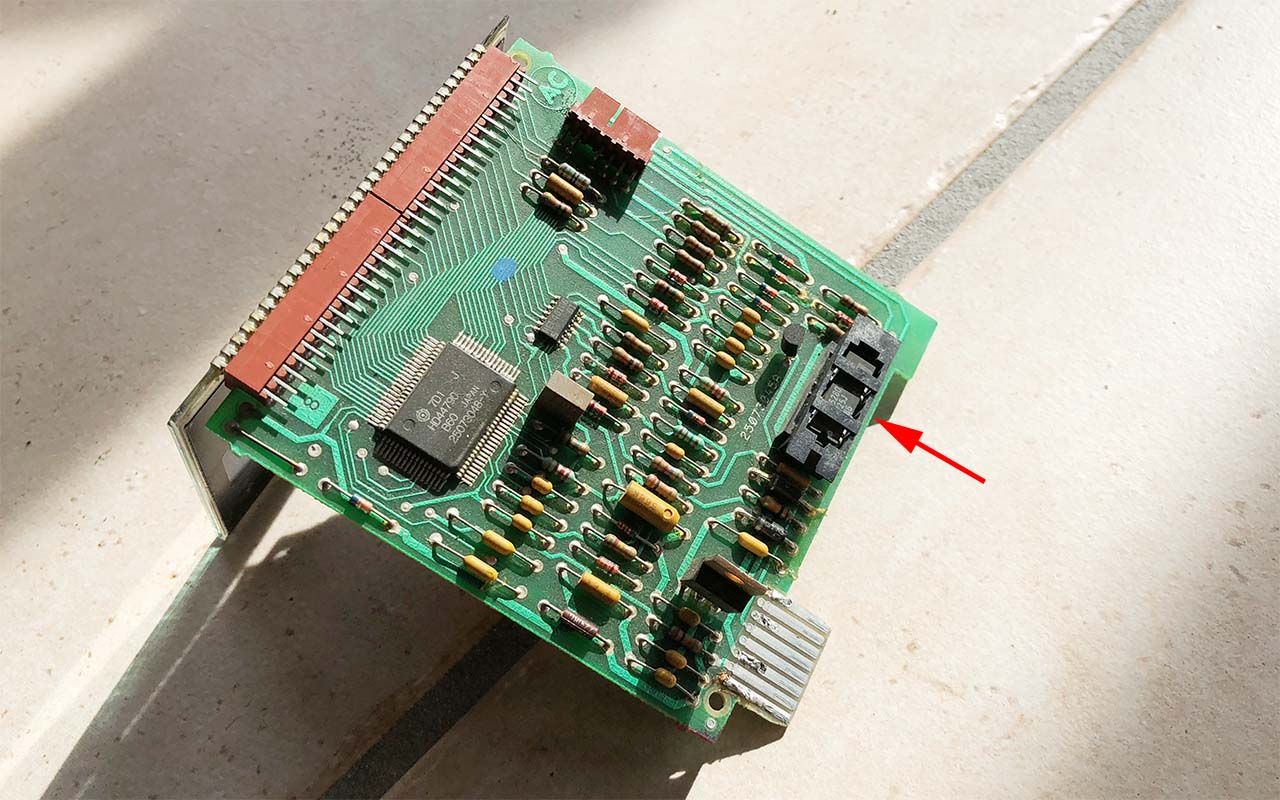
See my thread here: https://www.thirdgen.org/forums/elec...o-86-88-a.html

 03-07-2018, 06:15 AM
#38
Re: GTA digital dash swap - doing it the hard way - pic heavy
Again, a careful lift from the left side will remove the frame including the four remaining displays. Depending on the force that holds them in, we will find that either the PCB stays in place and the displays are removed from them or - which is less likely - the PCBs will come off and stay attached to the displays.
Either way, in the end everything needs to be separated. There are four diffusor plates behind the LCDs as well.
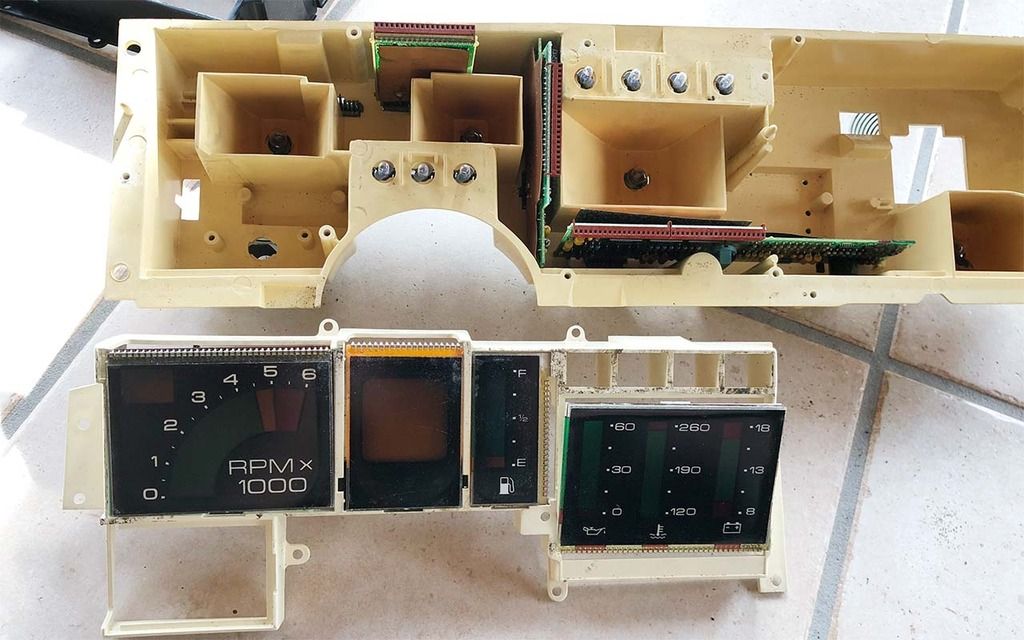
Either way, in the end everything needs to be separated. There are four diffusor plates behind the LCDs as well.

 03-07-2018, 06:17 AM
#39
Re: GTA digital dash swap - doing it the hard way - pic heavy
So that's it! There are some bulbs that can be replaced if needed, but those don't need a complete disassembly as they are easily accessible from behind. Note that we also don't need to disassemble the dash if we just need to get to the odometer chip, as that one is accessible from behind the dash as well, see red arrow.
I hope, some of you will find that information useful.

I hope, some of you will find that information useful.
 03-15-2018, 04:27 PM
#40
Re: GTA digital dash swap - doing it the hard way - pic heavy
Well here we go again. There was not much going on with this thread in a long time, but now it looks as if some spare time is around the corner for me to get back to work on the digital dash swap project.
I thought about some options about the dash carrier. As I have stated above the 1990 - 1992 dash carrier is significantly different from the 1985-1989 carrier. So there seem to be the following options:
#1 Swap an entire digital dash carrier including all the wiring/harness and all the modules from an 86-88 Trans Am to the 1991 Firebird
#2 Swap only the dash carrier and leave the original harness and wiring from the 1991 Firebird and change the connectors where needed
#3 Swap only part of the dash carrier i.e. cut out the part that holds the instrument panel and transfer it into the existing 1991 dash carrier
I'm very concerned that #1 is not going to work as I have stated in another thread. As far as I know many electrical and mechanical elements have changed between mid thirdgens and late thirdgens. I definitely don't want to take that risk. There could also be a problem with #3 because if I cut out a whole section from the dash carrier I might not end up with perfect alignment and stability.
So I decided to go with #2 and swap the 1988 dash carrier that I have but otherwise keep all the wiring of my 1991 Firebird.
03-15-2018, 04:30 PM
#41
Re: GTA digital dash swap - doing it the hard way - pic heavy
Here is a complete 1988 digital dash with the dash carrier and the entire harness. I'm about to take it apart and in the process take a note of all the steps I take and of all the pieces I remove.
The dash has some rust but otherwise it is in a decent shape. Comparing to my mint 1991 Firebird this will need some refurbishing before it can go in my car.
The dash has some rust but otherwise it is in a decent shape. Comparing to my mint 1991 Firebird this will need some refurbishing before it can go in my car.


 03-15-2018, 04:37 PM
#42
Re: GTA digital dash swap - doing it the hard way - pic heavy
One thing came to my mind when I removed the instrument cluster: maybe - just maybe - the metal frame that holds the plastic part of the dash carrier might be the same through all the years. If that was true then
- I wouldn't need to remove the whole dash carrier from the 1991 Firebird, and
- I wouldn't need to move around the current harness in the car, and
- I wouldn't even need to remove the rust from the 1988 metal frame
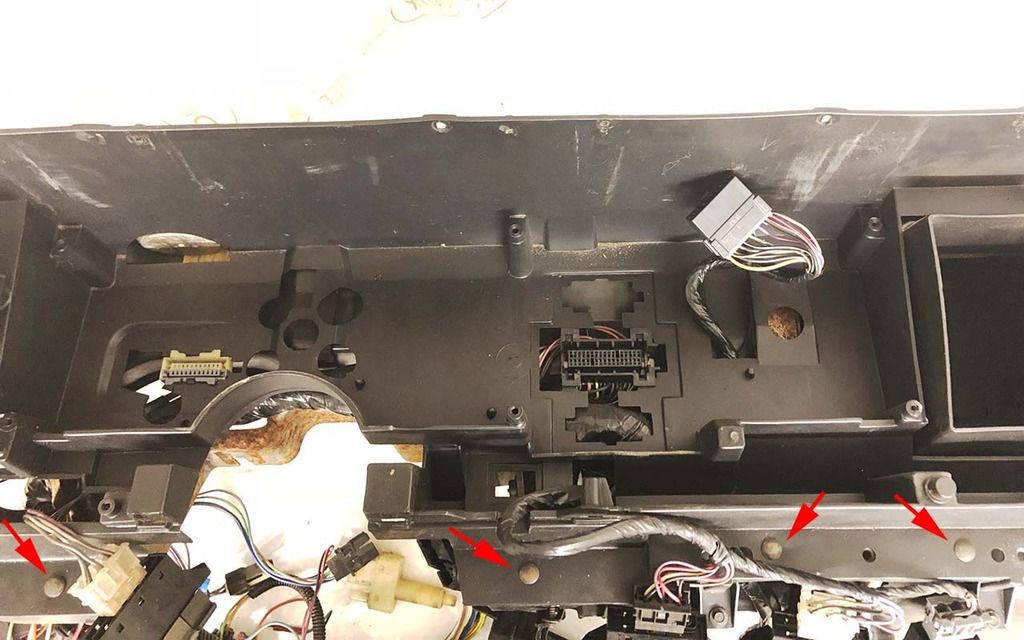
Not really setting too much hope in that. The next few days will make it clear. If my idea is working out I could just remove those rivets marked with a red arrow (and a few more).
- I wouldn't need to remove the whole dash carrier from the 1991 Firebird, and
- I wouldn't need to move around the current harness in the car, and
- I wouldn't even need to remove the rust from the 1988 metal frame
Not really setting too much hope in that. The next few days will make it clear. If my idea is working out I could just remove those rivets marked with a red arrow (and a few more).
 03-18-2018, 01:40 PM
#43
Re: GTA digital dash swap - doing it the hard way - pic heavy
Made some small progress today.
There are more differences between the mid and the late thirdgen dash carrier than I had hoped for. That means I will have to take apart the whole dash
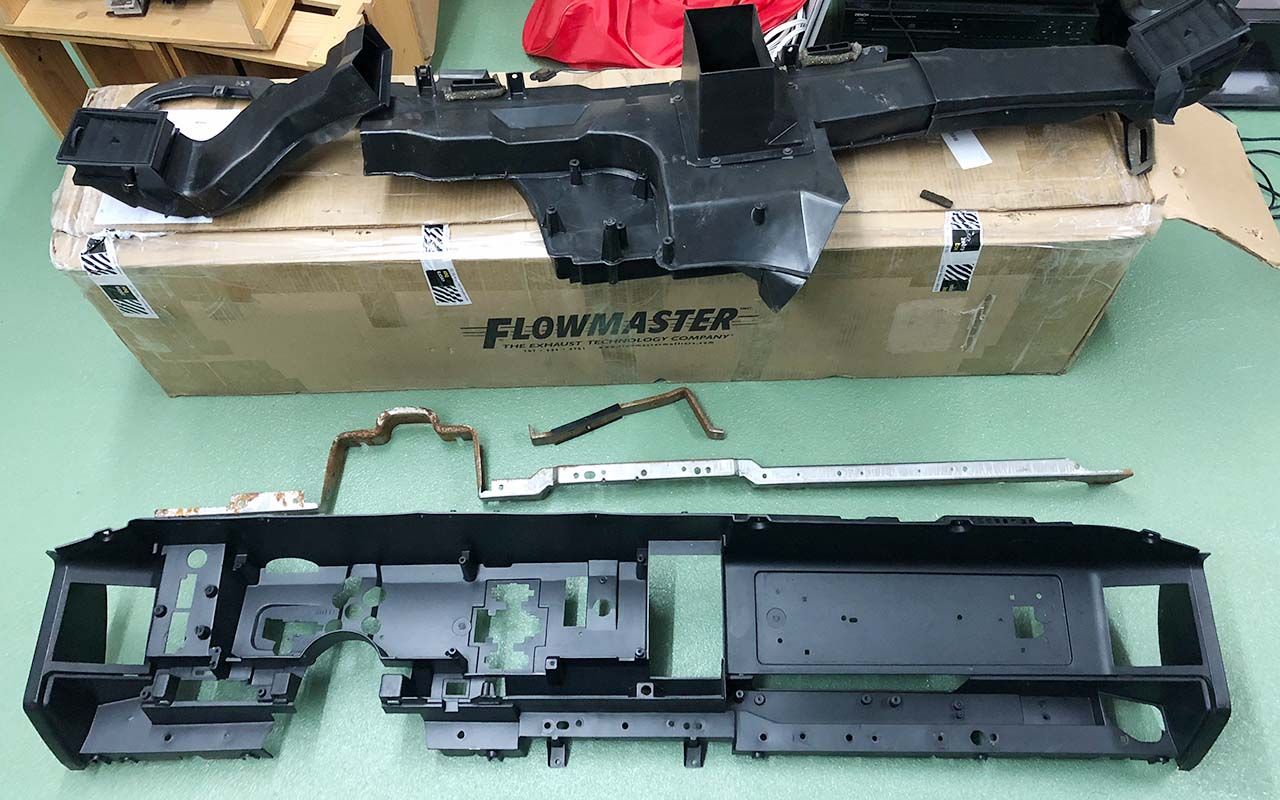
Today I drilled out all the rivets and separated the steel support from the plastic frame. As it turns out, the middle part of the air ducts are the same and they share the same GM part number. But the driver side vent is narrower in the late model year and both side ducts have a different part number, too.

Last edited by Cehbra; 06-12-2018 at 06:50 AM.
03-18-2018, 01:41 PM
#44
Re: GTA digital dash swap - doing it the hard way - pic heavy
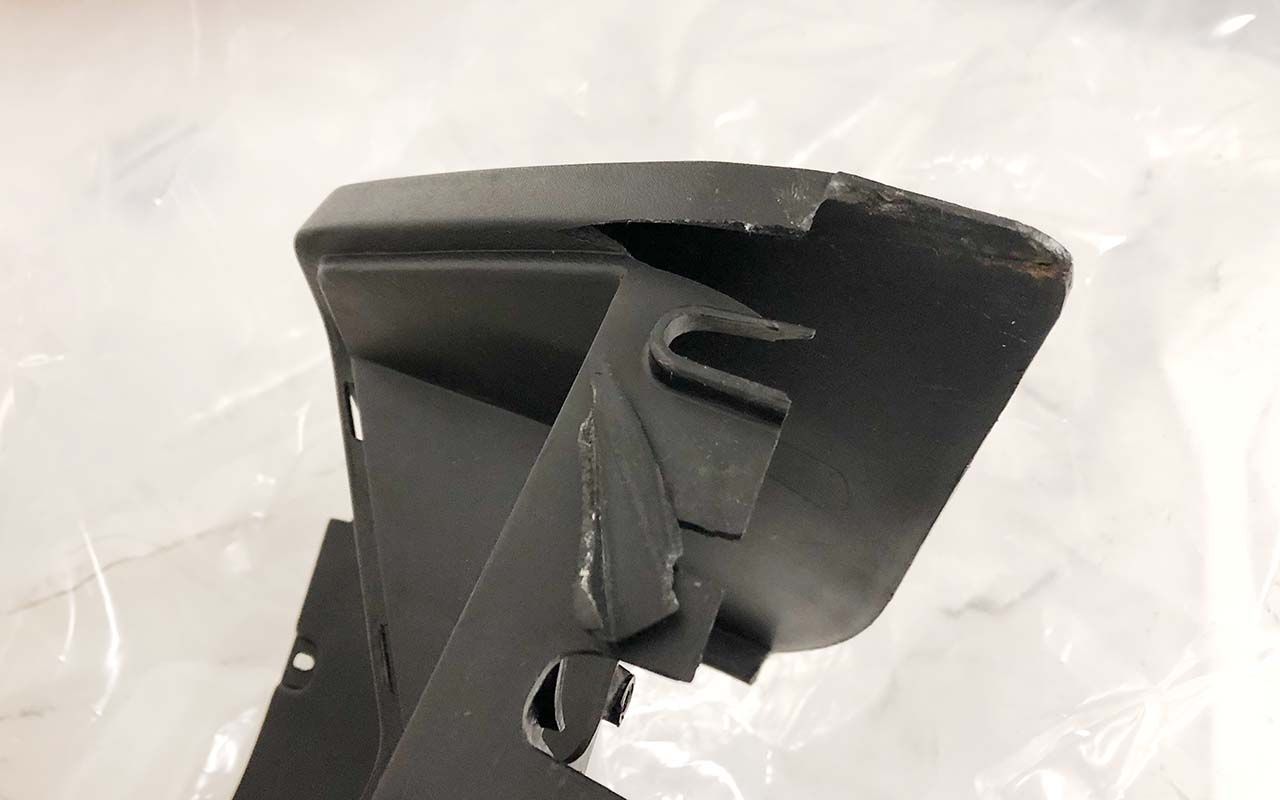
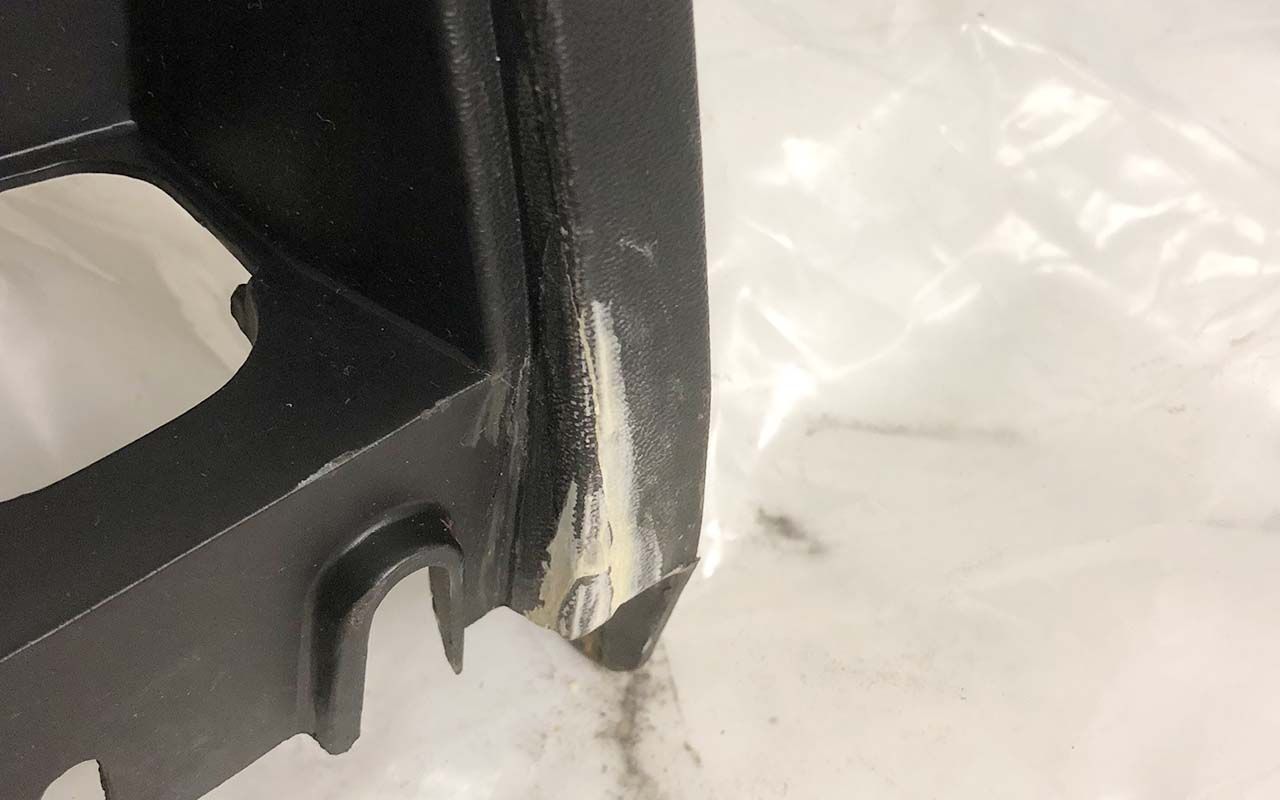
There are a few cracks and blemishes that need to be fixed. I used 2K epoxy glue and some bondo. I think it looks quite ok after two coats with SEM satin black color coat.


Last edited by Cehbra; 03-19-2018 at 03:45 PM.


 03-18-2018, 01:52 PM
#46
Re: GTA digital dash swap - doing it the hard way - pic heavy
Somehow I was in the mood to try out that door ajar switch. I know it's way too early to start adding sensors - but why not?
I couldn't figure out how to mount that switch until I checked Firechicken86's excellent thread:
https://www.thirdgen.org/forums/inte...ml#post5520412
That mounting hole actually still exists in the 91 Firebird! It was really painful and tedious to get that thing mounted as there was only little space to move. I ended up removing the three bolts on the leading edge of the door so I could move the lock a bit.
Turns out that switch is actually working! It closes electrically, as soon as I open the door. The door must be fully closed to open the connection - door ajar sensor in the car.
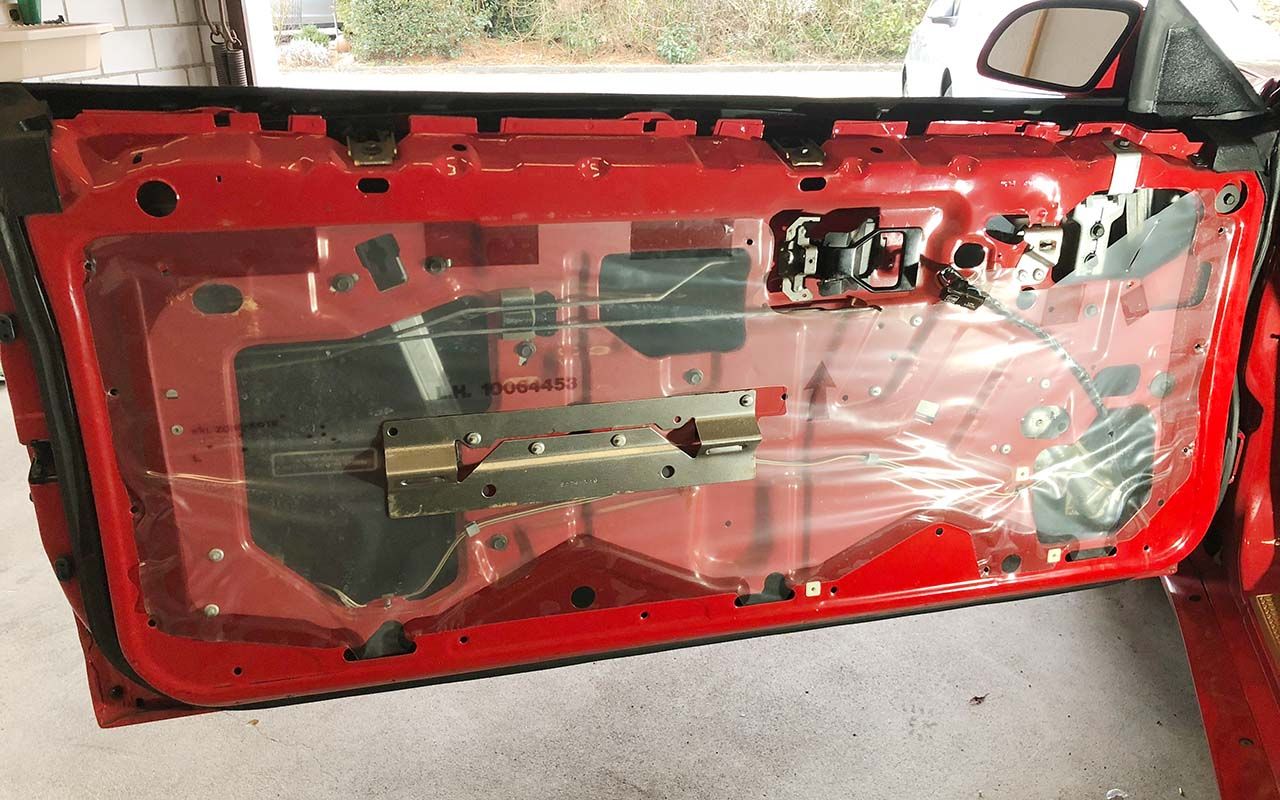
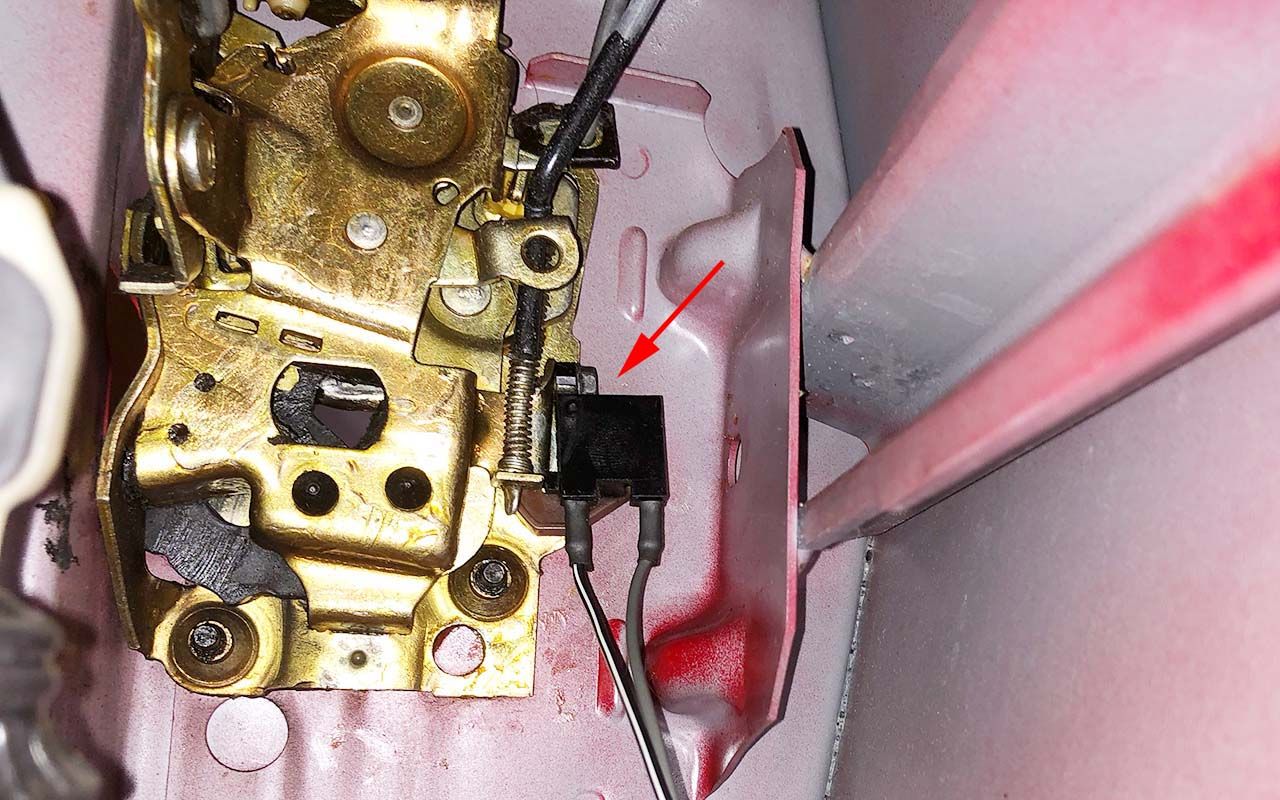


Last edited by Cehbra; 03-18-2018 at 01:57 PM.
The following users liked this post:
JadedBirdsFlame (08-02-2020)
03-18-2018, 02:02 PM
#47
Re: GTA digital dash swap - doing it the hard way - pic heavy
Just for the records, these are the GM part numbers for the door ajar switches:
- GM SWITCH ASM DR AJAR LH: part #16602431 (brown prong)
- GM SWITCH ASM DR AJAR RH: part #16602430 (yellow prong)
Last edited by Cehbra; 03-18-2018 at 02:21 PM.

 03-19-2018, 03:47 PM
#50
Re: GTA digital dash swap - doing it the hard way - pic heavy
Why didn't I think of that 
Thanks!
Edit: There is a great thread by Drew about this exact problem: https://www.thirdgen.org/forums/body...p-bumpers.html
Thanks!
Edit: There is a great thread by Drew about this exact problem: https://www.thirdgen.org/forums/body...p-bumpers.html
Last edited by Cehbra; 06-12-2018 at 06:53 AM.