
Here we go again. Swap #2 has begun. LOTS of pics...

Supreme Member
Joined: Mar 2004
Posts: 2,519
Likes: 4
From: In the Garage
Car: Camaro
Engine: 6.2L
Transmission: T56
Re: Here we go again. Swap #2 has begun. LOTS of pics...
No oil mess or film here at all and I ran the snot out of it last season. Lots of miles and high RPM. The only oil in the entire engine compt is right at the filter on the aluminum part but its so little it doesnt even reach the valve cover and I cant say thats not dribble from me when I pour it in.
As for damage I cant see it now that I think about it. All the thing does is allow venting of pressure nothing else. PCV just recycles that venting into the engine so I cant see how not doing that causes damage. Plus most every other HP car I've had was filtered on the valve covers and that was considered standard fare. Anyways dont worry about the link just get your car back together man
As for damage I cant see it now that I think about it. All the thing does is allow venting of pressure nothing else. PCV just recycles that venting into the engine so I cant see how not doing that causes damage. Plus most every other HP car I've had was filtered on the valve covers and that was considered standard fare. Anyways dont worry about the link just get your car back together man
Thread Starter
Joined: Sep 2002
Posts: 3,685
Likes: 10
From: PA
Car: 86 Trans AM
Engine: LS1 (not stock...)
Transmission: Built T56
Axle/Gears: Strange 12-bolt w/ 3.73
Re: Here we go again. Swap #2 has begun. LOTS of pics...
Haha... yeah Im workin on it  Ok...Im going to run breathers. If it blows up my motor...oh well. My stroker project will just start earlier than planned. haha.
I honestly cant see why its bad either. I mean...older cars ran like this for a long time. And NASCAR motors spin to 8800+ and use breathers. People just keep saying things like seals blowing out and having issues with the rings sealing properly. But it seems to be all speculation.
So Im going to run the autozone filter + hole in the oil cap set up. See what happens.
Cam...next time Im in ontario, remind me to buy you a beer. Haha... Your posts are always great one way or the other. Im hoping to see my LS7 clutch kit when I get home...thatd be sweet. Ill get her together soon.
J.
Ok...Im going to run breathers. If it blows up my motor...oh well. My stroker project will just start earlier than planned. haha. I honestly cant see why its bad either. I mean...older cars ran like this for a long time. And NASCAR motors spin to 8800+ and use breathers. People just keep saying things like seals blowing out and having issues with the rings sealing properly. But it seems to be all speculation.
So Im going to run the autozone filter + hole in the oil cap set up. See what happens.
Cam...next time Im in ontario, remind me to buy you a beer. Haha... Your posts are always great one way or the other. Im hoping to see my LS7 clutch kit when I get home...thatd be sweet. Ill get her together soon.
J.

Joined: Mar 2000
Posts: 43,187
Likes: 46
From: Littleton, CO USA
Car: 82 Berlinetta/57 Bel Air
Engine: L92/LQ4 (both w/4" stroke)
Transmission: 4L80E/4L80E
Axle/Gears: 12B-3.73/9"-3.89
I'm not that familiar with NASCAR design details, but I would have thought they would run vacuum pumps.
I wouldn't argue with that last part.
Supreme Member
iTrader: (1)
Joined: Jun 2006
Posts: 1,067
Likes: 0
From: Guelph, Ontario
Car: 89 IROC/05 RX8
Engine: LS1/LS1
Transmission: T56/T56
Axle/Gears: 3.42 GM/3.55 8.8
Re: Here we go again. Swap #2 has begun. LOTS of pics...
Rehr-Morrison nascar motors rely on a Drysump oiling system to create a crankcase vacuum.
Supreme Member
Joined: Mar 2004
Posts: 2,519
Likes: 4
From: In the Garage
Car: Camaro
Engine: 6.2L
Transmission: T56
Re: Here we go again. Swap #2 has begun. LOTS of pics...
Haha yeah man beer is always a good idea around here. As for the breather? Well i've driven this long so I see no reason to stop now. Besides that brings to mind one issue that became HUGE over at tech was swapping rod bolts... There was all sorts of bally hoo about how the higher tensile will deform the stock rods and eat your bearings and blah blah blah. I swapped mine out and have buzzed the heck out of it without issue so I would imagine like any mod theres a chance things can go wrong as some guys had troubles and the breather issue may just be that for some. Maybe in some cases it does cause problems but as for under hood airflow? Mine has plenty the Camaro hood is wide open for almost 1"x8" on either side above the headlights so I'm getting plenty o' fresh air in there.
I think its also important to factor in that not every guy wrenching and posting has good skills and may not be doing a quality job of his work either. So I always take that into consideration when I decide to do or use things that work for some and not for others. Anyways holy sidetrack now what about that car man???
I think its also important to factor in that not every guy wrenching and posting has good skills and may not be doing a quality job of his work either. So I always take that into consideration when I decide to do or use things that work for some and not for others. Anyways holy sidetrack now what about that car man???
Thread Starter
Joined: Sep 2002
Posts: 3,685
Likes: 10
From: PA
Car: 86 Trans AM
Engine: LS1 (not stock...)
Transmission: Built T56
Axle/Gears: Strange 12-bolt w/ 3.73
Re: Here we go again. Swap #2 has begun. LOTS of pics...
Today will be some progress I hope. Im leaving work at 11, going home and getting right to work. Gonna probably get going on the engine bay clean up first. Because I cant start putting things back together until its painted.
Another thing Im going to do is mount the pedals, and see where those brackets fall. Im still not 100% sure what Im doing for my clutch master cylinder rod. But Im going to see if I can use the stud out of the 4th gen pedals. Weld that sucker into the thirdgen pedals and be done with it. I just need to see if I have enough room for the rod end in the pedal assembly. Still on the fence with the breather vs. catch can decision.
On a side note...my LS7 clutch arrived yesterday. HOLY F... That thing is HEAVY!!!! Im going to weigh my SPEC set up vs. it...just to see. But I can tell its a huge difference just from picking it up.
Ill update you guys this weekend I have all day saturday dedicated to the car, so that should help.
J.
Another thing Im going to do is mount the pedals, and see where those brackets fall. Im still not 100% sure what Im doing for my clutch master cylinder rod. But Im going to see if I can use the stud out of the 4th gen pedals. Weld that sucker into the thirdgen pedals and be done with it. I just need to see if I have enough room for the rod end in the pedal assembly. Still on the fence with the breather vs. catch can decision.
On a side note...my LS7 clutch arrived yesterday. HOLY F... That thing is HEAVY!!!! Im going to weigh my SPEC set up vs. it...just to see. But I can tell its a huge difference just from picking it up.
Ill update you guys this weekend
I have all day saturday dedicated to the car, so that should help. J.
Joined: Mar 2000
Posts: 43,187
Likes: 46
From: Littleton, CO USA
Car: 82 Berlinetta/57 Bel Air
Engine: L92/LQ4 (both w/4" stroke)
Transmission: 4L80E/4L80E
Axle/Gears: 12B-3.73/9"-3.89
I didn't weigh the assembly before installation. It seemed about the same as the stock '00 SS I took off (although clearly of different design).


Joined: Dec 1999
Posts: 3,544
Likes: 19
From: WI,USA
Car: 89 FORMULA 350, 91 Z28 Convertible
Engine: ls1, LB9
Transmission: t56, Auto
Axle/Gears: S60/ 3.73
Re: Here we go again. Swap #2 has begun. LOTS of pics...
I always run a pcv system. it is "claimed" to add Hp and increase oil life too. it removes alot of harmful gases that go past the rings and find there way of depositing in the oil. it also is said to help seal pistion rings (don't really know there but I guess). look at the drag cars too. they run a pcv to the collectors and builders often claim the hp increase from doing this. I doubt your eng. will start leaking like an old harley but a breather won't help.
and for the old eng's look at how long they lasted befor rebuilds...
and for the old eng's look at how long they lasted befor rebuilds...
Supreme Member
Joined: Mar 2004
Posts: 2,519
Likes: 4
From: In the Garage
Car: Camaro
Engine: 6.2L
Transmission: T56
Re: Here we go again. Swap #2 has begun. LOTS of pics...
I didn't weigh the assembly before installation. It seemed about the same as the stock '00 SS I took off (although clearly of different design).

88 350 tpi There is an issue with the early LS1 PCV system in that it causes them engine to ingest oil and sometimes in large quantities so the breather option arose from that. Some do the LS6 PVC upgrade. The windage in LS1 crankcases is one of the key areas of improvement over previous sbc/bbc designs and from what I read when I put the filter on was the air flow was not a problem.
As for sealing issues I have none but I sure did on one other sbc car when I forgot to hook ther PCV up and pusehd out both the seals.
And as for horse power I certainly have seen the vac pumps etc on plenty of builds but my tuner just put down 1000+ rwhp on using the same breather as me
Thread Starter
Joined: Sep 2002
Posts: 3,685
Likes: 10
From: PA
Car: 86 Trans AM
Engine: LS1 (not stock...)
Transmission: Built T56
Axle/Gears: Strange 12-bolt w/ 3.73
Re: Here we go again. Swap #2 has begun. LOTS of pics...
Yeah Im goin to go breather for right now. I just cant spend 80 bucks on the good catch can... I have the LS6 vally cover and PCV set up. And I still get pools of oil in my intake. So we'll run the breather for a bit, see what happens. I wont be ragging on it for awhile anyway until the clutch is broken in.
My PCV is actually COSTING me HP at the moment. Its allowing oil into the intake. Its not Air + Fuel + Spark + Oil for a reason Granted it probably only a couple HP...but whats more important to me is that oil isnt getting into my MAP sensor, behind my valves, and all into the nooks of my intake.
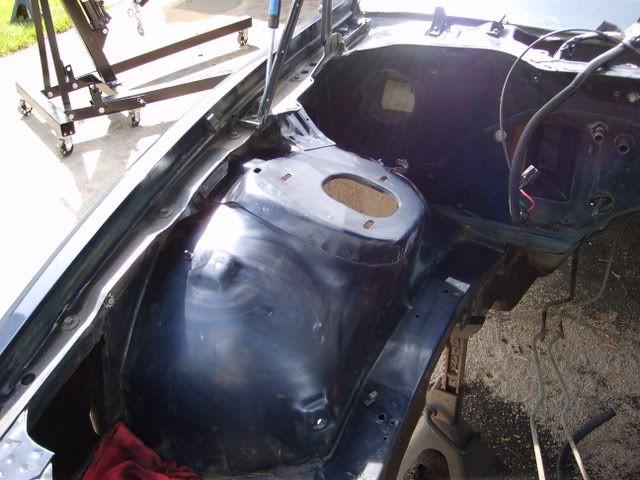
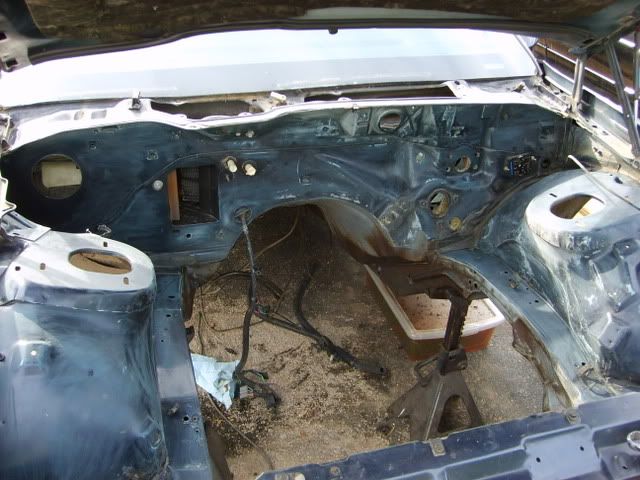
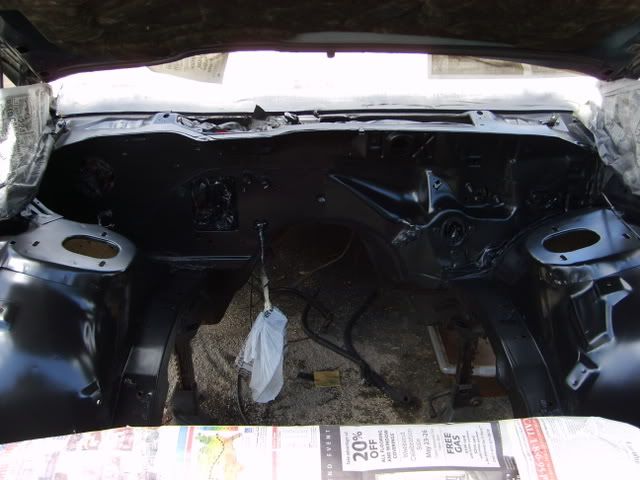
Got some work done today. But a guy came to pick up my 305, and we got to chatting. So that + lunch ate up some time. I got the steering box removed, along with the wiper motor to make painting easier. Then I set out to clean the engine bay. WHAT....A....PAIN....IN.....THE....BUTT!!!! It had that waxy undercoating crap ALL over it. I used a combination of scraping, sanding, and laquer thinner to get it off. And I couldnt get it all. Then there was some hard crap that looks to be yet another form of undercoating that was splattered all over. Anyway, I think I can paint tomorrow. Excited for that.
I also hung the pedals. A couple things. One is that the holes in the padding match my u-bolt for the master cylinder perfectly. Two, the one brace for the pedals fell directly on one of the holes. The other brace was lined up, but needed to be moved up a bit. I loosened the large bolt connecting it all together, and that second brace moved right up into place. So...Tomorrow Im going to pull the assembly, mount the master in there and check that its atleast somewhat lined up. Then Im going to cut the holes. After thats done, Im going to grind out the master cylinder studs from both pedal sets, and weld the 4th gen stud into the 3rd gen stud. Done and done with those hopefully. Im also routing my master cylinder hydraulic line inside the car. Not gonna worry about burning fluid in the line this time...
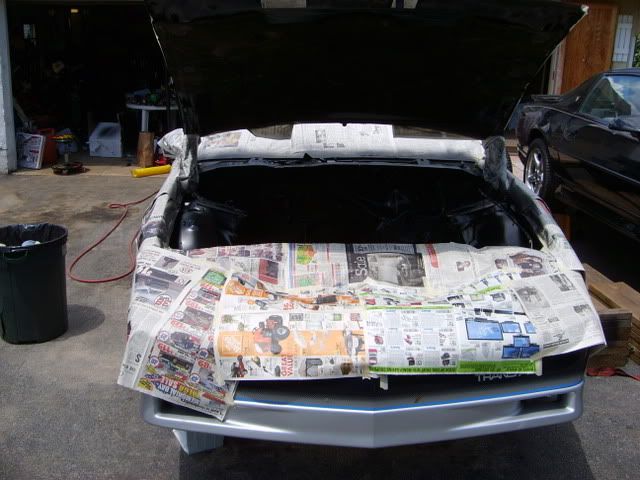
Ok. few pics. Hopefully tomorrow is more productive. I need to spray early, and hope that that paint dries quick. It wont be like my "engine paint spray can job" from last time. It will probably take a long time to dry. We'll see. I have plenty to keep me busy in the mean time.
Before any cleaning/scraping.

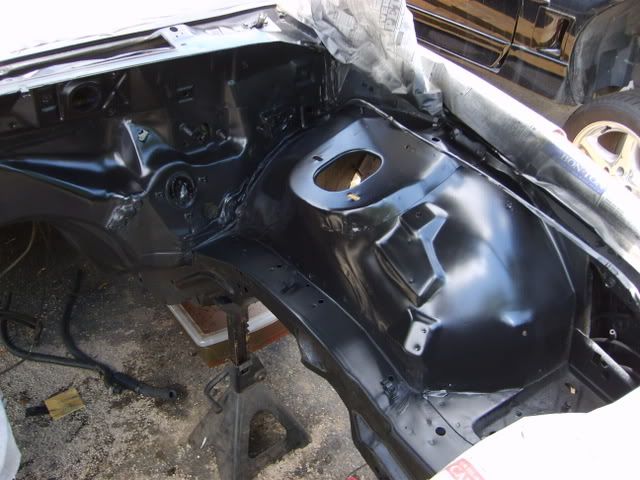
After.


Cam... Yeah I totally forgot about that link. I can see why the LS7 set up is more street friendly. It should let me lower my idle down some too. That alum flywheel was a pain when it came to setting the hot idle. Or thats what I was told was making it a pain...
J.
OH..hey guys. When I bolt in the master cylinder, do I leave the braces on top of that padding? So it goes master cylinder, firewall, padding, braces? Or do I somehow put the braces under the padding? The pedal assembly itself sandwhichs the padding, so I wasnt sure.
My PCV is actually COSTING me HP at the moment. Its allowing oil into the intake. Its not Air + Fuel + Spark + Oil for a reason
Granted it probably only a couple HP...but whats more important to me is that oil isnt getting into my MAP sensor, behind my valves, and all into the nooks of my intake. Got some work done today. But a guy came to pick up my 305, and we got to chatting. So that + lunch ate up some time. I got the steering box removed, along with the wiper motor to make painting easier. Then I set out to clean the engine bay. WHAT....A....PAIN....IN.....THE....BUTT!!!! It had that waxy undercoating crap ALL over it. I used a combination of scraping, sanding, and laquer thinner to get it off. And I couldnt get it all. Then there was some hard crap that looks to be yet another form of undercoating that was splattered all over. Anyway, I think I can paint tomorrow. Excited for that.
I also hung the pedals. A couple things. One is that the holes in the padding match my u-bolt for the master cylinder perfectly. Two, the one brace for the pedals fell directly on one of the holes. The other brace was lined up, but needed to be moved up a bit. I loosened the large bolt connecting it all together, and that second brace moved right up into place. So...Tomorrow Im going to pull the assembly, mount the master in there and check that its atleast somewhat lined up. Then Im going to cut the holes. After thats done, Im going to grind out the master cylinder studs from both pedal sets, and weld the 4th gen stud into the 3rd gen stud. Done and done with those hopefully. Im also routing my master cylinder hydraulic line inside the car. Not gonna worry about burning fluid in the line this time...
Ok. few pics. Hopefully tomorrow is more productive. I need to spray early, and hope that that paint dries quick. It wont be like my "engine paint spray can job" from last time. It will probably take a long time to dry. We'll see. I have plenty to keep me busy in the mean time.
Before any cleaning/scraping.
After.
Cam... Yeah I totally forgot about that link. I can see why the LS7 set up is more street friendly. It should let me lower my idle down some too. That alum flywheel was a pain when it came to setting the hot idle. Or thats what I was told was making it a pain...
J.
OH..hey guys. When I bolt in the master cylinder, do I leave the braces on top of that padding? So it goes master cylinder, firewall, padding, braces? Or do I somehow put the braces under the padding? The pedal assembly itself sandwhichs the padding, so I wasnt sure.
Last edited by ghettocruiser; May 23, 2008 at 06:52 PM.
Thread Starter
Joined: Sep 2002
Posts: 3,685
Likes: 10
From: PA
Car: 86 Trans AM
Engine: LS1 (not stock...)
Transmission: Built T56
Axle/Gears: Strange 12-bolt w/ 3.73
Re: Here we go again. Swap #2 has begun. LOTS of pics...
Well guys, Im exhausted. Im not gonna talk too much. Just gonna post pictures. They'll tell the story for the most part. Got the engine bay painted. Looks great IMO. Using a spray gun is 1000 times better than rattle cans!
Got the pedals somewhat done. It was still a pain in the butt. I hate that part of the job. I have to commit to the thirdgen pedals or commit back to the 4th gen pedals. Because I need to change the stud on the pedals out. Until I do that, I cant be sure its lined up good. It looks close though.
I installed the newer pop-up module for the head lights. I also laid in the wiring from the bulkhead connector, and ran all the connectors to the lights, horns, wipers etc etc. Everything seems to be ok. I want to test it tomorrow...hopefully.
On to the pics.


con't...
Got the pedals somewhat done. It was still a pain in the butt. I hate that part of the job. I have to commit to the thirdgen pedals or commit back to the 4th gen pedals. Because I need to change the stud on the pedals out. Until I do that, I cant be sure its lined up good. It looks close though.
I installed the newer pop-up module for the head lights. I also laid in the wiring from the bulkhead connector, and ran all the connectors to the lights, horns, wipers etc etc. Everything seems to be ok. I want to test it tomorrow...hopefully.
On to the pics.
con't...
Thread Starter
Joined: Sep 2002
Posts: 3,685
Likes: 10
From: PA
Car: 86 Trans AM
Engine: LS1 (not stock...)
Transmission: Built T56
Axle/Gears: Strange 12-bolt w/ 3.73
Re: Here we go again. Swap #2 has begun. LOTS of pics...


Started working on the motor...but I got as far as dropping the pan and ran out of steam. Hopefully more updates tomorrow...
Here is where she sits for the night...

J.
Joined: Jan 2003
Posts: 949
Likes: 0
From: New Germany, MN
Car: 1986 Iroc
Engine: 5.3
Transmission: 4L80E
Axle/Gears: 9 Inch w/ 3.55
Re: Here we go again. Swap #2 has begun. LOTS of pics...
Wow this swap looks like its going to be really clean.
Thread Starter
Joined: Sep 2002
Posts: 3,685
Likes: 10
From: PA
Car: 86 Trans AM
Engine: LS1 (not stock...)
Transmission: Built T56
Axle/Gears: Strange 12-bolt w/ 3.73
Re: Here we go again. Swap #2 has begun. LOTS of pics...
Thanks! Im tryin... Progress has just been so slow. Im moving this weekend too...so not much will get done until after next week after Im settled. The thing is...I could really take my time and clean things up and make them look perfect. However that would take way too long for my patience level. I want to drive the car for most of this summer. Also...its a daily driver more or less. It sees rain and road grime and long trips to the shore. So having it spotless in certain areas is pointless. But Im doing what I can along the way so it doesnt look like total crap
Here are some updates.
Pedals are in for a final time. You'll notice the master cylinder is slightly off. I dont have the rod all the way on for one thing, and for another, it needs to be slightly tweaked. Also the braces arent tight yet. I swapped the attachment peg from the 4th gen pedals to the 3rd gen. The pictures will show it all... Worked great. Things seem to be working out well in the pedal department. I made a crappy U-bolt for the master cylinder a while back. It sucked. So I made a new one real quick. makes installing the master MUCH easier.
Along with the pedals is the booster and some odds and ends. Before I started to cut into the floor and make holes everywhere, I wanted the carpet out. Just easier. Im also installing 4th gen seat belts. So I pulled all the belts and the carpet. I found one good thing...and some bad things. The good thing is... ZERO rust. Not really a surprise with this car. But it was nice to see. The bad thing was...i found a total of 4 dead mice. Little ones. So f'ing gross. They probably got in there from the car sitting. Found two under the console/shifter, one under the carpet along the tunnel, and one way back under the rear seat belt retractor. Im going to pull the rest of the carpet and panels to find any more of the little bastards. I pulled the carpet to cut the shifter hole, remove the rear seat pegs for the 4th gen rear seats, and to drill holes to pass the clutch master cylinder hydraulic line inside the car...yes inside the car... No more hot fluid for me.
After that, it was dark. So I went in and cleaned out the oil pan. Which was fun. Im not totally sure how to line up the oil pan correctly, so I might wait until the motor is back on the hoist and the bellhousing can be bolted up. I installed the remote bleeder onto the slave cylinder. And then called it quits.
Here come the pics...
Two clutch pedals. 3rd gen on left, 4th gen on right.

After some grinding, and a whack with the hammer and punch.


3rd gen pedals with the peg removed. 4th gen peg in the picture. The hole needed to be 31/64 or there abouts. So it needed to be bigger... Got the drill bit and welded it up.


Looks kinda messy...just getting things bolted up.

Homemade U-bolt.

Here are some updates.
Pedals are in for a final time. You'll notice the master cylinder is slightly off. I dont have the rod all the way on for one thing, and for another, it needs to be slightly tweaked. Also the braces arent tight yet. I swapped the attachment peg from the 4th gen pedals to the 3rd gen. The pictures will show it all... Worked great. Things seem to be working out well in the pedal department. I made a crappy U-bolt for the master cylinder a while back. It sucked. So I made a new one real quick. makes installing the master MUCH easier.
Along with the pedals is the booster and some odds and ends. Before I started to cut into the floor and make holes everywhere, I wanted the carpet out. Just easier. Im also installing 4th gen seat belts. So I pulled all the belts and the carpet. I found one good thing...and some bad things. The good thing is... ZERO rust. Not really a surprise with this car. But it was nice to see. The bad thing was...i found a total of 4 dead mice. Little ones. So f'ing gross. They probably got in there from the car sitting. Found two under the console/shifter, one under the carpet along the tunnel, and one way back under the rear seat belt retractor. Im going to pull the rest of the carpet and panels to find any more of the little bastards. I pulled the carpet to cut the shifter hole, remove the rear seat pegs for the 4th gen rear seats, and to drill holes to pass the clutch master cylinder hydraulic line inside the car...yes inside the car... No more hot fluid for me.
After that, it was dark. So I went in and cleaned out the oil pan. Which was fun. Im not totally sure how to line up the oil pan correctly, so I might wait until the motor is back on the hoist and the bellhousing can be bolted up. I installed the remote bleeder onto the slave cylinder. And then called it quits.
Here come the pics...
Two clutch pedals. 3rd gen on left, 4th gen on right.
After some grinding, and a whack with the hammer and punch.
3rd gen pedals with the peg removed. 4th gen peg in the picture. The hole needed to be 31/64 or there abouts. So it needed to be bigger... Got the drill bit and welded it up.
Looks kinda messy...just getting things bolted up.
Homemade U-bolt.
Supreme Member
iTrader: (7)
Joined: Nov 2006
Posts: 3,740
Likes: 15
From: Alamogordo, NM
Car: 88 Formula 350
Engine: 5.7
Transmission: T-56
Axle/Gears: 9" 3.89
Re: Here we go again. Swap #2 has begun. LOTS of pics...
Looks great. The Second time around always turns out ALOT better! I Might do an LS1 Swap this summer. I am not sure it is worth it as my engine only has 14k miles on it, along with Aluminum heads, Super Ram, and the whole Shebang. It would help out with the swap Fee's though...HMMM

Supreme Member
Joined: Apr 2002
Posts: 3,552
Likes: 5
From: New Jersey
Car: 86 Corvette, 89 IROC, 1999 TA
Engine: 350, 350, LS1
Transmission: 700r4, 700r4, T-56
Axle/Gears: 3.07, 373, 4.10
Re: Here we go again. Swap #2 has begun. LOTS of pics...
engine bay looks great, what kind of paint did you use?
Thread Starter
Joined: Sep 2002
Posts: 3,685
Likes: 10
From: PA
Car: 86 Trans AM
Engine: LS1 (not stock...)
Transmission: Built T56
Axle/Gears: Strange 12-bolt w/ 3.73
Re: Here we go again. Swap #2 has begun. LOTS of pics...
cont'd....
Here are the pedals. They look kind of weird because I dont have the pivot bolt tight. I still need to tweak the braces, so once I do that they'll even out.

Rustless floors.... Thats what garage kept gets ya.


And just the oil pan to cap it off...


OK guys... need an opinion on something. I need to do something for an overflow bottle, and a washer tank. The drivers side battery tray is full of fuse boxes and the cruise control module. The pass. side tray has the battery. Last time, I had the 4th gen overflow/batt. tray combo mounted in the pass. side. That requires a big hole to be cut. Ide rather not cut into the perfect battery tray. So...what do you think. Re-install the 4th gen batt tray/overflow combo. Or install a clean new 3rd gen stock tank.
On the washer, I had a 4th gen bottle installed. However I never finished it off. I can re-do that work as well. Or I could probably use a new 3rd gen washer bottle...which I have already.
What do you think? Here is my engine bay from the last car. Keep it like this? Or new 3rd gen bottles in the stock locations...

Thanks for lookin guys!
J.
----------
First time ever using a spray gun. Used a gravity feed gun from harbor freight. The paint was eastwood underhood black. Picked it because its the right color and gloss in my opinion. I reduced it 100% with laquer thinner. Thats 1:1... Played with the gun for a total of 30 seconds til the pattern was right, and went to town. Let me tell you. Its 100x better than using a spray can. So much smoother, easier to cover, comes out nice. Dried quick too.
Plus this paint should be somewhat solvent resistant, and heat resistant over 250 degrees. Last time I used engine paint...which is said to withstand over 500 degrees...but it wasnt very solvent resistant. It seemed soft even after it was dry.
J.
Here are the pedals. They look kind of weird because I dont have the pivot bolt tight. I still need to tweak the braces, so once I do that they'll even out.
Rustless floors.... Thats what garage kept gets ya.
And just the oil pan to cap it off...
OK guys... need an opinion on something. I need to do something for an overflow bottle, and a washer tank. The drivers side battery tray is full of fuse boxes and the cruise control module. The pass. side tray has the battery. Last time, I had the 4th gen overflow/batt. tray combo mounted in the pass. side. That requires a big hole to be cut. Ide rather not cut into the perfect battery tray. So...what do you think. Re-install the 4th gen batt tray/overflow combo. Or install a clean new 3rd gen stock tank.
On the washer, I had a 4th gen bottle installed. However I never finished it off. I can re-do that work as well. Or I could probably use a new 3rd gen washer bottle...which I have already.
What do you think? Here is my engine bay from the last car. Keep it like this? Or new 3rd gen bottles in the stock locations...
Thanks for lookin guys!
J.
----------
First time ever using a spray gun. Used a gravity feed gun from harbor freight. The paint was eastwood underhood black. Picked it because its the right color and gloss in my opinion. I reduced it 100% with laquer thinner. Thats 1:1... Played with the gun for a total of 30 seconds til the pattern was right, and went to town. Let me tell you. Its 100x better than using a spray can. So much smoother, easier to cover, comes out nice. Dried quick too.
Plus this paint should be somewhat solvent resistant, and heat resistant over 250 degrees. Last time I used engine paint...which is said to withstand over 500 degrees...but it wasnt very solvent resistant. It seemed soft even after it was dry.
J.
Last edited by ghettocruiser; May 29, 2008 at 10:14 PM. Reason: Automerged Doublepost
Supreme Member
Joined: Sep 2005
Posts: 1,951
Likes: 13
From: Ottawa, ONT
Car: 1987 Firebird
Engine: 355
Transmission: T56
Re: Here we go again. Swap #2 has begun. LOTS of pics...
NO CUTTING! Go with the third gen stuff for now, until you find a "cleaner" solution.
Also: you prolly missed the question a couple times, but
WHAT PAINT DID YOU USE???
Also: you prolly missed the question a couple times, but
WHAT PAINT DID YOU USE???
Thread Starter
Joined: Sep 2002
Posts: 3,685
Likes: 10
From: PA
Car: 86 Trans AM
Engine: LS1 (not stock...)
Transmission: Built T56
Axle/Gears: Strange 12-bolt w/ 3.73
Re: Here we go again. Swap #2 has begun. LOTS of pics...
See the end of the post right above yours for the paint explaination I got it directly from Eastwood's website. It was like $20 for a quart of it...or something like that. Also ordered a spray can for any touch up areas.
I think Im good with the 3rd gen overflow. But the washer tank is going to be an issue. With my brake lines and line lock. I dont want to modify those parts.. And I dont want to use a 3rd gen overflow, and not washer. Its all or nothing. It will look lop sided otherwise. Ill see what I can do. I might try to heat up the washer tank with the heat gun and get it to cave in. I dont care if it cuts capacity in half...I dont use the washers that often, and Ill just keep a bottle in the hatch.
J.
I got it directly from Eastwood's website. It was like $20 for a quart of it...or something like that. Also ordered a spray can for any touch up areas.I think Im good with the 3rd gen overflow. But the washer tank is going to be an issue. With my brake lines and line lock. I dont want to modify those parts.. And I dont want to use a 3rd gen overflow, and not washer. Its all or nothing. It will look lop sided otherwise. Ill see what I can do. I might try to heat up the washer tank with the heat gun and get it to cave in. I dont care if it cuts capacity in half...I dont use the washers that often, and Ill just keep a bottle in the hatch.
J.
Supreme Member
Joined: Sep 2005
Posts: 1,951
Likes: 13
From: Ottawa, ONT
Car: 1987 Firebird
Engine: 355
Transmission: T56
Re: Here we go again. Swap #2 has begun. LOTS of pics...
If you dont need it that badly, id search around and see if you can find a washer bottle from a crappy little import or something. Maybe even a brake fluid reservoir?? But me thinks (since you dont have the HUGE HEI distributor with the LS1) just mount a tiny bottle right next to the wipermotor. WHat do you think? Youd have to do some hunting though for the right size...
something like this maybe?
http://www.bfyobsoleteparts.com/files/t_4252.jpg
Also, i didnt mean to sound like a douche askin about the paint. I read the post on my e-mail replies, then dropped in to check the pix. Didnt notice your description :S. But i really like that paint, maybe ill use it in my engine bay.Mine turned out too glossy for me, and i dont like it anymore.
Keep up the good progress, and dont be afraid to slow down if too many things come up. Thats how you ruin something.
Last edited by online170; May 29, 2008 at 11:27 PM.
Thread Starter
Joined: Sep 2002
Posts: 3,685
Likes: 10
From: PA
Car: 86 Trans AM
Engine: LS1 (not stock...)
Transmission: Built T56
Axle/Gears: Strange 12-bolt w/ 3.73
Re: Here we go again. Swap #2 has begun. LOTS of pics...
You didnt sound like a douche. haha. Dont worry about it. I didnt realize it was going to automatically merge my posts.
I kinda dig that little tank you linked me to. I tracked down the part itself and its $85!!! Yikes. The washer bottle is much less important. The overflow is what I need to figure out.
I could easily cut out the tray to match the 4th gen piece. Some have mounted it from underneith, but the neck has to be heated and bent and the battery seems like it has to sit crooked to clear the neck.
I dont know. Ill figure something out. Ill check out some universal stuff and see what I come up with.
J.
Thread Starter
Joined: Sep 2002
Posts: 3,685
Likes: 10
From: PA
Car: 86 Trans AM
Engine: LS1 (not stock...)
Transmission: Built T56
Axle/Gears: Strange 12-bolt w/ 3.73
Re: Here we go again. Swap #2 has begun. LOTS of pics...
Ok... since using the 3rd gen tanks requires no modification to the car, Im going to run them. Gonna order a nice new overflow. And then modify the washer bottle that I already have to work. Hopefully...
Ill see how it looks. If I hate it, I can always change it. Im gonig to try to make the washer bottle fit first. Before I even order the other stuff. So we'll see how it turns out. Im a fan of believing that I can make anything work. haha. Sometimes that works out, sometimes it doesnt.
J.
Ill see how it looks. If I hate it, I can always change it. Im gonig to try to make the washer bottle fit first. Before I even order the other stuff. So we'll see how it turns out. Im a fan of believing that I can make anything work. haha. Sometimes that works out, sometimes it doesnt.
J.
Member
iTrader: (1)
Joined: Jan 2001
Posts: 222
Likes: 0
From: Republic of Texas
Engine: LS2
Transmission: T56
Axle/Gears: Moser Ford-9, 3.50
Re: Here we go again. Swap #2 has begun. LOTS of pics...
Move the battery to the trunk. You can get some small aluminum tanks for the washer and overflow to put on that side, Canton makes a good variety of tanks.
Thread Starter
Joined: Sep 2002
Posts: 3,685
Likes: 10
From: PA
Car: 86 Trans AM
Engine: LS1 (not stock...)
Transmission: Built T56
Axle/Gears: Strange 12-bolt w/ 3.73
Re: Here we go again. Swap #2 has begun. LOTS of pics...
Stop giving me more project ideas I actually thought about moving it to the trunk. Just didnt want to have to deal with figuring out what cable to buy, how to hook it all together, etc etc right now.
Once I get the car going, and at an acceptable spot, Im going to probably do an audio upgrade. I might move the batt. then.... Once I do that, Ill probably either look into canton...or just use a new explorer combo tank. Those seem to work pretty good.
Speaking of the car...goin out to work on it now...check back in later.
J.
I actually thought about moving it to the trunk. Just didnt want to have to deal with figuring out what cable to buy, how to hook it all together, etc etc right now. Once I get the car going, and at an acceptable spot, Im going to probably do an audio upgrade. I might move the batt. then.... Once I do that, Ill probably either look into canton...or just use a new explorer combo tank. Those seem to work pretty good.
Speaking of the car...goin out to work on it now...check back in later.
J.
Supreme Member
Joined: Sep 2005
Posts: 1,951
Likes: 13
From: Ottawa, ONT
Car: 1987 Firebird
Engine: 355
Transmission: T56
Re: Here we go again. Swap #2 has begun. LOTS of pics...
That tank i showed you was just an example. Im sure you you could find or fab something very quickly to serve the same purpose.
Summit sells a few things, or maybe you could use an old thermos?
In any case, for the overflow tank, get one of summit's cheepo ones, and put it in front of the rad for now. I cant imagine it would be any fun to fill, but if u have a good cooling system, you shouldnt have to worry.
I just dont like the idea of cutting anything.
OR go with third gen stuff like you said, no harm done.
Member
iTrader: (1)
Joined: Jan 2001
Posts: 222
Likes: 0
From: Republic of Texas
Engine: LS2
Transmission: T56
Axle/Gears: Moser Ford-9, 3.50
Re: Here we go again. Swap #2 has begun. LOTS of pics...
You know you want more projects! Here's another one: Second Skin insulation.
It'll be a lot easier now with the interior torn out to do both of those! The battery move isn't that hard. I used BMR's battery bracket and a cable kit from Taylor: http://www.taylorvertex.com/hp/index...leGroundingKit
I bought the 20' cable and used the left over portion for the ground wire (no more than 18 inches long, from what I've read). I made the mistake of using a 10 gauge cable for the battery recharge and it's not working as good; if you do this then use a 6 or 8 gauge instead.
Here's another one: Second Skin insulation.It'll be a lot easier now with the interior torn out to do both of those! The battery move isn't that hard. I used BMR's battery bracket and a cable kit from Taylor: http://www.taylorvertex.com/hp/index...leGroundingKit
I bought the 20' cable and used the left over portion for the ground wire (no more than 18 inches long, from what I've read). I made the mistake of using a 10 gauge cable for the battery recharge and it's not working as good; if you do this then use a 6 or 8 gauge instead.
Thread Starter
Joined: Sep 2002
Posts: 3,685
Likes: 10
From: PA
Car: 86 Trans AM
Engine: LS1 (not stock...)
Transmission: Built T56
Axle/Gears: Strange 12-bolt w/ 3.73
Re: Here we go again. Swap #2 has begun. LOTS of pics...
Ive been giving serious thought to sound deadner. After driving around in the 86, I loved how quiet it was inside compared to my 87. I tore out most of the padding and insulation from that car. Plus I left holes in the firewall, and didnt take care to cover things up real well. That second skin stuff looks pretty good and you get a lot for the price.
I dont know about relocating the battery. But its starting to look like a good idea. My bottle situation is turning into a mess. Im still not sure what all I need to get from that site you linked me to, but it looks like a good company. And there is a speed shop somewhat nearby that can get that brand... So we'll see.
Tonight I didnt get much done. Just busy with packing and all. But I did manage to get a couple things started/done. I routed my clutch hydraulic line inside the car. Looks great, and should keep me from ever having clutch fluid issue due to heat. Plus it will still be easy to remove/replace should the need arise. I started to fit the 3rd gen washer bottle. Problem is, my line lock and rear brake adjustable prop valve are in the way. I had the stainless lines bent all nice and neat and dont really want to mess with them. So I started to heat the bottle up and adjust it. Didnt work so well. And its just becoming a nightmare. So I might scratch this idea and come up with something else. Not gonna waste anymore time on it though for now.
Anyway..on to a few pictures.

Used a grommet and it should work well. Once the line is hooked to the trans, Im going to fill in around the line in the grommet with some RTV. Just to seal things up nicely.


Just a couple pictures of the bottle fitting.


Getting close to putting the motor in. Gotta cut the shifter hole, install the fuel and brake lines, modify the k-member alittle bit for more oil pan clearance, cut the hole for the wiring harness to go through, and thats about it. Oh and put the new clutch in and re-attach the trans.
Tomorrow is gonna be packing and what not. Plus its supposed to rain. Sunday I move. The first couple days of next week will be getting settled in at the new place. Then I should be able to hit the car hard again.
J.
I dont know about relocating the battery. But its starting to look like a good idea. My bottle situation is turning into a mess. Im still not sure what all I need to get from that site you linked me to, but it looks like a good company. And there is a speed shop somewhat nearby that can get that brand... So we'll see.
Tonight I didnt get much done. Just busy with packing and all. But I did manage to get a couple things started/done. I routed my clutch hydraulic line inside the car. Looks great, and should keep me from ever having clutch fluid issue due to heat. Plus it will still be easy to remove/replace should the need arise. I started to fit the 3rd gen washer bottle. Problem is, my line lock and rear brake adjustable prop valve are in the way. I had the stainless lines bent all nice and neat and dont really want to mess with them. So I started to heat the bottle up and adjust it. Didnt work so well. And its just becoming a nightmare. So I might scratch this idea and come up with something else. Not gonna waste anymore time on it though for now.
Anyway..on to a few pictures.
Used a grommet and it should work well. Once the line is hooked to the trans, Im going to fill in around the line in the grommet with some RTV. Just to seal things up nicely.
Just a couple pictures of the bottle fitting.
Getting close to putting the motor in. Gotta cut the shifter hole, install the fuel and brake lines, modify the k-member alittle bit for more oil pan clearance, cut the hole for the wiring harness to go through, and thats about it. Oh and put the new clutch in and re-attach the trans.
Tomorrow is gonna be packing and what not. Plus its supposed to rain. Sunday I move. The first couple days of next week will be getting settled in at the new place. Then I should be able to hit the car hard again.
J.

Senior Member

Joined: Jul 2002
Posts: 631
Likes: 2
From: Saskatchewan
Car: 1992 GTA
Engine: LS1
Transmission: T56
Axle/Gears: 4.10
Re: Here we go again. Swap #2 has begun. LOTS of pics...
I vote battery relocation as well. It frees up a bunch of space in the engine bay. I have a washer resivoir from an Aerostar that tucks nicely under the inner fender on the drivers side. I stil have the factory 3rd gen coolant overflow tho and would like to get rid of it at some point.
The only negative for having a battery in the spare tire well is you need a cutoff switch if you want to run at a track.
I hope you enjoy the LS7 clutch. I have about 3K miles on it and really love it. Make sure you post up how the hydraulic line reroute works. I already changed the fluid in my resivoir as it was starting to discolor already from some 6500rpm shifts.....
Member
iTrader: (1)
Joined: Jan 2001
Posts: 222
Likes: 0
From: Republic of Texas
Engine: LS2
Transmission: T56
Axle/Gears: Moser Ford-9, 3.50
Re: Here we go again. Swap #2 has begun. LOTS of pics...
The battery relocation is fairly easy, but you'll need to get an Optima battery to prevent getting gasses inside the the car; otherwise you need a sealed battery box and vent it outside. I know this makes it sound like a pain and the Optima's aren't cheap, but there are good benefits to moving it to the trunk (engine bay space and weight distribution). You can always do it later, but it's easier with the interior pulled out (at least the way I did it).
From Taylor's site you can buy part number 21540 or 21550. From the battery I ran the cable inside the car along the passenger side, down by the door. There's an opening in the passengers foot well just in front of the door, I ran the cable through that and looped it under the car to the starter. From the starter I ran the cable to the elctrical junction next to the radiator, so everything else get's power. With the left over cable I cut about 12 inches and wrapped it in electrical tape to make it my ground cable. I drilled through the frame towards the rear seat and put a bolt through it for the ground connection.
Now you need 6 or 8 gauge cable to run from the alternator back to the battery. I ran it under the radiator towards the starter and then it follows the battery cable back to the battery. The carpet and interior panels cover everything up. Both cable are held in place with loop fasteners.
I'm away from my house so I can't post any pictures. I know you're trying to get things done soon and you have a lot of work, but this is just something to think about.
Thread Starter
Joined: Sep 2002
Posts: 3,685
Likes: 10
From: PA
Car: 86 Trans AM
Engine: LS1 (not stock...)
Transmission: Built T56
Axle/Gears: Strange 12-bolt w/ 3.73
Re: Here we go again. Swap #2 has begun. LOTS of pics...
A10... Youve sparked my interest now. I think I might look into relocating that sucker. I already have an optima. So thats not an issue. This would allow me to run an explorer combo container for the washer/overflow. Nice and clean and simple. The only thing that worries me is being track legal... Will I def. need a battery switch? If so, I wouldnt even being to know where to put it. Ill see the track a few times this year, then more next year.
If you have some pictures of how you mounted the batt, and of the junction up front Ide like to take a look. Im sure I can figure it out. But its always nice to see another car the same as mine with it set up. I always have trouble deciding what to do for connetors and routing and all that. My projects always seem to take longer that way.
Do you have that second skin stuff in your car? Thats not the stuff that smells or fumes or anything like that is it? Or am I thinking of the stuff you get from home depot that some people claim is messy and stinky.
Raining its butt off right now...so nothing will get done today unfortunetly.
J.
Member
iTrader: (1)
Joined: Jan 2001
Posts: 222
Likes: 0
From: Republic of Texas
Engine: LS2
Transmission: T56
Axle/Gears: Moser Ford-9, 3.50
Re: Here we go again. Swap #2 has begun. LOTS of pics...
Unfortunately I'm away from my home all summer and I don't have the pics. The Taylor cable already has the battery connector on it, so you have to buy a 0 gauge connection for the starter, then 2 more like that to go from the starter to the junction. With the left over cable, the other end has the battery connection for the battery ground post, so you need a 4th 0 gauge connection to ground it to the frame. Then you just need some looped connections for the recharge line; one for the alternator and the other for the positive battery post. Finally, you can use your old ground cable to ground the engine block to the front frame rail, this may help with the overall ground.
The BMR mounting bracket is pretty simple. You have to take out the spare and it just bolts onto the rear frame rail.
I don't know about track requirements, but I'm not sure why you'd need a cutoff switch. Several new cars come with the battery in the trunk and the Optima's are sealed.
I have the thin Second Skin all inside my car. This stuff will absorb most vibrations but it's not much for noise insulation, my car is still pretty loud from the engine and some road noise. Another option is to add the thicker insulation to the firewall and on the wheel wells, this should make things better. There's no smell with this stuff, it's like Dynomat but a little cheaper.
Last edited by A10Beav; May 31, 2008 at 03:03 PM.
Senior Member
Joined: Jul 2002
Posts: 631
Likes: 2
From: Saskatchewan
Car: 1992 GTA
Engine: LS1
Transmission: T56
Axle/Gears: 4.10
Re: Here we go again. Swap #2 has begun. LOTS of pics...
A10... The only thing that worries me is being track legal... Will I def. need a battery switch? If so, I wouldnt even being to know where to put it. Ill see the track a few times this year, then more next year.
If you have some pictures of how you mounted the batt, and of the junction up front Ide like to take a look. Im sure I can figure it out. J.
If you have some pictures of how you mounted the batt, and of the junction up front Ide like to take a look. Im sure I can figure it out. J.
If you want pictures let me know and I can take a few of my optima and the junctions....
On Probation
iTrader: (9)
Joined: Feb 2005
Posts: 2,042
Likes: 2
From: So Cal
Car: 87 IROC-Z
Engine: LsX
Transmission: MN12 6speed
Axle/Gears: 3:42
Re: Here we go again. Swap #2 has begun. LOTS of pics...
I think he post how much material and price on the 6th page.
Thread Starter
Joined: Sep 2002
Posts: 3,685
Likes: 10
From: PA
Car: 86 Trans AM
Engine: LS1 (not stock...)
Transmission: Built T56
Axle/Gears: Strange 12-bolt w/ 3.73
Re: Here we go again. Swap #2 has begun. LOTS of pics...
Quick question to you guys that have added some form of insulation. Did you remove all the OEM insulation? Like all the padding under the carpet? Or did you leave all the stock stuff in place, and just lay the new stuff down under it.
Im still not 100% sure if Im going to go through all that right now. Doesnt take much to remove the carpet and all. We'll see... going to do some more research on it.
J.
Im still not 100% sure if Im going to go through all that right now. Doesnt take much to remove the carpet and all. We'll see... going to do some more research on it.
J.
Junior Member
Joined: Feb 2007
Posts: 82
Likes: 0
From: Gold Coast, Australia
Car: 1986 IROC Z
Engine: Nothing but air
Axle/Gears: Four stands
Re: Here we go again. Swap #2 has begun. LOTS of pics...
Thanks for the detailed pics of the engine bay and pedals. I can now see why my manual pedals wouldn't fit. My steering column goes through the firewall between the brake and clutch pedals, right where the clutch master cylinder should mount.
Member
Joined: May 2008
Posts: 228
Likes: 0
From: Battle Ground, WA
Car: 1986 Chevy Silverado
Engine: 350 Crate
Transmission: Turbo 400 w/ shift kit
Axle/Gears: dana60/corp14 4.10 gears
Re: Here we go again. Swap #2 has begun. LOTS of pics...
Very informational!!!!! I have an 83 I am going to totally revamp. A project in the waiting. Unfortunate for me I have to buy a house with a garage. Wife says I can't build it in front of our condo. The "community" hates us enough as loud as the car is now. LOL. O but it is coming. Anybody want to buy a Condo???
Member
Joined: May 2006
Posts: 330
Likes: 1
From: Melbourne Australia
Car: 88 GTA
Engine: Ls1
Transmission: 4L60E
Axle/Gears: 9 bolt 3.27
Re: Here we go again. Swap #2 has begun. LOTS of pics...
Great thread, and some awesome info, now I'm back to wanting to do the LSx swap. Hmmmmm, turbos or LSx? Or both?.............
Member
iTrader: (1)
Joined: Jan 2001
Posts: 222
Likes: 0
From: Republic of Texas
Engine: LS2
Transmission: T56
Axle/Gears: Moser Ford-9, 3.50
Re: Here we go again. Swap #2 has begun. LOTS of pics...
I left the insulation on the firewall and wheel wells because it was thicker, and then placed Second Skin over it. I removed the factory rubber "insulation" mats.
Thread Starter
Joined: Sep 2002
Posts: 3,685
Likes: 10
From: PA
Car: 86 Trans AM
Engine: LS1 (not stock...)
Transmission: Built T56
Axle/Gears: Strange 12-bolt w/ 3.73
Re: Here we go again. Swap #2 has begun. LOTS of pics...
Whats up guys! What a busy week... Moving was a pain. Now Im further away from my car with SUCKS! With gas being so friggin expensive, I hate driving.
Anyway I did get a few little things finished. Saturday I planned to trash on it and get the motor in and have stuff done. However the 95* temps stopped me dead in my tracks. I used an infared therm on my driveway...over 120* on the black top. So...I spent most of the day in the garage with a huge fan blowing on me. Just a total waste of a day.
Ok on to some pictures.
Got my hole made for my wiring harness. Did a much cleaner job this time, and got a good way to seal the hole up, which I didnt do at all last time around.


Got the shifter hole cut. The car is officially a manual trans car.


Hit the holes with POR-15, and the pass. side footwell. Had some moisture down in there, which was dry before paint, but there were a couple little rust spots. So I tossed some paint on it. Contemplating coating my entire floor with POR-15. I have a whole quart of it. So why not?

Got the intake off my motor, and the ports cleaned up/out. As well as the exhaust ports. Just a couple pics of that.


cont'd.....
Anyway I did get a few little things finished. Saturday I planned to trash on it and get the motor in and have stuff done. However the 95* temps stopped me dead in my tracks. I used an infared therm on my driveway...over 120* on the black top.
So...I spent most of the day in the garage with a huge fan blowing on me. Just a total waste of a day. Ok on to some pictures.
Got my hole made for my wiring harness. Did a much cleaner job this time, and got a good way to seal the hole up, which I didnt do at all last time around.
Got the shifter hole cut. The car is officially a manual trans car.
Hit the holes with POR-15, and the pass. side footwell. Had some moisture down in there, which was dry before paint, but there were a couple little rust spots. So I tossed some paint on it. Contemplating coating my entire floor with POR-15. I have a whole quart of it. So why not?
Got the intake off my motor, and the ports cleaned up/out. As well as the exhaust ports. Just a couple pics of that.
cont'd.....
Thread Starter
Joined: Sep 2002
Posts: 3,685
Likes: 10
From: PA
Car: 86 Trans AM
Engine: LS1 (not stock...)
Transmission: Built T56
Axle/Gears: Strange 12-bolt w/ 3.73
Re: Here we go again. Swap #2 has begun. LOTS of pics...
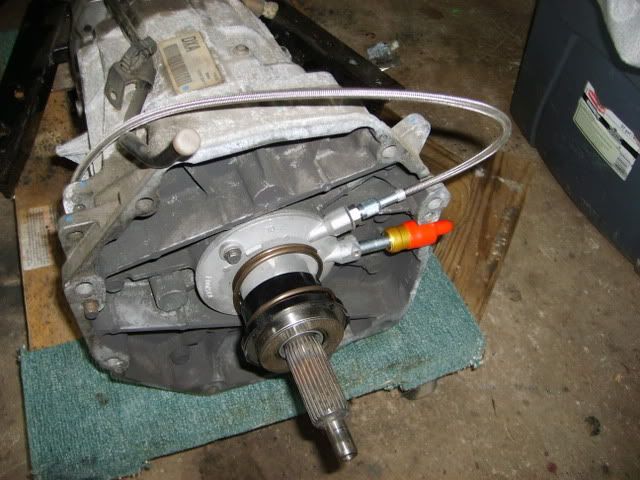
Also built my breather... Not as pretty as the expensive one, but only cost about $12 and alittle RTV.


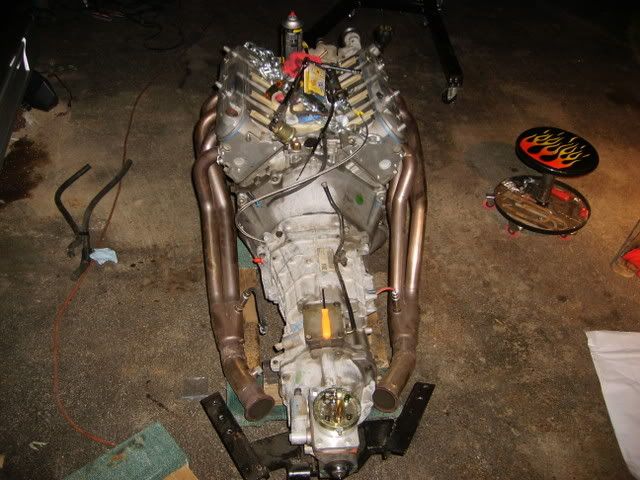
And FINALLY...probably the biggest profess I can report. I got the clutch installed, and trans back on the motor. I gotta say, getting that trans onto the motor, with the motor swinging back and forth was a pain. I got it to the point where I was pretty sure the output shaft was engaged into the pilot bushing, and then just used the bolts to pull it in. The bolts turned very easy, almost by hand. So I felt ok using them to guide it in. Pics are pretty self explanitory.


Thats it for now. This week, once the temps drop, Im going back to put the motor in. Gotta swap the fuel/brake lines over. And modify the k-member alittle bit. Then its ready to slap in. Once thats done, and the motor is in, Im hoping that things start really moving. Should be ok, because its nothing new after that. Gotta rebuild my intake, slap it back on. Run some wiring. blah blah blah. More pictures to come!
J.
And FINALLY...probably the biggest profess I can report. I got the clutch installed, and trans back on the motor. I gotta say, getting that trans onto the motor, with the motor swinging back and forth was a pain. I got it to the point where I was pretty sure the output shaft was engaged into the pilot bushing, and then just used the bolts to pull it in. The bolts turned very easy, almost by hand. So I felt ok using them to guide it in. Pics are pretty self explanitory.
Thats it for now. This week, once the temps drop, Im going back to put the motor in. Gotta swap the fuel/brake lines over. And modify the k-member alittle bit. Then its ready to slap in. Once thats done, and the motor is in, Im hoping that things start really moving. Should be ok, because its nothing new after that. Gotta rebuild my intake, slap it back on. Run some wiring. blah blah blah. More pictures to come!
J.

Supreme Member
Joined: Jan 2001
Posts: 1,374
Likes: 2
From: Pittsburgh, PA
Car: 06 SRM M6 GTO, 98 Grand Prix GTP
Re: Here we go again. Swap #2 has begun. LOTS of pics...
Nice progress, I hadnt seen any new posts in awhile, I was beginning to wonder if the heat got you.
Thread Starter
Joined: Sep 2002
Posts: 3,685
Likes: 10
From: PA
Car: 86 Trans AM
Engine: LS1 (not stock...)
Transmission: Built T56
Axle/Gears: Strange 12-bolt w/ 3.73
Re: Here we go again. Swap #2 has begun. LOTS of pics...
Haha... yes the heat did get me the one day. Couldnt do squat. But moving is what really got me. Havent had a chance to do much...working on it one night a week, and my weekends are now back to being busy. Stupid life and all its little hold ups....
Anyway...HUGE hurdle tonight. MOTOR IS IN!!! Wasnt easy though. I got home, started on the fuel/brake lines. Im not running evap this time, so I separated the EVAP and fuel line, and was then able to run the brake line in the same clips as the fuel line. Which was nice. Much cleaner. I needed to install the fuel/brake lines before the motor, because I wouldnt have had the room to install the clips and lines with the way those headers fit. Of course I got covered in gas and brake fluid.
The next thing I did, was grind away on the k-member. It was close in a couple spots, so I wnated to clearance it some more. Finished that and hit it with some paint. I installed the headers back on the motor, and put on the new stage 8 hardware and locks. Installed the k-member...and it was time to shove her in...
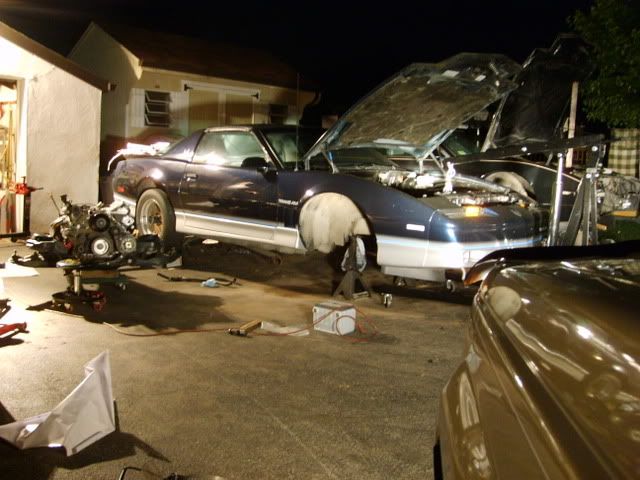
One problem. By now it was dark. Pitch black. I was determined to get it in though. So I set up my big halogen work lamp. Just as I hooked the hoist to the car, the bulb blew. WTF. So I ended up doing it all with my mom's Jeep headlights providing the lighting. haha.
Anyway...on to some pics. By the way, I have some cleaning to do on the motor...but the flash still makes it look 100x worse than it is.
Just a shot of the fuel/brake lines. I still need to tweak them to look neater, but they are where they need to be. And I can mess with them once the motor is in.

Motor ready to go.
Here is my lighting....not great conditions to do this sort of thing.
On its way.

IN!!


The shifter hole I cut was just about perfect. Maybe too perfect. Haha. I think I might trim a little more away. But I doubt Ill have issues the way it is. Note...the trans mount is loose, and the trans crossmember is just bolted enough to hold the trans up. So its off to the side alittle.

Thats it guys... didnt take many pics beacuse I was busting my hump trying to get it done. Having the motor in is a huge relief though. So much more work can be done now that its in there...
More updates to come when I get to work on her!
J.
Anyway...HUGE hurdle tonight. MOTOR IS IN!!! Wasnt easy though. I got home, started on the fuel/brake lines. Im not running evap this time, so I separated the EVAP and fuel line, and was then able to run the brake line in the same clips as the fuel line. Which was nice. Much cleaner. I needed to install the fuel/brake lines before the motor, because I wouldnt have had the room to install the clips and lines with the way those headers fit. Of course I got covered in gas and brake fluid.
The next thing I did, was grind away on the k-member. It was close in a couple spots, so I wnated to clearance it some more. Finished that and hit it with some paint. I installed the headers back on the motor, and put on the new stage 8 hardware and locks. Installed the k-member...and it was time to shove her in...
One problem. By now it was dark. Pitch black. I was determined to get it in though. So I set up my big halogen work lamp. Just as I hooked the hoist to the car, the bulb blew. WTF. So I ended up doing it all with my mom's Jeep headlights providing the lighting. haha.
Anyway...on to some pics. By the way, I have some cleaning to do on the motor...but the flash still makes it look 100x worse than it is.
Just a shot of the fuel/brake lines. I still need to tweak them to look neater, but they are where they need to be. And I can mess with them once the motor is in.
Motor ready to go.
Here is my lighting....not great conditions to do this sort of thing.
On its way.
IN!!
The shifter hole I cut was just about perfect. Maybe too perfect. Haha. I think I might trim a little more away. But I doubt Ill have issues the way it is. Note...the trans mount is loose, and the trans crossmember is just bolted enough to hold the trans up. So its off to the side alittle.
Thats it guys... didnt take many pics beacuse I was busting my hump trying to get it done. Having the motor in is a huge relief though. So much more work can be done now that its in there...
More updates to come when I get to work on her!
J.
Joined: Jun 2002
Posts: 13,576
Likes: 30
From: Harford County, MD
Car: camaro sportcoupe
Engine: 7.0L
Transmission: G-Force GF5R
Axle/Gears: Moser 9"
Re: Here we go again. Swap #2 has begun. LOTS of pics...
can you please let me know what you think of that ls7 clutch when you get it back on the road?
Thread Starter
Joined: Sep 2002
Posts: 3,685
Likes: 10
From: PA
Car: 86 Trans AM
Engine: LS1 (not stock...)
Transmission: Built T56
Axle/Gears: Strange 12-bolt w/ 3.73
Re: Here we go again. Swap #2 has begun. LOTS of pics...
Dont worry...Ill let everyone know. Im hoping for two things...well three. Two are improvements, and one is just the hope for longevity.
1) I hope it holds. I dont think Ill have a slipping issue. I wont be running slicks for awhile. By then Ill probably be doing my cam swap and ordering a tex.
2) I hope streetability is better. The alum flywheel was fun. But it was a bit of a burden in heavy traffic or some normal driving around. Had to give it way more RPM to get going, I couldnt just let the clutch out slowly and take off like a stock car can. Plus the RPMs go up and down so fast while shifting, you had to quick shift if you wanted it to be smooth.
3) I hope I can set my hot idle down 100-200 rpm. Right now it idles right around 1000... if I could knock that down to 900 or 850, my idle sound would be better ( more lope). It was rather difficult to get the idle set with that light flywheel. Less inertia to keep the motor running.
J.
Joined: Jun 2002
Posts: 13,576
Likes: 30
From: Harford County, MD
Car: camaro sportcoupe
Engine: 7.0L
Transmission: G-Force GF5R
Axle/Gears: Moser 9"
Re: Here we go again. Swap #2 has begun. LOTS of pics...
cool. if my swap goes like i want it to, i'm putting it in a care that will see slicks on a regular basis, but obviously, budget is key. but my car with the ls1 swapped in should weigh in at ~2800lbs without me in the car.
Senior Member
Joined: Jul 2002
Posts: 631
Likes: 2
From: Saskatchewan
Car: 1992 GTA
Engine: LS1
Transmission: T56
Axle/Gears: 4.10
Re: Here we go again. Swap #2 has begun. LOTS of pics...
mw66nova, if you are running slicks on a regular basis it might not hold depending on HP levels. From everything I have read once you get it hot it doesn't clamp hard on back to back run situations.
That being said I have put 2K miles on my car this spring on my new LS7 clutch and love it. My car seldom sees a track tho. I use it mainly for DD and the odd Friday races up to 110mph. I think Cam has had some very good mileage from his LS7 with some of it being 1/4 mile runs.
Things I noticed about the clutch is first the clamping power. When its enguaged it doesn't slip at all on MT Sportsman SR's. Tires take some abuse tho. And it has a very light pedal feel. In traffic my left leg loves it. And the heavier flywheel does limit the engines ability to climb in RPM somwehat, but it makes it up in consistant hard launches from a dig and the fact that on a level piece of pavement I can walk my car out from a dead stop without any gas. Keep in mind my car has a 228/228 cam. Its not that big of a cam but enough to still surge slightly at 850 idle. On my LS6 clutch last year there was no way that could happen....

Senior Member
iTrader: (1)
Joined: Nov 2002
Posts: 889
Likes: 0
From: Kansas City
Car: 1991 Trans Am
Engine: L98
Transmission: T56
Re: Here we go again. Swap #2 has begun. LOTS of pics...
He told me that all the setups do something similar (obviously not as bad as his) but as the clutch breaks in the engagement point moves up the pedal.
The pedal is light as a feather. It was amazing how light it was. It literally felt completely stock. I loved it.
Joined: Mar 2000
Posts: 43,187
Likes: 46
From: Littleton, CO USA
Car: 82 Berlinetta/57 Bel Air
Engine: L92/LQ4 (both w/4" stroke)
Transmission: 4L80E/4L80E
Axle/Gears: 12B-3.73/9"-3.89
I'm lovin' all the good stuff being said about the LS7 clutch. Especially since I took the plunge and bought one before much was being said about it. . .
Now, to go do something I haven't done since March - actually go work on the swap!
Now, to go do something I haven't done since March - actually go work on the swap!
Thread Starter
Joined: Sep 2002
Posts: 3,685
Likes: 10
From: PA
Car: 86 Trans AM
Engine: LS1 (not stock...)
Transmission: Built T56
Axle/Gears: Strange 12-bolt w/ 3.73
UGH....
Had an absolutely TERRIBLE time with the car last night. First of all, I do haev pictures, but was so disgusted that I didnt even put them online. Ill do it later after work when I go straight home to sit down with a cold beer.
Yesterday I left for "home" to go work on the car. I now have a 40 minute drive to get home to the car. So Im all amped up to work on it. Have a mental list of what I want done etc etc.
My first task was to re-drill the hole that I made to pass the master cylinder hydraulic line inside. I wanted it in a new location. Then I drilled the hole in the tunnel for the line to go into the trans. I hooked up the line to the slave cylinder, and was getting ready to bleed.
I use a Motive power bleeder to bleed my brakes and my clutch. Works great. Well...in the middle of the line for the bleeder, there is a brass coupling. I had to change ends, so I needed to tighten this fitting. Guess I over did it, and didnt see that there was a crack in the female fitting. Pressurized the tank to 10psi...and brake fluid spit all over the mother#@$@@%@$ son of a #$#@$@ engine bay. You know what happens when brake fluid gets on paint like that? Especially without clearcoat? If not, I have pictures of that too.
Needless to say, wind was out of my sails at this point. SO I decided to use the remote bleeder, and do it the traditional way. At first the clutch pedal felt ok. Bleeding seemed to be going normal. After a bit, I closed the bleeder, and tried the clutch pedal. Felt like it had some more air in it...but felt ok. I pushed it one more time, felt/heard a pop, and now the pedal is soft for the first 1/2 of travel, and really hard for the second half. Feels like Im pressing against a spring. Doesnt feel like a clutch at all, especially since this is an LS7 set up, and I was expecting the pedal to be light. I should note I didnt see any fluid dumping out under the trans. So I dont think the slave popped...but who knows.
SO...I quit. Cleaned up, packed up my crap, and came back home with my tail between my legs. I was too angry and frustrated at that point to continue.
Basically...thursday Im planning on going back and checking the clutch issue out. THis is going to consist of more bleeding, putting in the driveshaft to check for engagement/disengagement of the clutch. If its still not right...trans is coming back out, and Ill have to order a new GM slave...and return the POS slave from autozone.
SOOOOO discouraged after last night.
J.