Here we go again. Swap #2 has begun. LOTS of pics...
 11-05-2008, 07:42 PM
#401
Supreme Member

iTrader: (2)
Join Date: Feb 2005
Location: West Warwick RI, postal code: 02893
Posts: 4,337
Received 55 Likes
on
41 Posts
Car: Building LS3, T56 Z28
Engine: LS3
Transmission: T-56
Axle/Gears: Moser/ 4.11
Re: Here we go again. Swap #2 has begun. LOTS of pics...
I did a full tear down/ build up of my car too. I used lunch bags. I would say a few hundred. no joke.
And organised each part of the car's bags in laundry baskets lol.
It worked, thats all I gotta say
And organised each part of the car's bags in laundry baskets lol.
It worked, thats all I gotta say
 11-05-2008, 08:37 PM
#402
Member
iTrader: (1)
Join Date: Aug 2005
Location: Portsmouth, Ohio
Posts: 331
Likes: 0
Received 0 Likes
on
0 Posts
Car: 87 Buick Regal T
Axle/Gears: 2.56 blah
Re: Here we go again. Swap #2 has begun. LOTS of pics...
So i finally just went through this build and I am doing the same if not more on my 92z... my question, how did you keep things organized as far as screws/bolts for all interior parts/trim/etc...?
I guess I can zip lock bag and label everything but I think that would take forever
Any other (better) ideas?
I guess I can zip lock bag and label everything but I think that would take forever
Any other (better) ideas?
I am using brown sandwich bags and labeling everything as I go.
11-06-2008, 06:24 AM
#403
Senior Member

Join Date: Sep 2007
Location: Long Island, NY
Posts: 599
Likes: 0
Received 1 Like
on
1 Post
Car: 1992 z28
Engine: 383 LT1 in the works
Transmission: T-56 in the works
Axle/Gears: 3.73 in the works
Re: Here we go again. Swap #2 has begun. LOTS of pics...
Yup, thats what I had figured... well I got me hundreds of zip locks from wholesale so I am ready to go, i guess lol
Thanks guys
Thanks guys
11-06-2008, 06:32 AM
#404
Re: Here we go again. Swap #2 has begun. LOTS of pics...
Yup...sandwich bags is what I did. On my 87, I didnt do that. My memory is pretty decent when it comes to what goes where though. I cant remember what I did last week...but I know the difference between the dash screws. Go figure However it was still an issue because i would lose screws, or put some in the wrong place and wind up with mis matched screws in the end.
But yeah. Get some zip lock bags, and just start organizing. There is no such thing as TOO organized when it comes to this sort of thing. All I know is, this time around, putting things together was like using a "kit" for the car. No scrounging, no guessing, just smooth assembly.
J.
However it was still an issue because i would lose screws, or put some in the wrong place and wind up with mis matched screws in the end.But yeah. Get some zip lock bags, and just start organizing. There is no such thing as TOO organized when it comes to this sort of thing. All I know is, this time around, putting things together was like using a "kit" for the car. No scrounging, no guessing, just smooth assembly.
J.
11-06-2008, 08:49 AM
#405
Supreme Member
iTrader: (1)
Join Date: Jun 2006
Location: Guelph, Ontario
Posts: 1,067
Likes: 0
Received 0 Likes
on
0 Posts
Car: 89 IROC/05 RX8
Engine: LS1/LS1
Transmission: T56/T56
Axle/Gears: 3.42 GM/3.55 8.8
Re: Here we go again. Swap #2 has begun. LOTS of pics...
I used alot of ziplock bags for mine. Just drop parts in and write on the bag where they go.
p.s. - Why do my threads never get this popular!

p.s. - Why do my threads never get this popular!
11-06-2008, 01:41 PM
#406
Re: Here we go again. Swap #2 has begun. LOTS of pics...
Haha...it did get alittle long huh? I didnt even take or post as many pics as I was hoping... I guess Ill just have to come up with some more stuff to post pictures of to keep it fresh
J.
J.
11-06-2008, 02:41 PM
#407
Supreme Member
iTrader: (1)
Join Date: Jun 2006
Location: Guelph, Ontario
Posts: 1,067
Likes: 0
Received 0 Likes
on
0 Posts
Car: 89 IROC/05 RX8
Engine: LS1/LS1
Transmission: T56/T56
Axle/Gears: 3.42 GM/3.55 8.8
Re: Here we go again. Swap #2 has begun. LOTS of pics...
Haha, anywho.
Im getting my T56 stuff into my car this week along with starting my new wiring project. Im mega excited to get this car running perfect (though i may be trading it off for a TT 383 iroc :O)
Im going to use your guide for converting thirdgen pedals. Id prefer to use them over the 4th gens if i can find a set at a decent price.
11-07-2008, 07:00 AM
#408
Re: Here we go again. Swap #2 has begun. LOTS of pics...
Well..on the list after inspection is FINALLY installing my shift light, maybe wiring up the 4th gen cruise and taking lots of notes on that since I couldnt find any.... Um... I still might make the trap door in my hatch for the pump and install the upgrade harness. Oh, and I gotta install my overhead console and 4th gen rear view mirror with map lights.
I also got all the parts I need to install power locks. They stunk in my 87...so this time I got actuators, and the rods, pivot pieces, etc. I also have new switches and switch bezels along with the pig tails for the switches. So Ill be building the harness from scratch. I did that with the power windows and locks on my cherokee and it turned out nice. And worked better than factory jeeps of the same year. That might be a separate thread tho.
Shel...how about you convert your car to LS1...be in love with the new found power and performance...THEN TT the LS1 TT LS motors are
Im still planning my FI set up. Im working with no money so its gonna be awhile. haha.
J.
I also got all the parts I need to install power locks. They stunk in my 87...so this time I got actuators, and the rods, pivot pieces, etc. I also have new switches and switch bezels along with the pig tails for the switches. So Ill be building the harness from scratch. I did that with the power windows and locks on my cherokee and it turned out nice. And worked better than factory jeeps of the same year. That might be a separate thread tho.
Shel...how about you convert your car to LS1...be in love with the new found power and performance...THEN TT the LS1
TT LS motors are Im still planning my FI set up. Im working with no money so its gonna be awhile. haha.
J.
11-09-2008, 09:42 AM
#409
Supreme Member

Join Date: Jan 2001
Location: Pittsburgh, PA
Posts: 1,374
Likes: 0
Received 1 Like
on
1 Post
Car: 06 SRM M6 GTO, 98 Grand Prix GTP
Re: Here we go again. Swap #2 has begun. LOTS of pics...
overheard console eh? What kind are you putting in? I only ask cause I have a console out of a Blazer in mine, but I never got around to hooking up anything beyond the lights.
11-09-2008, 06:51 PM
#410
Re: Here we go again. Swap #2 has begun. LOTS of pics...
Just the factory one from my 87. Im not sure why I even want it... I dont use the map light, or the flash light, or the pocket, or the seemingly useless counters... I guess I just dont want to part with it, so the best place I can think of to store it is in the 86 haha.
J.
J.
11-12-2008, 06:07 PM
#411
Member
iTrader: (2)
Join Date: Nov 2004
Location: New Mexico
Posts: 379
Likes: 0
Received 0 Likes
on
0 Posts
Car: 87 Firebird,
Engine: lq4
Transmission: gto t56 (mn12)
Re: Here we go again. Swap #2 has begun. LOTS of pics...
Do you have any clearance problems with the headers scraping? It looks like from the pics that the collectors hang below the frame?
11-13-2008, 06:43 AM
#412
Re: Here we go again. Swap #2 has begun. LOTS of pics...
The collectors do hang below the front sub frame alittle. But I never scrap them. The only thing I was busting up was one of my v-band exhaust clamps that I had turned so the screw was facing down. Kept getting caught on certain speed bumps. Other than that....I dont hit anything.
I dont go dukes of hazzard over the speed bumps either though. I take it easy, and when I can I go crooked. But the clearance is good. I dont think they hang down any lower than some of the stock exhaust, you just notice is because they run right along the subframe.
Couple visuals...(on my 87...but, same parts so no difference)


I was pleased with the clearance I ended up with after I built my own y-pipe.
J.
I dont go dukes of hazzard over the speed bumps either though. I take it easy, and when I can I go crooked. But the clearance is good. I dont think they hang down any lower than some of the stock exhaust, you just notice is because they run right along the subframe.
Couple visuals...(on my 87...but, same parts so no difference)
I was pleased with the clearance I ended up with after I built my own y-pipe.
J.
11-13-2008, 06:46 AM
#413
Member
iTrader: (2)
Join Date: Nov 2004
Location: New Mexico
Posts: 379
Likes: 0
Received 0 Likes
on
0 Posts
Car: 87 Firebird,
Engine: lq4
Transmission: gto t56 (mn12)
Re: Here we go again. Swap #2 has begun. LOTS of pics...
Nice! Thanks for the detailed pics. Another question I had was about the headers again. Are you worried or are you having problems with the headers running so close to the fuel lines? That seems like a major problem and I can't see a good solution to it yet. Any ideas you are working on? Or does it not even effect your performance at all. Righteous build man!
11-13-2008, 07:09 AM
#414
Re: Here we go again. Swap #2 has begun. LOTS of pics...
Well...I considered wrapping the fuel and brake line where they come close. But honestly, I havent had a problem. The fuel goes through there at 60psi...so its not hanging out long by the hot spot. Also, stainless does a better job handling heat, and seems to not get quite as hot, and cools down faster than steel in my experience.
The simple thing is...I just plain forgot to wrap it. And once it was all screwed down, and the motor/headers were in, I didnt want to go back and try to do it. Ive had it that way for probably around 5000 miles with no issues. I can also tell you that I drove from West Chester, PA down to the Outer Banks, NC almost non-stop. Just stopped for fuel (which wasnt as often as the other cars that went ) and I had no heat related issues at all.
J.
The simple thing is...I just plain forgot to wrap it. And once it was all screwed down, and the motor/headers were in, I didnt want to go back and try to do it. Ive had it that way for probably around 5000 miles with no issues. I can also tell you that I drove from West Chester, PA down to the Outer Banks, NC almost non-stop. Just stopped for fuel (which wasnt as often as the other cars that went
) and I had no heat related issues at all. J.
11-13-2008, 10:03 AM
#415
Senior Member
Join Date: Sep 2007
Location: Long Island, NY
Posts: 599
Likes: 0
Received 1 Like
on
1 Post
Car: 1992 z28
Engine: 383 LT1 in the works
Transmission: T-56 in the works
Axle/Gears: 3.73 in the works
Re: Here we go again. Swap #2 has begun. LOTS of pics...
THat look like some pretty decent ground clearance with long tubes...
I am looking at putting LT's on my LT1 swap but everyone keeps saying they are too low and if I lower the car I will hit everything. Is yoru car lowered at all?
I am going to run the front/rear coilover setup so I should be able to adjust ride height some but what do you guys think?
I am looking at putting LT's on my LT1 swap but everyone keeps saying they are too low and if I lower the car I will hit everything. Is yoru car lowered at all?
I am going to run the front/rear coilover setup so I should be able to adjust ride height some but what do you guys think?
11-13-2008, 01:50 PM
#416
Re: Here we go again. Swap #2 has begun. LOTS of pics...
Im running the Eibach Prokit. So alittle over an inch at all four corners. It sits just about where I want it too. I dont like real low...and I didnt like stock height. So it actually worked out perfect.
I never have issues during normal driving. The only thing that hits is the torque arm on the rear floor. And after it hits, it'll never hit again at that same height. haha. It just keeps self clearancing.
On speed bumps, before I would scrape...and if its a REALLY high bump, I just go super slow. But I dont have any issues.
J.
11-13-2008, 09:46 PM
#418
Re: Here we go again. Swap #2 has begun. LOTS of pics...
Well...On average around the city Im pulling around 14-18. Its broad, because I cant keep my foot out of it. haha. I tried to go a full tank driving 100% reasonable. Didnt last more than a day.
On the highway, its fantastic. I cruise anywhere between 65 and 75 during most of my highway trips. Thats when I use 6th gear. My aeroforce gauge tells me I get 35+ depending on conditions. But I did some quick calcs on my trip to OBX, and I saw an avg of 30 during the one leg that I actually drove like a normal personl haha. That was near the Chesapeak Bay Bridge Tunnel. So I was just kinda cruising for awhile.
In summary. ~16 City - ~28-30 Hwy.
Im also running rich...and need a tune. So I could quite possibly take a few MPG on after thats done.
J.
11-16-2008, 10:23 AM
#420
WOO HOOO!!!
Got her inspected today!!! I got a guy that Im sorta buddy buddy with at a shop. Was worried because I always took the car to another friend that always just passed it without hardly looking at it. But the guy I went to today was cool. He knew me from when I was a manager at autozone. So he's real good to me. Always giving me discounts and all. However I wasnt sure how he'd react to my car. No cats was my biggest worry...everything else is fine for the most part. But being emissions exempt I guess he didnt even need to look.
Either way...I was relieved. Now she's good for another year and Im going to drive the crap out of her before winter hits!!!
J.
Either way...I was relieved. Now she's good for another year and Im going to drive the crap out of her before winter hits!!!
J.
11-16-2008, 02:02 PM
#421
Supreme Member
iTrader: (2)
Join Date: Feb 2006
Location: 39.84N 105.11W
Posts: 1,547
Likes: 0
Received 0 Likes
on
0 Posts
Car: '89 Trans Am GTA
Engine: WAS 350 - now L92 (alum. 378/6.2L)
Transmission: WAS 700R4, now a built T56
Axle/Gears: 3.27 9-bolt
Re: Here we go again. Swap #2 has begun. LOTS of pics...
 Good to hear man, congrats!
  11-16-2008, 07:39 PM
#422
Member
iTrader: (2)
Join Date: Nov 2004
Location: New Mexico
Posts: 379
Likes: 0
Received 0 Likes
on
0 Posts
Car: 87 Firebird,
Engine: lq4
Transmission: gto t56 (mn12)
Re: Here we go again. Swap #2 has begun. LOTS of pics...
How are you exempt from not having cats? I know the laws are different everywhere but how did you pull that one off? Emissions laws aren't too tough over here but they always check for a cat.
11-16-2008, 08:55 PM
#423
Junior Member

Join Date: Jul 2006
Posts: 30
Likes: 0
Received 0 Likes
on
0 Posts
Re: Here we go again. Swap #2 has begun. LOTS of pics...
Hi, i've been reading your posts and viewing your pics, you are a huge insperation to us all im sure, but anyways i have an 85 trans am (black/gold). it was in my parents back yard for 2 years and i started it up 2 sundays ago, anyways they gave it to me and im going to do an ls1 swap on it and redo the interior (t-tops leaked and destroyed the interior) but i had a few questions, the brake booster is it a 4th gen or is it just a 4th gen master cylinder bolted to a 3rd gen booster. also are there any special headers needed for this engine/car combo, i know that there are certain headers for third gen camaro's due to clearence issues. the center console in mine is buckling and i liked your 4th gen one, does it bolt right up or require new bolt holes? i was also told that the coils on the passenger side would interfear with the a/c box and they said a coil bracket for a truck would work, any insight on that?will a stock 4th gen k member bolt up to my third gen, or do i need to use the stock one or aftermarket. ok last question, my friend hooking me up with the engine and interior is including the block/heads, coils, wiring harness, factory PCM, all the drive accessories, is there anything else i need for this to run other than a fuel tank with a 4th gen pump/regulator?
11-17-2008, 06:53 AM
#424
Re: Here we go again. Swap #2 has begun. LOTS of pics...
Well...Im emissions exempt because I keep the car under 5000miles a year. I can do that mainly because every year since I built it Ive had to work on it for a few months at a time. haha. But they dont even look at emissions parts, or worry about the SES, or anything.
P.S...I dont condone removing your cats for various reasons...if I could have built random tech cats into my y-pipe, I would have. I still might...
My brake system: 4th gen master, 4th gen booster, 4th gen ABS delete and line lock kit, 4th gen front calipers, 4th gen rear calipers. Almost 100% 4th gen...and they work FANTASTIC. Lurk around in the brake forum, there is plenty of info on the 4th gen parts.
The only headers I know of are the Hawks stainless headers. Im pretty sure you have 3 choices. Stock manifolds (which are acceptable over shorties in my opinion), Hawks Stainless, or build your own. Thats it... Camaros and firebirds are 100% exactly the same in that respect.
Yes...more or less the 4th gen unit bolts right up. PLENTY of threads on this...search "4th gen console"
Im not sure...but I know the truck stuff will work. I have a totally custom HVAC box, and I chose to relocate that coil slightly. Just trimmed the bracket and used a new hole. No big deal.
Absolutely not. Nothing on the front of a 4th gen will work.
When I first read this, I thought it was too broad to answer... but basically. No...you dont need much else. As long as the motor is complete. You just give it fuel, and hook up a handful of wires and she'll fire.
J.
P.S....A lot of your questions are answered in the sticky in this forum. As well as in my previous threads (just do a search for threads started by me for tons of pics). Also, if you havent. go check out LS1tech.com. There is a ton of info there as well....pretty much everything you need to know.
P.S...I dont condone removing your cats for various reasons...if I could have built random tech cats into my y-pipe, I would have. I still might...
also are there any special headers needed for this engine/car combo, i know that there are certain headers for third gen camaro's due to clearence issues.?
the center console in mine is buckling and i liked your 4th gen one, does it bolt right up or require new bolt holes??
i was also told that the coils on the passenger side would interfear with the a/c box and they said a coil bracket for a truck would work, any insight on that??
will a stock 4th gen k member bolt up to my third gen, or do i need to use the stock one or aftermarket.?
ok last question, my friend hooking me up with the engine and interior is including the block/heads, coils, wiring harness, factory PCM, all the drive accessories, is there anything else i need for this to run other than a fuel tank with a 4th gen pump/regulator?
J.
P.S....A lot of your questions are answered in the sticky in this forum. As well as in my previous threads (just do a search for threads started by me for tons of pics). Also, if you havent. go check out LS1tech.com. There is a ton of info there as well....pretty much everything you need to know.
11-17-2008, 06:47 PM
#425
Junior Member
Join Date: Jul 2006
Posts: 30
Likes: 0
Received 0 Likes
on
0 Posts
Re: Here we go again. Swap #2 has begun. LOTS of pics...
ok, thanks for your help, when i do my swap i'll post pics but probably not as indepth as yours, i work at a pontiac dealership and things are pretty slow right now so i'll be working on it soon!
11-17-2008, 06:57 PM
#426
Senior Member
Join Date: Sep 2007
Location: Long Island, NY
Posts: 599
Likes: 0
Received 1 Like
on
1 Post
Car: 1992 z28
Engine: 383 LT1 in the works
Transmission: T-56 in the works
Axle/Gears: 3.73 in the works
Re: Here we go again. Swap #2 has begun. LOTS of pics...
Question about putting the motor in... that way you did it looks way easier than dropping it in from above. Did you have to take any special precautions?
Can any engine lift/cherry picker/whatever you want to call it lift up the front end like you did? I am thinking of doing the same along with the new K-member/a-arms etc... as much as I can in one smooth install.
Do you have to have the rear raised up or is it just cause its a lot easier?
Can any engine lift/cherry picker/whatever you want to call it lift up the front end like you did? I am thinking of doing the same along with the new K-member/a-arms etc... as much as I can in one smooth install.
Do you have to have the rear raised up or is it just cause its a lot easier?
11-17-2008, 07:49 PM
#427
Junior Member
Join Date: Jul 2006
Posts: 30
Likes: 0
Received 0 Likes
on
0 Posts
Re: Here we go again. Swap #2 has begun. LOTS of pics...
i tried searching but couldnt find anything but i was told by one of the guys in the shop who has done one of these swaps before that i need the theft detterent module in order to recieve the fuel enable signal, any truth to this and anyhting i can do beside getting the module?
11-17-2008, 09:18 PM
#428
Supreme Member
iTrader: (2)
Join Date: Mar 2005
Location: East Tennesse
Posts: 2,820
Likes: 0
Received 3 Likes
on
3 Posts
Car: 1991 RS Camaro
Engine: L03 (want LS1)
Transmission: 700R-4 (and T56)
Axle/Gears: 4th Gen 3.23 posi
Re: Here we go again. Swap #2 has begun. LOTS of pics...
I think turning it off in the LS1 computer is one option.
11-17-2008, 09:31 PM
#429
Re: Here we go again. Swap #2 has begun. LOTS of pics...
Whats up fellas. Ok...answers.
SomeGuy25thZ: Going through the bottom was very easy. My main reasons were as follows. No hood removal, headers already bolted on, motor mounts are already in and tight, and its just plain easier!
When you lower the car, with a block under the trans so that the motor tilts forward slightly, the car and motor will be almost perfectly oriented to each other. Just a matter of getting bolts started and maybe using a floor jack to jostle things around alittle.
No special hoist is needed. Something 2.5tons or better. The front of the car is really quite light without the motor in it. In fact, two guys can lift it up once the motor weight is gone. You will want the rear tires on ramps or blocks. I dont suggest jack stands since they can tilt and slip. You need the rear up so you can lift the front higher relative to the ground without the car being at an extreme angle. You need to watch the nose of the car assuming its installed. When I had the car up high enough to sneak the motor out, the nose of my bumper cover was only a couple millimeters away from the hoist ram. Just take your time, use your head, DONT GET UNDER THE CAR while its on the hoist and you'll be fine.
Also, you wont have much luck trying to leave the a-arms installed. You'll need the k-member pretty much bare.
Deadcell: I have a thread here and over on tech about the VATS bypass. You have three options here. 1) have Vats programmed out of your PCM. I thought mine was, yet it still managed to come back some how...still a mystery. 2) buy a bypass module and wire it in. You can get a nice tiny one from ebay. I have mine wired with a weather pack connector so i can unplug it and take it with me. Its like a security device almost. 3) build your own using online instructions. I have a thread on tech about this. For about $11 at radioshack you can build a simple bypass module. I did this at first, to confirm VATS was my issue. Then I bought a nice pre-made unit. If you arent good at building circuits or soldering ICs...then Ide skip this. Just grab one off ebay if you arent ready to have your PCM worked on.
J.
11-17-2008, 11:31 PM
#430
Senior Member
Join Date: Sep 2007
Location: Long Island, NY
Posts: 599
Likes: 0
Received 1 Like
on
1 Post
Car: 1992 z28
Engine: 383 LT1 in the works
Transmission: T-56 in the works
Axle/Gears: 3.73 in the works
Re: Here we go again. Swap #2 has begun. LOTS of pics...
Sounds good... I appreciate the info. Goodluck with the build, I hope to get mine started right after christmas time
11-18-2008, 12:32 AM
#431
Junior Member

Join Date: Mar 2008
Location: Charlotte, NC
Posts: 99
Likes: 0
Received 0 Likes
on
0 Posts
Car: 86 IROC
Engine: LS6
Transmission: 4L60E
Axle/Gears: 3.08
Re: Here we go again. Swap #2 has begun. LOTS of pics...
Question about putting the motor in... that way you did it looks way easier than dropping it in from above. Did you have to take any special precautions?
Can any engine lift/cherry picker/whatever you want to call it lift up the front end like you did? I am thinking of doing the same along with the new K-member/a-arms etc... as much as I can in one smooth install.
Do you have to have the rear raised up or is it just cause its a lot easier?
Can any engine lift/cherry picker/whatever you want to call it lift up the front end like you did? I am thinking of doing the same along with the new K-member/a-arms etc... as much as I can in one smooth install.
Do you have to have the rear raised up or is it just cause its a lot easier?
Last edited by midnit; 11-18-2008 at 12:34 AM. Reason: spelling
11-18-2008, 06:50 AM
#432
Re: Here we go again. Swap #2 has begun. LOTS of pics...
Ah...thanks for reminding me. I forgot to mention. I used furniture dolly from harbor freight. I used a bigger one than linked. Im not gonig to post a picture of it because you can see it in the pictures of me moving my motor around.
J.
J.
11-18-2008, 08:33 AM
#433
Supreme Member
iTrader: (2)
Join Date: Mar 2005
Location: East Tennesse
Posts: 2,820
Likes: 0
Received 3 Likes
on
3 Posts
Car: 1991 RS Camaro
Engine: L03 (want LS1)
Transmission: 700R-4 (and T56)
Axle/Gears: 4th Gen 3.23 posi
Re: Here we go again. Swap #2 has begun. LOTS of pics...
My brother would have loved to know about those eBay pieces for his 97 Formy...
11-24-2008, 01:04 AM
#435
On Probation
iTrader: (9)
Join Date: Feb 2005
Location: So Cal
Posts: 2,042
Likes: 0
Received 2 Likes
on
2 Posts
Car: 87 IROC-Z
Engine: LsX
Transmission: MN12 6speed
Axle/Gears: 3:42
Re: Here we go again. Swap #2 has begun. LOTS of pics...
plenty of good info on this thread.. im just finishing mine off.
11-24-2008, 04:24 AM
#436
Re: Here we go again. Swap #2 has begun. LOTS of pics...
at harbor fright u will get metal wheel dollies with metal casters....I got 2 of those and took the casters out and put two 2X4 and combined them...they fit perfectly under the tranny and K-member and u can get the hoist legs around them......works like a charm !!
11-25-2008, 07:29 AM
#437
Re: Here we go again. Swap #2 has begun. LOTS of pics...
Well...stupid winter showed up last week. Couldnt believe it when I woke up...we got about 4" of snow on friday morning. Had to get a ride to work, then a ride back to my parents to get my Jeep. So...needless to say, but the car is going to be going away for the winter soon. I have to get the garage cleaned out so I can park her away.
Im keeping it out for two more weeks. The County Corvette Toy Drive here in West Chester is on Dec. 6th. Im going to try to keep it out for that. Hopefully it doesnt snow/rain that day. After that, its done for the year... I dont store it though. Ill probably still start it and take it out a couple times here and there.
On my list for the warm weather...basically because Im bored right now...
-From the 87: Overhead console, 4th gen rear view mirror
-Tick master cylinder
-Possibly installing the new GM slave cylinder
-Find my coolant leak. Thinking its my radiator...but havent had a chance to check. Just a slow leak.
-HID projector conversion
-Fixing the "belt throwing" issue
-Shift light wiring
-4th gen cruise wiring. unit is installed, but not wired at all.
-I need to replace my rear wheel bearings...but that requires conversation with Strange to try to figure out what bearings I have. So Im procrastinating.
-New u-joints
-Wideband..if I can afford it
-Paint fiberglass spoiler. Delete high mount brake light. convert to under the spoiler third brake light.
.....Ill add to the list when the other stuff comes to me.
haha...There's enough to keep me occupied for alittle once the weather breaks. But atleast its not anything serious. I still want to pull my k-member and make more oil pan clearance...but thats pretty involved. ide like to do that over the winter in a heated garage. haha.
J.
11-25-2008, 08:02 AM
#438
Supreme Member
Join Date: Mar 2004
Location: In the Garage
Posts: 2,519
Likes: 0
Received 4 Likes
on
3 Posts
Car: Camaro
Engine: 6.2L
Transmission: T56
Re: Here we go again. Swap #2 has begun. LOTS of pics...
-I need to replace my rear wheel bearings...but that requires conversation with Strange to try to figure out what bearings I have. So Im procrastinating.
As for the belt throwing issue thats easilly solved with a Katech billet tensioner. Not one problem for me since but it cost me a couple belts trying to get my stock tensioner to work.
As for snow? Meh we're buried in it up here man... buried... As in feet of the stuff. Snowmobile season? Now thats some speeed with no fear of losing your license
 11-25-2008, 09:42 AM
#439
Re: Here we go again. Swap #2 has begun. LOTS of pics...
Im not sure I have the sealed bearings. There is a street set up for those rears, and a drag set up for those rears. I have the drag set up. They are ball bearings and they use an inner seal that the bearing retainer slips into. Then the bearings themselves have an o-ring that goes around the circumference...then the outer guts. I dont like em... They told me they were normal 12-bolt parts...but definetly not waht I found. They also told me it would have a pinion spacer when I was going to rebuild it. But I found a crush sleeve. Pain in the butt working with them so far....
They wanted me to send them the axles to have the bearings replaced, and seemed reluctant to sell me just the bearing package...so Im thinking Ill need to talk to them again and be alittle more persistent. I was trying to get ready for a trip to OBX...so I didnt have time to mess around.
Here's a pic of the bearing...best one I got. I blew that inner seal out..thats why there is oil all over everything. And the reason the axle is even out.

I was looking at the Katech tensioner. My problems with that are $$$...and Im not sure thats my issue. I never threw a belt when the set up was in my 87. It saw plenty of 7000 rpm runs with no issues. Now, in the 86, almost every time I hit 6k or more, it starts to walk. The ONLY thing I touched was the power steering pulley. Now it seems as tho this pully is too far back. I see rubber dust on the alternator, like the belt is scrubbing. It also seems to be off visually. So...Im not sure what happened here.
Maybe I overtightened the pully installer and made the pully go back too far? Maybe the pump shaft is messed up? I dont know...
First thing I have to do is come up with a reliable way to check pully alignment...any ideas on that one cam? I know they make a laser set up, but I dont know where to get it or how much it costs.
Then after I either confirm alignment, or fix it, Im going to get a new Buick Regal idler pulley and try that. It has a higher outer lip. If that doesnt fix it...then I might go with either Katech, or that other company that sells the billet replacements with the high lip. Ill have to see.
Man...I miss my snowmobile days. I had an arctic cat thundercat. That thing was really insane. I went from a 1973 Arctic Cat Cheetah (440cc) to the Thundercat. Quite a step up. We used to run them at a frozen lake at a buddy's cabin with studded tracks. Talk about acceleration.
You keep that snow up there ok??
J.
They wanted me to send them the axles to have the bearings replaced, and seemed reluctant to sell me just the bearing package...so Im thinking Ill need to talk to them again and be alittle more persistent. I was trying to get ready for a trip to OBX...so I didnt have time to mess around.
Here's a pic of the bearing...best one I got. I blew that inner seal out..thats why there is oil all over everything. And the reason the axle is even out.
I was looking at the Katech tensioner. My problems with that are $$$...and Im not sure thats my issue. I never threw a belt when the set up was in my 87. It saw plenty of 7000 rpm runs with no issues. Now, in the 86, almost every time I hit 6k or more, it starts to walk. The ONLY thing I touched was the power steering pulley. Now it seems as tho this pully is too far back. I see rubber dust on the alternator, like the belt is scrubbing. It also seems to be off visually. So...Im not sure what happened here.
Maybe I overtightened the pully installer and made the pully go back too far? Maybe the pump shaft is messed up? I dont know...
First thing I have to do is come up with a reliable way to check pully alignment...any ideas on that one cam? I know they make a laser set up, but I dont know where to get it or how much it costs.
Then after I either confirm alignment, or fix it, Im going to get a new Buick Regal idler pulley and try that. It has a higher outer lip. If that doesnt fix it...then I might go with either Katech, or that other company that sells the billet replacements with the high lip. Ill have to see.
Man...I miss my snowmobile days. I had an arctic cat thundercat. That thing was really insane. I went from a 1973 Arctic Cat Cheetah (440cc) to the Thundercat. Quite a step up. We used to run them at a frozen lake at a buddy's cabin with studded tracks. Talk about acceleration.
You keep that snow up there ok??
J.
Last edited by ghettocruiser; 11-25-2008 at 09:50 AM.
11-25-2008, 09:58 AM
#440
Supreme Member
Join Date: Mar 2004
Location: In the Garage
Posts: 2,519
Likes: 0
Received 4 Likes
on
3 Posts
Car: Camaro
Engine: 6.2L
Transmission: T56
Re: Here we go again. Swap #2 has begun. LOTS of pics...
If the bearings have ***** they are sealed type or a derivative of. The taper bearings look just like the ones in your front rotor except bigger and there is no seal on the inside the gear lube is what keeps them lubed there is only a seal on the outside to keep the lube from leaking out. They use the large cylindrical needles and NOT ball bearings which have no business back there IMO its a cheapo way to go.
As for the solid pinion spacer? BAH No one that i know of save for the exception of Mark Williams uses them in their installs they are a royal PITA to use as it involves many in and outs of the gears to get it just right ( usually 3 or better ) and they are trying to bang these things out. That and the fact that very very seldom to collapsible spacers cause issues in the larger diffs ( 12 bolt etc. ) BUT and yes thats a mighty BIG BUT in our cars case the torque arm puts soooooooo much stress in the pinion area that a solid pinion spacer is a must have upgrade and not an option and in fact is probably one of the main causes of 12 bolt failure issues in F bodies.
I'd let Strange whistle dixie and go find the PN for the taper bearings over at tech I'm sure someone will help you over there if not sell you some. I'd give it to you myself but i am not certain of Strange axles bearing journal dia nor their housing ends as I use Moser.
Regarding the pulley alignment I use a cheap laser thats for construction ( lining up studs for a wall etc. ) on a tri-pod but my issue was not alignment it was tensioner deflection at high RPM caused by the load of the accessories. I dont know of any other way to lign them up save for a long straight edge but I dont know how you would get it in there.
AHA I just see your pic now musta added afterwards. Yup sealed type crapo ditch em.
11-25-2008, 10:30 AM
#441
Re: Here we go again. Swap #2 has begun. LOTS of pics...
Haha... See I HATE crush sleeves. I deal with them constantly when re-gearing jeep axles. They are, to me atleast, a royal pain. The solid spacer I got for my 12-bolt was a breeze to install. I measured the old crush sleeve, matched the solid to that, then made some small adjustments to tighten it up. Now I can just crank the pinion nut to torque and be done with it. Follow up work just seems much easier.
Hmm...didnt realize those bearings were junk. Actually thought they were an upgrade. But now that I think about it, I think I know why they are for "track" use.
I wouldnt mind upgrading the bearings to something I can get easier and that will last longer. Just as long as what Im installing will work, Im fine with whatever. I need to measure the bearing journal as well as the shaft O.D. and see what I have to work with I guess. Strange seems to have used different parts here and there. Which is another reason talking to them is a pain. They dont like to tell you what you need without having the axle in front of them for fear of having you buy the wrong stuff.
Ill look into the bearing conversion in the spring cam...thanks for that heads up. Ive posted on tech about it, but didnt get much help. So maybe when the time comes Ill give it another go over there.
The reason your belt was walking could very well be the reasons mine likes to stray as well... I just want to start with the basics and make sure the pulleys are ok first. Because it was fine before I messed with the power steering pump pulley this go around. Plus the belt dust is just raising a flag. Ill sort it out though Im sure.
Best time to do that will be if I need to replace the radiator. That rad is the same one that was in my 87 during the crash. The A/C condenser actually has a slight bow to it . but nothing leaked at the time. Im wondering if the rad is now letting go since its getting colder out. Expansion and contraction and all that. But with it out, gettign to the pulleys is easier. We'll see.
J.
Hmm...didnt realize those bearings were junk. Actually thought they were an upgrade. But now that I think about it, I think I know why they are for "track" use.
I wouldnt mind upgrading the bearings to something I can get easier and that will last longer. Just as long as what Im installing will work, Im fine with whatever. I need to measure the bearing journal as well as the shaft O.D. and see what I have to work with I guess. Strange seems to have used different parts here and there. Which is another reason talking to them is a pain. They dont like to tell you what you need without having the axle in front of them for fear of having you buy the wrong stuff.
Ill look into the bearing conversion in the spring cam...thanks for that heads up. Ive posted on tech about it, but didnt get much help. So maybe when the time comes Ill give it another go over there.
The reason your belt was walking could very well be the reasons mine likes to stray as well... I just want to start with the basics and make sure the pulleys are ok first. Because it was fine before I messed with the power steering pump pulley this go around. Plus the belt dust is just raising a flag. Ill sort it out though Im sure.
Best time to do that will be if I need to replace the radiator. That rad is the same one that was in my 87 during the crash. The A/C condenser actually has a slight bow to it
. but nothing leaked at the time. Im wondering if the rad is now letting go since its getting colder out. Expansion and contraction and all that. But with it out, gettign to the pulleys is easier. We'll see.J.
11-25-2008, 05:38 PM
#442
Member
iTrader: (2)
Join Date: Nov 2004
Location: New Mexico
Posts: 379
Likes: 0
Received 0 Likes
on
0 Posts
Car: 87 Firebird,
Engine: lq4
Transmission: gto t56 (mn12)
Re: Here we go again. Swap #2 has begun. LOTS of pics...
Can you shed some light on the buick regal pulley? Haven't heard of that one. I priced a pulley yesterday and it was $60 for the ls1. I'm looking for a better alternative.
11-25-2008, 05:42 PM
#443
Member
iTrader: (2)
Join Date: Nov 2004
Location: New Mexico
Posts: 379
Likes: 0
Received 0 Likes
on
0 Posts
Car: 87 Firebird,
Engine: lq4
Transmission: gto t56 (mn12)
Re: Here we go again. Swap #2 has begun. LOTS of pics...
NVRMND 2000 Buick Regal Supercharged. Thanks for pointing me in the right direction.
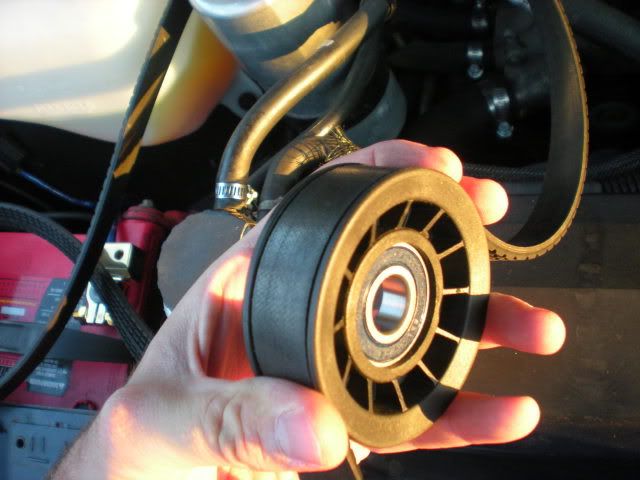
11-30-2008, 03:48 PM
#445
Regal Pulley Swap
Hey all. Did a quick project this weekend. Was tired of worrying about the belt walking off. It started off with me just wanting to pick up a spare belt..just in case it walked off and started to shred. I have an ASP pulley, so I wasnt sure about my belt length. Decided to pull the belt and measure. After doing that...I thought...why not just grab a pulley and do the swap.
So I grabbed a 2000 Buick Regal Supercharged Idler pulley, and a 770k Gatorback belt. I grabbed three different lengths, beacuse the regal pulley has a bigger diameter than the stocker. But, it turns out the 770k was right either way.
The pulley requires alittle bit of clearancing on the back face, to clear the tensioner assembly. Its pretty tight...and the rim of the pulley was lightly dragging...but it still spun freely so I figured it would just clearance itself the rest of the way. The pictures show where I made the clearance.
Pics...
New on left, old on right.

Ditto...

Stock pulley belt engagement.

Regal pulley belt engagement.

Where I cut. I just used a stanley knife. Pretty easy.

Installed and working. Motor was running in this picture...I was pretty shocked my camera took this without being blurry...haha.


So far, so good. Did a couple 7000rpm pulls and did some throttle jabs. Didnt get a chance to really beat on it, but so far, it hasnt walked. I STILL think my power steering pulley is offset. I plan to pick up a new pulley from gmpartsdirect and try to get it aligned...but for now I think this is a worthwhile mod. The pulley is cheap. Like $15. The belt was $20...but I got a hook up at autozone... So it was way cheaper.
Just thought Ide toss this out there since someone asked about it... Ill post again when I get a chance to really try it out.
J.
So I grabbed a 2000 Buick Regal Supercharged Idler pulley, and a 770k Gatorback belt. I grabbed three different lengths, beacuse the regal pulley has a bigger diameter than the stocker. But, it turns out the 770k was right either way.
The pulley requires alittle bit of clearancing on the back face, to clear the tensioner assembly. Its pretty tight...and the rim of the pulley was lightly dragging...but it still spun freely so I figured it would just clearance itself the rest of the way. The pictures show where I made the clearance.
Pics...
New on left, old on right.
Ditto...
Stock pulley belt engagement.
Regal pulley belt engagement.
Where I cut. I just used a stanley knife. Pretty easy.
Installed and working. Motor was running in this picture...I was pretty shocked my camera took this without being blurry...haha.
So far, so good. Did a couple 7000rpm pulls and did some throttle jabs. Didnt get a chance to really beat on it, but so far, it hasnt walked. I STILL think my power steering pulley is offset. I plan to pick up a new pulley from gmpartsdirect and try to get it aligned...but for now I think this is a worthwhile mod. The pulley is cheap. Like $15. The belt was $20...but I got a hook up at autozone... So it was way cheaper.
Just thought Ide toss this out there since someone asked about it... Ill post again when I get a chance to really try it out.
J.
11-30-2008, 09:01 PM
#446
Member
Join Date: Dec 2006
Posts: 138
Likes: 0
Received 0 Likes
on
0 Posts
Re: Here we go again. Swap #2 has begun. LOTS of pics...
Those rear wheel bearings are similar to Ford 9 inch axle units. Clearly not a GM design. They have the pressed on spacer and open construction like the Ford units. Look for numbers on the bearings and hit the parts stores. They will be a pain in the *** to remove at home unless you have a shop press. It can be done with a grinder, punch, and chisel to remove them. They can be reinstalled with a piece of pipe and a bfh. Thanks, counterman.
11-30-2008, 09:59 PM
#447
Supreme Member
iTrader: (2)
Join Date: Feb 2006
Location: 39.84N 105.11W
Posts: 1,547
Likes: 0
Received 0 Likes
on
0 Posts
Car: '89 Trans Am GTA
Engine: WAS 350 - now L92 (alum. 378/6.2L)
Transmission: WAS 700R4, now a built T56
Axle/Gears: 3.27 9-bolt
Re: Regal Pulley Swap
Originally Posted by ghettocruiser
Regal pulley belt engagement.
")
Originally Posted by ghettocruiser
Installed and working. Motor was running in this picture...I was pretty shocked my camera took this without being blurry...haha.


Originally Posted by ghettocruiser
I STILL think my power steering pulley is offset.
 Just kind of "thinking out loud"...
(I'll spare you the details of how I was trying to measure that before, suffice it to say that I was making it WAY more complex than it needed to be...)
 12-01-2008, 06:53 AM
#448
Re: Here we go again. Swap #2 has begun. LOTS of pics...
oldtimer: Im all set to remove/install the bearings. I can do Dana 44 and 8.8 axle bearings with my eyes shut at this point. haha. Im going to look into the bearing replacement. I guess it all depends what the bearing journals will let me do and all that jazz. Im going to wait for spring time to deal with it. Its fine for now. Thanks for the feedback!
V8Rumble: I thought about it walking off the power steering pulley first... But, when it was walking off before, all I did was pop it on the tensioner pulley and crank the motor. It would cause the belt to re-align itself. So I figure if it trys to walk now, the newer pulley should keep it together. If it does start to walk, hopefully it will pull it back on on its own without me popping the hood. Ill try to test it out today alittle more 
As for pulley alignment. You are right. Using a straight edge is the usual way to do it. Except its hard to get a straight line of sight in that engine bay. Its pretty cluttered. Plus, I always think the pulley faces could be different, and I just need to try it to see how well it works out. I was looking for a laser alignment tool that I saw on powerblock on spike tv. But I cant remember the show or the brand name of the tool. I need to replace my radiator this spring as well...and might toss a new water pump on. When I do that work, I can get in there better and see whats happening.
J.
V8Rumble: I thought about it walking off the power steering pulley first... But, when it was walking off before, all I did was pop it on the tensioner pulley and crank the motor. It would cause the belt to re-align itself. So I figure if it trys to walk now, the newer pulley should keep it together. If it does start to walk, hopefully it will pull it back on on its own without me popping the hood. Ill try to test it out today alittle more
As for pulley alignment. You are right. Using a straight edge is the usual way to do it. Except its hard to get a straight line of sight in that engine bay. Its pretty cluttered. Plus, I always think the pulley faces could be different, and I just need to try it to see how well it works out. I was looking for a laser alignment tool that I saw on powerblock on spike tv. But I cant remember the show or the brand name of the tool. I need to replace my radiator this spring as well...and might toss a new water pump on. When I do that work, I can get in there better and see whats happening.
J.
12-01-2008, 12:13 PM
#449
Re: Here we go again. Swap #2 has begun. LOTS of pics...
Lunch break was fun. 45mph, dropped to 2nd, WOT. 7000rpm, shift, 6800rpm shift. Slowed back down to around 35 in 2nd. Went from zero throttle to 100% really quick about 5 times in row. Think I got whiplash..hahah.
Bottom line is, belt stayed up. Not even a hint of it trying to go bye-byes. So, for now, it seems like the $15 fix worked fantastic. Ill keep my eye on it, and most likely Ill leave the old belt, old pulley, and a 15mm wrench in the back just in case.
J.
Bottom line is, belt stayed up. Not even a hint of it trying to go bye-byes. So, for now, it seems like the $15 fix worked fantastic. Ill keep my eye on it, and most likely Ill leave the old belt, old pulley, and a 15mm wrench in the back just in case.
J.
12-01-2008, 07:22 PM
#450
Member
iTrader: (2)
Join Date: Nov 2004
Location: New Mexico
Posts: 379
Likes: 0
Received 0 Likes
on
0 Posts
Car: 87 Firebird,
Engine: lq4
Transmission: gto t56 (mn12)
Re: Here we go again. Swap #2 has begun. LOTS of pics...
www.rockauto.com
GATES 38009 Idler Pulley $ 12.07
Doesn't need clearancing! For anyone else who stumbles upon this gigantic thread.
GATES 38009 Idler Pulley $ 12.07
Doesn't need clearancing! For anyone else who stumbles upon this gigantic thread.