
Not looking forward to the next step

Thread Starter

Joined: Mar 2000
Posts: 43,187
Likes: 46
From: Littleton, CO USA
Car: 82 Berlinetta/57 Bel Air
Engine: L92/LQ4 (both w/4" stroke)
Transmission: 4L80E/4L80E
Axle/Gears: 12B-3.73/9"-3.89
Not looking forward to the next step
Dash wiring. 
Custom aftermarket instrument cluster, 4th gen clutch switches in an originally auto car, mounting the PCM, etc.
Custom aftermarket instrument cluster, 4th gen clutch switches in an originally auto car, mounting the PCM, etc.
Supreme Member

Joined: Nov 2008
Posts: 1,545
Likes: 10
From: South Carolina
Car: 85 2M6, 87 'Bird 88 'burb
Engine: LX9, LG4, L05
Transmission: F23, 700r4, 700R4
Axle/Gears: 3.63, 2.73, 4.10

Supreme Member
iTrader: (2)
Joined: Feb 2006
Posts: 1,547
Likes: 0
From: 39.84N 105.11W
Car: '89 Trans Am GTA
Engine: WAS 350 - now L92 (alum. 378/6.2L)
Transmission: WAS 700R4, now a built T56
Axle/Gears: 3.27 9-bolt
Re: Not looking forward to the next step
UGH. Geez, after thinking about that nightmare, now I won't be able to sleep tonight! (Glad that I'm not messing with that...) 
Thread Starter
Joined: Mar 2000
Posts: 43,187
Likes: 46
From: Littleton, CO USA
Car: 82 Berlinetta/57 Bel Air
Engine: L92/LQ4 (both w/4" stroke)
Transmission: 4L80E/4L80E
Axle/Gears: 12B-3.73/9"-3.89
I didn't pull it apart that much, but visions of the task still keep me awake at night.
The aftermarket instrument panel doesn't have provision for turn signal or high beam indicators. I suppose I should do something about that as well.
The aftermarket instrument panel doesn't have provision for turn signal or high beam indicators. I suppose I should do something about that as well.
Supreme Member
Joined: Nov 2008
Posts: 1,545
Likes: 10
From: South Carolina
Car: 85 2M6, 87 'Bird 88 'burb
Engine: LX9, LG4, L05
Transmission: F23, 700r4, 700R4
Axle/Gears: 3.63, 2.73, 4.10
Re: Not looking forward to the next step
you could go with LED's, all you have to do is drill a couple of small holes. use something similar like the ones car stereo guys use as alarm indicators, just different colors other than red.
Thread Starter
Joined: Mar 2000
Posts: 43,187
Likes: 46
From: Littleton, CO USA
Car: 82 Berlinetta/57 Bel Air
Engine: L92/LQ4 (both w/4" stroke)
Transmission: 4L80E/4L80E
Axle/Gears: 12B-3.73/9"-3.89
That's what I figured I'd do. Green for the turn signals, blue for the high beam. I just haven't looked for them yet.
Also haven't started tracing down the harness wires to figure out what's what.
Also haven't started tracing down the harness wires to figure out what's what.
Supreme Member
Joined: Nov 2008
Posts: 1,545
Likes: 10
From: South Carolina
Car: 85 2M6, 87 'Bird 88 'burb
Engine: LX9, LG4, L05
Transmission: F23, 700r4, 700R4
Axle/Gears: 3.63, 2.73, 4.10
Trending Topics
Supreme Member
iTrader: (2)
Joined: Dec 2006
Posts: 5,538
Likes: 0
From: Hou. TX
Car: 86 TA, 91 B4C
Engine: 5.3, 4.8
Transmission: 4L80 4000, T56
Axle/Gears: 4.30 M12, 23.42 10 bolt
Re: Not looking forward to the next step
What a nightmare, i dont have the time or patience to do some **** like that, i just wire in what i need and remove whatever doesnt work as i need and get to it.

Thread Starter
Joined: Mar 2000
Posts: 43,187
Likes: 46
From: Littleton, CO USA
Car: 82 Berlinetta/57 Bel Air
Engine: L92/LQ4 (both w/4" stroke)
Transmission: 4L80E/4L80E
Axle/Gears: 12B-3.73/9"-3.89
In Berlinetta #1, I swapped the entire '86 donor car dash into the '82. I didn't realize until after pulling both that I could have left the harness attached to the dash.  The bigger issue was a change in the type and number of connectors to the rear chassis - took a lot of diagram study and wire tracing to resolve that (didn't help that the '86 was severely rear ended so I couldn't "test" the donor system).
Wiring is fairly straight-forward, but those bundles can be very intimidating.
The bigger issue was a change in the type and number of connectors to the rear chassis - took a lot of diagram study and wire tracing to resolve that (didn't help that the '86 was severely rear ended so I couldn't "test" the donor system).Wiring is fairly straight-forward, but those bundles can be very intimidating.
Last edited by five7kid; Mar 3, 2010 at 11:28 AM.
Supreme Member
Joined: Mar 2004
Posts: 2,519
Likes: 4
From: In the Garage
Car: Camaro
Engine: 6.2L
Transmission: T56
Re: Not looking forward to the next step
Oddly enough this was the easiest part of my build. Its because Ive had the car for so long and added things piece by piece. Getting the gauges mounted in the factory location cleanly was the most difficult part. My whole dash is bizarrely customized yet looks entirely factory. I've relocated so many things like the service engine light and the high beam light half the gauges etc etc. I did this while still retaining the function of half my stock gauges. The flat laminate gauge circuits are half cut, soldered and patched to fit around things and reroute things. If i ever get in there for whatever reason Im always a bit taken aback at how much rework there actually is as you forget over time. But piece by piece it just kind of happened so I cant say I ever struggled with it.

Senior Member
Joined: Jul 2006
Posts: 615
Likes: 1
From: Warrenton, VA
Car: 1987 Camaro IROC-Z
Engine: LS1
Transmission: LS1 T56
Axle/Gears: Richmond 3.73
Joined: Sep 2002
Posts: 3,685
Likes: 10
From: PA
Car: 86 Trans AM
Engine: LS1 (not stock...)
Transmission: Built T56
Axle/Gears: Strange 12-bolt w/ 3.73
Re: Not looking forward to the next step
If you are adding all aftermarket gauges, its not that hard. Just treat them as an accessory. The only things you'll want to keep from the old dash wiring are things like turn signals, high beams, check engine, and brake light. The rest you can ditch.
I retained my stock signal and high beam indicators. The rest is custom. I think the firebird guys have it a little easier than the camaro guys in this dept though...
Just a matter of not getting overwhelmed. Thats the BIGGEST thing when doing a wiring project. Take it one wire at a time. I just recently re-wired an 83 Sportster for a buddy. We had a replacement harness, but we wanted to move all of the connections under the tank as opposed to in the headlight bucket...which becomes a rat nest. So I basically started from scratch, and was really starting to get confused and overwhelmed, even with a fairly simple electrical system. So I just took one wire at a time, starting with the ones I was confident about, and before I knew it, I was down to a handful. And those were easy to figure out from there. Exact way I handled my LS1 harness.
Just take your time, take notes, and you'll figure it out no problem.
J.
Thread Starter
Joined: Mar 2000
Posts: 43,187
Likes: 46
From: Littleton, CO USA
Car: 82 Berlinetta/57 Bel Air
Engine: L92/LQ4 (both w/4" stroke)
Transmission: 4L80E/4L80E
Axle/Gears: 12B-3.73/9"-3.89
I've got a complete panel that mounts with the original cluster screws. Nothing would fit into the factory cluster, and there is no connection to the original harness connector available (the factory cluster side is just a flexible PCB). Haven't decided yet if I'll remove the original connectors or just splice into the wires. Gauge lighting power, fuel level signal, and engine temp signal along with turn signal and high beam indicators are things I'll want to keep from the original harness. The rest, like you said, is like an add-on - tach signal and speedometer signal come from the PCM, and my oil pressure is mechanical. Actually, when it's all added up, I'll be using more from the original harness than I'll be running all new.
I also hadn't mentioned OBD II connector, but that's pretty simple. The programmable fuel gauge looks interesting. The electronic speedometer will be easy enough after I locate a marked 2-mile stretch of road.
I haven't removed steering column, seats, or carpet (did remove the console). The car is still up on jack stands. Need to drag the drop light into the car, either sit in the seat or lean in through the open door (which bangs into the car in the other stall) to work. The interior looks like a combination war zone and spare parts bin. It's been cold out in the garage, making electrical tape harder to work with (also harder to work while shivering). Wire cutters, wire stripper, crimp tool, soldering iron and heat gun need some place to set when not being used.
Forgot about the brake light! (will want to keep that from the factory harness as well)
But it's going to be sooooo nice when it's done. . .
I also hadn't mentioned OBD II connector, but that's pretty simple. The programmable fuel gauge looks interesting. The electronic speedometer will be easy enough after I locate a marked 2-mile stretch of road.
I haven't removed steering column, seats, or carpet (did remove the console). The car is still up on jack stands. Need to drag the drop light into the car, either sit in the seat or lean in through the open door (which bangs into the car in the other stall) to work. The interior looks like a combination war zone and spare parts bin. It's been cold out in the garage, making electrical tape harder to work with (also harder to work while shivering). Wire cutters, wire stripper, crimp tool, soldering iron and heat gun need some place to set when not being used.
Forgot about the brake light! (will want to keep that from the factory harness as well)But it's going to be sooooo nice when it's done. . .
Joined: Sep 2002
Posts: 3,685
Likes: 10
From: PA
Car: 86 Trans AM
Engine: LS1 (not stock...)
Transmission: Built T56
Axle/Gears: Strange 12-bolt w/ 3.73
Re: Not looking forward to the next step
Dont forget that brake light since it tells you if you lost fluid too 
Have you already picked out your speedo and tach and the rest of the gauges?
There is a really neat gauge coming out, for not a whole lot of money, that is GPS enabled. Just give it power, and thats it. It has a working odometer, couple trip computers, shows you altitude and peak speed... Its really thin also. And maybe even the best part, you pick the font, color of the print/needle, back lighting, and you can put custom lettering like "Trans AM" or whatever.
Not that programming an autometer is tough. But with GPS, you dont have to recalibrate for gearing, tire, or trans changes.
J.
Thread Starter
Joined: Mar 2000
Posts: 43,187
Likes: 46
From: Littleton, CO USA
Car: 82 Berlinetta/57 Bel Air
Engine: L92/LQ4 (both w/4" stroke)
Transmission: 4L80E/4L80E
Axle/Gears: 12B-3.73/9"-3.89
I bought the panel from a tech member a while back. It came with Equus gauges. I bought Autometer programmable fuel gauge and electronic speedometer to replace those two. Not an exact match to the other Equus gauges, but I'm a function over form guy, anyway (might replace the others with Autometer parts over time).
The GPS unit would have to respond quicker than my Garmen or Tom Tom do.
Yes, the brake light would be a good one to have. I just hooked that wire up to the combo valve Monday night.
So, when I go to the store tonight: two green LEDs, one blue LED, one yellow LED, and one red LED. My son has a nice label maker, I'll have him make labels for the brake and SES.
Senior Member
iTrader: (4)
Joined: May 2006
Posts: 704
Likes: 2
From: Beloeil, Quebec
Car: IROC-Z
Engine: LSx
Transmission: T56
Axle/Gears: Fabbed 9"
Re: Not looking forward to the next step
When cluster, I used 2 green leds for flashers, 1 blue led for high beams and 2 red leds for SES and E-brake/brake low fluid. Just let me know if you need any help with the wiring color.
Since you swapped a T56 the clutch switch mounts easily at the top of the pedal, its no biggy there. It goes in-line with the starter + wire.
As far as mounting the pcm, I mounted mine at the stock location. I bought a 2004 S-10 PCM mount and glued the thing behind my dash where the original PCM used to be. Fits like a glove, and all the wires are easily reachable if you remove the dash pad.


Thread Starter
Joined: Mar 2000
Posts: 43,187
Likes: 46
From: Littleton, CO USA
Car: 82 Berlinetta/57 Bel Air
Engine: L92/LQ4 (both w/4" stroke)
Transmission: 4L80E/4L80E
Axle/Gears: 12B-3.73/9"-3.89
That's the same or similar panel as I have, but mine is a mix of Equus and Autometer gauges now.
There is only one sender, for the engine temp, which I mounted in the passenger head on the back (corresponds to the CTS in the driver side head).
The oil pressure is mechanical, this is where I tapped that:
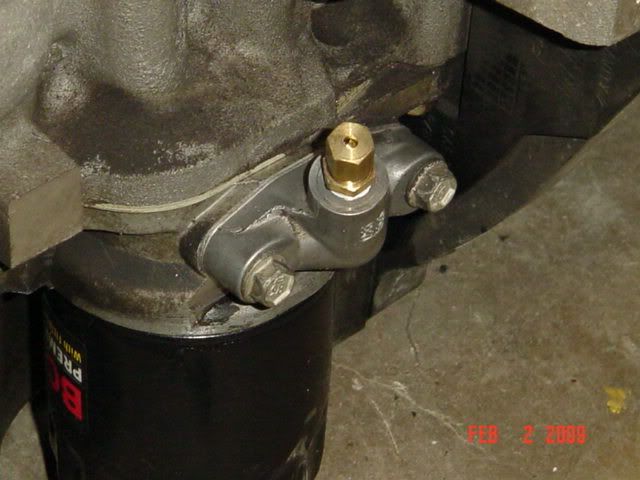
I'll use copper line to keep the inspectors at the track happy.
The clutch has an "anticipate" switch at the top (next to the brake light switch), and the start safety switch at the bottom. I'll have to fish the neutral safety switch wires out from under the carpet, since they went to the shifter originally. I'll have to look again, but I don't think there is a need for a tie to the brake light switch to the PCM (no cruise control), so I should be able to use the '82 brake light switch. If I do need to tie it to the PCM, I can splice in a wire.
For the original cluster wires, I can trace the back of the factory cluster to figure out what's what. But, if you've already identified them. . .
There is only one sender, for the engine temp, which I mounted in the passenger head on the back (corresponds to the CTS in the driver side head).
The oil pressure is mechanical, this is where I tapped that:
I'll use copper line to keep the inspectors at the track happy.
The clutch has an "anticipate" switch at the top (next to the brake light switch), and the start safety switch at the bottom. I'll have to fish the neutral safety switch wires out from under the carpet, since they went to the shifter originally. I'll have to look again, but I don't think there is a need for a tie to the brake light switch to the PCM (no cruise control), so I should be able to use the '82 brake light switch. If I do need to tie it to the PCM, I can splice in a wire.
For the original cluster wires, I can trace the back of the factory cluster to figure out what's what. But, if you've already identified them. . .
Supreme Member
iTrader: (2)
Joined: Dec 2006
Posts: 5,538
Likes: 0
From: Hou. TX
Car: 86 TA, 91 B4C
Engine: 5.3, 4.8
Transmission: 4L80 4000, T56
Axle/Gears: 4.30 M12, 23.42 10 bolt
Re: Not looking forward to the next step
I am not sure how to use the aftermarket coolant temp gauge in the head, i hope one of the random adapters i have might work.
Thread Starter
Joined: Mar 2000
Posts: 43,187
Likes: 46
From: Littleton, CO USA
Car: 82 Berlinetta/57 Bel Air
Engine: L92/LQ4 (both w/4" stroke)
Transmission: 4L80E/4L80E
Axle/Gears: 12B-3.73/9"-3.89
Probably not. That is one part that had been installed (but not used) by the PO, when I went to install it in the head, it snapped off.
Available from Summit: http://www.summitracing.com/parts/ATM-2277/
Available from Summit: http://www.summitracing.com/parts/ATM-2277/
Supreme Member
iTrader: (2)
Joined: Dec 2006
Posts: 5,538
Likes: 0
From: Hou. TX
Car: 86 TA, 91 B4C
Engine: 5.3, 4.8
Transmission: 4L80 4000, T56
Axle/Gears: 4.30 M12, 23.42 10 bolt
Re: Not looking forward to the next step
Is that the correct one to use a mechanical water temp gauge?
Thread Starter
Joined: Mar 2000
Posts: 43,187
Likes: 46
From: Littleton, CO USA
Car: 82 Berlinetta/57 Bel Air
Engine: L92/LQ4 (both w/4" stroke)
Transmission: 4L80E/4L80E
Axle/Gears: 12B-3.73/9"-3.89
No, that is for an electrical gauge.
Not sure about a mechanical gauge. Could be sporty with the small hole available in the head. Would probably have to drill & tap the head to get a mechanical to fit.
Not sure about a mechanical gauge. Could be sporty with the small hole available in the head. Would probably have to drill & tap the head to get a mechanical to fit.
Supreme Member
iTrader: (2)
Joined: Dec 2006
Posts: 5,538
Likes: 0
From: Hou. TX
Car: 86 TA, 91 B4C
Engine: 5.3, 4.8
Transmission: 4L80 4000, T56
Axle/Gears: 4.30 M12, 23.42 10 bolt
Re: Not looking forward to the next step
LOL, friends told me he drilled and tapped into the water pump...guess that is the plan.
Re: Not looking forward to the next step
It would be cool if you could post pic/details on how to take the dash out without removing the harness. On my 82 looks like the harness is hooked at multiple places under the dash. I am having nightmares that the dash plastic is to brittle to take out saftley.
I would also like to follow how you add the T56 wiring to an orginal automatic car.
I thought I was done with the wiring now I have to convert it to manual tran .....ugh ..
I would also like to follow how you add the T56 wiring to an orginal automatic car.
I thought I was done with the wiring now I have to convert it to manual tran .....ugh ..
Thread Starter
Joined: Mar 2000
Posts: 43,187
Likes: 46
From: Littleton, CO USA
Car: 82 Berlinetta/57 Bel Air
Engine: L92/LQ4 (both w/4" stroke)
Transmission: 4L80E/4L80E
Axle/Gears: 12B-3.73/9"-3.89
I can't show pics, didn't take any back 10 years ago. But, yes, it is attached in several places. Disconnect the bulkhead connectors to the firewall, ECM harness, and the aft chassis connectors, the rest will come out with the dash. Think about how the factory would install it - they would have the dash with wiring already installed, bolt it into the car, then connect a few connectors.
The auto to manual part has already been pretty much described.
The auto to manual part has already been pretty much described.
Thread Starter
Joined: Mar 2000
Posts: 43,187
Likes: 46
From: Littleton, CO USA
Car: 82 Berlinetta/57 Bel Air
Engine: L92/LQ4 (both w/4" stroke)
Transmission: 4L80E/4L80E
Axle/Gears: 12B-3.73/9"-3.89
Except for one thing - back-up lights.
I can't find anything on the back-up light signal. The switch is in the tranny, the tranny harness joins the engine harness, must be one of the C100, C101, C102, C220, or C230 connectors, but I can't find anything that says which one it is.
I can't find anything on the back-up light signal. The switch is in the tranny, the tranny harness joins the engine harness, must be one of the C100, C101, C102, C220, or C230 connectors, but I can't find anything that says which one it is.
Joined: Sep 2002
Posts: 3,685
Likes: 10
From: PA
Car: 86 Trans AM
Engine: LS1 (not stock...)
Transmission: Built T56
Axle/Gears: Strange 12-bolt w/ 3.73
Re: Not looking forward to the next step
five7... for what its worth, I dont have any switches hooked up to my clutch pedal. Just the neutral safety switch at the bottom. That switch, and plug, were the same from 87 to 02. On my 86, I had to swap the plug with the one from my 87, because its quite different. Im also running the factory brake light switch...on my thirdgen pedals. I also used it with my 4th gen pedals while I had them without issue.
Youre back up lights are EASY... Was the car originally an auto? If so, your reverse wires were part of the neutral safety switch. Its as simple as running the two wires for your reverse lights to the switch on the side of the trans. It'll work perfectly. I forget the colors off hand, but I just ran the wires down through the hole for the shifter cable, and right to the trans. You'll need the pigtail for the T56 reverse sender obviously, but they are easy to get ahold of. If the T56 wires are bunched into a harness, just remove them and bring the wires into the car where you need them. I used GM weather pack connectors so that everything is unpluggable if I need it. I saw no need to run 10 ft of wire through the car to go a total of 1.5 ft.
As for the temp gauge sender, the adapter from five7's link is indeed for the electric gauge sender. They are VERY fragile due to the limited amount of material left after threading for the head. You need to use some pipe sealant, and just snug it up. I busted one too, and ended up buying two more just in case.
For a mechanical gauge, I wouldnt go into the water pump. Ide be tempted to just put a tee fitting into the rad hose, with an NPT thread hole. Like this one from autometer.

You just need to figure out what the ID of your hose is. I like this idea, because you'll get the true temp of the coolant as it flows by, and wont get heat soaked from the block or water pump casting. If you ever have to change water pumps, you wont have to drill and tap the new one. Just my $.02 on that.
Ok im done babbling.
J.
Youre back up lights are EASY... Was the car originally an auto? If so, your reverse wires were part of the neutral safety switch. Its as simple as running the two wires for your reverse lights to the switch on the side of the trans. It'll work perfectly. I forget the colors off hand, but I just ran the wires down through the hole for the shifter cable, and right to the trans. You'll need the pigtail for the T56 reverse sender obviously, but they are easy to get ahold of. If the T56 wires are bunched into a harness, just remove them and bring the wires into the car where you need them. I used GM weather pack connectors so that everything is unpluggable if I need it. I saw no need to run 10 ft of wire through the car to go a total of 1.5 ft.
As for the temp gauge sender, the adapter from five7's link is indeed for the electric gauge sender. They are VERY fragile due to the limited amount of material left after threading for the head. You need to use some pipe sealant, and just snug it up. I busted one too, and ended up buying two more just in case.
For a mechanical gauge, I wouldnt go into the water pump. Ide be tempted to just put a tee fitting into the rad hose, with an NPT thread hole. Like this one from autometer.
You just need to figure out what the ID of your hose is. I like this idea, because you'll get the true temp of the coolant as it flows by, and wont get heat soaked from the block or water pump casting. If you ever have to change water pumps, you wont have to drill and tap the new one. Just my $.02 on that.
Ok im done babbling.
J.
Re: Not looking forward to the next step
Backup switch connector is the same for 3rd gens
Colors are light green and brown
Generally on the 4th gen harness, they are contained in the two connectors that went into the dash, C220, C230. Splice them into your old auto shifter wiring or run the connector separate from the engine harness like Justin suggested
Colors are light green and brown
Generally on the 4th gen harness, they are contained in the two connectors that went into the dash, C220, C230. Splice them into your old auto shifter wiring or run the connector separate from the engine harness like Justin suggested
Thread Starter
Joined: Mar 2000
Posts: 43,187
Likes: 46
From: Littleton, CO USA
Car: 82 Berlinetta/57 Bel Air
Engine: L92/LQ4 (both w/4" stroke)
Transmission: 4L80E/4L80E
Axle/Gears: 12B-3.73/9"-3.89
I'll look for light green and brown wires. Thanks.

On Probation
Joined: Oct 2008
Posts: 6,319
Likes: 19
From: Northern Utah
Car: seeking '90.5-'92 'bird hardtop
Engine: several
Transmission: none
Axle/Gears: none
Re: Not looking forward to the next step
It would be cool if you could post pic/details on how to take the dash out without removing the harness. On my 82 looks like the harness is hooked at multiple places under the dash. I am having nightmares that the dash plastic is to brittle to take out saftley.
I would also like to follow how you add the T56 wiring to an orginal automatic car.
I thought I was done with the wiring now I have to convert it to manual tran .....ugh ..
I would also like to follow how you add the T56 wiring to an orginal automatic car.
I thought I was done with the wiring now I have to convert it to manual tran .....ugh ..
Thread Starter
Joined: Mar 2000
Posts: 43,187
Likes: 46
From: Littleton, CO USA
Car: 82 Berlinetta/57 Bel Air
Engine: L92/LQ4 (both w/4" stroke)
Transmission: 4L80E/4L80E
Axle/Gears: 12B-3.73/9"-3.89
Backup switch connector is the same for 3rd gens
Colors are light green and brown
Generally on the 4th gen harness, they are contained in the two connectors that went into the dash, C220, C230. Splice them into your old auto shifter wiring or run the connector separate from the engine harness like Justin suggested
Colors are light green and brown
Generally on the 4th gen harness, they are contained in the two connectors that went into the dash, C220, C230. Splice them into your old auto shifter wiring or run the connector separate from the engine harness like Justin suggested
Now to figure out which wires they are in the auto neutral safety/backup light switch harness. Besides the large starter wires, there are smaller light green, blue, orange with black stripe, and black with white stripe.
Joined: Sep 2002
Posts: 3,685
Likes: 10
From: PA
Car: 86 Trans AM
Engine: LS1 (not stock...)
Transmission: Built T56
Axle/Gears: Strange 12-bolt w/ 3.73
Re: Not looking forward to the next step
Hmmm...I really need to put my wiring diagrams on my work PC. I think its the green and blue wire...but I cant remember if those are for the hatch to open or for reverse. There are two wires that you have to twist together so your electric hatch pop will work. They were there so that you couldnt pop the hatch if you were in any other gear but park or neutral. Maybe even just park...
J.
EDIT:...yeah...LT Green and DK Blue...

J.
EDIT:...yeah...LT Green and DK Blue...
Last edited by ghettocruiser; Mar 4, 2010 at 10:18 AM.
Re: Not looking forward to the next step
Two big wires are P/neutral safety switch for the starter
Middle two are back up lights, they are not order dependent
Bottom two are ECM P/neutral switch. Connect them together for manual swaps
Middle two are back up lights, they are not order dependent
Bottom two are ECM P/neutral switch. Connect them together for manual swaps
Thread Starter
Joined: Mar 2000
Posts: 43,187
Likes: 46
From: Littleton, CO USA
Car: 82 Berlinetta/57 Bel Air
Engine: L92/LQ4 (both w/4" stroke)
Transmission: 4L80E/4L80E
Axle/Gears: 12B-3.73/9"-3.89
If the bottom two are for ECM, that should be moot now. I won't be using any of the under dash factory ECM wiring (although I might borrow a wire for the MIL to OBD II connector).
Dumb question - I haven't done a lot of "special" lighting. The parts store had some larger LEDs, but didn't have all of the colors, and they were over $10 a piece. They had neon "indicator" lights, all the colors, half the price. Will they work? Not sure how neon lights respond, etc.
Dumb question - I haven't done a lot of "special" lighting. The parts store had some larger LEDs, but didn't have all of the colors, and they were over $10 a piece. They had neon "indicator" lights, all the colors, half the price. Will they work? Not sure how neon lights respond, etc.
Re: Not looking forward to the next step
Use a resistor if using LEDs inplace of bulbs
Try a radio shack or similar electronics store for a better selection than autozone or whatever
Try a radio shack or similar electronics store for a better selection than autozone or whatever
Thread Starter
Joined: Mar 2000
Posts: 43,187
Likes: 46
From: Littleton, CO USA
Car: 82 Berlinetta/57 Bel Air
Engine: L92/LQ4 (both w/4" stroke)
Transmission: 4L80E/4L80E
Axle/Gears: 12B-3.73/9"-3.89
There used to be a Radio Shack right close by, now I have to go half way across town.
The neon bulbs are marked "12V", so they should be ready to go.
The neon bulbs are marked "12V", so they should be ready to go.
Thread Starter
Joined: Mar 2000
Posts: 43,187
Likes: 46
From: Littleton, CO USA
Car: 82 Berlinetta/57 Bel Air
Engine: L92/LQ4 (both w/4" stroke)
Transmission: 4L80E/4L80E
Axle/Gears: 12B-3.73/9"-3.89
Trying to pull those safety switch wires out of the bundle. I'm about ready to pull the dash out and work on this thing on a table in the basement.
Thread Starter
Joined: Mar 2000
Posts: 43,187
Likes: 46
From: Littleton, CO USA
Car: 82 Berlinetta/57 Bel Air
Engine: L92/LQ4 (both w/4" stroke)
Transmission: 4L80E/4L80E
Axle/Gears: 12B-3.73/9"-3.89
Hmmm...I really need to put my wiring diagrams on my work PC. I think its the green and blue wire...but I cant remember if those are for the hatch to open or for reverse. There are two wires that you have to twist together so your electric hatch pop will work. They were there so that you couldnt pop the hatch if you were in any other gear but park or neutral. Maybe even just park...
I think you are right, there is a path through the neutral/park safety switch to power the hatch. Still need to figure that out; too late to do that now, about burnt myself out unwrapping the bundle for the start safety switch (took so many things apart, hope I can remember how to put them back together). At least the clutch safety switch is wired now.
Oh, and the back-up light will be very easy. Just send those wires over to the firewall pass-through. I'll use connectors so they can be passed back out if the engine/trans need to come back out some day (but, how likely is that???).
Last edited by five7kid; Mar 6, 2010 at 12:14 AM.
Thread Starter
Joined: Mar 2000
Posts: 43,187
Likes: 46
From: Littleton, CO USA
Car: 82 Berlinetta/57 Bel Air
Engine: L92/LQ4 (both w/4" stroke)
Transmission: 4L80E/4L80E
Axle/Gears: 12B-3.73/9"-3.89
Pretty much got the dash put back together this weekend. In looking through other posts, realized I forgot to hook up the brake light switch. Shouldn't take too long to do that.
I had hoped to get the battery in and check out the dash functions, but the battery needed charging. Tomorrow, perhaps.
Still need to mount the PCM and stow all of the unused C220/C230 wires. The console isn't in yet, either, planned on waiting until after the clutch is bled to do that.
List of remaining work:
Mount brake light switch and PCM
Finish wrapping fuel line with heat reflecting tape
Bleed clutch & brakes
Install shifter (lower boot is on back order, mid-April estimated arrival)
Install radiator, radiator fans, radiator hoses, PS cooler, PS hoses
Top off fluids
Install air inlet/filter, including IAT and MAF (will probably need to rig a bracket for the filter)
Install battery
Install console, stereo, HVAC control, kick panels
Mount tires
Add gas
See if it fires
Install hood.
Then exhaust.
AC will come later.
Joined: Sep 2002
Posts: 3,685
Likes: 10
From: PA
Car: 86 Trans AM
Engine: LS1 (not stock...)
Transmission: Built T56
Axle/Gears: Strange 12-bolt w/ 3.73
Re: Not looking forward to the next step
Sounds good! You are getting down to the details
If you are waiting on a shifter boot to button things up, you might want to try here...
http://www.tacreationsusa.com/shift_boots.htm
Not sure where you were ordering the boot from. I cant promise they have one, or how fast you'd get it. But if they have it, Im sure it would be before mid april. And probably cheaper.
J.
Thread Starter
Joined: Mar 2000
Posts: 43,187
Likes: 46
From: Littleton, CO USA
Car: 82 Berlinetta/57 Bel Air
Engine: L92/LQ4 (both w/4" stroke)
Transmission: 4L80E/4L80E
Axle/Gears: 12B-3.73/9"-3.89
I had checked out that outfit earlier, if I recall correctly, they couldn't get me the mounting ring (I'm starting out with nothing because my car was auto). Finding a universal one big enough was the next hurdle. Summit listed one, but it's back ordered (now saying 4/8 instead of 4/15 - a week's improvement in 3 days).
These might be "details", but if past experience is any indicator, they can take what seems like forever to finish.
I signed up for a track rental day on the 26th. I don't intend to take this out, but there are a few things I need to do to the '57 to get ready for that (installing a wideband O2 air/fuel gauge the biggie).
Supreme Member
Joined: Mar 2004
Posts: 2,519
Likes: 4
From: In the Garage
Car: Camaro
Engine: 6.2L
Transmission: T56
Re: Not looking forward to the next step
Stay focused man and get er done your almost there!!! One project at a time LOL start that thing!!!!
I now return to my regularly scheduled mind set of;
overwhelmednesslyfooilshwhatwasIthinkingtearingappartaperfectlygoodworkingcar kind of daze.
I now return to my regularly scheduled mind set of;
overwhelmednesslyfooilshwhatwasIthinkingtearingappartaperfectlygoodworkingcar kind of daze.
Thread Starter
Joined: Mar 2000
Posts: 43,187
Likes: 46
From: Littleton, CO USA
Car: 82 Berlinetta/57 Bel Air
Engine: L92/LQ4 (both w/4" stroke)
Transmission: 4L80E/4L80E
Axle/Gears: 12B-3.73/9"-3.89
I bought this car because I couldn't bring myself to take apart Berlinetta #1 for the LS1/T56. After I drove this silver Berlinetta #2 home and drove it for a couple of months, I started feeling the same way about it. But, I took it apart, anyway. Last week while I was working on it, my wife asked if she would be allowed to drive it. I said, sure. Then she said, "I kind of liked it the way it was before."
I'll keep on it. Multiple projects is nothing new to me. I don't really need to start on the '57 until this coming weekend, so I should get pretty close on the LS1/T56 by then.
Need to find some of those nut clips that are used to attach the radiator fans. It's always something. . .
I'll keep on it. Multiple projects is nothing new to me. I don't really need to start on the '57 until this coming weekend, so I should get pretty close on the LS1/T56 by then.
Need to find some of those nut clips that are used to attach the radiator fans. It's always something. . .
Joined: Sep 2002
Posts: 3,685
Likes: 10
From: PA
Car: 86 Trans AM
Engine: LS1 (not stock...)
Transmission: Built T56
Axle/Gears: Strange 12-bolt w/ 3.73
Re: Not looking forward to the next step
What mounting ring are you talking about on the lower boot? The metal part is part of the boot itself...? If you mean the ring on the tunnel, you dont really need that. I bent the edges of my hole down to give it some rigidity, then just screwed right through the floor. With some RTV to seal it up. Worked great, and Ive had it in and out a few times without the holes stripping out. Just another option. Hate to see progress twarted by backorded stuff.
I know how you guys feel about not wanting to tear them apart. My 86 was so clean, and tight, and QUIET, and comfy... But lethargically slow and peg legged and just no fun haha. So I didnt have too much issue once I got started.
Man...your threads are making me want to get my junk inpsected and back on the road. Got so much to do!!! Stupid PA weather.
J.
Thread Starter
Joined: Mar 2000
Posts: 43,187
Likes: 46
From: Littleton, CO USA
Car: 82 Berlinetta/57 Bel Air
Engine: L92/LQ4 (both w/4" stroke)
Transmission: 4L80E/4L80E
Axle/Gears: 12B-3.73/9"-3.89
Ah, so the metal ring is molded into the rubber. This won't hold up my project, it'll just be something I may need to go back and finish up later.
Thread Starter
Joined: Mar 2000
Posts: 43,187
Likes: 46
From: Littleton, CO USA
Car: 82 Berlinetta/57 Bel Air
Engine: L92/LQ4 (both w/4" stroke)
Transmission: 4L80E/4L80E
Axle/Gears: 12B-3.73/9"-3.89
Shot with power on the panel (hard thing to get a photo of):
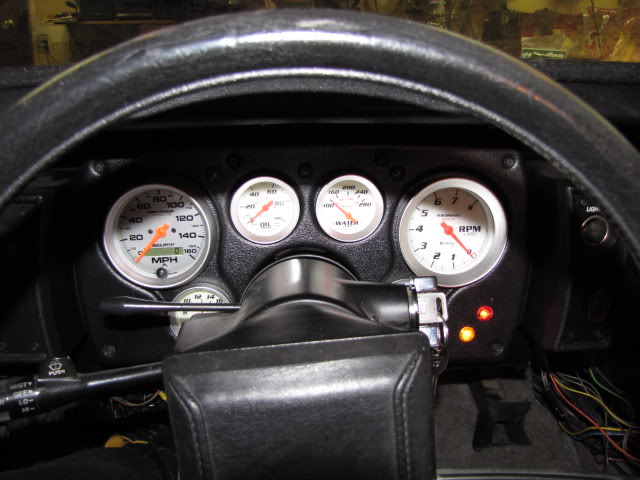
The neon warning lights seem to work well. Not too bright, not too dim.
For some reason I don't have power to the body, but the engine starts. Probably something I did wrong under the hood. Always something. . .
The neon warning lights seem to work well. Not too bright, not too dim.
For some reason I don't have power to the body, but the engine starts. Probably something I did wrong under the hood. Always something. . .
Re: Not looking forward to the next step
what was the summit one you were looking at ? link. I am in the same boat .
If I had the option What do you guys would fit the T56 better the 4th gen lower boot or third gen one ?
Also this may be stupid question but here goes
Why is it that the hole has to me sqr ? If I can find a big enough hole saw can I just drill a circular hole for the circle part of the shifter to come thru ? will that work ? I am thinking it will make it easier.
I have the B&M Precision Sport Shifter
Thread Starter
Joined: Mar 2000
Posts: 43,187
Likes: 46
From: Littleton, CO USA
Car: 82 Berlinetta/57 Bel Air
Engine: L92/LQ4 (both w/4" stroke)
Transmission: 4L80E/4L80E
Axle/Gears: 12B-3.73/9"-3.89
http://www.summitracing.com/parts/MRG-1652/
For me, the base of the shifter actually sticks up above the tunnel. In fact, I had to shim the tranny crossmember to get the top of the tranny off of the tunnel. Not sure if that was caused by the Skulte crossmember being designed for LT1 T56's, or the '82 tunnel.

For me, the base of the shifter actually sticks up above the tunnel. In fact, I had to shim the tranny crossmember to get the top of the tranny off of the tunnel. Not sure if that was caused by the Skulte crossmember being designed for LT1 T56's, or the '82 tunnel.